Article Contents:
- What Does It Mean to Divide a Room with Wall Molding?
- What molding can accomplish
- What molding cannot replace
- Build a room hierarchy in three decisions
- 1. Vertical trim lines between functional areas
- 2. A chair rail or horizontal trim band
- 3. Picture-frame molding panels for each activity
- 4. An architectural focal composition
- 5. Minimal zoning for a studio or small apartment
- Open-concept living room and kitchen
- Living room and dining room on the same long wall
- A bedroom with a home-office corner
- A dining nook in a small apartment
- Entryway without a separate foyer
- A family room with a play area
- An apartment studio with sleeping, dining, and work areas
- Retail and hospitality spaces
- Contemporary and transitional interiors
- Neoclassical and traditional interiors
- Japandi and quiet minimalism
- Art Deco and bolder accents
- Profile selection by viewing distance
- One profile throughout or two coordinated sizes?
- Matching corners and decorative appliques
- A twelve-foot wall with three equal panels
- Calculate the total molding length
- Make a cutting map, not just a linear-foot estimate
- Why the cutting map changes when panels get taller
- Separate independent trim runs from framed panels
- Step 1: Check the wall and finish
- Step 2: Transfer a single layout reference to the wall
- Step 3: Cut and dry-fit each group of pieces
- Step 4: Select the adhesive for the specific assembly
- Step 5: Mount, align, and allow to cure
- Step 6: Finish seams and paint the system
- Can molding really separate a living room from a dining room?
- What is the best molding for a small studio?
- Should every zone have the same number of wall panels?
- Does wall trim need to run all the way to the ceiling?
- Is a chair rail necessary for defining zones?
- Is polyurethane suitable for kitchens and bathrooms?
- Can I install picture-frame molding myself?
- How many extra strips should I order?
- Should the molding be painted before or after installation?
- Where should I begin if I have never used decorative wall trim?
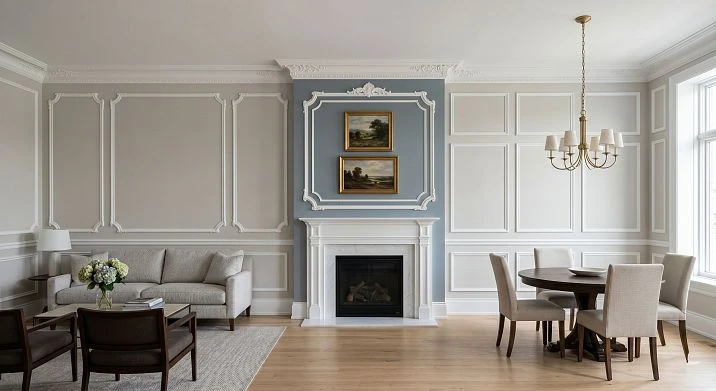
An open-concept living room can look beautiful in a floor plan and still feel unfinished once the furniture arrives. The sofa faces one direction, the dining table claims a corner, and a work desk competes for the same sightline. When every wall has the same plain finish, none of those areas has a clear visual identity. Building a partition is not always the answer. Often the better first step is to give the walls a deliberate architectural pattern.
Wall molding can visually define living, dining, entry, and work zones without taking away floor area. Applied decorative trim creates frames, vertical boundaries, and horizontal lines that make separate activities easier to read as parts of a coherent room. It works best when it responds to the existing furniture, doors, windows, ceiling height, and lighting—not when it is installed as a generic grid.
This guide translates that idea into an actionable plan for a U.S. home. You will find five layout methods, room-by-room advice, a comparison of actual STAVROS polyurethane profiles, measurements in inches and feet, a cutting example based on factory-length strips, installation notes, and a buying checklist. Start by exploring the STAVROS wall molding collection if you want to compare the profiles discussed below.


What Does It Mean to Divide a Room with Wall Molding?
A visual zone is an area that reads as having a purpose even when no physical wall separates it. In an open-concept house, a sofa and media console may define the living area; a pendant light and table define dining; a desk and bookcase define a workspace. Decorative wall molding can reinforce those cues with an intentionally different rhythm or scale of trim.
Think of molding as a frame around an activity, not a fence. A large rectangular molding panel aligned with a sofa anchors the seating area. A pair of narrow vertical lines can give a desk its own wall section. A low chair rail can tie the dining side of a room to the adjacent hallway. The wall is still one continuous surface, but the eye understands where one composition ends and the next begins.




What molding can accomplish
- Give a long or blank wall organized proportions rather than an arbitrary collection of objects.
- Create a focal point behind a sofa, dining buffet, bed, or console table.
- Introduce a repeatable design language across open rooms without repeating the same wall treatment everywhere.
- Support color blocking: the same wall can use related paint colors separated by a crisp molding line.
- Make a small work area feel intentional instead of temporary, especially when a desk shares a bedroom or living room.
- Add architectural detail to otherwise flat drywall, with no need to construct a new partition.
Наша фабрика также производит:
Смотреть весь Каталог продукции
What molding cannot replace
Decorative trim does not provide acoustic isolation, visual privacy, fire separation, structural support, or a safer walking path. It also will not solve circulation problems caused by furniture that blocks the route between the kitchen and dining room. If a home office needs confidentiality, a glass door, screen, or separate room may still be necessary. If a traffic aisle is too narrow, rearrange the furniture before adding wall detail.
Treat trim as one layer of a broader plan that also includes lighting, rugs, furniture placement, and color. The strongest open-concept rooms use several quiet signals rather than a single decorative trick.
Получить консультацию
Start with the Floor Plan, Not the Molding Profile
Before choosing a decorative molding, draw a simple plan of the space. You do not need architectural software; graph paper and a tape measure are enough. Record the finished wall lengths, ceiling height, door swings, window placement, outlets, switches, vents, return-air grilles, and any furniture that is unlikely to move. Also mark where people normally travel: kitchen to dining table, entryway to living room, and hallway to staircase.
Decide which activity should be visually dominant. In many homes it is the living area, but an open dining room with an impressive buffet or a large entry console may deserve the main composition. A useful rule is to give the primary area the larger or more expressive frame and keep secondary areas simpler. Two equally elaborate accent walls facing each other can make the room feel competitive rather than balanced.
Measure the visible wall rather than only the overall room dimension. A 14-foot wall interrupted by two doors is not one uninterrupted 14-foot design surface. The usable panel widths depend on the casings, nearby switches, and the wall between openings. Where a desk has a 42-inch width, for example, a 72-inch decorative frame might overwhelm it unless it is intentionally centered on a larger alcove.
Build a room hierarchy in three decisions
- Select the hero zone. Choose one area—often the sofa wall or dining buffet—that gets the strongest molding composition.
- Choose a linking element. Repeat the same trim cross-section, paint finish, or baseline across the open plan so the zones still belong to one home.
- Control the quieter zones. Use fewer frames, one vertical line, or a low-relief profile in the secondary areas.
This is the difference between thoughtful room zoning and decorating every empty square foot. Empty wall area is not wasted; it is what allows the finished trim to look deliberate.
Five Wall-Molding Layouts That Define Open-Concept Spaces
Each of these arrangements is useful for a different architectural problem. Pick the one that fits the room geometry, then adjust its dimensions around the furniture instead of copying an example blindly.
1. Vertical trim lines between functional areas
A pair of vertical molding runs can establish a gentle boundary between two uses of the same long wall. For example, a living room may have a sofa on the left and a compact writing desk on the right. Place the verticals where the furniture group changes, with enough clear wall at either side for the line to breathe. You do not have to run the molding from floor to ceiling: it can end above the baseboard and below the crown molding to maintain a considered reveal.
Verticals are particularly helpful where ceiling heights feel low because they emphasize height instead of subdividing the wall with horizontal bands. Keep them aligned with architectural features where possible. A line that nearly hits a door casing but misses by an inch looks accidental. A line placed deliberately several inches away reads as a design choice.
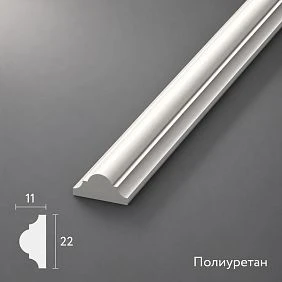
A thin profile is often enough for this treatment. The MLDPU-001 polyurethane molding has a 0.39-inch-wide face and a 0.24-inch projection; the subtle bead can mark a boundary without turning it into a heavy decorative column.
2. A chair rail or horizontal trim band
A chair rail creates a continuous reference line at a comfortable visual height and can connect a dining room to an open living space. In U.S. interiors, an approximate 30–36-inch range above the finished floor is a common starting point for planning a traditional chair-rail effect, but the correct height depends on the wall proportions, furniture, and desired panel arrangement. Do not treat any one measurement as a universal code or installation requirement.
A horizontal band may separate two paint colors, organize a series of lower-wall panels, or establish a background for dining furniture. When it continues through an open floor plan, the shared line makes different areas feel related. Use a single consistent datum; changing height without an architectural reason is conspicuous.
In an area with frequent chair contact, make sure the chosen profile and coating suit the exposure. A decorative polyurethane strip is not automatically a rated impact-protection rail. Keep fragile objects and electrical devices clear of the trim path. See the STAVROS decorative wall trim options when comparing lower-wall treatments.
3. Picture-frame molding panels for each activity
Rectangular wall molding panels are a flexible way to define zones. A broad central panel can frame the wall behind the sofa; a narrower panel can emphasize a dining buffet; two small repeated panels might flank a console. The panels need not all have the same dimensions, but they should follow one visual system: consistent profile shape, related margins, and predictable paint treatment.
Choose the frame size based on what will sit in front of it. A small frame centered above a large couch may feel undersized, while a huge rectangle visually cut apart by a television can feel careless. A useful test is to tape out the perimeter and sit in the room. View the arrangement from the entry, from the dining chair, and from the sofa. A frame that only looks good when standing directly in front of it is not necessarily the right frame for an open plan.
For medium-relief panels, MLDPU-002 molding has a 0.87-inch face and a 0.43-inch projection. Its stepped shape makes the boundary clearer than a very narrow bead. If you want a finer double outline inside a larger frame, pair the design concept—not necessarily the joint—with a slim profile and maintain a consistent gap.
4. An architectural focal composition
Not every zone needs its own full frame. Sometimes one strong composition around a focal feature does the most work. Examples include a fireplace surround, the wall behind a dining sideboard, or an accent panel around a reading nook. You can use a central rectangle, flanking narrow panels, and perhaps a decorative applique. The overall arrangement should support the room's main object rather than compete with it.
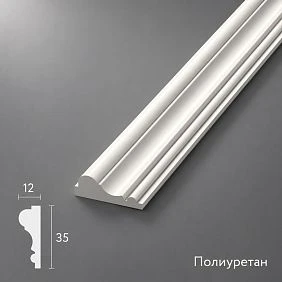
A larger molding such as MLDPU-003 is 1.38 inches across and projects about 0.47 inch, creating a more pronounced shadow. That can work on a large feature wall but can be too assertive when repeated across every wall in a small apartment. The important variable is visual weight, not simply the quantity of trim purchased.
Optional ornamental pieces belong to the same proportioning exercise. Use the decorative molding corners and accents collection to explore options, but confirm profile compatibility rather than assuming any corner ornament fits every straight molding.
5. Minimal zoning for a studio or small apartment
A small open-plan apartment often benefits from the least decoration. One refined panel around the dining table, two fine verticals beside a desk, or a single low chair rail may be more effective than a grid of rectangles. Matching the trim color to the wall creates quiet depth through shadow. A gentle change of sheen can also distinguish the profile without creating a high-contrast stripe.
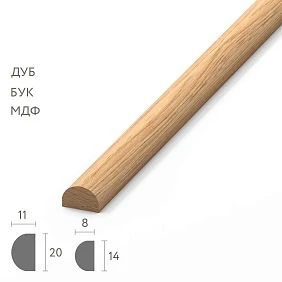
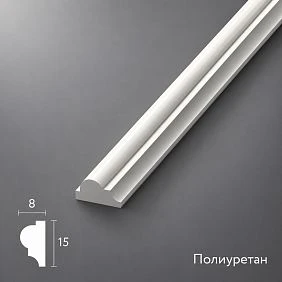
For minimal projects, MLDPU-004 polyurethane panel molding has a 0.59-inch face and a 0.31-inch projection. It creates a defined but relatively compact line. Another alternative is the MLDPU-027 half-round profile, offered in 0.55-inch and 0.79-inch widths. A smooth rounded line suits a restrained modern or Japandi-inspired interior.
A studio needs visual calm and flexible furniture placement. If you anticipate moving the desk or dining table regularly, avoid a detailed framing system so specific that the entire arrangement looks wrong when furniture shifts a few feet.
Room-by-Room Plans for Living, Dining, Work, and Entry Areas
The best pattern depends on what actually happens in the space. A floor plan with two zones is not the same design problem as a studio apartment with five activities. The following examples show where the decorative boundaries should go—and when not to add them.
Open-concept living room and kitchen
When the kitchen and living room share one volume, it is tempting to draw a bold vertical line exactly where one floor finish meets another. That can be visually awkward if the wall location has no relationship to the kitchen cabinetry, sofa, or walkway. Instead, establish the living-area composition around a real anchor, such as the sofa or media wall. Use a calmer trim treatment near the kitchen, where backsplashes, cabinet doors, range hoods, and appliances already create visual detail.
One workable scheme is a large molding rectangle behind the sofa, with no corresponding rectangle behind the cabinets. Repeat the same paint color or profile shape in a small section beside the pantry or a console, if the architecture allows it. Another scheme is a consistent lower-wall trim band in the dining and living portions, stopping cleanly at an intentional architectural termination before the backsplash.
Do not run decorative polyurethane molding through an area exposed to direct stovetop heat, persistent grease, or regular splashing without confirming product and finish suitability. A profile intended for a dry painted wall is not automatically appropriate near a range or sink. Keep it clear of required access panels and the equipment clearances specified by appliance manufacturers.
Look at the room from the most frequently used entrance. Can you distinguish the seating area from the kitchen at a glance? If the answer is yes, an understated scheme has achieved its purpose. There is no obligation to fill the remaining blank wall.
Living room and dining room on the same long wall
A long wall serving both a couch and dining table is one of the clearest situations for wall zoning. Give the larger furniture group a broad molding composition and the smaller one a related treatment. For example, the sofa could receive a dominant panel aligned with its centerline, while the dining side receives two slim vertical runs or a smaller panel above a buffet.
The dividing point should respect the transition between furniture groups. Measure the visible gap between the end of the sofa and the beginning of the buffet, not the midpoint of the total wall. A zone edge that lands behind a lamp, tall cabinet, or wall sconce may disappear in daily use. A line several inches clear of those objects will remain legible.
Keep the paint palette connected. A continuous off-white trim on two nearby warm-gray wall colors, for example, can make the rooms feel related. Conversely, a black profile in one area and heavily ornamented white trim in the other may need additional design coordination to avoid looking like two unrelated projects.
Where both areas are visible from the front door, consider one dominant composition and one intentionally quieter companion. The goal is controlled rhythm, not identical decoration on every surface.
A bedroom with a home-office corner
A bedroom office is a functional compromise: the desk needs visual identity, but the rest of the room should still feel restful. A pair of narrow vertical molding lines outside the desk footprint can make the workspace read as a defined niche. A subtle frame above the desk works too, particularly if the desk is centered on a clear wall segment.
Avoid treating the office wall like a corporate feature wall. Oversized classical frames may bring too much activity to a room used for sleep. Paint the polyurethane trim the same color as the bedroom wall for a softer result; let natural light create the relief. If the workspace needs a little more emphasis, a slightly different wall color inside the framed area can work without using another molding style.
Check the placement of shelving and monitor arms before drawing the frame. A monitor that covers most of the center panel will hide the geometry; a wall-mounted shelf may require screws anchored in the wall rather than in decorative trim. Keep electrical outlets accessible and do not conceal cords behind nonrated trim assemblies.
A molding-defined home office is a visual improvement, not a sound barrier. For video calls or focused work, lighting, acoustics, and screen positioning matter more than the trim arrangement.
A dining nook in a small apartment
A dining nook may have only 48–72 inches of clear wall behind a two-person table. In that case, a single frame aligned with the tabletop, or one horizontal band, is usually more useful than several narrow rectangles. The moldings should not be placed so close to a chair that the chair back repeatedly strikes the profile.
Consider the lighting as part of the composition. A pendant centered over the table can correspond to the midpoint of a wall panel. If the pendant is off-axis because of an existing junction box, adjust the wall arrangement to the room as it exists; forcing symmetry around the wrong point may emphasize the misalignment.
Painted wall and trim in the same tone can keep a compact dining nook open and calm. A different shade within the panel may be appropriate when the rest of the room is neutral, but multiple contrasting outlines can fragment a small wall. If the table might expand for guests, plan around its larger footprint instead of only its everyday size.
Entryway without a separate foyer
Many U.S. open-plan homes have a front door that opens straight into the living area. A wall panel over a console, hooks, or a narrow bench can imply an entry zone even when there is no physical foyer. Keep the treatment shallow and out of the normal path for coats, bags, and door handles.
A floor-length vertical boundary close to a door needs careful placement because the door swing, casing, and light switch often compete for a small amount of space. A panel above a console is safer visually and easier to compose. Consider matching the profile used elsewhere in the living room rather than introducing a decorative style only at the entry.
For more ideas about working around multiple door openings, see the STAVROS guide to hallway and entryway wall molding. The same principle applies: the clear width between openings, not the entire nominal wall length, determines your usable composition.
A family room with a play area
In a shared family room, a change of wall color or a simple panel can distinguish a play corner from adult seating. Keep applied trim out of areas where rolling toys, energetic play, or furniture frequently strike the wall. An exposed decorative edge is not a substitute for protective corner guards or durable baseboard materials.
Children's furniture changes rapidly, so avoid a highly customized frame that fits only today's toy shelf. One broad panel or a restrained horizontal molding line offers more flexibility than a pattern built around temporary furniture dimensions. Choose washable paint appropriate for the space, and follow the coating manufacturer's preparation and curing instructions.
If safety is a concern, check for sharp protrusions, loose trim, and child-accessible small ornamental components. Decorative appliques that could detach should not be installed where they create a hazard. A simple, low-relief approach is often the most practical choice for active rooms.
An apartment studio with sleeping, dining, and work areas
In a studio, the furnishings already perform a lot of zoning work: a sofa, a bed, a rug, a dining table, and perhaps a freestanding bookcase. Adding an elaborate wall treatment behind every one of those functions usually produces visual overload. Select two zones at most for the more prominent trim and allow the rest of the wall to stay quiet.
One approach is a single picture-frame panel behind the sofa with a matched pair of vertical accents near the work area. Another is a continuous subtle chair rail across one wall, combined with different but coordinated paint colors for sleeping and dining. The second approach is easier to adjust when furniture shifts.
Before ordering, tape the pattern and live with it for several days. A studio is experienced from many viewpoints and at close range; the composition should work when standing at the kitchen counter, sitting on the couch, and entering from the hallway. A pattern that looks balanced only in a straight-on photograph may be wrong for daily use.
Retail and hospitality spaces
Decorative trim can give a lobby, boutique, or reception area a sense of sequence: waiting, consultation, display, and circulation. The same design rules apply, but commercial spaces require separate attention to durability, accessibility, cleaning protocols, fire performance, and local code requirements. Do not specify a decorative product for those applications on appearance alone.
Profiles installed in corridors, exit routes, public spaces, or rooms subject to specialized finish rules may need documented fire classification and a code review. Obtain material documentation and coordinate with the architect or building official before specifying them. The wall treatment can support wayfinding, but it cannot replace required signs or lighting.
Choose a Style That Supports the Architecture
A large open-plan room does not automatically require ornate trim. Style is expressed by profile shape, spacing, repetition, and color—not just by the number of decorative components. Use a consistent underlying rhythm even when zones receive different degrees of emphasis.
Contemporary and transitional interiors
Flat walls, simple cabinet fronts, and restrained furnishings work well with narrow profiles and generous negative space. Choose one principal line thickness and a small set of recurring margins. Same-color paint allows molding relief to appear as a shadow instead of a contrasting outline.
Transitional rooms can support a slightly more dimensional profile: the wall is contemporary, but the trim adds a hint of traditional structure. A medium-width panel around the sofa or buffet is often enough. Keep picture-frame corners clean and uncomplicated unless the room has other ornamental architectural features.
Neoclassical and traditional interiors
Symmetry and balanced repetition are important here. A large center panel flanked by narrower side panels can give a living-room wall a composed appearance. If two dining room walls face one another, align their principal horizontal datums. Decorative corner blocks or a central applique can be effective, but only when the ornament relates to the scale of the molding and the room.
Traditional styling is not a license to ignore switches, windows, and furniture placement. If the architecture is asymmetrical, use careful visual balance rather than forcing an exact mathematical mirror image that collides with a doorway.
Japandi and quiet minimalism
In a restrained room, one narrow relief line may be more persuasive than an entire panel grid. Select a smooth profile, match it to the wall color, and use a small number of intentional vertical divisions. Avoid adding ornate corner details simply to make the molding visible. The composition should be noticeable because its proportions are right, not because it shouts.
Art Deco and bolder accents
An Art Deco-inspired arrangement may use broader bands, geometric symmetry, or a deliberate dark-light contrast. But strong color and geometry multiply visual activity. If the dining wall is the feature, consider leaving the adjacent seating wall comparatively simple. Metallic finishes can emphasize detail, but test products and application methods on samples rather than assuming every paint will adhere well to the polyurethane substrate.
| Interior direction | Suggested visual approach | Profile emphasis | Paint strategy |
|---|---|---|---|
| Contemporary | One large panel or a few vertical lines | Thin to medium | Wall-matched or subtle contrast |
| Transitional | Picture frames coordinated with furniture | Medium | Warm white or coordinated neutral |
| Neoclassical | Symmetrical panels and measured gaps | Medium to prominent | Uniform finish, optional accents |
| Japandi | Single fine lines, generous plain wall | Narrow, smooth relief | Tone-on-tone |
| Art Deco-inspired | Geometric focal wall, deliberate contrast | Medium to bold | Contrasting colors or tested metallic effect |
| Small studio | One dominant panel, fewer secondary lines | Narrow | Same-color trim for visual calm |
These are design starting points, not rigid material specifications. Profile shape and actual installed scale matter more than a generic style label.
Which STAVROS Polyurethane Molding Should You Choose?
To compare products fairly, distinguish the face width, profile projection, and factory strip length. Width determines how much of the wall the trim occupies when viewed straight on. Projection determines the shadow and how noticeably the profile stands proud of the wall. Strip length determines joints, offcuts, and shipping considerations. A thin profile is not automatically inexpensive to install if it requires many short pieces and careful finishing; a wide profile is not automatically better because it costs more.
The following dimensions are taken from STAVROS product listings and converted to the inch values displayed in the U.S. catalog. They describe decorative polyurethane profiles, not structural door casings or room-separating beams.
| STAVROS profile | Face width | Projection | Strip length | Best use in an open-plan scheme |
|---|---|---|---|---|
| MLDPU-001 | 0.39 in | 0.24 in | 102.36 in | Very fine boundaries and inner contours |
| MLDPU-004 | 0.59 in | 0.31 in | 102.36 in | Compact wall panels and secondary zones |
| MLDPU-027, small | 0.55 in | 0.35 in | 102.36 in | Smooth rounded lines and restrained interiors |
| MLDPU-027, large | 0.79 in | 0.47 in | 102.36 in | Related design with a stronger presence |
| MLDPU-002 | 0.87 in | 0.43 in | 102.36 in | Readable main frames and medium-sized feature walls |
| MLDPU-003 | 1.38 in | 0.47 in | 102.36 in | Larger focal panels with pronounced relief |
Profile selection by viewing distance
A fine bead can be elegant from two feet away but almost disappear across a 20-foot living room. Conversely, a large decorative profile that looks appropriate on a long wall may be too forceful above a compact console. Tape a paper strip at approximately the intended face width, then step back to the room's normal viewing distance. If the outline gets lost, consider a more dimensional profile or slightly stronger paint contrast before adding extra panels.
Also think about lighting direction. Side lighting produces more noticeable shadows than flat frontal illumination, especially with stepped relief. A molding with a smaller face width but deeper projection may read more strongly than a flatter, wider strip. Order or inspect a sample when possible; product diagrams help, but a real piece under your room's light is more informative than a screen image alone.
One profile throughout or two coordinated sizes?
The simplest approach is one primary profile throughout the whole visible open plan. This creates cohesion even when the panel shapes change by zone. If you want a primary and secondary scale, choose deliberate roles: the main wall gets a substantial outline and the work corner gets a smaller related outline. That is different from randomly alternating profiles within the same rectangle.
One particularly practical option is a common profile with different panel proportions. A large frame behind the sofa and two narrower frames behind a dining buffet can look related without requiring any change of product. This reduces ordering complexity, simplifies corner cutting, and makes future touch-ups easier.
Matching corners and decorative appliques
A corner ornament is more than an accent: its geometry must align with the straight molding. Compare section diagrams, not only product names. A corner block that looks similar in a photo may leave a visible ridge or gap where the molding joins it. The same caution applies to centerpiece appliques, which should sit naturally within the frame rather than appearing squeezed between narrow rails.
For more detail, review the STAVROS guide to molding corner blocks before mixing different profiles and decorative pieces. When a matching corner is unavailable, a clean miter joint is often a better choice than forcing a decorative element to fit.
How to Measure and Lay Out Wall Panels in Inches
Measurement begins with the zone's available wall, not the entire room. Make a sketch with dimensions and a clear installation datum. Record finished floor level, top of baseboard, underside of any crown molding, door and window casing edges, and each electrical device. Check measurements in more than one place because walls and floors are rarely perfectly square.
For a rectangular panel, draw the outside long-point dimensions if you plan to miter the corners. The visible frame size and the cut length can differ depending on how you measure the profile. Mark whether a dimension runs to the outside edge, inside edge, or centerline. A cutting list that mixes these references is almost guaranteed to produce inconsistent panels.
A twelve-foot wall with three equal panels
Suppose a 12-foot wall has 144 inches of uninterrupted width. You want three equal rectangular wall panels, each 32 inches wide and 56 inches tall, with balanced spaces across the wall. Choose 12-inch outer margins and 12-inch gaps between panels:
- Three frames occupy 3 × 32 = 96 inches.
- Two gaps occupy 2 × 12 = 24 inches.
- Left and right margins occupy 2 × 12 = 24 inches.
- Total = 96 + 24 + 24 = 144 inches.
The horizontal layout fits exactly. For the vertical layout, place a temporary tape rectangle on the wall and adjust the height according to the sofa back, artwork, switches, and ceiling. In an 8-foot room, a 56-inch panel might, for example, run from 18 inches above the floor to 74 inches above the floor. Those numbers are design choices, not required clearances. The important test is whether the composition clears the actual baseboard, furniture, crown molding, and devices.
Stand at the doorway and check whether the side frames look equally weighted. A mathematically centered layout can still appear off-center if an adjacent window, floor lamp, or tall cabinet dominates one side. If that happens, revise the panel layout on paper before you buy molding.
Calculate the total molding length
Each 32 × 56-inch panel has two horizontal pieces and two vertical pieces. Its trim perimeter is 2 × (32 + 56) = 176 inches, or 14 feet 8 inches. Three frames require 528 inches, which equals 44 linear feet of finished pieces before any cutting loss.
The usual next calculation is to divide that number by the factory strip length. For 102.36-inch STAVROS strips, 528 ÷ 102.36 is about 5.16, suggesting a theoretical minimum of six strips. But that arithmetic alone is not a purchase plan: each individual piece must fit within a factory length, and the cuts must be laid out realistically.
Make a cutting map, not just a linear-foot estimate
For these particular frames, a useful cutting arrangement is one 56-inch vertical and one 32-inch horizontal from each 102.36-inch strip. Each pair uses 88 inches before saw kerf, leaving roughly 14.36 inches of nominal length. Because each frame needs two of each piece, the three frames require six such pairs. A six-strip cutting map therefore works geometrically, provided the stated lengths account for the actual miter long points, saw kerf, and the usable condition of the supplied stock.
| Cutting-map item | Quantity | Finished length each | Total |
|---|---|---|---|
| Vertical frame sides | 6 | 56 in | 336 in |
| Horizontal frame sides | 6 | 32 in | 192 in |
| All finished frame pieces | 12 | — | 528 in |
| Proposed factory strips | 6 | 102.36 in | 614.16 in |
The six strips provide about 86 inches of nominal offcut in total. That does not mean you should order exactly six: the plan has no allowance for a damaged piece, a poor miter, or a measurement change. Seven strips would be a more forgiving shopping starting point for this example. Confirm the actual long-point cut list and complete a sample cut before finalizing the order.
Notice that an arbitrary percentage added to total footage may not map neatly to purchasable stock. The product is sold in fixed lengths, so round in whole strips only after laying out the actual pieces.
Why the cutting map changes when panels get taller
Now compare three frames measuring 36 × 84 inches. Their combined perimeter is 720 inches, or 60 feet. A naive division by 102.36 suggests eight strips. But the vertical pieces are 84 inches long; two cannot share one strip, and an 84-inch piece cannot be paired with a 36-inch horizontal one. All six verticals therefore need six individual strips. The six 36-inch horizontals need at least three additional strips because two 36-inch pieces fit on each. The practical minimum is nine strips, assuming suitable saw kerf and usable stock—not eight.
This difference can surprise buyers ordering many identical frames. A reliable approach is to list each finished piece, sort the pieces by length, group pieces into factory strips without exceeding usable length, and only then add a project-appropriate spare. For a more extensive explanation, consult how to calculate wall molding quantities.
Separate independent trim runs from framed panels
If a project also has a chair rail, vertical separators, or a continuous accent band, list those as separate line items. A ten-foot horizontal band is longer than a 102.36-inch strip, so it requires a planned joint; do not count it as a single uninterrupted piece. Placement of that joint, pattern continuity, and finishing quality may matter more than achieving the theoretical smallest number of strips.
Keep special corner details separate, too. Three rectangular frames need twelve decorative corner blocks if the design uses one at every corner, but the exact part must be compatible with the selected straight molding. If you are doing plain mitered frames, you need no corner blocks. A central overlay is optional and should be counted only for frames where it actually belongs.
Installing Polyurethane Wall Molding on Painted Drywall
An attractive trim plan can be undermined by careless installation. A frame that looks perfectly square on the drawing may appear crooked against an uneven ceiling, and a strong adhesive cannot compensate for loose paint or dusty drywall. Work in an orderly sequence, follow the molding and adhesive manufacturers' guidance, and test the method before installing every piece.
Step 1: Check the wall and finish
Inspect the painted wall for peeling paint, chalky patches, dampness, glossy or contaminated coatings, and major unevenness. Address moisture problems before applying decorative trim. Adhesive bond strength depends on the actual substrate, not simply the word "drywall" on a product label. If the wall has fresh paint, let it cure for the period specified by the coating manufacturer.
Evaluate whether the molding will be installed over paint, primer, or properly prepared gypsum board. Some adhesives require a specific surface preparation or do not bond well to particular finishes. Confirm the compatibility of all materials in writing where possible, and complete a small adhesion test in an inconspicuous location.
Step 2: Transfer a single layout reference to the wall
Mark the panel's centerline and outer bounds using a level, laser, tape measure, and a light pencil. For several panels, work from one consistent horizontal baseline and repeat the same offsets. Verify diagonals on rectangles before applying any adhesive. When a wall is not square, make thoughtful decisions about visual alignment; do not simply follow a sloping floor line if that makes every frame appear tilted.
Painter's tape offers an inexpensive mock-up. Use it to review frame width, height, margins, and how furniture overlaps the pattern. Check the design from more than one viewpoint. Once you are satisfied, label the planned lengths on the wall drawing and prepare a cut list.
Step 3: Cut and dry-fit each group of pieces
Use cutting tools suitable for the profile and material. For square-cornered decorative frames, establish the miter orientation before making a production run of cuts. A common mistake is to cut two "matching" corners that both face the same direction; that creates an unusable pair. Label the back of each strip by location: frame one top, frame one right, and so on.
Dry-fit a complete frame on the floor or against the wall before spreading adhesive. Confirm that the long points, profile face, and relief pattern align. For profiled molding, a joint can be geometrically closed but still look wrong if the stepped relief is rotated or offset.
Step 4: Select the adhesive for the specific assembly
Choose a compatible construction adhesive or product specifically approved for polyurethane trim and the actual wall surface. Do not assume that every general-purpose adhesive or solvent-based product is suitable. Follow the adhesive maker's instructions for bead size, application pattern, open time, temporary support, minimum temperature, and cure time. Adhesives with similar packaging can behave differently.
An adhesive should not be treated as a universal substitute for structural or code-required attachment. These profiles are decorative. Use the STAVROS adhesive selection guide as a starting point, then confirm your chosen product's current technical instructions.
Step 5: Mount, align, and allow to cure
Install pieces according to a consistent sequence. For simple rectangles, some installers begin with a horizontal member to establish the datum; others start from a carefully measured corner. Either method can work if the frame stays aligned and the adhesive has the required support. Press the molding into place evenly and remove excess adhesive promptly using a method approved for the finish.
Do not let a narrow trim strip bridge a severely bowed wall without checking whether it is meant to flex. A rigid profile forced across a large surface irregularity may develop gaps or spring away. If the wall is substantially out of plane, repair the substrate or redesign the detail rather than trying to solve everything with extra adhesive.
Step 6: Finish seams and paint the system
After the adhesive cures, inspect every joint and the interface between molding and wall. Use compatible paintable filler or caulk only where appropriate; do not assume one material works both as a structural joint adhesive and a cosmetic gap filler. Let the finishing compound cure, sand gently if recommended, remove dust, and apply the specified primer or coating system.
Painting the trim and adjacent wall together produces a quiet built-in appearance. Painting the trim in a contrasting color creates a more graphic boundary, but it also emphasizes uneven joints and imperfect linework. If you want two colors, read the two-tone polyurethane molding painting guide and test the paint on a spare piece first.
For additional installation detail, the STAVROS polyurethane molding installation reference covers surface preparation and finishing workflows. Always defer to the specific product's instructions where they differ from general advice.
Paint Strategies That Make Zones Feel Related
The easiest way to make several decorative zones coexist is to keep the trim finish consistent. White molding against a colored wall is familiar, but wall-matched trim often looks more integrated in an open-concept house. When paint, wall, and molding share a color, their differences show primarily as light and shadow rather than strong graphic outlines.
A useful three-part palette is a shared wall neutral, one accent zone color, and a consistent trim treatment. For instance, the living-room wall can stay warm beige, the dining panel can use a deeper related shade, and all polyurethane trim can use the same off-white. A subtler version is to keep everything one color and use changes in sheen only after testing the finish under natural and artificial light.
Avoid assuming that a darker color inside every frame automatically helps with zoning. Several dark panels may shrink the apparent openness of a small room. Start with the hero zone and let the secondary treatments remain quieter. If the project has an 8-foot ceiling, control the visual weight of the trim; the STAVROS article on decorative trim for low ceilings provides more proportioning ideas.
When painting around outlets, switches, and fixtures, shut off and protect equipment as required by the work, and avoid painting electrical components or reducing required clearance. Never cover a device or junction box with trim. Cosmetic detailing must remain secondary to access and safety.
Common Design and Ordering Mistakes
A frame gets hidden by furniture. Plan from the furniture silhouette, including the maximum height of a headboard, sofa back, TV, or bookcase. Draw the frame at a scale where the visible portion still reads as an intentional outline. If most of the lower rail sits behind a sofa, consider raising the panel or using a simpler pair of vertical lines.
Too many small frames make the wall busy. Repetition is useful only when the scale is large enough to be seen clearly. On a short wall between doors, one well-sized panel generally communicates more than four narrow columns. There is no rule requiring every bay to contain a framed rectangle.
The design ignores circulation. A molded wall can visually clarify a dining zone, but it cannot make a walkway wider. Maintain the actual functional clearances needed for furniture, doors, accessibility, and everyday movement. Do not let decorative ambition drive unsafe furniture placement.
The pattern conflicts with electrical devices. Measure outlets, switches, thermostats, air returns, and wall-mounted equipment before marking the final panels. Sometimes shifting the whole composition a few inches is better than breaking a molding line around a switch at the last moment.
The product label is mistaken for a material guarantee. Catalogs may contain polyurethane, polystyrene, wood, MDF, and other trim. Check each product page. Do not assume all moldings are interchangeable simply because their photos show a similar white finish. Even two polyurethane profiles can have incompatible reliefs or corner pieces.
A purchase is calculated from perimeter alone. Factory length, finished cut lengths, miter long points, and waste all matter. Build the cutting map first. Keep spare pieces in the same SKU and size so a repair does not introduce an obvious mismatch.
The design grows more elaborate with every revision. Start with a coherent layout and add ornament only when it improves the primary composition. When uncertain, tape out a simpler option and compare it with the busier version. Many successful modern wall molding projects look intentional because they stop before the decoration overwhelms the room.
A Practical STAVROS Shopping Checklist
Before placing an order, write down the exact location of each zone, the chosen profile, the finished lengths, and any special details. For a typical wall-molding zoning project, the working list looks like this:
- Straight polyurethane molding: one selected SKU and cross-section for all matching frames, with quantities based on a piece-by-piece cutting map.
- Optional corner blocks: only if a compatible design is confirmed and the geometry allows them. Count them by frame and note their size and orientation.
- Optional central ornament: use selectively on a main feature panel rather than assuming each frame needs one.
- Approved adhesive and temporary supports: chosen for the wall substrate and profile, not only for convenience.
- Finishing supplies: compatible joint filler or caulk, primer where necessary, paint, masking materials, and cleaning tools.
- Cutting and layout tools: accurate tape measure, level, square, suitable saw and cutting guide, pencil, and protective equipment.
- Extra matching stock: consider one or more spare factory strips after the cutting map, especially where damaged parts would be difficult to replace later.
For product options, compare polyurethane molding profiles and matching molding accessories. Confirm the current catalog specifications, availability, packaging, shipping destination, and order terms directly with STAVROS before purchasing; international delivery and lead times should not be inferred from a product listing.
FAQ: Wall Molding for Open-Concept Rooms
Can molding really separate a living room from a dining room?
It can separate them visually. A prominent sofa panel, a related dining panel, and consistent trim shape give the two activities distinct identities. Physical privacy, acoustic separation, and traffic flow still depend on other design decisions.
What is the best molding for a small studio?
A narrow, low-relief polyurethane profile painted to match the wall is a sensible starting point. The exact product depends on the size of the panel and the distance from which it will be seen. MLDPU-001, MLDPU-004, and the smaller MLDPU-027 are examples worth comparing rather than universal prescriptions.
Should every zone have the same number of wall panels?
No. The number and size of panels should respond to the furniture and usable wall. A single large living-room panel can coordinate with two smaller dining panels if the cross-section, margins, or paint treatment make the system coherent.
Does wall trim need to run all the way to the ceiling?
No. Vertical trim can stop below crown molding or above the baseboard; framed panels can float within a deliberate set of margins. The key is a clean endpoint and a consistent alignment strategy. Keep trim from interfering with doors, vents, fixtures, and required access.
Is a chair rail necessary for defining zones?
No. It is one of several visual tools. A chair rail is useful when the design needs a continuous horizontal datum, but one or two well-placed wall frames may be better when you want to emphasize particular furniture groups without carrying a line across the whole room.
Is polyurethane suitable for kitchens and bathrooms?
Some polyurethane decorative profiles can perform well in normally humid interiors when installed and finished correctly. That does not mean every profile, adhesive, joint filler, or paint is approved for direct water exposure, high heat, or constant condensation. Verify the complete assembly for the intended location.
Can I install picture-frame molding myself?
Many careful DIYers can install simple rectangular decorative frames with appropriate tools and preparation. The most demanding tasks are establishing a level layout, cutting accurate corners, obtaining secure adhesion to the actual wall coating, and finishing joints cleanly. Complex layouts or problematic substrates may warrant an experienced installer.
How many extra strips should I order?
There is no reliable single percentage for every layout. Determine the cut list, fit the pieces into actual manufacturer lengths, and add a practical allowance based on complexity and risk. A spare strip is often worthwhile for small projects; large projects benefit from an explicit cutting schedule and a documented waste allowance.
Should the molding be painted before or after installation?
You can often prime or precoat accessible surfaces first and finish the visible assembly after installation to conceal joints. The correct sequence depends on the factory finish, adhesive instructions, and paint system. A final coat after joint finishing usually produces the most continuous appearance.
Where should I begin if I have never used decorative wall trim?
Choose one clearly defined wall zone, measure it accurately, and tape out a simple rectangle or two vertical lines. Compare the actual STAVROS polyurethane profiles and select a size that reads well from the room's typical viewing distance. Build a piece-by-piece cut list before ordering, and test the adhesive and finish on a spare piece.
Final Planning Advice
The most effective wall molding layout is not the one with the most rectangles. It is the one that makes a home's activities feel naturally organized. Start with the dominant furniture groups, establish a shared design language, and use the molding to reinforce—not substitute for—the room's existing architecture.
For an open-concept living and dining room, that might mean one confident feature panel and a quiet companion frame. For a studio, it may be no more than a pair of subtle vertical lines. And for a bedroom workspace, a small wall composition can make a desk feel considered without making the whole room look like an office.
Choose a STAVROS polyurethane molding profile, verify dimensions and compatible accessories, calculate the actual cutting plan in inches, and finish the trim as one cohesive system. The result should help the whole home read more clearly—not compete for attention with the people and furniture inside it.