Article Contents:
- Can You Install Crown Molding on an 8-Foot Ceiling?
- Measure the Actual Ceiling Before Selecting Trim
- The three measurements that govern the visual result
- What “low profile” really means
- A choice that depends on the ceiling, not the catalog photograph
- How to assess the width at home
- Electrical and fan clearance come first
- A practical three-sample color test
- Plan A: A 10 × 12-Foot Bedroom with an 8-Foot Ceiling
- Plan B: A Small Hallway or Entry with a 7-Foot-6-Inch Ceiling
- Plan C: A 12 × 16-Foot Living Room with an 8-Foot-6-Inch Ceiling
- Plan D: An Open Kitchen-Dining Area with a 9-Foot Ceiling
- What changes when the trim comes in 102.36-inch lengths?
- 1. Inspect the substrate and finish
- 2. Lay out each line with a full-size sample
- 3. Dry-fit and cut carefully
- 4. Use a compatible attachment system
- 5. Finish joints without burying the relief
- 6. Prime and paint as specified
- Does crown molding make an 8-foot ceiling look lower?
- What is the best size crown molding for 8-foot ceilings?
- Is polyurethane molding the same as crown molding?
- Can I put a ceiling medallion around a ceiling fan?
- Are ceiling medallions worth using in a small bedroom?
- Is white the only suitable trim color for low ceilings?
- What is the difference between a ceiling frame and a crown?
- Can I install low-profile molding over textured ceilings?
- How do I calculate a molding order for a rectangular room?
- Should I use an entire CPU-P ceiling kit in an 8-foot room?
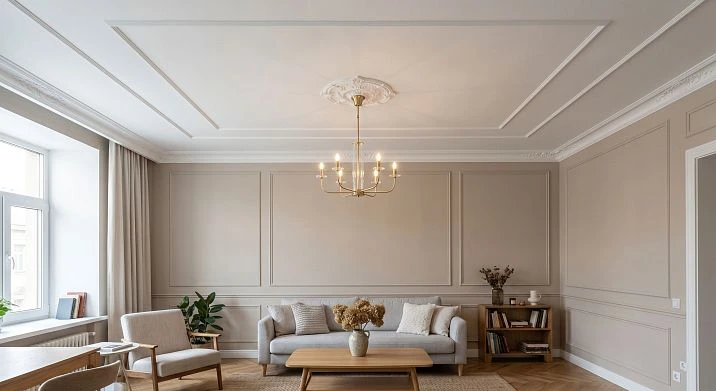
A room with an 8-foot ceiling does not need to give up architectural detail. It needs the right kind of detail. A slim line at the wall-to-ceiling junction can make a basic room feel carefully finished, while an oversized crown molding can draw attention to the very height you are trying not to emphasize. The difference is not simply whether a room has molding; it is where the molding sits, how far it projects, how much contrast it creates, and whether the ceiling still has room to breathe.
This guide takes the practical questions behind crown molding for 8-foot ceilings and turns them into a buying and design process for American homes. We will compare traditional crown molding with flat decorative trim, discuss low-profile polyurethane molding and polystyrene cornices, size a ceiling medallion around a light fixture, calculate realistic material quantities, and plan a finish that works with the room instead of dominating it. Product examples come from the STAVROS catalog; they are identified by their actual material and dimensions rather than grouped under the vague label of “stucco.”
The central idea is simple: make the transition between wall and ceiling intentional, but do not make every square inch of that transition compete for attention. You may want a barely visible bead, a clean crown profile, or a restrained decorative frame. Each can work. The best choice comes from the dimensions of your particular room.
Can You Install Crown Molding on an 8-Foot Ceiling?
Yes. An 8-foot ceiling is approximately 96 inches (2,438 mm) above the finished floor, and crown molding does not automatically make it look lower. A profile that repeats the ceiling color and makes a smooth transition at the top of the wall may be relatively quiet. A dark, deep, highly ornamented cornice placed against bright walls may look considerably more prominent. Both occupy some space; the visual effect is different.
The same logic applies to bedrooms, living rooms, hallways, and apartments. A small room with a regular rectangular plan is often easier to detail than a larger room full of bulkheads, soffits, ceiling fans, and irregular corners. In the first room, you can establish a consistent top line. In the second, you must resolve each interruption before choosing the trim.
There is no universal building rule that says an 8-foot ceiling must use a 2-inch, 3-inch, or 4-inch crown. Those numbers describe possible design starting points, not code requirements or a promise about appearance. Test a paper template at full size. Step back to the doorway. Look from a seated position as well as standing directly below the sample. If the molding looks like a heavy band around the room, try a quieter cross-section, a softer paint transition, or a flat applied molding instead.
A useful first decision is whether you actually need a projecting crown profile. If the ceiling line is fairly straight and you mainly want an elegant border, flat decorative molding can accomplish the design goal without creating a wide dropped band on the wall. That opens up more options for a ceiling that is genuinely low.




Measure the Actual Ceiling Before Selecting Trim
The advertised height of a room is not always its usable height. Flooring upgrades, a lowered ceiling, an HVAC soffit, or a sloped perimeter can change the available space. Measure from the finished floor to the finished ceiling in several locations. Check the lowest point that will interact with the decorative profile, and note the position of doors, window casings, cabinets, smoke alarms, recessed lighting, and ceiling fans.
Do not confuse the length of a piece of trim with its visible height. For crown molding, you need at least three measurements: the overall profile dimensions, its wall drop (the distance it descends along the wall), and its ceiling projection (the distance it extends across the ceiling). A product described as 3 inches may have a different actual wall drop depending on its cross-section and installation angle. Ask for a profile drawing when the product description is not explicit.
The chart below is a design worksheet, not a strict rule. It helps you decide which sample to test first.
| Finished ceiling height | First design to mock up | What to check carefully |
|---|---|---|
| About 7 ft 6 in (90 in) | Flat bead or very restrained transition | Soffits, door heads, tall cabinets, and ceiling fan clearance |
| 8 ft (96 in) | Low-profile crown or a slim perimeter molding | Actual wall drop, color contrast, and visual weight |
| 8 ft 6 in (102 in) | Slim to moderate crown; possibly one simple ceiling frame | Whether the room is wide enough for a second decorative line |
| 9 ft (108 in) | Moderate crown or a more developed but controlled scheme | Balance between the perimeter, chandelier, and central ceiling field |
Do not choose a larger profile simply because your ceiling is 6 inches taller. Room width, lighting, existing trim, and even the viewing angle can matter just as much. For nearby metric comparisons and an additional design approach, read the STAVROS guide to ceiling decor for rooms around 2.6–2.8 meters high.
Наша фабрика также производит:

Смотреть весь Каталог продукции
The three measurements that govern the visual result
Wall drop affects the visible horizontal band at the top of the wall. Ceiling projection affects how the molding meets the ceiling and whether it can interfere with nearby fixtures. Relief depth controls the shadow the profile casts. Two profiles with the same face width can look different because one is smooth and the other contains repeated steps and deep recesses.
Bring the dimensions into the room with a full-scale mock-up. A folded piece of cardboard taped at the intended installation angle can be more informative than a product photograph taken in a large showroom. Mark the lowest edge of the molding with removable tape; then walk into the room as a visitor would. This is particularly useful for hallways, where the ceiling is close to the observer and the molding runs continuously along both sides.
Получить консультацию
Crown Molding, Flat Molding, and Ceiling Medallions Are Different Purchases
A shopping page may place many decorative elements under “molding,” but they solve different problems. A crown molding finishes the wall-ceiling junction. A flat applied molding follows a wall or ceiling surface to create a narrow line or geometric frame. A ceiling medallion is a separate ornament, usually arranged around the position of a chandelier or pendant. The best scheme might use one of these, two of them, or none if the room already has enough detail.
| Product type | Main job | Best low-ceiling application | Important limitation |
|---|---|---|---|
| Crown molding / ceiling cornice | Finish the wall-ceiling junction | One continuous, restrained perimeter | Verify the real wall drop and mounting angle |
| Flat polyurethane molding | Draw a subtle outline on a flat surface | Small ceiling frame or slim border on an appropriate substrate | A wall molding is not automatically a structural crown profile |
| Ceiling medallion | Give the fixture a decorative setting | Low-relief centerpiece sized to the room and fixture | Must not replace an electrical box or fixture support |
| Decorative ceiling kit | Coordinate medallion, frame, and accents | Spacious rooms with enough open field | Overall layout can overwhelm a small ceiling |
If you are starting from scratch, compare the STAVROS polyurethane molding profiles with the separate crown molding and ceiling cornice selection. These are not interchangeable product groups. Read each item's dimensions and its intended mounting location instead of assuming all decorative lengths are crown molding.
What “low profile” really means
Low profile refers to the visual and physical footprint of the installed trim, not just a short product name. A narrow molding may have pronounced relief; a wider molding may have a soft face with little shadow. Painted in white against a white ceiling, both may look lighter than the same profiles painted charcoal. Think in terms of how much of the room's upper edge becomes a new visual stripe.
A common design mistake is to try to solve three problems with one oversized product: conceal an uneven junction, add decorative character, and create a place for hidden lighting. Those goals may require different details. A compatible small crown can finish the joint; a separate thin applied molding can add rhythm; and lighting may need a purpose-designed profile with space for wiring and maintenance. Decide which function matters before you add visual weight.
Polyurethane vs. Polystyrene, Wood, and Plaster
For an American buyer, specifying the material accurately matters more than using an impressive category label. STAVROS carries several types of architectural trim. The MLDPU examples discussed below are polyurethane. The HIWOOD ceiling cornices in the STAVROS crown molding category are described as polystyrene. Wood and MDF profiles belong to other product families. Traditional plaster is another material entirely, with different handling, installation, and repair considerations.
| Material | Reasons to consider it | What to verify before ordering |
|---|---|---|
| Polyurethane decorative molding | Detailed, paintable profiles with a defined shape and relatively small cross-sections available | Intended installation surface, adhesive compatibility, length and finish preparation |
| Polystyrene crown molding | Purpose-designed crown profiles in the HIWOOD range, including restrained styles | Material-specific adhesive, supplied length, heat exposure, and actual wall drop |
| Wood crown or trim | Natural grain, stain-grade finishes, traditional joinery | Movement with humidity, fastening requirements, species and finish |
| MDF trim | Uniform machine-made profiles that can work well in appropriate dry interiors | Moisture exposure, cut-edge sealing, fastening and paint system |
| Plaster ornament | Traditional mineral material and the possibility of sculptural detail | Weight, substrate capacity, skilled installation and repair |
Calling every trim piece polyurethane would mislead a shopper. It can also lead to the wrong adhesive or finishing method. In particular, do not substitute a random solvent-based glue on polystyrene; some formulations can damage it. Follow the product manufacturer's written installation guidance and test on an offcut when there is any uncertainty.
Polyurethane is particularly useful when the design calls for narrow applied contours, light ornament and repeatable relief. But it is not a structural support. It does not make an electrical installation safe, eliminate the need to prepare a painted substrate, or solve a badly out-of-level ceiling. Material selection is one part of the system rather than a substitute for sound planning.
Four STAVROS Polyurethane Profiles Worth Comparing
The most useful starting point for a restrained project is not necessarily an elaborate crown. STAVROS has narrow polyurethane molding profiles that can form a line on a suitable flat wall or ceiling. Their sizes are supplied by the manufacturer's product pages; the inch values below are rounded conversions.
| Profile | Face width × depth | Supplied length | Design character |
|---|---|---|---|
| MLDPU-001 | 0.39 × 0.24 in (10 × 6 mm) | 102.36 in (2600 mm) | Very fine semicircular bead |
| MLDPU-004 | 0.59 × 0.31 in (15 × 8 mm) | 102.36 in (2600 mm) | Narrow but defined stepped relief |
| MLDPU-002 | 0.87 × 0.43 in (22 × 11 mm) | 102.36 in (2600 mm) | Noticeable, layered detail |
| MLDPU-003 | 1.38 × 0.47 in (35 × 12 mm) | 102.36 in (2600 mm) | More prominent decorative line |
The MLDPU-001 slim polyurethane molding is useful when you want a nearly pencil-thin line around a small ceiling frame or along a wall. Its compact shape is not designed to span the wall-ceiling corner like a conventional crown. Treat it as applied decorative trim and confirm that the ceiling surface is suitable for adhesive mounting.
The MLDPU-004 polyurethane profile adds a little more presence, which can be helpful in a room that feels too plain with a 0.39-inch line. The depth remains modest, but the steps catch more light. Mock up both options in the actual paint color rather than deciding only from a thumbnail image.
Choose MLDPU-002 when the ceiling or upper wall can support a clearly visible frame. Its 0.87-inch face can work nicely around a defined center zone, but using it for multiple nested contours may be excessive in a small bedroom. Reserve the MLDPU-003 wider profile for a room in which you genuinely want the relief to read from a distance. A 1.38-inch face is still relatively narrow in absolute terms, yet it will call more attention to an overhead frame than MLDPU-001.
A choice that depends on the ceiling, not the catalog photograph
For a 10-by-12-foot living room with an 8-foot ceiling, first test the MLDPU-001 or MLDPU-004 as one simple rectangular inset if the ceiling is flat. For a wider living area with 9-foot ceilings, the 0.87-inch MLDPU-002 may give a clearer outline. These are design suggestions, not manufacturer-declared suitability ratings. Some profiles are sold primarily as wall molding; your installer must approve the mounting approach before placing them overhead.
If the ceiling is highly textured, damaged, or visibly uneven, an applied decorative frame can magnify those imperfections rather than hide them. Prepare the surface before choosing a delicate profile. Clean geometry is unforgiving: the eye notices a small discontinuity in a repeated, straight line.
Choosing a Crown Molding Profile for a Standard-Height Room
If you want a traditional crown at the junction rather than an applied bead, shop for a profile made specifically for that purpose. The STAVROS HIWOOD crown molding selection includes polystyrene cornices. The site lists these pieces at approximately 78.74 inches (2,000 mm) long, which is shorter than a typical 8-foot board. That distinction matters when you calculate joints and order quantities.
Focus first on a restrained silhouette with a modest wall drop. A softly curved or simple stepped section can give the room a finished edge without the busier shadow pattern of repeated dentils or heavy floral carving. Avoid making a decision from the package width alone. Ask how the profile sits against two perpendicular surfaces; a wide-looking section may have only a moderate installed drop, while a bulky multi-step profile can emphasize the ceiling line even when its front face is not particularly wide.
There is also a difference between hiding and decorating a junction. A crown can cover a small imperfect paint transition, but it is not a reliable structural fix for movement, cracks, moisture problems, or an out-of-plane wall. If the joint is changing because of water intrusion or substantial movement, address that condition before installing trim. Otherwise, the new finish may simply make future repairs more difficult.
How to assess the width at home
Make a 24-inch-long sample that reproduces the actual mounting angle. Place it at a normal corner under the room's typical evening light. Check five things: the perceived wall drop; the shadow under the bottom edge; the distance to the top of nearby door and window trim; the relationship to the tallest cabinets; and the way the color meets the ceiling. A product that looks tiny on a catalog wall may feel heavier above a narrow doorway.
The best crown for an 8-foot ceiling is not necessarily the thinnest item in the store. A small profile with busy ornament can be more visually distracting than a slightly deeper but smooth profile. At the same time, oversizing the cornice in order to mimic a grand historic interior usually asks more of the room than its height can give.
Ceiling Medallions for Low Ceilings: Use Scale, Not Guesswork
A ceiling medallion, sometimes called a ceiling rose, can create an elegant transition around a pendant light or chandelier. In a room with limited height, however, its diameter and relief depth need careful attention. The important visual relationships are between the ornament, the light fixture, the ceiling field and the surrounding crown. None can be sized intelligently in isolation.
Start with the light fixture. Measure the canopy or cover plate, then check the widest visible part of the fixture and its drop from the ceiling. A tiny, flush-mounted ceiling light usually does not need a large ornamental ring. A compact chandelier may justify a slightly more noticeable surrounding detail. There is no universal rule that a medallion must be a fixed percentage of the fixture width; use that kind of proportion as a visual test, not as a specification.
For comparison, the STAVROS ceiling medallion category includes substantial modular arrangements. The smallest composition listed in that group, CRPU-070, has an overall decorative layout approximately 30.12 inches across. It is made of separate polyurethane elements and is not a tiny one-piece disk. It may be beautiful in a room with generous ceiling area, but it is far from an automatic recommendation for a small 8-foot-ceiling bedroom.
Here is a practical approach: draw a circle matching the outer diameter of the proposed arrangement on painter's paper. Temporarily place the template on the ceiling, centered on the fixture's actual mounting position. View it from the doorway and from your main seating area. If the circle crowds recessed lights, curtain tracks, crown molding or a ceiling fan's sweep, move to a smaller design or skip the medallion. In a low room, restraint is often more effective than trying to include every possible ornament.
You can also review STAVROS polyurethane decorative rosettes, which include much smaller decorative pieces. For example, RPU-057 is sold in sizes starting around 1.18 inches. Those small decorative appliqués are not substitutes for an electrical ceiling medallion or fixture support. They are best considered as ornaments within an independently planned decorative composition. Do not drill through them or use them to support a chandelier without a product-specific, approved assembly.
Electrical and fan clearance come first
A ceiling medallion does not carry the weight of a light fixture. The fixture must be secured to a properly rated electrical box or other approved support as required for the installation. Electrical splices must remain accessible as required by applicable code, and decorative pieces cannot be used to hide an unsafe junction. If a ceiling fan is involved, confirm the approved fan-rated support and all required clearances. Never arrange projecting trim inside the moving blade envelope. Hire a qualified electrician when the mounting or wiring is not already suitable.
For a fuller look at coordinating a ceiling ornament with the lighting, use the STAVROS guide to matching a ceiling medallion and crown molding with a chandelier. The point is to design one composition, not buy a medallion first and discover that the fixture canopy or ceiling shape is incompatible later.
Should You Buy a Complete Ceiling Decor Kit?
A coordinated kit can solve the problem of choosing ornaments from several unrelated collections. STAVROS offers CPU-P ceiling decor kits with central details, frame elements and decorative accents. They are useful design references, particularly for a formal dining room or an interior with a well-defined furniture axis.
But a kit is not automatically appropriate for a low ceiling simply because it is coordinated. The CPU-P1, CPU-P2 and CPU-P5 designs in the current catalog are shown with an overall layout of approximately 98.43 × 98.43 inches, or 2,500 × 2,500 mm. That is just over 8 feet square. If your room is only 10 feet wide, a full-size 98.43-inch layout would leave about 10.8 inches on each side before allowing for any additional crown molding or nearby fixtures. That may produce an uncomfortably crowded composition.
Consider these differences when reviewing the kits:
- CPU-P1: more emphasis on nested framing and a central composition; check whether multiple contours compete with an 8-foot room's proportions.
- CPU-P2: a broad, ornamental arrangement with prominent corner groups; usually a candidate for a room where there is enough uninterrupted ceiling to see the whole pattern.
- CPU-P5: a relatively slender frame and smaller central ornament within its series; visually quieter than some alternatives, but its cataloged overall layout is still around 98.43 inches square.
Rather than relying on the model number, make a scaled ceiling drawing with accurate room dimensions. Draw the whole kit footprint, not only the medallion. Then subtract the area occupied by crown molding, lights, fan clearances, soffits and any built-in furniture that changes the composition below. A balanced room should have intentional breathing space around the decorative pattern.
If you like the style of a kit but it is too large, the better solution may be a custom arrangement using one appropriately sized decorative element and a restrained applied frame. That can preserve the design language without forcing a full-scale composition into a smaller room. Verify individual component availability and quantities with the supplier before treating a catalog image as a shopping list.
Can Indirect LED Lighting Make a Low Ceiling Feel Taller?
Indirect lighting can soften the boundary between the wall and ceiling, but the result depends on the complete assembly. A strip of LEDs hidden behind a profile is not automatically a good low-ceiling solution. The position of the light, reflectance of the ceiling paint, available clearance and access to the driver all affect how the room looks when illuminated.
STAVROS lists the HIWOOD LB32 as a profile for backlighting. Its published nominal dimensions are approximately 32.5 × 24 mm, and it belongs to the polystyrene range rather than the polyurethane MLDPU collection. Review the LB32 indirect-lighting molding if you are considering a concealed perimeter light. Confirm the exact LED system, heat management, mounting method and service access with the manufacturers involved.
Start with a short test installation. Look for visible hotspots, uneven bands of light, reflections in glossy paint and shadows where walls are not flat. A harsh line of light can draw more attention to the ceiling boundary than an unlit crown. A softly washed surface may feel more open, but that is an aesthetic effect, not a measured increase in physical height. Electrical work should comply with applicable requirements and be carried out by a qualified person where necessary.
For some rooms, a well-placed floor lamp or a wall sconce is a simpler and better solution than building an illuminated cornice. Low ceilings make maintenance access and fixture clearance especially important. Do not commit to an electrical system merely to justify a larger molding.
Paint Color and Sheen: The Simplest Way to Control Visual Weight
A small piece of molding is only part of the picture. The paint scheme can make the same section nearly disappear or become the most noticeable line in the room. On an 8-foot ceiling, starting with the same color on the crown and the ceiling is often a sensible approach. The crown reads as a continuation of the overhead plane instead of a strongly contrasting border painted onto the wall.
White-on-white is not the only option. A soft warm white ceiling with matching warm white trim can suit a traditional living room; a muted neutral ceiling and matching applied molding can look contemporary. If you want a two-tone room, consider keeping the top transition light and placing the stronger color change farther down the wall. That prevents the highest horizontal line from becoming the dominant graphic in a compact space.
Sheen also matters. Semi-gloss molding against a flat ceiling can look more prominent even when the paint colors match exactly. That is not necessarily wrong, but it deserves a sample. Brush texture, caulk lines and uneven joints may become more visible under grazing light. Follow the paint and molding manufacturer's surface-preparation directions, test adhesion on a spare piece and assess the result after the coating has fully cured.
A practical three-sample color test
Paint three identical offcuts: one in the exact ceiling color and sheen; one in the ceiling color with a slightly different sheen; and one in the wall color. Tape them in place in a corner. Look in natural daylight, with only the main ceiling light on, and in the room's typical evening lighting. The winning option may be different from what looked best on a small color chip.
Contrast is a design choice, not an error. Dark trim can work in an intentionally graphic room with strong walls and furniture. But do not select a contrasting crown merely because the catalog photograph looks dramatic. Test whether the line still feels good when you are sitting at the table or looking through an open doorway. For detail-focused painting techniques, see STAVROS's guide to painting polyurethane molding in two colors.
Four Low-Ceiling Room Plans You Can Adapt
The correct design becomes easier to see when you connect the trim to the room's furniture and dimensions. These examples are not preapproved STAVROS installation packages; they are practical layouts to test before buying materials.
Plan A: A 10 × 12-Foot Bedroom with an 8-Foot Ceiling
Start with the ceiling and upper walls in the same soft white or neutral. Use one quiet crown profile if you want the wall-to-ceiling joint finished. If the room is already visually busy with a patterned headboard, curtains and several lamps, stop there. The perimeter alone can provide enough architectural structure.
If you prefer a decorative ceiling frame, keep it simple and locate it over the bed rather than automatically centering it between all four walls. A narrow applied polyurethane profile can be appropriate when the ceiling is flat and the chosen attachment method is approved. Check whether the bed is aligned with a pendant, fan, or recessed lights. Do not position trim where it interferes with a fixture or creates difficult-to-clean narrow gaps.
In this size bedroom, avoid assuming that a multi-piece medallion nearly 30 inches across will be delicate. Make the full-size template first. The ideal treatment may be a slim upper perimeter with no central ornament at all. A finished, quiet edge can make the entire room feel more settled.
Plan B: A Small Hallway or Entry with a 7-Foot-6-Inch Ceiling
A hallway gives you a close view of every cornice joint. The walls are usually near each other, so a contrasting heavy band overhead can become visually dominant. Consider a plain paint transition, a compact crown with minimal projection, or an applied bead on the wall rather than a layered ceiling design.
The narrow geometry makes straightness crucial. Mark a consistent reference line with a laser. If the ceiling slopes, determine whether it will look better to follow the ceiling or keep a level visual line; in many cases, simply copying an uneven ceiling edge makes a uniform product look crooked. Test the choice before cutting the entire order. Avoid ornament at every doorway interruption, and keep smoke alarms, sensors and other building components unobstructed.
For an entry with tall casing, compare the space between the top of the casing and the underside of the proposed crown. If they nearly meet, the room can look crowded even when the crown itself is small. An applied accent in another location may be preferable.
Plan C: A 12 × 16-Foot Living Room with an 8-Foot-6-Inch Ceiling
This room may have enough width for a modest crown and one thin ceiling rectangle, provided the layout is orderly. Begin with the seating group: a sofa, rug and coffee table establish the room's visual center. Sketch a single rectangle above that group, leaving clear breathing room between the applied molding and the perimeter cornice. Try the slimmer MLDPU profiles first; a broader profile may be appropriate if the plan still looks underdefined at full scale.
Do not combine a heavy crown, two nested frames, a large ceiling medallion and multiple ornamented corners without a reason. In a standard-height living room, the layers can compete with one another. Choose a hierarchy: either the perimeter is the star, or the central field is the star. The other should support it.
A matched ceiling color will usually make the frame subtler. If the room has a chandelier, align the design with the actual fixture location only after considering whether the electrical position can and should move. A furniture-centered arrangement and a ceiling-mounted fixture may not currently share the same axis.
Plan D: An Open Kitchen-Dining Area with a 9-Foot Ceiling
A slightly higher ceiling provides more flexibility but also more interruptions: tall cabinets, pendant lights, range ventilation and recessed fixtures. Keep the wall-to-ceiling transition consistent around the main room. Where upper cabinets approach the ceiling, check whether the crown should continue, terminate against cabinet trim, or be omitted in a controlled way. Random stops create the impression of unfinished work.
An applied molding frame above the dining table can help organize the open plan, but it does not need to extend over the kitchen work zone. The ceiling is one continuous surface, so the lines must feel related even when they define different uses. A calm, painted profile often does that more successfully than highly contrasting or heavily carved trim.
In this setting, also confirm cleaning and coating requirements near cooking areas. A finish that looks perfect in a dry bedroom may need more attention in a space exposed to grease, steam and frequent cleaning. Select materials and paint systems for the actual environment, not just the room's style.
How Much Crown Molding Do You Need? A 12 × 10-Foot Example
For a rectangular room, measure every wall individually. As a first pass, the perimeter of a 12-by-10-foot room is 2 × (12 + 10) = 44 linear feet, equivalent to 528 inches. This is the installed length before cuts, corner losses, joints and extra material. It does not tell you by itself how many pieces to buy.
Many HIWOOD crown moldings in the STAVROS ceiling cornice category are supplied in 2,000 mm lengths, or 78.74 inches (about 6.56 feet). If you divide 528 inches by 78.74 inches, the result is approximately 6.71 pieces. Rounding up gives seven as a mathematical coverage minimum, but that is not a dependable purchase quantity because each wall needs a specific group of segments, and corner cuts consume usable length.
A straightforward plan might use two segments on each of the four walls: two on each 12-foot wall and two on each 10-foot wall. That is eight pieces before accounting for mistakes, damaged ends, pattern matching or installation allowances. A different cutting scheme might reuse offcuts and change the result, but you need to prove the scheme with a cut list. Some jobs will require additional pieces. The responsible number to order comes from the cut plan, not just the total linear feet.
Use this process:
- Measure the usable crown run on every wall and identify each inside and outside corner.
- Confirm whether the profile's 78.74-inch figure is the usable supplied length and how its ends must be cut.
- Mark joint locations where they are least conspicuous and away from complicated corners if possible.
- Allocate the longest cuts first; then test whether shorter cuts can be taken from the remaining material.
- Allow for mitering, saw kerf and practice pieces. Add an appropriate contingency for your layout rather than applying a blind percentage.
What changes when the trim comes in 102.36-inch lengths?
The four STAVROS MLDPU profiles discussed earlier are 102.36 inches long. That does not make them equivalent to crown molding, but it changes the math for an applied ceiling frame. Imagine a 6 × 8-foot rectangular frame on a flat ceiling. The outline requires 2 × (6 + 8) = 28 linear feet, or 336 inches, before cut allowances.
Four full-length 102.36-inch sticks provide 409.44 inches. A practical plan is to cut two approximately 96-inch segments and two approximately 72-inch segments from four separate sticks, adjusting the actual measurements for your layout and miter geometry. There is enough nominal length for those four runs plus reasonable cutting allowances. If the finished frame dimensions refer to the outside edges rather than the centerline, account for the profile's face width when making the final cut list.
Even when total available footage appears sufficient, a long uninterrupted side may force you to buy an extra full-length piece. You cannot assume every offcut will fit somewhere useful. Conversely, an accurate drawing can prevent buying excessive material simply because a percentage calculator suggests it. Take the actual SKU length from the product page; never use 8 feet or 10 feet as a generic substitute for the manufacturer's dimensions.
Installation Sequence for a Clean, Quiet Ceiling
Installation is where a carefully selected low-profile molding can lose its intended elegance. In a low room, imperfect miters, proud joints, uneven caulk and visible adhesive often catch the eye because the detail is close to normal viewing height. Plan the sequence before starting and always follow the specific trim and adhesive manufacturer's installation instructions.
1. Inspect the substrate and finish
Check drywall or plaster for loose paint, dust, moisture damage and cracked areas. Confirm that previous coatings are well bonded. A clean and level reference line helps, but it does not compensate for a failing substrate. Repair loose finishes first and let them dry fully. If the ceiling shows signs of water intrusion, solve the source before applying decorative trim.
2. Lay out each line with a full-size sample
Use a pencil, low-tack tape and a laser level as appropriate. Confirm that the design centers on its intended reference, whether that is the room, the table or a light fixture. Look from the doorway and the most frequently used seating position. Also check for soffits, stair openings, smoke alarms and any fixture with a required clearance zone.
3. Dry-fit and cut carefully
A perfectly square 90-degree room corner is not guaranteed. Measure the actual angle and practice on scrap before committing the final pieces. Identify inside versus outside corners clearly, and keep the profile in its intended cutting orientation. For patterned crown molding, align the repeat so two pieces meet in a visually coherent way. A factory-designed corner piece can be useful when compatible, but it is not a universal substitute for measuring.
4. Use a compatible attachment system
Adhesive selection depends on the molding material and the existing coating or substrate. Some assemblies also require approved mechanical fastening. Consult the manufacturer's instructions for overhead attachment and do a trial bond where appropriate. Hold or brace pieces for the required setting period; do not assume that quick initial tack means the installation has reached full strength. For additional material-specific background, see choosing adhesive for polyurethane molding.
5. Finish joints without burying the relief
Use a filler or paintable sealant suitable for the product and joint type. A flexible perimeter seal and a rigid joint between trim pieces may require different products. Sand and clean only when the manufacturer allows it. Excess filler rounds off crisp steps and can make a very slim molding look lumpy. Inspect the finished joint under the same directional lighting the room will use.
6. Prime and paint as specified
Some molded products arrive with a prepared surface; others require a particular primer. Do not assume the finish state from the product category alone. Once the recommended preparation is complete, apply thin, even coats rather than loading relief with paint. Protect fixtures and ventilation openings while working, and never paint over an electrical component or moving fan part to make it “disappear.”
Seven Mistakes That Make a Low Ceiling Feel Busy
Buying by face width alone. A labeled 3-inch crown can have a different installed wall drop from another 3-inch profile. Request the section drawing and test its actual position.
Using a wall bead as a crown. Flat decorative molding can make a good inset frame, but it does not necessarily have a cross-section suitable for bridging the wall-ceiling junction. Select products by function.
Applying several strong horizontal borders. A crown, frieze, second molding, dark paint break and ceiling frame can create more visual bands than the room needs. Remove elements until the primary line is clear.
Choosing a large medallion without checking fixture clearances. An ornament that looks proportional in an isolated product photograph may interfere with a pendant, fan or recessed lights. Mock up its actual footprint.
Forgetting to plan joints. Total footage divided by piece length does not equal a reliable cut list. Work from actual wall lengths and the real manufacturer-supplied profile length.
Mixing materials without checking finish and adhesive compatibility. Polyurethane, polystyrene, MDF and wood have different requirements. The ceiling should look coordinated, but the specification must remain material-specific.
Treating the ceiling as a separate decoration project. A beautiful overhead design can still look wrong when it ignores doors, curtain tracks, upper cabinets and the furniture axis. Make the room's visual hierarchy consistent from floor to ceiling.
Shopping Checklist: What to Confirm Before Ordering
Collect your room measurements, ceiling height, photos of existing trim, a drawing of your desired layout and the dimensions of every nearby fixture. Then compare the supplier's actual product specifications rather than relying on generalized descriptions. Start with the STAVROS architectural molding catalog to explore the broader selection, and narrow it by application and material.
For every item, confirm the SKU, material, cross-section, supplied length, number of pieces, finish condition and compatible installation method. For crown, ask specifically about wall drop and ceiling projection. For an applied molding, confirm whether the substrate and overhead orientation are appropriate. For a kit, compare its overall footprint with your room's ceiling field and confirm exactly which components are included.
Do not assume a U.S.-facing page implies domestic warehousing or nationwide U.S. delivery. Check current ordering terms, location-specific shipping availability, lead times and total landed cost with the supplier before committing to a project schedule. Prices and stock can change; for that reason, this guide does not substitute an unverified price quote for a bill of materials.
Frequently Asked Questions
Does crown molding make an 8-foot ceiling look lower?
Not necessarily. A low-contrast, restrained profile can complete the perimeter without drawing much attention to the wall's height. A deeply projecting, high-contrast design is more likely to emphasize the top boundary. Test the real section at full size instead of trusting a generic dimension rule.
What is the best size crown molding for 8-foot ceilings?
There is no single best width. Begin with a visually compact profile, check its installed wall drop and ceiling projection, and compare a sample with the room's doors, cabinets and windows. The profile's relief and paint color often matter as much as the advertised size.
Is polyurethane molding the same as crown molding?
No. Polyurethane describes a material; crown molding describes an application and profile geometry. STAVROS sells polyurethane applied moldings and separate ceiling cornices, including HIWOOD polystyrene options. An MLDPU wall molding should not automatically be treated as a conventional crown.
Can I put a ceiling medallion around a ceiling fan?
Only after checking the fan manufacturer's clearances, the approved fan-rated support and the proposed ornament's projection. Decorative material must never carry the fan's load or extend into the blade sweep. If the assembly is uncertain, consult a qualified electrician and the fan manufacturer.
Are ceiling medallions worth using in a small bedroom?
Sometimes. A modest, low-relief ornament can create a finished setting for a suitable pendant or chandelier. A large, highly ornate composition can overpower a small room. Compare a full-size paper outline against the actual ceiling and fixture before ordering.
Is white the only suitable trim color for low ceilings?
No. Matching the trim to the ceiling is a reliable first test because it reduces contrast at the top of the wall. Warm whites, neutral colors and carefully designed contrasts can also work. Check the samples in daytime and evening light, and evaluate the paint sheen as well as hue.
What is the difference between a ceiling frame and a crown?
A ceiling frame is a decorative outline applied to the ceiling surface, commonly forming a square or rectangle. Crown molding bridges the wall-ceiling junction. They use different profile geometries and may require different mounting and cutting approaches.
Can I install low-profile molding over textured ceilings?
Only after deciding how the uneven texture will affect adhesion and the final edge. A fine, straight profile can highlight irregularities. It may be better to prepare a smooth strip or repair the substrate before installation rather than try to bridge inconsistent surfaces with extra adhesive.
How do I calculate a molding order for a rectangular room?
Measure each wall or frame segment, then create a cut list using the exact supplied length for the chosen SKU. Add cut losses, miters and a sensible contingency for your layout. The perimeter calculation is only a starting point; it does not replace segment-by-segment planning.
Should I use an entire CPU-P ceiling kit in an 8-foot room?
Not without a scale drawing. The listed CPU-P kits have an overall layout around 98.43 inches square, which can leave limited open ceiling in a narrow room. A smaller custom frame or a single decorative accent may be better. Compare the full footprint rather than treating the kit name as a guarantee of suitability.
Final Recommendation: Give the Ceiling One Clear Job
If you want a more finished room with an 8-foot ceiling, begin with one deliberate architectural line. Choose a small crown when the junction needs a finished transition. Choose a narrow polyurethane applied molding when the goal is a simple frame on a suitable flat surface. Add a ceiling medallion only when it fits both the light fixture and the open ceiling field. Keep the paint scheme coherent, and let the room's furniture and lighting guide the composition.
The STAVROS catalog makes it possible to compare authentic polyurethane profiles, purpose-designed polystyrene crown molding, modular ceiling ornaments and coordinated decor kits. Use the exact product pages to verify dimensions and materials. Then make a full-size mock-up, write the cut list, and confirm the installation method before buying. Low ceilings do not prohibit decorative molding. They reward precision, thoughtful proportions and a willingness to stop when the room already feels complete.