






Article Contents:
- Why a stepped screen needs separate finishing for its outer edges
- What is known about the UG-001 outer corner piece
- 25×25 mm or 34×34 mm cross-section: choosing by the actual edge
- Beech or oak: don't confuse wood properties with the type of finish
- How to measure a stepped screen without mistakes
- Original specification: ten parts instead of a single number
- Option A: six identical 2400 mm strips
- Option B: five long corner pieces and one short one
- Option C: buying all three factory lengths
- Comparing three schemes: how much material to buy
- Price of UG-001 25×25 mm: beech set
- Oak corner 25×25 mm: same geometry, different estimate
- 34×34 mm section: when a wide corner justifies the price
- How to finish the transition between vertical and horizontal
- Is a 100 mm remainder enough for a 1420 + 880 mm pair
- When a straight end is enough and when a cut is needed
- Surface preparation and attaching the decorative overlay
- Finishing the ends and choosing a coating
- Common mistakes when ordering for ten edges
- In which cases you should not order UG-001 immediately
- How to place an order with delivery to Nizhny Tagil
- Checklist before payment and cutting
- How the estimate changes when dimensions are adjusted after measurement
- What to tell the craftsman if the corner piece has already been ordered
- Questions that arise before purchase
- Can you buy exactly 11.93 m of wooden corner molding?
- Which profile to choose if the screen looks narrow
- What do the 4 and 21 mm dimensions mean for UG-001 25×25?
- Why not buy only 1500 mm corner pieces for short sections?
- Which option has the lowest cost for beech UG-001 25×25?
- Can offcuts be joined to reduce the number of full-length strips?
- Is there a STAVROS warehouse in Nizhny Tagil?
- Should extra corner pieces be bought as spares?
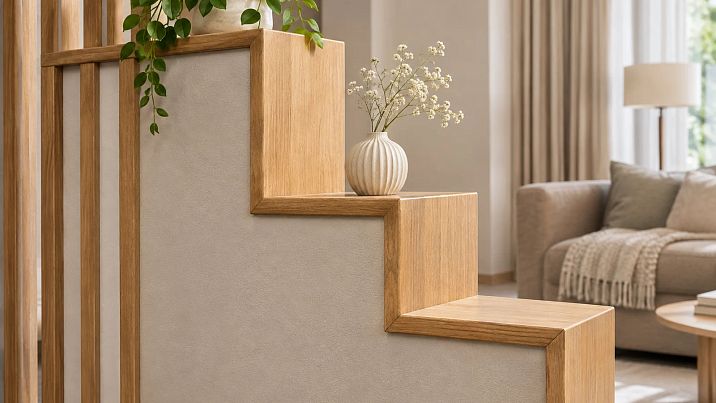
The stepped interior screen has ten exposed outer edges. Two of them rise to 2250 mm, two are 1420 mm long, three are 880 mm, and three more horizontal ends are 650 mm each. Adding up the dimensions gives 11.93 m of wooden corner strip. But buying twelve metres does not yet mean there will be enough parts: short offcuts after cutting are not always usable, and on long verticals an extra joint will immediately stand out.
For this order, the UG-001 outer wooden corner strip in oak or beech is suitable. According to the STAVROS product card, sections of 25×25 and 34×34 mm and factory lengths of 1000, 1500 and 2400 mm are available. For the specified ten edges, of the three purchasing methods considered, the most cost-effective is a set of five 2400 mm strips and one 1000 mm strip. When choosing the beech 25×25 mm profile, its calculated cost is 12,420 ₽ at prices fixed on 13 November 2026. This is the cost of the products, not of the entire installation and delivery.
For a buyer from Nizhny Tagil, it is more useful to first check the lengths, angles and cutting plan, then buy a wooden corner strip in Nizhny Tagil with a specific specification. The article provides the dimensions of each part, ways of placing them in factory strips, comparative estimates and checks that are best done before payment.

Why a stepped screen needs separate finishing for its outer edges
An interior screen divides a space but remains visible from several sides. Its vertical faces meet horizontal ledges, so an uneven end line or a differing texture is noticeable even under soft lighting. On an ordinary rectangular panel, the joint can be hidden at the skirting board or under furniture; on a stepped screen, the sequence of exposed edges makes such masking more difficult.
A wooden outer corner covers two adjoining planes and forms a visible corner line. It does not straighten the frame, replace fasteners, or turn a lightweight partition into a load-bearing structure. Its purpose in this project is finishing and protecting accessible ends from everyday contact. The impact resistance of the entire structure is also determined by the base, the fastening, and the operating conditions. Do not expect the overlay to hold a poorly secured panel.
Let us imagine a screen next to a sofa and a walkway. The lower steps are at the level of hands and bags, while the upper vertical is perceived at a distance. On short sections, the transition between adjacent ends is especially visible. Therefore, what is needed is not one total linear meterage but a list of whole segments and a preselected method of joining them. If the actual shape of the screen differs from the design, the list must be re-measured from the finished base.
The corner retains its function only with a suitable base geometry. If the edge is rounded or the panels meet at an angle other than 90°, a standard L-shaped profile should not be forced against the surface. In such a case, it is better to first resolve the issue with the base or choose a different finish than to compensate for the gap with a thick layer of adhesive.

What is known about the UG-001 outer corner
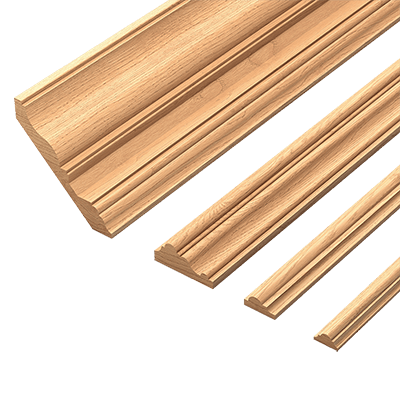
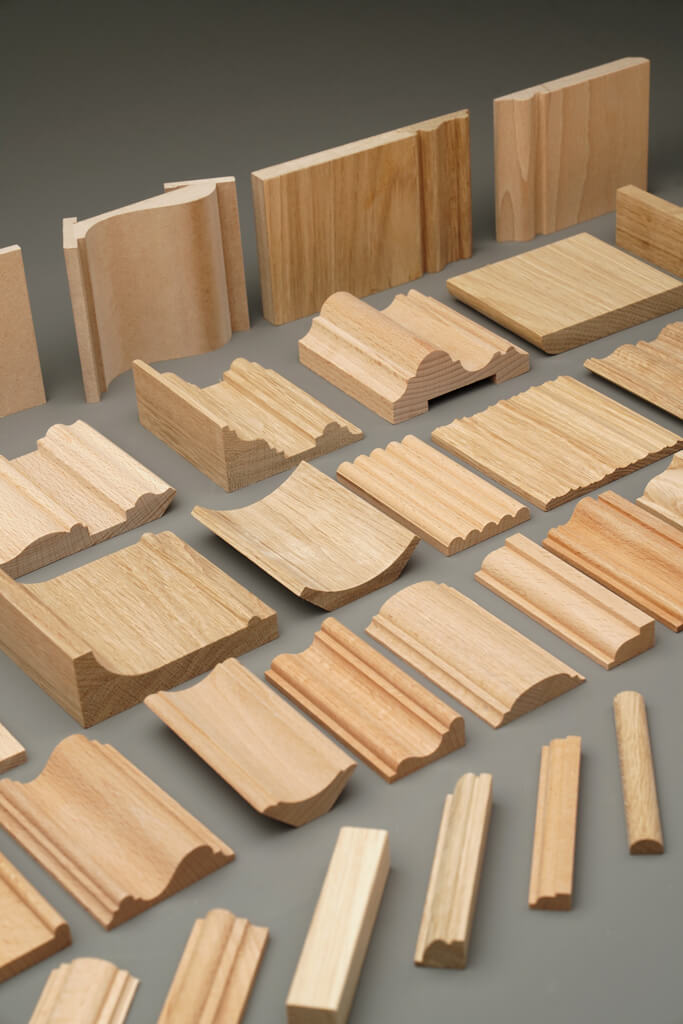
In the STAVROS catalog, the model buy wooden corner piece is available in options made of oak and beech. UG-001 is an outer L-shaped profile that covers two sides of an edge. It is one product with selectable versions, not six different models. For a project specification, three parameters matter at once: shelf width, wood species, and blank length.
For the smaller section, the outer dimensions are 25×25 mm, the wall thickness is 4 mm, and the inner dimension is 21 mm. For the larger version, the outer dimensions are 34×34 mm, the wall thickness is 6 mm, and the inner dimension is 28 mm. These are the values from the product card and drawing specified in the brief; they should be compared with the specific selected version before ordering. Do not confuse the width of the visible shelf with the inner space of the corner. If there is already protruding trim under the overlay, the outer dimension alone does not guarantee compatibility.
The factory lengths for the assortment considered are 1000, 1500, and 2400 mm. For a 2250 mm section, a whole 2400 mm blank is practically necessary unless a noticeable joint is planned. For a 1420 mm section, a 1500 mm length may be suitable, but this does not mean it is always advantageous to buy it: sometimes a longer blank allows another needed part to be obtained at the same time. The whole point of comparing estimates is to combine these two requirements.
For an accurate purchase, write down the item in advance as "UG-001, beech, 25×25 mm, 2400 mm, 5 pieces; UG-001, beech, 25×25 mm, 1000 mm, 1 piece". If you need oak or a wider section, change the specification in all lines, not just the first one. Mixing sizes within one batch may be a design decision, but it cannot be considered an unnoticed substitution without an agreed project.
Our factory also produces:




Section 25×25 mm or 34×34 mm: choosing by the actual edge
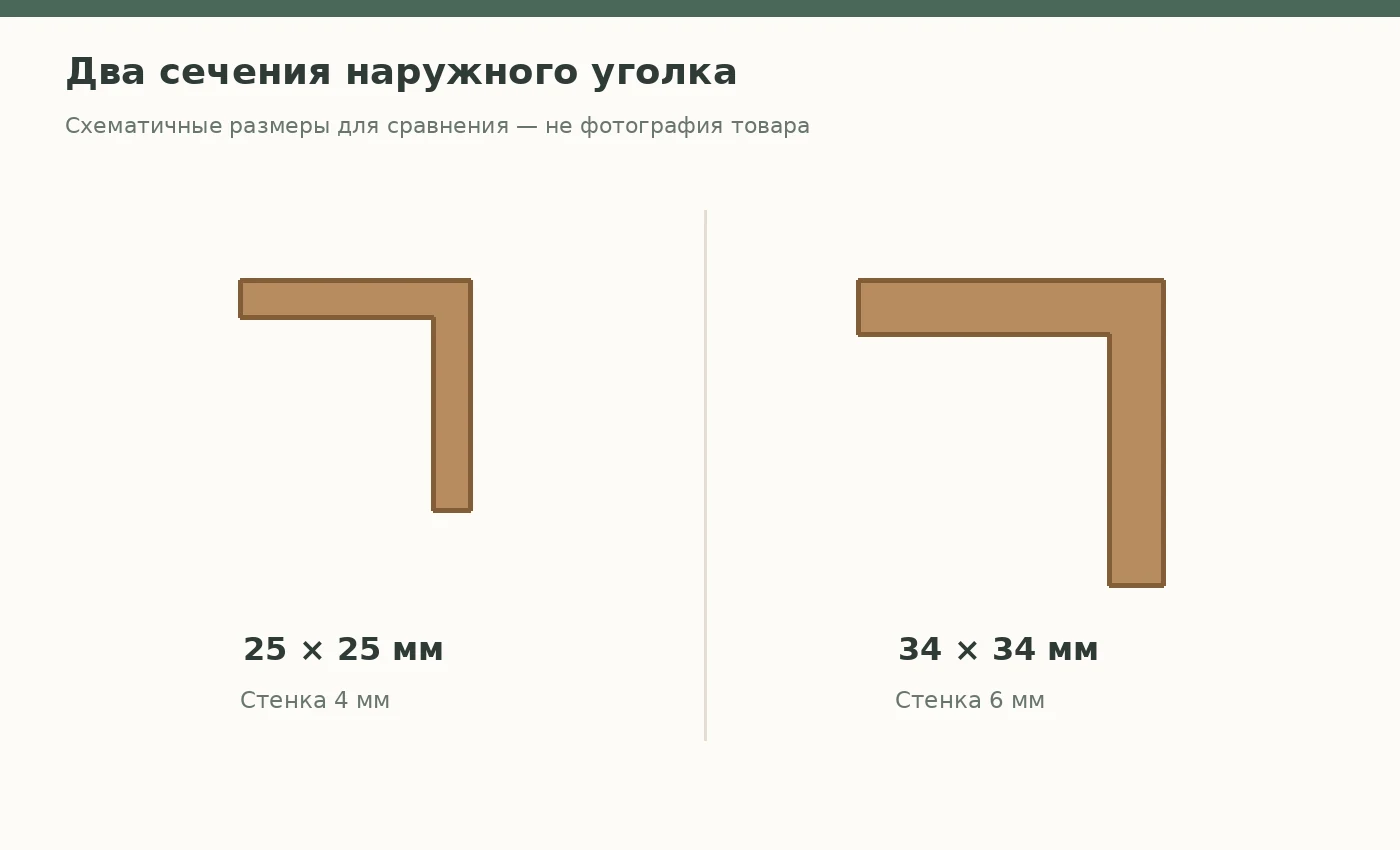
The difference between the two sections is not just nine millimetres on paper. On a long vertical, the width of the visible wood strip determines how actively the corner frames the wall. On a short step, the 34×34 mm profile takes up most of the edge and visually highlights the transition. The narrower 25×25 mm corner trim usually looks more restrained on small surfaces. This is a question of proportion and placement, not a claim that one option is better than the other.
Do a simple check before ordering. On a piece of thick paper, mark out two L-shaped outlines, 25 and 34 mm wide. Hold them against the actual edge, look at the passage screen and from where a person usually stands. The template does not replace a material sample, but it lets you see the scale. Such a trial fit is especially useful at a step with a 650 mm horizontal strip: there, a wide overlay can change the perceived height of the riser.
For 25×25 mm, the project conditions specify an internal size of 21 mm with a thickness of 4 mm. For 34×34 mm — 28 mm with a thickness of 6 mm. The internal space cannot be interpreted as the permitted thickness of any cladding layer. You need to check exactly how the flanges meet the two planes, whether decorative coatings interfere, and whether a gap appears at the apex of the corner.
If slatted or wall panels are already installed, first measure how far the cladding protrudes relative to the edge. Compatibility cannot be checked by panel thickness alone: the position of the panel, the backing and the adhesive can change the actual profile of the corner. If the overlay is to cover uneven edges, photograph the joint with a ruler and agree on the solution before purchasing. This is cheaper than reworking a cut wooden product.
Get Consultation
Beech or oak: don't confuse the properties of the wood with the type of finish
The product card in question, UG-001, offers two materials — beech and oak. Both are wood, so the visible colour, grain direction and final shade depend on the blank itself and the coating. Oak often shows a more pronounced pore pattern; beech may appear more even in tone, but you should choose based on an actual sample, not a general description of the species.
If the screen is located next to oak flooring, this does not mean that an unfinished oak corner trim will match in shade. The floorboard may have been tinted, heat-treated or coated with a product that changes the colour. Similarly, a beech profile may look considerably warmer after oil or lacquer is applied. Materials should be compared under the lighting in which they will be used, and taking into account the chosen coating.
For a single screen, it is more convenient to purchase corner profiles of one cross-section and one wood species. If several materials are chosen, shade transitions will be required, and the place where they meet on the step will be especially noticeable. If such a composition is intended, it must be marked on the drawing as a separate solution. If not, a uniform specification reduces the likelihood of an accidental difference between the vertical and horizontal parts.
In the estimate below, beech is cheaper than oak at each of the named sizes and factory lengths. However, price cannot be turned into the only criterion: after purchase, cutting, end treatment and, possibly, approval of the finish coating lie ahead. If the customer has not yet approved the color, it is advisable to first make a decision based on a sample and then purchase the entire volume. Returns of already processed or cut parts may be governed by the seller's separate terms.
How to measure a stepped screen without errors
Start with a list of all places where the corner profile should be visible. Do not measure only one side of the screen if the trim runs across several planes. On the paper diagram, assign a number to each edge: two tall verticals, two medium ones, three short ones and three horizontal ones. Separately mark the open ends, angled joints and places where the profile abuts the floor, a shelf or an adjacent panel.
Measure each dimension along the line on which the specific corner shelf will lie. On a stepped element, the center line, the inner side and the outer edge may give different values when cutting at an angle. You cannot transfer a dimension from the base corner to the front edge of the part without checking. If the ends are cut at 45°, first determine which dimension is specified in the project: along the long or the short side of the cut.
Check the straightness of long sections with a straightedge or a straight batten. On a 2250 mm vertical, unevenness of the base may manifest not only as a gap but also as stress when trying to press the wooden part into place. It is advisable to check the ledges with a square at several points. An angle close to a right angle at one edge does not necessarily remain so over the entire height if the cladding was installed with a deviation.
After measuring, prepare a cutting list indicating four things: the edge number, the length along the agreed measurement line, the type of joint at both ends and the direction of the visible surface. This list must be available to the person who will cut the material. Total linear meters or a photograph of the screen alone do not replace such source data. If chamfers, miters or on-site fitting are required, add machining allowances and recheck that the parts fit into each blank.
Initial specification: ten parts instead of a single number
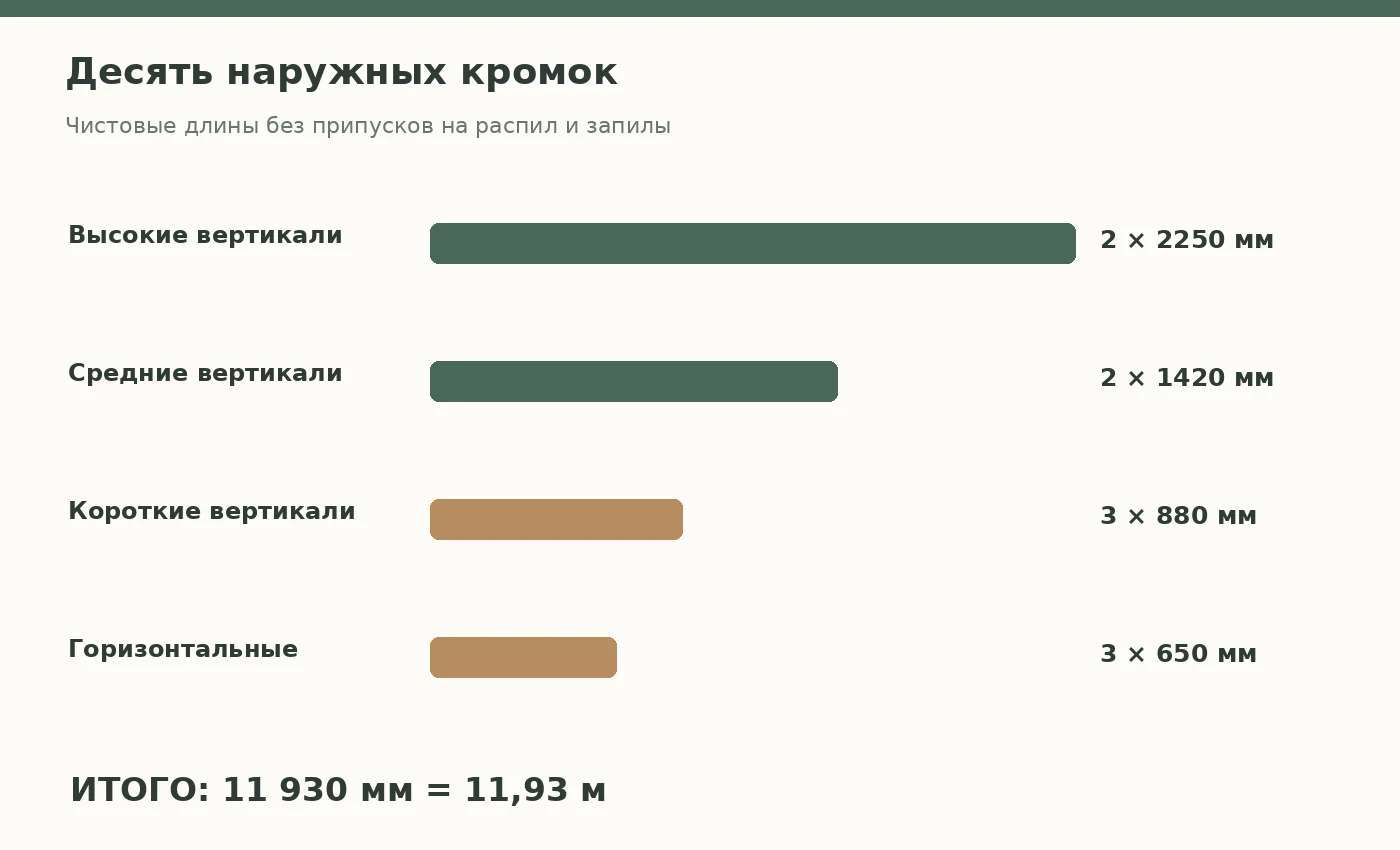
According to the training project, the two tall verticals have a finished length of 2250 mm each. They will require 4500 mm of profile. The two medium ones at 1420 mm each add another 2840 mm. The three short vertical edges at 880 mm each give a total of 2640 mm. The last three horizontal lines at 650 mm each give 1950 mm. The sum of the four groups is 11,930 mm, that is, 11.93 m.
| Section | Length of one part | Quantity | Finished length of the group |
|---|---|---|---|
| Tall vertical | 2250 мм | 2 | 4500 мм |
| Medium vertical | 1420 мм | 2 | 2840 мм |
| short vertical | 880 мм | 3 | 2640 мм |
| Horizontal end | 650 мм | 3 | 1950 мм |
| Total | — | 10 | 11,930 mm |
The figure 11.93 m describes only the finished straight segments. It does not say how many factory strips to buy. A 2400 mm blank can yield one tall vertical, but not two medium ones. A combination of 1420 and 880 mm, by contrast, fits within 2400 mm with a nominal remainder of 100 mm; after sawing, the kerf width must also be taken into account. Any layout must keep every required part intact.
The project has ten visible edges, but the number of cuts is not necessarily twenty. Where the end is closed by the structure, a straight end trim may suffice. Where two wooden strips meet at a visible step, a neat matched joint is required. First determine the required end geometry, and only then treat the layouts below as the final production map.
Option A: six identical 2400 mm strips
The simplest purchasing layout is six long angles. Two separate blanks are allocated for the two 2250 mm parts. From two more strips, a pair of 1420 and 650 mm pieces can be cut, giving a nominal remainder of 330 mm for each. The fifth blank yields two short 880 mm segments, and the sixth yields 880 and 650 mm.
| 2400 mm blank | Cut pieces from it | Nominal remainder |
|---|---|---|
| №1 | 2250 | 150 мм |
| №2 | 2250 | 150 мм |
| №3 | 1420 + 650 | 330 мм |
| №4 | 1420 + 650 | 330 мм |
| №5 | 880 + 880 | 640 мм |
| №6 | 880 + 650 | 870 мм |
| Total | 10 parts | 2470 мм |
The purchased linear meterage here is 14.4 m. The difference between it and the 11.93 m of finished products is 2.47 m. These are nominal remainders before accounting for the actual kerf and additional end trimming. The table shows that all ten parts can be accommodated without internal longitudinal joints, but it does not yet prove that this is the best option in terms of cost.
Plus the cutting plans — unified lengths in the order and a small number of variants. Minus — two short parts end up being the reason for buying an extra long blank. The 870 mm offcut is especially telling: on its own it is not useless for a workshop, but when calculating this screen, none of the remaining required parts fits into it anymore. If the material has to be ordered specially, such an offcut should be counted as part of the project cost, not as a conditionally free reserve.
Option B: five long angles and one short
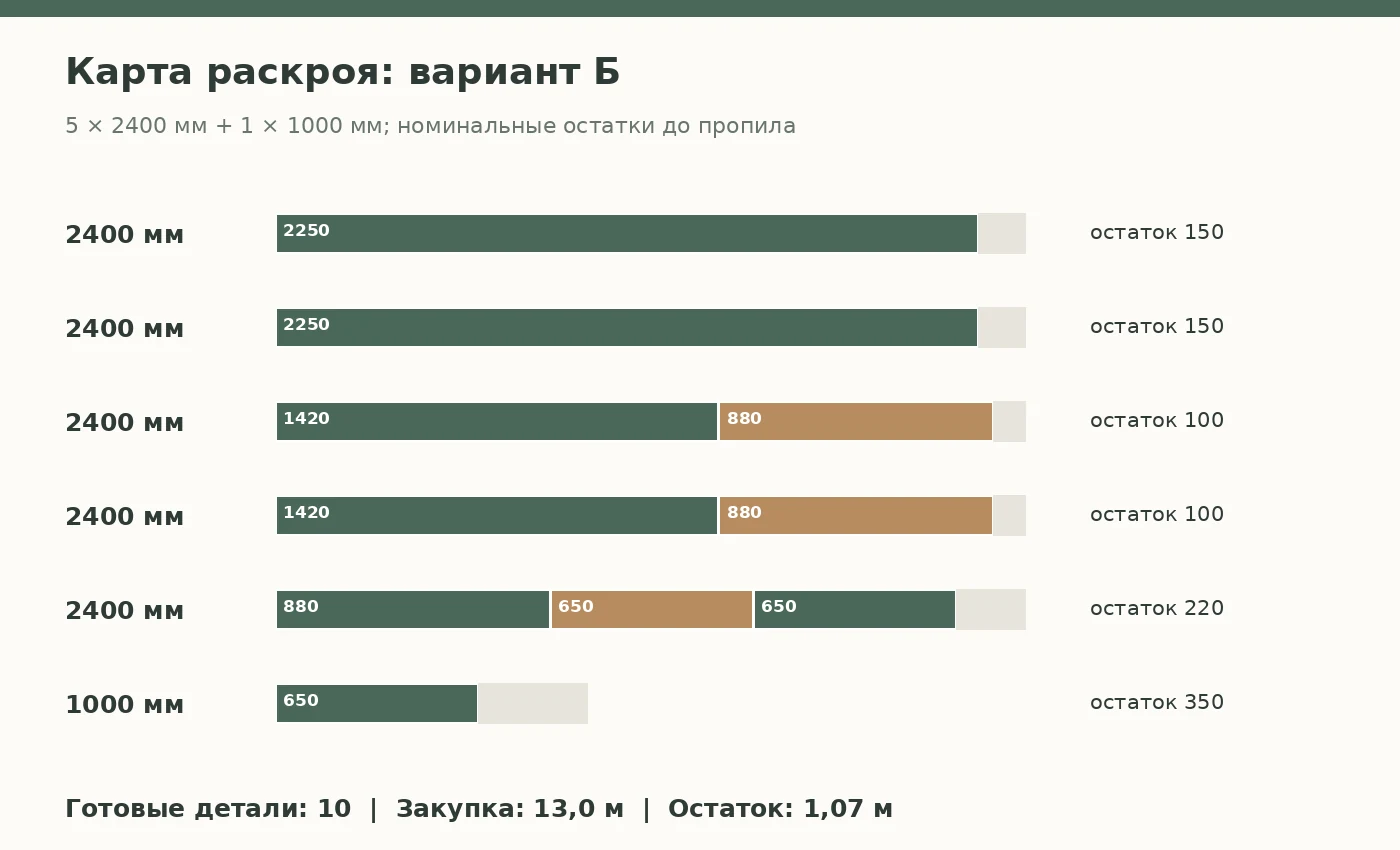
Another cutting plan uses five 2400 mm blanks and one 1000 mm blank. Two long ones again go to the 2250 mm verticals. The third and fourth yield pairs of 1420 + 880 mm. The fifth holds 880 + 650 + 650 mm. The remaining horizontal part of 650 mm is cut from the short angle.
| Workpiece | Resulting parts | Nominal remainder |
|---|---|---|
| 2400 mm, No. 1 | 2250 | 150 мм |
| 2400 mm, No. 2 | 2250 | 150 мм |
| 2400 mm, No. 3 | 1420 + 880 | 100 мм |
| 2400 mm, No. 4 | 1420 + 880 | 100 мм |
| 2400 mm, No. 5 | 880 + 650 + 650 | 220 мм |
| 1000 mm, No. 6 | 650 | 350 мм |
| Total | 10 parts | 1070 мм |
The total purchase length is reduced to 13 m. The nominal offcut is 1.07 m, that is, 1.4 m less than in option A. All ten fragments remain whole. At first glance such a calculation looks obvious, but its advantage only becomes apparent when checking the cost of items of a specific length: the price per linear metre is not necessarily the same for different blanks.
The 1420 + 880 mm pairs have a 100 mm margin before accounting for the cut. For an ordinary straight cut this nominal margin looks sufficient, but with a complex joint at both ends it cannot automatically be considered free. An angled cut along the outer side of the profile, squaring off a raw end, and rejecting a damaged section can reduce the available length. Therefore scheme B is an advantageous preliminary kit, not permission to work without re-marking.
Ordering buy wooden outer corner UG-001 for such a scheme, give the seller not only the quantity but also the chosen cross-section. Different versions share the same nominal factory lengths, but differ in price and in how the corner joints are finished. Mixing 25×25 and 34×34 mm in one set is not possible without a special solution.
Option C: buying all three factory lengths
The third scheme uses four pieces of 2400 mm, two of 1500 mm, and one of 1000 mm. The two longest blanks are again allocated to the 2250 mm verticals. The third long piece yields 880 + 650 + 650 mm; the fourth yields 880 + 880 mm. Each of the two 1500 mm strips becomes one 1420 mm middle vertical. The short 1000 mm blank provides the last 650 mm horizontal.
| Workpiece | Parts | Remainder before cutting |
|---|---|---|
| 2400 mm, No. 1–2 | 2250 each | 300 mm total |
| 2400 mm, No. 3 | 880 + 650 + 650 | 220 мм |
| 2400 mm, No. 4 | 880 + 880 | 640 мм |
| 1500 mm, No. 5–6 | 1420 each | 160 mm total |
| 1000 mm, No. 7 | 650 | 350 мм |
| Total | 10 parts | 1670 мм |
The purchase length is 13.6 m. By this metric, the scheme sits between A and B. But it requires seven separate product units instead of six. Smaller offcuts on the middle verticals are a clear advantage when organizing work, but distributing short segments across other blanks increases the total purchase length compared with option B.
This scheme may be useful if certain factory lengths are more accessible or easier to transport, but such a situation must be confirmed by the actual order conditions. It cannot be declared preferable in any city based on a single calculation. For Nizhny Tagil, the availability and transport cost of specific lengths should be checked when placing the purchase.
Comparison of the three schemes: how much material to buy

| Indicator | Option A | Option B | Option C |
|---|---|---|---|
| 2400 mm strips | 6 | 5 | 4 |
| 1500 mm strips | 0 | 0 | 2 |
| Strips 1000 mm | 0 | 1 | 1 |
| Total planks | 6 | 6 | 7 |
| Purchasing linear footage | 14.4 m | 13.0 m | 13.6 m |
| Nominal remainder | 2.47 m | 1.07 m | 1.67 m |
The comparison reveals an important limitation of the simple "add ten percent" approach. If you add ten percent to the net 11.93 m, you get 13.123 m. This footage is mathematically sufficient, but without distribution across factory lengths the result cannot be used as an order. Even 14.4 m may be inconvenient with incorrect cutting; 13 m turns out to be sufficient precisely because each required part is placed in a specific strip in advance.
It is equally important to distinguish waste from useful offcuts. For example, part of the 870 mm length from scheme A can be kept for future repairs, but within the current specification it does not cover the missing finished part. You cannot reduce the order amount on the basis that this piece might come in handy someday. To compare the three methods, it is more correct to calculate the full price of the purchased products, then separately the possible value of the remaining material.
When choosing, do not limit yourself to a single column. A buyer may prefer fewer factory lengths if the workshop works with a simple work order, or a scheme with smaller offcuts if storage space is limited. However, option B combines both a moderate number of strips and the minimum purchased footage among these three offers. Therefore, the next check is its actual estimate.
Price UG-001 25×25 mm: beech set
According to the data recorded for the official STAVROS product page on 13 November 2026, a 25×25 mm beech corner piece costs 1120 ₽ per 1000 mm, 1530 ₽ per 1500 mm and 2260 ₽ per 2400 mm. These are prices for individual factory-made items, not a quote for a fixed price on a future order. When placing an order, they should be checked again.
Option A — six long blanks: 6 × 2260 = 13 560 ₽. Option B — five long and one short: 5 × 2260 + 1120 = 12 420 ₽. Option C — four long, two medium and one short: 4 × 2260 + 2 × 1530 + 1120 = 13 220 ₽.
| Scheme | Order composition | Cost of 25×25 beech |
|---|---|---|
| А | 6 × 2400 mm | 13 560 ₽ |
| Б | 5 × 2400 + 1 × 1000 mm | 12 420 ₽ |
| В | 4 × 2400 + 2 × 1500 + 1 × 1000 mm | 13 220 ₽ |
The difference between the most expensive Option A and Option B is 1140 ₽. Between C and B it is 800 ₽. The saving comes from changing the number and lengths of the blanks, not from a discount, promotion or an assumption about the availability of a particular batch. The estimate does not include cutting, any trial pieces, finishing, fasteners, packaging or delivery.
If required buy beech corner UG-001 for a specific screen, these figures make it possible to put together a clear initial request. But if, after measuring, even one of the medium uprights turns out to be longer than 1420 mm, the cutting plan must be redone. The price of a scheme that looks good on paper does not make up for being unable to cut the required part.
Oak corner piece 25×25 mm: same geometry, different estimate
Changing the wood species does not change the ten specified dimensions. The process sequence and distribution across factory lengths remain the same as long as the cutting conditions and cross-section are unchanged. Based on the prices given in the source data as of 13 November 2026, oak UG-001 25×25 mm costs 1600 ₽ per 1000 mm, 2210 ₽ per 1500 mm, and 3290 ₽ per 2400 mm.
Option A will cost 6 × 3290 = 19,740 ₽. Option B requires 5 × 3290 + 1600 = 18,050 ₽. Option C — 4 × 3290 + 2 × 2210 + 1600 = 19,180 ₽. Thus, for oak as well, among the three cutting maps considered, scheme B has the lowest product price.
| Scheme | Cost of oak 25×25 |
|---|---|
| А | 19 740 ₽ |
| Б | 18 050 ₽ |
| В | 19 180 ₽ |
For the oak version, the difference between A and B is 1690 ₽, and between C and B — 1130 ₽. This is not a percentage saving from a conventional per-meter cost, but specific arithmetic based on factory lengths. In an actual order the price may change, so specify not only the total but also the quantity of items.
If oak is specifically required by the design, there is no need to replace it with beech solely to reduce the budget. First agree on the appearance, the type of finish, and the combination with the already installed cladding. The shade and grain of natural wood can vary even within a single wood grade. Where possible, discuss selecting items for a single visible node, especially when vertical and horizontal trims meet at eye level.
Cross-section 34×34 mm: when a wide corner piece justifies the price
The 34×34 mm option is visually more noticeable and costs more, since it is a different profile version. For beech, the original product card lists prices of 2630 ₽ per 1000 mm, 3700 ₽ per 1500 mm, and 5060 ₽ per 2400 mm. For oak, respectively 3960, 5550, and 7610 ₽. These values should be compared using the same set of parts: increasing the cross-section does not mean that the length can be reduced or one edge omitted.
For beech 34×34 mm, the three schemes cost: A — 6 × 5060 = 30,360 ₽; B — 5 × 5060 + 2630 = 27,930 ₽; C — 4 × 5060 + 2 × 3700 + 2630 = 30,270 ₽. For oak: A — 45,660 ₽; B — 5 × 7610 + 3960 = 42,010 ₽; C — 4 × 7610 + 2 × 5550 + 3960 = 45,500 ₽.
| Material, cross-section | А | Б | В |
|---|---|---|---|
| Beech, 25×25 | 13 560 ₽ | 12 420 ₽ | 13 220 ₽ |
| Oak, 25×25 | 19 740 ₽ | 18 050 ₽ | 19 180 ₽ |
| Beech, 34×34 | 30 360 ₽ | 27 930 ₽ | 30 270 ₽ |
| Oak, 34×34 | 45 660 ₽ | 42 010 ₽ | 45 500 ₽ |
Scheme B at the quoted prices turns out to be cheaper than A and C in all four versions. But a wide profile should not be chosen on the principle of “the more expensive, the more reliable.” The decorative outer corner is not treated in this task as a structural load-bearing element. The width of the shelves primarily affects the covered surface, the geometry of the joint, and the visual scale. The sufficiency of mechanical protection must be verified for the entire structure.
For a buyer who wants buy a wooden corner 34×34, particular attention should be paid to the 650 mm horizontal end pieces. Wide shelves can occupy a noticeable part of their visible plane. It is better to test the scale on site than to draw this conclusion after processing and installing all six factory strips.
How to design the transition between vertical and horizontal
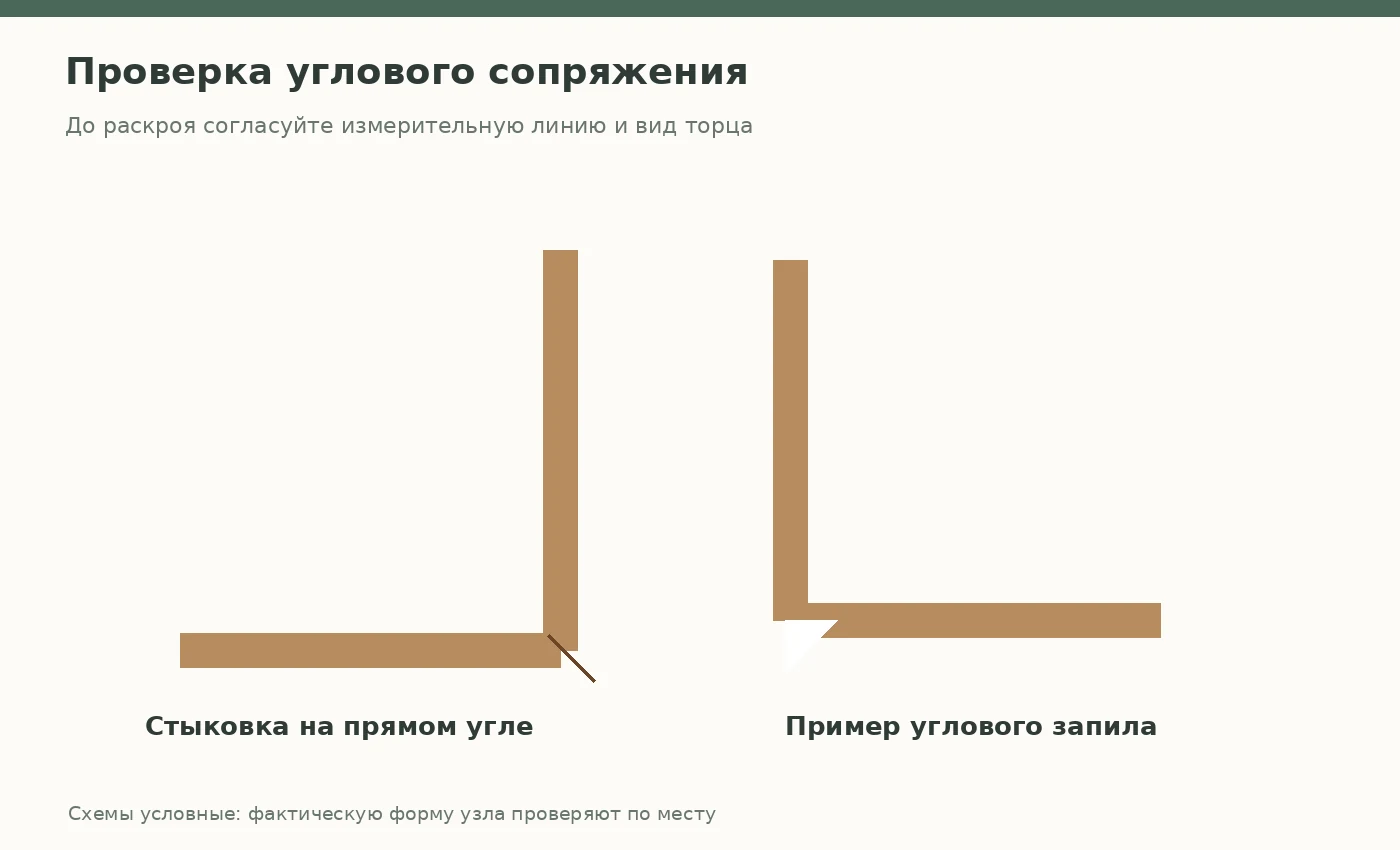
On a stepped screen, the main difficulty is often not in the long straight piece but at the point of transition from the vertical strip to the horizontal one. Two wooden corner pieces can meet end-to-end at a right angle, with a miter cut, or terminate separately — the choice depends on the construction and the desired appearance. One option cannot be automatically prescribed for all joints. What matters is the direction of the visible faces, the thickness of the shelves, and how noticeable the end of each product is.
Before the final cut, make a test joint on small offcuts of the same cross-section. Place the two pieces against the base and mark the contact lines. If a 45° joint is planned, first make sure that the two parts actually form the required external angle and that the shelf lines meet without protruding. A complex base angle may require individual fitting; a standard miter cut will not correct a skewed surface.
Handle the 650 mm piece with particular care. In the general list it seems simple, but after two visible end treatments the usable length may become shorter. If the room already has finishes, the final cutting should not be done according to the old layout plan. Measure the space between the actual joints, then transfer the dimension to the workpiece. An error of a few millimeters on a short horizontal piece is often more noticeable than the same error at floor level.
When joining a vertical to a horizontal, plan the installation order. Sometimes it is easier to first fix the long vertical profile, test-fit the horizontal one, and only then finally secure it. In other cases, the decorative edges require simultaneous dry assembly. The sequence depends on the base and the fastening method. Do not replace the trial assembly with an attempt to immediately glue all the parts: correcting a misalignment after the adhesive sets will be more difficult.
Is the remaining 100 mm sufficient for the pair 1420 + 880 mm
In the most economical cutting plan, the combination 1420 + 880 mm appears twice. Their sum is 2300 mm; the factory length is 2400 mm, so nominally 100 mm remains. This does not mean that all one hundred millimeters can be used as free margin. The kerf width, initial edge trimming, and a possible allowance for a shaped joint will be deducted from it.
For example, if the workpiece has a defect-free working length of 2390 mm after end trimming, the sum of the finished lengths is still 2300 mm, and 90 mm remains before accounting for the separating cut. If an additional 20 mm is needed for processing each of the four open ends of the two parts, the margin will be reduced significantly. This is an illustrative tolerance calculation, not an indication of the actual STAVROS technology. The real requirement depends on the type of joints and the craftsman's tools.
Before starting the saw, make a table of all the cuts. For each part, specify the finished length, the allowance on the left, the allowance on the right, and the number of kerfs required to produce it. The sum of the lengths and process losses must fit within the selected workpiece. This applies especially to option B: it offers the best price, but the savings must not come at the cost of abandoning careful end processing.
If, after accounting for allowances, the combination 1420 + 880 mm does not fit into a 2400 mm workpiece, change the plan before purchasing. You can redistribute the short parts among other strips or add material, but the final estimate will change. It is better to honestly obtain a new calculation than to declare the original option suitable under all conditions in advance. For a finisher, it is more important to reliably saw the required lengths than to preserve a nice figure in the table.
When a straight end is sufficient and when a bevel cut is needed
Not all ends on an interior screen are the same. The lower end of a vertical corner piece may be hidden at the floor or another element, and there a neat straight end trim is sometimes sufficient. An open upper step, by contrast, shows the thickness of the wood, the direction of the grain, and the quality of the joint. The same material requires different processing depending on where the viewer looks.
A bevel cut allows visible surfaces to be joined, but it places high demands on geometry. If the base deviates from a right angle, two precise factory 45° cuts will not necessarily meet without a gap. On a wooden profile with two flanges, the error may show up on both sides at once. Therefore, use a square and an on-site check, not just the saw's angle gauge.
A straight end is easier to process and control by length. But a cross-cut left exposed may differ in color after finishing, absorb the coating more strongly, and show the wood structure. If such an end remains in the line of sight, it must be included in the design decision in advance: process it, agree on the shape of the end, or cover it with a suitable transition. You cannot promise that it will be invisible on its own.
A practical order of work is to choose the joint type on a paper diagram, then make one real sample. Examine it in side lighting, check how both shelves fit, and only after that transfer the dimensions to the main workpieces. On two tall verticals, a mistake is especially costly: a ruined 2400 mm strip cannot yield a new one-piece part of 2250 mm after a significant incorrect trim.
Surface preparation and fastening of the decorative overlay
Before installing the wooden corner, check the base. It must be strong and stable enough to hold the facing and the decorative profile. If a thin panel is movable, the corner will move with it, and the joint may open up. Do not use the decorative element as a way to hide an unreliable frame or poorly secured finishing sheets.
A dry fit allows you to identify gaps and mismatched angles before applying adhesive or fasteners. Place the profile against both adjoining sections and check the fit along the entire length. If there is protruding filler, uneven edge tape, or a difference in the facing, eliminate the cause first. Do not press the corner with force onto a curved base: this creates stress and worsens the appearance of the line.
The fastening method is chosen based on the type of base, the size of the profile, the condition of the coating, and the recommendations of the manufacturers of the materials used. An adhesive suitable for one coating may be undesirable for another. Mechanical fasteners can leave visible heads or split a thin shelf if used incorrectly. Therefore, before installation it is advisable to make a test on a hidden area or on a separate sample with similar materials.
After fixing, keep the edge in position until the applied compound has set, if the adhesive method is chosen. Do not install the adjacent part in such a way that it displaces the not-yet-secured vertical. Finally, inspect the joints in daylight and side lighting. On a stepped structure, one slightly shifted line visually disrupts the overall rhythm, even if each part individually appears straight.
Edge finishing and choice of coating
Wooden corners can be selected to match the natural look of the wood or to suit the subsequent finish. It is better to make this decision before cutting, especially if cross cuts will be visible on the horizontal steps. An open end grain and a longitudinal surface often take the coating differently. Smooth sanding helps prepare the surface but does not guarantee a complete match of shade in different grain directions.
First check the processing conditions recommended for the specific batch and the compatibility of the coating with the wood. A test sample is needed not only to choose the color: it will show how noticeable the sanding marks are, whether the contrast of the grain changes, and whether an identical result can be achieved on the vertical and horizontal surfaces. Lighting conditions can change the perception of even the same compound.
Do not sand the outer edges heavily before the trial fit. Excessive removal of material can change the straight line and the outer dimension of the shelf, which is especially noticeable next to adjacent sections. First prepare the ends, carefully remove burrs after sawing, and check the joint. Perform the general finishing in a sequence compatible with the fastening method and the chosen coating.
If the wood is to be painted to match the screen, the narrow and wide corner pieces should not be considered interchangeable. Even under opaque paint, different cross-sections cast different shadows and protrude different distances from the base. Color hides some of the differences in texture but does not eliminate the geometry. Therefore, a width sample remains useful even in a project with a painted profile.
Typical ordering mistakes for ten edges
The first mistake is buying based only on the total of 11.93 m. For example, twelve one-meter strips give an even slightly greater total length, but they cannot be used to make solid 2250 mm verticals. The total length is suitable only for a preliminary estimate; the working specification is built around the longest individual piece. For this screen, two 2400 mm blanks are already necessary because of the two tall verticals.
The second mistake is comparing the price of one linear meter without accounting for waste. A short profile may have a higher price per meter, but buying it can sometimes eliminate the need for an entire long blank. In our option B, one 1000 mm strip covers the last horizontal and reduces the total order length by 1.4 m compared with six long pieces. The decision is confirmed by calculating the full amount, not by intuition.
The third mistake is forgetting about the ends of the parts. If the list shows 1420 and 880 mm, and a complex cut is intended, these finished dimensions cannot automatically be treated as the lengths of the raw blanks. For each visible end, the cut type and measuring datum must be specified. Choosing the wrong long or short side of the cut will lead to an error even with careful work on the machine.
The fourth mistake is changing the finish in the middle of the order. The UG-001 25×25 strip and the UG-001 34×34 strip have different outer dimensions. If the vertical is made with the wide profile and the horizontal continuation with the narrow one, the transition line will be broken. Such a combination is acceptable only as a deliberately designed feature. For ordinary solid trim, it is better to stick to one cross-section.
The fifth mistake is promising the customer the exact cost of the entire project based on one price for the wooden products. Packaging, transport to Nizhny Tagil, processing, installation, and additional materials are not included in the tables provided. These costs require a separate calculation. The original product card mentions a rigid packaging frame costing 390 ₽, but the conditions for applying this item must be clarified when ordering, without automatically adding it to each of the six strips.
When you should not order UG-001 immediately
If the corners on the finished screen are clearly not right angles, buying a standard outer corner without fitting is premature. The L-shaped profile is convenient where two planes form a suitable angle and allow the flanges to fit without skew. With a rounded edge, large relief, or uneven cladding thickness, a separate structural solution will be required. Such mismatches usually cannot be hidden with a single overlay.
If the screen is installed in an area of intense mechanical impact, the decor should not be chosen as a substitute for a protective element with rated characteristics. A wooden corner piece can cover an exposed edge, but we do not have confirmed data on the impact load that a specific assembly with your base and fastening can withstand. Where regulatory impact resistance or a safe rounded edge is required, the structural requirements are determined first, and only then is the material selected.
If the final color has not been agreed upon, it is reasonable to postpone the main purchase until the sample has been checked. This is especially important when adjacent to existing wooden flooring or veneered furniture. The wood species does not guarantee a tone match. It is also not advisable to order all six blanks until the transitions between verticals and horizontals have been determined: the choice of cut can change the length of the blank required for one or more parts.
Finally, if the actual screen differs significantly from the reference diagram, the given estimate ceases to be a complete bill of materials. The figure of 12,420 ₽ applies to strictly defined ten segments in a single version. If a new ledge is added, a vertical is lengthened, or cladding appears on the second side, the calculation must be redone.
How to place an order with delivery to Nizhny Tagil
To place an order, a short but precise list is needed. Specify the delivery city — Nizhny Tagil, Sverdlovsk Oblast, model UG-001, the selected wood, cross-section, factory length, and quantity. For the basic economical option, this is five corner pieces of 2400 mm and one of 1000 mm. Separately state whether approval of the finish, packaging, and additional conditions for transporting long items is required.
Order buy a 25×25 mm oak corner piece or the beech version can be ordered via the product page, after first rechecking the price and availability of the selected combination. The availability of a specific length should not be inferred from the existence of a product page: preparation times may vary when ordering. Do not state a fixed delivery day until the seller has confirmed the shipping conditions for the specific set.
When confirming the order, it is useful to provide the cutting list and ask how the corner pieces are supplied: as whole strips or whether a separate processing service is possible. The original calculation assumes the purchase of factory lengths without cutting included. If the seller or craftsman offers on-site cutting, clarify who is responsible for the final measurements and how the joints on the steps will be checked.
See also buy wooden corner pieces for finishing in the catalog only if they actually match the geometry of the screen. A similar name does not make an inner or outer profile interchangeable. For the article under consideration, the central product remains UG-001; there is no need to expand the order with other items just to increase the number of positions.
Checklist before payment and cutting
For a screen with ten edges, the final specification must exist in two forms: a product one and an installation one. The product one indicates the quantity of factory-made items. The installation one lists the segments and the methods of joining. If the order contains only "13 metres of wooden corner", it is impossible to verify that the long parts will be sufficient and that the craftsman has correctly understood the design intent.
In the product schedule for the example with 25×25 mm beech, there should be: UG-001, 2400 mm — 5 pcs at 2260 ₽; UG-001, 1000 mm — 1 pc for 1120 ₽. The total cost of the items at the verified original prices is 12,420 ₽. For oak of the same size — 18,050 ₽. In the installation schedule: two segments of 2250 mm, two of 1420 mm, three of 880 mm, three of 650 mm. Next to each, indicate the installation location and the end type.
After that, make sure that the sum actually matches the cutting map: two long blanks are occupied by parts of 2250 mm; two by pairs of 1420 and 880 mm; one by a combination of 880, 650 and 650 mm; from the short one, the last part of 650 mm is obtained. If during renumbering one part is recorded twice and another has disappeared, this will be revealed before cutting begins.
Keep a separate note about technological allowances. The calculated remainders of 150, 100, 220 and 350 mm are nominal. They must be reduced by the actual kerf width and machining operations. If, on re-checking, some set no longer fits within the factory bar, do not try to hide the problem behind rounding of the linear metres. Correct the schedule and the order total.
The final check concerns visual integrity. All long verticals and their horizontal continuations must be consistent in width and material, and open ends must have a clear finish. Only after this check does the request become a working document for purchasing and installation, rather than an approximate cost estimate.
How the estimate changes when dimensions are adjusted after measurement
A plan accurate to the millimetre is useful only when the dimensions do not change after approval. Suppose one of the two middle verticals, instead of 1420 mm, became 1510 mm. The total length increased by only 90 mm, but the previous pair of 1420 + 880 mm no longer matches the new list. If you try to fit 1510 and 880 mm into a 2400 mm blank, nominally only 10 mm remains — almost certainly insufficient even for an ordinary separating kerf and end trimming. This means that not only the text in the schedule will change, but the entire cutting map as well.
Another example — a horizontal edge, instead of 650 mm, became 720 mm. This increase of 70 mm is in itself insignificant compared with the 13 metres purchased. But the combination of 880 + 650 + 650 mm in one long bar turns into 880 + 720 + 650 mm, totalling 2250 mm. Nominally 150 mm remains, so the scheme may still fit given a sufficient technological reserve. Here the adjustment does not necessarily require an additional factory bar. The difference between the two examples is that the original cutting combinations have different reserves.
When dimensions change, check not the percentage by which the finished linear metres are exceeded, but the specific bar in which the changed part is located. This is especially valuable for small interior orders: a single length error can change the composition of the purchase more than the total linear metres suggest. The recalculation may take a few minutes, while ordering an extra 2400-millimetre blank will noticeably affect the budget.
If several lengths change at the same time, do not try to preserve the original layout at any cost. Write out the new list of parts, mark those that must be continuous, prioritise the long segments, and only then place the short ones in the remaining space. Compare the resulting options by cost, not only by metres of waste. In an order with natural wood, you should additionally take into account that the grain and shade of the blanks may differ if material is purchased later.
What to tell the craftsman if the corner profile has already been ordered
Even correctly purchased six factory-made pieces do not guarantee identical quality across all ten finished edges. The craftsman must see the full list of parts and understand which sides will remain exposed. Mark the installation position number and the orientation of the visible side on each future part. This is especially useful for an L-shaped profile: if the cut is oriented incorrectly, two parts may fail to form the required joint even though their measured lengths match.
In the worksheet, highlight the two long verticals of 2250 mm separately. It is almost impossible to obtain a replacement of the same length from these blanks after a significant mistaken cut. Therefore, they should be checked first, but cut only after the dimensions are finally confirmed. On the short edges, you can perform a trial end treatment to agree on the appearance of the joint, then repeat the chosen technique on the remaining sections.
Ask them not to throw away the offcuts until installation is complete. They will be useful for a trial coating application, refining the cut shape, or testing the adhesive joint. However, do not include the potential usefulness of the offcuts in the initial cost as guaranteed compensation: their suitability depends on length, condition, and future tasks. Record which remnants will actually remain after all work operations and which were used for trial pieces.
After assembly, inspect the screen sequentially from the lower step to the upper one. If necessary, use side lighting: it clearly reveals protruding edges, uneven transitions, and gaps in the joint. Check not only the outer line but also how tightly both shelves of the corner profile fit. If a particular edge separates from the base, the task is not to cosmetically mask the gap but to determine the cause — geometry, surface preparation, or fastening.
Questions that arise before purchase
Can I buy exactly 11.93 m of wooden corner profile?
This figure describes the finished cut pieces. The catalog offers factory lengths of 1000, 1500, and 2400 mm, so an order is made up of whole items. For the specified ten parts, the most cost-effective of the three considered schemes requires purchasing 13 m of material. The length and number of strips matter more than an abstract linear meterage.
Which profile should I choose if the screen looks narrow?
First, place the 25 mm and 34 mm templates against the edge and look at the result from a normal distance. The narrow profile takes up less visible surface, while the wide one emphasizes the border more. You cannot determine the preferred size from a photograph alone, and you cannot substitute one size for another in the middle of a set without revising the joints.
What do the dimensions 4 and 21 mm mean for UG-001 25×25?
In the drawing under consideration, 4 mm is the wall thickness and 21 mm is the internal dimension. These are not two additional factory lengths, nor the overall width of the profile. For a 34×34 mm section, the corresponding values are 6 and 28 mm. When selecting for a finished cladding, check the position of both flanges, not just the numerical panel thickness.
Why not buy only 1500 mm angles for short sections?
Because the set includes two one-piece parts of 2250 mm each, which do not fit into a 1500 mm blank. In addition, pairs of segments of different lengths may fit more conveniently in a 2400 mm bar. The decision on factory length is made based on the entire list of parts, not on each line separately.
Which option has the lowest cost for beech UG-001 25×25?
At the original prices as of November 13, 2026, this is option B: five 2400 mm bars and one 1000 mm bar, totaling 12,420 ₽. The alternatives cost 13,560 and 13,220 ₽. This is a comparison of product cost before delivery, cutting, coating and other costs. If prices or allowance requirements change, the result must be recalculated.
Can offcuts be joined to reduce the number of full-length bars?
Technically, several short fragments can be joined, but this changes the appearance and installation requirements. In the given calculation, all ten straight edges are planned as one-piece, without an additional joint within the line. If the project allows a visible joint, a different cutting task arises and it must be agreed separately.
Is there a STAVROS warehouse in Nizhny Tagil?
The source data does not confirm a local warehouse or showroom. The purchase should be made through the official catalog, and the availability of the selected versions and delivery terms to an address in Nizhny Tagil should be clarified. The presence of a product page on the website does not mean that all combinations of length and wood species are in stock right now.
Should I buy extra angles as a reserve?
If the geometry has been measured, the cutting method has been approved, and the cutting plan accounts for allowances, the additional reserve is determined by the conditions of the specific job. For non-standard angles, unknown substrate quality, or a high cost of error, one more strip may be needed. Such a purchase cannot be declared mandatory without understanding its purpose; but neither should you economize down to zero remaining stock without checking the actual end-trimming operations.
What to read before choosing a different profile
If you need to understand the very purpose of exterior and interior elements, this material will help “Wooden corner: exterior and interior profile”. For pairing with a specific slatted cladding, there is a separate breakdown UG-001 for panel PAN-003. Another practical scenario can be compared with the article “Buy a wooden corner in Penza”, dedicated to other sizes of vertical ribs.
For the current stepped screen, the solution can already be formulated without unnecessary assumptions. Ten solid segments of four lengths are needed. With confirmed geometry and a standard cutting pattern, of the options considered, five UG-001 at 2400 mm and one at 1000 mm are more economical. In the 25×25 mm beech version, this is 12,420 ₽; in oak, 18,050 ₽, at the prices from the original specification as of November 13, 2026. The choice between wood species and cross-section remains with the project; the final purchase comes after checking dimensions, cuts, availability, and delivery.
A catalog is available for other finishing elements Buy wooden trim, but there is no need to add irrelevant products to the order just to fill out the line items. The main result of this specification is a clear procurement list that can be handed to the seller and the craftsman without ambiguity.