

























Article Contents:
- Where to buy wooden slats in Volzhsky and what to prepare before ordering
- RK-001 solid wood slat: actual dimensions and how it differs from ready-made panels
- Two patterns on one wall: how 24×5 and 40×5 mm slats differ
- Oak or beech: how to choose the material for a diagonal panel
- Why a 45° diagonal layout requires a separate calculation
- Where to start measuring a rectangular panel on a finished wall
- Calculating a 1600×1200 mm diagonal panel: RK-001 24×5 option
- RK-001 40×5 mm option: wider slat, fewer pieces
- How the lengths of the diagonal parts are obtained, not just their quantity
- Cutting list RK-001 24×5 mm, including a 20 mm allowance
- Cutting list RK-001 40×5 mm, including a 20 mm allowance
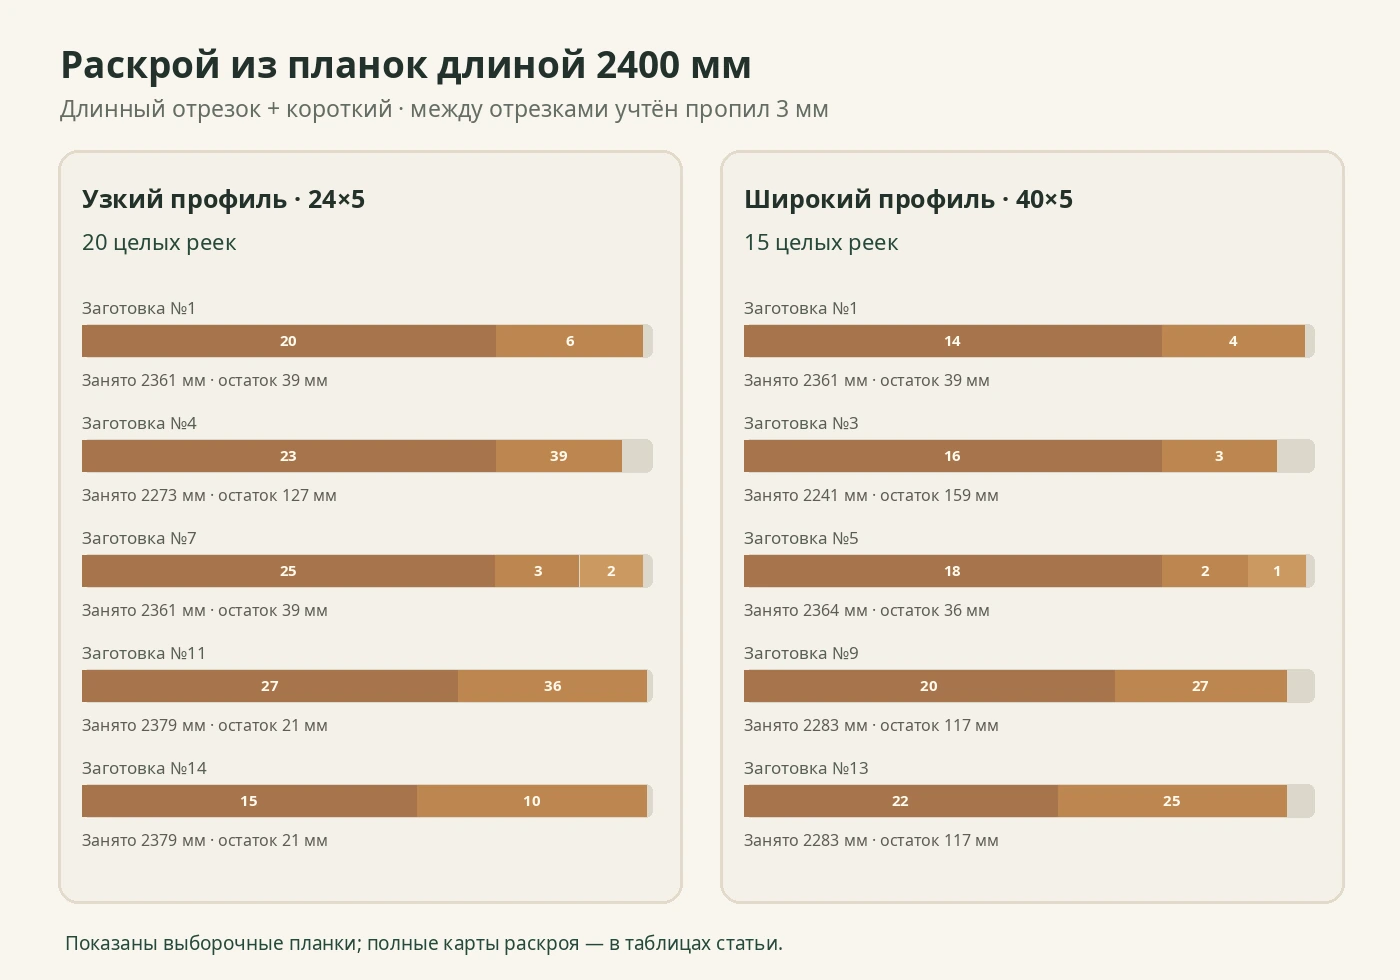
- Working cutting plan 24×5 mm: 43 parts from 20 slats
- Working cutting plan 40×5 mm: 31 parts from 15 slats
- Which size looks best on a 1600×1200 mm panel?
- Why does the narrow version have 43 pieces instead of 45?
- What is the 20 mm distance indicated on the diagram?
- Why is the longest piece longer than 1697 mm?
- Can I buy slats by total linear meterage only?
- Can oak and beech slats be mixed in a single panel?
- How do I calculate the panel if the wall has different dimensions?
- Do I need to buy one extra slat?
- Can slats be installed on a painted wall without preparation?
- Does the delivery cost to Volzhsky depend on the number of cut pieces?
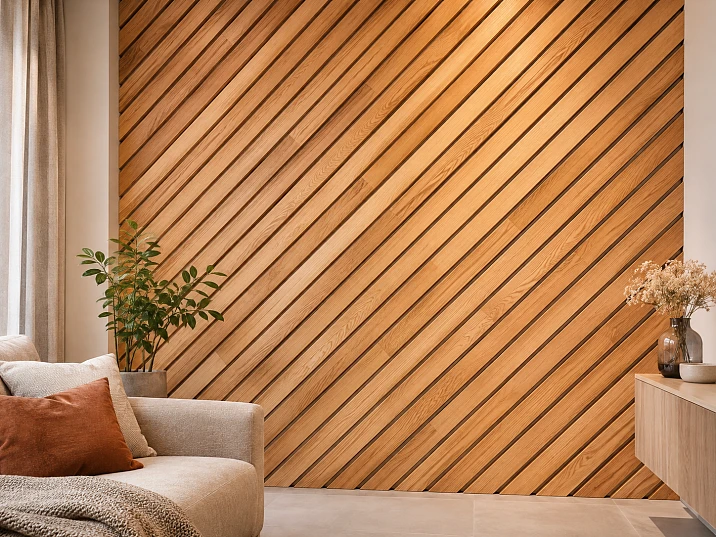
A diagonal wooden slat panel has a feature that is easy to overlook when ordering: two walls of the same area may require completely different numbers of full planks. It is not so much about the area as about the direction of the pattern and the combination of long central pieces with short segments at the corners. If you simply measure the wall width, choose a nice spacing and multiply the number of strips by the height, the estimate will be incorrect.
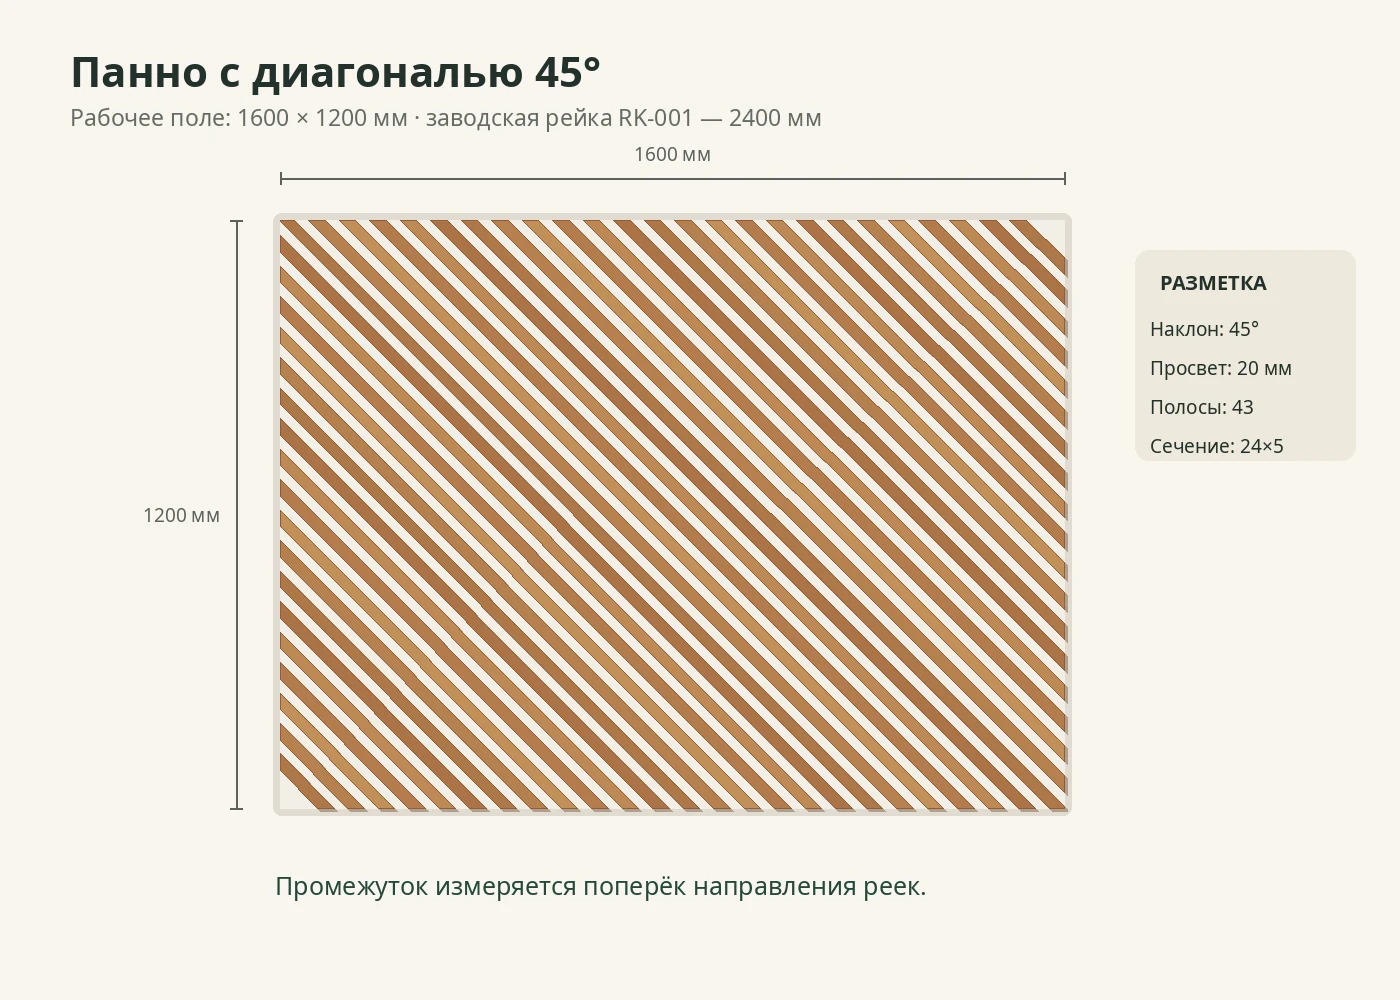
Let's imagine a decorative rectangle 1600 mm wide and 1200 mm high. The slats run at a 45° angle from the top left corner to the bottom right. In the center, segments about 1.7 m long are needed, and closer to the corners, small fragments. For the RK-001 plank with a factory length of 2400 mm, this is fundamental: some short pieces can be made from the offcuts left after the long ones, but two long pieces do not fit into one plank. In the project, we will separately compare oak and beech, the narrow 24×5 mm section and the wider 40×5 mm one. All calculations relate to a single panel, not to cladding the entire wall.
If the goal is to buy wooden slats in Volzhsky and to understand the purchase volume in advance, it is better to start with the geometry. On the STAVROS website, RK-001 versions in oak and beech are available, and in the category you can choose other sections and check the specifications. Selection and delivery must be arranged taking into account the actual batch, weight and dimensions. Buy wooden slats in Volzhsky this can be done through the general wooden slats section; this is an order with delivery to the city, not a statement about the company's local warehouse.
Where to buy wooden slats in Volzhsky and what to prepare before ordering
A customer from Volzhsky does not need to choose products at random based on a picture of a finished interior. It is enough to specify the material, cross-section, length, the calculated number of whole products, and the desired surface preparation. For the described panel, one of the RK-001 variants will be needed: 24×5×2400 mm or 40×5×2400 mm. These are separate options, not an alternation of narrow and wide strips within a single pattern.
It is useful to attach to the request a diagram showing the panel width, height, diagonal direction, and the size of the gap between the slats. Otherwise, the seller can only calculate the cost of the specified number of products but cannot check whether it matches the project. In the correspondence, it is advisable to separate the "linear meters of finished parts" and the "number of factory planks" — these values are not equal.
The buyer should also understand the nature of the product. RK-001 is a wooden finishing slat; it can be mounted on a prepared base and does not replace the load-bearing elements of the wall or the fastening system. For a diagonal decorative composition, the framing must be decided in advance: whether the ends will be visible at the boundary of the rectangle, whether the backing will be painted in a contrasting color, and whether a technological gap will remain around the perimeter. These decisions affect the cost of the slats indirectly, but they greatly change the impression of the result.
If the panel is located above a sofa, cabinet, or near a passage, measurements are taken after the final placement of furniture and light fixtures. Otherwise, the lower part of the diagonal may be hidden by a high headboard, and a composition with a formally uniform spacing may look visually unbalanced. When ordering, it is appropriate to separately clarify Decorative planks for walls to buy in the required variant, without focusing on the minimum price of the family: it may refer to a different cross-section.


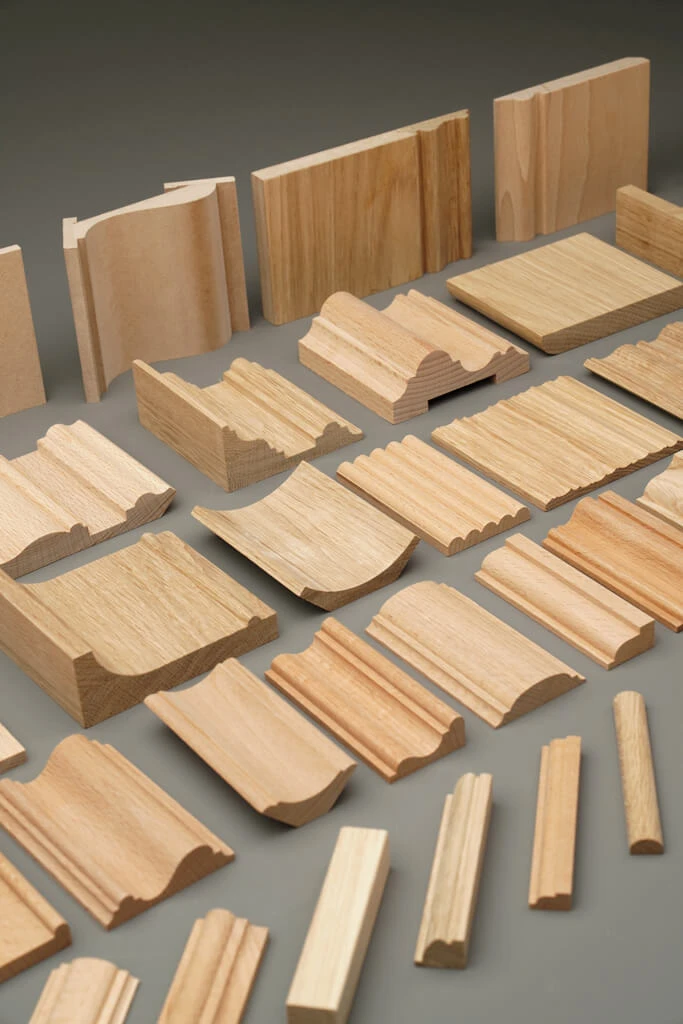
RK-001 solid wood slat: actual dimensions and difference from ready-made panels
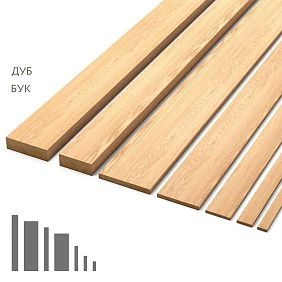
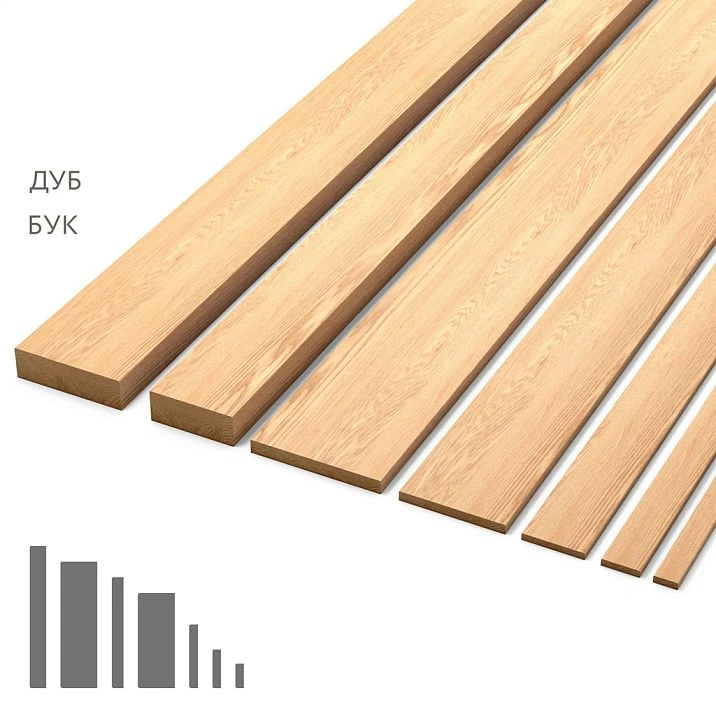
The official RK-001 product page lists seven cross-sections in oak and beech. For our project, 24×5 and 40×5 mm are being considered: both planks are 2400 mm long and 5 mm thick. The other confirmed dimensions — 15×5, 60×23, 70×7, 80×23, and 90×10 mm — can be used for other decorative tasks. They cannot be automatically included in the panel calculation: wide or thick parts change the visible mass, spacing, consumption, and fastening requirements.
| RK-001 version | Size, mm | Length, mm | Beech, ₽/pc. | Oak, ₽/pc. |
|---|---|---|---|---|
| Narrow slat | 24×5 | 2400 | 840 | 1 150 |
| Wide slat | 40×5 | 2400 | 1 130 | 1 620 |
Prices were re-verified against the current STAVROS product card on November 18, 2026. This is the cost of one factory slat in the corresponding material, not the price of a finished cut-to-size piece for a panel. Availability of a specific quantity, processing, and the final order total must be confirmed at checkout: stock levels and prices change.
A standalone slat differs from a ready-made slatted panel in how the pattern is formed. In a panel, the spacing is usually set by the base construction or a repeating set of elements. For a set of independent RK-001 slats, the installation layout determines the position of each strip. On one hand, this gives you freedom: you can choose a 45° diagonal, create an asymmetrical edge, or leave more breathing room around the composition. On the other hand, layout mistakes won't correct themselves. Unevenness in even one strip is more noticeable in a long diagonal row than in a single vertical element.
The product card lets you check the shape, photos, and execution details buy a wooden slat RK-001. Below, we do not transfer data from other series to RK-001, and we do not substitute oak or beech with the cost of MDF products. If a designer suggests replacing the slats with a panel of a different composition, a new calculation and a different specification will be required.
Our factory also produces:

Two patterns on one wall: how 24×5 and 40×5 mm slats differ
With the same spacing between slats, the narrow profile creates a denser sequence of light gaps and wood lines. The wide profile makes each line more noticeable: wood occupies a larger share of the visible area, and the gaps look comparatively narrower. This is not a question of which option is "better." For a light wall next to wooden furniture, a thin diagonal can serve as an accent; on a large open area, wide slats will read as a decorative plane in their own right.
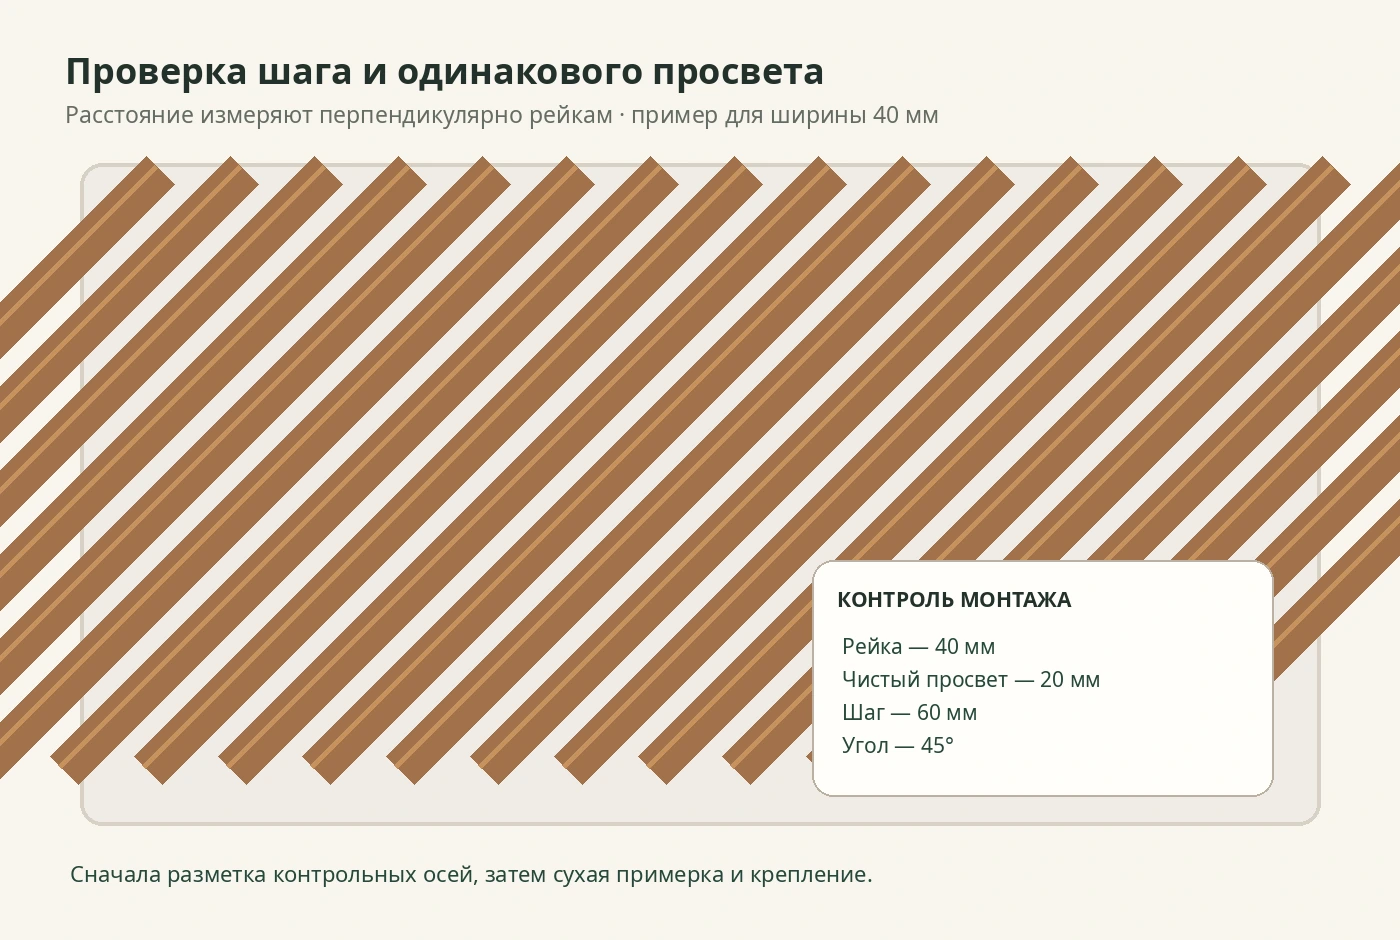
For a fair comparison, let's keep the same clear gap of 20 mm, measured perpendicular to the direction of each strip. Then the pitch, that is, the distance between adjacent edges of the same name, will be 44 mm for a width of 24 mm and 60 mm for a width of 40 mm. Mixing up pitch and gap is dangerous: the entry "pitch 20 mm" for a 40-millimeter batten would be physically impossible if it refers to the distance between the axes of adjacent pieces.
In the finished panel, the diagonal strips run parallel. A half-batten does not necessarily have to appear at the edge of the rectangle. You can deliberately leave an unfilled diagonal edge near the corner. For a neat interior, this is often better than two short triangular pieces that are difficult to hold during installation and that provide little visual benefit. We chose options with noticeable but not excessive setbacks at the outermost diagonals.
Width alone does not indicate cost. The narrow option has more pieces, but each factory batten costs less. The wide one has fewer pieces, but the price of each is higher. And the number of pieces is not yet equal to the number of planks purchased: some of the two short fragments may come from a single blank. Therefore, comparing a solution only by the numbers "43 versus 31" is wrong. You need a length map and a cutting map.
Get Consultation
Oak or beech: how to choose the material for a diagonal panel
The pattern of the battens depends especially on the lighting. When light comes from the side, an alternation of shadow and illuminated wood appears between the strips, emphasizing the diagonal. If the surface is coated with a transparent finish, the grain is additionally visible. In oak, the structure is usually more pronounced; in beech, the pattern is calmer, and it is often considered for enamel finishing. At the same time, the specific method of painting must be chosen based on the characteristics of the supplied batch and the coating technology, not on the name of the species.
Let's imagine a living room with a light wall and an oak table. If the visible texture is to be left, oak battens can tie the panel to the furniture, but a color match is not guaranteed. Different products, even of the same species, can vary in tone, grain direction, and glued lamellas. In a room where all wall finishing must be one solid color, beech under an opaque coating is often more convenient from the standpoint of the visual task. This is a design choice, not a statement that beech is always cheaper with any finish.
The cost of the finish coating cannot be derived from the difference in prices of the battens themselves. Clear oil, lacquer, stain, and enamel require different preparation stages, and the number of small end faces increases with diagonal installation. Even if the battens themselves are already sanded, the new ends must be treated after sawing. For a project with a noticeable contrast between the wood and the background, it is especially important to agree on the color of the side edges: they will be visible in the gaps.
As of the check date, a beech set may cost noticeably less than an oak one, but saving on material ceases to be an advantage if the customer specifically wants an open oak pattern. For a product with pronounced grain, it is convenient to purchase one sample in advance or agree on photos of the batch if the seller offers such an option. When complex tinting is planned, coordinate it with the actual wood base and a test application, not with an image on a screen.
Why a 45° diagonal layout requires a separate calculation
For vertical cladding 1200 mm high, all slats of the same height could only be cut in pairs from a 2400 mm strip if there were no allowances and no saw kerf — that is, in practice such a cutting plan would already require recalculation. In a diagonal panel the situation is more complex: the length of the strip depends on where the diagonal crosses the rectangle. Near a corner the intersection is short, closer to the center it increases, then for a while it remains large and then decreases again.
For a 1600×1200 mm field, the greatest length of a straight segment along a 45° line inside the rectangle reaches approximately 1697 mm: this is the diagonal passage across the short side, equal to 1200×√2. The diagonal of the entire rectangle, about 2000 mm, is not suitable here: it lies at an angle of approximately 36.9° to the horizontal, not 45°. Confusion between these numbers leads to overestimation or underestimation of the calculated lengths.
A slat has its own width. For an honest cutting plan, one cannot count only the distance between two points on its centerline. If a part reaches the boundary of the rectangle and the end is cut at an angle, the extreme point of the wooden strip may protrude beyond the centerline segment. Therefore, the following geometry is used of the entire strip of a given width, intersected with the rectangle. The extreme lengths are rounded up, and a separate technological allowance of 20 mm is added to each workpiece for final trimming. This is a preliminary production schedule, not a final drawing of machine cuts.
The calculation also contains one more assumption: the slat width is the visible width on the wall, the gap is measured along the normal to the diagonal, and the angle is taken as strictly 45°. On site, it is necessary to re-measure the rectangle, check its angles and agree on the diagonal axis. If the field turns out to be trapezoidal, the top and bottom have different dimensions, or a different angle is chosen, the given quantities cannot be used without adjustment.
Where to start measuring a rectangular panel on a finished wall
Before laying out, mark the horizontal line of the lower boundary and draw verticals along the two side edges of the intended rectangle. Check the 1600 mm width at the top, middle, and bottom, and the 1200 mm height near both edges and in the center. If the values differ, you need to decide whether to keep a geometrically precise decorative rectangle and compensate for deviations with the background, or to follow the curvature of the base. For parallel wooden strips, the second approach is almost always more noticeable and more complex.
Next, choose the position of the pattern relative to the furniture. When placed above a sofa, for example, the rectangle may be slightly offset relative to the wall but remain centered relative to the sofa itself. This is a justifiable design decision. The mistake occurs when, out of habit, you find the center of the entire wall without considering that after the furniture is installed, the visible area has changed.
It is useful to make a paper or digital layout drawing based on the wall. Mark the actual outlets, switches, wire leads, TV mounting points, and future drilling points. You cannot assume that a thin batten will automatically hide any unevenness or allow you to safely cover electrical equipment. In areas with access to utilities, the composition must be changed in advance while preserving the ability to service them.
Leave room for the final finishing of the ends and for the method of closing the edge. If a rectangular frame around the panel is planned, its width changes the available field and requires a new calculation: the actual size inside the frame will be smaller than the outer 1600×1200 mm. Here, for simplicity, we are considering an open composition without a wooden frame, and the values are set directly for the decorative area itself.
Before cutting, check the direction of the diagonal on the wall with a taut cord or a marked long straightedge. If the strips are to run in the opposite direction, the list of lengths will be mirrored, but the amount of material will not change for a strictly rectangular field. However, the location of the joints, the grain pattern, and the visible ends may change significantly. It is better to decide this before cutting, when it is still possible to rearrange the intact planks.
Calculation of a diagonal panel 1600×1200 mm: variant RK-001 24×5
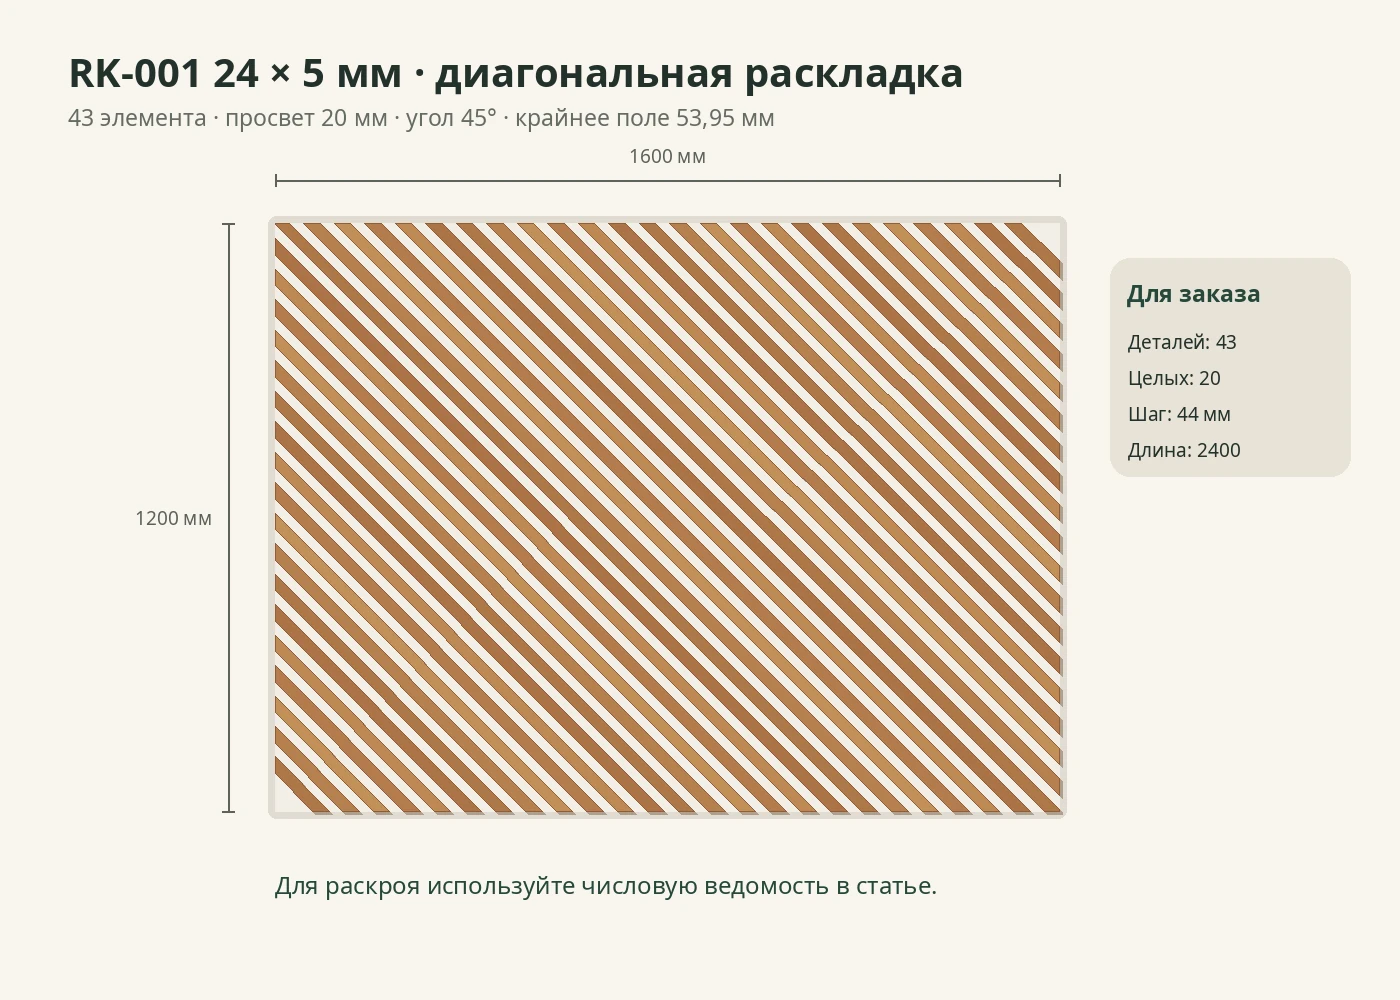
In the narrow variant, each batten occupies 24 mm along the normal to the diagonal. We leave 20 mm of exposed background between adjacent edges. This gives a pitch of 44 mm. Let us assume that the first and last strips do not touch the two far corners of the panel. This is not a forced loss of material but a chosen compositional boundary: short offcuts at the very corners would be harder to install and would hardly affect the reading of the pattern.
Geometric width of the entire rectangle perpendicular to the diagonal equals (1600+1200)/√2, that is approximately 1979.9 mm. To place 43 strips 24 mm wide with 42 gaps of 20 mm, you need 43×24+42×20 = 1872 mm. This leaves 107.9 mm. We distribute the remainder equally between the opposite diagonal edges: by 53.95 mm. The width of the edge margin is measured perpendicular to the slats and is not equal to the usual offset from the left or top edge of the wall.
We get forty-three separate pieces: first short, then increasingly longer, in the central zone several close to the maximum length, and then short again. The schedule is symmetrical in lengths, but the pieces themselves in mirrored positions have opposite directions of cuts. During installation, it is impossible to imperceptibly flip a finished fragment if the face side has a pronounced wood grain or a specific orientation of the bevel is required.
For the calculation schedule, the entire geometric strip on the rectangle was first determined, not just its axis. Then the blank size was rounded up to a whole millimeter and increased by a total allowance of 20 mm. Therefore, the first piece has a calculated blank length of 176 mm, the second — 264 mm, and the longest — 1742 mm. These numbers are the blank dimensions before final trimming, and not a promise of factory cutting exactly to them.
If you want to visually bring the outermost slat closer to each corner, you can place 45 strips with an edge of about 10 mm. The formal area of the wooden pattern will increase insignificantly, but very short corner elements will appear. For our example, such a choice was deliberately rejected. At a different scale of the panel, for example on a long narrow wall, the criterion for the usefulness of the edge pieces will be different. It is impossible to declare 43 strips a universal norm for any diagonal pattern.
Inside the field, the backing remains visible. It is its shade that sets the contrast and helps the thin wooden lines not to dissolve on the wall. For a narrow cross-section, changes in the width of the gap are especially noticeable even at a few millimeters. Therefore, the calculation is only valid together with precise step marking: it is not enough to order 43 slats of the required wood species and arrange them "roughly evenly".
Option RK-001 40×5 mm: wider slat, fewer parts
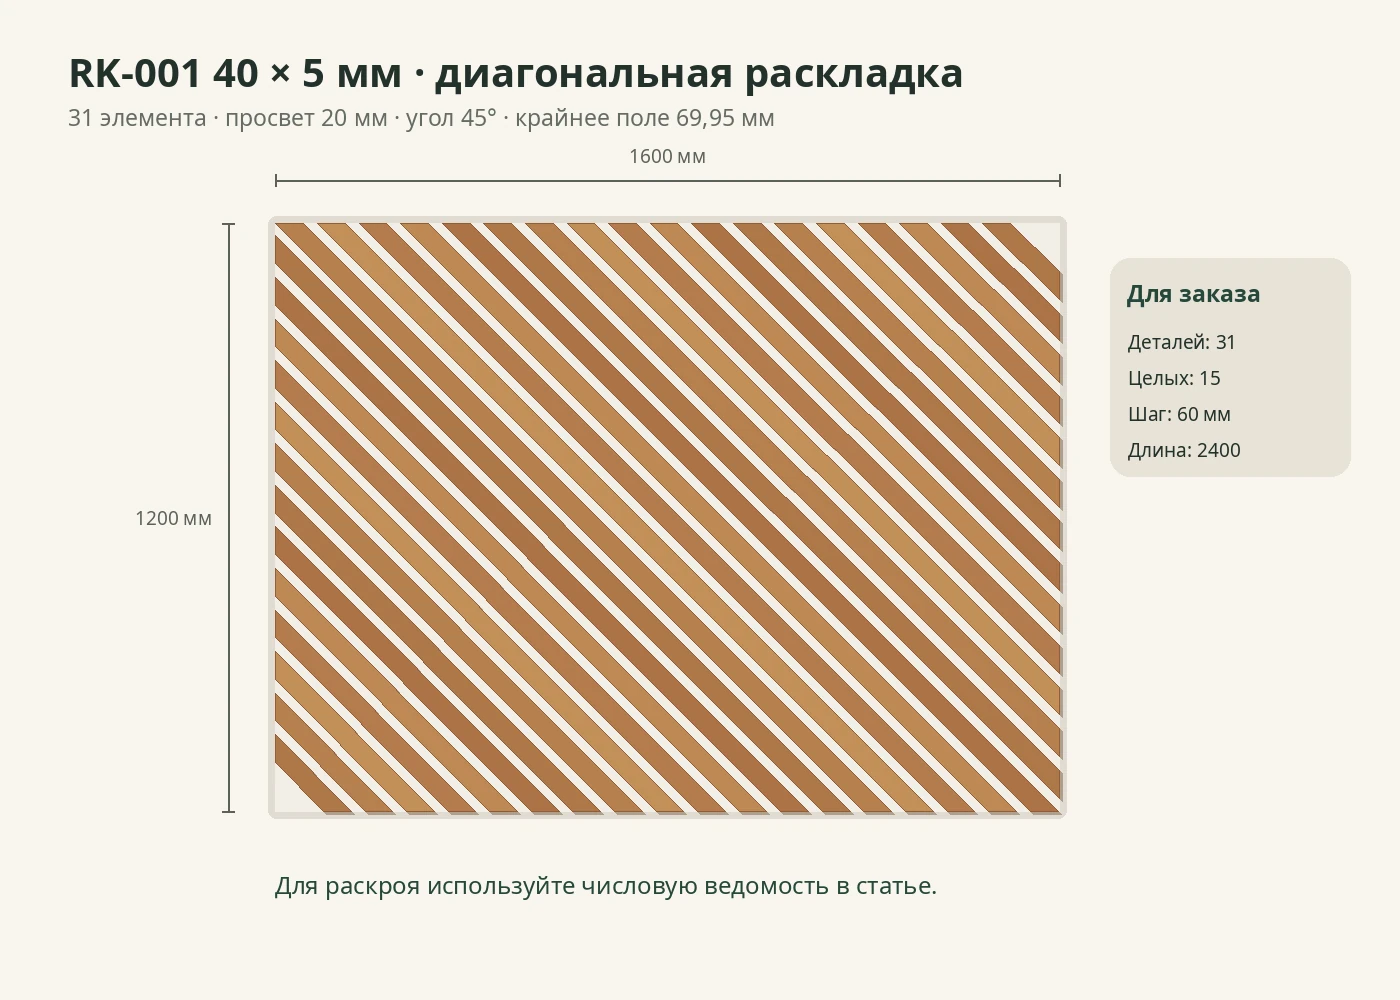
We keep the same field of 1600×1200 mm and the same gap of 20 mm. For a slat 40 mm wide, the step is already 60 mm. To avoid creating short triangular offcuts at the corners, we accept 31 strips. Their total width together with thirty gaps is 31×40+30×20 = 1840 mm. After centering, two edge margins of approximately 69.95 mm normal to the diagonal.
Due to the smaller number of strips, the wide composition is perceived as calmer in terms of repetition frequency, but more massive in terms of the proportion of wood. If the furniture has wide planes and smooth fronts, such a rhythm can support their scale. If the interior is overloaded with carved details and active textiles, an additional 40 mm wide strip will be more noticeable than a thin one. It is useful to check the appearance on a scaled printout or on a paper layout of at least part of the panel.
At the edges, short elements are again produced, but they are larger in width. For our geometric scheme, the first and last calculated blanks are 240 mm long, followed by 360, 480, 600 mm, and so on. In the middle part, the longest ones reach 1758 мм including the technological allowance. The greater width slightly increases the required blank length relative to the narrow option, even with a similar central section.
An important practical difference shows up when ordering: the narrow scheme has 43 finished parts, the wide one has 31. But the work operations do not decrease exactly in the ratio of 43 to 31. For each strip you still need to measure the position, mark two ends, treat the surface, check parallelism and fix it without displacement. With a 45° diagonal, it is harder to notice a small angular error in one part before a long row is built up. On a flat painted wall it will show up as a difference in the gaps closer to the end of the panel.
That is why, when choosing a size, you should evaluate more than just the difference in material cost. If the work is done by a craftsman, ask whether the price includes making a template, cutting to the actual rectangle, sanding the ends, checking the angles and protective finishing. Reducing the number of strips can reduce labor costs, but this must not be turned into a promise of fixed savings without a specific quote from the contractor.
How the lengths of the diagonal parts are obtained, not just their quantity
For verification, it helps to represent the panel in coordinates: the top-left corner is (0;0), the bottom-right is (1600;1200). Each diagonal strip is bounded by two parallel lines at 45° and intersected by the rectangle's borders. On a computer you can find its intersection polygon and measure the extreme points along the direction of the slat itself. The resulting distance is used as the minimum geometric length of the blank without a technological allowance.
This method is more accurate than calculating the length along a single centerline. Take the wide central slat: the axial diagonal path may be about 1697 mm long, but the wood occupies a 40 mm wide strip, so a rectangular block for the angled ends must have a slightly greater overall length. For the chosen scheme, the calculated blank with allowance reaches 1758 mm. In production, the actual requirement will also depend on exactly how the blank is cut and how the visible edge is finished.
Below is a compact complete list of calculated lengths. The strip numbers run from one diagonal edge to the opposite one; part No. 1 is in one corner of the field, and the last one is in the symmetrical other corner. Pairs of equal lengths on opposite sides let you check the arithmetic faster. Values from one list cannot be mechanically transferred to another: the profile size changes not only the number of strips but also the geometry of their end projections.
Blank schedule RK-001 24×5 mm, including a 20 mm allowance
| Parts in order from the edge | Blank length, mm |
|---|---|
| No. 1 and No. 43 | 176 |
| No. 2 and No. 42 | 264 |
| No. 3 and No. 41 | 352 |
| No. 4 and No. 40 | 440 |
| No. 5 and No. 39 | 528 |
| No. 6 and No. 38 | 616 |
| No. 7 and No. 37 | 704 |
| No. 8 and No. 36 | 792 |
| No. 9 and No. 35 | 880 |
| No. 10 and No. 34 | 968 |
| No. 11 and No. 33 | 1056 |
| No. 12 and No. 32 | 1144 |
| No. 13 and No. 31 | 1232 |
| No. 14 and No. 30 | 1320 |
| No. 15 and No. 29 | 1408 |
| No. 16 and No. 28 | 1496 |
| No. 17 and No. 27 | 1584 |
| No. 18 and No. 26 | 1672 |
| No. 19 and No. 25 | 1739 |
| No. 20 and No. 24 | 1742 |
| No. 21 and No. 23 | 1742 |
| № 22 | 1742 |
Cutting list RK-001 40×5 mm, including 20 mm allowance
| Parts in order from the edge | Blank length, mm |
|---|---|
| No. 1 and No. 31 | 240 |
| No. 2 and No. 30 | 360 |
| No. 3 and No. 29 | 480 |
| No. 4 and No. 28 | 600 |
| No. 5 and No. 27 | 720 |
| No. 6 and No. 26 | 840 |
| No. 7 and No. 25 | 960 |
| No. 8 and No. 24 | 1080 |
| No. 9 and No. 23 | 1200 |
| No. 10 and No. 22 | 1320 |
| No. 11 and No. 21 | 1440 |
| No. 12 and No. 20 | 1560 |
| No. 13 and No. 19 | 1680 |
| No. 14 and No. 18 | 1758 |
| No. 15 and No. 17 | 1758 |
| № 16 | 1758 |
Cutting is performed after checking the base: for each part, the shape of both ends, the grain direction, and the position on the wall are verified. For the central strips, the ends more often fall on two different boundaries of the rectangle. For the short ones, they sometimes fall on adjacent boundaries. Even if two segments have the same total length, their angles and orientation may differ. Therefore, the length calculation sheet does not replace the numbered installation map.
If a person is preparing the panel independently, it is more convenient to first print the diagram with numbers and lay out all the whole slats nearby. After each cut, immediately write the number of the future part on masking tape on the back side, not on the face of the wood. Then a short offcut 352 mm long will not accidentally be installed instead of a mirrored part of the same size. For a transparent finish, this is especially useful: the orientation of the grain pattern can be difficult to change later.
Cutting map for factory slats 2400 mm long
By total linear meterage of the narrow variant, the sum of calculated blanks is 45,452 mm, and of the wide one — 33,750 mm. Dividing these numbers by 2400 gives theoretical minimums: approximately 18.94 and 14.06 strips. But in real cutting, you cannot join the remnants of two different products into one long batten without a visible seam; you also need to account for the kerf thickness and the ease of machining the ends.
For the educational chart, the factory length of 2400 mm and the material loss width per one separating cut are assumed 3 мм. For each part, a total technological allowance of 20 mm is already provided. This is an example of an acceptable cutting plan under the given assumptions, not a guarantee that the workshop uses exactly this blade, an equally short base when cross-cutting, or the same sequence of cuts. Before manufacturing, the technology must be verified and the delivery terms confirmed.
Below, each row is a separate whole purchased batten. The blank length is shown in parentheses after the part number. For example, the entry “No. 20 (1742) + No. 4 (440) + No. 1 (176)” means that three parts are obtained from one strip, with space reserved in advance for two intermediate cuts. The table shows actual combinations, not a uniform waste percentage.
Cutting chart 24×5 mm: 43 parts from 20 battens
| Factory batten | Which parts to get (No., length in mm) | Used with kerfs, mm | Remainder, mm |
|---|---|---|---|
| 1 | №20 (1742) + №6 (616) | 2361 | 39 |
| 2 | №21 (1742) + №38 (616) | 2361 | 39 |
| 3 | №22 (1742) + №5 (528) | 2273 | 127 |
| 4 | №23 (1742) + №39 (528) | 2273 | 127 |
| 5 | №24 (1742) + №4 (440) + №1 (176) | 2364 | 36 |
| 6 | №19 (1739) + №40 (440) + №43 (176) | 2361 | 39 |
| 7 | №25 (1739) + №3 (352) + №2 (264) | 2361 | 39 |
| 8 | №18 (1672) + №7 (704) | 2379 | 21 |
| 9 | №26 (1672) + №37 (704) | 2379 | 21 |
| 10 | №17 (1584) + №8 (792) | 2379 | 21 |
| 11 | №27 (1584) + №36 (792) | 2379 | 21 |
| 12 | №16 (1496) + №9 (880) | 2379 | 21 |
| 13 | №28 (1496) + №35 (880) | 2379 | 21 |
| 14 | №15 (1408) + №10 (968) | 2379 | 21 |
| 15 | №29 (1408) + №34 (968) | 2379 | 21 |
| 16 | №14 (1320) + №11 (1056) | 2379 | 21 |
| 17 | №30 (1320) + №33 (1056) | 2379 | 21 |
| 18 | №13 (1232) + №12 (1144) | 2379 | 21 |
| 19 | №31 (1232) + №32 (1144) | 2379 | 21 |
| 20 | №41 (352) + №42 (264) | 619 | 1781 |
The longest central fragment cannot be combined with another of the same kind: two blanks of 1742 mm exceed the available length. However, a short corner piece can be added to the central strip if the sum with the kerf does not exceed 2400 mm. In our map, most of the strips are used densely. One strip is consumed for the remaining short fragment of 528 mm; its remainder of 1872 mm is not counted as a new "full strip", but may be useful for test staining, repairs, or another project with agreed material requirements.
Working cutting map 40×5 mm: 31 parts from 15 strips
| Factory batten | Which parts to get (No., length in mm) | Used with kerfs, mm | Remainder, mm |
|---|---|---|---|
| 1 | №14 (1758) + №4 (600) | 2361 | 39 |
| 2 | №15 (1758) + №28 (600) | 2361 | 39 |
| 3 | №16 (1758) + №3 (480) | 2241 | 159 |
| 4 | №17 (1758) + №29 (480) | 2241 | 159 |
| 5 | №18 (1758) + №2 (360) + №1 (240) | 2364 | 36 |
| 6 | №13 (1680) + №30 (360) + №31 (240) | 2286 | 114 |
| 7 | №19 (1680) | 1680 | 720 |
| 8 | №12 (1560) + №5 (720) | 2283 | 117 |
| 9 | №20 (1560) + №27 (720) | 2283 | 117 |
| 10 | №11 (1440) + №6 (840) | 2283 | 117 |
| 11 | №21 (1440) + №26 (840) | 2283 | 117 |
| 12 | №10 (1320) + №7 (960) | 2283 | 117 |
| 13 | №22 (1320) + №25 (960) | 2283 | 117 |
| 14 | №9 (1200) + №8 (1080) | 2283 | 117 |
| 15 | №23 (1200) + №24 (1080) | 2283 | 117 |
For the wide variant, the theoretical lower bound, taking into account total lengths and intermediate kerfs, equals fifteen whole strips, and the given map reaches this quantity. But some remainders are relatively large: they cannot be considered automatic savings for another order if the species, shade, finish, or grain direction differ. Keep usable fragments labeled and protected, separate from household waste.
Why shouldn't you buy based only on the sum of lengths? The narrow scheme could mathematically fit into nineteen strips only with an extremely dense combination of segments and almost zero free remainders. The proposed map uses twenty and allows a realistic sequence of cuts. It can be re-optimized for a different machine, a different allowance, or other constraints, but claiming without calculation that nineteen pieces would definitely be enough would be incorrect.
How much does an oak and beech panel cost: four estimates based on real cutting
Now prices can be compared with the number of items purchased. We do not estimate cost by the area of a rectangle and do not multiply the length of a conventional wall by the average cost per linear meter. For the narrow pattern, the calculated map requires twenty factory strips RK-001 24×5×2400 mm. For the wide one — fifteen strips 40×5×2400 mm. This is the minimum according to the provided working maps, if no defects occur and there is no need to keep an additional intact plank for future repairs.
| Panel layout | Whole planks | Price per one, beech | Set, beech | Price per one, oak | Set, oak |
|---|---|---|---|---|---|
| RK-001 24×5 | 20 | 840 ₽ | 16 800 ₽ | 1 150 ₽ | 23 000 ₽ |
| RK-001 40×5 | 15 | 1 130 ₽ | 16 950 ₽ | 1 620 ₽ | 24 300 ₽ |
Prices refer to the state of the STAVROS product page as of November 18, 2026. Before payment, the selected finish and the final number of available planks must be confirmed. At the time of checking, the public product page shows a limited quantity of items in a specific storage city for some variants. This is not grounds to automatically claim that the full set is in stock, that immediate shipment to Volzhsky is possible, or that there is a fixed delivery time.
The difference between the two beech variants is only 150 ₽ for the slats themselves: the narrow set costs 16,800 ₽, the wide one — 16,950 ₽. However, the appearance and the number of installation steps will differ noticeably. For oak, the difference for the same layouts is 1,300 ₽: 23,000 versus 24,300 ₽. To a buyer who focuses only on the price of a single plank, this result is not obvious. A 40 mm wide slat is more expensive per piece, but fewer of them are required.
In these numbers no the cost of staining or clear coating, prepared substrate, cutting, consumables, craftsman's labor, possible framing, packaging and delivery. The cost of each of these operations must appear on a separate line of the commercial proposal. If you mix them with the price of the wooden slats, it will be impossible to understand which option actually turned out to be more expensive and why.
In some cases, the craftsman will suggest using a different joint pattern or longer parts without end allowances. This is acceptable only after checking the geometry: saving two or three dozen millimeters on individual parts is not equivalent to eliminating an entire slat from the purchase. It is useful for the buyer to request a cutting map with numbers, lengths and offcuts: it can be used to verify that the money was paid for actual products, and not for an arbitrary "installation allowance".
To order a specific wood species, you can use the product card buy oak slats 24×5 mm and select specifically the oak version, rather than the starting price value displayed for the cheapest size. For wide-section beech, the material and size should also be verified: the link to beech decorative slats RK-001 leads to the family card, where the parameters are selected separately.
What allowance to order and when it is really needed
The working map provides technological allowances for each part and kerfs between segments. This does not yet mean that spare material is not needed. When working with natural wood, damage during transport, discovery of a defect on a visible area, an error in the direction of an angled cut, or the need to replace a strip after finishing are possible. But a mechanical addition of ten or fifteen percent to the number of slats does not explain which risk it protects against.
For a small composition, it makes sense to consider one additional full-length slat of the selected cross-section and species, if the budget allows. Then a set in beech 24×5 will cost 21×840 = 17,640 ₽, and in oak — 21×1150 = 24,150 ₽. For the 40×5 option, respectively 16×1130 = 18,080 ₽ and 16×1620 = 25,920 ₽. This slat remains intact until needed; if it is cut into test pieces right away, it will no longer serve as a reserve for a long damaged element.
| Scheme with one reserve slat | Beech | Oak |
|---|---|---|
| 24×5: 21 full-length slats | 17 640 ₽ | 24 150 ₽ |
| 40×5: 16 full-length slats | 18 080 ₽ | 25 920 ₽ |
If the product is purchased for a project with a fixed completion date, a reserve is often justified organizationally: an accidental incorrect cut can halt the finishing work until the next delivery. For an unhurried DIY project, when usable offcuts are kept, you can agree to purchase according to the main cutting plan and resolve the reserve question separately. However, buying one additional slat later does not guarantee a color match with the first batch. This is especially noticeable with a clear finish and pronounced oak grain.
There is also another reserve — time and attention for marking. It is not expressed in the number of slats. If the strips are fastened immediately after rough marking, losses can occur when trying to remove and reposition an already glued part. It is wiser to spend time on a template and a dry fit than to try to compensate for a mistake with extra material. Reserve purchases help fix damage, but they do not replace precise technique.
When ordering buy RK-001 40×5 mm slats it is useful to ask for confirmation that the required number of products belongs to one species and the agreed preparation option for the finish. This is especially important if the estimate lists one item across several lines: base cost, reserve, preparation, and transport. All lines must be verifiable.
Can costs be reduced through angle, spacing, and offcuts
The simplest change is to increase the spacing between the slats. With the same rectangle, fewer strips will be needed, which means the number of parts and the amount of work will probably be reduced. But this is already a different patternThe difference between a 20 mm and 30 mm gap is noticeable, especially against a contrasting finish. You cannot change the spacing to reduce waste without recalculating the positions of all the strips and their lengths. The tables given earlier are not suitable for this option.
Changing the angle also changes the geometry. At 30°, the pattern will become flatter, some elements at the edges will be longer, and the working area along the normal will change. At 60°, the strips will visually approach vertical, and the distribution of lengths will again be different. If the angle was chosen based on the line of the staircase, the ceiling slope, or furniture fronts, it should not be revised just to slightly reduce the number of items. Decorative consistency may be more important than the difference of one plank.
Within a given angle, savings arise from the competent grouping of blanks: long central sections are combined with short corner ones, checking the total length taking cuts into account. Useful offcuts can be used for testing the coating, but they must not be quietly included in the full set as new long elements. On a large project, offcuts from several panels of different sizes can sometimes be combined into a common cutting plan — only if they have the same species, cross-section, finish, and acceptable grain direction.
Planning the location of joints also affects consumption. In our example, any diagonal segment is shorter than one factory slat; therefore, a visible joint within the strip itself is not needed. But if the decorative field increases, individual strips may become longer than 2400 mm and a new scheme will be required: either a joint or a different length of supplied material, if it is actually provided by the catalog. One should not assume the existence of an “RK-001 3000 mm plank” without product confirmation.
Finally, with a narrow profile, the material allowance in a single map is distributed unevenly. The offcut from an almost fully used plank is not suitable for a new long element, while a 1872 mm offcut from another can become a full-fledged visible part of a separate small design. But using it in another room requires checking color and quantity. Saving on offcuts makes sense only when there is a specific useful task, not just an unwillingness to throw away wood.
Installing diagonal slats on a wall: how to avoid pattern displacement
They start not with glue or nails, but with checking the base. The wall must have sufficient strength, flatness, and surface condition suitable for the chosen fastening method. Freshly painted loose plaster, peeling putty, thin decorative film, and a damp base require different solutions. You cannot promise reliable adhesion just because a 5 mm thick profile is relatively light: durability is determined by the entire chain “base — coating — fastener — wood.”
First, mark the boundaries of the panel and the diagonal baseline. It is better to transfer both outer edges of several reference slats onto the wall: then, even before fastening, you can see whether the 20 mm gap is maintained. On a large field, error accumulates from each inaccurate installation. If you rely only on one adjacent strip, inaccuracies can progressively shift the pattern. Control lines at several steps reduce this risk.
The end fragments are especially sensitive to edge treatment. A short piece in a corner has comparatively little room for fastening, so you cannot, without checking, place it on a weak area of paint and expect it to last. Sometimes it is safer to slightly alter the pattern boundary or to omit a tiny corner fragment. This is exactly why the article chose the edge margin: it reduces the number of difficult pieces and preserves a meaningful completion of the panel.
The fastening method — mounting adhesive, concealed fixings, or a combined solution — is agreed upon with the specific substrate and the recommendations of the manufacturers of the compounds and fixings. A thin decorative profile cannot simply be nailed anywhere: cables, pipes, and other utilities may lie behind the finish. Before drilling or using fixings, the location of concealed systems must be checked. If the base is a drywall partition, the position of the frame and the permissible loads are taken into account, rather than relying on a single top sheet.
For an accurate diagonal pattern, a template that sets the angle and the position of the first element is useful. If the entire field is laid out on paper or in a program, several reference dimensions can be transferred to the wall and checked with a tape measure. But even an accurate digital layout does not replace measuring the real object: plastered corners are rarely perfect. It is sensible to cut the first two or three pieces after a dry fit, then check the gap sizes and the position of the last strip on the mock-up.
The battens should be fastened so as not to create excessive point pressure on the thin profile and not to damage the face surface. Excess mounting compound must be removed according to the manufacturer's instructions for the compound, without smearing it over the wood. After fixing, a coating that is incompatible with the adhesive or with a substrate that has not yet finished drying should not be applied immediately. The technological sequence must be agreed upon before work begins.
Wood preparation, painting, and care of the finished panel
After sawing, each piece has at least one new end. There the wood is open and may absorb the finishing compound differently from the sanded face surface. If the panels are to be left natural, it is worth comparing in advance the shade of the main material and the treated end on a test offcut. Sometimes the difference is almost imperceptible; sometimes it forms a dark or light line along the panel boundary. It is more difficult to resolve this completely after installation.
First check for chips, the direction of the grain, the quality of the face edges, and the dimensions. If necessary, sand carefully in the direction of the grain and remove dust. Compounds are chosen according to purpose, the required appearance, and the manufacturer's instructions. For a clear finish, it is important to maintain identical preparation of all pieces. If some battens were treated differently, a visible alternation of tone may appear in the diagonal row after installation, even though the differences seemed small in the stack of blanks.
Natural wood is sensitive to changes in humidity and temperature. This does not mean that wooden battens cannot be installed in a living room; it only means that they should not be mounted on a damp substrate immediately after delivery from outside or stored in an unheated room without regard to the manufacturer's conditions. Allow the material to remain in the safe conditions specified for the chosen product and coating; confirm the exact acclimatization times according to technological recommendations, not by a universal formula for all species.
During use, a diagonal wall is easier to clean with a soft dry or slightly damp cloth, taking into account the chosen coating. Dust accumulates in the gaps between the battens, and that is exactly where damage to the painted background is most easily noticed. Aggressive solvents and heavy wetting should not be recommended without checking the coating's resistance. If a separate damaged spot appears on the surface, a saved spare batten will make it possible to produce a suitable fragment; an exact color match in this case depends on the age and condition of the rest of the finish.
Lighting matters for preserving the appearance. Side light creates shadows from the strips, so the LED backlight near the panel must be coordinated with the pitch and direction of the diagonal. A source that is too close can emphasize wall irregularities or traces of adhesive that are invisible under frontal daylight. Before fixing all the slats, it is useful to switch on the planned lighting on a test section.
When a diagonal panel should not be made specifically from RK-001
Not every interior will benefit from diagonal finishing. If a completely flat, continuous surface without visible gaps is required, standalone wooden slats with a 20 mm gap will not solve this task. If the customer expects an acoustic system with guaranteed sound absorption ratings, the decorative RK-001 set without a special design and testing is also not a confirmed acoustic solution.
Slats must not be chosen as a replacement for a load-bearing lattice, fencing, mounting frame, or technical protection of utility lines. Such tasks require separate load calculations and appropriate products. In rooms with unstable humidity, direct constant moisture, or near a source of increased heat, the operating conditions must be assessed in advance. The general wording "solid wood" by itself does not mean that any conditions are acceptable.
There is also an aesthetic limitation. If a small wall already has bold wallpaper, many open shelves, and furniture lines running in different directions, diagonal slats can increase visual fragmentation. Sometimes it is better to leave one area calm and use a more straightforward molding or a solid-color panel. In the article about wooden wall finishing with moldings, slats, and ornament other decorative scenarios are compared; our panel is specifically a particular option that requires cutting.
If the budget is limited, an alternative may be to reduce the decorative field while keeping the chosen cross-section. But dimensions should be reduced only after evaluating the layout: a thin diagonal rectangle under furniture that is too large loses its point. Price is one criterion; the second is the ability to place the entire pattern without conflicts with switches, door casing, baseboard, and lighting.
How to combine diagonal slats with baseboards, doors, and furniture
A panel does not exist separately from the room. The lower edge of the rectangle may run above the baseboard, or it may end up directly above it. In the second case, the transition between the diagonal strips and the horizontal baseboard line becomes especially noticeable. If the bottom of the panel coincides with the top edge of a tall baseboard, some diagonal ends will appear visually pressed against its profile. A small gap often helps preserve the composition's separateness, but its specific size is chosen on site.
It is not necessary to repeat the wood species in every element of the room. An oak panel next to a white-painted skirting board can look quite cohesive if their lines do not conflict in scale. If the skirting board, architrave and battens are to be left in natural wood, it is better to agree on the shade and coating samples in advance. The same species name on different products does not guarantee a completely identical colour after finishing.
When decorating several rooms, it is sensible not to turn one successful technique into a mandatory one. A diagonal panel may be present only in the living room, while in the bedroom a simple wooden moulding or a calm paint finish is used. In the catalogue you can Buy wooden trim items from trusted manufacturers who provide care recommendations. for different tasks, but the selection of additional elements should be based on the real proportions of the rooms. The product carousel of this article, by contrast, is limited to one model, RK-001: adding unrelated skirting boards to it would be incorrect.
If there is a door nearby, check whether it opens towards the decorative field and whether it catches the protruding battens with its handle or doorstop. A product thickness of 5 mm is not equal to the required operational clearance: the base, fixings, actual protrusion and path of movement must be taken into account. The corner ends must not protrude into the passage or form sharp accessible edges. If necessary, the composition is moved away from the doorway and the field is recalculated, rather than cutting the finished elements arbitrarily.
Check the combination with furniture in its everyday position of use. A tall chair back, an opening wardrobe door or a lamp on a swivel bracket can overlap the diagonal in unexpected places. On a drawing of an empty wall this goes unnoticed. Therefore, before buying, it is useful to mark the real large interior items on the drawing. If most of the panel ends up behind furniture, it may be worth choosing a different area or reducing the size of the decorative zone.
Delivery of wooden battens to Volzhsky: what to agree on in advance
Delivering a set of long wooden products is different from sending a small box. Even if the finished diagonal pieces are short, the goods arrive as factory RK-001 planks 2400 mm long. For the transport company, the length of the packaging, weight, number of items, method of protecting the corners and loading dimensions all matter. One cannot assume that the short future cut pieces will automatically make transportation cheap: it is the whole planks that are shipped before sawing.
The official STAVROS website describes the shipping options via transport companies and the calculation of delivery taking into account the dimensions of the order. The current terms must be checked when placing an order. One should not promise a resident of Volzhsky a fixed price, a specific delivery time or the availability of a local warehouse unless this information is confirmed by a separate order. Long-length timber sometimes requires rigid packaging, so it is useful to request the final amount including packaging before payment.
A purchase request is drawn up so that the seller can check each item without guessing. For example: “RK-001 batten, beech, 24×5×2400 mm, 20 whole planks for the project and one spare; please confirm the price, availability of a single batch, surface preparation and the cost of delivery to an address in Volzhsky.” For the wide option, the cross-section and quantity are substituted. If finishing with a clear coating is planned, wishes regarding the appearance of the wood are stated separately, within the supplier's actual options.
Learn more delivery of wooden slats across Russia can be found in the relevant STAVROS section. In the finished specification, it is also advisable to include the recipient's contact details, the unloading method, and the conditions for inspecting long-length packaging. If damage is discovered upon delivery, it is recorded in the manner established by the carrier, without first trying to saw up the entire batch and only then determine which items were affected.
For a buyer from Volzhsky, there is a simple check question: “What exactly will I receive — twenty whole slats or pre-cut parts?” In our project, the calculation is based on purchasing whole products and cutting them yourself or through a contractor after receipt. The possibility of ordering ready-made fragments of the required lengths from the manufacturer has not been confirmed; such a service cannot be promised without individual agreement. If a workshop cuts the slats already on site, it must work with a numbered schedule and the final refined geometry of the panel.
Frequently asked questions about wooden slats for a diagonal panel
Which size looks better on a 1600×1200 mm panel?
Both considered cross-sections are suitable for the chosen training size, but they create different pattern densities. 24×5 mm gives more thin strips and a more frequent sequence of gaps, while 40×5 mm gives fewer elements and wider wooden surfaces. It is better to lay out several test strips on the wall with a 20 mm gap and evaluate them under actual lighting.
Why does the narrow version have 43 parts rather than 45?
With 45 strips, the edge offsets from the far diagonal corners would be about 10 mm, and very short parts would appear at two corners. For the practical project, 43 strips with 53.95 mm edges were chosen to avoid inconvenient fragments. The number 43 relates to the adopted composition, not to a mandatory rule for all panels of this size.
What 20 mm distance is shown in the diagram?
This is the light gap between adjacent side edges of the slats, measured perpendicular to the diagonal. A horizontal or vertical ruler will give a different projection of the distance. For a stable pattern, it is better to use a template that fixes exactly the required normal clearance.
Why is the maximum part longer than 1697 mm?
The number 1697 mm describes the length of the long diagonal section on a 45° line inside the rectangle. The actual slat has a width, and its angled ends take up additional length along the blank. The bill of materials also includes a 20 mm allowance for final trimming. Therefore, for the wide option, the maximum blank reaches 1758 mm.
Can I buy slats based only on the total linear meters?
It is better not to do this. The total linear meters indicate the sum of the lengths of future pieces, but do not show which pairs or triples can be cut from a single 2400 mm plank. In the selected narrow scheme, the useful sum of blanks is 45,452 mm, however the working map requires twenty whole products, not simply a mathematical rounding of the division by the factory length.
Can oak and beech slats be mixed in one panel?
Technically, different species can be used in a decorative composition with appropriate preparation and coordinated installation, but this is already a different design task. The article's four estimates are calculated for homogeneous sets: either all beech or all oak of the selected cross-section. Mixing materials will require a separate specification, a finishing decision, and a recalculation of the quantity of each version.
How do I calculate a panel if the wall has different dimensions?
You need to set the width, height, angle, actual slat width, gap, method for finishing the end strips, and the machining allowance again. Then determine the geometry of where the strips intersect the field and create a new cutting map. You cannot simply scale the total cost by area: the number of short and long pieces changes unevenly.
Should I buy one extra slat?
This is a reasonable but not mandatory option. The estimates separately show the main sets and an additional full-length plank that can be kept in case of damage. If the budget is limited and the work is done without haste, the question of a reserve is discussed with the craftsman, taking into account the cutting specifics, order timelines, and the desire to keep the same batch of wood.
Can slats be installed on a painted wall without preparation?
Only if the coating and substrate are suitable for the chosen fastening method. You need to check the adhesion strength of the paint, the absence of peeling, the evenness and dryness of the surface, as well as the recommendations of the fastener manufacturer. You cannot promise durability based solely on the fact that the wall is already painted.
Does the delivery cost to Volzhsky depend on the number of cut pieces?
The carrier receives whole factory slats in packaging if cutting has not been ordered and agreed in advance. Therefore, the cost is determined by the actual dimensions and parameters of the shipment, the route, and the carrier's terms. The calculated 43 or 31 finished parts are not separate shipping units until cutting is done.
Buy RK-001 wooden slats with delivery to Volzhsky
For a diagonal panel measuring 1600×1200 mm at a 45° angle, you can choose two separate compositions from RK-001. The narrow 24×5 mm with a 20 mm gap gives 43 parts, which according to the provided map fit into twenty whole 2400 mm slats. The wide 40×5 mm with the same gap gives 31 parts from fifteen planks. Both schemes account for angled edges, the allowance for finish cutting, and losses from intermediate saw cuts.
The difference between cross-sections is determined primarily by the pattern, not just the price: beech sets according to the calculation chart are close to each other in price, while oak ones differ more. The species should be selected taking into account the finish and adjacent wooden surfaces. Separately, you need to resolve the question of reserve, fastening, end protection, and transportation of long-length products.
To Buy wooden trim for a specific project, prepare a diagram with dimensions, select the species and cross-section in the RK-001 product card, then provide the supplier with the number of whole slats according to the agreed chart. Clarify the price of the selected version, availability of the entire batch, packaging, and delivery to Volzhsky. Perform the final cutting only after measuring the wall: then the order will be tied not to an abstract number of meters, but to the actual details of the future panel.