








Article Contents:
- Where to buy a wooden corner piece in Penza and what to specify in your order
- What the UG-001 external corner piece is
- Available UG-001 sizes: six variants of a single model
- 25×25 mm cross-section: when a compact corner piece is enough
- 34×34 mm cross-section: when a wider flange is justified
- Oak or beech: the choice depends on the visible finish
- What length of corner piece you need: 1000, 1500 or 2400 mm
- Eight external edges: the project's original geometry
- Measuring before purchase: eight separate entries
- Three long ribs of 2380 mm each: choosing 2400 mm strips
- Three medium ribs of 1480 mm each: why 1500 mm strips are convenient
- Two short ribs of 980 mm each: 1000 mm strips
- Full specification: eight corner pieces without horizontal joints
- Option using only 2400 mm strips: how many you will actually need
- Waste and cuts: why linear meters do not equal the work plan
- How much do UG-001 25×25 mm in oak and beech cost
- What changes when choosing a 34×34 mm cross-section
- How to check dimensions A, C, D and E before installation
- How to finish the start and end of a wooden corner strip
- How to combine UG-001 with battens, mouldings and other trim profiles
- Surface preparation and fastening method
- When it's better to avoid buying a wooden corner strip
- Installation sequence without haste and unnecessary waste
- How to order wooden corner strips with delivery to Penza
- Frequently asked questions before buying UG-001
- Can I order one corner strip 1000 mm long and the rest later?
- What should I do if, after the final finish, the height increased from 2380 to 2405 mm?
- Do I need to buy a spare strip for each of the three sizes?
- Will the corner strip work on a wall clad with tiles on one side and painted on the other?
- How should the corner pieces be stored after delivery if installation will be later?
- Do I need to choose the widest model to protect a frequently used passage?
- Can the remaining 920 mm be used after cutting the middle group?
- How can I make sure that the product card refers specifically to the external corner piece?
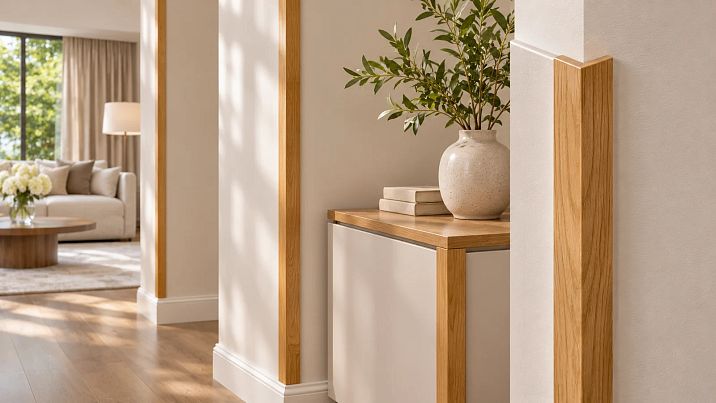
In a single interior, eight external edges rarely have the same height. For example, three wall sections reach almost to the ceiling, three partition end faces stop at about one and a half meters, and two short projections appear near low built-in structures. If wooden corner pieces 2400 mm long are ordered for all sections, some of the material will end up as offcuts. If too short ones are chosen, the profile will have to be joined in the middle of a visible vertical line.
For our example, three pieces of 2380 mm, three of 1480 mm, and two of 980 mm are needed. Selecting factory lengths 2400, 1500, and 1000 mm makes it possible to finish all eight edges without longitudinal inserts: three long, three medium, and two short corner pieces. The initial order will include 13.7 m items for 13.54 m finish. The difference is only 160 mm, so before payment the actual measurement and the allowance for trimming the ends must be confirmed.
The basis of the project will be the UG-001 external corner moulding made of solid oak or beech with a nominal cross-section of 25×25 mm. Below is the quantity calculation, a comparison with purchasing only long strips, actual prices and the procedure for checking dimensions on site. This example relates to interior decorative finishing: the corner moulding must not bear loads like a structural profile.

Where to buy a wooden corner moulding in Penza and what to specify in the order
If required buy a wooden corner moulding in Penza, it is convenient to start with the STAVROS product category: it offers the UG-001 external profile in several size and length options. In the request, it is better to write immediately not "a wooden corner moulding for thirteen and a half metres", but the exact quantities: 25×25 mm, three pieces of 2400, three of 1500 and two of 1000 mm. Beech or oak is selected separately, and the quality of surface preparation for subsequent finishing is agreed.
A buyer from Penza does not need to invent a local warehouse or look in the catalogue for an already cut set "for eight edges". The choice is made from actual product variants, and delivery is agreed for a specific address. Since the products are long items, packaging, the conditions of handover to the carrier, the length of the cargo unit and the procedure for checking upon receipt matter. It is reasonable to resolve these issues before payment, especially if the finishing is planned for a specific day.
Before choosing the material, it is useful to draw even the simplest plan: list the eight sections, write down their heights and mark which sides of each structure remain visible. A decorative corner moulding is not bought by the total wall area. Its quantity is determined by the length of external edges, which actually need to be covered. One wall may have many metres of surface and not a single suitable corner; a short partition, on the contrary, has two noticeable external edges.

What is the UG-001 external corner profile?
The UG-001 has two flanges that form an L-shaped profile, which is fitted over the outer edge of a finished surface. Its job is to neatly join visible planes, cover the edges of the finish and create a stable visual line. Unlike a straight batten, it wraps around the adjacent sides. Unlike a relief moulding, it is not intended to create a wide decorative frame within a plane. These products sometimes appear in the same project, but they do not substitute for one another.
An external corner is especially demanding when it comes to installation quality. It is seen from two directions, and side lighting highlights even a small step at the edge. If a wooden strip deviates from the vertical, the error becomes more noticeable on a long edge: the line seems to drift away relative to a door or cabinet. That is why the accuracy of the substrate matters more than the promise that any corner profile will "hide all the unevenness".
The wooden profile is a finishing product. It must not be used in place of a metal or other structural corner bracket designed for load-bearing joints, reinforcing a partition, mounting wall-hung furniture, or use in an area of constant moisture without separate confirmation that the material and coating are suitable. If the edge is regularly struck by trolleys or heavy objects, decorative wood alone may not provide sufficient protection.
For the buyer, the key question is this: how much space does the visible flange take up, and will it be enough to cover the existing edge? You should not choose a cross-section based on a catalogue photo alone. You need the actual dimensions of the adjoining surfaces, the exact angle between them and the distance to neighbouring elements — door casings, skirting boards, furniture fronts or switches.
Our factory also produces:




What sizes of UG-001 are available: six variants of one model
The official UG-001 product page has been verified for two cross-sections and three factory lengths. The materials are beech and oak. The dimensions in the table below are given in millimetres; the designations A, C, D, E correspond to the dimension letters on the product page. They do not replace a technical drawing: before a complex joint, it is important to see exactly how these values are marked on the cross-section image.
| Cross-section A×C | Additional D/E | Factory length L | Materials |
|---|---|---|---|
| 25×25 | 4/21 | 1000 | Beech, oak |
| 25×25 | 4/21 | 1500 | Beech, oak |
| 25×25 | 4/21 | 2400 | Beech, oak |
| 34×34 | 6/28 | 1000 | Beech, oak |
| 34×34 | 6/28 | 1500 | Beech, oak |
| 34×34 | 6/28 | 2400 | Beech, oak |
From a purchasing standpoint, this is six variants of a single product, not six independent SKUs. In the carousel, one card for UG-001 is enough: there the customer selects the required length and cross-section. Repeating it several times with the same cover image is pointless. An exact link to from STAVROS is a representative of exactly this type. Equal-flange profile made from select beech or oak with a precisely calibrated right angle between the flanges. The surface is sanded for applying any finish coating: oil, varnish, enamel, tint. This product is equally organic on the corner of a wooden panel in a classic study and on the edge of a slatted partition in a modern living room. leads to the entire size range.
The table does not contain a universal recommendation to "take the longest one." If the edge is 980 mm high, a 1000 mm product leaves a small allowance and does not create a two-meter offcut. If the height is 2380 mm, the long version really is needed: assembling such a line from 1500 and 1000 mm is possible only with an additional visible joint. Determining the appropriate factory length reduces the number of manual operations and increases the predictability of the result.
Get Consultation
Cross-section 25×25 mm: when a compact corner is sufficient
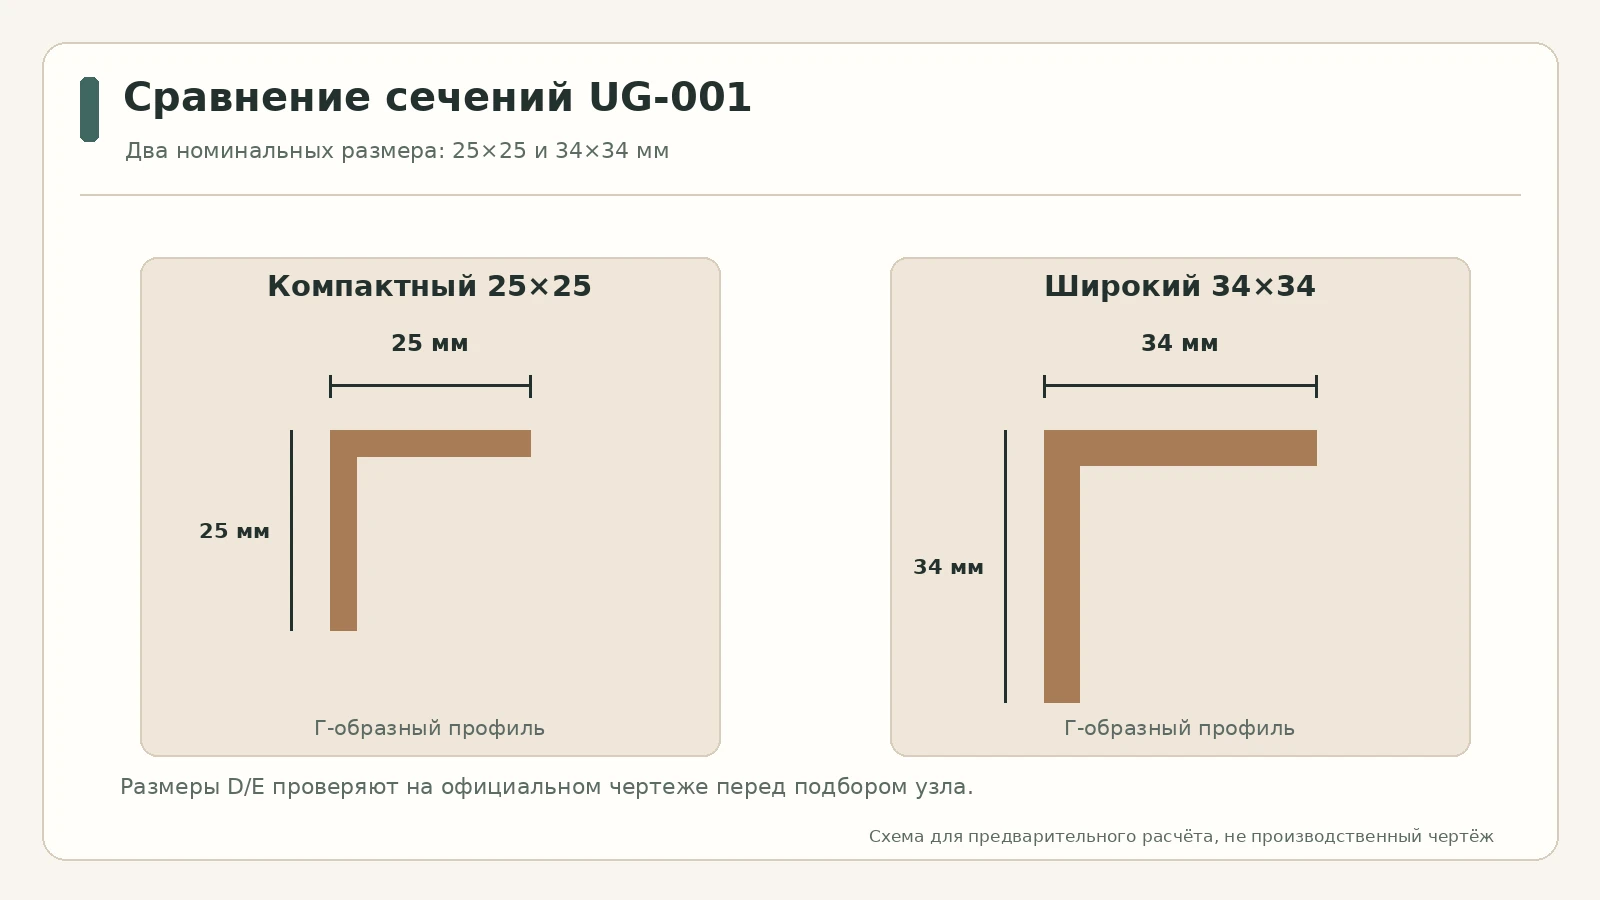
For most of our training project, a 25×25 mm cross-section was chosen. It forms a relatively narrow overlay on each of the two converging planes. On a simple painted wall pier, such a profile highlights the edge but does not turn it into a wide architectural column. Near a small protrusion next to furniture, this is often an advantage: the additional element is noticeable but does not compete with a door casing or a joinery frame.
When assessing the size, do not limit yourself to the two numbers "25×25." Check how deeply the inner surface of the profile must cover the actual protrusion and whether the edge of the coating will be overlapped. For the 25×25 mm cross-section, the card lists additional dimensions D=4 mm and E=21 mm. These are dimensional parameters of the specific profile that must be read on the drawing, not arbitrarily interpreted as the thickness of the entire flange or a guaranteed clearance under any panel.
There is a practical sign of the wrong choice: a noticeable line of the old coating remains at the junction, but the corner can no longer be widened because a door frame is right next to it. Before ordering, mark out with masking tape about 25 mm wide on both sides of the edge. It will not replicate the profile in depth, but it will show the visible width it occupies and any possible conflict with nearby objects. For a complex edge, ask for a sample or an exact drawing.
For a one-piece element 2380 mm high, an ordinary manual attempt to "stretch" a short corner with a joint at eye level can ruin a neat line. Therefore buy an oak corner piece UG-001 with a length of 2400 mm should only be purchased after checking the actual distance between the upper and lower points of the future trim: an extra twenty millimeters is not enough for every correction of unevenness.
34×34 mm cross-section: when a wide flange is justified
The 34×34 mm version takes up nine millimeters more than its nominal width on each plane than the 25×25 mm option. On paper the difference seems small; on a thin partition end the visual mass changes noticeably. A wider contour can look natural next to a massive skirting board, a large door frame, or a decorative panel, whereas on a narrow furniture protrusion it may draw attention to itself.
The large version specifies dimensions D=6 mm and E=28 mm. This does not mean it can be installed on any 28 mm thick edge without checking. The cross-section must be matched to the actual assembly, the coating thickness, and the fastening method. Be especially careful with steps at the junction of two different materials: if one side is painted and the other is faced, the internal geometry of the corner piece may require adjusting the base, which cannot be replaced by an additional layer of adhesive.
A simple test at the design stage is useful: draw contours 25 and 34 mm wide on two adjacent edges and step back to the entrance of the room. If the wide option leaves too little free surface between the corner and the adjacent trim, the narrow one will look better. If, on the contrary, the outer corner separates a large wall composition and requires a more confident line, the narrow profile may get lost. This is a criterion of visual scale, not a judgment that "more expensive means better."
Three lengths are also available for it. But you cannot replace 25×25 with 34×34 in the estimate without changing the cost: the larger version is significantly more expensive and has different cross-section dimensions. Below we will separately show the budget for the two options so that the buyer sees the price of the solution before the final finishing.
Oak or beech: the choice depends on the visible finish
In a wooden corner piece, the material is visible from both sides at once. Oak usually produces a pronounced pattern with clearly readable pores, while beech appears more even in color and texture. However, two strips of the same species do not have to match in shade down to the finest half-tone. Wood has natural variations, and the final appearance is determined both by the sorting of the blanks and by whether the surface will be painted, tinted, or coated with a clear finish.
For eight separate edges, it is reasonable to decide in advance whether the wood should remain visible. If a covering enamel is planned, the main things are even surface preparation, coating durability on the edges, and neatly sealed ends after cutting. With a clear finish, the combination of the pattern with the floor skirting, furniture, and existing details comes to the fore. The same light beech looks different against a cool gray wall and a warm oak door.
The product card sometimes mentions "for enamel". At STAVROS, this denotes a gluing option without mandatory matching of lamellas by color and texture; for a transparent finish, it cannot automatically be considered fully identical in pattern. If you want to see natural wood, clarify the suitable sorting and coating option before purchase. Do not try to correct a contrasting pattern with random varnish after delivery: the coating changes the tone but does not always hide the difference between adjacent areas.
In our calculation, the wood species are treated as two separate orders. Mixing five beech and three oak corners to save money is acceptable only where this is a deliberate part of the project and there is no requirement for a continuous uniform color. On eight edges of one room, mismatched materials may look like the result of buying up leftovers. Therefore buy a beech corner 25×25 it makes sense to buy as a set, having first checked the future finish and the actual options in the product card.
What length of corner is needed: 1000, 1500 or 2400 mm
The size of the factory strip is selected not by the largest number in the catalog, but by the length of the specific outer edge. For a 980 mm section, a one-meter product leaves twenty millimeters for adjustment. For a 1480 mm section, a length of one and a half meters is logical; for 2380 mm — two meters forty centimeters. In each case, a single-piece profile covers the edge with one line. When ordering only 2400-millimeter products, offcuts are generated that do not always find a place in other sections.
There is also a less obvious benefit. Working with three factory lengths reduces the number of sawing operations. The installer does not need to mark out a two-meter excess each time, carry a long workpiece across the room, or store large pieces with open ends on site. For finished housing, this is a matter not only of wood consumption but also of work convenience. True, a short factory strip is not always cheaper per meter, so the final decision must be checked against the cost of specific versions, not just one linear measurement.
If one side of the partition ends at the floor and the other at a step or furniture surface, it is useful to clarify where the length is measured from. An edge with a length of 1480 mm indicated on the architectural drawing may become shorter after floor covering installation, and after adding a top decorative overlay it may become longer or require a special termination. For ordering, what matters is the final length of the visible profile, not the height of the wall without finishing.
In the long model, it is permissible to make several short parts if their total length and the width of the cuts allow this. But this is not universal savings: two 1480 mm sections will not come out of one 2400 mm strip, while two 980 mm parts will. It is this simple cutting check that determines how many source strips will be needed in the second purchasing option.
Eight outer edges: the original geometry of the project
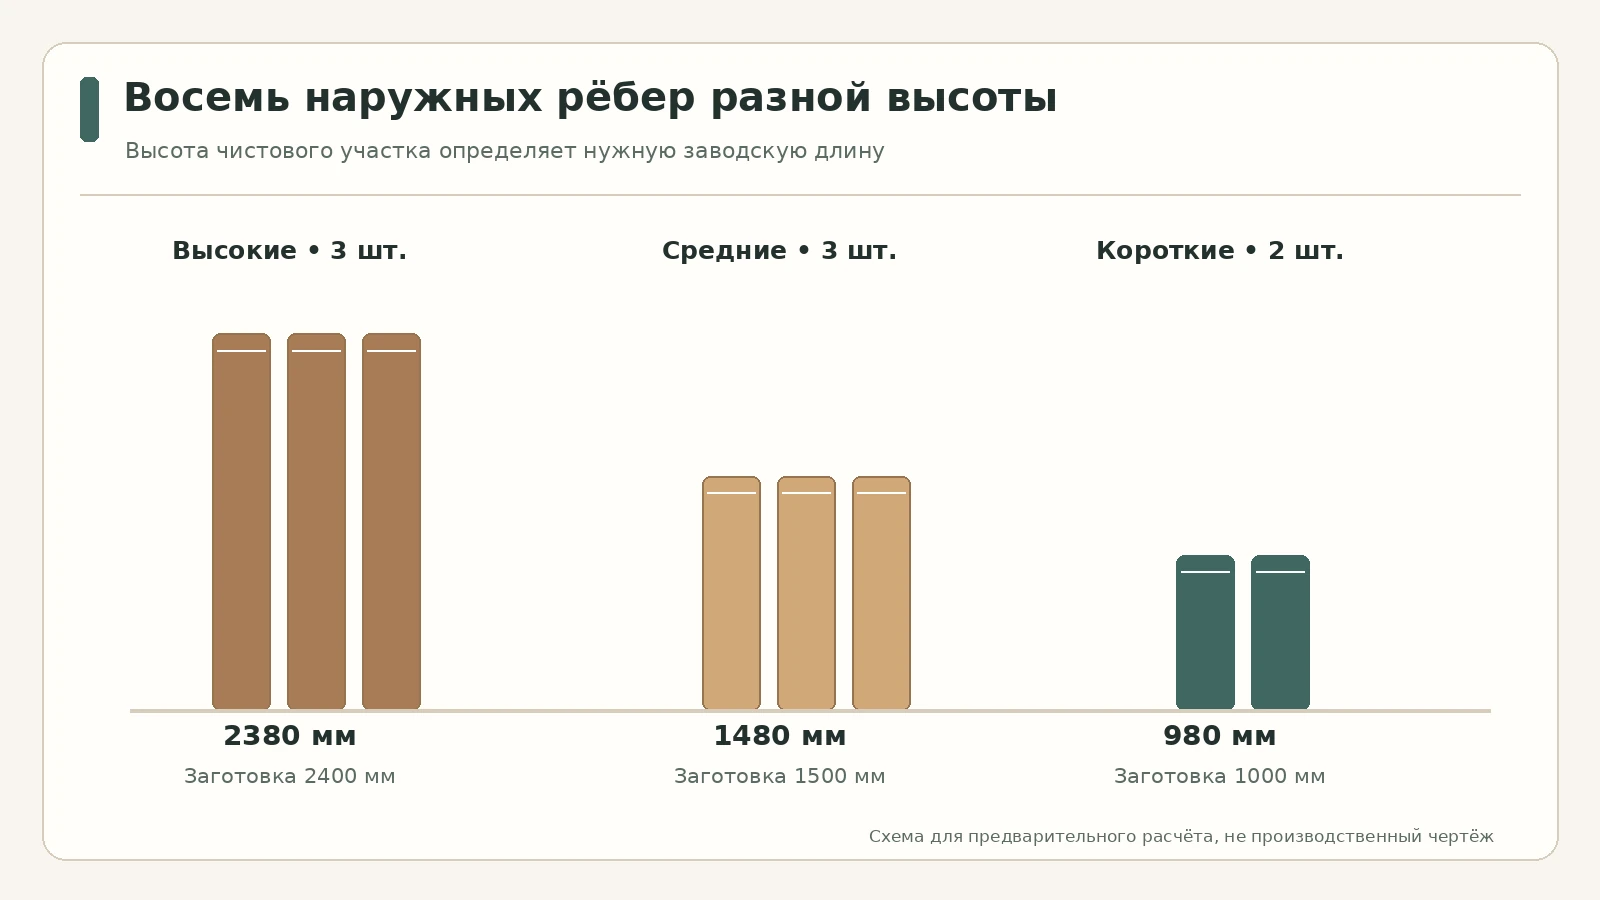
Imagine an interior with several rectangular projections. Three tall edges are located on the visible ends of the wall piers and run almost the full height of the clad section. Another three are formed by low partitions or wall piers, and two short ones are found near built-in furniture. There is no need to look for one specific room type in this scheme: the calculation task will be useful for both an apartment and a commercial interior if the lines are straight and the dimensions can be measured on site.
| Edge group | Finished height of one | Quantity | Total length |
|---|---|---|---|
| High | 2380 мм | 3 | 7140 мм |
| Medium | 1480 мм | 3 | 4440 мм |
| Short | 980 мм | 2 | 1960 мм |
| Total | — | 8 | 13,540 mm |
Three tall edges require more careful vertical marking. A small error of a few millimeters, almost unnoticeable on the short end of a cabinet, at a height of 2380 mm can create a visible wedge between the strip and the finished surface. Middle edges are often located closer to eye and hand level, so chips and steps are especially noticeable on them. Short parts are often located near everyday objects and require careful joining with the furniture edge or skirting board.
Here we deliberately do not calculate the width of the entire wall, the number of square meters of cladding, or the number of internal corners. They do not affect the specified eight lengths unless additional profiles are provided by the project. At the same time, there may be more external edges after the installation of built-in partitions. Therefore, you first need to complete the geometry plan, then label each position from first to eighth, and only after that calculate the order.
Measurement before purchase: eight separate records
To work, prepare a tape measure, a long level or laser line builder, a straight square, a paper diagram, and a simple pencil. Separately record the height of each edge from the intended lower end to the upper one. Do not transfer the dimension from a neighboring edge, even if the structures look identical. The corners are on different sides of the wall, and the finished coating, skirting board, or countertop may change the actual height.
Check straightness at several marks. Place a long straight batten or level against both surfaces and see where there are protruding spots and hollows. Then measure how close the outer face is to a right angle. Also mark the visible ends on the diagram: for example, at the bottom the corner rests against the skirting board, and at the top it meets the ceiling trim. With such a joint, the installation length differs from the abstract height of the partition.
It is convenient to keep a schedule with columns for "edge", "actual height", "cross-section", "bottom termination", "top termination", "finish", and "notes". For example, for item No. 2, write: 2380 mm, 25×25 mm, floor junction at the bottom, open end at the top, surface painted. For item No. 5: 1480 mm, butts against the countertop, top edge visible. Such a document helps avoid mixing up blanks during unpacking.
If, after measuring, one edge turns out to be 2410 mm, a 2400 mm strip is no longer suitable for a single-piece installation. The solution here is not to "press it against the wall" or rely on a layer of glue: a different size, a change in the termination point, or a pre-planned joint is needed. If the size is 2396 mm, the twenty-millimeter margin from the original design almost completely disappears, which must also be taken into account before ordering.
Three tall edges of 2380 mm each: choosing 2400 mm strips
Each long vertical requires a separate 2400 mm strip. One blank cannot yield two solid 2380 mm elements, and joining two shorter pieces will add a horizontal seam. The calculation takes 2380 mm as the finished length; the preliminary remainder from each strip is 20 mm, totaling 60 mm for three items. Offcuts of this size have almost no reuse, but they do allow the blank to be trimmed neatly.
At the same time, twenty millimeters cannot be considered a full safety margin for any errors. If the wall is out of plumb, the planes diverge, and the ends need to be fitted to an angled junction, part of the margin will be used to correct the geometry. If the blank arrives with a damaged end, trimming it will also reduce the available length. Therefore, before sending the order, it is useful to make sure that 2380 mm is the final, already measured size, and not a rounded estimate from the drawing.
On a long line, it is especially desirable to avoid unstable or random fastening. A wooden corner piece can follow irregularities in the base and create a visual wave. Do not try to correct this by pressing on the profile while gluing if the base deviates noticeably: strong stress and uneven contact with the adhesive can lead to gaps. First prepare a straight edge, then install the solid decorative piece.
In the purchase schedule, this group looks simple: 3 × UG-001 25×25×2400 mm. All three products are of the same species and in an agreed finish. If the room is lit by a large side window, lay the profiles side by side before the final finishing and check for a noticeable difference in the grain pattern. It is better to carry out such an inspection before cutting, when it is still possible to decide which part of the room each blank will go to.
Three medium edges of 1480 mm each: why 1500 mm strips are convenient
For the middle group, three pieces of 1500 mm are needed in advance. Each profile is shortened to the required 1480 mm; the nominal remainder is twenty millimeters each. All three ribs will form a continuous line, and the number of places where decorative parts must be joined will not increase. If the upper end is visible at eye level, the absence of a horizontal joint is especially beneficial.
From an economic standpoint, a long 2400 mm strip is not an equivalent substitute. After obtaining a 1480 mm part, approximately 920 mm remains, minus the saw kerf width. This remainder is too short for either of the two planned short ribs with a height of 980 mm. Therefore, three additional long pieces will still be required for the three middle parts if you choose to purchase only one factory length.
In some projects, the 920 mm remainder could go toward another structure not included in the original bill of materials. But accounting for such use in advance is risky: the additional rib may not exist, and the wood will simply remain in stock. If the list of objects is closed with eight positions, there is no need to calculate savings based on a hypothetical ninth element. In this article, we compare a specific task without imaginary use of offcuts.
In the model card, you can buy a wooden corner 34×34 of the same length, but the width decision is made separately. For the three middle ribs, it is better not to change the cross-section just because it is more convenient in terms of quantity: different visible widths within one group can disrupt the unified rhythm of the finish.
Two short ribs of 980 mm each: strips 1000 mm long
Here the most natural order is two separate meters of profile. If the base is prepared and the actual installation height does not exceed 980 mm, each of them will allow a one-piece part with a small allowance. Waste will be 20 mm per position, 40 mm in total. Compare this with the situation where two long strips are purchased for two short ribs: an excessive unused volume of material is created.
But in the alternative scheme, where only 2400 mm pieces are available, two 980 mm parts do indeed fit into one strip: 980 + 980 = 1960 mm. Even with a kerf width of several millimeters, more than four hundred millimeters remain. Therefore, for a pair of short ribs, a long blank is needed one, not two. This nuance changes the entire comparative calculation: without a cutting map, you can overstate the purchase and the price.
When an edge is bounded by a countertop or lower shelf, check whether a structural gap needs to be left between the wood and the adjacent surface. The gap cannot be set by eye: it must match the chosen installation method and the nature of the joint. If the top edge of the corner piece remains exposed, it is important to provide a finish for the cross-cut so that it does not stand out with untreated fibers against the painted surface.
Short pieces are convenient for checking the appearance of the finish before installing the long ones. First, you can test-fit the prepared piece, see how it spans two planes and how the chosen coating looks next to the skirting board. But do not turn such a test-fit into a load test: the profile is decorative, and the reliability of fastening is assessed by the base materials and the mounting system.
Full specification: eight corner pieces without horizontal joints
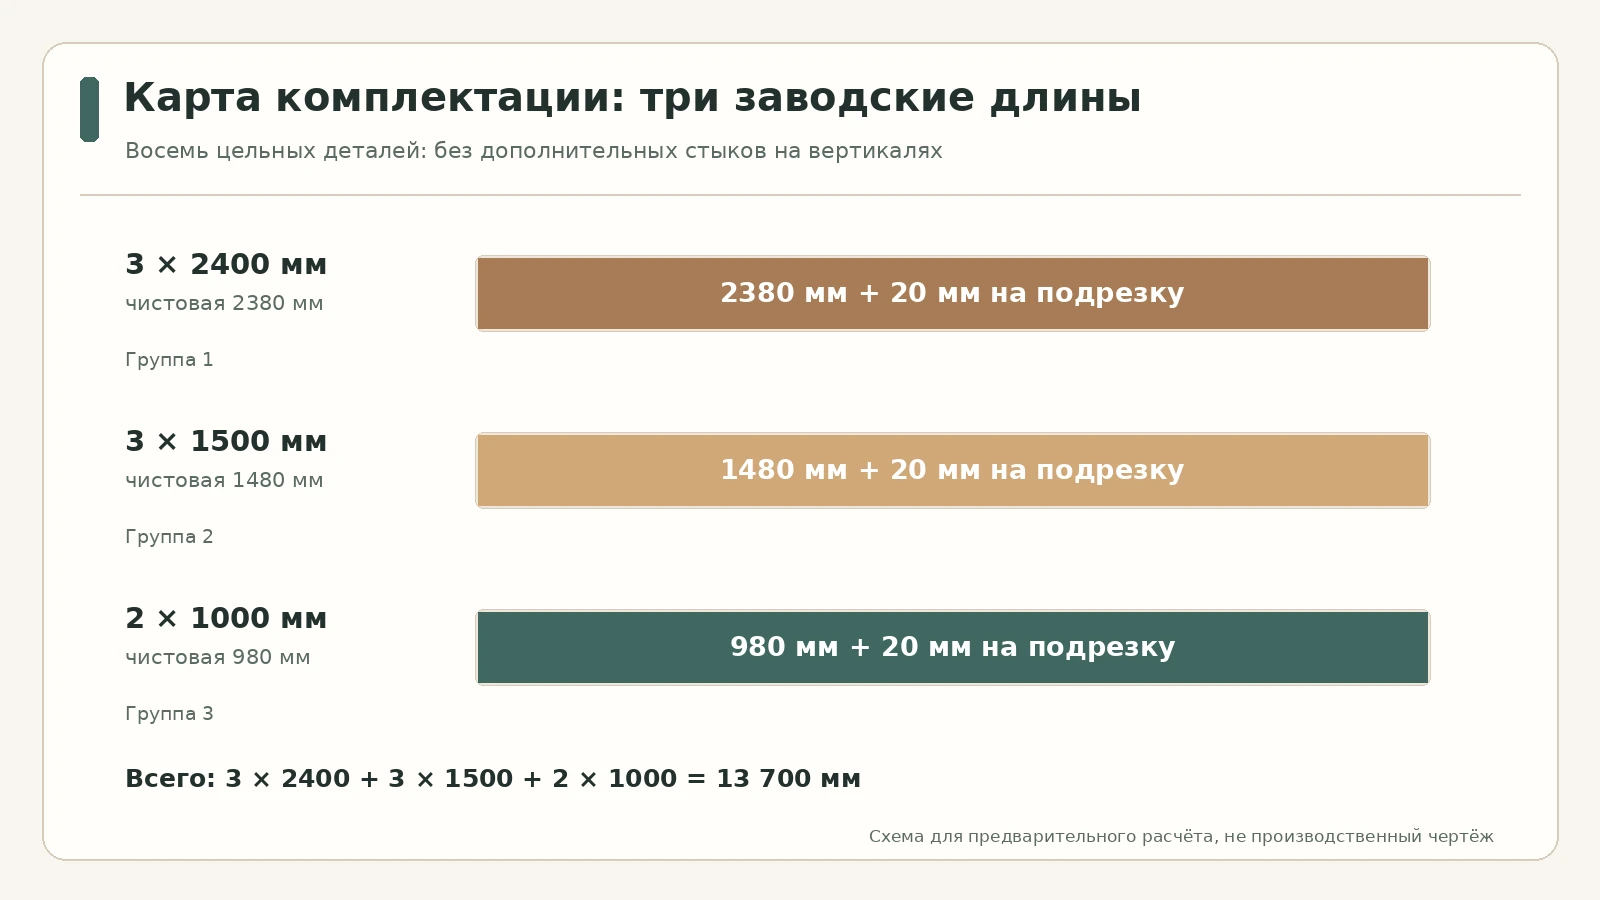
Let's compile the results into a single table that can be used for preliminary order approval. It includes only UG-001 items of one selected cross-section — 25×25 mm. For a clear finish, it is best to specify the desired wood species and the agreed type of preparation right away. The number "eight" is the number of physical strips, not the number of meters and not the number of different product cards.
| Finished part | Factory length | Quantity | Sum of original lengths | Nominal remainder |
|---|---|---|---|---|
| 2380 мм | 2400 мм | 3 | 7200 мм | 60 мм |
| 1480 мм | 1500 мм | 3 | 4500 мм | 60 мм |
| 980 мм | 1000 мм | 2 | 2000 мм | 40 мм |
| Total | — | 8 | 13,700 mm | 160 мм |
Calculation of the finished length: 3 × 2380 + 3 × 1480 + 2 × 980 = 13,540 mm. Original length of the set: 7200 + 4500 + 2000 = 13,700 mm. The difference is 160 mm before accounting for saw cuts and end trimming. The order ends up with three packaging groups by length, which are convenient to label separately, but all items belong to the same model.
The table does not automatically assume a spare strip. If the site has already been accurately measured and each edge fits the corresponding size, the order can consist of these eight items. If there is a risk of damage during complex fitting, the reserve is discussed deliberately: long edges require a long spare strip specifically; it cannot be replaced with a one-meter one. Therefore, a general reserve of "plus any one piece" is not a technical solution. Clarify which group is the most complex, and only then decide whether to purchase an additional one.
It is useful for the buyer to have both the finished and factory lengths in the order file. If the request only says "3 pieces of 2380", the seller may take this as a request for custom cutting. If you write "factory 2400 mm, finished cut 2380 mm on site", the meaning becomes unambiguous. The 1500 and 1000 mm groups should be documented in the same way.
Option using only 2400 mm strips: how many will actually be needed
Sometimes it is more convenient for the buyer to order all corners of the same length: for example, if a combined delivery with other rooms is planned, or the required short version is not available at the time of ordering. Let us check such a purchase separately. Three pieces of 2380 mm will require three long strips. Three pieces of 1480 mm — three more, because two such segments do not fit into 2400 mm. Two pieces of 980 mm can be obtained from one remaining strip. In total seven items of 2400 mm.
The sum of the original lengths is 7 × 2400 = 16,800 mm. Of these, 13,540 mm are turned into eight installation pieces. The nominal remainder is 3260 mm. It includes short offcuts after the tall ribs, three relatively long segments of approximately 920 mm each, and one offcut after the two one-meter pieces of about 440 mm. The actual values will be slightly smaller due to saw kerfs and possible end trimming.
The main feature of this scheme is that seven purchased items yield eight installed pieces. This is possible because one strip is cut into two short segments. One cannot mechanically compare the number of original strips with the number of outer ribs and declare any set of seven to be "insufficient". The cutting list shows that each of the eight sections will receive a solid piece.
However, the alternative set has a cost that is not only monetary. Long blanks will be required where a short one fully covers the task; offcuts will remain that will have to be stored or disposed of; the volume of waste will increase. If additional 900 mm high ribs are needed for future finishing, the offcuts from the medium pieces could theoretically become useful. But as long as such ribs are not in the project, this benefit cannot be counted.
Waste and saw kerfs: why linear meters do not equal the work plan

The comparison of the two schemes is clear: 13.70 m of material with three factory lengths versus 16.80 m when purchasing only long ones. The difference is 3.10 m of original linear lengthor almost a quarter of the project's finished area. At the same time, choosing a set solely by length is also wrong. The price per meter varies between factory options, and the costs of fitting and transportation are not part of the meterage arithmetic at all.
| Indicator | Three factory lengths | Only 2400 mm length |
|---|---|---|
| Number of commercial planks | 8 | 7 |
| Initial length | 13.70 m | 16.80 m |
| Finish length | 13.54 m | 13.54 m |
| nominal leftovers | 0.16 m | 3.26 m |
| Horizontal joints on the edges | Not required | Not required |
The word “optimal” is often used too loosely in calculations like these. Here is an option based on three factory lengths minimizes unnecessary initial linear meters for a given bill of materials, but it does not prove absolute optimality of all possible purchases under any prices, tolerances, delivery conditions, and use of offcuts. If the carrier's tariff depends on the length of the shipping unit, overall logistics can also affect the final decision.
Every cut has a width. Even if the blade removes only a few millimeters, when making two parts from one board you cannot simply add the two finished lengths and treat the remainder as a ready usable offcut. For 980 + 980 mm, the allowance in a long board is sufficient even after a standard saw cut; for parts that fit the factory length almost exactly, the situation is different. There, a separate allowance is needed for edge alignment, not just for the width of the cutting tool.
How much do UG-001 25×25 mm in oak and beech cost
As of November 12, 2026, the official STAVROS product page for the 25×25 mm cross-section lists the following prices per board. These are specifically the wooden versions in the selected species, not the average price across the entire category and not the cost per meter after cutting. Before paying, the values should be checked again: the assortment, order status, and delivery terms may change.
| Factory length | Beech per piece | Oak per piece |
|---|---|---|
| 1000 мм | 1 120 ₽ | 1 600 ₽ |
| 1500 мм | 1 530 ₽ | 2 210 ₽ |
| 2400 мм | 2 260 ₽ | 3 290 ₽ |
For a mixed-length set of eight units, beech will cost 3 × 2260 + 3 × 1530 + 2 × 1120 = 13 610 ₽. A similar oak order: 3 × 3290 + 3 × 2210 + 2 × 1600 = 19 700 ₽. If you buy seven long strips, you get respectively 7 × 2260 = 15 820 ₽ or 7 × 3290 = 23 030 ₽. The savings from precisely matching factory lengths will be 2210 ₽ for beech и 3330 ₽ for oak.
| Purchase plan | Beech, 25×25 | Oak, 25×25 |
|---|---|---|
| 3×2400 + 3×1500 + 2×1000 | 13 610 ₽ | 19 700 ₽ |
| 7×2400 | 15 820 ₽ | 23 030 ₽ |
| Difference in favor of the first option | 2 210 ₽ | 3 330 ₽ |
These amounts do not include delivery to Penza, packaging, surface preparation, fasteners, a possible reserve, or the labor of installers. If a specific enamel color is required, the costs of materials and finishing are calculated separately. If the product is purchased for an organization with a special payment method, the terms are also clarified when placing the order. There is no need to add a fictitious “average delivery per kilometer” to the cost of the angles.
What changes when choosing the 34×34 mm section
A wider corner noticeably changes the project price. According to the verified table in the product card, the prices for 34×34 mm are: beech 1000 mm long — 2630 ₽, 1500 mm — 3700 ₽, 2400 mm — 5060 ₽; oak respectively 3960, 5550 and 7610 ₽. These versions belong to the same model UG-001, but have different shelves, D/E dimensions and different processing and material costs. They cannot be substituted for the narrow options in an already calculated order without approval.
According to the three factory lengths scheme, eight wide beech corners cost 3 × 5060 + 3 × 3700 + 2 × 2630 = 31 540 ₽. For oak, the calculation gives 3 × 7610 + 3 × 5550 + 2 × 3960 = 47 400 ₽. If you buy seven strips only 2400 mm long, the cost will be 35 420 ₽ in beech or 53 270 ₽ in oak. The difference between the schemes is 3880 and 5870 ₽ respectively.
At the same time, sections cannot be compared by the total sum alone. If a wide uneven edge needs to be covered on the outer rib or a striking architectural line needs to be created, the narrow option may be visually unsuitable. First the functional and spatial task is determined, then the cost of the chosen solution is calculated. But if both widths are equally acceptable, the price difference matters: for finishing eight ribs it is already measured in tens of thousands of rubles.
For open oak finishing, it is better to check how the future profile combines with adjacent elements before purchasing. A wider shelf shows more wood surface, so the difference in grain and shade on adjacent parts of the structure is more noticeable. When painting with opaque enamel, the priority shifts to shape, the quality of the joint and the ability to neatly close the end.
How to check dimensions A, C, D and E before installation
The name “corner 25×25” describes only the main dimensions, but not the full internal shape or the ability to cover a specific cladding. For precise installation, dimensions A, C, D and E from the official drawing are needed. Ask for the drawing or open it in the product card, find the direction of each arrow on it and compare it with the two outer surfaces of your protrusion. Do not assign your own meaning to the letter values without the manufacturer's drawing.
The case where two walls meet not at a strictly right angle is especially important. On old plaster, the outer edge may be slightly rounded; after installing the panels, a different width of the contact zone results; a metal corner bead can create a local protrusion. All of this changes how the wooden profile fits. Applying it to one visible section is not enough: check at least the top, middle and bottom of the rib.
If the corner piece "rocks" on an edge, leaving a gap on one side and then the other, you should not fill the entire cavity with a thick layer of adhesive in the hope that it will replace a level base. The reliability of such an installation depends on the specific adhesive and the coating material, while the geometry remains unpredictable. The more correct approach is to remove the protrusions and prepare the contact area, and in the case of a complex shape, discuss a custom joint with a craftsman.
Do not try to combine two profiles of different cross-sections on a single continuous line by simply trimming one of the flanges. The visible width will change in the middle of the edge, and the face plane may end up with a step. If the project really calls for a decorative transition, it should be made as a separate detail rather than an accidental junction of two mismatched profiles.
How to finish the start and end of a wooden corner piece
On a long edge, the lower end may meet the floor, a skirting board or a floor step, while the upper end may meet the ceiling, a horizontal band or an open partition ledge. These terminations must not be treated as random places where "the excess material is simply sawn off". The finished appearance of the entire vertical line depends on where the profiles meet. End grain is visible on an open end; after a clear finish, its shade and absorption may differ from the face surface.
If the corner piece reaches a wooden skirting board, the dimensions and installation sequence of the two products must be coordinated. For example, the vertical piece can be terminated above the top line of the skirting board if they are geometrically compatible and the project specifies this. You cannot promise in advance that any skirting board series has a ready-made connection with UG-001. A specific skirting board has its own cross-section and relief, so first the joint is test-fitted on a small area or checked against precise drawings.
At an open upper termination on a low partition, the quality of the end finishing is especially noticeable. A clean straight cut, light edge treatment and a coordinated final finish look better than an attempt to hide the cut with a thick layer of paint. For enamel, it is advisable to prepare the end according to the instructions of the chosen coating. If the structure carries an overlay tabletop, check the clearance to it and possible dimensional changes during use.
External edges that are frequently touched should not be left with sharp chips or protruding fasteners. Treat the cut edges, inspect the surface by hand through a clean cloth, and make sure there are no burrs. At the same time, arbitrary deep rounding of a corner after installation can change the geometry of the factory profile. It is better to determine the shape of the termination in advance and repeat it on all similar edges.
How to combine UG-001 with battens, mouldings and other trim
An external corner piece often appears in the same composition with straight wooden elements. But it performs a separate task: it covers the external edge. For example, if vertical decorative battens are installed on the adjacent wall, their ends do not necessarily have to reach the corner piece flush. A well-thought-out setback or transition is needed so that the additional thickness appearing at the edge does not form an accidental step.
In the catalog you can choose solid wood millwork for the remaining parts of the room. Such a general selection is useful when, in addition to eight edges, you plan to finish openings or frames, but you should not buy everything from one category without checking its purpose. The corner piece, batten, moulding and bar have different cross-sections and joining methods.
If a slatted composition runs along the wall, a separate Wooden slat RK-001 can be used for your own straight trim lines. In this case, the size of the slat and the point where it ends must be matched to the width of the selected UG-001: the edge of the slatted composition must not accidentally hide behind the corner piece. In categories of wooden wall slats there are different variants, and the same material name does not automatically mean a compatible assembly.
For ready-made slatted wall panels another construction: the product may have a base and a predefined rhythm of slats. Joining such a panel to an external corner requires a separate calculation of thickness and edge overlap. A detailed example of combining UG-001 with PAN-003 has already been covered in a separate STAVROS article; in this material we do not repeat that assembly, since our main task is the kit of eight different heights.
For thin decorative lines on a flat surface, the following is suitable Wooden Moulding MLD-004, but it should not be installed instead of L-shaped edge protection without a special solution. And Wooden Block BR-001 refers to a different profile shape. Consider the purpose of each product, otherwise a compact order of several items on paper will turn into a complex fitting of incompatible parts on the wall.
Surface preparation and fastening method
Before installation, the outer edge is cleaned of loose coating areas and checked for protrusions or local depressions. A wooden corner is best installed on a stable, dry and level surface. If the plaster has a peeling layer of paint, a good adhesive will not make it stronger: the coating layer itself may come off together with the profile. If the surface is made of furniture board, find out whether the material allows the chosen fastening and where the area of stable contact is.
No single type of adhesive can be designated as universal for all substrates. Compatibility depends on the wall material, the existing coating, humidity, temperature, the weight of the profile, and the operating conditions. Some structures may require additional fastening, which should be agreed with the manufacturer of the finishing materials and the installer. Do not promise that two drops of adhesive are enough for a 2400 mm corner, especially on an edge that is constantly touched.
A solid wood component should be acclimatized in the room conditions according to the manufacturer's and coating recommendations. Do not install a wooden profile immediately after wet finishing work, while the walls are still drying. Changes in humidity can affect the wood and the quality of the finish layer. First complete the main wet processes, check the condition of the surface, then proceed to the final finishing and installation of the trim in the agreed sequence.
Before final fixing, each strip is dry-fitted, its position is marked, and the fit of both flanges and the ends is checked. Such a trial fit is especially useful for the 2380 and 1480 mm groups. A temporarily pressed profile should sit without excessive force. If a strong bend is required for contact, the problem should be sought in the geometry of the substrate rather than trying to compensate for it with fasteners.
When it is better to avoid buying a wooden corner
There are tasks for which UG-001 will not be a suitable solution. For example, if a load-bearing corner element is required to reinforce a frame, a decorative wooden strip will not replace a calculated structural component. If the outer edge is outdoors, in the rain, or in a permanently damp area, the suitability of the wood, coating, adhesive, and structure must be checked separately. On the basis of the name "solid oak" alone, you cannot promise resistance to any external environment.
Another situation is a strongly curved or rounded edge where the angle changes along the height. A straight factory profile is not obliged to follow such a surface. First, assess the possibility of leveling the substrate. If the geometry cannot be changed, a different profile or a custom-made assembly may be required. Buying eight standard corners in the hope of "fitting them on site" is risky here.
Sometimes a decorative overlay is not needed at all. If the painted outer corner is already neatly executed, is not damaged by anything, and according to the design should remain visually inconspicuous, adding a wooden line can make the composition heavier. This is especially noticeable on narrow wall sections: two wide vertical strips at the edges leave a small central plane. In such a case, omitting an unnecessary part is not a mistake but a conscious choice.
If the profile is needed specifically to cover the edge and coordinate the finish, it must match in shape and dimensions. Checking whether the purchase is necessary helps avoid a situation where a beautiful product becomes an obstacle to opening a facade or passing through. On the outer edge near a door, measure the actual path of the leaf, and near furniture, the movement of drawers and doors, taking handles into account.
Installation sequence without haste and unnecessary waste
Start not with the longest product but with a control trial fit on the most convenient edge. Mark the vertical axis, place the profile against both sides, and check that it matches the preliminary marking. If the cross-section is chosen correctly, fix the working end points on the diagram. After that, repeat the check on the remaining seven sections: on different surfaces, the same strip may not fit equally well.
The next stage is cutting to individual measurements. Label the parts before installation so you don't mix up the three nearly identical long pieces. When trimming, use a suitable tool and secure the workpiece safely; the cutting direction and the need for additional allowances are determined by the specific assembly. Treat the cut ends and prepare them for finishing, leaving no accidental chips. Only after this does it make sense to install the corner pieces according to the agreed fastening technology.
Pay special attention to the cleanliness of the lines. A wooden overlay has a well-finished face side and contact surfaces that are not intended for decorative display. Do not turn the product arbitrarily just to close a local gap: the profile must occupy the correct position. If the edge protrudes after installation, check whether there is a drop of hardened compound or an uneven base underneath it.
The final check includes the absence of visible chips, the evenness of both shelves, neat ends, color consistency, and a clean joint with adjacent materials. Inspect the result not only up close but also from the main direction of passage. A line that looks correct from twenty centimeters away sometimes shows a noticeable deviation when viewed across the whole room.
How to order wooden corner pieces with delivery to Penza
To place an order, prepare a short specification with the name UG-001, a 25×25 mm cross-section, the wood species, the three required lengths, and the quantity of each version. State whether the profile is needed for opaque painting or whether a clear finish is being considered. Add the delivery address in Penza or the Penza region and clarify the conditions for transporting a long-length order. Do not assume that a STAVROS warehouse is located directly in the city or promise a specific arrival day without confirmation from the carrier.
When purchasing, it makes sense to check how items 2400 mm long will be packaged and who is responsible for their safety during handover. Even a small dent on the edge may be noticeable after painting, and a broken edge on the nearly finished length of 2380 mm can make the strip unusable. If the store offers rigid packaging, clarify its cost for the entire order and the procedure for inspection upon receipt. The official product page contains information about the packaging frame; the final amount and terms should be confirmed for your specific shipment.
Upon receiving the goods, check the number of long, medium, and short items separately. Then inspect the two face shelves, the ends, the straightness, and the matching of the selected wood. Compare the set with the order document before starting to cut. If a discrepancy is discovered after all the strips have already been sawn or finished, it will be more difficult to determine the cause. Record any defects found with clear photographs and contact the seller in the prescribed manner.
If you are finishing several rooms at once, do not combine them into one vague line such as “corner piece — 25 meters.” Individual rooms may require different cross-sections and different layouts, and mixed leftovers do not yet guarantee savings. A simple list by room avoids confusion and helps coordinate delivery with the installer.
Frequently asked questions before buying UG-001
Can I order one corner piece 1000 mm long and the rest later?
Individual size versions are available on the product page, but availability and order terms should be confirmed at the time of purchase. Technically, such a sequence is possible, but different batches may differ in wood shade and surface condition. If all eight edges must look identical under a clear finish, it is wiser to order a single complete set rather than buy adjacent parts later after a long interval.
What should I do if, after the final finishing, the height increased from 2380 to 2405 mm?
A 2400 mm long strip will no longer yield a single piece of the required length. Do not count on the wooden profile being able to be "stretched" or on five millimeters being hidden by glue. The end point must be reconsidered, a different permissible version chosen, or a separate joint designed. The change must be agreed upon before cutting, especially if the top end face is visible.
Do I need to buy a spare strip for each of the three sizes?
Not necessarily. The original calculation provides for eight items without a reserve. The additional reserve depends on the quality of the measurement, the complexity of the cuts, and the possibility of replacing a damaged part. For a particularly complex high edge, it is more useful to discuss a 2400 mm reserve, since a shorter strip cannot replace a long single piece. Buying three spare items at once without assessing the risks may be unjustified.
Will the corner profile suit a wall clad with tile on one side and painted on the other?
The profile name alone is not enough to answer. Tile has its own thickness, edge, and possible step relative to the painted plane. These parameters must be compared with the actual internal cross-section of UG-001, and the fastening method and clearance requirements must be checked. If the surfaces on one edge are at different levels, substrate preparation or a different finishing assembly may be required.
How should the corner profiles be stored after delivery if installation will be later?
Follow the manufacturer's storage conditions: protect the items from water, sharp humidity fluctuations, local heating, and mechanical damage. Long wooden strips should not be left leaning unsteadily against a wall for a long time where they could be hit. The packaging is unpacked and the parts inspected with regard to preservation requirements and preparation for installation; the specific conditioning conditions are agreed with the manufacturer and the chosen finish.
Should the widest model be chosen to protect a frequently used passage?
Not always. A wider shelf covers a larger finishing area, but by itself it does not turn a wooden overlay into an industrial protective bumper. If the edge is constantly exposed to carts, large furniture, or equipment, the impact load is assessed separately and a system designed for it is chosen. For ordinary interior finishing, a width of 25 or 34 mm is determined by geometry, visibility, and adjacent elements.
Can the remaining 920 mm after cutting the middle group be used?
Yes, if a standalone part of suitable finished length appears and it is possible to account for saw kerfs, end faces, wood grain direction, and the condition of the offcut. However, there are no such parts in the bill of materials under consideration. The two short ribs are each 980 mm long, so pieces of approximately 920 mm will not replace them. Do not include the intended use of offcuts in the cost of the current set until a real additional section becomes available.
How can I make sure that the product card refers specifically to the external corner piece?
Check the full name “Wooden external corner UG-001”, the cross-section shape, dimensions A×C, length L, and material. Do not rely solely on the word “wooden” in the name of a neighboring molding or batten. In the UG-001 card, different sizes are selected within a single product; this is not a reason to consider them separate models or to substitute similar trim of another profile into the order.
Read also
If you need detailed theory on choosing internal and external profiles, this material will be useful “Wooden corner trim: how to choose an outer and inner profile”. The specific junction to an installed slatted panel is covered separately: “Wooden corner UG-001 for slatted panel PAN-003”. And for coordinating different lines of wooden finishing, this article is useful “Corners, battens, and skirting boards: finishing geometry”.
These materials supplement the calculation but do not replace the specification by finished lengths. For our project, the key items remain the eight measured ribs, one selected profile, and two procurement schemes being compared.
Order the STAVROS wooden exterior corner
For eight straight edges with heights of 2380, 1480 and 980 mm, it is sufficient in advance eight UG-001 corners 25×25 mm: three at 2400 mm long, three at 1500 mm, and two at 1000 mm. This set lets you avoid unnecessary horizontal joints and reduce the total linear meters compared with buying only long strips. Beech and oak are calculated separately, without mixing materials. For a greater visible width, choose the 34×34 mm version and recalculate the cost.
Before placing an order, confirm the dimensions on the finished base, check the cross-section drawing, the condition of the ends and the intended finish. Then specify the quantities of each length in a single specification and arrange transportation to Penza. A long list of item codes alone does not make a purchase precise; precision appears when every purchased strip already has a specific place in the interior.