Article Contents:
- Wide Polyurethane Wall Molding: Make the Frame Fit the Room
- Three questions to answer before buying
- Face width and projection can tell different stories
- Use a real-size paper mockup
- How to use the line as a system
- Separate product facts from buying assumptions
- Choose the real focal plane
- Respect existing trim
- Give walls breathing room
- Living rooms with a long, uninterrupted wall
- Dining rooms and formal entertaining spaces
- Staircase landings and double-height walls
- Bedrooms with a generous headboard wall
- Libraries, home offices and classic interiors
- Entry halls and the wall around a console
- Small bedrooms and apartments
- Narrow hallways with several door casings
- Rooms with existing ornament
- Walls carrying many practical devices
- Compare molding with door casing
- Measure the empty wall, not just the room
- Layout 1: One oversized picture frame
- Layout 2: Two balanced vertical frames
- Layout 3: Three panels with a wider center
- Layout 4: Tall frames above a lower wall treatment
- Layout 5: Double molding frame
- Example A: A 12-foot living-room focal wall
- Example B: A dining-room wall with two tall panels
- Example C: A high-ceiling foyer with a central mirror
- Define what your dimension measures
- Worked example: two frames, 48 by 70 inches each
- Why percentage waste allowances are only a first approximation
- Make a cut schedule for each SKU
- Account for stairs and irregular walls
- Same-color molding and walls
- Contrasting trim against a dark wall
- One- or two-tone variation
- Prep and coating sequence
- Baseboards are functional as well as visual
- Crown molding and the ceiling transition
- Optional relief ornaments and centerpieces
- Plan around lighting and wiring
- Polyurethane wall profiles
- Primed MDF and wood moldings
- Polystyrene crown and baseboard profiles
- 1. Inspect and prepare the wall
- 2. Establish one level reference
- 3. Dry-fit and label the cuts
- 4. Choose compatible adhesive, not a generic promise
- 5. Support the molding while it sets
- 6. Finish seams carefully
- 7. Prime and paint to the actual specification
- Mistake: choosing a width from a photo
- Mistake: treating every long profile as the same material
- Mistake: placing frames too close to existing trim
- Mistake: buying by linear footage alone
- Mistake: using a decorative line as a functional guard
- Mistake: overloading one feature wall
- Is 35 mm molding really wide?
- Can I use wide wall molding with an eight-foot ceiling?
- What is the difference between picture-frame molding and wainscoting?
- Can polyurethane molding be painted the same color as the wall?
- How many 102-inch molding strips do two large frames need?
- Can I bend standard polyurethane wall molding around an arch?
- Is decorative wall molding a substitute for crown molding?
- Is the STAVROS catalog exclusively polyurethane?
- How should I plan panels around sconces and outlets?
- Does wider molding automatically make a room look more expensive?
- How can I order the right STAVROS molding for a U.S. project?






Wide Polyurethane Wall Molding: Make the Frame Fit the Room
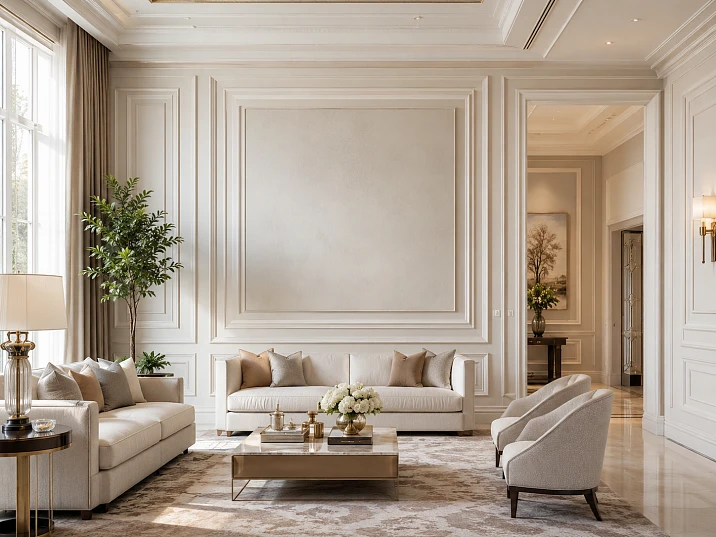
Wide wall molding can turn an ordinary painted surface into the most deliberate architectural feature in a room. The effect does not come from adding as much trim as possible. It comes from choosing a border substantial enough to be seen across the room, giving that border enough open wall around it, and keeping the relationship among doors, baseboards, furniture and the ceiling consistent. Picture-frame wall molding is especially effective on larger living-room walls, in dining rooms, in formal entries and on staircase landings where people can see the entire composition from a distance.
For homeowners in the United States, useful search terms include wide wall molding, polyurethane wall molding, picture-frame molding, decorative wall trim, wall panel molding and urethane molding. These are related terms, but they do not describe an interchangeable set of products. A decorative picture-frame molding sits on the wall surface and creates an outline. It is not the same as a load-bearing frame, a protective chair rail, an actual raised-panel wall or a crown molding at the ceiling. Understanding the intended use will help you shop accurately.
Start by browsing the STAVROS collection of polyurethane wall moldings, then compare individual product dimensions before making a layout. The original STAVROS discussion considers the difference between narrow and wide profiles, scale, wall frames, installation and visual balance. This American-English guide develops those ideas into measured design choices and practical cut lists. It also corrects an important sizing issue: a profile described as relatively wide within a specific collection is not necessarily two or three inches wide.




Three questions to answer before buying
First, from where will you see the wall? A panel behind a sofa is usually viewed from a different distance than a narrow passage beside a doorway. Second, how much uninterrupted wall is available after accounting for door casings, switches, vents and furniture? Third, should the molding read as a subtle shadow line in the wall color or as a high-contrast architectural border? The right profile is the one that answers all three questions, not simply the broadest one in a product photograph.
If you are planning an entire room, make the wall molding part of a hierarchy: a primary large frame, a secondary trim line only where needed, and a clear visual relationship to the existing casing and baseboard. More pieces do not automatically mean better architecture. A single precisely aligned rectangular frame may do more for a room than a grid of small panels placed without reference to its furniture or openings.
Наша фабрика также производит:



Смотреть весь Каталог продукции
What Counts as Wide Wall Molding?
The word wide has no universally binding size definition for decorative wall molding. A homeowner may call a one-inch profile wide when comparing it with a pencil-thin bead, while a designer working on a double-height foyer may be looking for a face width above two inches. Some catalogs classify profiles in relative tiers; others classify them by use, shape or depth rather than their face dimension. Always distinguish the face width you see on the wall, the projection away from the surface and the stock length supplied for cutting.
| Working visual category | Approximate face width | How it tends to read | Possible use |
|---|---|---|---|
| Fine line or bead | 3/8 to 5/8 in. | Subtle outline and shallow shadow | Small panels, secondary borders, restrained rooms |
| Medium architectural line | 3/4 to 1 1/4 in. | Clearly visible from normal room distance | Picture-frame panels and transitional interiors |
| Broader panel profile | About 1 3/8 to 2 in. | Stronger line, especially with shaped relief | Large frames, focal walls, layered outlines |
| Extra-wide decorative band | Over 2 in. | Dominant architectural border | Large formal spaces if a suitable product is actually offered |
These ranges are design descriptions, not standard industry grades and not a claim that STAVROS stocks every width shown. They are useful for comparing visual scale. The profile that looks best in a photograph of a hotel lobby may overwhelm a nine-foot-ceiling bedroom. Conversely, a narrow detail may disappear on a long wall when seen from the opposite side of an open-plan living space.
Получить консультацию
Face width and projection can tell different stories
Imagine two trim samples with similar face widths. One has a quiet, almost flat edge; the other has a deep round-over and several stepped lines. The second usually appears more substantial because it casts stronger shadows, even though both occupy the same amount of wall in plan view. That is why product drawings and samples matter more than a headline description. Compare the edge shape under the lighting you expect in the finished room. Side lighting from a window or wall sconce reveals relief that may be barely noticeable under diffuse overhead light.
Use a real-size paper mockup
Print or draw a small profile at its actual width, cut a strip of paper to that size, and tape it to a wall at the planned frame location. Move back to the main viewing position. Repeat with a narrower and broader option if possible. This low-cost test immediately shows whether a profile creates an intentional outline or merely a stripe. It also makes the trade-off between a bold molding and the available blank wall easier to judge before placing an order.
Actual STAVROS Polyurethane Profiles: Check the Numbers
The STAVROS wall-molding range provides a useful comparison because several profiles differ in both face width and depth. The dimensions below are taken from currently published product specifications. The millimeter values are the product's native dimensions; inch figures are approximate conversions for U.S. planning. Each listed profile is a polyurethane molding, supplied at 2,600 mm long, or approximately 102.36 inches (8.53 feet). Confirm the current specification and selected variant on the product page before purchase.
| Profile | Face width | Projection | Length | Best initial role |
|---|---|---|---|---|
| MLDPU-001 | 10 mm / 0.39 in. | 6 mm / 0.24 in. | 102.36 in. | Fine line, inner or secondary border |
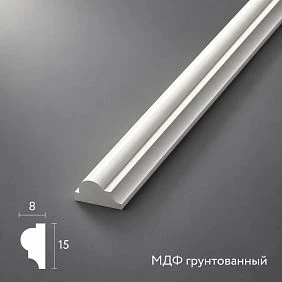
| MLDPU-004 | 15 mm / 0.59 in. | 8 mm / 0.31 in. | 102.36 in. | Small, shaped frame |
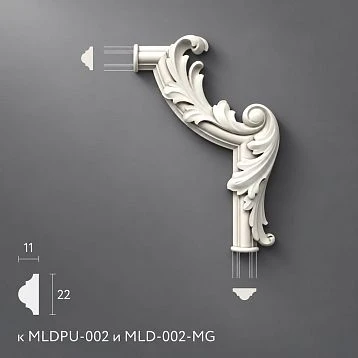
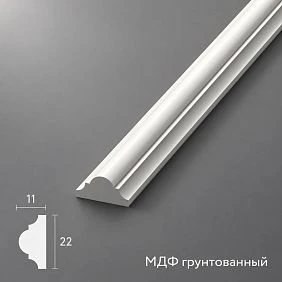
| MLDPU-002 | 22 mm / 0.87 in. | 11 mm / 0.43 in. | 102.36 in. | Mid-scale primary frame |
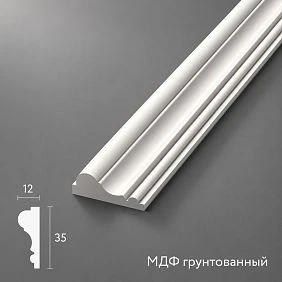
| MLDPU-003 | 35 mm / 1.38 in. | 12 mm / 0.47 in. | 102.36 in. | Broader primary or outer frame |
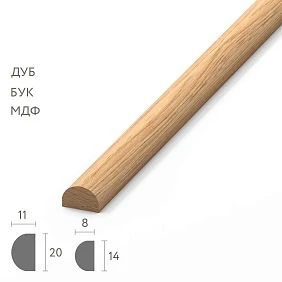
| MLDPU-027 | 14 or 20 mm / 0.55 or 0.79 in. | 9 or 12 mm / 0.35 or 0.47 in. | Check variant | Soft rounded line where its shape suits the design |
The broadest profile in this particular comparison is MLDPU-003, a 35 mm polyurethane panel molding. STAVROS describes it as a wide profile relative to its smaller wall-molding designs. It is not a 50, 60 or 80 mm strip. Accordingly, a project drawing that calls for a 2 1/2-inch face should not be silently substituted with MLDPU-003. Check whether another suitable product is available and suitable before committing to that design, or modify the plan to use a verified dimension.
How to use the line as a system
For a substantial wall frame, MLDPU-003 can be the principal border and MLDPU-001 can become a separate inner line. A double frame works best when the two lines have distinct roles and a deliberate gap between them. It can make the outer profile read as more architecturally important without pretending that the molded face itself is wider. In a restrained contemporary room, MLDPU-002 may provide all the emphasis needed. The visual result also depends on room size, color, daylight and the spacing around the frame.
If decorative corner flourishes are part of the concept, review polyurethane molding corners and decorative accents, but do not assume that every corner ornament automatically joins every straight molding. Compare the contour and actual sizes, and dry-fit the pieces before installation. A large ornament can distract from the underlying geometry unless the rest of the wall composition is intentionally quiet.
Separate product facts from buying assumptions
Do not treat the catalog's USD display as a guarantee of final U.S. checkout pricing or delivery. Product prices, taxes, availability, shipping destinations, long-length handling and other terms require confirmation with the seller. Likewise, an item in a broad architectural-decor category may be made of wood, MDF or polystyrene rather than polyurethane. Product material should be verified at the SKU level. When shopping for polyurethane wall trim, start with the individual specification instead of assuming that the entire navigation menu is one material family.
Read the Architecture Before Laying Out a Large Wall Frame
A successful picture-frame wall molding design begins with the wall that exists, not the rectangle you want to draw. Measure the finished ceiling height, the uninterrupted width, the clearance to door and window casings, and the position of large furniture. Record outlets, switches, thermostats, return-air grilles, wall sconces, art-hanging locations, built-ins and any wall features that cannot move. Mark both the physical wall boundaries and the zone people will actually see once the room is furnished.
Choose the real focal plane
A 14-foot-long wall may appear to offer plenty of room, but if a bookcase consumes four feet, a doorway occupies three and a side table sits in front of another section, the visible design field is smaller. Centering a molding composition on the complete wall can make it appear off-center relative to the sofa or dining table. Decide whether the layout should be centered on the wall itself, the main piece of furniture, a fireplace opening or a pair of sconces. There is no universal correct answer: the goal is a composition that looks aligned from the main sightlines.
Respect existing trim
In many U.S. homes, door casing, window casing, crown molding and baseboards already establish a trim language. A new picture-frame molding need not replicate every profile, but it should not appear accidentally more ornate or unusually deep beside plain, narrow casing. Make a simple elevation drawing that includes the baseboard top and the underside of any crown molding. The negative space between these elements and the decorative frame is just as important as the trim itself.
Give walls breathing room
A broad border around a very small field can look crowded because the trim consumes too much of the image. An oversized frame with almost no space from adjacent door casing can appear like an installation error. Begin with a deliberately generous border to corners, casings and the ceiling. Adjust that border for the room rather than copying a single numerical rule from a photo. A full-scale painter's-tape outline is particularly helpful because the width of the tape line can mimic the apparent weight of the chosen molding.
Where Broader Wall Molding Works Best
Living rooms with a long, uninterrupted wall
A large wall behind a sofa is a natural place for a prominent frame. A single horizontal rectangle can connect the sofa visually to the architecture while allowing the furniture to remain the main functional element. Two tall frames can be effective when the wall supports a balanced pair of furniture pieces or lamps. If the room is open to a dining area, compare the frames from both spaces before deciding on widths and spacing. A profile that looks prominent when standing close to the wall may become understated when viewed across an open-plan room.
Dining rooms and formal entertaining spaces
Decorative wall panels can make a dining room feel intentional even without ornate wallpaper. Two or three tall picture frames, aligned with the table and doorway, establish a rhythm that works with a sideboard or china cabinet. Allow furniture, chair backs and wall art enough clearance from the molding's projection. If the space includes a chair rail or wainscoting, treat the new molding as part of that composition rather than drawing extra rectangles randomly above and below it.
Staircase landings and double-height walls
These areas often reward a stronger visual line because the wall is seen from farther away or from multiple levels. A broad, simple frame on the landing can connect the lower and upper floors. On a staircase run, though, cutting and layout become more complex. Rectangles can follow the slope with angled top and bottom edges, or upright frames can be stepped along the wall. The correct strategy depends on the stair geometry. Never assume a 45-degree miter fits a sloped transition; create a full-size cutting template for the actual angle.
Bedrooms with a generous headboard wall
A quiet, oversized frame behind the bed can replace a visually busy accent wall. Choose a profile and finish that hold up to the presence of the headboard, bedside lighting and nightstands. A same-color installation may create a calm shadow line, especially in warm white, greige or muted color. If the wall is only slightly wider than the headboard, a 35 mm face may be more appropriate than a very broad hypothetical trim. Keep any frame away from points where the bed, hanging artwork or lighting hardware would collide with the relief.
Libraries, home offices and classic interiors
A home office with bookshelves, a substantial desk or a fireplace often supports wall molding more readily than a compact multipurpose room. Large rectangular fields can echo the organization of shelves and doors without requiring ornate appliques. If the interior already includes heavily detailed furniture, a plain or moderately shaped wall profile may be more refined than a deep, complex one. The strongest effect usually comes from scale and repetition rather than maximum ornamentation.
Entry halls and the wall around a console
A spacious entry has a clear arrival sightline and may accommodate one large framed field around a console or mirror. Before using picture-frame trim close to an entry door, check the door swing, nearby coat storage and everyday movement through the space. The molding should be visible but not interfere with the objects that make the entrance functional. For a narrow passage, the design should generally be quieter; a large-profile treatment that works in a foyer can become crowded beside multiple door openings.
When a Narrower Profile Is the Better Architectural Choice
The promise of wide wall molding should not make smaller profiles seem inferior. In a compact room, a modest molding often does the same work with less visual pressure. Room dimensions matter, but the amount of interruption matters just as much. A nine-foot ceiling with a broad blank wall may support a shaped 35 mm frame very well, while the same ceiling height in a narrow hall filled with doors may call for the 10 or 15 mm options. One width cannot be declared universally correct for every home with a particular ceiling height.
Small bedrooms and apartments
When a room is viewed from only a few feet away, deep relief can dominate the wall. If furniture nearly reaches the corners, the frame has little space to breathe. A compact polyurethane molding such as MLDPU-004 can create a visible edge without placing a large decorative object on the wall. A same-color finish and restrained layout are especially useful in apartments where several walls can be seen at once.
Narrow hallways with several door casings
A hallway may be long without having much usable wall. Every doorway, switch bank and closet opening interrupts a proposed frame. In these spaces, a series of narrow vertical accents or one carefully proportioned outline can be more convincing than repeated wide rectangles. The best solution may be to decorate a single uninterrupted end wall and leave the side walls quiet. Treat circulation and clearance as design constraints, not inconveniences to disguise.
Rooms with existing ornament
Substantial crown molding, detailed fireplace trim, carved furniture and patterned wallpaper may already supply all the visual weight the space needs. Adding an equally bold picture-frame molding can create competing focal points. Instead, use a simpler line to support the other details, or omit wall molding entirely from the most crowded portion. The design does not have to use every product category that appears in a catalog.
Walls carrying many practical devices
Thermostats, outlets, returns, switches, sconces and wall-mounted displays are not decorative accents that must be centered inside every molding panel. Some are constrained by electrical or mechanical requirements. Plan around them, leave access intact and do not cover them with decorative material. When a clean border is impossible, move the design to another wall. A broken or squeezed frame is rarely worth sacrificing the usability of the room.
How to Choose Molding Width for U.S. Ceiling Heights
U.S. homes commonly use ceiling heights such as eight, nine and ten feet, with higher ceilings in some new or custom construction. It is tempting to turn those heights into a rigid rule, such as a fixed molding width for every eight-foot room. That approach is too simplistic. Two walls of identical height can have completely different proportions, and the face of the molding is only one variable. Use ceiling height as a first check, then make the choice based on wall length, the frame dimensions, projection, finish and the quantity of visible trim.
| Ceiling-height context | Design starting point | What to test before committing |
|---|---|---|
| About 8 ft. | Favor a lighter visual line unless the wall is unusually open | Frame height, gap above baseboard, existing casing width |
| About 9 ft. | Medium to broader profile may work in a generous wall field | View from doorway, sofa or table; relief depth |
| About 10 ft. | Broad primary frame can look well proportioned | Furniture scale, ceiling trim, available blank wall |
| Above 10 ft. or double-height | Consider a more prominent line or layered composition | Actual product width, installation access, sightlines |
These are visual starting points, not code requirements or guaranteed design ratios. A 22 mm polyurethane wall profile can be surprisingly prominent if painted white against a dark wall, while a 35 mm profile painted the same color as the background may seem quieter. Contrast increases the strength of a line. Profile depth increases its shadow. A heavily segmented composition magnifies both effects.
Compare molding with door casing
Look at the face width and shape of the casing around your doors. If the new frame molding is more elaborate than the existing casing, decide whether that contrast is intentional. In a traditional room, a developed wall frame can be balanced by similarly shaped door trim; in a modern room, simple casing and restrained molding can coexist. What tends to look accidental is a highly decorated panel squeezed directly beside unadorned casing with no visual margin.
Measure the empty wall, not just the room
A 16-foot-wide room does not necessarily contain a 16-foot decorative wall. Subtract openings and the portions hidden by built-ins. For a two-frame arrangement, measure the actual clear field and divide it into a left margin, first frame, central gap, second frame and right margin. Recheck those measurements on the floor with tape before marking the wall. The most common layout problems are visible before any material has been cut.
Five Useful Layouts for Large Picture-Frame Wall Panels
Layout 1: One oversized picture frame
One large rectangle is the simplest high-impact treatment. It can sit above a sofa, dining sideboard or console and organize the wall without dividing it into many small compartments. Plan the frame in relation to the furniture width, and leave space above and below. The frame does not need to cover every available inch. Its job is to establish a deliberate architectural boundary, not to imitate an outline drawn around the wallpaper. Consider a broader profile for the principal frame and keep other ornamentation limited.
Layout 2: Two balanced vertical frames
Two tall panels work where a wall is almost symmetrical and the furniture arrangement supports that symmetry. They may flank a bed, share the wall behind a long sofa or correspond to a pair of lamps. The key dimensions are the left and right margins, center gap and finished height. Do not adjust the second frame by eye after completing the first. Lay out both from one centerline, measure their outside long-point dimensions and check the result from the main doorway.
Layout 3: Three panels with a wider center
A center-dominant arrangement can support a large mirror, fireplace or artwork. Rather than using three equal rectangles, make the middle panel wider when the room has a clear central focal point. Keep the top edges aligned and consider whether the side panels should be visually quiet. This scheme needs more careful calculation because differences of only a fraction of an inch become obvious when repeated across a wall. It may also need more stock lengths than a single frame even if the total linear footage looks similar.
Layout 4: Tall frames above a lower wall treatment
If the room uses a chair rail or wainscoting, wall molding can frame the upper panels while the lower wall remains simpler. In a dining room, this can create a layered traditional effect; in a transitional home, painting everything one color reduces the visual complexity. Remember that decorative applied molding does not transform drywall into genuine raised-panel carpentry. If the lower area is intended to resist chair backs and everyday impacts, choose an assembly designed for that functional requirement, not merely a fragile decorative line.
Layout 5: Double molding frame
An inner and outer line can make a large field more expressive without choosing an unverified extra-wide SKU. Put a broader STAVROS MLDPU-003 border around the primary perimeter and introduce a narrower profile, such as MLDPU-001 polyurethane bead molding, inside it. The gap must be intentional and consistent. If the two profiles are too close, they may look like an accidental double edge; if too far apart, they may read as two unrelated rectangles. Test the gap with temporary tape before cutting.
A double-frame layout also adds many pieces and corners. Calculate the two perimeters independently and build a separate cut plan for each SKU. Ordering extra units of the wrong profile does not solve a shortage of the correct one. Keep each product code and the planned location together in your drawing and installation notes.
Three Measured Design Examples
Example A: A 12-foot living-room focal wall
Imagine a wall 144 inches wide with a nine-foot ceiling. A 90-inch sofa sits centered beneath it. Start with a single decorative frame 100 inches wide and 68 inches tall, measured to the outer tips of the mitered corners. This creates 22 inches of wall to either side if the wall and frame centers coincide. The vertical placement still needs testing: determine the ceiling gap, baseboard relationship and how much of the frame will remain visible above the sofa. A 1.38-inch-face polyurethane molding would create a reasonably substantial outline without becoming a two-inch band.
Do not assume the sofa determines the exact frame width. If a tall floor lamp occupies one end or a window trim interrupts the other, shift or resize the frame around the truly visible field. Tape the outside outline on the wall and view it from the entry to the room. Decide on the finish only after you can see how much of the trim will be visible against the furniture.
Example B: A dining-room wall with two tall panels
Suppose an uninterrupted wall is approximately 13 feet wide and 9 feet high. Two frames, each 48 inches wide and 70 inches tall, can create a formal rhythm if there is adequate space to each side and in the center. Those dimensions are for illustration rather than a prescribed layout. A profile with a medium to broader face can be used depending on the presence of a sideboard, sconce or artwork. Check whether wall-mounted lights are centered within the frames or intentionally placed between them, and have a qualified electrician handle any necessary electrical changes.
The two-panel arrangement is also an excellent example of why ordering by total linear footage alone can produce a shortage. Four 70-inch vertical pieces and four 48-inch horizontal pieces are needed. Each long vertical consumes its own 102.36-inch stock length, while two 48-inch horizontals can fit on another length with allowance for saw kerf. This cut plan requires six pieces of stock before a spare: four for the uprights and two for the top and bottom rails. The full calculation appears below.
Example C: A high-ceiling foyer with a central mirror
In a foyer with a ten- or eleven-foot ceiling, a three-field arrangement can emphasize a central console and mirror. Rather than specifying an abstract 3-inch-wide molding and assuming it exists, build a mockup with the actual STAVROS line. A broad primary perimeter might be created with MLDPU-003 while a restrained secondary detail occupies the inside of the central field. Keep the outer frames quieter than the mirror, which should remain the first thing the viewer notices. Decorative polyurethane appliques and onlays are an optional accent, not an automatic requirement.
Before ordering for a foyer, consider entry-door movement, baggage and furniture placement, the wall's exposure to direct sunlight, and whether an overhead decorative element needs additional professional support. A careful layout is both more convincing and easier to install than a composition designed solely to look dramatic in a close-up photograph.
How to Measure Picture-Frame Molding Without Wasting Stock
The familiar perimeter formula is a useful first step: for a rectangular frame, add the intended height and width and multiply by two. But the perimeter describes total installed length, not necessarily the number of stock pieces required. A molding sold in long sections must be cut into particular side lengths. Short offcuts may not be usable for longer sections, and miter cuts consume material. This distinction becomes important with the STAVROS profiles discussed here because their standard length is about 102.36 inches.
Define what your dimension measures
Before calculating, specify whether each side dimension refers to the outside long points of the miters, the inside opening or the molding centerline. Those dimensions are not interchangeable. For a rectangular picture-frame molding made from straight profile with 45-degree mitered corners, a reliable cut list can use the outside long-point measurement for each finished side. Mark that dimension on the appropriate edge of each strip. The saw blade's kerf and any required trimming are additional considerations.
Worked example: two frames, 48 by 70 inches each
Assume two rectangular panels, each with an outside width of 48 inches and an outside height of 70 inches. Four verticals at 70 inches and four horizontals at 48 inches are needed. The theoretical perimeter for one frame is 2 x (48 + 70) = 236 inches; for two frames, that is 472 inches, or 39 feet 4 inches. Dividing 472 by 102.36 suggests at least five stock strips by length alone. That answer is not enough for this cutting pattern.
| Cut group | Pieces required | Pieces per 102.36-in. stock strip | Stock strips needed |
|---|---|---|---|
| Vertical frame sides, 70 in. | 4 | 1 | 4 |
| Horizontal frame sides, 48 in. | 4 | 2 | 2 |
| Total before spare stock | 8 finished cuts | By actual cut yield | 6 strips |
| Practical spare for errors or damage | Project-dependent | One additional strip in this example | 7 strips planned |
Why does this work? A 70-inch vertical leaves about 32.36 inches, not enough for a 48-inch horizontal. Two 48-inch pieces total 96 inches and fit within a 102.36-inch strip, leaving around 6.36 inches before allowing for blade kerf. Thus four strips are needed for the verticals and two for the horizontal pieces. A seventh strip is a prudent sample contingency for this specific example, not a universal rule that every project needs exactly one spare.
Why percentage waste allowances are only a first approximation
A 10 to 20 percent allowance is often used as a rough planning buffer, but it cannot repair an impossible cutting arrangement. An order of five strips with a 20 percent buffer becomes six, which happens to match the basic cut requirement in the example; however, this does not demonstrate that 20 percent always works. For some dimensions, a high percentage of theoretically usable footage remains in short offcuts. List every finished side, assign those sides to stock strips, allow for kerf and damage, and then decide on a spare. Use that plan rather than rounding every perimeter independently or relying on one generic percentage.
Make a cut schedule for each SKU
If your design includes a broad outer frame and a thin inner one, produce two schedules. The inner rectangle has a different size and may use different cut lengths. Put the SKU, face width, side location, outside long-point dimension, miter orientation and stock-strip assignment on each line. Number the strips with removable tape so the material on the floor matches the drawing. This is a simple way to reduce reversed miters and accidental use of the wrong profile.
Account for stairs and irregular walls
A staircase wall, an angled ceiling or a visibly out-of-square corner cannot always be calculated as a perfect rectangle. The actual angles may require a digital angle finder or cardboard templates. Make a paper or scrap test piece before cutting the purchased material. For an uneven wall, avoid forcing a rigid decorative profile into an unsupported gap. Confirm the product's bending characteristics and substrate requirements rather than assuming every polyurethane strip can follow a curve.
Finish Choices: Same-Color Walls, Contrast and Subtle Tonal Shifts
Paint is not a minor finishing decision for broad decorative molding. Color changes how strongly the face reads from across the room. The same profile can resemble quiet built-in architecture when painted to match the wall or become a bold graphic border when given a high-contrast color. Decide what should lead the room: the furniture, the artwork, the trim relief or a particular architectural feature. Then choose the finish that supports that hierarchy.
Same-color molding and walls
Painting the molding and background the same color allows the contour to show through light and shadow rather than through a sharp color boundary. This often works well for bedrooms, modern classic interiors and rooms where the profile is already quite detailed. Dark green, muted blue and warm gray can accentuate the profile in side lighting; softer off-white and beige schemes create a calmer effect. A satin or eggshell wall finish may be appropriate depending on the manufacturer's recommendations, but the trim coating must also be compatible with the selected polyurethane product and any primer supplied on it.
Contrasting trim against a dark wall
White or cream picture-frame molding on a darker wall is a familiar formal treatment. It makes geometry easier to read from a distance, which can be useful on a large dining-room wall. It also makes every crooked line, uneven spacing and open joint more visible. If you choose high contrast, invest extra time in accurately measuring both panels and dry-fitting corners before adhesive is applied. The bolder the contrast, the less forgiving the layout.
One- or two-tone variation
A molding painted slightly lighter or darker than the surrounding wall is a compromise between monochrome and contrast. It can complement the wood tones of furniture and flooring without creating a white outline around every panel. View paint samples at different times of day before committing. A color that looks barely different in morning light may produce stronger contrast under evening lamps, especially when the profile has multiple curved and stepped surfaces.
Prep and coating sequence
Check whether each molding is pre-primed and whether the specified paint requires another primer. Remove dust, test the coating on an offcut and follow the paint manufacturer's instructions for adhesion and curing. Do not assume that every solvent-based product is compatible with every decorative polymer. A good sequence is to finish major wall repairs, mark the layout, test adhesive compatibility, install and treat seams, then apply the final finish as specified. If the existing paint is peeling, its failure will undermine the adhesive joint regardless of how good the molding is.
Coordinate Wide Wall Molding With Baseboards, Crown Molding and Lighting
Wall trim gains credibility when it appears to belong to the building's other architectural details. You do not need to replace every baseboard or crown molding, but the decorative frame should acknowledge them. An applied wall frame placed too close to the top of a tall baseboard can look compressed, while an isolated frame floating in a large space without alignment to furniture can seem arbitrary. Build your elevation around the real top edges and corners of the surrounding trim.
Baseboards are functional as well as visual
Baseboards finish the bottom of a wall and may take everyday contact from shoes, mops, vacuum cleaners and furniture. A delicate polyurethane picture-frame profile is not automatically suitable as a protective baseboard. STAVROS carries a baseboard category, but the currently displayed products in that section include polystyrene items. Verify each material rather than calling everything polyurethane. On a traditional wall, matching the visual weight and finish of the baseboard is more important than forcing the products to share the same chemical composition.
Crown molding and the ceiling transition
In the United States, crown molding normally describes trim at the junction of the wall and ceiling, whereas picture-frame molding creates applied decorative borders within the wall field. STAVROS has a crown-molding category that currently presents polystyrene profiles. That does not make the wall-profile MLDPU series crown molding or prove the ceiling profiles are polyurethane. Choose each component according to its own geometry, substrate and material requirements. For a ceiling project, verify fixing recommendations, weight and location before installing anything overhead.
Optional relief ornaments and centerpieces
A large frame may enclose a mirror, wall sconce, painting or a small polyurethane ornament. Use the clear interior dimensions of the frame to judge whether an object fits with comfortable margins. The STAVROS decorative onlay collection has multiple shapes and proportions for walls and furniture; it is a separate category from long straight wall moldings. A floral ornament can be attractive in a classic study, while a plain field may be preferable in a modern space. More ornament is an option, not an automatic upgrade.
Plan around lighting and wiring
Wall sconces can emphasize a frame, but do not cut into an electrical box or conceal an outlet to improve symmetry. A qualified electrician should plan any fixture relocation or new wiring. Check the wall for hidden utilities before drilling or using mechanical fasteners. Also consider how light will hit a deep profile. A sconce mounted close to a raised molding may create unexpectedly harsh shadows, while light coming from the opposite side of a room can make the relief look elegantly restrained.
Material Reality Check: Polyurethane, MDF, Wood and Polystyrene
Shopping accurately is particularly important when using the word molding. It describes a shape and function, not one specific material. Many traditional trims are wood or MDF; other molded architectural elements may be polystyrene; STAVROS's MLDPU line discussed here is polyurethane. A design can use more than one material, but the installation and finishing instructions should reflect what was actually selected. Do not describe a wood baseboard, MDF strip or polystyrene crown molding as polyurethane simply because it appears in the same online catalog.
Polyurethane wall profiles
Decorative polyurethane profiles offer a defined molded shape for painted architectural outlines. They can be useful for building applied wall frames without fabricating every raised contour from separate wood pieces. The product's projection, rigidity, surface preparation, paint compatibility and attachment method must still be respected. Do not assume a standard rigid polyurethane profile is bendable for arches or irregular walls; request a product-specific bend-radius specification when a curved installation is planned.
Primed MDF and wood moldings
MDF and wood can be good choices for joinery-style trim, especially when the project calls for a material familiar to a carpenter or requires a profile not offered in the verified polyurethane range. However, an MDF product may have different moisture, fastener and joint-finishing requirements. A wood profile may move with changes in humidity and require its own acclimation and coating strategy. Choose them knowingly, not as silent substitutions for a SKU labeled polyurethane.
Polystyrene crown and baseboard profiles
The STAVROS navigation includes polystyrene crown molding and polystyrene baseboards. They may complement a polyurethane wall composition visually, but they are not the same material. Confirm adhesives, movement joints and finish systems for each component separately. If a project specification requires all decorative elements to be polyurethane, verify a polyurethane alternative rather than relying on the generic label molded decor.
Installing Broad Picture-Frame Molding on Painted Drywall
Applied wall molding is often presented as a simple adhesive-only do-it-yourself project. The basic concept is approachable, but the result depends on preparation, accurate marking, compatible adhesive and patient finishing. A broader profile is particularly revealing because the shadow lines make errors easy to see. Follow the instructions for the specific STAVROS item and the selected adhesive, as well as the condition of the substrate; the steps below are a project framework, not a substitute for product directions.
1. Inspect and prepare the wall
Use a long straightedge and level to check the intended installation area. Flaking paint, loose plaster, dust and damp spots are poor bonding surfaces. Repair weak areas and allow materials to cure as directed. Test adhesion to the existing coating when its history is unknown. A decorative molding attached to peeling paint is ultimately attached only as well as the peeling paint. In old houses, also check for cracks or repairs that may indicate movement rather than hiding an active problem beneath trim.
2. Establish one level reference
Mark a horizontal reference with a laser or spirit level, then transfer the planned frame dimensions to the wall. Do not measure each rectangle independently from an irregular ceiling line. Check that frame diagonals match if the intended shape is square or rectangular, and compare margins to nearby casings. Use removable tape to preview the outline. Take photographs from the room entrance and from the normal sitting position before proceeding.
3. Dry-fit and label the cuts
Cut the profile using a technique and saw suitable for the product. For an ordinary rectangular frame on a flat wall, 45-degree miter cuts are standard at the four corners, but real site conditions may require adjustment. Mark left/right and top/bottom orientation on the back of each piece. Lay the entire frame on a clean floor or hold it temporarily to the wall, then inspect gaps, joint alignment and the actual outside dimensions. A dry-fit now prevents a costly correction after bonding.
4. Choose compatible adhesive, not a generic promise
Use an adhesive approved for the molding material and the painted wall surface. Confirm compatibility with existing paint, primer and any special coatings. Some products require a particular bead pattern, holding method or curing environment. Do not assume every product marketed as liquid nails, construction adhesive or polyurethane adhesive works with every finish. Follow the manufacturer's minimum and maximum application temperatures and curing times rather than using a single made-up universal drying period.
5. Support the molding while it sets
Apply the adhesive according to the product directions, press each piece into position and use appropriate temporary support. Painter's tape may help prevent movement on a vertical wall, but it is not a substitute for any mechanical support or specialized installation technique required by a heavier component. Avoid crushing the relief with clamps or tape. Remove excess adhesive promptly in the way the adhesive manufacturer recommends so it does not interfere with paint.
6. Finish seams carefully
Inspect the corners and butt joints in raking light. Use a compatible filler or paintable sealant as appropriate for the joint type and instructions; not every gap should be bridged with the same material. Some adhesives and coatings need complete curing before filling or painting. Sand only when the material permits it and protect fine molded detail from excessive abrasion. A clean joint is especially important on broad, stepped profiles because any discontinuity becomes a visible shadow after painting.
7. Prime and paint to the actual specification
Test the chosen primer and paint on an offcut. Finish the repaired wall and molding so texture and sheen are consistent with the design. Avoid applying such heavy coats that fine relief disappears. Let each layer dry as directed. For a more detailed explanation of trim corners, joints and coating options, see the STAVROS guide to polyurethane molding installation and painting. If the job involves unusual substrate conditions, overhead work or built-in lighting, professional installation may be more appropriate.
Common Planning Mistakes That Make Wide Molding Look Wrong
Mistake: choosing a width from a photo
Without measurements, a close-up photo cannot tell you whether a molding has a 3/8-inch, one-inch or two-inch face. Compare the actual face width and projection on the SKU page, make a real-size mockup and view it at the intended distance. The same nominal face width can also read differently depending on the number of steps and curves in its profile.
Mistake: treating every long profile as the same material
Polyurethane, MDF, wood and polystyrene may all appear in decorative-trim results. They have different characteristics and may need different adhesives. Write the material into the specification beside the item code, and reject substitutions that were not approved. This is particularly important when several parts are purchased from different catalog categories.
Mistake: placing frames too close to existing trim
A frame that nearly touches a door casing or baseboard can look squeezed even if the individual profile is beautiful. Leave enough space for a deliberate border, and keep like-for-like margins consistent unless the design has a reason to differ. Check the finished layout from the doorway instead of judging only by a tape measure.
Mistake: buying by linear footage alone
The perimeter tells you how many inches will be installed, not how many 102.36-inch strips the saw schedule needs. Some offcuts cannot yield another full side. Calculate the cut grouping first, then add a sensible contingency. Label individual cuts to avoid wasting material on reversed miters.
Mistake: using a decorative line as a functional guard
Applied picture-frame molding is primarily visual. It is not automatically a chair rail, crash guard or structural wall panel. A busy hallway or commercial location may require a different durable assembly for impact protection. Avoid promising that decorative polyurethane will shield a wall simply because it creates an attractive raised line.
Mistake: overloading one feature wall
Wide wall molding, ornate crown molding, intricate appliques, patterned wallpaper and strong color contrast do not all need to compete for attention. Choose a primary feature and allow secondary details to support it. A large, quiet molding frame often looks more considered than a smaller design surrounded by unrelated ornaments.
Shopping Checklist: Buy the Correct Molding for the Plan
Begin with the drawing, not the shopping cart. Record the wall dimensions, the visible field, the chosen layout, the SKU, the face width and projection, the finish, and the actual cut lengths. Cross-check which parts of the room need a straight wall molding and which need a crown molding, baseboard or decorative applique. Only then choose each product.
- Confirm the product: the precise SKU, polyurethane material and published dimensions, not simply the word "molding."
- Confirm the role: principal picture-frame border, secondary line, decorative onlay or separate ceiling/baseboard treatment.
- Confirm the cut schedule: side-by-side pieces that can actually fit within the supplied strip lengths.
- Confirm the surface: sound drywall or other compatible substrate, existing finish, adhesive and primer requirements.
- Confirm visual scale: use actual-size samples or painter's tape and assess the wall from the room's normal sightlines.
- Confirm the order: current availability, shipping destination, handling of long strips, final price, taxes and return conditions directly with the seller.
For a substantial wall panel, compare the MLDPU-003 broader polyurethane molding with the MLDPU-002 medium profile. If an inner border is part of the composition, add a smaller polyurethane molding for fine detail. If you need a corner ornament or a central flourish, compare that separately in the STAVROS molding-decor collection. Buying a coordinated set of actual dimensions is more reliable than ordering a generic "wide molding kit" without knowing its contents.
Frequently Asked Questions About Wide Polyurethane Wall Molding
Is 35 mm molding really wide?
It is broad relative to 10, 15 and 22 mm profiles in the STAVROS straight polyurethane molding comparison. At approximately 1.38 inches, MLDPU-003 gives a noticeably stronger line than a small bead. It is not the same as a true 2- or 3-inch face. Whether that width looks substantial in your room depends on frame size, light, color contrast and viewing distance.
Can I use wide wall molding with an eight-foot ceiling?
Possibly. A large uninterrupted wall in an eight-foot room may support a moderately shaped profile, while a small wall with multiple doors may look crowded. Try painter's tape at the exact planned size and inspect the layout with furniture in place. Ceiling height is a useful clue, not an automatic permission or prohibition.
What is the difference between picture-frame molding and wainscoting?
Picture-frame wall molding uses applied trim to outline a shape on the existing wall. Wainscoting usually refers to a lower-wall treatment that may include panels, rails, stiles or other material. A row of applied decorative frames can create a wainscoting-inspired look, but does not necessarily provide the same construction, durability or protective function as a purpose-built panel system.
Can polyurethane molding be painted the same color as the wall?
Yes, when the molding's surface preparation and the chosen coating system are compatible. A same-color finish emphasizes shadows rather than contrast and can make a broader profile appear more integrated with the room. Confirm whether the SKU is factory-primed and follow the paint manufacturer's instructions.
How many 102-inch molding strips do two large frames need?
It depends on the actual side dimensions. For two 48-by-70-inch outside-long-point rectangles, eight finished cuts are required: four at 70 inches and four at 48 inches. With 102.36-inch stock, those cuts require at least six strips, not merely the five suggested by dividing total perimeter by stock length. A spare seventh strip may be wise for that example. For another set of dimensions, make a new cut schedule.
Can I bend standard polyurethane wall molding around an arch?
Do not assume so. Product-specific flexibility and minimum bend radius must be documented before planning a curved installation. A standard rigid MLDPU strip should not be represented as a dedicated flexible molding. For arches or curves, ask for a verified compatible product or another installation approach.
Is decorative wall molding a substitute for crown molding?
No. Wall picture-frame molding outlines panels on a vertical surface. Crown molding is shaped for a wall-to-ceiling transition and is chosen for that joint. Some catalogs include both products, but their cross-sections, mounting positions and materials can differ. Select the component intended for the actual application.
Is the STAVROS catalog exclusively polyurethane?
No. The site offers multiple materials in its broader architectural-decor navigation. The MLDPU straight wall profiles discussed here are published as polyurethane, while other sections include MDF, wood and polystyrene products. Always verify the material on the exact listing before ordering or writing a project specification.
How should I plan panels around sconces and outlets?
Keep all electrical boxes accessible and do not conceal required devices beneath molding. Design around their real locations, and consult a qualified electrician if a fixture needs to move. Mark the lighting locations on the same elevation drawing as the frames, then view the proposed layout with a full-size tape outline.
Does wider molding automatically make a room look more expensive?
No. The effect comes from proportion, exact spacing, thoughtful relation to furniture, correctly executed joints and a compatible finish. A broad but poorly aligned frame can look less refined than a simple, well-scaled one. Using the widest product available is not a substitute for measuring the wall.
How can I order the right STAVROS molding for a U.S. project?
Use the STAVROS polyurethane molding catalog to select and record the precise SKU, dimensions and quantity. Make your cut list before estimating the number of strips. Contact the seller to verify current shipment eligibility to your U.S. destination, the final checkout terms and long-length packaging. A USD display on the site alone does not establish availability or cost of delivery to every U.S. address.
Final Design Principle: A Bigger Line Needs a Better Plan
Wide polyurethane wall molding works best when the wall has enough scale to support it and the layout is determined before the product is ordered. Decide what the frame should emphasize, compare the face width and relief of real profiles, draw the outside long-point dimensions, group the actual cuts and coordinate the finish with nearby trim. The broadest verified STAVROS profile in the basic MLDPU comparison is 35 mm, not an imaginary universal 80 mm molding. That information is a useful design constraint rather than a disadvantage: it encourages a composition based on real materials and honest dimensions.
Start with the STAVROS selection of polyurethane wall moldings, decide whether a single or layered frame serves the space, and make a full-size mockup. A restrained architectural outline with the right proportions will usually outlast a trend-driven arrangement that relies on ornament alone. The quality of the result is in the planning, the cutting and the quiet relationship between the molding and the room around it.