Article Contents:
- Why corner overlays are needed: seven real-life situations
- Corner overlay, rosette, molding: different roles of one ensemble
- Molding — builds the line
- Corner overlay — completes the corner
- Rosette — central accent
- When all three elements are needed
- Overlays for furniture facades: complete application map
- Cabinet doors
- Kitchen facades
- Commode
- Cabinets and bedside tables
- Sideboard, display cabinet, credenzas
- Furniture portals and wall panels
- Bed Headboards
- Furniture restoration using wooden overlays: step-by-step guide
- What can be updated
- Sequence of work
- Effect
- How to choose the shape of a corner overlay: five key ornamental groups
- Floral ornament
- Geometric ornament
- Acanthus leaf and order motifs
- Weaving and rustic motifs
- Neutral decor: profile corners without ornament
- Overlay size: how to avoid mistakes
- Facade size guidelines
- Proportion of overlay width to molding width
- Overlay thickness
- How to combine overlays with moldings and other decorative elements
- Basic principle: hierarchy of decor
- System compatibility: ornament must speak one language
- Wooden baguette and molding: two close tools
- Handles and overlays: not to argue, but to complement
- Overlay material: wood vs MDF
- Solid wood: oak, beech, linden
- MDF with milling: comparison with wood
- Color and finish: how to match the furniture tone
- Overlays for painting
- Overlays for varnish and oil
- Contrasting Finishing
- How to attach wooden overlays to furniture
- Mounting methods
- Marking is more important than the installation itself
- Important: temperature and humidity during installation
- Mistakes in selection and installation: an honest list
- Wooden furniture decor as an investment: why it's more profitable than it seems
- FAQ: answers to popular questions about wooden overlays for furniture
- Where are wooden overlays for furniture corners used?
- Can overlays update old furniture?
- How is a corner overlay different from a rosette?
- Can wooden overlays be painted?
- How to attach wooden overlays to a furniture facade?
- Wood or MDF overlays — which to choose?
- How to choose an overlay ornament to match the interior style?
- About the Company STAVROS
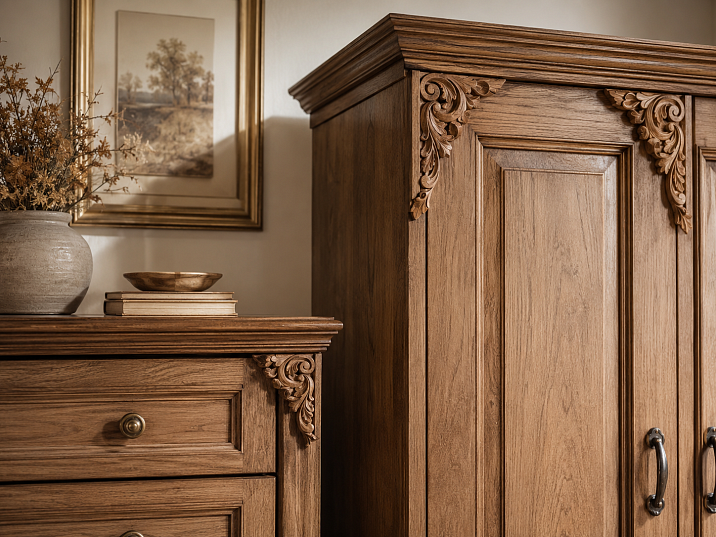
There are things that cost little but change everything. Furniture corner overlays are exactly that. A simple cabinet with them starts to look like furniture from an expensive workshop. An old chest of drawers, updated with carved corner elements and new furniture handles, ceases to seem like a Soviet relic and turns into a decorative object. A flat kitchen cabinet facade with three properly selected details — a molding, corner overlays, and a central rosette — acquires a handcrafted character.
Wooden furniture overlays are not cosmetics or a decorative souvenir. This is an architectural technique that has been used in furniture workshops for centuries: assemble a facade from simple blanks, place accents with overlay details — and get a product that is indistinguishable from expensive custom-made production.
Decorative appliqués for furniture choose based on the size of the facade, frame shape, ornament style, and future finish: for painting, varnish, oil, or tinting.
View wooden overlays, moldings, and furniture decor STAVROS →


Why corner overlays are needed: seven real-life situations
Before talking about the choice, it's worth honestly answering the question: who needs them and when? The answer is not straightforward because there are several application scenarios — and each is convincing in its own way.
The facade looks empty. This is the most common request. A flat cabinet door — even of good quality — gives an impression of incompleteness. Corner overlays on furniture facades, together with a molding frame, instantly give the surface structure, rhythm, and visual weight.
The molding frame requires completion. If moldings are already glued around the perimeter of the facade, the corners of the frame remain uncovered — the joint of the molding strips is visible. The corner overlay sits on top of this joint, covers it, and simultaneously becomes a decorative accent.
An old cabinet or chest of drawers needs updating. Furniture restoration using carved wooden overlays is a real practice, not a designer exotic. Wooden parts are glued onto the cleaned facade, primed, and painted together with it — and the furniture looks like new, only "with history."
There is damage on the corner of the furniture. Chips, cracks, a deformed corner of the facade — a corner overlay of the right size can completely cover the damage, while the other corners are decorated symmetrically. The problem disappears, the facade gains decor.
Classic or neoclassical furniture is needed without manufacturing from scratch. This is a designer scenario: order or buy simple furniture frames, and then use overlays, moldings, and rosettes to turn them into classic furniture with carved decor. This is cheaper than manufacturing furniture "from scratch" and no less effective.
I want to add decor to a symmetrical furniture composition. Sliding wardrobes, built-in shelving cabinets, kitchen sets — everywhere with many identical facades, overlays create rhythm and unity.
A furniture portal or decorative panel is created. In living rooms, studies, bedrooms, wooden wall panels with moldings, overlays and rosettes — is an independent design technique that requires no furniture at all.


Corner overlay, rosette, molding: different roles of one ensemble
These three elements are often confused or used interchangeably — but each has its own role, and they work best in combination.
Our factory also produces:


Molding — builds the line
Wooden moldings — is a linear profile used to assemble frames, lines, perimeters. Molding defines the facade structure: it creates a rectangular frame, a horizontal belt, a vertical post. This is the foundation, the skeleton of the decorative system.
Molding works with a line — it runs along the facade and sets its architecture. But at corners, molding ends with a 45° joint — and this joint requires either precise work with minimal gap or decorative covering.
Get Consultation
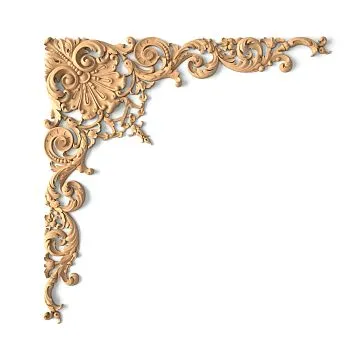
Corner overlay — completes the corner
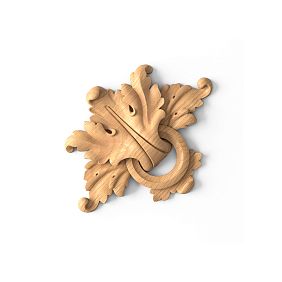
This is where the corner overlay works Decorative insert for furnitureIt sits on top of the joint of moldings in the corner of the frame — covering the technical solution and becoming a decorative accent. The corner cap can be symmetrical (identical along the axes), asymmetrical (elongated along one axis), or composite (several elements in the corner).
This is not just a covering part — it is a visual "brace" of the frame, giving it completeness and turning four molding strips into a single product.
Rosette — central accent
Furniture rosette is a decorative element placed in the center of the facade, panel, or frame. The rosette works as a focal point — the point where the gaze is directed. In classic furniture, it often replaces a handle or complements it.
The trio of "molding + corner caps + rosette" is a classic furniture formula found in furniture from the 18th–19th centuries and remains relevant in modern classic, neoclassical, and art deco interiors.
When all three elements are needed
If the facade is large enough (cabinet door from 400×800 mm), it is better to use the full system: moldings form a frame, caps in the corners, rosette in the center. This provides maximum visual effect and makes the facade look like a handmade product.
On small facades (dresser drawer, small door), corner caps without a rosette are sufficient — or only caps in the two upper corners if the lower ones are covered by a drawer.
Caps for furniture facades: complete application map
Carved appliqués for furniture are used more widely than usually thought. Here is a complete list of surfaces where they are appropriate — and each has its own logic.
Cabinet doors
The cabinet door is the largest and most visible facade. This is where corner overlays work with maximum effect. Four corner overlays around the perimeter of the molding frame + a rosette in the center — and a simple door turns into an architectural object.
For built-in wardrobes in the hallway or bedroom, this is a great way to turn a functional door into a decorative wall element — at minimal cost.
Kitchen facades
Kitchen facades, especially the upper sections, often look too flat and lacking in character. Overlays for furniture facades in the kitchen should be chosen with several conditions in mind: they should not interfere with the tight closing of the door, should not be too deep (otherwise the doors will protrude from the row), and should allow for wet cleaning.
For the kitchen, it is better to choose compact corner overlays with deep relief that are easy to wipe with a damp cloth.
Chest of drawers
A chest of drawers is one of the best objects to update with carved overlays. The facade of a chest of drawers usually consists of several drawers with uniform surfaces. Corner Decorative appliqués for furniture overlays on each drawer, coordinated in pattern, create rhythm and unity — and turn a simple chest of drawers into a classic furniture piece.
Important nuance: on dresser drawers, overlays are placed in the two upper corners — the lower corners are often visually "covered" by the body of the next drawer and do not require decoration. But this depends on the specific design.
Cabinets and Bedside Tables
On small cabinet fronts, overlays should be small — otherwise they will take up the entire front and create a feeling of overload. For a 400×400 mm cabinet, compact corner elements of 50×50 mm or 60×60 mm with a delicate pattern work well.
Sideboard, display cabinet, credenzas
A sideboard is large furniture with big fronts. Here you can use larger overlays, combine corner elements with side inserts and central rosettes. The display part of the sideboard — with glass doors — can also be decorated with overlays along the perimeter.
Furniture portals and wall panels
wooden furniture appliqués work great not only on furniture, but also on wall panels with moldings. In living rooms and studies, wooden panels with molding frames and corner overlays are an independent decorative technique without any furniture. Here, overlays create an architectural rhythm on the wall.
Bed headboards
A wooden headboard with molding frames and corner overlays is one way to turn a simple headboard panel into a designed architectural finish for the bed. This works especially well in classic and neoclassical bedrooms.
Furniture restoration using wooden overlays: step-by-step scenario
This is perhaps the most practical and commercially significant scenario. Not buying new furniture — but transforming what you have. And doing it in such a way that the result is more convincing than new furniture from a cheap store.
What can be updated
Any furniture with flat fronts: Soviet and post-Soviet wall units, dressers, sideboards, kitchen sets, bedside tables. The main condition is that the fronts must be sufficiently smooth and sturdy for gluing on overlays.
Work sequence
Step 1: Preparing the fronts. The surface is cleaned of grease, old varnish or paint (if they are in poor condition), and sanded. Good adhesion is the foundation of a strong bond.
Step 2: Marking. The placement of moldings, corner overlays, and rosettes is marked on the fronts with a pencil. This is the most important stage — symmetry and precision of marking determine the final look.
Step 3: Installing moldings. First, the molding frame is glued — strips are cut at 45° angles at the corners and laid on glue. After setting, straightness is checked.
Step 4: Installing corner overlays. The overlays are glued over the molding joints using construction or wood glue. If necessary, they are secured with finishing nails.
Step 5: Installing the rosette (if necessary). The rosette is glued to the center of the front.
Step 6: Puttying and painting. All joints are puttied and sanded. The front is primed and painted or varnished. The overlays are coated together with the front.
Effect
After completing the work, the furniture looks like new — and often more beautiful than any new furniture from budget stores. At the same time, the costs are the price of overlays, moldings, paint, and handles. Incomparably less than buying a new cabinet or dresser.
Along with new furniture handles and fresh coating, old furniture literally comes back to life. This works especially effectively with Soviet solid wood dressers: they have a sturdy and solid construction — only the aesthetics are outdated.
How to choose the shape of a corner overlay: five key ornamental groups
The shape of the overlay ornament is a stylistic decision. An incorrectly chosen ornament will ruin the interior style, even if the overlay itself is beautiful. A properly chosen one will become an organic part of the decorative system.
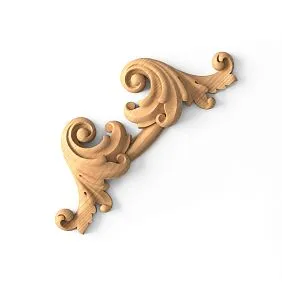
Floral ornament
Leaves, flowers, curls, branches — this is the classic of Western European furniture tradition. Floral ornament is appropriate in styles such as classicism, baroque, rococo, Provence, shabby chic. It is soft, organic, and lyrical in character.
For a bedroom in Provence style, for a living room with classic furniture, for a boudoir vanity table — floral overlays create the desired decorative atmosphere.
Geometric ornament
Diamonds, stars, squares, octagons, intersecting lines — geometric patterns belong to the ornamental language of neoclassicism, Empire, and Art Deco. Such overlays are strict, orderly, and rational.
For modern neoclassicism, for office furniture, for a hallway with geometric floor tiles — geometric corner overlays create the right tone.
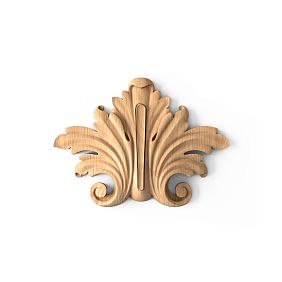
Acanthus leaf and order motifs
Acanthus is one of the most recognizable motifs in European architecture and furniture. A stylized acanthus leaf in an overlay appeals to the order system and works in interiors where there are columns, Capitals, moldings with classic profiles. This is solemn, slightly pompous, and very appropriate in living rooms with high ceilings.
Weaving and Rustic Motifs
Diagonal weaving, basket imitation, stylized natural forms — this is the ornamental language of country, rustic, and Tuscan styles. Such overlays are less formal, warmer, and cozier. For a country-style kitchen or a rustic country house, it's an ideal choice.
Neutral Decor: Profile Corners Without Ornament
Sometimes ornament is unnecessary. There are corner overlays that are simply profiled wooden corners without carving — only line relief, only profile geometry. Such elements are appropriate in modern classics, neoclassicism, and interiors where a delicate accent is needed without overt decorativeness.
Overlay Size: How to Avoid Mistakes
Proportion is the main principle for choosing size. The corner overlay should be proportionate to the facade on which it is installed. Too small, it will get lost and not be read. Too large, it will occupy the entire facade and create a feeling of pressure.
Facade Size Guidelines
| Front size | Recommended Corner Overlay Size |
|---|---|
| Small dresser drawer (up to 400 mm) | 40–60 mm |
| Nightstand door 400–500 mm | 50–70 mm |
| Medium cabinet door 500–700 mm | 70–100 mm |
| Standard cabinet door 700–900 mm | 90–130 mm |
| Large door 900–1200 mm | 120–160 mm |
| Sideboard, display cabinet, large portal | from 150 mm and above |
Proportion of overlay width to molding width
If a molding is installed on the facade, the corner overlay should be proportional to the width of the molding. A too narrow molding with a large overlay is a disproportionate pair. Guideline: the corner overlay should cover the molding joint with a margin of at least 10–15 mm on each side.
Overlay thickness
Wooden Carved appliqués for furniture have different thicknesses: from 5–8 mm for thin flat elements to 20–30 mm for voluminous carved parts. It is important that the overlay does not protrude significantly beyond the plane of the molding — otherwise the door will not close tightly or the cabinet will look deliberately bulky.
Optimal thickness for most furniture applications: 10–18 mm. This provides good relief without critical protrusion.
How to combine overlays with moldings and other decorative elements
This is a matter of system — and this is where the difference between "just decor" and "real furniture architecture" begins.
Basic principle: hierarchy of decor
In a properly structured decorative system, there is a hierarchy: main elements (rosettes, large overlays) attract the eye, secondary elements (moldings, corner pieces) create structure. If all elements are equally "shouting" — there is no system. If there is hierarchy — there is architecture.
In practice, this means:
-
The molding should be more restrained than the overlays
-
The rosette should be brighter than the molding, but not more complex than the overlays
-
Corner overlays should be at the same decorative weight as the rosette or slightly more modest
System compatibility: the ornament must speak one language
You cannot mix the floral ornament of overlays with geometric moldings and a Baroque rosette. Each ornamental motif belongs to a specific stylistic tradition — and elements of one composition must belong to one tradition.
Exceptions are only possible in the hands of an experienced designer who deliberately creates eclecticism. In other cases, unity of the ornamental language.
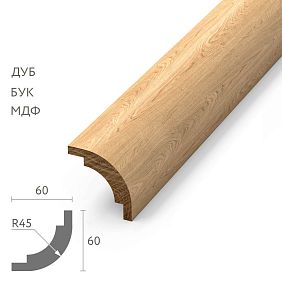
Wooden Picture Frame and molding: two close tools
In addition to profiled molding, wooden baguette is often used for furniture frames — a profiled molding from which frames of the required size are cut. Baguette allows you to choose the desired profile for a specific style: simple rectangular, with a pull, with a fillet, with an Ionic profile.
Together with corner overlays from the assortment wooden appliqués и trim you can assemble a furniture frame of any style and size.
Handles and overlays: not to argue, but to complement
Furniture Handles should belong to the same style group as the overlays. Classic cast handles — to floral overlays. Geometric metal handles — to geometric overlays. Carved wooden handles — to carved overlays with a similar ornament.
Conflict between a handle and an overlay is one of the most common aesthetic mistakes when updating furniture. It is easy to solve: choose the handle after the overlays, not before.
Material of overlays: wood vs. MDF
There are overlays made of different materials on the market — and it is important to understand the difference between them so as not to be disappointed after purchase.
Solid wood array: oak, beech, linden
Carved decor made of solid wood — is the only material that looks as good up close as it does in a photo. Carving on solid wood has depth, relief, live edges — it doesn't look "cast," it has individuality.
Oak — dense, expressive in texture, holds fine carving details well. Used in overlays for rich classical facades under varnish or tinted oil.
Beech — more uniform, without pronounced texture. Ideal for overlays under paint: after coating with enamel, the surface looks flawless. It is for this purpose — painting to match the facade color — that beech is the first choice.
Linden — a soft wood, used for fine artistic carving. Linden overlays with delicate ornament are used where maximum detail is needed.
MDF with milling: comparison with wood
MDF overlays with milled ornament are cheaper than wooden ones. Under multi-layer paint, they can look indistinguishable from wooden ones — if the painting is high quality and the coating thickness is sufficient.
The main disadvantage of MDF: it is afraid of moisture (especially at joints), and the milled relief is not as deep and sharp as wood carving. Up close, the difference is visible.
For furniture in a bathroom or kitchen, MDF is categorically unsuitable — moisture destroys it. For dry rooms and with high-quality coating, it is acceptable.
For serious restoration or for new classical furniture — only Solid wood overlaysThis is a case where saving on material is visible in the result.
Color and finish: how to match the furniture tone
Choosing the color of overlays is a technical question with a clear answer.
Overlays for painting
Most wooden overlays are sold unpainted — as raw wood. This is the right approach because it allows you to match any desired color.
Before painting, the overlay is sanded, primed — and painted together with the facade. This eliminates the boundary between the overlay and the facade, making them a single whole.
For white facades — white enamel over primer. For gray — gray. For cream — cream. For wooden facades under varnish — tinting of the desired shade.
Overlays for varnish and oil
If the furniture facade is finished with a transparent coating, the overlays are also coated transparently — and then the wood texture remains visible. Oak overlays under matte oil on an oak facade are beautiful because the texture matches and creates a single natural surface.
Contrast finish
In some design solutions, overlays are deliberately made contrasting: dark overlays on a light facade or vice versa. This works in Art Deco and some versions of neoclassicism, where contrast is a stylistic element. But it requires precise design calculation — random contrast looks like a mistake.
How to attach wooden overlays to furniture
Installing overlays is a simple operation, but requires precision in marking and patience.
Methods of mounting
Assembly adhesive (liquid nails or specialized wood glue). The most common method. Adhesive is applied to the back of the overlay, the element is pressed against the surface and held until it sets. Adhesive with a long open time allows adjusting the position of the overlay.
Finish nails. Thin nails (finish nails) are driven into the overlay through the surface. The heads are countersunk and filled with putty. They complement the adhesive — providing additional fixation during painting when the adhesive has not yet reached full strength.
Double-sided mounting tape. For lightweight thin overlays in dry rooms — an acceptable method for temporary or permanent fixation. But less reliable than adhesive.
Combined method: adhesive + finish nails. The optimal option for reliable and long-term fixation.
Marking is more important than the installation itself
Before applying adhesive, you need to precisely mark the position of each overlay with a pencil. The symmetry of overlays on the facade is what is checked by eye from a distance of three meters. Even a 3–5 mm shift of one element will be noticeable.
It is recommended to first do a dry fit without adhesive — lay out all elements on the facade in the desired position, check symmetry, take a photo for comparison — and only then glue.
Important: temperature and humidity during installation
The adhesive sets at temperatures not lower than +10°C. Installation in a cold room or in high humidity conditions reduces adhesion. Optimal: dry room, temperature +18–25°C.
Mistakes in selection and installation: an honest list
Buying overlays without measuring the facade. The overlay size must match the facade size and the molding width. Without measurements, it's a guessing game with a high miss rate.
Choosing a pattern that is too large. A large carved overlay on a small dresser drawer is overkill. The scale of the ornament should be proportionate to the facade.
Not considering the handle placement. If the handle is in the center of the facade, a rosette won't fit there. If the handle is at the edge, the overlay should not intersect with it. Marking begins with fixing the handle position.
Mixing different carving styles. Floral ornament + geometric molding + baroque rosette is a stylistic 'mess' where no element works.
Gluing without marking, 'by eye'. The result is an asymmetrical placement that immediately catches the eye.
Buying overlays for only one corner. The four corners of the frame should be arranged symmetrically. You need to buy a set.
Not considering the overlay thickness. An overly thick overlay prevents the cabinet door from closing or doesn't allow the doors to fold together in a pair.
Forgetting the finish coating. An unpainted wooden overlay darkens over time and contrasts with the facade. Coating is not an option, but a mandatory step.
Using decor without a systematic connection to other elements. An overlay without a molding frame, without coordinated handles, without a unified color — this is not a system, but random decor.
Wooden furniture decor as an investment: why it is more profitable than it seems
It's worth talking honestly about the economics: why buy decorative wooden overlays when you can just buy new furniture?
The answer is simple: new budget furniture will almost certainly be worse in structural quality than the old one. Soviet and early post-Soviet cabinets and chests of drawers made of solid wood are solid items that will outlive several more generations of owners. Replacing them with furniture made of chipboard with a film coating means losing twice: losing quality and spending money.
Carved appliqués for furniture in combination with moldings, rosettes, handles, and new paint — this is an investment in existing quality. You get furniture that looks more expensive than new, at a cost of decor incomparably lower than the cost of replacement.
And another argument: handmade wooden furniture decor retains value. Furniture decorated with carved solid wood elements is perceived as custom-made — regardless of when and where the base body was manufactured.
FAQ: answers to popular questions about wooden overlays for furniture
Where are wooden overlays for furniture corners used?
On facades of cabinets, chests of drawers, nightstands, sideboards, kitchen sets, doors, wall panels, bed headboards, and decorative panels. Everywhere where there is a flat facade that needs to be made more expressive.
Can overlays be used to update old furniture?
Yes, and this is one of the most effective ways to update. The overlays are glued onto the prepared facade, puttied at the joints, and painted together with the facade. Combined with new handles and a fresh coating, old furniture completely changes its appearance.
How is a corner overlay different from a rosette?
A rosette is a central accent placed in the middle of a facade or frame. A corner overlay completes the corner of the frame, covers the joint of moldings, and serves as a decorative "brace" for the corner. Together, they create a complete decorative system.
Can wooden overlays be painted?
Yes. Most wooden appliqués are sold unpainted — precisely so they can be painted to match the color of a specific facade. Sanding and priming are required before painting. They accept any type of finish: enamel, varnish, oil, tinting.
How to attach wooden overlays to a furniture facade?
The main method is using mounting or wood glue followed by fixing with a finishing nail. Marking is mandatory before installation — symmetrical placement of all elements on the facade. Installation in a warm, dry room at a temperature of +10°C or higher.
Wood or MDF overlays — which to choose?
For high results and durability — only solid wood stickersThey are deeper in relief, more resistant to moisture, and accept any type of finish. MDF is acceptable for dry rooms under painting, but is inferior to solid wood in carving quality and durability.
How to choose an overlay ornament to match the interior style?
Floral ornament — for classic, Provence, shabby chic. Geometric — for neoclassical, art deco, modern classic. Acanthus leaf — for formal classic and Empire style. Weave and rustic motifs — for country and rustic style.
About the company STAVROS
STAVROS is a Russian manufacturer of wooden decor, furniture elements, and solid wood products. The company's assortment includes a complete system for furniture decoration: Decorative Inserts, furniture rosettes, Wooden moldings, wooden moldings and picture frames, Furniture Handles и furniture frames.
All STAVROS carved decor made from solid oak, beech, and linden. The elements are designed as system-compatible: overlays, moldings, rosettes, and handles are coordinated by ornamental groups and sizes, allowing you to assemble complete decorative systems from a single source. The entire range of solid wood products is available in the STAVROS catalog.