Article Contents:
- A commercial bar and a home bar are different tasks
- Divide the bar into four decorative zones
- Bar counter front
- Back-bar
- Mirror and bottle shelves
- End panels, columns, and transitions
- Slat surface
- Panel surface
- Molding grid
- The direction of the slats changes the proportion of the counter
- Vertical direction
- Horizontal direction
- The pitch and module are determined before purchase
- The end face of the counter must not be left to the installer
- The lower zone of the counter is designed separately
- A ready-made frame and molding around a mirror are different systems
- Ready-made frame
- Molding framing
- Bottle shelves and decorative frames should share a common axis
- The bar logo should not compete with the stucco molding
- Bar counter decor in a classic interior
- Bar counter decor in a modern interior
- Slatted wall behind bottles: when it works
- Wall panels on the back-bar: the module should match the architecture
- Niche in the back-bar: access first, decor second
- Column near the bar: accent, counter extension, or background
- Slatted cladding
- Architectural profiles
- Smooth finish
- Dark bar: why the profile can disappear or become too contrasting
- Mock-up of one bar fragment before full installation
- Why area does not replace modular layout
- It is better to calculate the cutting of frames for the entire facade at once
- How to calculate a mirror and decorative framing
- How to calculate wooden trim in the bar area
- What to document for replicating the concept
- Classic bar: where to use moldings and carved decor
- Modern bar: finishing is built on rhythm and junctions
- Baseboard and plinth in the bar area
- Decorative profile on the edge: when it is needed
- How to design a curved bar counter
- How to design an island bar counter
- How to design a wall-mounted bar counter
- How to work with a door or service hatch in the facade
- How to design a back-bar without a mirror
- How to design a back-bar with only a mirror and shelves
- How to choose wall decor for a bar
- When it's better not to buy interior decor
- How to create a working elevation of a bar area
- How to prepare an interior standard for a chain
- What to buy first
- When you shouldn't order decor in advance
- Catalogs, DWG and 3D: where they help
- How not to mix a commercial bar with a home bar area
- Mistake: every layer tries to be the main one
- Mistake: slatted panels are calculated by area
- Mistake: the end face is not designed
- Mistake: the mirror is added after the shelves
- Error: molding is selected based on a white sample
- Error: active decor is placed in the contact zone
- Error: people copy photos online instead of specifications How to buy moldings without duplicating profiles
- How to buy moldings without duplicating profiles
- How to work with pricing without substituting the project
- What to check before payment and delivery
- Minimum sample kit for a commercial bar
- How to prepare a bar mock-up for approval with the client
- How to work with natural wood in a bar area
- Polyurethane in a commercial bar: where it is appropriate
- How to tie the front bar and back bar together with one language
- How to design a bar in a small space
- How to design a large bar area
- What to buy for commercial bar design
- How to order decor for a commercial interior without unnecessary back-and-forth
- Checkpoints before installation
- How to accept decorative finishes after installation
- What to keep after the bar opens
- Operational reserve: when it is needed
- How to prepare a second bar to match the standard of the first
- When the bar counter design needs a complete rethink
- Bar decor as part of the brand, not just a set of ornaments
- A small cocktail bar with a short straight counter
- A classic hotel bar with a long front bar
- A bar with a curved counter and modern finishes
- How to compare two decorative finishing estimates
- When a sample is not enough and a full mock-up is needed
- Which decor should I choose for a bar?
- How should I finish the bar counter facade?
- Are slatted panels suitable for a bar counter?
- How should I decorate the wall behind the bar?
- How should I decorate the mirror behind the bar counter?
- Which moldings should I choose for a bar?
- How do I calculate panels for a counter?
- Can a curved bar counter be finished with slatted panels?
- How do I order samples before the main volume?
- Where to buy interior decor for a bar?
- Should a mirror be used in every bar?
- How many types of decor does one bar need?
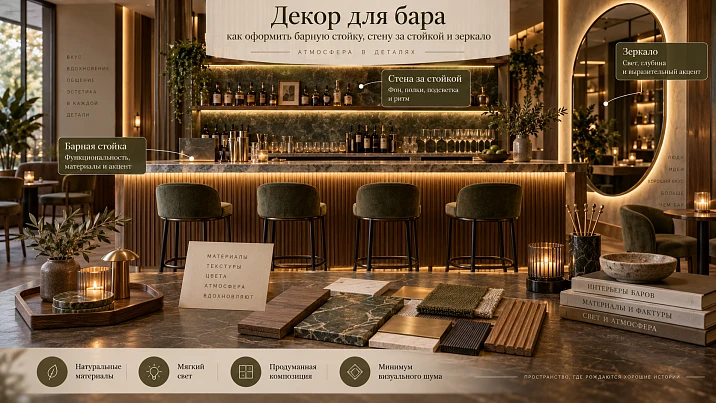
A commercial bar already has many visually active elements: bottles, glass, lighting, taps, menus, logos, open shelves, equipment, and constant movement of people. If you add contrasting slats, complex stucco, active moldings, and several materials at once on top of that, the interior quickly turns into noise. Therefore, the design of a commercial bar is better built around hierarchy rather than around the number of decorative techniques.
The practical formula is simple: product → light → architecture → decor. Bottles and product presentation remain the main color and semantic layer. Architectural materials organize the background, frame the mirror, set the rhythm of the bar counter facade, and connect the bar-front with the back-bar. Decor works for the structure rather than trying to become a separate exhibition.
The article covers real STAVROS product groups: wall and slatted panels, wooden and MDF trim, polyurethane moldings, carved decor, mirror frames, and physical samples. Refrigerators, coffee machines, sinks, beer systems, and professional restaurant equipment are not considered here — that is a different market and a different design scope.
Working sequence: bar counter → facade → end panels → back-bar → bottle shelves → mirror → logo → lighting → selected SKUs → layout → sample → quantity → order.
A commercial bar and a home bar are different tasks
STAVROS already has materials about the home bar area. There, the bar is part of a kitchen-living room, study, or another residential space. A commercial bar works differently: here there is higher visual density, more visitors, more open items, and higher requirements for finish repeatability.
| Parameter | Home bar | Commercial bar |
|---|---|---|
| Main Scenario | Private interior zone | Workplace and client center |
| Visual load | Limited | Bottles, glass, light, logo, menu, equipment |
| Repeatability | Single location | A chain and multiple locations are possible |
| Edges and joints | Often less noticeable | Clearly visible to visitors |
| Usage | Home | Constant movement and regular cleaning |
If a residential scenario is specifically needed, a separate material can be used about a home bar with moldings and decorative elements. The current article is dedicated to a commercial space.




Divide the bar into four decorative zones
Designing a bar as a single picture is inconvenient. It is better to break it into four independent zones and then tie them together with one material system.
Our factory also produces:

Bar counter facade
This is the surface that the visitor sees the longest. Rhythm, end faces, the lower contact zone, and the connection with the countertop are especially important here.
Get Consultation
Back-bar
The wall behind the bartender. The most saturated part: shelves, bottles, mirror, lighting, logo, equipment, and utilities.
Mirror and bottle shelves
A separate back-bar subzone, where decor should support symmetry and sectioning rather than compete with the merchandise.
Ends, columns, and transitions
This is precisely where the "installation" most often becomes visible: cut slats, random angles, exposed edges, and a conflict between the baseboard and the facade.
What should be the main focus — the merchandise or the decor
In a commercial bar, bottles, glasses, and lighting already create a complex colorful composition. Architectural decor is best used as a background and structure.
Its main functions:
- define the axes;
- group the shelves into sections;
- frame the mirror;
- support the logo;
- create a rhythm for the bar counter facade;
- close off the ends and transitions;
- unite the front bar and back bar with a single material.
If the decor itself becomes the main object, the product layer is lost. For a cocktail bar this is especially noticeable: bottles and glass are already a strong visual material.
Bar counter facade: three basic scenarios
Bar counter decor is easier to design if you first choose one main surface principle. On a small facade, you should not use slats, a panel grid, and molded panels all at the same time.
Rack surface
It provides a linear rhythm and works well on straight and, in some models, curved surfaces. It is suitable for a modern bar and facades with pronounced geometry.
Panel surface
It creates a more cohesive modular relief. It can be used as an insert on the front, end, or a separate section of the counter.
Molding grid
Suitable for classic and neoclassical scenarios. It allows organizing the facade with large fields without complex joinery panels.
First, one of three scenarios is selected, then the end, plinth, and top junction are worked out.
Slatted panels for the bar counter facade
Current STAVROS slatted panels are used not only on walls, but also on furniture facades, islands, and counters. The catalog includes rigid and flexible solutions; some flexible panels are designed for curved surfaces.
For bar-front, this opens up several scenarios:
- straight counter;
- radius front;
- rounded end;
- island counter;
- partial insert on a smooth facade;
- transition from post to column.
The suitability of a specific SKU for a radius, finishing method, and surface type must always be verified against the product page of the selected model. The properties of one flexible panel cannot be applied to the entire category.
The direction of the slats changes the proportion of the post
Vertical direction
Emphasizes height and makes a long post look more cohesive. Convenient when the countertop already creates a strong horizontal line.
Horizontal direction
Enhances the length and can be useful on a short but tall front. At the same time, special attention must be paid to the corners and the continuation of the pattern on the end faces.
The direction is chosen based on the geometry of the specific post, not the model. On a narrow radius, a horizontal slat can create a complex joint, while a vertical one more easily follows the curvature of a specific flexible system.
Spacing and module are determined before purchase
Ordering "approximately 12 square meters of panels" is not enough. A bar-front requires a layout plan.
Sequence:
finished front width → panel module → number of full modules → edge margins → cuts → end face.
If division leaves a narrow strip at the edge, it is better to adjust the layout before ordering: shift the center, change the starting point, or choose a different module. The installer should not have to decide this on site.
The end face of the post must not be left to the installer
The end face is especially noticeable on an island or L-shaped post. For a slatted facade, one of the following scenarios is chosen in advance:
- continue the rhythm on the end face;
- make the end face smooth;
- close the transition with a separate profile;
- use a corner piece;
- finish the slats before the end face and separate with material.
Random trimming of slats along the edge makes even expensive finishes look like an unfinished detail.
The lower zone of the bar counter is designed separately
The lower section is in the contact zone of shoes and chairs, and a footrest may run nearby. Active protruding relief should be used here with caution.
Check:
- baseboard or plinth;
- junction with the floor;
- position of the footrest;
- chair overhang;
- contact with visitors' feet;
- access for cleaning.
One should not automatically assume that any material is suitable for a specific wet cleaning method or intensive use. These properties are verified against the selected finish system and project.
Back-bar: the most complex wall of a commercial bar
The back-bar is almost always visually more saturated than the front of the counter. It simultaneously holds bottles, shelves, a mirror, lighting, a logo, equipment, utilities, and sometimes a screen or menu. That is why the decorative background is designed last, after the functional grid.
Work sequence:
- Lock in the equipment and shelves.
- Determine the width of the sections.
- Place a mirror or mirrored panels.
- Position the logo.
- Design the lighting.
- Only after that add panels, moldings, or trim.
If you start the other way around—first drawing a beautiful molding grid and then fitting bottle shelves into it—the decorative geometry will almost inevitably be disrupted by functional elements.
A mirror behind the bar doubles not only the space but also the visual noise
A mirror reflects bottles, light, people, shelves, and decorative elements. That is why a complex wall in front of a mirror is perceived even more actively.
If the back-bar is already saturated with colored glass and lighting, it is better to use a calm frame. In a classic interior, this can be a single profile around a large mirror surface. In a modern one — a thin architectural line or a clean mirror with no additional decor.
For a ready-made mirror object, you can use STAVROS mirror frames, but for a built-in back-bar, molding framing directly on the wall or furniture structure is often more convenient.
A ready-made frame and molding around the mirror are different systems
Ready-made frame
A standalone object. It has external dimensions, a mirror opening, thickness, and its own decorative plasticity. It is suitable if the mirror should read as a separate object.
Molding framing
It is part of the back-bar architecture. It can unite the mirror, shelves, and wall sections into a single system.
First, the mirror construction is determined. If it is built in between bottle shelves, a ready-made frame may turn out to be too massive. If the mirror stands on a separate wall next to the bar, on the contrary, a standalone frame may be more logical.
Bottle shelves and decorative frames should have a common axis
Shelves — the functional back-bar grid. Decor should support it.
First, the following are fixed:
- shelf width;
- number of sections;
- heights between levels;
- central axis;
- logo placement;
- mirrored margins.
After that, frames, moldings, and panels are designed. If a decorative frame is wider than the shelf by a random amount, a visual conflict arises. If the axes align, even a simple profile looks cohesive.
The bar logo should not compete with the stucco
If the logo is already the central mark, a second equally prominent decorative center is not needed nearby. A large rosette, carved overlay, or contrasting ornament can draw attention away from the brand.
Use a calmer frame, panel background, or a single material that supports the logo more strongly. The more complex the sign's graphics, the calmer the background should be.
Bar moldings: structure, not decoration for decoration's sake
STAVROS's polyurethane range allows the use of moldings, cornices, skirting boards and other architectural elements. For a commercial bar, they are especially useful as a way to structure sections and the mirror.
Main objectives:
- frame the mirror area;
- divide the back-bar into sections;
- support the central axis;
- connect the wall with the counter facade;
- complete the transition to the ceiling;
- mark a separate niche.
Categories: polyurethane decor и Polyurethane moldings, cornices, and baseboards.
Bar counter decor in a classic interior
The classic front design can be assembled from several large elements without turning the facade into a set of small panels.
Working scheme:
plinth → large rectangular frame → central field → top profile.
If the counter is long, it can be divided into several identical sections. But the sections must be tied to the real geometry: bar stools, end panels, columns, and the position of the work module.
Too frequent a grid creates the effect of a furniture cabinet. For a commercial counter, a large architectural grid usually reads better.
Bar counter decor in a modern interior
The modern scenario requires fewer elements, but places higher demands on geometry.
Minimum set:
- slatted or smooth panel;
- controlled lighting;
- clean end panel;
- a straight plinth line;
- one material or two coordinated materials.
Here, “bar counter decor” is better understood as the quality of the surface and joints, rather than as the addition of separate ornaments.
Slatted wall behind bottles: when it works
Slats behind shelves can provide a good backdrop if they remain calm themselves. They work when the color is close to the wall or the wood does not compete with the bottles, the shelves are simple, and the logo is not too active.
It becomes noisy when the following are present at the same time:
- contrasting slats;
- bright RGB lighting;
- mirrors;
- an active logo;
- many multi-colored bottles;
- additional ornament.
In that case, it is better to leave the rail only on part of the back-bar or replace it with a calmer flat surface.
Wall panels on the back-bar: the module must match the architecture
STAVROS wall panels can be used on walls, niches, racks, and furniture fronts. For a back-bar, the modular surface is especially sensitive to shelves.
If a shelf runs through the middle of a decorative module, the pattern loses its meaning. Therefore, the shelf grid is determined first, then the panel grid. Ideally, the seams and axes of the panel are aligned with the storage sections.
Niche in the back-bar: access first, decor second
A niche can look like an intentional architectural section if its perimeter is framed with a profile or another material. But before finishing, functional access must be checked.
Need to know:
- what is stored inside;
- whether there is equipment;
- whether access to utilities is needed;
- how the doors open;
- where the shelves run;
- how the lighting works.
The decorative profile must not cover the service panel or interfere with opening.
Column near the bar: accent, extension of the counter, or background
A column is often perceived as a technical obstacle, but it can be integrated into the bar system.
Slatted cladding
Suitable if the same rhythm is already used on the counter. For a radius, the specific flexible panel is checked.
Architectural profiles
Suitable for a classic concept if the column has sufficient width and is not in the contact zone.
Smooth finish
The best option if there are already many shelves, mirrors, and light around. Not every structure needs to be turned into a separate accent.
Light and relief are chosen at the same time
Side and directional light sharply intensifies the shadow from slats, moldings, and carved elements. A profile that appears calm on a sample under diffused light can become the main visual object under linear lighting.
Therefore, it is useful to view a physical sample under lighting close to the project lighting. This especially applies to:
- deep slats;
- wide moldings;
- carved overlays;
- dark tinting;
- matte and glossy finishes;
- mirrored surfaces next to the lighting.
Light should not "accidentally reveal" the texture after installation. It is better to test the effect in advance on a mock-up.
Dark bar: why the profile can disappear or become too contrasting
A graphite, dark green, black, or burgundy wall changes the perception of the molding more than it seems from a white catalog photo. Against a dark background, the profile can almost disappear under frontal light and become sharply pronounced under side light.
For dark bars, the following are especially important:
- physical paint sample;
- light direction;
- gloss level;
- profile depth;
- actual viewing distance.
You cannot choose a profile based only on a photo of a white sample and expect the same effect after painting it in a complex dark color.
Material board for the bar area: what to assemble on one board
A bar combines several materials in a very small area. That's why a material board is more useful than a long list of references.
On a single board or table, gather:
- the counter front;
- a slatted or wall panel;
- molding;
- a molding sample;
- a wood sample;
- the wall color;
- the metal of the shelves;
- the frame or profile of the mirror;
- tabletop;
- an example of the lighting, if it is colored or highly directional.
The main question for a material board: which material is the odd one out? If wood, brass, mirror, bright tile, a contrasting slat, and ornate molding are all competing at once, it's better to remove one layer before purchasing.
Sample before ordering a commercial bar
For a commercial project, physical samples of wood, panels, large moldings, and tinted finishes are especially useful. STAVROS has a dedicated section product samples, including moldings and slatted panels.
A sample isn't needed to "see the quality in general," but for specific checks:
- the scale of the profile at a distance of 1–3 m;
- the depth of light and shadow;
- wood texture;
- the color next to bottles and metal;
- compatibility with lighting;
- the thickness of the panel at the end of the counter;
- actual junction with the countertop.
One correct sample before the main purchase is cheaper than redoing a long bar front.
Mock-up of one bar fragment before full installation
For a complex or chain project, it is useful to assemble not the entire bar, but 1–1.5 m of a characteristic section. For example: part of the bar front, the plinth, a slatted panel, the upper transition, and one end.
For a back-bar mock-up, it may include:
- one section of shelves;
- a mirrored fragment;
- molding;
- lighting;
- several bottles;
- a sample of the logo or material next to it.
This is how the real interaction of the product, light, and decor is tested. A render does not show this fully.
How to calculate slatted panels for a facade rack
The calculation starts from the finished size, not from the order area.
Algorithm:
- Measure the width and height of the finished facade.
- Determine the direction of the slats.
- Choose a specific panel module.
- Lay out the modules along the entire length.
- Check the edge cuts.
- Determine the end treatment solution.
- Count the whole panels.
- Add only a justified reserve.
Example. The front of the rack is 3600 mm long. If the selected panel module has a working width of 300 mm, pure math gives 12 modules. But if the ends require an additional 150 mm wrap on each side, the frontal length no longer describes the entire volume. You need to calculate the full development of the rack.
Why area does not replace modular layout
An area of 3.6 m² can belong to a rectangular wall of 3.6 × 1 m or to a set of complex ends. The number of panels for the same area can differ due to modules and cuts.
Therefore, to buy wall panels wholesale or in a large B2B batch, you need not only square meters, but actual developments and the number of physical modules.
How to calculate molding for a facade or back-bar
Molding is calculated for each frame and then converted into commercial lengths.
Need to know:
- number of frames;
- the width and height of each;
- perimeter;
- the number of corners;
- the commercial length of the selected SKU;
- cutting map;
- offcuts that can be used in the adjacent section.
Example. The facade has three identical frames 900 × 600 mm. The perimeter of one is 3 m, of three — 9 m. But if the commercial length of the profile is 2.4 m, you cannot simply divide 9 / 2.4 and order four strips. You need to lay out six pieces of 900 mm and six of 600 mm so that the actual strips provide the required set without unwanted joints.
It is better to calculate frame cutting for the entire facade at once
If each frame is calculated separately, some of the leftovers are lost. With a shared cutting map, the leftover from one section can cover a part of the adjacent one.
For example, a 2400 mm strip can yield:
- 900 + 900 + 600 mm;
- 900 + 600 + 600 mm with a 300 mm leftover;
- another combination depending on all frames.
The optimal scheme depends on the actual dimensions. Therefore, linear footage calculation is built after the final geometry.
How to calculate a mirror and decorative framing
The size of the mirror glass and the size of the entire composition are different values. You need to record:
- the size of the mirror itself;
- the outer size of the finished frame or moulding border;
- the distance to the bottle shelves;
- installation clearances;
- the position of the lighting;
- the offset from the countertop or lower shelf.
If a ready-made frame is used, its outer dimensions are taken from the product card. If the moulding is installed on site, the size is set on the wall layout.
How to calculate wooden linear trim in the bar area
STAVROS wooden and MDF trim can be used on the front of the counter, in surrounds, plinths and decorative bands. It also needs to be calculated using product lengths.
If the profile runs along the front, end and column, it is better to combine the cutting list into a single list of parts. Then offcuts from one area can be used in another.
If natural wood remains visible, the direction and visual compatibility of the material are additionally taken into account, especially on adjacent parts.
Bar specification: one table instead of a set of screenshots
| Zone | Subzone | SKU | Material | Size / module | Quantity | Comment |
|---|---|---|---|---|---|---|
| FRONT | Main facade | PAN-___ | By card | Module | By layout | Vertical slats |
| FRONT | End face | PAN-___ / profile | As per project | By layout drawing | By layout | Corner closure |
| BACK | Mirror | MLD-___ | Polyurethane / wood | Profile | By cutting | Framing |
| BACK | Accent | PAN-___ | By card | Module | By layout | Behind the shelves |
Layout drawings are attached to the table. Then the supplier sees not an abstract request "we need decor for the bar", but a specific need by SKU, modules, and product lengths.
For a chain of bars, you first need one reference object
If the concept is planned to be replicated across multiple locations, the first bar should be treated as a PILOT BAR. It is used to test not only the appearance but also the production logic of the decorative system.
Need to confirm:
- the layout of the counter facade;
- the end panel solution;
- color and finish;
- the panel's behavior under the design lighting;
- the geometry of the mirror and shelves;
- the logo position;
- moldings and trim;
- the installation sequence;
- the actual material requirements;
- the behavior of the joints after opening.
After this, the solutions are turned into a standard rather than copied "from photographs."
What to record for concept replication
The chain's interior standard should store more than just visualizations.
Useful set:
- SKUs of all recurring materials;
- material and finish;
- direction and pitch of the slatted system;
- size of standard frames;
- end treatment of the post;
- the logo position;
- size and position of the mirror;
- type of lighting;
- approved sample;
- acceptable alternatives;
- photos of the finished pilot bar.
In the second space, the lengths and geometry change, but the language remains. This allows the concept to be scaled without an identical copy of every millimeter.
Classic bar: where to use moldings and carved decor
A classic bar does not require the maximum amount of ornament. Moldings are useful on the front of the counter and around the mirrored back-bar. STAVROS carved decor can be used locally: a central overlay, an accent in one section, framing for the branded area.
But if the bottles, mirror frame, shelves, and logo are already active, additional carving must be subordinate to the composition. Be especially careful with small repeating overlays: on a long counter they quickly turn into a visual pattern stronger than the product.
Modern bar: finishing is built on rhythm and joints
In a modern interior there are fewer decorative details, so installation mistakes are more noticeable. The main role is played by even slat spacing, clean ends, uniform gaps, concealed junctions, and light.
Instead of several ornaments, it is stronger to use:
- one type of slatted panel;
- smooth countertop material;
- one metal for shelves;
- calm back-bar color;
- one precise logo;
- mirror or clean background.
Here, decorativeness is created by the quality of geometry.
Baseboard and plinth in the bar area
The lower line unites the counter and the walls, but at the bar-front it may have a different operational scenario than at an ordinary wall.
Checked:
- baseboard height;
- protrusion relative to the facade;
- adjacency to the end of the post;
- contact with footwear;
- footrest;
- cleaning;
- transition to the wall skirting board.
If the bar counter has its own plinth, the wall skirting board does not need to be automatically continued along its front. The two lower profiles may conflict.
Decorative profile on the end face: when it is needed
The end face can be finished without a separate profile if the panel has a clean finish. The profile is needed if it:
- covers a real edge;
- protects the edge;
- connects two materials;
- is part of classical architecture;
- helps repeat the joint at several points.
Adding a profile just because "the end needs to be decorated with something" is not necessary.
How to design a radius bar counter
A radius requires a separate layout. If a flexible slatted panel is used, first check the minimum geometry of the specific model and build a development along the arc.
You need to decide:
- where the radius begins;
- how the slats transition from the straight section;
- where the joint is;
- how the edge is finished;
- whether the spacing remains consistent;
- how the lower zone is handled;
- how the panel meets the countertop.
A request to buy slatted panels for a radius column must be accompanied by a drawing and a specific SKU, not just the arc length.
How to design an island column
An island column has no “invisible wall,” so all ends and back sides are potentially visible. This increases the requirements for finishing the material.
It is useful to define in advance:
- main facade;
- side facades;
- the technical side;
- countertop joints;
- plinth;
- the logo position;
- visitor route.
If all four sides are equally decorative, the counter may lose its orientation. Usually one facade remains the main one.
How to design a bar counter against a wall
A counter adjoining a wall creates a complex angle. The slatted pattern and molding grid must have a clear termination.
You should not leave a narrow offcut of the panel just because the facade physically ends at the wall. It is better to adjust the layout along the entire length or provide a smooth field at the junction.
How to work with a door or service hatch in the facade
If the front-bar has technical access, it should be part of the pattern. For a slatted panel, it is decided in advance how the slats run across the door and where the gap will be. For a molding grid, the service hatch is best integrated into the boundaries of the section.
A random door cut after installing the decor disrupts the rhythm and complicates maintenance.
How to design a back-bar without a mirror
A mirror is not mandatory. If the room is visually rich even without it, you can use a calm panel wall, a painted surface, or wood.
Refusing a mirror is especially logical if it reflects an undesirable technical area, visitors from an awkward angle, or too many bright light sources.
How to design a back-bar using only a mirror and shelves
The opposite minimal scenario is a mirror surface and simple shelves without additional moulding. This works especially well in a small bar, where the reflection already creates sufficient depth.
The main task here is a precise shelf axis, neat fastenings, and light control.
How to choose decor for bar walls
If the task is formulated as buying decor for walls, first divide the walls by role:
- back-bar — functionally rich;
- seating area wall — can be calmer;
- entrance — branded;
- corridor — background;
- a bar counter is a furniture surface, not an ordinary wall.
The same decor does not have to be repeated on every surface. The connection can be built through color, material, or profile.
When it is better not to buy interior decor
If the back-bar is already filled with shelves, bottles, a mirror, and a bright logo, additional ornamentation can worsen the composition. The same applies to the front of the counter, where a contrasting panel and lighting are used at the same time.
Before buying interior decor, ask yourself: does it structure the existing elements or add yet another independent accent? In the second case, it is better to skip the purchase.
How to put together a working elevation of the bar area
A perspective render is not enough for purchasing and installation. You need frontal elevations that show the real geometry.
For the front of the counter, note:
- overall length and height;
- plinth;
- tabletop;
- ends;
- service doors;
- panel module;
- position of moldings;
- logo, if it is located on the front bar.
For the back bar:
- wall boundaries;
- mirrored margins;
- shelves;
- equipment;
- logo;
- lighting;
- moldings and panels;
- niches and service access.
A layout turns a design idea into a document that can be used to calculate and order materials.
How to prepare an interior standard for a chain
If there are several bars, it is useful to separate fixed and variable parameters.
| Fixed | Variable |
|---|---|
| Slatted panel SKU | Length of a specific post |
| main moulding | Frame size |
| Material and color | Number of back-bar sections |
| End-face principle | Position of doors and columns |
| Mirror framing type | Mirror dimensions |
| Lighting logic | Exact length of the light line |
This way, the new point does not mechanically copy the old one, but remains part of a single visual system.
Supply of finishing materials for the bar
The supply of finishing materials can be delivered in a single batch or in stages. For a small bar, it is often convenient to receive panels, trim, and the frame in one coordinated order. For a large project, it makes more sense to split deliveries according to the readiness of the zones.
For example:
- front-bar and end faces;
- back-bar;
- mirror area;
- local carved or molded decor;
- service or operational reserve.
Before sending, check whether the site is ready for acceptance, whether there is a safe place to store the long-length item and panels, and whether the current revision of the layout has changed.
What to buy first
It is worth ordering earlier the items that affect geometry and have a production lead time:
- panels for the main facade;
- frame or profile for the mirror;
- repeating molding;
- wooden trim;
- large carved elements, if they are truly needed for the concept.
Small local decor can be left for a later stage if it does not affect the layout and installation of other systems.
When you don't need to order decor in advance
Even at an attractive price, it's better to postpone the order if:
- the front layout has not been approved;
- the end panel has not been decided;
- the shelf grid has not been fixed;
- the mirror size has not been determined;
- the logo is still changing;
- the panel has not been checked with a sample;
- color and finish are not coordinated;
- no exact quantity of physical modules.
Early procurement does not save time if the material later has to be reworked or stored without a clear installation zone.
How to prepare a STAVROS request
For a commercial estimate, it is useful to provide a structured file rather than the general phrase "bar decor is needed."
Minimum composition:
- elevation of the counter facade;
- back-bar dimensions;
- specific SKUs;
- material and finish;
- panel layout;
- number of whole modules;
- linear footage in commercial lengths;
- need for samples;
- project address;
- desired deadline.
Thus, a request for decorative materials for a commercial bar turns into a clear B2B inquiry, and the commercial proposal relates specifically to the selected configuration.
Catalogs, DWG, and 3D: where they help
For a complex back-bar, radius counter, or chain project, working files save time. STAVROS publishes catalogs, DWG and 3D across several product groups.
They are useful for:
- accurate visualization of the slats;
- checking the molding profile;
- mirror layout;
- coordination of the panel with the countertop;
- preparation of working drawings;
- replicating the solution across the chain.
But the 3D model must remain linked to the real SKU. You cannot scale the product profile in the visualization and then assume the project still refers to the same item.
How not to mix a commercial bar with a home bar area
The site also has a second separate material about stucco decor and wooden slats for a home bar. There, the logic is built around a residential interior, a kitchen-living room, a study, and a mini-bar.
The current material does not repeat these scenarios. Here, the front bar is the furniture architecture of a commercial space, the back bar is a working wall, and the bottles, shelves, and lighting create a higher visual load.
Typical mistakes in commercial bar design
Mistake: every layer tries to be the main one
Cause: the panel, mirror, logo, and moldings are each liked separately. Consequence: the product layer gets lost. Prevention: define the visual hierarchy in advance.
Mistake: slatted panels are calculated by area
Cause: square meters are easier to get from the estimate. Consequence: edge cuts and end faces are resolved on site. Prevention: modular layout before ordering.
Mistake: the end face is not designed
Cause: it is not visible in the front render. Consequence: accidental trimming of the rhythm. Prevention: a separate end-face elevation.
Mistake: the mirror is added after the shelves
Cause: it is considered a background material. Consequence: the shelves do not align with the mirrored sections. Prevention: a coordinated back-bar grid.
Mistake: the molding is chosen based on a white sample
Cause: the design wall is dark, while the catalog profile is light. Consequence: the relief looks different under the design lighting. Prevention: a paint sample and a sample under similar lighting.
Mistake: active decor is placed in the contact zone
Cause: the facade is designed only visually. Consequence: the relief is constantly in contact with shoes and chairs. Prevention: a separate solution for the lower zone.
Mistake: people online copy photographs instead of specifications
How to buy moldings without duplicating profiles
Before buying moldings, consolidate all the bar's frames into a single table. It often turns out that one profile can work on the facade and around the mirror if the scale is suitable.
Reducing the number of SKUs simplifies purchasing, but it should not be an end in itself. If a large profile on the rack is too heavy for a mirror frame, it is better to use two coordinated sizes.
How to work with price without substituting the project
You need to compare identical configurations. A cheaper panel with a different module may require a different layout. A cheaper molding may change the proportions of the frame.
Commercial optimization begins after the technical check. Otherwise, saving on one item creates rework of the entire composition.
What to check before payment and delivery
Before the final order, double-check:
- SKU;
- the material;
- size and module;
- quantity;
- samples;
- layout;
- address;
- the deadline;
- delivery conditions;
- current price.
Commercial terms and logistics should be checked in the current section payment and delivery STAVROS.
How to tell that the project is ready for purchase
Readiness is determined not by the number of beautiful renders, but by how well the decorative idea has been translated into product data.
The project is ready for RFQ if:
- front-bar has a final layout;
- end faces are resolved;
- back-bar is divided into actual sections;
- the position of the mirror and shelves is fixed;
- the panel has a modular layout;
- moldings are converted into parts;
- the logo has a final placement;
- critical samples are approved;
- there is a specification by SKU;
- there are no formulations like "approximately this profile."
After that, procurement becomes technical rather than a continuation of the design search.
Minimum sample set for a commercial bar
There is no need to order a sample of every item on the shortlist. It is enough to order those where the screen conveys scale and texture the worst.
| Category | When a sample is especially useful | What to check |
|---|---|---|
| Slat panel | Large countertop area | Rhythm, thickness, texture |
| Wooden molding | Visible natural wood | Texture and finish |
| Polyurethane molding | Dark finish or side lighting | Depth and shadow |
| Carved decoration | Central accent | Ornament scale |
| Mirror frame | Standalone object | External dimensions and relief |
After review, the shortlist is reduced. This is better than discussing several dozen SKUs until the last day.
How to prepare a bar mock-up for approval with the client
A mock-up can be assembled even without a full rack. A fragment containing the main material conflict is enough.
For example:
- 500–1000 mm of frontage;
- actual panel;
- piece of countertop;
- plinth;
- backlighting;
- one end-grain section;
- a metal footrest sample.
For the back-bar — a mirror fragment, one shelf, molding, and real light. It is this set that shows the client the future depth and light-and-shadow better than an additional render.
How to work with natural wood in the bar area
Wood can become the main warm material of the bar, but it is better to use it systematically. If oak is chosen for panels, trim, or frames, neighboring wooden elements should be compared against a real sample.
The same word “oak” does not mean the same tint. In a bar, the difference is especially noticeable because of directional light and mirrors.
If a controlled painted surface is needed, MDF may turn out to be more logical for a specific scenario. This is not a ranking of materials, but a choice for the task.
Polyurethane in a commercial bar: where it is appropriate
Polyurethane decor is convenient where an architectural line, frame, or cornice with predictable geometry is needed. It works especially well on the back-bar and in a classic front-bar.
Complex overlays and rosettes are used selectively. If there are already many bottles, light, and a logo around, a calm profile is often stronger than ornament.
How to tie the front bar and back bar together with one language
Both zones don't have to be identical. The connection can be built through one parameter:
- the same wood species;
- one color;
- one molding profile;
- a repeating rhythm of sections;
- one metal;
- a shared lighting principle.
For example, the front of the bar can be slatted, while the back bar is smooth, but both use oak and the same dark metal. This looks more cohesive than literally repeating every slat on the back wall.
How to design a bar in a small space
In a small bar, the back bar and the counter are visible at the same time, so it's especially important to limit the number of active materials.
Practical minimum:
- one expressive surface on the front;
- a simple mirror or a calm wall behind the shelves;
- one material for the shelves;
- one logo;
- limited lighting.
If the space is small, complex molding and a contrasting rail at the same time can make the space feel visually tighter.
How to design a large bar hall
In a large space, the decorative system can be more complex, but it should be built hierarchically. The front bar remains the first level, the back bar the second, and the far walls are background.
Additional columns, niches, and wall panels are introduced only where they help organize the scale of a large hall. There is no need to distribute the same level of decorativeness across all surfaces.
What to buy for designing a commercial bar
The final list usually consists of a limited number of product groups:
- slatted or wall panels;
- wooden or MDF trim;
- polyurethane moldings;
- profile or ready-made frame for a mirror;
- local carved decor, if it is really needed;
- samples before the main batch.
Restaurant equipment is not included in this list. It is a separate purchase with a different specification.
How to order decor for a commercial interior without unnecessary back-and-forth
Instead of a general request like "I want to buy interior decor for a bar," send the supplier a table and elevation drawings.
Example structure:
PROJECT: BAR-01
FRONT / PAN-___ / 12 modules
FRONT-END / PROFILE-___ / 2 pcs.
BACK / MLD-___ / per cutting map
MIRROR / FRAME OR MLD-___ / 1 set
SAMPLES / SKU list
This is how the manager calculates the actual volume rather than reconstructing the project from images.
Checkpoints before installation
Even after purchase, the selected decorative materials can still be ruined by incorrect positioning on site. Before starting installation, it is useful to go through several checkpoints.
- the finished geometry of the upright matches the development;
- the countertop has its final overhang;
- the position of the footrest is known;
- technical doors and hatches have not changed;
- bottle shelves are secured along the current axis;
- the mirror has a confirmed size;
- logo and light lines are fixed;
- materials belong to the correct batch and SKU.
If one of the base dimensions has changed, the decorative layout must be rechecked before cutting panels and moldings. Correcting geometry after installation is more expensive than stopping work for a few hours.
How to accept decorative finishing after installation
Acceptance should compare the finished area not only with a beautiful render, but also with the working documentation.
For the front bar, check:
- uniformity of spacing;
- edge margins;
- ends;
- position of service doors;
- joint with the plinth and countertop;
- damage to the relief.
For the back bar:
- alignment of frame and shelf axes;
- mirror position;
- symmetry of sections;
- visible joints;
- light and shadow under working lighting;
- no conflict between logo and decor.
This is how acceptance turns from a subjective “like / don't like” into clear control of key points.
What to keep after opening the bar
For reordering and future repairs, it is useful to create an as-built package. It is especially valuable if the bar is part of a chain.
Save:
- the final specification;
- actually installed SKUs;
- material and finish;
- front-bar and back-bar elevations;
- photos of end faces;
- approved samples;
- delivery number or date;
- stock and reserved quantities;
- photos of the finished area under working light.
If a damaged section needs to be restored a year later, such an archive is more useful than any interior photo.
Operational reserve: when it is needed
A small reserve can be useful for a unique profile, panel, or finish, especially if the material is repeated across several locations in the chain. But its size should not be determined by a universal percentage.
The decision depends on:
- component cost;
- reorder speed;
- risk of damage;
- lifespan of the concept;
- number of bars in the chain;
- possibilities to use leftovers between objects.
It is better to store installation leftovers and operational reserve separately. Otherwise, the stock planned for repairs will be used up already at the first object.
How to prepare a second bar according to the standard of the first
Before scaling, you cannot simply send photos of the pilot bar to the contractor. The new object has a different geometry, so only the principles and SKUs remain constant.
For the second location, the sequence is as follows:
- take measurements of the new rack;
- apply the standard front-bar principle;
- recalculate the modules;
- double-check the end faces;
- adapt the back-bar grid;
- save approved materials;
- create a new quantity specification;
- check current prices and lead times.
This is how the concept scales without losing the brand language and without mechanically copying the dimensions of the old venue.
When the bar counter finish needs a complete rethink
The counter finish system should be rebuilt rather than adjusted locally if the geometry itself changes: the front becomes curved instead of straight, a new footrest appears, the service door is relocated, or the countertop gets a different overhang.
Such changes affect the module, the edge fields, and the end face. Trying to preserve the old layout at any cost usually creates narrow cuts and random joints.
Bar decor as part of the brand, not a set of ornaments
In a successful commercial project, the bar area's finish helps people recognize the place without directly repeating the logo on every wall. The repeating rhythm of slats, the character of the moldings, the wood tone, and the way the mirror is finished can all become part of the brand language.
That is why the most important decisions should be fixed in the chain's standard. A brand is preserved not by the number of decorative elements, but by the repeatability of the chosen architectural system.
Three practical bar design scenarios
A small cocktail bar with a short straight counter
The main risk is overloading a small space. A workable scheme: a calm slatted front bar, a simple mirror behind the shelves, one logo, and limited lighting. Molding can be used only as a thin frame for the mirror area. Large carved decor here tends to compete with the bottles.
A classic hotel bar with a long front bar
A long facade can be divided into large molded sections, linking them to the seating areas. The back bar then gets a single mirrored grid and calm shelves. If a carved overlay is added, it is used as a single central accent rather than repeated in every section.
A bar with a radius counter and modern finish
First, a flexible panel is selected, the radius is checked, and a development is built. The key decision is the joint location and the transition to the end face. The back bar is better kept simpler: a smooth wall or a mirror with linear shelves. Repeating the slatted radius on the back wall as well is not necessary.
The three scenarios show one rule: the amount of decor depends not on the area or budget, but on the existing visual load and geometry.
How to compare two decorative finish estimates
Two estimates cannot be compared by the total sum alone if they use different solutions. A slatted facade, a molded grid, and a modular panel have different work structures and material consumption.
For a fair comparison, bring the options to the same area and check:
- what is included in the area or square footage;
- whether end panels are included;
- whether whole modules and cuts are included;
- whether finishing is included;
- whether there is an edge profile;
- whether the reserve is included;
- whether installation requirements are the same;
- whether the price applies to the current SKU.
A cheaper estimate may be incomplete if it does not include end panels and profiles. A more expensive option may be more efficient if the module fits the geometry better and produces almost no waste.
When a sample is insufficient and a full mock-up is needed
A small fragment is enough to evaluate the texture and profile. A full mock-up is needed if the result depends on the interaction of several systems: rail + lighting + countertop + end panel, or mirror + shelves + molding + logo.
The more interdependencies there are, the less useful it is to view materials separately. For a chain bar, a mock-up is especially justified: one check protects subsequent locations from repeating the mistake.
What to measure on the finished site before the final purchase
Before ordering the finish, it is useful to re-take dimensions after the main construction work. For the bar counter, record the finished length and height of the front, the dimensions of the end panels, the plinth, the countertop overhang, and the service openings. For the back-bar — the wall width, the height to the ceiling, the actual shelves, the mirror, the niches, and the equipment.
A repeat measurement is needed because the rough design and the actual geometry may differ. If the bar counter has become 40–60 mm longer or the end panel has a different thickness, the modular panel layout may already change. The same applies to the mirror grid: moving one shelf can disrupt the pre-calculated frame.
The final purchasing specification should be based on the finished dimensions or on a clearly fixed design geometry that the contractor undertakes to maintain.
For sites with several bar counters or separate VIP zones, it is better to treat each counter as an independent geometry, even if the same material is used. The common SKU can be retained, but the number of modules, cutting, end panels, and mirror positions are calculated separately for each zone.
FAQ: decor for a commercial bar
Which decor should you choose for a bar?
First determine what already creates visual load: bottles, mirror, logo, lighting. Then choose one main architectural technique — panel, slat, or moulding system — and use the remaining elements as support.
How to finish the bar counter facade?
The main scenarios are a slatted panel, a modular panel, or a moulding grid. The choice depends on the style, the geometry of the counter, the end faces, and the lower contact zone.
Are slatted panels suitable for a bar counter?
Yes, in the STAVROS catalog, slatted panels are used on counters and furniture facades as well. For a radius, a specific flexible model is required, and its suitability is checked on the product page.
How to design the wall behind the bar?
First plan the shelves, mirror, logo, equipment, and lighting. Only after that add mouldings or panels. The back-bar should support the product, not compete with it.
How to design the mirror behind the bar counter?
Determine the size of the mirror field, the grid of bottle shelves, and the axis. Then decide whether a ready-made frame or a moulding surround as part of the wall is needed.
Which mouldings to choose for a bar?
Choose the profile based on the scale of the sections, style, and lighting. On a dark wall, be sure to check a physical sample under lighting close to the project lighting.
How to calculate panels for a bar counter?
Use modular layout: finished width → module → whole panels → edge cuts → ends. Floor area alone is not enough.
Can a curved bar counter be finished with slatted panels?
Yes, if the specific flexible panel is designed for the required geometry. Not every slatted panel can be considered flexible.
How to order samples before the main volume?
Select the critical SKUs — panel, molding, wood, frame — and order them through the samples section or agree on an available option with the manager. It is best to check samples together with the project lighting and adjacent materials.
Where to buy interior decor for a bar?
The STAVROS catalog includes panels, trim, polyurethane and carved decor, frames, and samples. For a commercial bar, it is better to first create a specification and then request a calculation.
Does every bar need to use a mirror?
No. In a small or visually busy back-bar, a calm paneled or painted wall can work better than a mirror.
How many types of decor does one bar need?
There is no fixed number. If the front-bar is already expressive, it's better to make the back-bar calmer. In a small bar, two or three coordinated materials are often enough.
Final route: from concept to order
- Separate the bar-front, back-bar, mirror, and end panels.
- Determine what is the main visual layer.
- Choose one base scenario for the counter facade.
- Lock in the functional grid of the back-bar.
- Determine the mirror and logo.
- Choose specific panels, moldings, and trim.
- Assemble the material board.
- Order critical samples.
- Create a mock-up.
- Calculate panel modules and commercial lengths.
- generate the specification.
- Check price, lead time, and delivery.
- Provide STAVROS with the specification of decorative materials for bar area calculation.
This is how bar decor becomes not a set of striking products, but a system that supports the product, lighting, brand, and operation of the counter. This is what distinguishes commercial bar architecture from a home decorative area.