Article Contents:
- Why an exposed end of a wooden skirting board is more noticeable than it seems
- End-grain wood differs from the face surface
- Why heights of 100 and 120 mm change the finishing requirements
- Where an exposed end occurs
- 1. Straight finished end
- 2. Returning the skirting board to the wall
- 3. Beveled termination
- 4. Wooden heel or transition element
- 5. Junction to furniture or vertical profile
- Smooth skirting board
- Decorative skirting board
- Tall profile and solid wood under a clear finish
- Step 1. Find the end point
- Step 2. Mark the main piece with an allowance
- Step 3. Make the first 45° cut
- Step 4. Make the mating piece in a safe way
- Step 5. Assemble the joint without glue
- Step 6. Glue the two parts together
- Step 7. Install the skirting board on the wall
- Step 8. Finish the joint and apply the final finish
- Clean cut without chipping
- Sanding end-grain wood
- Preparation for enamel
- Preparation for varnish or oil
- At a concealed-mount door and an opening without casing
- Near the staircase
- At a built-in wardrobe
- At a decorative panel
- On a long open wall
- Incorrect marking for an angled cut
- A small piece holds weakly
- Wood changes dimensions
- How to fix a minor defect
- How to finish a wooden skirting board beautifully when there is no architrave nearby
- How to cover the end of a wooden skirting board without an end cap
- What is a skirting board return to the wall?
- How to cut the end of a skirting board at 45 degrees
- Can a return be made from a short offcut?
- How to treat the end of an oak skirting board
- How to finish a skirting board near a door without an architrave
- What should I do if a gap appears between the return pieces?
- Can a return be made on an MDF skirting board?
The skirting board is laid along the wall, but near an open passage it has nothing to butt against. With a door casing, the issue is usually resolved by adjoining, but here a cross-cut end remains visible: on oak, the pores and grain direction are noticeable; on beech, the end surface differs in shade. Such an end is especially visible on a tall skirting board when viewed from the side of the passage.
There are several ways to close the end of a wooden skirting board without a plastic end cap: treat the straight cut, make a short return of the profile to the wall, finish the end with a bevel, or complete the line with a suitable wooden transition element. For a shaped profile, the most inconspicuous option is often the return: a small piece repeats the pattern of the front side and hides the exposed grain. But it cannot be cut and fixed in the same way as an ordinary long plank.
The solution is chosen based on the cross-section shape, skirting board thickness, termination point, and finish coating. A solid wood skirting board under clear varnish places different requirements on the joint than a profile that will be painted with opaque enamel after installation.




Why an open end of a wooden skirting board is more noticeable than it seems




End-grain wood differs from the front surface
The front side of a wooden skirting board usually runs along the grain. After sanding and clear finishing, an extended wood pattern is visible on it. On a cross-cut end, the fibers are exposed; the material absorbs primer, stain, varnish, or oil differently. Therefore, the same coating on the face and end can produce different color saturation and sheen.
The problem is not limited to shade. A poorly prepared cut retains small torn fibers, especially on the protruding parts of a relief profile. Under side lighting, they form an uneven shadow. If the end is near a passage, fabric and objects can catch on it, and sharp edges are more easily damaged during cleaning.
Our factory also produces:



Why a height of 100 and 120 mm changes the finishing requirements
On a 100 mm high skirting board, the open end face is already large enough for a person to notice the change in direction of the wood grain. On a 120 mm high profile, this face is one fifth taller. If the thickness is 15–16 mm, the open cut occupies approximately 1500–1920 mm² before shaped cutouts are taken into account. For a tall board, a careless end becomes a separate spot against the wall.
With a transparent finish, attention is drawn to the wood pattern; with opaque enamel, to the profile contour and the quality of the paintwork. In both cases a straight cut is acceptable; the mistake is to leave it unfinished.
Get Consultation
Where an open end occurs
Typical places are a concealed-door opening, the end of a wall at an arch, the start of a staircase, an abutment to the side of a built-in wardrobe, a transition to a wall panel. There is also sometimes a deliberate break in the line on a long wall, when the skirting ends before a decorative insert. Here it is important to understand whether the end will be visible only from the front or also from the side. In the second case, the open end face is more noticeable, and returning the profile usually looks more convincing.
Five ways to finish a wooden skirting board without an end cap
Several solutions may suit the same section. It is better to compare them on a sample of the actual profile, not only from a photograph of the room's general appearance.
1. Straight finished end
The skirting is cut at 90° to the longitudinal axis, burrs are removed, the end grain is prepared and coated with the same finishing material as the other surfaces. This method is appropriate for a flat modern skirting if a neatly finished cut is part of the intended geometry. It is also suitable in a discreet place next to furniture.
With a transparent finish, the end will not disappear: even the same stain does not turn cross grain into longitudinal grain. It is better to perceive it as a natural feature of solid wood rather than try to mask it completely.
2. Returning the skirting board to the wall
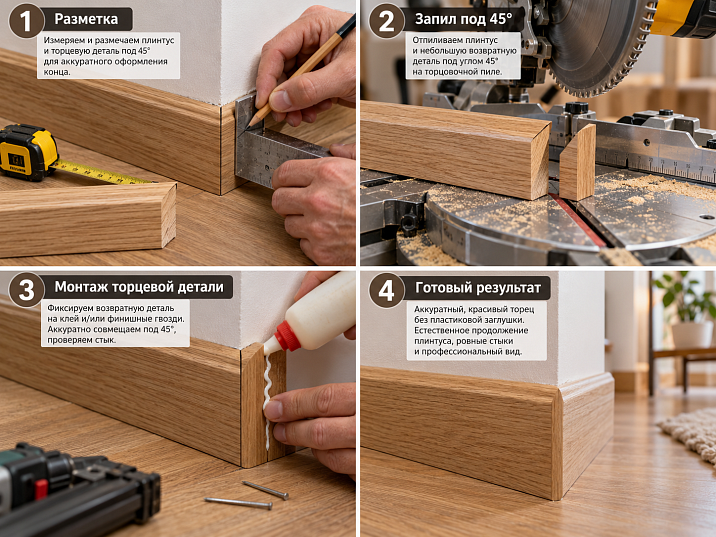
The main strip ends in an angled cut. A small matching fragment of the same profile with an opposing cut is glued to it. The fragment turns the decorative surface by approximately 90° and ends at the wall. Instead of exposed cross-grain wood, the viewer sees a continuation of the top and face contour.
This technique is especially useful on figured skirting boards made of oak and beech. In essence, it resembles a small external corner, after which the profile immediately meets the wall. For an ordinary straight 90° turn, two mating 45° cuts are used, but with other geometry the angle is selected on site.
Conventional diagram, top view:
WALL          ──────────────────────────┐
                                        │ ← short return
SKIRTING FACE  ═════════════════════════╝
                       main strip  ↑ toward the wall
The diagram conveys the principle, but not the scale or the shape of the mating planes. The exact cut lines are determined from the actual cross-section of the product. The return must not protrude beyond the passage boundary or touch moving parts of the door structure.
3. Beveled termination
On a simple profile, the end portion can be cut at a well-considered angle so that the end looks less massive. With this method, a separate matching piece is not needed. However, the cut surface remains visible, and on a figured skirting board the beveled plane can cross the decorative top edge unattractively.
A beveled end is not equivalent to a return. It does not turn the profile pattern toward the wall, but only changes the outline of the open end. If the bevel turns out sharp and fragile, it is wiser to avoid it in the passage.
4. Wooden heel or transition element
A heel is a separate piece that organizes the transition at the base of a casing or other vertical trim. In size and pattern it must be coordinated with the baseboard rather than simply covering its end. This method is appropriate where a pronounced vertical architectural line already exists.
A heel must not be confused with a small return made from an offcut. A return is almost invisible and serves to finish the profile, whereas a heel is generally perceived as an independent element of the composition. On a wall without a casing, a large heel may prove superfluous.
5. Junction to furniture or a vertical profile
If the baseboard meets the side panel of a cabinet, a column, or a casing, the end can be concealed by a precise junction. The condition is to match the thicknesses and not to cover moving furniture parts. Where furniture has adjustable supports or a removable plinth, the baseboard must not be glued to parts that must be removed for servicing.
Built-in furniture is often installed after finishing. Therefore, before cutting, it is useful to determine its final position: otherwise the end that was planned to be concealed remains visible after the cabinet is installed.
| Method | What the interior gets | Where the limitation is |
|---|---|---|
| Straight processed end | A simple finish without additional details | End-grain wood is visible |
| Return to wall | Continuous profile pattern and a concealed open cut | Precise cuts and safe handling of a small fragment are required |
| Beveled end | Softer transition without a separate piece | May look accidental on complex relief |
| Heel or transition element | Highlighted architectural junction | Size and style compatibility required |
| Abutment to a vertical element | The end is concealed by an adjacent element | Installation sequence and furniture access must be considered |
How the profile shape influences the choice of solution
Smooth skirting board
A flat strip with straight edges has no complex pattern that must be carried continuously through a corner. Here a straight machined end is often sufficient: after priming and painting it reads as a logical termination of a rectangular element. A return is also possible, but its advantages are more noticeable on a profile with a pronounced chamfer or a shaped top.
Shaped skirting board
Rounded corners, steps and coves form a characteristic line along the wall. A straight cut breaks it off abruptly, while a return carries the pattern to the wall. Opposing mitre cuts must match not only in overall height but also in every protruding part of the cross-section. If strips from different batches differ slightly in profile, a step may appear at the joint even with an accurate saw angle.
Tall profile and solid wood under a clear finish
For a 120 mm high skirting board, a small return looks compact visually, but in essence it is a tall and relatively thin fragment. It is difficult to hold when sawing, and the glue contact area is limited. Therefore you should start with a safe method of producing the part, not with an attempt to cut it from a small offcut.
For oak under clear lacquer, it is advisable to take the mating part from the same strip: the shade and grain direction will be closer. For beech this is also useful, especially when tinting, when the difference between sections may show after the composition is applied. Opaque enamel hides the wood colour but does not correct a mismatch in geometry.
Tools and materials for a neat end
| Tool or material | What it is for | What to pay attention to |
|---|---|---|
| Mitre saw with a suitable blade | Straight and angled crosscuts | Fence parallelism, setting accuracy, protection of the cutting zone |
| Miter box and fine-tooth hand saw | Small volumes, control samples | The workpiece must be stable; accuracy depends on the quality of the miter box |
| Angle finder, square, tape measure | Measuring the angle and transferring marks | The actual geometry of the passage may differ from 90° |
| Clamps, bar clamps, stops | Reliable fixation of long parts | Do not clamp the decorative part to the point of damaging the profile |
| Backing or sacrificial board | Fiber support at the tooth exit | Do not interfere with the operation of the saw's safety devices |
| Abrasive block and fine-grit paper | Deburring | Do not round over the miter joint surface |
| Wood glue | Joining two return parts | Compatibility with wood species, finish, and operating conditions |
| Primer, enamel, lacquer, or oil | Sealing end grain | Use a single compatible finishing system |
For safety, you need goggles, dust extraction and compliance with the tool instructions. A small offcut must not be held with your fingers near the saw blade. When working on a mitre saw, the workpiece must rest on the table and fence and be secured in a manner permitted by the tool manufacturer. If the part cannot be secured safely, do not make such a cut on the machine: use other suitable tooling or have the cutting done by a workshop. Do not remove the guard to gain access to a short offcut.
How to make a wooden skirting board return to the wall: step-by-step instructions
Suppose the wooden skirting board ends at an open passage, and the wall and the axis of the profile form an ordinary right angle in plan. For such a case, a return can be assembled from two parts with a 45° joint. The exact dimensions are determined by the actual thickness and shape of the skirting board.
Step 1. Find the end point
Place a whole strip against the wall in its working position. Mark not only the place where its front edge should end, but also the boundary beyond which the return must not protrude. Check whether there is enough distance to the door leaf, furniture and the passage. At a threshold with a concealed door, take into account the movement of the leaf and the construction of the frame.
If the skirting board covers the expansion gap of a floating floor covering, its end must not become a rigid stop for the floor. The skirting board is fixed to the wall, not to the movable covering, and the gaps specified by the floor manufacturer are maintained.
Step 2. Mark the main part with an allowance
On the front side, mark the final visible point and the direction of the turn. For a 90° return, an external mitre joint is assumed, but the actual cut line is first checked on a sample. When marking, distinguish between the length along the back and front edges: with a mitre cut these are not the same.
Leave an allowance for the first trial fit. It is especially undesirable to immediately cut to the final size from an expensive oak strip if you have not cut the chosen section before.
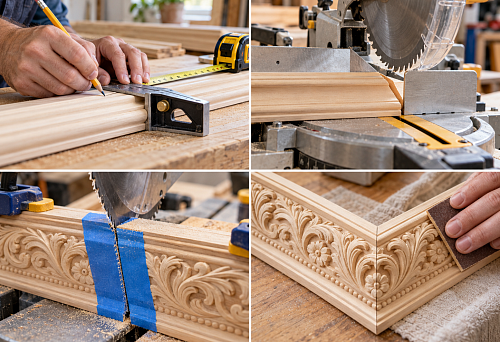
Step 3. Make the first 45° cut
Secure the long strip on the saw in the same orientation as it sits against the wall. Set the required cutting direction and make a test cut on a similar offcut. Make sure there are no chips on the face side and that the saw does not leave a ragged mark on the upper protrusion.
Only after checking, cut the main strip. Do not try to correct an incorrect angle with vigorous sanding: on a thin mitre joint it is easy to remove too much and end up with a gap on the most visible part of the profile.
Step 4. Make the mating fragment in a safe way
Take a sufficiently long offcut of the same skirting board. On its end, form a mating cut that joins with the main piece. First, dry-fit the two long elements together and see how the upper shaped line continues.
Only after that, mark the final edge of the return that will face the wall. The small piece is separated from the long workpiece in a safe way using the device intended for such a size and shape. If the resulting element cannot be held and secured according to the machine manual's requirements, do not try to finish cutting it "in mid-air". Such operations may require woodworking jigs or hand tools with reliable clamping.
The length of the return is not automatically equal to the stated thickness of the skirting board. It is affected by the position of the outer and rear planes, the shape of the relief, the kerf width and the chosen marking lines. With a thickness of 15–16 mm this is indeed a very short termination, but its geometry is determined by test fitting, not by a single number from the catalogue.
Step 5. Assemble the joint without glue
Place both pieces on a flat surface as they will stand against the wall. Check three things at once: whether the angle meets without a gap, whether the upper profile runs continuously, and whether the rear side of the return reaches the wall plane. If the mating element protrudes beyond the face edge of the main strip, adjust the fit before gluing.
Schematic diagram of the joint, top view:
  LONG SECTION                  RETURN
  ──────────────────╲          ╱────────
                     ╲ 45° 45°╱
                      ╲      ╱
                       ╲____╱   → toward the wall plane

  Both mitre cuts form a single turn of approximately 90°.
  The size and position of the short piece are refined against the actual profile.
In the front view after assembly, the top line of the skirting should wrap around the edge without a step; the untreated cross-cut should not face the walkway.
Step 6. Glue the two pieces together
Use a suitable wood adhesive, taking into account the future finish and the humidity conditions of the room. Apply the product to the mating surfaces without excess: squeezed-out glue is especially noticeable after staining and can prevent the finish from being absorbed evenly. Secure the joint so that the pieces do not shift and the face profile is not damaged.
An ordinary finishing nail is not suitable for such a small return: the impact and wedging can split the thin wooden part. Choose the fixing method and holding time according to the adhesive instructions. Do not install the assembled piece until its joint has reached the required strength.
Step 7. Install the skirting on the wall
Dry-fit the finished termination in the opening. Check whether the return creates a gap with an uneven wall. If the wall is curved, it is sometimes wiser to prepare the base locally than to sand down an already glued decorative contour.
Fix the main strip using a method suitable for the chosen wall and profile. Do not transfer the entire installation load to the small return element. It completes the pattern but does not replace the fixing of the long section of skirting.
Step 8. Treat the joint and finish
Under enamel, a small cosmetic defect within the tolerance of the chosen coating can be filled with a compatible wood filler, then primed and painted over the joint. With a clear finish, it is better to aim for a clean cut straight away: filler rarely reproduces the natural grain of oak or beech.
Provide access to the return edge and wall for neat finishing, but do not fill the moving floor components with a rigid compound. Any auxiliary products are chosen for compatibility with the wood, wall covering and finish.
How to finish the straight end of a wooden skirting board
Clean cut without chipping
A straight finish does not require a mitre cut, but here the entire cut surface is exposed to view. Before sawing, check that the mitre saw is set to 90° to the longitudinal axis and that the strip does not wobble on its supports. A backing strip, if permitted for the tooling, supports the emerging fibres and reduces the likelihood of tear-out. On a test cut, assess the cleanliness of the upper moulded projection.
If small burrs appear, remove them with an abrasive after sawing. A large chip cannot be "restored by sanding" without changing the dimensions of the part: repair or a new cut with a loss of length will be required.
Sanding end-grain wood
Choose the grit to suit the original treatment and the chosen coating system. Move the abrasive block across the end face, keeping it perpendicular to the length of the profile. Do not round the edge too much: on a skirting board with a flat top, the resulting curve will be noticeable.
Check the end face in raking light. Individual fibres and saw marks show up before the coating is applied, so it is best to remove them straight away. Remove dust by the dry method specified by the finishing technology.
Preparation for enamel
Cross-grain fibres often absorb primer more intensively than the face surface. An additional pass of compatible primer or intermediate sanding is sometimes required. Do not apply a thick coat of enamel to hide the pores quickly: after drying, unevenness and a difference in sheen between the end and the long side may remain.
When choosing a white or light enamel for oak, consider the risk of wood substances showing through an unsuitable water-based system. The need for an isolating primer is determined by a test coat and the coating manufacturer's recommendations.
Preparation for lacquer or oil
For a transparent finish, an even degree of sanding and a test application on a small sample are especially important. The end grain may darken more noticeably than the face side even with the same composition. Excess absorbed material is removed or distributed according to the instructions, without leaving sticky or glossy areas.
It is not necessary to completely hide the difference between the end grain and the face. The goal is to make it neat, without dirty spots, burrs, or uneven coating.
Where exactly the skirting board ends: solutions for tricky spots
At a concealed-frame door and an opening without casing
A door with a concealed frame often leaves a small section of wall without vertical trim. A tall skirting board looks especially bulky there, and the open cut end is in view at the entrance. A return allows the profile pattern to be completed up to the opening line without installing a decorative end cap.
First measure the space to the edge of the door leaf and check the opening path. Leaving the skirting board protruding in the door's path is unacceptable. If there is door casing nearby, this is a separate junction task: it is covered in detail in the article about the junction of a wooden skirting board and casing.
Near the staircase
At the start of a staircase flight, the skirting board may butt against a step or end on an exposed section of wall. Here the end is often viewed from the side and from above. A straight cut becomes noticeable; a return helps neatly finish the decorative edge.
Before choosing a method, check whether the short return piece will protrude into a walkway or cleaning area. At the outer corner of a step, impacts from footwear and objects are possible. If the return would be excessively fragile, it is better to make a sturdy junction to a suitable vertical element or choose a simpler end face.
At a built-in wardrobe
If the side panel of the wardrobe sits flush against the wall, the skirting board is often finished before it. However, the furniture plinth may be set deeper than the main plane of the facade, and the side panel may have its own overhang. Measure the actual depth of the furniture rather than relying only on the line of the door.
For a wardrobe with a removable plinth, serviceability is important. A wooden skirting board must not be glued simultaneously to a fixed wall and a removable furniture element. There is a separate article on decorative plinths and profiles “Skirting board for a wardrobe: profile, plinth and moulding”.
At a decorative panel
Where a skirting board meets a wooden wall panel, a difference in thickness arises. If the panel protrudes more, a neat straight end face can be fully concealed under its edge. If the skirting board is thicker, its own return often looks calmer than a random mitre cut.
The panel and skirting board must have compatible finishes. An oak panel under clear oil and a beech skirting board under stain may differ more than the samples suggest. Check the colours on the actual pieces under the room's lighting.
On a long open wall
Sometimes a decorative line deliberately ends before the start of a fireplace surround, arched element or cladding. Here a small gap without skirting can be left if it is compositionally intended and finished on the floor side. Such a break is better emphasised with a precise return than hidden behind a random cover piece.
Four STAVROS wooden skirting boards: how end-face work changes
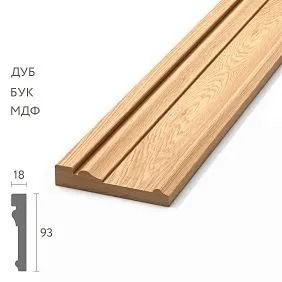
The product should be chosen before designing the return: its height, thickness and top-edge shape determine the complexity of processing. In the catalogue of oak and beech mouldings various profiles are presented that cannot be considered interchangeable just because of similar height.
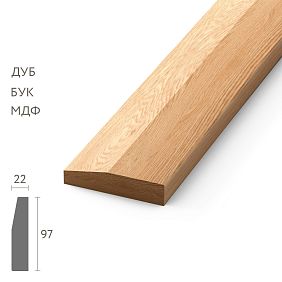
| STAVROS profile | Solid wood dimensions: height × thickness × length | What matters for an open end |
|---|---|---|
| PLT-001-1 | 120 × 15 × 2400 mm, beech or oak | Tall face surface; the straight end requires especially careful finishing |
| PLT-005 | 120 × 16 × 2400 mm, beech or oak | For the return, the decorative top contour must be precisely aligned |
| PLT-006 | 100 × 15 × 2400 mm, beech or oak | With a lower height, it is somewhat easier to visually organize the open edge |
| PLT-007 | 97 × 22 × 2400 mm, beech or oak | A greater thickness increases the projection; the space near the passage and the transition to the architrave should be checked |
PLT-001-1. wooden skirting board PLT-001-1 has a height of 120 mm with a wooden thickness of 15 mm. This is an example where the open end face turns out tall but rather narrow. Under a transparent finish, the direction of the grain will be noticeable on it; under enamel, the cleanliness of the outer contour becomes the priority.
PLT-005. For skirting board PLT-005 with a height of 120 mm and a thickness of 16 mm, the return to the wall helps preserve the character of the upper profile. It is better to prepare the mating part from an offcut of the same strip: matching the cross-section is more important than the fact that both parts formally belong to the same article number.
PLT-006. For skirting board PLT-006 the wooden version has a cross-section of 100 × 15 mm. With limited end visibility, it can be finished with a straight clean cut; if the open end faces a passage, a return usually looks more finished.
PLT-007. Skirting board PLT-007 has a cross-section of 97 × 22 mm. This is a relatively thick profile. Its product page separately notes the possibility of using the item as a skirting board or making a plinth block for the MLD-007.1 architrave from it. However, this does not mean that any small offcut of PLT-007 automatically becomes a ready-made plinth block: the shape and dimensions of the transition piece must be coordinated with the MLD-007.1 architrave.
The dimensions in the table refer to the specified solid wood versions; MDF and moisture-resistant MDF variants may have different thickness and length. Before ordering, verify the selected material and actual cross-section on the product page, not just the general skirting board drawing.
How to calculate material if open ends are required
An additional short return rarely changes the total linear meterage noticeably. But when cutting expensive solid wood, it may require another suitable offcut of the correct cross-section and pattern. Therefore, the number of such ends is recorded separately from the straight sections.
Let's imagine a wall 3500 mm long with one open end that needs to be finished with a return. For wooden planks 2400 mm long, the wall line itself cannot be made as a single piece: a longitudinal joint or another breakdown will be required. Mathematically, two planks give 4800 mm, which is more than 3500 mm. From the remainder after cutting, it is potentially possible to make a return and a control sample, but only after checking the joint position, allowances, kerf width and wood quality.
In another case, two walls of 2300 mm each require two nearly full planks 2400 mm long. The total remainder is only 200 mm before cuts. If several returns are planned, such a remainder is not always suitable: a safe length for fastening, the correct saw cut directions and a test setup are needed. It is better to express the reserve not in abstract percentages, but as a map of specific parts.
When compiling the list, record: the length of each straight section along the selected measurement line, the side of the open end, the type of cut, the number of mating parts and any visible longitudinal joints. A separate guide will be useful for the overall organization of cutting “Wooden skirting board: height, profile, colour and fixing”.
Why gaps appear in the return joint
Incorrect marking for a miter cut
A baseboard has a back line against the wall and a front visible edge. A 45° cut produces different lengths along these lines. If you mark only the "total wall length" and do not determine the end point of the face plane, the profile will end up shorter or longer than the calculated position.
The solution is to mark a reference point on the actually visible face and verify it with a test cut. After test-fitting, transfer not the theoretical length but the working mark you found.
A small part holds weakly
A return has a small gluing area. If the surfaces to be joined are covered with dust, an unsuitable lacquer, or residues of finishing material, the adhesive may hold less well. An additional risk is a side impact from a vacuum cleaner near a passage.
Check the order of operations: for some adhesive systems, the wood joint must be made before the finish coating, while others require special surface preparation. You cannot universally glue a fragment over a finished lacquer and expect the strength of bare wood.
Wood changes dimensions
Solid wood reacts to changes in air humidity. If a strip was stored in a damp room and dried out after installation, stresses may show up in the joints. Filler will not hold a large gap: it fixes neither an inaccurate cut nor a weak fastening.
Before cutting, let the products acclimatize under room conditions in accordance with the manufacturer's recommendations, and when finishing, follow the requirements of the selected materials. Do not glue together parts that cannot be joined without noticeable force.
How to fix a minor defect
If the geometry is generally correct but a small cosmetic unevenness remains at the joint, a suitable repair compound followed by sanding and painting may be used under opaque enamel. Under clear lacquer, precise fitting is better: a filled gap usually differs from the solid wood in color and texture.
When the joint opens along the entire height or a short part wobbles, do not mask the problem with a thick layer of filler. Remove the weak connection and prepare a new mating part.
Eight mistakes that ruin an exposed end grain
| Mistake | What will happen | How to proceed |
|---|---|---|
| Leaving a raw crosscut | The end grain differs in color, collects dirt, and may have burrs | Sand, prepare, and coat with a compatible finish |
| Marking the return without a test fit | A step or gap will appear at the corner | Check for matching kerfs on offcuts of the same cross-section |
| Attempting to cut a short piece by hand near the blade | Risk of severe injury and workpiece kickback | Use safe tooling or a different cutting method |
| Joining profiles with different patterns | The relief breaks off at the corner | Make the return from a suitable offcut of the same strip |
| Gluing dirty ends or ends finished with an unsuitable compound | Reduced strength of the glued joint | Prepare the wood according to the adhesive instructions |
| Do not treat exposed fibers | Uneven absorption of moisture and coating | Prepare the ends according to the selected finishing system |
| Fill the large gap with putty | The defect remains visible; the fill may crack | Correct the geometry or replace the short fragment |
| Rigidly cover the floor expansion gap | Deformation of the floating floor is possible | Attach the skirting board to the wall and comply with the floor covering requirements |
A separate mistake is choosing a thicker skirting board only to hide an inaccurate end of the old one. The new profile must match the interior and the actual distances near doors and furniture. If only 18 mm of free space remains in the passage, a 22 mm thick profile does not become suitable because of a neat return: it does not solve the problem of protrusion.
Frequently asked questions
How can you neatly finish a wooden skirting board if there is no architrave nearby?
Choose the finish based on how visible the end grain is. For a smooth skirting board, a straight cut with a high-quality finish may be suitable. For a shaped profile, a small return to the wall is more often used: the top contour is not interrupted, and the cross grain is hidden. Before cutting, check the clearance near the passage and prepare a test joint on an offcut.
How can you cover the end of a wooden skirting board without an end cap?
Without a separate plastic piece, you can treat the end grain with varnish, oil or enamel, or make a return from the skirting board itself. A return is preferable if it is important to continue the relief pattern. A suitable wooden plinth block serves as another solution: it creates a pronounced transition next to a vertical element rather than simply masking the cut.
What is a skirting board return to the wall?
It is a short mating piece that is attached to the mitred cut of the main board and turns its decorative contour towards the wall. Usually, for a straight turn, opposing 45° cuts are used. As a result, the outer end looks like a finished profile rather than an exposed cross-section of solid wood. The piece must be fitted precisely and glued securely.
How do you mitre the end of a skirting board at 45 degrees?
First determine which visible point the edge of the main board should occupy. Then check the orientation of the profile on the saw and make a test cut. For the return, you will need an opposing, mirror-oriented piece. If the geometry of the joint differs from a right angle, you cannot automatically keep the 45° setting: it is determined by the actual joint.
Can a return be made from a short offcut?
Yes, if the length and shape of the offcut allow it to be secured safely and the cut to be made with sufficient accuracy. But a small workpiece must not be held by hand near the saw blade. It is more sensible to first form the mating surface on a long remainder and only then separate the mating fragment in a safe way. If suitable tooling is not available, order the cut at a workshop.
How should the end of an oak skirting board be finished?
First, remove small tear-outs of the fibres while keeping the cut surface flat. Then test the chosen finish on a sample: the end grain of oak can absorb the product more strongly than the face side. For an opaque light-coloured enamel, a compatible isolating primer is sometimes required. Under a clear finish, it is important to achieve an even tone without over-saturating the end grain.
How should a skirting board be finished next to a door without an architrave?
With concealed-frame doors, the free end more often has to be finished up to the edge of the opening. Check the position of the door leaf when open and closed, the thickness of the skirting board and the permissible projection into the passage. After that, choose either a straight termination or a return. Do not fix the skirting board to the moving part of the door structure and do not cover the required technical gaps.
What should be done if a gap appears between the parts of a return?
Check the cause: inaccurate cutting, deformation of the wood or displacement during gluing. A small surface defect under enamel can sometimes be corrected with a compatible filler. If the gap runs through the entire joint or the mating part is poorly secured, it is better to replace it. Under clear lacquer, a new, precisely fitted fragment usually looks better than a filled seam.
Can a return be made on an MDF skirting board?
Yes, the joining principle is similar, but the MDF end grain especially needs protection and preparation for the finish coat. Possible chipping of the edges and the compatibility of the adhesive with the material should be taken into account. If a factory finish has already been applied, the joining procedure may differ from working with unfinished solid wood; it should be checked separately. Do not expect ordinary enamel to immediately conceal a raw cut.
Which method should ultimately be chosen
There is no single mandatory solution for the free end of a wooden skirting board. A straight finished end is appropriate on a simple profile and in places where the cross-cut does not spoil the composition. A return to the wall allows the pattern of a shaped skirting board to be preserved and hides the exposed fibres, but it requires a precise mitre cut and particularly careful work with a short piece. A plinth block or vertical transition is needed when the architecture of the opening requires it, not simply because an offcut is left over.
The most predictable result is achieved when open ends are planned before purchasing the material: choose the profile, check the location at the passage, decide which finish will be on oak or beech, and draw up a cutting plan. After that, from the STAVROS range you can select a solid wood skirting board of the required height and thickness for a neat finish to a specific wall.