Article Contents:
- Why Vertical Wall Molding Can Make a Room Feel Taller
- Direction Matters, but Proportion Matters More
- The Importance of Continuous Lines
- Why Low-Contrast Finishes Often Work Well
- Vertical Wall Molding
- Picture-Frame Molding
- Wainscoting
- Which Treatment Should You Choose?
- Choose a Narrow or Moderate Profile
- A Slightly More Defined Option: MLDPU-004
- Avoid Unnecessary Decorative Weight
- Keep the Ceiling Transition Simple
- Example With Crown Molding
- Example Without Crown Molding
- Plan the Vertical Joints
- STAVROS Profile Comparison
- Small Bedrooms
- Standard Living Rooms
- Formal Entry Halls
- Narrow Wall Sections
- Commercial Interiors
- The Equal-Gap Formula
- Example: Four Vertical Moldings on a 12-Foot Wall
- Why Centerline Measurements Can Be Useful
- When Equal Gaps Are Not the Best Choice
- Fixed-Margin Formula
- Example: A 10-Foot Accent Wall
- Which Formula Should You Use?
- Three Moldings
- Four Moldings
- Five or More Moldings
- Avoid Mechanical Repetition Around Openings
- Concept 1: Four Vertical Lines Behind the Headboard
- Concept 2: Two Vertical Lines Around the Bed
- Concept 3: One Central Decorative Feature
- Consider Bedside Lighting
- Behind the Sofa
- Beside a Window
- Around a Media Console
- In an Open-Plan Room
- Use a Consistent Architectural Rhythm
- Narrow Moldings Can Be More Practical
- Consider Commercial Accessibility Requirements
- Do Not Ignore Wall Controls
- Example: A 22-Inch-Wide Wall Pier
- Should You Use Two Moldings Instead?
- Coordinate With the Doors
- Small Entry With an 8-Foot Ceiling
- Larger Formal Foyer
- Entry With a Mirror
- Traditional Entry Design
- A Restrained Professional Background
- Avoid Excessive Relief
- Coordinate With Shelving
- Vertical Molding and Baseboards
- Vertical Molding and Crown Molding
- No Crown Molding?
- Keep Materials Clearly Identified
- NPU-362.1L and NPU-362.1R
- Decorative Accents Change the Design Language
- When a Ready-Made Composition Makes Sense
- When Individual Molding Is Better
- Combining Kits With Custom Vertical Lines
- 1. Same-Color Molding and Wall
- 2. Molding Slightly Lighter Than the Wall
- 3. High-Contrast Molding
- How Lighting Changes the Result
- Project A: Four Moldings on an 8-Foot Wall
- Project B: Four Moldings on a 9-Foot Wall
- Project C: Four Moldings on a 10-Foot Wall
- Compare the Three Examples
- Avoid Random Joint Positions
- Keep the Profile Aligned
- Use a Manufacturer-Approved Joint Treatment
- Finish Carefully
- Consider an Alternative Layout
- Step 1: Inspect the Wall
- Step 2: Confirm the Wall Dimensions
- Step 3: Mark the Layout
- Step 4: Prepare the Substrate
- Step 5: Cut the Molding
- Step 6: Dry-Fit the Profiles
- Step 7: Apply the Approved Adhesive
- Step 8: Position and Support
- Step 9: Complete the Joints
- Step 10: Prime and Paint
- Step 11: Inspect Under Actual Lighting
- Too Many Profiles
- Profiles That Are Too Wide
- Inconsistent Spacing
- Ignoring the Face Width
- Irregular Top Terminations
- Unplanned Joints
- Conflicting Decorative Systems
- Treating Every Room the Same
- Ignoring the Wall Substrate
- Forgetting Switches and Outlets
- Durability
- Fire and Building Requirements
- Accessibility
- Finish Maintenance
- Repeatable Material Specification
- Molding Profiles
- Installation Materials
- Finishing Materials
- Optional Decorative Accents
- Coordinated Wall Decor Kits
- Product Selection Table
- Verify the Exact SKU
- Review the Technical Drawing
- Calculate the Finished Cut Lengths
- Consider Samples
- Confirm International Shipping
- Can Vertical Wall Molding Make an 8-Foot Ceiling Look Taller?
- What Type of Molding Is Best for Low Ceilings?
- Should Vertical Molding Go All the Way to the Ceiling?
- How Many Vertical Moldings Should I Use on One Wall?
- How Far Apart Should Vertical Wall Moldings Be?
- Can I Install Vertical Molding in a Small Bedroom?
- Is Tone-on-Tone Molding Better for Low Ceilings?
- Can Vertical Molding Be Used Between Two Doors?
- Does Vertical Molding Work in Hallways?
- Can I Combine Vertical Molding With Wainscoting?
- Can I Combine Vertical Molding With Crown Molding?
- Is Polyurethane Molding Better Than Wood?
- Can Polyurethane Vertical Molding Be Painted?
- Can I Paint the Molding the Same Color as the Wall?
- Can I Install Polyurethane Molding Over Wallpaper?
- What Adhesive Should I Use for Vertical Polyurethane Molding?
- How Long Are STAVROS Polyurethane Molding Strips?
- Is One Molding Strip Enough for an 8-Foot Ceiling?
- Is One Molding Strip Enough for a 9-Foot Ceiling?
- How Do I Calculate Vertical Molding for a 10-Foot Ceiling?
- Can I Use Ornamental End Pieces With Vertical Molding?
- Are STAVROS Wall Decor Kits Entirely Polyurethane?
- Where Can I Buy Polyurethane Molding for Vertical Walls?
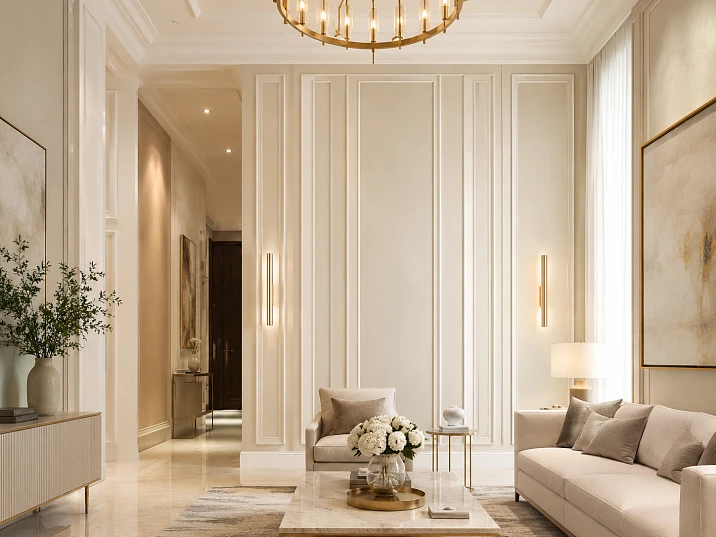
An 8-foot ceiling is common in American homes, but it can feel lower than its actual height when the room has bulky furniture, heavy horizontal trim, dark ceiling transitions, or walls without clear architectural proportions.
Raising the ceiling physically would require major construction. Changing how the room is perceived, however, may be possible through a carefully planned decorative wall treatment.
One approach is vertical wall molding.
Narrow, raised architectural profiles introduce continuous lines that guide the eye upward. They can emphasize wall height, define narrow areas between doorways, organize long hallways, and create subtle geometric detail behind a bed or sofa.
Unlike full-height wood paneling, individual decorative profiles can be applied to an existing prepared wall without rebuilding its entire surface.
For this type of project, polyurethane molding offers several useful possibilities. It can reproduce fine architectural detail, create predictable decorative lines, and receive suitable painted finishes.
The result may be minimalist, with thin molding painted the same color as the wall, or more traditional, using pronounced profiles and coordinated ornamental accents.
However, successful vertical wall trim requires more than evenly placing a few strips on a wall.
The molding's face width affects the spacing. The stock length determines whether vertical joints are necessary. Baseboards and crown molding influence the endpoints. Doors, switches, outlets, and furniture create practical constraints.
And although vertical lines may help a room feel taller, their visual effect is subjective. Decorative molding does not create additional ceiling height, and no profile can guarantee a specific increase in perceived dimensions.
This guide explains how to design floor-to-ceiling molding, choose appropriate polyurethane profiles, calculate spacing, create accent walls for rooms with 8-, 9-, and 10-foot ceilings, and prepare a reliable material order.
We'll also examine real STAVROS products, including narrow, medium, and wide polyurethane profiles available in the company's decorative wall molding catalog.
Whether you're renovating a small bedroom, remodeling a traditional living room, or designing a series of rooms for a residential project, the goal is the same:
Use architectural lines to make the wall feel deliberately proportioned, rather than simply decorated.






Why Vertical Wall Molding Can Make a Room Feel Taller
Vertical lines influence how we read the proportions of a wall.
A strong horizontal feature emphasizes width.
A vertical feature introduces an upward direction.
When repeated with deliberate spacing, vertical architectural lines may encourage the eye to follow the wall from the baseboard toward the ceiling.
This can reinforce the perception of height.
The principle is familiar in architecture.
Traditional pilasters emphasize vertical structure. Tall wall panels help establish rhythm in formal interiors. Narrow vertical details can create a sense of upward movement even on a relatively modest wall.
Applied wall molding offers a simplified version of this architectural language.




Direction Matters, but Proportion Matters More
It is tempting to assume that any vertical line will make any room look taller.
That is an oversimplification.
The overall effect depends on several relationships:
The height and width of the wall
The number of vertical profiles
The distance between them
The visible width and projection of the molding
The color contrast between trim and wall
The height of the baseboard and upper trim
The position of doors, windows, and furniture
A narrow vertical molding repeated three times across a bedroom wall can feel restrained.
The same wall covered with fifteen closely spaced profiles may read more like a striped surface.
Both use vertical lines, but they create different impressions.
The design challenge is to establish a clear architectural rhythm without overwhelming the room.
Наша фабрика также производит:



Смотреть весь Каталог продукции
The Importance of Continuous Lines
For a room with a low ceiling, long vertical lines can provide a useful visual cue.
A profile that extends from the top of the baseboard toward the ceiling emphasizes the full height of the wall.
A short decorative strip placed only in the middle of the wall does not create the same visual relationship.
However, uninterrupted floor-to-ceiling molding is not the only successful solution.
A tall rectangular wall panel or a composition that terminates neatly below crown molding can also emphasize height.
The important factor is that the vertical dimensions dominate the composition.
Получить консультацию
Why Low-Contrast Finishes Often Work Well
When the wall and molding are painted the same color, the architectural detail becomes visible primarily through light and shadow.
The vertical line is present, but it does not divide the wall into strongly contrasting stripes.
This can be particularly useful in small rooms.
A narrow tone-on-tone molding can add definition while preserving a relatively calm appearance.
High-contrast trim may also work, but it produces a much stronger graphic effect.
For low-ceiling rooms, contrast should be a deliberate design decision rather than an automatic choice.
Vertical Molding vs. Picture-Frame Molding vs. Wainscoting
These three wall treatments are related, but they are not identical.
Understanding their differences helps avoid choosing the wrong decorative system.
Vertical Wall Molding
Vertical wall molding uses individual upright profiles to organize the surface.
The profiles may extend most of the wall height.
They do not necessarily connect to one another.
The result is a series of architectural lines.
This treatment is useful when the main objective is to emphasize height or establish a measured rhythm.
Picture-Frame Molding
Picture-frame molding uses decorative profiles to create rectangular or other enclosed shapes.
Each frame generally contains horizontal and vertical components.
This approach provides more visual structure.
It can create the impression of paneled walls without installing full raised panels.
The proportions of the frames determine whether they emphasize height or width.
Tall, narrow frames may support a vertical effect.
Wide, shallow frames may emphasize the horizontal composition.
Wainscoting
Wainscoting traditionally describes a decorative treatment of the lower portion of a wall.
It may use actual panels, applied molding, battens, or other materials.
A horizontal chair rail often establishes its upper boundary.
Wainscoting can be attractive in dining rooms, hallways, and traditional living spaces.
However, a strong horizontal division may not be the most suitable choice when the primary goal is to emphasize the full wall height.
Which Treatment Should You Choose?
| Design objective | Treatment to consider |
|---|---|
| Make an 8-foot room feel more vertical | Tall, restrained vertical molding |
| Create traditional decorative wall panels | Picture-frame molding |
| Decorate and protect the lower wall | Appropriate wainscoting |
| Add subtle structure to a small bedroom | Tone-on-tone vertical trim |
| Create an elaborate neoclassical wall | Tall frames with selected ornamental accents |
| Organize a long hallway | Repeated vertical architectural elements |
No single treatment is universally superior.
The best choice depends on the room's proportions, architectural style, and practical requirements.
Vertical Wall Molding for 8-Foot Ceilings
An 8-foot ceiling measures 96 inches above the finished floor.
That dimension is common in many American residences, particularly older houses, bedrooms, hallways, and selected multifamily buildings.
A well-proportioned vertical molding composition can make these rooms feel more architecturally defined.
The first decision is the width of the molding.
Choose a Narrow or Moderate Profile
For an 8-foot room, a profile around 0.39–0.59 inches wide is a useful starting point.
These dimensions are small enough to create relatively fine lines.
They can add relief without introducing the visual weight of a large pilaster.
Consider the STAVROS MLDPU-001 polyurethane molding.
Its listed dimensions are:
| Specification | MLDPU-001 |
|---|---|
| Face width | 0.39 in |
| Projection | 0.24 in |
| Stock length | 102.36 in |
| Material | Polyurethane |
The narrow semicircular profile creates a delicate raised line.
It can be considered for small bedrooms, entryways, narrow wall sections, and restrained contemporary interiors.
A Slightly More Defined Option: MLDPU-004
The STAVROS MLDPU-004 polyurethane molding is another option for small and medium-sized rooms.
Its dimensions are:
| Specification | MLDPU-004 |
|---|---|
| Face width | 0.59 in |
| Projection | 0.31 in |
| Stock length | 102.36 in |
| Material | Polyurethane |
The profile uses a rounded central element with stepped transitions.
This creates a more defined shadow than a simple narrow bead.
It can work in transitional, modern classic, and restrained neoclassical interiors.
Avoid Unnecessary Decorative Weight
A small bedroom with an 8-foot ceiling may not need ornate corner blocks, heavy crown molding, large wall appliques, and wide vertical profiles at the same time.
Each additional decorative element competes for visual attention.
If the goal is to make the room feel taller, prioritize the vertical geometry.
A small number of carefully placed lines can be more effective than an elaborate decorative system.
Keep the Ceiling Transition Simple
The upper termination influences the appearance of the vertical lines.
A profile might stop neatly beneath existing crown molding.
Alternatively, it may terminate just below the ceiling.
Choose one consistent solution.
Avoid irregular gaps where individual vertical profiles appear to stop at slightly different heights.
A deliberate upper alignment is more important than forcing every molding into direct contact with the ceiling.
Vertical Wall Trim for 9-Foot Ceilings
A 9-foot ceiling measures 108 inches.
The additional height can accommodate somewhat more pronounced decorative profiles.
For example, a 0.87-inch molding may create an attractive vertical rhythm in a medium-sized living room or bedroom.
The STAVROS MLDPU-002 polyurethane molding measures:
Face width: 0.87 inches
Projection: 0.43 inches
Stock length: 102.36 inches
Material: polyurethane
Its stepped cross-section provides more visible architectural relief than the narrower MLDPU-001.
However, stock length becomes an important issue.
A 9-foot wall is 108 inches tall.
The factory strip is only 102.36 inches long.
Whether one strip is sufficient depends on the actual finished length of the vertical molding.
Example With Crown Molding
Suppose the wall has:
Ceiling height: 108 inches
Baseboard height: 4.5 inches
Vertical molding termination: 2 inches below the ceiling
The required molding length is:
108 − 4.5 − 2 = 101.5 inches.
One 102.36-inch stock strip is sufficient.
The remaining nominal length is:
102.36 − 101.5 = 0.86 inches.
This is a very small cutting allowance.
Accurate field measurement is essential.
Example Without Crown Molding
Suppose the molding is intended to stop only 0.25 inches below the ceiling.
The required length becomes:
108 − 4.5 − 0.25 = 103.25 inches.
That exceeds the stock length by:
103.25 − 102.36 = 0.89 inches.
A single stock strip is not sufficient.
The installer must revise the design or create an approved joint.
This is why ceiling height alone does not determine material quantity.
Vertical Wall Trim for 10-Foot Ceilings
A 10-foot ceiling measures 120 inches.
At this scale, broader profiles can create a stronger architectural statement.
For example, the STAVROS MLDPU-003 polyurethane molding measures:
Face width: 1.38 inches
Projection: 0.47 inches
Stock length: 102.36 inches
Material: polyurethane
Its substantial relief may be appropriate for selected formal living rooms, home libraries, entry halls, and larger bedrooms.
But a wider profile is not automatically required because the ceiling is high.
A contemporary 10-foot room might look better with narrow trim.
The decorative style and wall width still determine the appropriate scale.
Plan the Vertical Joints
For many 10-foot walls, a single 102.36-inch strip will not reach from the baseboard to the upper termination.
A second piece will be required.
That does not mean the installer must purchase two full strips for every individual vertical line.
Offcuts can be allocated across multiple profiles.
A proper cutting plan can significantly improve material utilization.
We'll examine an example below.
Choosing the Right Polyurethane Molding Width
The molding's face width determines how prominently it reads against the wall.
Its projection determines the depth of the shadow.
Both dimensions matter.
A profile with a modest face width but pronounced projection may appear more visible under directional lighting than a broader, flatter molding.
STAVROS Profile Comparison
| Product | Face width | Projection | Length | Visual character |
|---|---|---|---|---|
| MLDPU-001 | 0.39 in | 0.24 in | 102.36 in | Delicate |
| MLDPU-004 | 0.59 in | 0.31 in | 102.36 in | Fine stepped relief |
| MLDPU-002 | 0.87 in | 0.43 in | 102.36 in | Pronounced neoclassical line |
| MLDPU-003 | 1.38 in | 0.47 in | 102.36 in | Substantial architectural accent |
All four are polyurethane products.
Their dimensions and intended applications should be evaluated against the actual room.
Small Bedrooms
A narrow profile often provides enough relief.
For a compact bedroom with an 8-foot ceiling, MLDPU-001 or MLDPU-004 may be a useful starting point.
Standard Living Rooms
A medium profile such as MLDPU-004 or MLDPU-002 can create a stronger architectural line.
The choice depends on wall width, furniture proportions, and lighting.
Formal Entry Halls
Larger entry halls may support MLDPU-002 or MLDPU-003.
However, substantial trim should be balanced with door casing, baseboards, and ceiling details.
Narrow Wall Sections
For a narrow wall between two doors, a fine profile is often more proportionate.
A large molding can consume too much of the visible surface.
Commercial Interiors
Hotels, showrooms, and office interiors may use more pronounced repeated profiles.
However, the design must account for circulation clearance, maintenance, finish durability, and applicable building requirements.
How to Space Vertical Wall Moldings Correctly
Spacing is one of the most important parts of the design.
A wall can look elegant or crowded depending on the distance between its vertical profiles.
The correct calculation must include the actual molding width.
Simply dividing the wall width by the number of moldings plus one ignores the space physically occupied by the profiles.
The Equal-Gap Formula
Suppose the objective is to create equal clear spaces between every molding and at both outer edges.
Use:
Clear gap = (Wall width − Number of moldings × Molding face width) ÷ (Number of moldings + 1)
Or:
G = (W − N × P) ÷ (N + 1)
Where:
G = clear gap
W = available wall width
N = number of vertical moldings
P = molding face width
This formula assumes that the full wall width is available and that all moldings are identical.
Real rooms may require different outer margins.
Example: Four Vertical Moldings on a 12-Foot Wall
Suppose:
Wall width: 144 inches
Number of moldings: 4
Molding: MLDPU-002
Face width: 0.87 inches
Total width occupied by the molding:
4 × 0.87 = 3.48 inches.
Remaining clear wall width:
144 − 3.48 = 140.52 inches.
There are five equal clear spaces:
One at each end and three between the moldings.
Therefore:
140.52 ÷ 5 = 28.104 inches.
The intended clear gap is approximately 28.1 inches.
This produces a regular arrangement.
The spacing between molding centerlines is approximately:
28.104 + 0.87 = 28.974 inches.
Why Centerline Measurements Can Be Useful
Installers often prefer working with centerlines.
For repeated profiles, a common center-to-center spacing may be easier to mark accurately.
However, the outside margins must still be checked.
A layout can have perfectly equal centerline spacing while being visibly off-center on the wall.
The complete elevation should be verified before installation.
When Equal Gaps Are Not the Best Choice
Equal spacing is a useful starting point, not a universal requirement.
A wall containing a bed or fireplace may need a composition centered around that feature.
A wall interrupted by doors may require each available section to be treated separately.
A large central panel may also need wider decorative margins than adjacent narrow panels.
The objective is visual order—not blind adherence to one mathematical formula.
How to Calculate Vertical Molding With Fixed Outer Margins
Sometimes the designer wants specific distances from the wall corners.
For example, the outermost moldings may need to align with furniture or avoid a door casing.
In this situation, use a different formula.
Fixed-Margin Formula
Internal clear gap = (Wall width − 2 × Outer margin − Number of moldings × Profile width) ÷ (Number of moldings − 1)
Or:
G = (W − 2M − NP) ÷ (N − 1)
Where:
W = available wall width
M = fixed margin at each outer edge
N = number of moldings
P = face width
This assumes equal left and right margins.
Example: A 10-Foot Accent Wall
Suppose:
Wall width: 120 inches
Outer margins: 12 inches each
Number of vertical profiles: 3
Face width: 0.59 inches
Calculate:
120 − 24 − 1.77 = 94.23 inches.
There are two internal spaces.
94.23 ÷ 2 = 47.115 inches.
The resulting arrangement has:
A 12-inch left outer margin
Three profiles, each 0.59 inches wide
Two clear internal gaps of approximately 47.12 inches
A 12-inch right outer margin
This is more open than the equal-gap layout.
Whether it is preferable depends on the wall composition.
Which Formula Should You Use?
Use equal gaps when the objective is a simple repeated rhythm.
Use fixed outer margins when the composition must relate to room corners, door casing, furniture, or other specific architectural boundaries.
For irregular walls, create a dimensioned elevation rather than relying only on a formula.
How Many Vertical Moldings Should You Install?
There is no correct number for every wall.
The answer depends on scale.
A 10-foot-wide bedroom wall might use three or four narrow profiles.
A narrow wall between two doorways may need only one.
A formal 16-foot living room wall may support several repeated vertical elements.
The main objective is to avoid visual crowding.
Three Moldings
Three profiles can create a simple, balanced rhythm.
The center profile establishes a strong vertical axis.
This arrangement may work on a wall without a large central furniture piece.
Four Moldings
Four profiles create three internal zones between the lines.
This can be useful behind a bed or sofa.
A bed may be centered between the two middle profiles.
This produces a symmetrical composition without placing a molding directly behind the center of the headboard.
Five or More Moldings
A larger number may work on a wide wall.
However, the profile width and spacing should be tested.
A large number of high-contrast lines can create an overly busy appearance.
For traditional paneled interiors, multiple lines may be appropriate.
For minimalism, fewer may produce a cleaner result.
Avoid Mechanical Repetition Around Openings
A long wall with three doors should not automatically be treated as one uninterrupted decorative surface.
Each door changes the visual geometry.
The molding layout should respond to the available sections.
In certain cases, keeping the molding consistent within each individual wall area looks better than continuing a theoretical grid across the entire room.
Vertical Wall Molding Behind a Bed
The bedroom is one of the most effective locations for full-height decorative trim.
The headboard creates a natural focal point.
Vertical molding can reinforce that area without requiring a large upholstered feature wall or elaborate panel system.
Concept 1: Four Vertical Lines Behind the Headboard
Consider a bedroom with an 11-foot-wide wall.
The ceiling height is 8 feet.
Four narrow profiles are positioned symmetrically.
For illustration, use MLDPU-004 with a 0.59-inch face width.
The total molding width is:
4 × 0.59 = 2.36 inches.
Available clear width:
132 − 2.36 = 129.64 inches.
With five equal gaps:
129.64 ÷ 5 = 25.928 inches.
The composition uses clear gaps of approximately 25.93 inches.
This creates a measured vertical rhythm.
The bed can be centered on the wall.
The two central moldings can frame the headboard's central zone.
However, the actual headboard width should be checked before finalizing the positions.
Concept 2: Two Vertical Lines Around the Bed
A simpler approach uses one profile on either side of the headboard.
This is useful when the room is relatively small.
The lines emphasize the area behind the bed without creating a complete grid.
The wall can be painted in a muted color.
The molding may receive the same finish.
Concept 3: One Central Decorative Feature
For an asymmetrical bedroom, a single vertical molding may establish a deliberate architectural reference.
However, a lone molding placed arbitrarily on a large wall can look unfinished.
Its location should relate to the furniture, artwork, or another architectural element.
Consider Bedside Lighting
Wall sconces should be planned with the molding layout.
The fixture backplates need suitable mounting surfaces.
Avoid placing decorative molding across an electrical box or where it would interfere with the fixture.
For hardwired sconces, coordinate the electrical installation before applying the decorative profiles.
Vertical Molding for a Small Living Room
A small living room benefits from decorative restraint.
Large architectural elements can make a compact space feel crowded.
However, a few vertical molding lines can introduce visual structure.
Behind the Sofa
The sofa is often the dominant horizontal object in the room.
Vertical molding can create a useful counterpoint.
The trim may extend from the baseboard toward the ceiling.
Its positions should relate to the sofa width.
A few well-spaced profiles may be preferable to a wall covered in small rectangular frames.
Beside a Window
A narrow molding line may emphasize the vertical proportions of a window.
However, it should not interfere with curtains, blinds, or their mounting hardware.
The profile should complement the casing rather than compete with it.
Around a Media Console
Vertical molding can organize the wall around a television.
However, avoid creating a decorative arrangement that conflicts with the TV mount or cable routes.
If the television wall already contains slatted panels or strong texture, additional molding may be unnecessary.
In an Open-Plan Room
Vertical molding can identify a living area without introducing a physical partition.
A selected accent wall may contain the decorative profiles.
Adjacent walls can remain simple.
This can create visual distinction while preserving a cohesive interior.
Vertical Wall Trim in a Narrow Hallway
Hallways often present different design challenges from living rooms.
They may contain several doors, switches, thermostats, and other functional elements.
The wall may also be visible at a shallow viewing angle.
Use a Consistent Architectural Rhythm
Vertical lines can provide visual order along a long hallway.
However, the number of profiles should respond to the available wall sections.
A series of identical moldings may work on a long uninterrupted wall.
A hallway with closely spaced door openings may benefit from just one or two accents between openings.
Narrow Moldings Can Be More Practical
A low-profile decorative molding may reduce the visual and physical impact on a narrow circulation space.
STAVROS MLDPU-001 projects approximately 0.24 inches.
MLDPU-004 projects approximately 0.31 inches.
These are relatively shallow decorative profiles.
Nevertheless, the complete wall design must preserve applicable circulation clearances.
Consider Commercial Accessibility Requirements
In spaces subject to the Americans with Disabilities Act, certain wall-mounted objects with leading edges more than 27 inches and not more than 80 inches above the finished floor are limited to a maximum 4-inch horizontal projection into circulation paths.
This applies to relevant regulated spaces, not automatically to every privately occupied single-family residence.
A typical narrow molding profile projects substantially less than that limit.
But additional decorative ornaments, sconces, cabinets, and other components must also be evaluated.
The wall treatment should not reduce required accessible-route widths.
Do Not Ignore Wall Controls
A thermostat, light switch, or outlet may interrupt the intended composition.
Plan these locations before installation.
Decorative molding should not conceal electrical boxes or interfere with access to controls.
The layout may need to shift to accommodate existing conditions.
Vertical Molding for Narrow Wall Sections Between Doors
A narrow wall section between doors is sometimes called a wall pier.
These areas can be difficult to decorate because there is insufficient width for a full framed panel.
Vertical molding may provide an alternative.
Example: A 22-Inch-Wide Wall Pier
Suppose the clear wall width between two door casings is 22 inches.
The selected profile is STAVROS MLDPU-001, with a 0.39-inch face width.
If one molding is centered, the clear space on each side is:
(22 − 0.39) ÷ 2 = 10.805 inches.
The result is a narrow raised vertical line with equal surrounding space.
This may provide enough visual definition without adding a full rectangular frame.
Should You Use Two Moldings Instead?
Two profiles can work, but the wall must have sufficient width.
The arrangement should not create cramped margins against the door casing.
The actual casing projection and appearance matter.
Coordinate With the Doors
Door trim already introduces strong vertical lines.
Adding more molding may be redundant.
If the wall pier is very narrow, leaving it undecorated may be the better decision.
The goal is not to fill every available surface.
It is to create an intentional architectural composition.
Vertical Wall Molding in Entryways and Foyers
An entryway creates the first impression of the interior.
Vertical trim can introduce architectural character even where there is insufficient space for furniture or artwork.
Small Entry With an 8-Foot Ceiling
Use a narrow profile.
A tone-on-tone finish can provide subtle relief.
Consider only one or two vertical elements on each suitable wall section.
A heavily ornamental treatment may overwhelm a compact entrance.
Larger Formal Foyer
A foyer with a 10-foot ceiling may support more pronounced profiles.
MLDPU-002 or MLDPU-003 can be considered according to the scale of the space.
A symmetrical arrangement can reinforce the doorway or central hall axis.
Entry With a Mirror
A tall mirror already contributes a vertical element.
The molding may frame the surrounding wall or create a complementary line.
Avoid placing a decorative strip where it interferes with the mirror's mounting system.
Traditional Entry Design
A more classical composition may incorporate ornamental accents.
STAVROS offers polyurethane molding accessories for selected profile systems.
However, decorative accents should be matched to the correct molding family.
Not every ornament is compatible with every profile.
Vertical Molding in a Home Office
A home office benefits from deliberate architectural organization.
Vertical molding can create a composed background behind a desk or seating area.
This can be particularly effective in rooms used for video meetings.
A Restrained Professional Background
A few full-height profiles can introduce depth without creating a visually distracting pattern.
The molding can be painted in the same color as the wall.
Dark green, taupe, charcoal, and warm gray may all work depending on the furniture and lighting.
Avoid Excessive Relief
Strong relief can produce pronounced shadows under directional lighting.
That may be desirable in an elaborate traditional office.
It may be distracting in a small modern workspace.
Use the lightest profile that provides the intended architectural effect.
Coordinate With Shelving
Built-in shelving often introduces its own repeated vertical lines.
Additional molding should support the shelving layout.
If the bookcase already dominates the wall, decorative profiles may be more effective on an adjacent surface.
Using Vertical Moldings With Baseboards and Crown Molding
The upper and lower endpoints influence whether vertical molding looks architecturally integrated.
A molding that begins and ends randomly may appear like an applied strip rather than part of the room's design.
Vertical Molding and Baseboards
Baseboards form the lower boundary of many interior walls.
A vertical profile can terminate neatly at the top of the baseboard.
The junction should be planned.
The baseboard's visible profile and projection determine how the elements meet.
A narrow vertical molding beside a substantial baseboard can look balanced.
But forcing two incompatible cross-sections together may create an awkward detail.
Vertical Molding and Crown Molding
Crown molding defines the upper transition between the wall and ceiling.
A vertical profile may terminate against its lower edge.
This can create the appearance of a connected architectural system.
However, the actual shapes must be compatible.
A stepped vertical molding may not fit neatly against an elaborate crown profile without a planned termination.
No Crown Molding?
A room does not need crown molding to use vertical wall trim.
The vertical profiles may stop consistently just below the ceiling.
A small deliberate termination gap can create a clean modern appearance.
Its size should be established in the drawing.
Keep Materials Clearly Identified
The STAVROS catalog includes polyurethane architectural profiles as well as products made from MDF, wood, and high-density polystyrene.
These materials should not be described interchangeably.
If a project combines them, verify each product's properties, finish preparation, and installation method.
Decorative End Caps and Ornamental Accents
Straight vertical profiles can terminate with a clean cut.
For classical interiors, selected decorative accents may also be considered.
STAVROS offers compatible molding accessories within specific product families.
NPU-362.1L and NPU-362.1R
The NPU-362.1L left-hand polyurethane molding accent measures approximately 2.13 × 1.02 × 0.43 inches.
The matching NPU-362.1R right-hand accent belongs to the same decorative family.
These components are intended for systems based on MLDPU-001 and related first-series molding.
They are directional ornamental elements.
Their suitability at a vertical termination should be verified from the manufacturer's technical drawing and intended orientation.
They should not be assumed to work as universal caps for every vertical layout.
Decorative Accents Change the Design Language
A continuous fine molding may feel modern.
A molding with a floral ornament at the top becomes more traditional.
A row of highly ornamented vertical elements can create a formal architectural character.
For a room with an 8-foot ceiling, that added ornament may not be desirable.
Keep the primary design objective in mind.
If the goal is visual height, ornamental details should support the vertical direction rather than interrupt it unnecessarily.
Neoclassical Vertical Wall Decor Kits
Designing a complete decorative system from individual profiles provides flexibility.
However, some homeowners and designers prefer coordinated wall decor kits.
STAVROS offers Neoclassic Light wall decor compositions.
These include vertical and framed decorative arrangements with coordinated ornamental elements.
An important material detail is that some kits combine polyurethane ornaments with primed MDF molding.
They are not necessarily all-polyurethane products.
When a Ready-Made Composition Makes Sense
A coordinated kit can be useful when the desired appearance is more elaborate than a few individual vertical strips.
For example, a narrow decorative panel might include an upper ornamental element and a lower architectural termination.
This can work in a formal bedroom, entryway, or home office.
When Individual Molding Is Better
If the primary goal is to make an 8-foot ceiling feel taller, a simple full-height layout may be more appropriate.
Individual profiles provide more control over the line height and spacing.
They also allow the designer to respond to doors and furniture without forcing a prefabricated decorative composition into an unsuitable wall section.
Combining Kits With Custom Vertical Lines
A designer may use one ornate decorative panel as a focal point and simpler vertical lines elsewhere.
This can create a hierarchy.
However, check the profiles and proportions carefully.
Products from different collections should not automatically be assumed dimensionally compatible.
Three Color Strategies for Vertical Molding
Color affects how strongly the decorative profiles read.
The right color strategy depends on the desired visual character.
1. Same-Color Molding and Wall
This is one of the most restrained options.
The vertical trim and wall receive the same finish color.
The molding remains visible through subtle shadows.
This approach is particularly useful in small rooms and modern interiors.
For an 8-foot bedroom, a light neutral wall with tone-on-tone molding can create architectural detail without strong visual division.
2. Molding Slightly Lighter Than the Wall
A small tonal contrast makes the decorative lines more visible.
For example, a warm gray wall might be combined with a lighter gray trim.
The effect is stronger than a monochromatic treatment but softer than white molding on a dark wall.
This can work in transitional living rooms and bedrooms.
3. High-Contrast Molding
White molding against a deep-colored wall creates pronounced lines.
Dark molding on a light wall produces a more graphic appearance.
These treatments can be effective in Art Deco-inspired or formal interiors.
However, the number and width of the profiles should be controlled.
Strong contrast makes irregular spacing and imperfect joints more visible.
How Lighting Changes the Result
Directional light emphasizes the molding's projection.
A narrow profile may cast a noticeable shadow when light crosses the wall from the side.
A wide profile produces a different relief pattern.
Evaluate a sample under the room's actual lighting before choosing the final paint finish.
Floor-to-Ceiling Molding Calculator: How Many Strips Do You Need?
Material quantity depends on the installed vertical length and the factory stock length.
For the STAVROS polyurethane profiles discussed in this guide, the listed stock length is 102.36 inches.
That is approximately 8 feet 6.36 inches.
This is long enough for many 8-foot ceiling applications.
It may also work for certain 9-foot rooms when the baseboard and upper termination reduce the exposed vertical length.
For taller compositions, joints may be required.
Project A: Four Moldings on an 8-Foot Wall
Assume:
Ceiling height: 96 inches
Baseboard height: 4.5 inches
Upper termination: 2 inches below the ceiling
Number of vertical profiles: 4
Selected molding: MLDPU-001
Required length per profile:
96 − 4.5 − 2 = 89.5 inches.
For four profiles:
4 × 89.5 = 358 inches.
That equals:
358 ÷ 12 = 29.83 linear feet.
Each strip is 102.36 inches long.
One strip produces one 89.5-inch vertical piece.
Therefore, the project needs:
4 full MLDPU-001 strips.
There is no need for a mid-height joint in the intended layout.
Project B: Four Moldings on a 9-Foot Wall
Assume:
Ceiling height: 108 inches
Baseboard height: 4.5 inches
Upper termination: 0.25 inches below the ceiling
Number of vertical profiles: 4
Required length:
108 − 4.5 − 0.25 = 103.25 inches per profile.
That is longer than the 102.36-inch stock length.
One approach is to create four longer main pieces and four shorter extensions.
For example:
Four main pieces at 90 inches
Four matching extensions at 13.25 inches
Each completed vertical line measures:
90 + 13.25 = 103.25 inches.
Four stock strips can provide the 90-inch main pieces.
A fifth strip can provide the four 13.25-inch extensions.
Therefore, the preliminary requirement is:
5 full molding strips.
The joint positions must be evaluated and finished according to the manufacturer's installation method.
A different design may be more practical if it can terminate beneath a suitable crown molding without a joint.
Project C: Four Moldings on a 10-Foot Wall
Assume:
Ceiling height: 120 inches
Baseboard height: 4.5 inches
Upper termination: 1.5 inches below the ceiling
Number of vertical profiles: 4
Required length per profile:
120 − 4.5 − 1.5 = 114 inches.
Total finished molding:
4 × 114 = 456 inches.
That equals 38 linear feet.
A feasible preliminary cutting plan is:
| Stock strip | Cuts |
|---|---|
| Strip 1 | 90 inches |
| Strip 2 | 90 inches |
| Strip 3 | 90 inches |
| Strip 4 | 90 inches |
| Strip 5 | Four pieces at 24 inches each |
Each completed vertical molding uses:
90 + 24 = 114 inches.
Four 24-inch pieces require 96 inches of stock.
They fit within one 102.36-inch strip, allowing for ordinary saw kerf.
Therefore, the intended four vertical lines can be produced from:
5 full stock strips.
This is more efficient than purchasing two complete strips for every line.
Compare the Three Examples
| Ceiling | Finished line length | Vertical lines | Required full strips |
|---|---|---|---|
| 8 ft | 89.5 in | 4 | 4 |
| 9 ft | 103.25 in | 4 | 5 |
| 10 ft | 114 in | 4 | 5 |
The examples use specific assumptions.
Actual field dimensions, cutting kerf, defects, joint treatment, and ornament placement may change the quantity.
The best ordering method is to prepare a complete cutting schedule before purchasing.
Where Should You Place Joints in Long Vertical Moldings?
A vertical joint is often more visible than expected.
The profile's relief must continue accurately across the connection.
Even a small mismatch can catch light.
Avoid Random Joint Positions
Do not simply join two pieces wherever the offcuts happen to meet.
Choose the joint locations as part of the cutting plan.
Consider the lighting, wall height, and visibility.
Keep the Profile Aligned
The profile face and projection must remain consistent across the joint.
A stepped molding requires careful attention to its decorative cross-section.
Misalignment may produce a visible shadow or ridge.
Use a Manufacturer-Approved Joint Treatment
The appropriate joining material depends on the polyurethane profile and coating system.
Follow the manufacturer's recommendations for joint preparation, bonding, and filling.
Do not assume that ordinary wall caulk is sufficient for every molding-to-molding joint.
Finish Carefully
After the joint material cures, prepare the surface using approved methods.
Avoid removing decorative relief during sanding.
A final painted finish may help unify the appearance, but it cannot fully conceal a poorly aligned joint.
Consider an Alternative Layout
If the planned vertical line is only slightly longer than the stock strip, consider whether a different upper termination would improve the design.
A consistent gap below crown molding may eliminate unnecessary joints.
However, do not distort the composition solely to avoid purchasing material.
The architectural result should remain the primary consideration.
How to Install Vertical Polyurethane Molding
Installation should begin only after the full layout has been finalized.
The following sequence provides a practical framework for typical interior decorative applications.
The exact adhesive, substrate preparation, and finishing method must follow the manufacturer's requirements.
Step 1: Inspect the Wall
Check for damaged drywall, unstable paint, moisture problems, and surface irregularities.
The mounting surface must be sound.
A decorative profile should not be used to conceal deteriorating plaster or persistent dampness.
For U.S. homes built before 1978, disturbing existing painted surfaces may introduce lead-paint hazards.
Contractors performing applicable renovation work must follow relevant EPA or authorized state requirements.
Step 2: Confirm the Wall Dimensions
Measure the wall height at several locations.
Do not assume that the ceiling and floor are perfectly parallel.
Measure the baseboard height.
Determine the intended upper termination.
Record the exact installed length of every vertical profile.
Step 3: Mark the Layout
Use a suitable level, plumb line, or laser.
Mark each molding's centerline or edge.
Verify the spacing.
Check the relationship to corners, doors, windows, furniture, and electrical devices.
Step 4: Prepare the Substrate
Follow the adhesive manufacturer's preparation requirements.
Remove unsuitable contaminants and unstable finishes.
Use primer where specified.
Do not assume that a particular universal primer is appropriate for every wall surface.
Step 5: Cut the Molding
Measure each piece individually.
Cut it using a method suitable for the specific profile.
Check the ends.
Where joints are required, prepare the pieces according to the intended connection detail.
Step 6: Dry-Fit the Profiles
Position each strip without adhesive.
Check that the decorative lines are plumb.
Confirm the upper and lower termination.
For repeated moldings, verify that the arrangement is visually consistent.
Step 7: Apply the Approved Adhesive
Use an adhesive compatible with the polyurethane and wall substrate.
Follow the specified application pattern.
Do not assume that a general-purpose adhesive is always suitable.
The required bond area, working time, and curing conditions depend on the selected system.
Step 8: Position and Support
Install each molding along its intended vertical line.
Check alignment while adjustments are still possible.
Temporary supports or suitable tape may be required during curing.
The method must not damage the decorative profile or wall finish.
Step 9: Complete the Joints
Use compatible joint compounds, fillers, or sealants where appropriate.
Molding-to-molding joints and molding-to-wall transitions may require different products.
Allow the materials to cure before finishing.
Step 10: Prime and Paint
Some polyurethane profiles may arrive prepared for painting.
Others require additional work.
Follow the published finishing instructions.
If the wall and molding are to be painted the same color, confirm coating compatibility with both surfaces.
Avoid excessive paint buildup that obscures the relief.
Step 11: Inspect Under Actual Lighting
Turn on the room's lighting.
Check alignment, joints, and finish consistency.
Directional light may reveal defects that are difficult to see under diffuse daylight.
Correct visible imperfections before considering the project complete.
Vertical Wall Molding With Existing Wallpaper
Some homeowners want to install decorative molding without completely removing existing wallpaper.
This requires additional care.
A wallpaper surface may not provide a reliable mounting base.
The attachment depends partly on the wallpaper's adhesion to the wall.
For permanent architectural profiles, bonding directly to an appropriately prepared substrate is generally preferable.
Where existing wallpaper must remain, assess whether the mounting zone can be prepared without damaging surrounding finishes.
Do not assume that applying more adhesive will compensate for weak wallpaper paste.
Use direct wallpaper mounting only if the product and adhesive manufacturers approve the specific installation conditions.
For a new design, it may be more reliable to install the molding first and apply wallpaper to the intended decorative fields afterward.
Mistakes That Make Vertical Wall Molding Look Wrong
Too Many Profiles
Adding more vertical lines does not automatically strengthen the effect.
A crowded layout can create a striped appearance.
Test the number and spacing before ordering.
Profiles That Are Too Wide
A substantial molding may overwhelm a narrow wall.
Choose the scale according to the room.
Inconsistent Spacing
Small spacing differences can become noticeable when repeated across a wall.
Use a complete measured layout.
Ignoring the Face Width
The moldings occupy real space.
Spacing calculations must account for that width.
Irregular Top Terminations
Vertical profiles that stop at different heights appear unfinished.
Choose a consistent termination detail.
Unplanned Joints
A visible mid-height splice can interrupt the architectural line.
Prepare the cutting plan before installation.
Conflicting Decorative Systems
A room containing highly ornate crown molding, heavy baseboards, large picture frames, and numerous vertical profiles may feel excessively decorated.
Use a clear hierarchy.
Treating Every Room the Same
An 8-foot bedroom and a 10-foot foyer require different scale decisions.
A single layout should not be copied mechanically across an entire house.
Ignoring the Wall Substrate
Poor adhesion can occur when molding is attached to damaged paint, loose wallpaper, or an unsuitable surface.
Prepare the wall correctly.
Forgetting Switches and Outlets
A vertical profile can conflict with existing devices.
Plan around them.
Do not cover electrical equipment or required access points.
Vertical Molding for Hotels, Offices and Commercial Interiors
Repeated vertical profiles can create a consistent architectural language in commercial spaces.
A hotel corridor may use measured decorative intervals.
A reception area may use taller, more substantial lines.
An office conference room may benefit from restrained relief.
However, commercial installations introduce additional considerations.
Durability
A decorative profile in a high-traffic hallway may experience impacts from luggage, carts, or furniture.
Material selection should account for that exposure.
Polyurethane formulations differ in hardness and impact behavior.
Fire and Building Requirements
Commercial projects may require documentation of material fire performance and compliance with applicable building codes.
Do not assume that all polyurethane decorative products are approved for every commercial application.
The required documentation depends on the building and jurisdiction.
Accessibility
Keep required circulation paths and clearances unobstructed.
Wall-mounted decorative components may be subject to relevant accessibility requirements.
Finish Maintenance
Commercial spaces are cleaned more frequently.
The selected paint system should suit the cleaning and maintenance program.
Repeatable Material Specification
For projects with many rooms, specify the exact profile SKU and finish.
A coordinated procurement schedule can help maintain consistent appearance.
However, availability, batch consistency, and replacement supply should be confirmed with the manufacturer.
What to Buy for a Vertical Wall Molding Project
A complete order should be based on the final wall elevation.
The decorative profiles are only one part of the installation.
Molding Profiles
Choose among suitable STAVROS polyurethane profiles.
For delicate lines, consider MLDPU-001.
For a slightly stronger profile, consider MLDPU-004.
For more pronounced relief, evaluate MLDPU-002 or MLDPU-003.
Installation Materials
The project may require an approved molding adhesive, suitable wall preparation materials, temporary supports, and compatible joint-finishing products.
Their quantities depend on the substrate and selected installation method.
Finishing Materials
Select primer and paint according to the actual products.
If the molding and wall use one color, confirm that the coating system is appropriate for both surfaces.
Optional Decorative Accents
More elaborate designs may use polyurethane molding accessories or ornamental wall appliques.
These should be selected according to the architectural composition.
They are not mandatory components of a vertical molding design.
Coordinated Wall Decor Kits
For traditional decorative panels, browse STAVROS wall decor collections.
Verify the exact kit dimensions and materials.
Some compositions use both polyurethane ornament and primed MDF linear molding.
Product Selection Table
| Project | STAVROS product |
|---|---|
| Minimal vertical lines for an 8-foot bedroom | MLDPU-001 |
| More visible trim for a modern classic interior | MLDPU-004 |
| Defined neoclassical vertical rhythm | MLDPU-002 |
| Large formal accent wall | MLDPU-003 |
| Ornamental profile details | Molding Decor |
| Coordinated classical decorative panels | Wall Decor Collections |
Buying Polyurethane Wall Molding for a U.S. Project
When purchasing architectural molding online, evaluate more than the photograph.
The profile dimensions, stock length, decorative cross-section, and material determine its suitability.
Verify the Exact SKU
Two moldings can have similar appearances but different dimensions.
Record the exact product code.
This matters when ordering additional material or compatible accessories.
Review the Technical Drawing
A cross-sectional drawing helps establish how far the molding projects.
It also helps determine how the profile meets baseboards or other decorative elements.
Calculate the Finished Cut Lengths
Do not purchase based only on the room height.
Subtract the actual lower and upper terminations.
Prepare a stock-length cutting plan.
Consider Samples
A physical sample can help evaluate molding scale and paint finish.
This is especially useful when choosing between profiles that are similar in photographs.
Confirm International Shipping
STAVROS provides an English-language product catalog with dimensions in inches and prices displayed in U.S. dollars.
However, the published delivery information primarily describes Russia and certain neighboring countries.
Customers buying for projects in the United States should confirm current international shipping availability, freight charges, customs requirements, and delivery terms directly before ordering.
U.S.-dollar pricing should not be interpreted as proof of domestic U.S. inventory.
Frequently Asked Questions About Vertical Wall Molding
Can Vertical Wall Molding Make an 8-Foot Ceiling Look Taller?
It may help create the impression of greater height by emphasizing upward visual lines. The result depends on the complete room design. It does not physically increase ceiling height or guarantee a measurable optical effect.
What Type of Molding Is Best for Low Ceilings?
A narrow or moderately sized architectural profile is often a useful starting point. For example, STAVROS MLDPU-001 and MLDPU-004 provide relatively fine polyurethane relief.
Should Vertical Molding Go All the Way to the Ceiling?
Full-height lines can create a strong vertical effect, but a consistent termination below crown molding or the ceiling can also work. The best choice depends on the architectural composition.
How Many Vertical Moldings Should I Use on One Wall?
There is no universal number. For a standard bedroom or living room wall, a few carefully spaced profiles may provide enough definition. Determine the quantity from the wall width, molding face width, and furniture layout.
How Far Apart Should Vertical Wall Moldings Be?
Use the clear wall width and profile face width to calculate the spacing. Equal-gap and fixed-margin formulas provide different layout options. The final design should be evaluated visually.
Can I Install Vertical Molding in a Small Bedroom?
Yes. Narrow molding and a restrained painted finish can introduce architectural detail without requiring full decorative paneling.
Is Tone-on-Tone Molding Better for Low Ceilings?
Tone-on-tone molding is often a useful choice because it provides relief without strong graphic contrast. However, contrasting molding may be appropriate for some designs.
Can Vertical Molding Be Used Between Two Doors?
Yes. A single centered profile may work on a narrow wall pier. The design should account for the surrounding door casing and any electrical devices.
Does Vertical Molding Work in Hallways?
Yes. It can create rhythm and architectural structure. In narrow hallways, use restrained profiles and preserve required circulation clearances.
Can I Combine Vertical Molding With Wainscoting?
Yes. The two treatments can be combined within a coordinated design. However, strong horizontal divisions may change the visual emphasis of the wall.
Can I Combine Vertical Molding With Crown Molding?
Yes. The vertical profiles may terminate against a suitable upper molding. The cross-sections and finished dimensions should be planned carefully.
Is Polyurethane Molding Better Than Wood?
Each material has advantages. Polyurethane is useful for molded decorative profiles. Wood provides natural grain and traditional millwork characteristics. The best material depends on the project.
Can Polyurethane Vertical Molding Be Painted?
Many suitable polyurethane moldings can be painted using a compatible coating system. Follow the manufacturer's preparation and finishing instructions.
Can I Paint the Molding the Same Color as the Wall?
Yes. This is a common way to create subtle architectural relief.
Can I Install Polyurethane Molding Over Wallpaper?
Not automatically. For permanent installations, direct bonding to a suitable prepared wall substrate is generally preferable unless the product and adhesive manufacturers approve the wallcovering application.
What Adhesive Should I Use for Vertical Polyurethane Molding?
Use an adhesive approved for the exact molding and wall substrate. Follow the manufacturer's instructions for preparation, application, support, and curing.
How Long Are STAVROS Polyurethane Molding Strips?
MLDPU-001, MLDPU-004, MLDPU-002, and MLDPU-003 are listed in 102.36-inch lengths.
Is One Molding Strip Enough for an 8-Foot Ceiling?
Often, yes. The actual installed length is reduced by the baseboard height and any upper termination. Measure the finished area before purchasing.
Is One Molding Strip Enough for a 9-Foot Ceiling?
It depends on the finished vertical length. In some configurations, one 102.36-inch strip fits. In others, a joint or a different termination is required.
How Do I Calculate Vertical Molding for a 10-Foot Ceiling?
Measure each finished line and prepare a cutting plan. Multiple long and short pieces can often be cut efficiently from a smaller number of stock strips than simply purchasing two strips for every vertical.
Can I Use Ornamental End Pieces With Vertical Molding?
Possibly. Decorative accessories are designed for particular molding families and orientations. Verify their intended use and compatibility before ordering.
Are STAVROS Wall Decor Kits Entirely Polyurethane?
Not always. Certain kits combine polyurethane ornaments with primed MDF molding. Check the product specification.
Where Can I Buy Polyurethane Molding for Vertical Walls?
Browse the STAVROS polyurethane molding catalog.
For additional architectural accents, explore polyurethane molding accessories and decorative wall collections.
Verify the exact dimensions, material, availability, and shipping conditions before ordering.
Conclusion: Use Vertical Molding to Improve Wall Proportions, Not Just Add Decoration
Vertical wall molding is a practical way to introduce architectural rhythm into rooms with standard or low ceilings.
A carefully positioned profile can emphasize the height of a wall.
Repeated lines can organize a living room, bedroom, or hallway.
A narrow decorative element can transform an awkward wall pier between doors into part of a coherent architectural composition.
But the result depends on proportion.
The most important decisions are the profile width, spacing, length, color, and relationship to the room's existing architectural elements.
For an 8-foot ceiling, a restrained polyurethane profile may provide sufficient relief.
For 9-foot rooms, the decorative scale and stock length require additional consideration.
For 10-foot rooms, more pronounced molding may be appropriate, but joints and material usage must be planned carefully.
STAVROS provides polyurethane molding in several cross-sectional sizes, including MLDPU-001, MLDPU-004, MLDPU-002, and MLDPU-003.
The catalog also includes decorative molding accessories, polyurethane appliques, and coordinated wall decor collections for more elaborate compositions.
For a successful project, begin with the room itself.
Measure the walls.
Identify the architectural boundaries.
Establish the furniture layout.
Choose the number of vertical lines.
Calculate the spacing using the actual molding face width.
Determine the finished cut lengths and stock-strip requirements.
Then install the profiles on a properly prepared wall and finish them using compatible materials.
The most effective vertical wall molding is not necessarily the widest, most ornate, or most expensive profile. It is the one that makes the room's proportions feel intentional, balanced, and architecturally complete.