Article Contents:
- A straight cut covers the material, but doesn't always complete the architecture
- Short answer: PLT-004 has four working finishing scenarios
- Why PLT-004 can't be considered a solid wooden plank
- What the viewer sees on the exposed cut
- The end map matters more than a simple perimeter measurement
- Self-return of PLT-004: when the profile closes its own end
- Where self-return is especially appropriate
- When self-return may look weak
- Why self-return should be designed in advance
- What an end block can look like
- Where a block works better than self-return
- The main risk of an end block
- Pilaster
- Column
- Wooden corner
- Wall batten
- Self-return at the passage
- Single block on the edge
- Different baseboards in adjacent rooms
- Bring to the plane
- Finish before the element
- Go around the perimeter
- Enter the lower block
- Single finishing block
- Separate endings
- Continuation of the baseboard
- Run behind the furniture
- End at the side panel
- Place a block
- Make self-return
- Step 1. Get the cross-section
- Step 2. Transfer the profile to cardboard
- Step 3. Draw the ending location
- Step 4. Add the chosen solution
- Step 5. View from different angles
- Step 6. Check the finish
- Room without open ends
- Hall with complex ends
- First assemble, then paint
- First finish, then assemble
- Combined sequence
- Counting PLT-004 as a solid oak or beech plank
- Finishing the profile with a straight cut without a sketch
- Considering painted MDF as a ready-made decorative cap
- Making a self-return after painting the entire batch
- Using too short a trim
- Sanding veneer like solid wood
- Taking the remainder of another batch
- Not checking the side view
- Counting only the perimeter
- Placing a joint next to an open end
- Covering the cut with a random plastic element
- Confusing a self-return with a regular external corner
- Not checking compatibility with the casing
- Running the baseboard behind a built-in wardrobe without approval
- Leaving the end joint to the installer's discretion
- What is PLT-004 made of?
- What size does PLT-004 have?
- What is the length of the PLT-004 strip?
- Why is MDF visible at the end of the wooden PLT-004?
- Can the end simply be painted over?
- What is the self-return of a skirting board?
- How does self-return differ from an external corner?
- Is a separate end cap needed for PLT-004?
- Is a ready-made end piece for PLT-004 available?
- How to finish PLT-004 at an open passage?
- How to finish the end of the baseboard on a short partition?
- How to finish PLT-004 at the first step?
- Can PLT-004 be connected to a door casing?
- Can the baseboard be brought up to a pilaster?
- Can the baseboard go around a column?
- Can PLT-004 be routed behind a built-in wardrobe?
- How to protect exposed MDF after cutting?
- How to avoid chipping the veneer?
- Can a self-return be made from any leftover?
- Is it necessary to make a test end joint?
- How much material should be added for open ends?
- Is a backup strip needed?
- Where to place the joint of long planks?
- Should the end be finished before installation?
- How to check the appearance of the end in advance?
- Where to buy PLT-004?
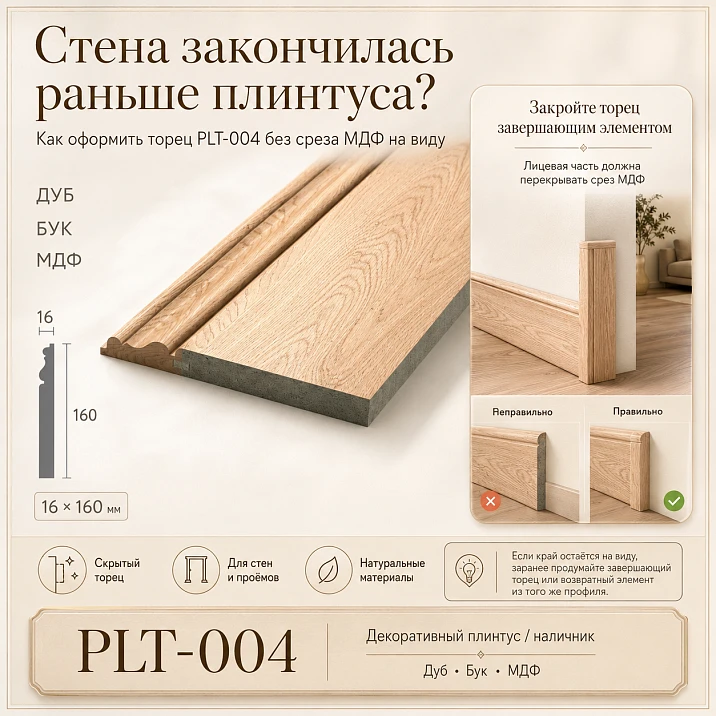
A tall baseboard is already installed almost throughout the room. The profile confidently runs along the long wall, emphasizes the height of the doors, connects the floor with wall panels, and makes the interior cohesive. Only the last section remains—half a meter to the open passage. There is no casing there, and it is impossible to continue the baseboard onto the adjacent plane, so the installer makes a straight cut.
Technically, the work is finished. The profile is brought to the edge of the wall, excess length is removed, and the surface is painted. But when viewed from the adjacent room, the end becomes visible: the MDF base, veneer facing, and the upper decorative part made of solid wood read as separate layers. Instead of an architectural finish, it feels as if the long plank was simply sawed off and stopped.
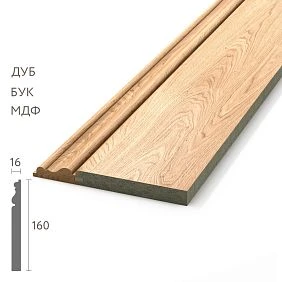
With the high skirting board PLT-004, such a situation requires a separate solution. Wooden versions of the profile cannot be perceived as a solid oak or beech board. The lower profiled part has an MDF base and is veneered, while the upper decorative element is made of solid wood. Therefore, a straight cut reveals the structure of the product. It can be technically protected with primer and coating, but protecting the material does not yet turn the cut into an expressive finish.
The question of "how to close the end of a high skirting board" needs to be resolved before ordering the full footage. The chosen node determines the cutting, allowance, number of short pieces, position of joints, finishing method, and installation requirements. Sometimes a self-return is enough — a short section that brings the profile back to the wall. In another place, an end block is needed. Near a door, it is more correct to connect PLT-004 with a casing or vertical element. And in a low-visibility area, you can leave a treated straight end if it truly looks intentional.
Before Buy combined skirting board PLT-004, you need to find on the plan all places where the profile does not turn into an internal or external corner, but ends in view. These points determine how much material will be needed and what the completion of the entire composition will be.
A straight cut covers the material, but does not always complete the architecture
The skirting board is perceived as a horizontal line. As long as this line runs from corner to corner, the eye does not look for its beginning and end. But at an open opening, short partition, staircase, or column, the horizontal line suddenly breaks off. The end of the profile becomes an independent detail that is visible no less than the front surface.
A regular straight cut solves only one task: it reduces the plank to the required length. It does not answer other questions:
-
should the front line smoothly return to the wall;
-
is a separate end element needed;
-
should the horizontal line transition into a casing or pilaster;
-
is it acceptable to show the end of the material;
-
will the end be visible from the adjacent room;
-
will the color and texture match after treatment;
-
will the profile not seem unfinished.
When it comes to a simple painted strip without pronounced relief, a neatly finished end sometimes remains almost invisible. PLT-004 has a different shape. The height of 160 mm, thickness of 16 mm, and developed upper part make the profile a noticeable architectural element. Therefore, the end of such a line is perceived sharply.
You can flawlessly prime the MDF, even out the color, and cover all layers with enamel, but the viewer will still see a vertical plane that was not present along the entire wall. The problem is not so much material as compositional: a long relief suddenly turns into a flat rectangular end.
A good ending answers the question: why does the profile end exactly this way? If the form is explainable — returns to the wall, abuts a block, connects to a casing, or deliberately breaks off in shadow — the joint looks finished. If there is no explanation, even a well-painted cut resembles incomplete installation.




Short answer: PLT-004 has four working completion scenarios
The open end of PLT-004 can be finished in four main ways.
-
Self-return. A short matching piece turns the profile toward the wall and covers the structural cut.
-
End block. The baseboard approaches a separate vertical or rectangular piece that takes on the end of the horizontal line.
-
Transition to another profile. PLT-004 connects to a casing, pilaster, wooden corner, wall panel, or furniture side panel.
-
Intentionally exposed end. The straight cut is carefully prepared and remains visible as a deliberate part of the design.
No option can be declared universal. Self-return works well on a flat open wall, but may look too small next to a large door portal. End block helps assemble a complex joint, but introduces an additional vertical. Transition to casing looks natural near a door, but requires precise matching of thickness, relief, and finish. Straight end remains the simplest in geometry, but the most demanding in composition.
The solution is chosen not by the principle of "what is easier to cut off," but by the installation location and viewing points.
Our factory also produces:


Why PLT-004 cannot be considered a solid wooden plank
PLT-004 belongs to tall baseboards, but wood versions have a combined construction. This is fundamental for any visible end.
| Characteristic | Confirmed value | Why this matters for the ending |
|---|---|---|
| Article number | PLT-004 | Helps not to transfer properties of another model to the profile |
| Product type | Tall floor baseboard | The ending is located in a visible part of the wall |
| Cross-section size | 160 × 16 mm | The end face has a significant area and is well readable |
| The lower profiled part of wooden variants | MDF base with veneer facing | A straight cut shows the base and the facing layer |
| Top decorative element | Solid wood | Materials of different construction meet at the end face |
| Length of MDF execution | 2600 мм | Used when compiling the cutting map |
| Length of wood options | 2400 мм | Affects the number of joints, remnants, and return parts |
| Finishing | Depends on the selected execution and order | The end cap assembly needs to be coordinated before the final finish. |
| Finished end cap | Not confirmed as a mandatory serial component | Cannot be relied upon without separate approval |
The combination does not make PLT-004 less valuable. It allows for a highly expressive profile with a wood surface and a solid wood top. However, the construction requires thoughtful cutting.
If you look only at the front side, the profile appears to be wooden. The veneer forms a natural surface, pattern, and color. At the end, it becomes visible that the wood surface and solid wood are not the same. That is why a straight cut of the oak or beech version cannot be processed as if the installer were dealing with a regular solid wood plank.
Before ordering, it is useful look at the PLT-004 design and to determine not only the material of the front surface but also the position of all future endings.
Get Consultation
What the viewer sees on the open cut
On a neatly sawn wood version of PLT-004, several structural zones can be read:
-
the base of the lower part made of MDF;
-
thin veneer facing layer;
-
profile geometry of the front surface;
-
top decorative element made of solid wood;
-
joint line of different parts;
-
finish coating on the front side;
-
new vertical plane that appeared after cutting.
Even if all materials are matched by color, their end-grain structure differs. MDF looks more uniform. Solid wood shows the direction of wood fibers. Veneer on the edge reads as a thin layer. After clear finishing, this difference can be more noticeable than before it.
With opaque painting, color differences are covered, but the geometry of the cut itself remains. If the end of the profile faces the passage, a person sees not only the color, but also the plane of the end. The question "can you just paint MDF" therefore has two answers.
Technically, protecting the cut is possible and necessary. Open MDF should not remain without proper preparation.
Decoratively finishing a profile with just one paint does not always work. Enamel covers the material, but does not explain the sudden end of the relief.
This distinction needs to be established at the project stage:
-
technical protection is responsible for the condition of the material;
-
the decorative node is responsible for the appearance of the profile end.
Self-return, block, or transition solve the compositional task. Primer, sealing, and finish coating solve the technological one.
The end map is more important than simple perimeter measurement
Most baseboard calculations start with the room perimeter. Doorways are subtracted from the total wall length, a reserve is added, and the number of planks is obtained. For the high PLT-004, this is not enough.
Each place where the profile:
-
ends at an open passage;
-
approaches the edge of a partition;
-
meets the first step;
-
approaches the column;
-
adjacent to the pilaster;
-
ends at the wall panel;
-
butts against built-in furniture;
-
does not continue on the adjacent plane;
-
must transition into the casing;
-
remains visible from the side.
Such points are considered independent nodes.
| Section | What is after the baseboard | Where the end is visible | Possible solution |
|---|---|---|---|
| Open passage without trim | Wall edge | From two rooms | Self-return or end block |
| Short partition | Open edge | Front and side | Self-return |
| First step | Staircase unit | Top, side, when moving | Block or transition element |
| Column | Vertical volume | Frontally | Joint with column or bypass |
| Pilaster | Decorative vertical | Frontally | Transition into pilaster |
| Wall panel | End of boiserie | Across the entire wall | Single finishing block |
| Built-in wardrobe | Furniture side panel | Frontally | Joint with side panel or separate block |
| Subtle niche | Blind side zone | Only up close | Processed straight end |
This table does not assign a final decision. It makes you see the problem before cutting.
Different methods may be used on the same object. At an open passage, the profile returns to the wall. Near a cabinet, it butts against the side panel. At a door portal, it transitions into a trim. In a niche, it remains a straight processed cut.
Identical endings throughout the house are not required. A unified logic is required: each joint must look intentional.
Self-return PLT-004: when the profile closes its own end
Self-return is a short response piece that unfolds the baseboard profile to the plane of the wall. On the front side, a long horizontal strip reaches the edge, forms a neat external turn, and returns back through a small side section.
As a result, the structural end is closed. The viewer sees:
-
full front profile PLT-004;
-
aligned external corner;
-
short continuation of the profile;
-
finish at the wall;
-
absence of an open MDF cut.
The self-return is perceived as a miniature turn of the baseboard. The horizontal line does not break off but seems to fold and go into the wall.
Where the self-return is especially appropriate
Such a joint is suitable if:
-
the baseboard ends on a flat section of the wall;
-
there is no trim or pilaster nearby;
-
the end is clearly visible from the side;
-
no large vertical element is required;
-
the depth of the short return is sufficient to read the profile;
-
the installer can accurately assemble a complex miter joint;
-
the order includes material for a trial assembly.
Self-return works well at an open passage without a door frame. It does not require adding a new decorative shape and preserves the character of the PLT-004 itself.
When self-return may look weak
Near a massive column, a wide door portal, or a large staircase element, a short return can sometimes seem too small. A baseboard 160 mm high has noticeable architectural mass. A tiny side fragment may look not like a finish, but like an attempt to hide the end.
In such places, the end block or transition to a vertical profile reads more confidently.
Why self-return needs to be designed in advance
A short return piece requires material. It cannot be considered a free offcut that will definitely remain after installation. The remainder may:
-
turn out to be too short;
-
have damaged veneer;
-
not match the grain direction;
-
belong to a different batch;
-
not allow for a safe precise cut;
-
be needed for another area;
-
not match the finish of the main plank.
Therefore, self-returns are included in the cutting map along with long sections.
Self-return geometry: why two cuts must work as a single pair
A self-return is built not around a single corner, but around a pair of matched parts. The main plank ends with a cut. The short element receives matching geometry, connects with the main part, and returns the profile to the wall.
If one corner is made precisely and the second approximately, the joint does not assemble. On the front side, the following appear:
-
a step in the relief;
-
a break in the top line;
-
a gap between veneered surfaces;
-
a mismatch in the decorative solid wood part;
-
a change in overall height;
-
a different offset from the wall.
A high profile amplifies any error. On a narrow baseboard, a slight offset is sometimes lost at the bottom of the wall. On PLT-004, the vertical joint line runs through 160 mm of height and becomes noticeable.
Before working with full-size parts, a test joint is needed. Its task is to check not only the angle, but also the entire profile:
-
whether the bottom line matches;
-
whether the relief continues;
-
whether the top part aligns;
-
whether the veneer has cracked;
-
whether the return depth is sufficient;
-
whether the structural end is covered;
-
how the ending looks from the side.
A test assembly is especially needed if the baseboard will be coated with a transparent or semi-transparent finish. Under enamel, small color differences can be corrected, but a geometric step will remain visible.
Why a short return piece cannot be cut from the first available offcut
An offcut is suitable for self-return not because it is short, but because it retains all the necessary properties of the main strip.
A good return piece must:
-
have a full, undamaged cross-section;
-
belong to the same PLT-004 version;
-
match in veneer;
-
have a suitable direction of the wood grain;
-
retain the upper part made of solid wood;
-
be long enough for reliable processing;
-
have no chips on the face edge;
-
match in preparation and finishing;
-
allow precise alignment of the relief.
Very short remnants are especially dangerous. They are difficult to hold and control during processing. Here, saving a few centimeters of material does not justify the risk of damaging the part or getting an inaccurate joint.
Rational cutting involves preparing a workpiece with a technological length, after which it is brought to the final size. The exact processing sequence is determined by the craftsman, taking into account the equipment and safety rules.
Self-return should be entrusted to a specialist who understands the structure of the veneered profile. PLT-004 cannot be treated as a homogeneous beam: aggressive sanding can damage the facing layer, and careless cutting can tear the veneer at the edge.
End block: when the ending needs its own vertical
An end block is a separate element against which the horizontal baseboard rests. It can be rectangular, profiled, connected to a casing, pilaster, or other vertical decor.
Such a block does not mask the end. It makes it part of the composition.
What an end block can be like
According to the design, the block can:
-
coincide with the height of PLT-004;
-
be slightly higher;
-
have greater thickness;
-
protrude forward relative to the baseboard;
-
continue upward as a pilaster;
-
connect with the door frame;
-
be painted in the wall color;
-
receive a wood finish;
-
cover the difference between several profiles.
It cannot be claimed that a ready-made serial end element for PLT-004 necessarily exists. The possibility of selecting or manufacturing a compatible part must be clarified before ordering.
Where the block works better than self-return
An end block is justified if:
-
PLT-004 fits the door portal;
-
a staircase starts nearby;
-
several horizontal profiles meet;
-
the thickness difference needs to be covered;
-
a short return looks too weak;
-
the interior already contains vertical decorative elements;
-
a long wall needs to be visually stopped;
-
the baseboard transitions into a wall panel system.
At the first step, the block can simultaneously finish the plinth and form the base of the stair assembly. At the door, it connects the lower horizontal with the casing. At the boiserie, it takes on the end of several profiles.
The main risk of the end block
A too-large piece looks like a random cabinet against the wall. A too-small one resembles a glued-on plug. The size should be checked at a 1:1 scale.
The block is considered not separately, but together with:
-
the height of the plinth;
-
the thickness of the casing;
-
the width of the opening;
-
the pilaster;
-
the first step;
-
the wall panel;
-
furniture;
-
adjacent room.
Transition PLT-004 to the casing: a natural joint only when geometry matches
Near the door, one wants to solve the problem simply: run the baseboard up to the casing and consider the end finished. Sometimes this is indeed the best option. The vertical line of the door frame logically accepts the horizontal profile.
But not every casing automatically becomes compatible with PLT-004. Before ordering, check:
-
the height of the baseboard;
-
the width of the casing;
-
the thickness of both elements;
-
the projection from the wall;
-
relief;
-
radii and bevels;
-
position of the top decorative line;
-
finishing;
-
node at the floor;
-
presence of a heel or bottom block.
If the casing is thinner than the baseboard, the horizontal will protrude forward. If the baseboard is thicker, a reverse step will appear. If the reliefs meet without a transition, the joint looks random.
When there is actually a door frame nearby, it is useful to look at how to design the joint when there is a casing and a heel nearby. This node differs from the situation with an open wall edge: with a casing present, the horizontal profile gets a logical vertical support.
General principles of how to connect the baseboard to the door frame, help determine whether the parts should match in color, thickness, and relief character.
Transition to a pilaster, column, or wooden corner
Not every ending has to be inconspicuous. Sometimes the baseboard meets a standalone architectural vertical. In such cases, the end of the horizontal profile can be emphasized.
Pilaster
The pilaster is perceived as part of the wall composition. PLT-004 can:
-
blend into its plane;
-
end before the protruding part;
-
butt against the lower block;
-
continue around the base;
-
match it in finish.
The solution depends on the thickness and profile of the pilaster. A random straight cut next to a relief vertical almost always loses to a well-thought-out joint.
Column
For a column, two scenarios are possible: the baseboard goes around it along the perimeter or ends before it. Going around requires a corner map and additional material. Ending before the column requires a block, a return, or an agreed-upon open end.
If the column has its own base, it is the base that can accept PLT-004.
Wooden corner
The corner can cover the edge of the partition and simultaneously become the vertical end of the baseboard. But the sizes need to be compared against the actual cross-section. A too-thin corner will not cover the end of a tall profile, while a too-massive one will create a noticeable protrusion.
Wall batten
A vertical batten works only when it is included in the overall wall layout. A single piece placed solely to hide a cut may look artificial.
Deliberately exposed end: when a straight cut is acceptable
Sometimes a straight end is the right solution. Not every end needs to be turned into a complex joint. But an exposed cut must be intentional.
It is acceptable if several conditions are met simultaneously:
-
the location is not in direct view;
-
the cut is made cleanly;
-
the veneer has no chips;
-
the open MDF is protected;
-
all layers are covered with a finish coating;
-
the color of the end face is matched with the front surface;
-
the geometry looks intentional;
-
there is no element nearby that the profile was supposed to connect with;
-
the end face does not create a feeling of a broken line.
For example, PLT-004 ends inside a deep niche behind furniture. The side plane is visible only upon close inspection. In such an area, a complex block may be unnecessary.
Another situation is a minimalist interior where straight vertical cuts are repeated in panels and furniture. Then the end face of the baseboard can support the overall geometry.
But in an open passage that is viewed daily from two rooms, such an option requires special caution. The high profile ends at a level clearly visible to a standing person. Even even painting does not always save the composition.
The main criterion is simple: the straight end should look chosen, not left behind.
Open passage without a casing: a place where the end is visible twice
An opening without a door and casing seems simple. The wall ends, another room begins. But it is here that the end of the baseboard is visible from both sides at once.
From the first room, a person sees the front line of PLT-004 and where it ends. From the second, the side plane of the end. If the profile is cut straight, the structure faces the viewer.
Self-return at the passage
For a flat wall, the self-return often becomes the most compact solution. It preserves the relief and does not introduce an additional block.
When designing, check:
-
how far the return extends onto the side plane;
-
whether it is visible from the second room;
-
whether it conflicts with the baseboard on the reverse side;
-
whether the heights of the profiles in the two rooms match;
-
how is the wall edge finished;
-
is there room left for corner finishing.
Single block on the edge
If the partition is wide or the opening has architectural framing, the end block can finish PLT-004 on both sides. It becomes part of the portal.
Different baseboards in adjacent rooms
In one room, a tall PLT-004 is installed, in another — a low profile or different material. The return helps stop the tall baseboard before the transition. The block allows the height difference to be assembled in a single node.
Trying to connect two different profiles directly on the wall edge without an intermediate part is risky. The mismatch in height, thickness, and relief will be in the most visible spot.
End of a short partition: why the side view matters more than the facade
In the facade view, a short partition looks like a regular wall. PLT-004 runs along it and neatly ends at the edge. But people often approach the partition from the side, so the end becomes the main focus.
Here you need to check:
-
partition thickness;
-
finishing of its open edge;
-
presence of a skirting board on the back side;
-
direction of passage;
-
distance to furniture;
-
possibility of return;
-
symmetry of endings.
If the skirting board runs only on one side, a self-return usually looks more logical than a straight cut.
If PLT-004 runs on both sides of the partition, two independent returns or a single end block are possible. You cannot automatically continue one profile through the edge: an external turn will require precise alignment and may create too massive a framing.
For a very short wall, it is worth assessing whether a high skirting board is justified along the entire section. Sometimes so little horizontal space remains between two large endings that the composition turns into a set of end nodes. In such a case, the entire layout is checked, not just a single end.
The first step of the staircase: the straight cut ends up at eye level
Near the staircase, the baseboard often ends before the wall. It approaches the first step, stringer, post, or lower railing block. You cannot automatically continue the profile along the flight: the slope changes, other elements appear, and the straight horizontal section must end somewhere.
Such an end is clearly visible from above when descending. A person looks at it not from floor level, but at an angle. The structural layers of PLT-004 become more noticeable.
Possible solutions:
-
self-return to the stair assembly;
-
end block near the first step;
-
transition into the base of the stair post;
-
joint with the vertical panel;
-
deliberately finished end in the shadow zone;
-
continuation around the landing according to a separate project.
You cannot simply butt PLT-004 against the step without checking thicknesses. The top part of the baseboard may end up higher or lower than the significant line of the staircase. A gap or an accidental step will appear between the profiles.
The end block at the staircase sometimes solves several tasks at once:
-
finishes the baseboard;
-
accepts the edge of the wall panel;
-
connects with the first step;
-
forms the base of the vertical element;
-
covers the difference in materials.
Such a block must be shown on the drawing. It cannot be assigned on site after cutting all the planks.
Column and pilaster: four different ways to bring PLT-004
When a tall baseboard meets a column or pilaster, there are several design options.
Bring to the plane
PLT-004 ends at the front surface of the vertical element. The end is closed by the plane itself. For this, the thickness and position must match.
End before the element
A meaningful gap is left between the baseboard and the column. The profile ends with a self-return or a block. The gap should look like part of the composition, not a measurement error.
Go around the perimeter
The baseboard turns around the column. Additional external and internal corners, short sections, and joints appear. Consumption increases.
Enter the lower block
The column or pilaster receives a developed base into which PLT-004 fits. This is the most architectural option if the vertical element is truly important to the composition.
Each scenario requires its own cutting plan. You cannot first order the baseboard by wall length and then decide that you would like to go around the column. Short sides will require additional parts, and remnants may not match the veneer direction.
Edge of a wall panel or boiserie
A tall PLT-004 can become the lower part of a wall composition. Above it are frames, panels, moldings, or vertical slats. When the boiserie ends, the question arises: should the baseboard and the upper elements end at the same point?
There are three main approaches.
Single finishing block
The vertical piece accepts the plinth, panel edge, and other horizontal profiles. The composition looks assembled.
Separate endings
The plinth ends with a self-return, and the panel ends with its own profile. A meaningful gap is left between the termination points.
Plinth continuation
The wall panel ends, but PLT-004 continues along the wall. Then the plinth does not require an end cap at this point, but the panel itself needs to be finished neatly.
The error occurs when each profile ends where the original material ended. This results in several mismatched vertical lines. Before cutting, a common wall layout is built.
Built-in furniture: run the plinth behind the cabinet or stop it before the side panel
Next to a built-in wardrobe or kitchen, the end of PLT-004 may be visible or completely hidden. The decision depends not only on the current appearance but also on the possibility of dismantling the furniture.
Run behind the furniture
The plinth continues behind the side panel. There is no external end, but the cabinet does not sit directly against the wall. The 16 mm thickness and the shape of the tall profile need to be taken into account.
This option is not suitable for all furniture. The base, back panel, and mounting scheme must allow for the plinth.
End at the side panel
PLT-004 butts against the furniture. The side panel becomes the vertical end. Check whether it fully covers the end and whether the overhangs align.
Install a block
A separate piece appears between the cabinet and the plinth. It covers the difference in thickness and allows the furniture to be removed without damaging the long strip.
Make a return
The plinth ends before the cabinet and returns to the wall. A small gap remains between it and the furniture. This option is useful if the side panel should not take on the architectural profile.
You cannot automatically hide the plinth behind built-in furniture. In a few years, the cabinet may be replaced, and the unfinished section will become visible. If the continuation is not finished or is assembled from random scraps, repairs will become more complicated.
Template 1:1: how to see the ending before ordering the full length
The card image shows the front side. On the plan, the profile is often marked as a rectangle. Neither of these views conveys how exactly PLT-004 will end at the wall.
A full-size template helps to check:
-
height of 160 mm;
-
thickness of 16 mm;
-
relief of the front part;
-
self-return size;
-
proportions of the end block;
-
joint with the casing;
-
view from the adjacent room;
-
position relative to furniture and step.
Step 1. Get the cross-section
Use the confirmed cross-section PLT-004. If there is no exact template, request technical materials or a short sample.
Step 2. Transfer the profile to cardboard
On the template, mark the wall plane, front surface, end, and floor edge.
Step 3. Draw the ending point
Show the edge of the opening, partition, column, or furniture.
Step 4. Add the chosen solution
For self-return, draw a short side section. For a block, draw its height, width, and overhang. For a casing, draw the full vertical profile.
Step 5. View from different angles
Step aside to the adjacent room. Look from above if the node is near the stairs. Crouch to the level of a seated person if there is a sofa or armchair nearby.
Step 6. Check the finish
Separately assess whether the end will be painted opaquely or will retain the wood surface. Color changes perception, but not geometry.
Only after such a check does it make sense to calculate the final number of planks.
A sample of the full cross-section is more useful than a small face swatch
For color matching, it is enough to see the face surface. For designing the end, this is not enough.
A short fragment of the full cross-section is needed, on which you can examine:
-
the MDF base;
-
veneer;
-
the solid wood top;
-
profile;
-
thickness;
-
the behavior of the material after cutting;
-
possible return size;
-
method of processing the cut.
In this section you can order a sample of wooden profile, but the presence of exactly PLT-004 or the required full cross-section must be confirmed before ordering. It cannot be assumed that any standard set necessarily contains this item.
If the goal is a test end joint, the manager needs to be told directly that what is required is not a color sample, but a short segment of PLT-004 to check the cut, relief, and self-return.
Such a fragment allows answering in advance the questions:
-
are the layers easy to read on the end;
-
is the processed straight cut satisfactory;
-
is the enamel sufficient for the chosen effect;
-
what return size looks proportional;
-
will the installer be able to make a precise joint;
-
is the veneer damaged with the technology used.
Calculation PLT-004: endings are counted separately from linear meters
The basic order formula looks like this:
Total order = wall planks + corner pieces + open ending pieces + trial material + justified reserve.
You cannot limit yourself to the formula "perimeter plus 10%". For a room with four internal corners and no visible ends, one reserve is needed. For a hall with two passages, a staircase, a column, and a built-in wardr
Why universal "plus 10%" does not work
The percentage reserve is convenient for a preliminary budget estimate, but it does not replace cutting.
Let's consider two conditional objects with the same perimeter.
Room without open endings
The baseboard runs from corner to corner. There are several internal joints and one door opening with casings. Short offcuts can be used on the wall sections between openings.
Hall with complex endings
Same wall lengths, but additionally present:
- two open passages;
- short partition;
- staircase;
- column;
- a built-in wardrobe;
- three self-returns;
- two end blocks.
The second object requires more trial pieces and short elements. The percentage of the total length may not yield a single suitable blank for the return, although formally there will be a surplus.
The right approach:
- Count the slats along straight sections.
- Assign corner parts.
- Add each return.
- Add blocks and transitions.
- Reserve material for testing.
- Determine which remnants are actually usable.
- Only then add a safety reserve.
How to make a clean cut without damaging the veneer
PLT-004 requires careful handling. The face surface of wood options is veneered, which cannot be sanded like thick solid wood.
Main risks:
- chip on the edge;
- tearing of the facing layer;
- damage to the upper part;
- step between materials;
- uneven corner;
- overheating and darkening of the cut;
- excessive sanding;
- loss of relief;
- mismatch of paired parts.
Detailed recommendations on how, how to make a clean cut and protect exposed MDF, you need to study it before cutting the main batch.
The key principle for PLT-004: first a test, then finish parts.
You cannot start with the longest plank already assigned to the central wall. An error will damage not only the end, but also the entire cutting map.
Working with short parts requires reliable and safe fixation. A very small offcut cannot be held by hand near the cutting zone. The technology should be chosen by a specialist who works with the appropriate equipment.
Technical protection of exposed MDF
After cutting, the base material is exposed. It cannot be left unprotected, especially if the surface may come into contact with wet cleaning or humidity changes.
Preparation depends on the chosen finishing system, but includes several common tasks:
- clean the cut;
- remove loose parts;
- stabilize the edge;
- prepare MDF for coating;
- cover possible veneer damage;
- even out the color;
- apply a compatible finish coat.
Exact materials cannot be assigned without information about the selected finish. One project uses an opaque enamel, another uses a transparent system, and a third uses a combination of veneer and painted edge.
Suitable materials for protecting the MDF edge are selected after a trial assembly. The primer, adhesive, and finish must be compatible with each other and with the specific PLT-004 execution.
Do not apply the compound to the entire batch before testing a sample. MDF, veneer, and solid wood may react differently to the same material.
Technical protection does not replace the decorative solution
This principle is worth repeating separately, because it is here that buyers most often underestimate the problem.
Let's imagine that the end face is straight:
- cut exactly;
- primed;
- painted in the color of the front surface;
- has no chips;
- protected from external influences.
From a technical point of view, the work is done well.
But if the end face faces an open passage, the viewer still sees a vertical plane 160 mm high. The profile relief breaks off. The upper decorative line ends. The architectural horizontal line does not get a continuation.
Such a node may remain visually unfinished.
Self-return or lock changes not only the end material but also the shape of the ending. They explain where the profile went.
Therefore, the project must contain two separate solutions:
- What shape does the end of PLT-004 take.
- How cut surfaces are protected and finished.
Finishing the self-return: before or after assembly
There is no universal order for all coatings, but the decision must be made in advance.
Assemble first, then paint
The advantage is that the joint can be finally aligned as a single unit. The color covers minor differences. This path is suitable for opaque finishes if the technology allows working with the assembled part.
The limitation is that some areas become hard to reach after joining.
Finish first, then assemble
Advantage — every surface gets coated before assembly. This is useful for wood versions with visible veneer.
Limitation — any chip or shift during assembly damages the finished finish. The joint has to be retouched.
Combined sequence
Part of the preparation is done before assembly, the finish — after a dry fit. This approach is often more convenient, but must match the chosen materials.
The main rule: you cannot assemble a self-return for the first time after the entire batch is fully finished. First, a test unit is created and the technology is determined.
Dry assembly is mandatory
Before applying the finish, parts are assembled without final fixation.
Check:
- relief match;
- height;
- bottom line;
- top decorative element;
- joint density;
- position relative to the wall;
- return depth;
- side view;
- installation feasibility;
- need for local correction.
Each node is assigned a number:
- passage 1;
- partition 2;
- staircase 3;
- cabinet 4.
Parts are marked on the back side. This prevents swapping after finishing.
Self-returns made from similar pieces are easy to mix up. One may differ by just a few millimeters, but after replacement a gap will appear.
How not to confuse PLT-004 with a solid wood plinth
The combined PLT-004 and a solid wood profile may look similar in a photo. But the end treatment differs.
In solid wood, the wood material continues throughout the entire cross-section. The end shows fibers of the same species. It still needs to be designed and finished, but the cut has no MDF core and thin veneer layer.
In the wood versions of PLT-004, the lower part combines MDF and veneer, while the upper part is made of solid wood. The straight end shows the transition of materials.
A detailed comparison of how the combined PLT-004 differs from a solid wood plinth, helps choose the profile before developing the end joint.
It is not possible to transfer all methods of processing a solid array to PLT-004:
- deeply sanding veneer;
- expecting that the end will show beautiful wood on its own;
- changing the relief without considering the facing;
- using any leftover as a homogeneous wooden blank.
PLT-004 made of MDF and wood variants: length affects cutting
The MDF version is produced in a length of 2600 mm, wood variants — 2400 mm. The difference of 200 mm seems small, but on several walls it changes the number of joints and leftovers.
A wall 2500 mm long can be covered with one MDF plank 2600 mm long with trimming. For the wood variant of 2400 mm, a joint will be required.
If an open end is at the end of such a wall, the position of the joint needs to be thought through. It is undesirable to place a short insert directly before the self-return: two complex lines will be nearby.
The wood variant requires a more careful cutting map:
- consider the length of 2400 mm;
- maintain the direction of the veneer;
- select adjacent slats;
- allocate material for return;
- do not place a joint at the visible end;
- maintain a full reserve.
MDF execution also requires an edge solution. The difference is that the cut will not have the same combination of veneer and solid wood top. But a high straight edge can still look unfinished.
What to buy together with PLT-004
| Position | Why it's needed | What to check | Inner page |
| PLT-004 | Main high profile | Execution, length, material, and finish | Order PLT-004 size 160 × 16 mm |
| Additional strip or segment | Self-returns, test cut, reserve | Matching material and batch | To be clarified when calculating the order |
| Full cross-section sample | Check the end and relief | Availability of exactly PLT-004 | Check the end and relief before purchase |
| Primer and finishing materials | Protection of exposed MDF and finish | Compatibility with selected version | Primer and enamel for baseboard |
| Mounting compound | Fixing of profile and joints | Wall base, finish, and installation method | Select mounting adhesive |
| Casing or vertical profile | Transition to door framing | Thickness, projection, relief, and color | Selected per project |
| End block | Independent completion | Manufacturing capability and dimensions | To be clarified with STAVROS |
An accompanying order cannot be assembled mechanically. Not every end needs a block. Not every object requires an additional vertical profile. But trial material and reserve for complex ends should be provided in advance.
Who is PLT-004 for
High PLT-004 should be considered if:
- a pronounced baseboard with a height of 160 mm is needed;
- the profile must participate in the wall architecture;
- the interior includes tall doors, panels, or moldings;
- the buyer is ready to plan open ends;
- lengths of 2400 or 2600 mm are accounted for in cutting;
- installation is performed by a specialist skilled in working with veneer;
- a sample or trial piece is provided;
- end nodes are aligned before final finishing;
- the combined construction matches the task;
- need a skirting board with a solid wood top part.
PLT-004 is especially expressive in spacious hallways, living rooms, corridors, studies, and interiors with wall panels. The profile height allows it to be connected with door portals and vertical elements.
When PLT-004 should not be ordered without an additional project
You cannot limit yourself to choosing color and length if:
- there are many open passages in the room;
- the skirting board ends at several partitions;
- there is a staircase nearby;
- the profile meets a column;
- no solution for built-in furniture;
- transparent finish for wood options is required;
- the installer has not worked with veneered profiles;
- the order is calculated exactly along the perimeter;
- there is no material for test cuts;
- random plastic plugs are expected to be used;
- the finished end element is considered existing without confirmation;
- joints are already assigned near visible ends.
In such a project, first create a map of endings, and then select the quantity and execution.
If PLT-004 turns out to be too high or complex for a specific wall, you can view all tall baseboards and compare profiles made of MDF, beech, or oak.
Mistakes that leave the MDF cut visible
Count PLT-004 as a solid oak or beech plank
A wood face surface does not mean solid wood throughout the cross-section. The end reveals a combined construction.
Finish the profile with a straight cut without a sketch
The installer only sees the technical length. No one checks the view from the adjacent room.
Consider painted MDF as a ready-made decorative cap
Primer and enamel protect the material but do not create a finishing shape.
Do a self-return after painting the entire batch
The first test is performed on finished parts. Any error damages the finished coating.
Using too short a trim piece
The part cannot be processed safely and accurately.
Sand veneer like solid wood
The thin veneer layer is damaged, and MDF appears on the face surface.
Take a remnant from another batch
The shade and pattern do not match the main plank.
Not checking the side view
From the front, the edge is almost invisible, but from the passage it becomes the main element.
Counting only the perimeter
Self-returns and test parts remain without material.
Place a joint next to an open end
At one point, a transverse seam, an external corner, and an end node meet.
Cover the cut with a random plastic element
The material, profile, and color do not match the architectural character of PLT-004.
Confuse self-return with a regular external corner
At an external corner, the profile continues along the adjacent wall. With self-return, a short piece completes the line and returns to the plane.
Do not check compatibility with the trim
Heights match, but thickness and projection differ.
Run the baseboard behind the built-in cabinet without approval
Furniture cannot be moved against the wall or dismantled without damaging the profile.
Leave the end node to the installer's discretion
By the time of installation, the material is already ordered, painted, and distributed across the walls. The ability to change the cutting layout is limited.
Work sequence: from measuring to local touch-up
- Measure all walls and openings.
- Find visible end points.
- Create a separate map of end nodes.
- Choose a self-return, block, transition, or straight end.
- Check the design of the selected PLT-004 configuration.
- Obtain a cross-section or sample.
- Make a 1:1 template.
- Check the node from the adjacent room.
- Create a cutting map for length 2400 or 2600 mm.
- Add self-return parts.
- Add a test material.
- Assign a justified reserve.
- Perform a test cut.
- Assemble the node dry.
- Check the relief and top line.
- Number the parts.
- Determine the finishing sequence.
- Protect open surfaces.
- Apply the finish coating according to the selected system.
- Perform installation.
- Check the joints from different angles.
- Perform local touch-up if it is provided by the technology.
This sequence looks longer than the command "cut to size." But it saves full planks and protects the already completed finish.
Pre-order checklist
-
Selected version PLT-004.
-
Size 160 × 16 mm confirmed.
-
Length 2400 or 2600 mm taken into account.
-
The structure of the wooden version is clear.
-
All open endings found.
-
A separate node is assigned for each ending.
-
The view from adjacent rooms has been checked.
-
Self-return locations have been selected.
-
End blocks have been defined.
-
Transitions to architraves have been checked.
-
The first stair step has been taken into account.
-
Columns and pilasters have been checked.
-
The joint with built-in furniture has been agreed upon.
-
A sample or full cross-section has been obtained.
-
A 1:1 template has been made.
-
A trial cut is scheduled.
-
A map of the strips has been compiled.
-
Short return parts have been taken into account.
-
Material for testing has been added.
-
A justified reserve has been added.
-
A finishing system has been selected.
-
Materials for MDF protection have been selected.
-
The installer's qualification has been verified.
-
The current price has been updated in the card.
-
The kit is agreed upon before payment.
How to order PLT-004 on the STAVROS website
First open the card and check the price and length of PLT-004. Make sure the selected configuration matches the project.
Then provide the manager not only with the total length, but also with the end map. In the request, it is useful to specify:
- number of planks;
- selected material;
- the length of the configuration;
- the number of internal corners;
- the number of external corners;
- the number of open ends;
- expected self-returns;
- end blocks;
- transitions to architraves;
- need for a sample;
- material for a test cut;
- desired finish;
- photos of complex areas;
- drawings of walls and openings.
If a wood option is needed, you can separately choose PLT-004 with oak veneer or clarify the execution with beech veneer. Actual characteristics and order conditions are checked in the product card and with the manager.
For a wide selection, use the STAVROS floor plinth catalogIf PLT-004 does not fit in height, design, or end complexity, it is better to choose a different profile before purchasing than to simplify the joint after delivery.
FAQ: answers to questions about the open end of PLT-004
What is PLT-004 made of?
The design depends on the version. In wood variants, the lower profiled part has an MDF base with a veneer facing, and the upper decorative element is made of solid wood. Therefore, the profile cannot be considered a solid wooden plank across the entire cross-section.
What size does PLT-004 have?
The confirmed cross-section size is 160 × 16 mm. The height of 160 mm makes the open end noticeable, so the finishing method should be planned in advance.
What is the length of the PLT-004 plank?
The MDF version is produced in a length of 2600 mm, wood variants — 2400 mm. The chosen length affects the number of joints, waste, and the possibility of making return parts.
Why is MDF visible on the end of the wood PLT-004?
Because the lower part has an MDF base faced with veneer. On the front side, the base is covered by a wood surface, but after a straight cut, the internal structure becomes visible.
Can you simply paint over the end face?
The cut can be technically prepared and coated with a compatible material. But painting does not always solve the decorative task: the vertical plane remains visible, and the profile relief abruptly ends.
What is a skirting board self-return?
A self-return is a short mating piece that, through a coordinated cut, turns the PLT-004 relief toward the wall. It covers the structural end and creates a finished side section.
How does a self-return differ from an external corner?
With an external corner, the skirting board continues along another wall. With a self-return, the short piece does not lead the profile further but finishes it at the wall plane.
Is a separate end cap needed for PLT-004?
Not always. The end can be finished with a self-return, a block, a transition to a casing, or a processed straight cut. The availability of a ready-made serial end cap cannot be assumed without confirmation.
Is a ready-made end element for PLT-004 produced?
In the provided data, a ready-made mandatory element is not confirmed. The possibility of manufacturing or selecting a block according to the drawing needs to be clarified with STAVROS.
How to finish PLT-004 at an open doorway?
On a flat wall, self-return often works. For a large portal, an end block can be used. The solution is checked from both sides of the opening.
How to finish the baseboard end on a short partition?
Both sides of the partition need to be assessed. If PLT-004 is installed on one side, self-return is suitable. If on both sides, two returns or a single block on the edge can be used.
How to finish PLT-004 at the first step?
The profile can be finished with a block, tied to the base of the stair element, or returned to the wall. The straight end at the step is clearly visible from above, so it requires a particularly careful design.
Can PLT-004 be connected to a casing?
Yes, if the height, thickness, projection, relief, and finish match or are meaningfully coordinated. Compatibility with any casing is not automatically guaranteed.
Can the baseboard be brought to a pilaster?
Yes, the pilaster can serve as a vertical termination. It needs to be determined whether PLT-004 enters its plane, butts against the lower block, or ends before it.
Can a skirting board go around a column?
Yes, if the project includes a turn around the column. Additional corners, short pieces, and a separate material calculation will be required.
Can PLT-004 be routed behind a built-in wardrobe?
Only after checking the furniture construction. The height and thickness of the skirting board may prevent the wardrobe from being installed flush against the wall. The possibility of future dismantling must be considered.
How to protect exposed MDF after cutting?
The cut is cleaned, prepared, and sealed with a compatible finishing system. The exact materials depend on the PLT-004 finish and the chosen final coating. A test is performed first.
How to avoid chipping the veneer?
Use an appropriate clean-cut technique, securely fix the piece, and first work on a test offcut. Veneer must not be sanded intensively like solid wood.
Can a self-return be made from any leftover piece?
No. The leftover must retain the full cross-section, match the material and veneer, have sufficient length, and an undamaged edge.
Do I need to make a test end joint?
Yes, especially for self-return, outside corner, or transparent finish. The test shows relief matching, cut quality, and the appearance of the end.
How much material should be added for open ends?
The amount is determined by the joint map. Each self-return, block, and test piece is counted separately. A universal percentage does not replace cutting layout.
Is a spare strip needed?
For a complex project, a reserve is desirable. It is especially useful if there are many open ends, a wood variant is used, or it will be difficult to purchase matching material later.
Where should the joint of long planks be placed?
The joint should be moved away from the open end and the central viewpoint. Its position is determined by wall lengths and the cutting map.
Do I need to finish the end before installation?
The order depends on the coating and the shape of the joint. But a test assembly is always done before final finishing of the entire batch.
How to check the appearance of the end in advance?
Use a 1:1 template or a short full-section sample. Apply it to the wall and view it from all adjacent rooms.
Where to buy PLT-004?
You can order the profile in the STAVROS product card. Before payment, clarify the finish, length, price, number of slats, allowance, and the method for finishing open ends.
The baseboard should end before the wall only by design, not by accident.
The open end of PLT-004 is a small part of the interior in length but important in perception. It is at this point that the viewer understands whether the horizontal line was fully thought through or whether the installation simply ended where the slat ended.
Wood finishes of PLT-004 combine MDF, veneer, and a top part made of solid wood. A straight cut reveals the construction. Primer and finish protect the material but do not always create a complete form.
Before ordering, you need to choose one of four scenarios: self-return, end block, transition to a vertical profile, or a deliberately open treated end. After that, a cutting map is created, short pieces, material for testing, and a justified reserve are added.
STAVROS helps you assemble such an order step by step: choose PLT-004, compare the tall combined profile with other baseboards, check the full section, select materials for finishing, and agree on the quantity. The main next step is not just to measure the walls, but to mark on the plan every place where the baseboard ends in view. Then the end will cease to be a technical cut and become a full architectural completion.