Article Contents:
- Why the top edge of slat panels cannot be left random
- In which situations panels are run to the ceiling or just below the ceiling
- Accent wall in the living room
- TV zone from floor to ceiling
- Wall behind the bed
- Hallway and corridor
- Office
- High niche
- Pier between windows or doors
- Option one: slat panels and wooden cornice
- What is a wooden cornice and why is it needed
- Where the cornice works best
- Technical parameters of the cornice above slat panels
- Cornice as a light control tool
- Option two: ceiling wooden baseboard
- When a ceiling plinth is better than a cornice
- How a ceiling plinth covers the top gap
- Proportionality: ceiling plinth and floor plinth
- Option three: molding above a slatted panel
- When molding is the right choice
- How molding covers the top edge of the panel
- Molding as a decorative "cornice" above a slatted insert
- Option four: wooden batten as a top trim
- When a batten is more appropriate than profiles
- Parameters of the batten for top trim
- How to choose the color and style of the top profile
- Wood-look panels + cornice in the same tone
- Wood-look panels + white ceiling plinth
- Panels for painting + profile for painting
- Contrast top molding
- Unified vertical system: bottom plinth + panels + top cornice
- Installation nuances of top finishing
- Compensation gap between panel and ceiling
- Installation Sequence
- Cuts in internal and external corners
- Straightness of the profile
- Profile end processing
- Errors when finishing the top edge of slat panels
- What to buy for finishing the top part of the wall
- Table: how to choose the top profile by situation
- FAQ: answers to the most pressing questions
- About the Company STAVROS

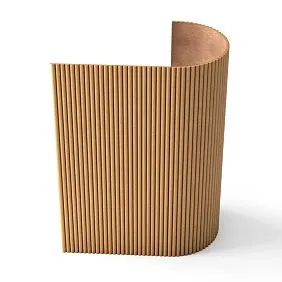
The wall with slat panels rises up — slat by slat, meter by meter. The rhythm of vertical lines gains strength, the space becomes taller and richer. And then the last slat reaches the ceiling. What next? This is where many stop in confusion: how to finish the wall at the top without ruining everything that was so carefully built from below?
The top joint is the final point of the entire slat system. And like any final point in architecture, it requires no less attention than everything that came before. slatted panels for walls, raised all the way to the ceiling or almost to it, give a feeling of height, volume, and integrity — but only if the top transition is finished correctly.
In this article — four specific solutions, details for each of them, color schemes, installation nuances, and an honest analysis of mistakes. For those who want to bring their slat wall to the ceiling — and get a result that doesn't need to be redone.


Why the top edge of slat panels cannot be left random
The ceiling in any apartment is not a perfect horizontal line. Irregularities of 5–10 mm along the wall length are the norm, not a pathology. That is why, when Slatted wall panel it rises to the ceiling without a compensating profile, the top gap becomes chaotic: somewhere 3 mm, somewhere 12, and in one place the panel touches the ceiling tightly. This does not look like incompleteness — it looks like carelessness.
But this is not the only problem. The open top end of the panel is the same cut of MDF or wood as the side ends. It absorbs moisture, darkens, and collects dust. At a height of two meters, it is not so clearly visible — but with side lighting, especially in the evening with the lights on, it reads distinctly.
There is also a third, purely architectural reason. A wall with slats has a strong vertical rhythm. This rhythm "asks" for a horizontal finish at the top — just as a musical phrase asks for a final chord. Without a top horizontal profile, the wall seems "cut off," unfinished. A wooden cornice, ceiling plinth, or molding above the slatted panel provides that final horizontal line — and the wall gains completeness.
Finally, the top profile is an opportunity to hide lighting. The cornice above the slatted panel is a classic place for a hidden LED strip, which gives a soft glow down along the slats. Without a cornice, this technique is impossible.


In which situations are panels run to the ceiling or right up to the ceiling
Not in all interiors do slatted panels go up to the ceiling. But there are cases where this is not just acceptable — it is the only correct solution.
Our factory also produces:


Accent Wall in Living Room
Living room — a space with a claim to architecturality. A slatted wall from floor to ceiling in the living room is a strong design statement. It visually raises the height of the room, creates depth, and makes the room more significant. Here, the top profile is especially important: wooden cornice above the slatted wall in the living room — it is not a detail, it is an architectural element that gives the entire wall weight and completeness.
Get Consultation
TV zone from floor to ceiling
A TV zone raised to the ceiling is a powerful central accent in any living room. Slats running from the baseboard to the cornice create a "portal" around the screen. decorative slatted panels PAN-001 In this zone with a wooden cornice on top and a ceiling plinth, it is a complete system that needs no explanation: it speaks for itself.
Wall behind the bed
In the bedroom, slatted panels behind the headboard are often raised all the way to the ceiling to create the effect of a "niche" or architectural canopy. Here, the upper profile works softly: a ceiling plinth or molding above the slatted zone creates a delicate horizontal boundary that does not overwhelm the bedroom interior.
Hallway and corridor
In the hallway, slatted panels often run along all walls and up to the ceiling. The space is small, every detail is visible. The top joint here must be as neat as possible: no gaps, no misalignment, no extra elements. wooden ceiling molding Around the perimeter of the hallway is a concise and clean solution.
Office
In the study, slatted panels create an atmosphere of a "library" or "office with character." Slats from floor to ceiling + a wooden cornice + a ceiling plinth — this is the level at which the workspace feels thoughtful, serious, and expensive.
High niche
A niche occupied by slatted panels on three sides and raised to the ceiling requires a horizontal profile along the top edge. Without it, the niche looks like a "hole in the wall." With a cornice or molding, it looks like an architectural element.
Pier between windows or doors
A narrow vertical pier with slats up to the ceiling is one of the most challenging cases. The width is small, the height is significant. The upper profile here creates a "cap" for the pier, uniting it with the horizontal line of the ceiling.
Option one: slatted panels and a wooden cornice
The most prestigious and most expensive option for top trim. wooden cornice is a profile with a developed cross-section, which is attached in the wall-ceiling transition zone and creates an architecturally expressed upper horizon.
What is a wooden crown and why is it needed
A wooden cornice is not just a 'large baseboard.' Its cross-section is more substantial, its relief more expressive, and its role in the interior is fundamentally different: the cornice does not just cover the joint, it creates an architectural transition — the 'crown' of the wall.
In classical architecture, the cornice is the finishing element of the entablature that separates the vertical plane of the wall from the horizontal plane of the ceiling. In a modern interior, this principle works exactly the same: the cornice above a slatted wall reads as a deliberate architectural detail, not a technical gap cover.
Where the cornice works best
Classic and neoclassical interior. Oak wood slats, a cornice with a figured profile, a white ceiling — this is a classic triad that works without explanation. The cornice connects the warm wood tone of the slatted wall with the neutral white ceiling.
High ceilings from 280 cm. With high ceilings, a cornice with a developed profile does not overload the space — it is proportionate to the height. With ceilings of 240 cm, the cornice can "weigh down" — there, a molding or ceiling plinth is better.
Cabinets and libraries. Dark slatted panels + a cornice in the same tone create a "masculine" interior with character. The cornice above the slatted area makes the wall monumental.
Living room with a slatted accent wall. Here, the cornice becomes the final chord of the entire decorative system. buy a wooden cornice and installing it above the slatted area is not an expense on a detail, it is an investment in the integrity of the interior.
Technical parameters of the cornice above the slatted panels
The width of the cornice should be proportionate to the size of the slats. If the slats have a pitch of 30–40 mm, the cornice should have a projection of 50 mm or more. This is the "rule of proportions": the cornice should visually "overhang" the slatted area, not get lost above it.
Installation of the cornice: it is attached to both the wall and the ceiling simultaneously — either on special brackets or with finishing nails and glue. Internal corners — cut at 45° in a miter box with a clamp. External corners — the same logic.
If an LED strip is planned behind the cornice, a cable is laid before installation, along which an aluminum profile for the strip will be installed. The cornice covers both the cable and the profile — from the outside, only soft light emanating from below is visible.
The cornice as a tool for light control
This is a special role of the wooden cornice above the slatted panels — and it is rarely discussed in the context of finishing. Cornice + LED strip = hidden lighting that illuminates the slatted wall from top to bottom with soft diffused light. Shadows between the slats become more pronounced, the relief of the panel "comes to life." This is a professional technique that elevates the slatted wall from the category of "beautiful finish" to the category of "architectural object."
Option two: ceiling wooden baseboard
If a cornice is about architectural grandeur, then wooden ceiling molding — about laconic completeness. This is a more modest-sized profile that is attached at the junction of the wall and ceiling and creates a clean horizontal line.
When a ceiling plinth is better than a cornice
Low ceilings. At a height of 240–250 cm, a massive cornice will make the space feel heavy. A ceiling plinth with a small profile is the right choice: it covers the top joint without overloading the space vertically.
Modern and minimalist interior. There is no need for the architectural grandeur of a cornice. A clean line is needed to define the upper boundary of the slatted area. Wooden ceiling baseboard with a simple flat or slightly beveled profile — that's exactly it.
Bedroom. In a bedroom, the ceiling is psychologically important: it should not feel oppressive. A lightweight ceiling plinth above the slatted panels behind the headboard covers the gap and creates a final horizon — without the excessive monumentality of a cornice.
Hallway around the perimeter. In a small hallway, the ceiling plinth runs along the entire perimeter — along all walls with slatted panels. This creates a unified upper contour of the space. Not a separate decorative element, but a systemic profile.
How the ceiling plinth covers the top gap
Technically wooden ceiling plinth PLT-001 mounted in the wall-ceiling corner. Its profile is beveled at 45°: one shelf on the wall, the other on the ceiling. The gap between the top end of the slat panel and the ceiling — up to 20 mm — is completely covered by the skirting board.
Installation with liquid nails + finishing nails. Important nuance: the ceiling plinth is installed after the slatted panel but before the final painting (if the system is monochrome). Then both the joint between the plinth and the panel and the joint between the plinth and the ceiling are painted together, without visible seams.
Proportionality: ceiling plinth and baseboard
One of the most important principles of systematic wall design: the height of the floor skirting board and the height of the ceiling skirting board should be proportional. This does not mean 'identical', but they should be in a clear ratio.
Classic rule: the floor skirting board is 1.5–2 times higher than the ceiling skirting board. Floor — 100 mm, ceiling — 50–60 mm. Floor — 120 mm, ceiling — 60–80 mm. This creates the correct visual hierarchy: the wall 'stands' on a heavy floor skirting board and 'touches' the ceiling with a light ceiling skirting board.
solid wood baseboard floor skirting board + solid wood ceiling skirting board on top — a unified system where the lower and upper horizons 'echo' each other in material, tone, and style.
Option three: molding above the slat panel
wooden molding — not a cornice and not a skirting board. It is a horizontal decorative strip that is mounted directly above the top edge of the slat panel on the wall plane — not in the wall-ceiling corner, but lower.
This means that the molding above the slatted zone works on a different logic: it creates a horizontal boundary between the slatted zone and the smooth part of the wall — where the panels do not reach the ceiling.
When molding is the right choice
Panels do not reach the ceiling. If the slatted zone ends, say, at a height of 200 cm with a ceiling of 260 cm, a strip of smooth wall remains above. Wooden decorative moldings MLD-019 along the top edge of the slatted zone creates a clear horizontal boundary: "below — slats, above — painted wall." This is an intentional transition, not a random break.
Transition to a painted wall. Where the slatted zone borders a smooth surface not only on the sides but also on the top, molding creates a decorative frame. The slatted zone becomes an "insert" in the wall, framed by molding around its entire perimeter.
Horizontal belt. In some interiors, molding is used not as a frame but as an independent horizontal belt that divides the wall into zones: a slatted lower part and a smooth upper part. The installation height of the molding in this case is an architectural decision that affects the proportions of the entire space.
How molding covers the top end of the panel
Buy wooden molding and install it horizontally above the top end of the slatted panel — this is a solution for both aesthetics and protection. The lower shelf of the molding covers the top cut of the panel base. The upper part of the profile fits against the wall. The end is closed.
The width of the molding must be sufficient to overlap the panel cut with a margin of 5–8 mm. For a standard slatted panel with a thickness of 14–16 mm, a molding width of at least 20 mm is required.
Molding as a decorative "cornice" above the slatted insert
If the slatted panel is an accent insert of a certain width and height, framed by molding on all four sides, the top horizontal molding plays the role of a "horizontal cornice" of this frame. It visually completes the accent zone, creating a "cap" for the entire structure.
In this version, the top molding works together with the side vertical moldings and the bottom baseboard as a complete frame. decorative wooden moldings in a classic or modern profile create a finished architectural insert.
Option four: a wooden batten as the top extension
The most concise and technically simple option. Decorative wooden slat is mounted horizontally directly above the top edge of the slat panel — as a "closing strip".
When a batten is more appropriate than profiles
Minimalist interior. Where a cornice seems too massive, a molding too decorative, and a ceiling plinth too "technical", a horizontal batten is the ideal solution. It continues the language of the slat wall: the same width, the same tone, the same shape.
Closing a narrow gap. If the gap between the top end of the panel and the ceiling is small — 15–25 mm — a batten of the required section closes it neatly, without the excessive volume of a profile.
Continuing the vertical rhythm. A horizontal batten above the slat zone is the "final horizontal" that puts an end to the vertical rhythm of the slats. This is not decoration for decoration's sake, but architectural logic: vertical → horizontal → ceiling.
Height extension. If the panel ends below the required level and you need to "add" a few centimeters to reach a molding or cornice — you can buy a wooden batten of the required cross-section and cover the area above the top edge of the panel with it.
Parameters of the batten for the top extension
-
Width: from 20 to 60 mm — depending on the gap and desired visual accent.
-
Thickness: from 10 to 20 mm — no thicker than the battens of the panel itself.
-
Finish: the same tone as the main battens. Or for painting — for monochrome systems.
Wooden batten RK-001 — a standard option for additional horizontal elements: size, tone, material are compatible with slatted panels.
How to choose the color and style of the top profile
The top profile — cornice, ceiling molding, or trim — does not exist in isolation in the interior. It is part of a system, and its color and style should be chosen deliberately.
Wood-look panels + cornice in the same tone
Oak Slat Panel in a warm tone + wooden cornice in the same shade — a monolithic «wooden» upper part of the wall. The cornice becomes an extension of the slatted zone, its «roof». For classic, library, and «hunting» interiors — an ideal scheme.
Risk: if the tones differ slightly — the difference will be noticeable. Order the cornice and panels from the same manufacturer or ensure tone compatibility.
Wood-look panels + white ceiling plinth
Warm wood tone of slats + white wooden ceiling molding at the ceiling — one of the most beautiful and versatile options. The white profile acts as a border between the wooden area and the white ceiling. Warm wood does not 'dissolve' into the ceiling but clearly defines its upper boundary.
This solution works in Scandinavian style, modern classic, and eco-interiors.
Panels for painting + profile for painting
Slatted panel paintable PAN-002 + MDF Skirting Board top + bottom MDF Skirting Board bottom — all under a single paint finish. This is a monochrome system: one color on all elements. The transition between the panel, ceiling plinth, and ceiling «disappears» under a single coating.
Monochrome — the strictest and most modern solution. The shade can be any: white, light gray, graphite, dusty green. The main thing is the unity of coating on all elements.
Contrasting top molding
Dark slat panels + white molding on top — a clear contrast. The molding "cuts off" the slat area from the white ceiling with architectural precision. This is an elegant technique that emphasizes the designer's intent. A dark wall with a white "frame" at the top is no longer just a finish, it's a statement.
Unified vertical system: bottom baseboard + panels + top cornice
Ideal system: solid wood baseboard bottom + Slatted wall panels middle + wooden cornice above — all in a coordinated wood tone. The wall from floor to ceiling turns into a single architectural element with a pronounced hierarchy: base — body — finish.
This scheme follows classical architectural logic and works in any space — from hallway to study.
Installation nuances of top trim
A correctly chosen profile installed with errors results in a poor outcome. Several technical details you need to know.
Compensation gap between panel and ceiling
A slatted panel made of wood or MDF is a material that reacts to changes in humidity. It expands and contracts slightly. If the panel is pressed tightly against the ceiling without a gap, deformation will occur at the first seasonal humidity fluctuation: either the panel will bulge from below, or the ceiling will develop a crack along the top edge.
A technical gap of 5–10 mm between the top end of the panel and the ceiling is mandatory. This gap is covered by a cornice, ceiling plinth, or molding.
Installation order
Correct sequence: installation of slatted panel → installation of top profile (cornice or ceiling plinth) → installation of bottom plinth → painting (if the system is monochrome). Doing it in reverse means redoing everything.
If lighting is planned behind the cornice, the cable is laid before installing the cornice. After the cornice is installed, the cable is hidden.
Miter cuts at internal and external corners
The cornice and ceiling plinth are installed around the perimeter of the room. At corners, make 45° miter cuts. For wooden profiles, this requires a miter box with a clamp and a sharp saw: wood chips easily with an inaccurate cut, which is especially noticeable on the top line of the wall.
Stock up on material considering corners: each internal corner consumes additional profile length (sum of both flanges × 2). For a room with 4 corners, a minimum of 10–12% extra length is needed.
Straightness of the profile
The top profile at ceiling level is the most visible horizontal element in the room. A curve, bump, or sag of 2–3 mm is clearly visible from below. Install using a laser level or a taut string — no "eyeballing" will help here.
Processing profile ends
The ends of the cornice and ceiling plinth that abut a corner or wall must be cut cleanly. If the system is for painting, the ends are puttied along with the rest of the surface. If for varnish, the ends are sanded before installation.
Mistakes when finishing the top edge of slatted panels
The most typical miscalculations — and why they are so costly.
Bringing the panel all the way to the ceiling without an expansion gap. Result — deformation when humidity changes. Fixing requires dismantling and reinstalling the last row of slats. It's easier to do it right the first time: leave a gap of 5–10 mm and cover it with a profile.
Leaving an uneven top cut. The cut of the panel's top end must be straight — even though it will be covered by the profile. If the cut is uneven, the profile will sit with gaps that will be visible under certain lighting.
Choosing a molding that is too thin. A molding 15 mm wide above a slatted wall with a slat spacing of 30–40 mm is a disproportionate ratio. The molding "gets lost" and does not fulfill its visual role. The width of the top molding should be at least the spacing of the slats.
Installing a ceiling plinth of a different style. decorative slatted panels in a modern minimalist design + a classic ceiling plinth with rich relief — a style conflict. The style of the profile must match the style of the panels.
Do not connect the top of the wall with the bottom baseboard. Two different profiles — top and bottom — create a sense of randomness. They can be of different sizes, but must be from the same stylistic family and, if possible, from the same material or the same finish.
Use different wood shades without intention. If the bottom baseboard is light oak, the panels are dark walnut, and the cornice is pine — that's chaos. A single tone or intentional contrast: there are no other options.
Forget about lighting if it is planned near the ceiling. If lighting behind the cornice was planned, but the cable was not laid before installation — after installing the cornice, it will have to be dismantled. This is a waste of time, materials, and nerves.
Mount the profile without a level. Any horizontal profile at the ceiling level is mounted strictly by level. A crooked cornice or baseboard near the ceiling is the first thing a person sees when entering the room.
What to buy for decorating the upper part of the wall
Final list for those ready for specific actions.
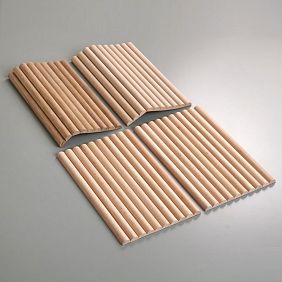
slatted panels for walls — in three versions: PAN-001 with coating, PAN-002 primed for painting, PAN-003 oak wood effect.
wooden cornice — for classic interiors and high ceilings. Architectural completion of a slatted wall with the possibility of hidden lighting.
Wooden ceiling baseboard PLT-001 — for a laconic top joint. Covers the gap between the panel and the ceiling, creating a clean horizontal line.
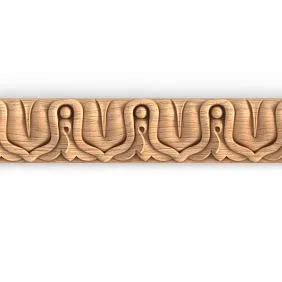
molding MLD-019 — for a horizontal border above the slatted area, if the panels do not reach the ceiling. Covers the top end, creating a decorative frame.
Wooden slat RK-001 — for filling the narrow upper gap, continuing the rhythm of the slats, a concise horizontal strip.
Decorative wooden slat — for non-standard upper transitions, a wide range of sections.
solid wood baseboard — the lower horizon of the system. Paired with the upper cornice — a complete architectural frame for the wall.
MDF Skirting Board — for monochrome systems for painting.
wood trim items — for non-standard joints, niche corners, transitions in complex areas near the ceiling.
Table: how to choose the upper profile by situation
| Situation | Recommended profile |
|---|---|
| High ceiling (280+ cm), classic | wooden cornice |
| Low ceiling (240–260 cm) | wooden ceiling molding |
| Panels do not reach the ceiling | molding MLD-019 |
| Monochrome for painting | MDF Skirting Board + MDF cornice |
| Minimalist interior | Horizontal Rail |
| Lighting behind the cornice | wooden cornice + LED profile |
| Accent insert with frame | Molding around the perimeter |
| Hallway with slats around the perimeter | Ceiling Skirting Around the entire perimeter |
FAQ: answers to the most pressing questions
How to cover the top edge of a slatted panel?
Depends on ceiling height and interior style. For high ceilings and classic style — wooden corniceFor a modern minimalist interior — wooden ceiling moldingFor panels that do not reach the ceiling — wooden molding.
Can slatted panels be brought up to the ceiling?
Yes, this is one of the most striking options. However, a compensation gap of 5–10 mm between the panel end and the ceiling is mandatory. This gap is covered by a cornice or ceiling molding.
Is a ceiling molding needed above slatted panels?
If the panels go flush to the ceiling, the ceiling molding covers the gap and creates a clean horizontal line. If the panels do not reach the ceiling, a molding is placed on the top edge. In any case, an open end is undesirable.
What is better on top: a molding or a wooden cornice?
A cornice is for formal, classic, and study interiors with high ceilings. A molding is for modern interiors and where a decorative border is needed rather than a large-scale profile. This is a matter of style and proportions, not 'better/worse'.
How to finish the joint between a slatted panel and the ceiling?
With a wooden cornice, ceiling molding, or trim — depending on the style. Mandatory: a technical gap and installation of the profile level.
Can slat panels be combined with a wooden cornice?
Yes, this is a classic combination. It works especially well when the cornice and Oak Slat Panel are matched in tone or when the cornice intentionally contrasts with the panel in color.
What color should I choose for the top profile?
Three working options: matching the panels (monolithic system), contrasting white (clear boundary), a single color for painting (monochrome). Mixed tones without a system are undesirable.
Is it necessary to leave a gap between the panel and the ceiling?
Absolutely — 5–10 mm. This compensates for material deformations due to humidity changes. The gap is covered by a profile. Without a gap, there is a risk of deformation of the panel or ceiling.
About the company STAVROS
A slat wall raised to the ceiling requires a system. Not a set of parts, but a system — where the baseboard, panels, and top cornice exist in one logic, one material, one concept.
STAVROS produces a full range for such a system: Rafter panels in three versions, Wooden cornices for the top trim, wooden ceiling molding for a clean joint, moldings MLD-019 и Wooden moldings, Wooden planks, solid wood baseboard и MDF Skirting Board, Trimming Items for non-standard places.
STAVROS — when the wall starts at the floor and ends at the ceiling. Thoughtful. Systematic. Beautiful.