Article Contents:
- What is KRPU.VRS-013 and which dimensions of the beam are really important
- The height of 250 mm sets the scale the most
- The width of 100 mm determines how well the bracket aligns with the visible axis of the beam
- The depth of 61 mm affects the side view
- Clean junctions
- Two KRPU.VRS-013
- Why you need to be especially careful with thin beams
- Why a large beam does not guarantee success
- How to make templates
- Where to place the template
- Why you should look not while standing under the beam
- Why with three beams you cannot decide only based on budget
- Is it possible to install only the central beam
- Do I need to buy a spare bracket
- Strictly along the axis of the false beam
- Slightly inward from the end
- On the wall under the beam, not on the beam itself
- On the side plane of the beam
- Conflict with the ceiling cornice
- Conflict with curtains
- Conflict with wall-mounted frame
- One beam
- Several parallel beams
- In the color of the wall
- In the color of the false beam
- In ceiling color
- Contrast color
- The beam is too thin
- The ceiling is low
- There are many beams
- There is already a lot of molding on the walls
- The beam is modern
- The junction is done perfectly
- All beams are the same — all pairs are the same
- Only the central beam
- Only the two outer beams
- Alternation through one
- Base
- The paint should hold better than the bracket
- The pair is marked out from one coordinate system
- Dry fitting is mandatory
- Final Painting
- Mistake 1. Considering 250 mm as 'minor decor'
- Mistake 2. Buying two elements without checking the 61 mm depth
- Mistake 3. Using KRPU.VRS-013 as a real support
- Mistake 4. Checking only one end
- Error 5. Multiply a pair across all beams without a common layout
- Error 6. Choose color only by a small sample
- Can KRPU.VRS-013 be installed only at one end of a false beam?
- Do I need to leave a gap between the top of the bracket and the beam?
- Can KRPU.VRS-013 be installed after the renovation is fully complete?
- Will KRPU.VRS-013 fit a wooden faux beam?
- Can two brackets be used as supports for a heavy beam?
- What to do if 250 mm in height is too much?
- Should I take six KRPU.VRS-013 brackets for three beams at once?
- Do all brackets need to be painted the same way?
- Can KRPU.VRS-013 be placed next to a ceiling cornice?
- What is better for a modern interior: KRPU.VRS-013 or a clean beam?
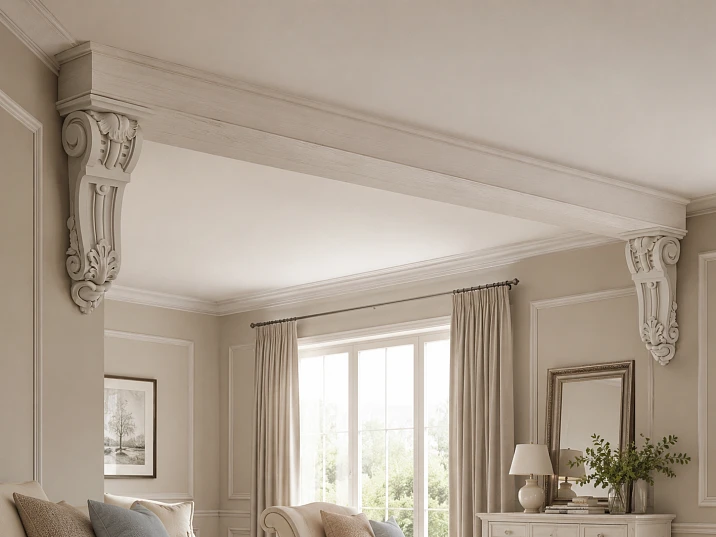
The ceiling faux beam is already installed and fits flush against two opposite walls. The structure holds itself, joints are done, ceiling and walls are painted. At this stage, an architectural rather than installation question arises: leave both junctions clean or add two carved decorative brackets under the beam ends to make the joint look like a well-thought-out support.
For such a scenario, KRPU.VRS-013 made of polyurethane can be considered. It is a large carved decorative bracket measuring 250 × 100 × 61 mm and priced at 9,850 ₽ per piece. For one beam with symmetrical design, 2 elements are needed, that is, 19,700 ₽. For three identical beams, it is already 6 brackets for 59,100 ₽. Therefore, the decision cannot be made on the principle that 'two elements look nice in photos.' The more beams in the room, the more a pair of brackets on each changes the entire ceiling rhythm and budget.
The main limitation is even more important than price: KRPU.VRS-013 should not be considered a load-bearing console for the beam. The faux beam must have its own structural fastening system. The polyurethane bracket is added afterward as architectural decor for the joint — it visually depicts support but does not replace fasteners or structural calculations.
Therefore, the correct sequence before purchasing is as follows: first measure the actual cross-section and position of the false beam, then make two identical full-size templates of KRPU.VRS-013, place them simultaneously on both ends of one beam, look at the composition from the floor, and only then decide whether to buy a pair, repeat it on all beams, or leave clean junctions altogether.
What is KRPU.VRS-013 and which dimensions of the beam are actually important
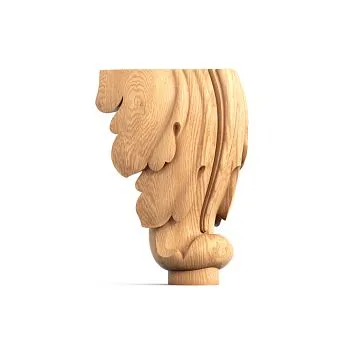
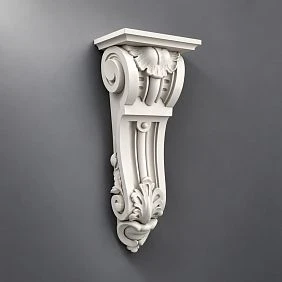
KRPU.VRS-013 is a carved decorative polyurethane bracket. In the STAVROS catalog, it is located in the section of polyurethane brackets and capitals. For the model in question, three dimensions are confirmed: height 250 mm, width 100 mm, depth 61 mm.
| Parameter | KRPU.VRS-013 |
|---|---|
| Type | carved decorative bracket |
| Material | Polyurethane |
| Height | 250 мм |
| Width | 100 мм |
| Depth | 61 мм |
| Price per 1 pc. | 9 850 ₽ |
| Pair for 1 false beam | 19 700 ₽ |
| Made to order | 3–7 days |
Buy carved bracket KRPU.VRS-013 made of polyurethane makes sense only after checking the three dimensions on the actual junction.




Height 250 mm sets the scale the most
A quarter meter vertically is not a small point overlay. The bracket occupies a noticeable part of the wall under the false beam and visually continues the ceiling structure downward. This is why KRPU.VRS-013 can turn a simple junction of "beam entering the wall" into a clearly readable architectural node.
If the false beam is compact, a 250-millimeter bracket may look larger than the beam itself. This is not necessarily a mistake: in classical architecture, a console is often noticeable. But such a scale must be deliberate. If the interior is built on light, thin lines, a large-height carved element can change the character of the ceiling more than expected.
Our factory also produces:


Width 100 mm determines how well the bracket matches the visible axis of the beam
The width cannot be assessed separately from the actual width of the false beam and from where exactly the bracket will be positioned relative to its axis.
If the beam is visually narrow, a 100-millimeter decorative element can almost match its width or turn out to be wider. If the beam is significantly wider, the bracket will become a central accent under it, rather than a continuation of the entire plane.
There is no universal rule here like "the bracket should be narrower than the beam by X percent." Such a number without a specific composition would be artificial. The correct check is a full-size template on the actual joint.
Get Consultation
The 61 mm depth affects the side view
The bracket is viewed not only from below. From the adjacent area of the room, its side profile is visible. The 61 mm depth creates a real protrusion, so the element cannot be assessed with just a flat 250 × 100 mm image.
If the false beam itself has a small height, the protruding bracket visually enhances its volume. If there are cornices, trims, curtains, or tall cabinets nearby, the side clearances also need to be checked.
For the first test, a cardboard template of 250 × 100 mm is sufficient. For the final decision, a three-dimensional mock-up with an approximate protrusion of 61 mm or a physical fitting of the actual product is useful.
The decorative bracket must not bear any load from the false beam
This is the fundamental boundary of the entire topic.
Visually, KRPU.VRS-013 looks like a console that supports the beam. It is precisely this image that makes it interesting. But the appearance does not turn a polyurethane part into a calculated structural support.
The false beam must be secured independently of decorative brackets. If it is hollow, wooden, MDF, polyurethane, or assembled from other materials, its own mounting system is determined by the design of the beam itself and the ceiling base.
KRPU.VRS-013 in such a node performs a different job:
-
visually completes the junction area;
-
creates the impression of architectural support;
-
connects the ceiling beam to the wall;
-
adds a classic or neoclassical relief;
-
can visually hide a too-empty area under the end of the beam if the joint itself is already technically completed.
It should not be used as an excuse for weak beam fastening.
If differences between the wooden and polyurethane versions of this model are needed, it is useful to separately read the STAVROS material "Carved bracket buy: wooden KR.VRS-013 or polyurethane KRPU.VRS-013 — what to choose"It compares two versions by material, finish, and purpose, with the polyurethane model considered specifically as wall and ceiling molded decor.
What changes if you install two brackets instead of clean junctions
The choice between "0" and "2" is not a choice between unfinished and finished renovation. Both options can be correct.
Clean junctions
Without brackets, the false beam reads as an independent ceiling line. It starts at one wall and ends at another without additional vertical accents.
This solution is more suitable if:
-
the ceiling is modern and minimalist;
-
the beam itself already has an expressive profile or texture;
-
the walls are occupied by molding frames, furniture, or curtains;
-
the room height is small and you don't want to lower the decor another 250 mm down;
-
There are many beams, and additional pairs would make the ceiling too busy.
A clean junction works especially well when the end of the beam is truly finished neatly. A decorative bracket is not needed just to "add something."
Two KRPU.VRS-013
A pair at the ends of one beam changes its meaning. The beam begins to be perceived as part of an architectural system: not just a strip on the ceiling, but an element that visually "rests" on the walls.
This option works better if:
-
The interior is classic or neoclassical;
-
the room already has stucco decor;
-
the beam is large enough for a bracket 250 mm high;
-
both walls at the junction points are free;
-
the pair is clearly visible from the main viewpoint;
-
it is necessary to emphasize specifically the ends of the beam.
The key word here is pair. One KRPU.VRS-013 on one end of a regular symmetrical beam usually raises the question "why is there no second side?". A single element is justified only with real architectural asymmetry: for example, the other end is hidden by a column, portal, built-in cabinet, or is part of another decorative node.
How to understand whether 250 mm is too large specifically for your false beam
Instead of the subjective "the bracket is large", it is better to compare its height with the visible height of the beam.
Let us denote:
Hк = 250 mm — height of KRPU.VRS-013;
Hб — actual visible height of the false beam.
You can use a simple ratio:
R = Hк / Hб.
It is not a standard. It is a tool that shows how far the bracket extends down the wall relative to the height of the beam itself.
| Height of the false beam Hб | Ratio 250 / Hб | What a person will see |
| 80 мм | 3,13 | The bracket is much higher than the beam and becomes a strong vertical |
| 100 мм | 2,50 | The decorative support is very noticeable |
| 150 мм | 1,67 | The scale of elements converges |
| 200 мм | 1,25 | The bracket is perceived more calmly relative to the beam |
| 250 мм | 1,00 | The height of the bracket equals the visible height of the beam |
This table does not say that at 80 mm KRPU.VRS-013 is "prohibited" and at 200 mm it is "correct." It shows that the same product on different false beams creates a completely different sense of mass.
Why you need to be especially careful with thin beams
If the beam is low and the bracket extends down by 250 mm, visually the support may become larger than what it supposedly supports. For a formal classic interior, this may be acceptable. For a light bedroom or kitchen, it is already debatable.
On a thin false beam, it is especially useful to compare three options:
-
beam without decor;
-
two full-size KRPU.VRS-013;
-
more compact decorative brackets from the same category.
If the second option drastically changes the entire ceiling, that is not a reason to automatically reject it. But the decision should be deliberate.
Why a large beam does not guarantee success
A large false beam better withstands the 250 mm scale, but another problem arises: the bracket width of 100 mm may be too narrow relative to the beam itself. Then the console looks not like its extension, but like a separate vertical part.
Therefore, both height and width are checked simultaneously, not just one dimension.
How much free wall is needed under a 250 mm high bracket
The height of the KRPU.VRS-013 itself is confirmed — 250 mm, but from this one cannot derive a universal rule that exactly 250 mm of empty wall is sufficient under the beam. Formally, the product will fit into such a dimension, but compositionally it will be squeezed between the beam and the nearest wall element.
Before purchasing, it is useful to measure not only the bracket height, but also the free vertical field under the end of the false beam. The top of a trim, a molding frame, a picture, a sconce, a curtain, a door portal, or tall furniture may fall into it.
Let's denote the free field as Hсв. Then comparison with KRPU.VRS-013 can be done not as a standard, but as a scenario check:
| Free field under the beam | What happens with KRPU.VRS-013 with a height of 250 mm |
| less than 250 mm | the product physically does not fit in the selected zone |
| about 250 mm | placement is possible only flush; there is no visual air |
| 300–350 mm | it becomes possible to consciously set the top or bottom offset |
| 400 mm and more | the bracket can be evaluated as a separate architectural detail, rather than as filling the entire free area |
This table does not establish mandatory indents. It shows why the phrase "250 mm high bracket" itself does not yet answer the question of compatibility with the wall.
The problem especially often occurs with a false beam near a doorway. For example, the upper casing or portal is already close to the ceiling. If only 270 mm remains between the beam and the casing, KRPU.VRS-013 formally fits, but almost completely fills the gap. As a result, three elements — the beam, the bracket, and the casing — visually merge into one heavy block.
Another scenario is an empty tall wall. There, the same 250 mm looks much calmer because a large free plane remains under the bracket. Therefore, KRPU.VRS-013 should be evaluated not by the product photo or by the beam size separately, but by the relationship of three objects: beam → bracket → free wall.
The full-size template should also include adjacent boundaries. On the wall, it is useful to mark the top of the casing, the edge of the future curtain, or the line of the molding frame with painter's tape. Then you can see not only "does the bracket fit," but also how cramped the entire assembly becomes.
If there is not enough free space, it is better not to try to reduce KRPU.VRS-013 by arbitrary trimming. It is more correct to compare architectural decor made of polyurethane and choose a model originally designed for a smaller scale.
Can KRPU.VRS-013 be used as a way to hide an untidy joint between the beam and the wall?
The decorative bracket does indeed cover part of the wall under the end of the beam and can visually distract attention from the junction. But this does not mean that it should be used as an "overlay on top of a problem."
If there is a noticeable gap, crack, wobbling section, unpainted mounting seam, or geometry violation between the end of the false beam and the wall, you first need to address the joint itself. KRPU.VRS-013 should not become a way to hide a defect that continues to work underneath it.
Here it is useful to distinguish two cases.
The first is a technical joint that is already sound, but visually too empty. The beam is secured, the gap is closed, and the finishing is complete. In that case, the bracket truly serves a decorative purpose: it adds architectural logic and turns the end of the beam into a focal point.
The second is a technically problematic joint. For example, the beam is movable, the finishing cracks, the seam opens, or the end does not fit against the wall. In such a case, the base and fastening are restored first. Only after that is it decided whether a decorative element is needed at all.
The reason is simple: if weak finishing continues to move under the bracket, the polyurethane decor will be glued to an unstable area. Then the problem will simply become less noticeable for a short time.
There is also a compositional risk. When KRPU.VRS-013 is purchased only for masking, its position is dictated by the defect, not by the beam axis and wall architecture. As a result, the bracket may end up offset, too close to the cornice, or asymmetrical relative to the opposite end.
Therefore, before trying it on, it is useful to take a photo of the joint without the decor and ask: if the joint were executed perfectly, would you still want to install the bracket? If the answer is "yes," the product is needed as an architectural element. If "no," the junction itself should be fixed first.
For a calmer way to finish the boundary, you can also look at polyurethane moldings, cornices, and baseboards, but their purpose will be different: not to imitate a support, but to create a linear finish.
Full-size fitting: why two templates are needed at once, not one
One template shows the size of the product. Two templates show the composition.
For KRPU.VRS-013 this is fundamental, because the buyer is going to finish both ends of one beam. If you attach a paper silhouette only on one side, you might think the element looks neat. After the second one appears, it turns out that the pair makes the room heavier than expected.
How to make templates
For the first stage, you need two identical silhouettes approximately 250 × 100 mm in size. They can be cut from thick cardboard or foam board. It is better not to limit yourself to a simple rectangle: if you can print the front silhouette of the product at a 1:1 scale, the result will be more informative.
At the second stage, it is useful to add an approximate depth of 61 mm to see the side volume.
Where to place the template
The template is placed in the position where the real KRPU.VRS-013 will visually support the end of the beam. Then check:
-
alignment with the beam axis;
-
distance to the ceiling cornice;
-
distance to the corner of the room;
-
neighboring curtains and trim;
-
switches and wall sconces on the wall;
-
a tall cabinet or display case;
-
the symmetry of the opposite end.
Why you should look not while standing under the beam
Directly under the beam, the bracket appears larger and distorted by perspective. You need at least three points:
-
the entrance to the room;
-
the center of the room;
-
the main living area — sofa, table, bed.
For several parallel beams, one more point is added: a view along the entire system. It is from there that you can see whether six or eight brackets turn into an excessively frequent rhythm.
After such a fitting, you can order a pair of KRPU.VRS-013 250 × 100 × 61 mm on the first beam, and only then decide whether to repeat the composition.
How many brackets to buy for 1, 2, 3, or 4 false beams
If each beam runs from wall to wall and both ends are finished identically, the calculation is simple:
Quantity of KRPU.VRS-013 = number of beams × 2.
| Quantity of false beams | Brackets | Cost at 9,850 ₽/pc. |
| 1 | 2 | 19 700 ₽ |
| 2 | 4 | 39 400 ₽ |
| 3 | 6 | 59 100 ₽ |
| 4 | 8 | 78 800 ₽ |
This is one calculation that does not need to be repeated for each beam individually.
Why with three beams you cannot decide based only on budget
Six KRPU.VRS-013 is not just "three times two." A new decorative rhythm appears: six large vertical accents, each 250 mm high.
If the beams are placed frequently, the brackets may start to dominate over the beams themselves. If the spacing is large and the ceiling is high, on the contrary, a repeating pair can make the system more convincing.
Therefore, for three to four beams, the template is no longer made on just one. The minimum useful test is to show two adjacent beams simultaneously. Even better is to print or cut out six to eight simplified silhouettes and see the rhythm in full.
Can I install only the central beam?
Yes, if the central beam truly has a special status: it runs along the axis of a fireplace, chandelier, dining table, or another architectural center.
But if three identical beams are equal, two brackets on only one may look random. Such a scenario is acceptable not as a way to save four elements, but as a deliberate ceiling hierarchy.
Do I need to buy a spare bracket?
Automatically, no. Unlike linear moldings, there is no linear cutting or waste here. One beam requires two whole elements.
A third one makes sense only for a specific reason: complex painting, risk of damage on site, the need to have a reserve from the same batch, or a plan to decorate another joint.
Where exactly to place KRPU.VRS-013 relative to the end of the beam?
The most obvious position is directly under the false beam near the wall. But even here there are several options, and they give different results.
Strictly along the axis of the false beam
This is the basic scheme. The bracket is visually perceived as a support under the beam.
Suitable when:
-
the beam is symmetrical;
-
the wall around is free;
-
a width of 100 mm logically corresponds to the beam;
-
the bracket drawing is designed for frontal reading.
Slightly inward from the end
Sometimes the edge of the beam ends at a complex corner, cornice, or trim. A slight offset can provide a clean fit.
But the offset must be repeated at the opposite end. If one bracket sits flush against the end and the other is set back without reason, the pair falls apart.
On the wall under the beam, not on the beam itself
For a decorative scenario, this is usually more logical: KRPU.VRS-013 becomes a wall element that visually supports the ceiling structure.
The mounting surface should be checked in advance. If the wall has wallpaper, decorative plaster, panels, or weak paint, the fastening system must match the specific substrate.
On the side plane of the beam
This is already a different composition. The bracket ceases to depict a support at the junction point and becomes an applied decoration of the beam itself. This option cannot be automatically considered equivalent to the original theme.
If you want to see more shapes and sizes before making a final choice, it is better to choose decorative polyurethane brackets and compare them at full size on the same node.
How a depth of 61 mm affects the junction with the wall, curtains, and cornices
The frontal template of 250 × 100 mm answers only part of the question.
61 mm of depth is a noticeable protrusion. It creates a shadow, adds lateral volume, and may conflict with adjacent details.
Especially, you need to check:
-
the ceiling cornice, if it passes above the beam;
-
the wall molding or frame nearby;
-
door trim;
-
curtain rod and curtain folds;
-
tall cabinet;
-
wall panel;
-
wall sconce or other light fixture;
-
decorative portal.
Conflict with ceiling cornice
If a large cornice already runs along the perimeter of the room, the end of the false beam often approaches exactly this area. Then KRPU.VRS-013 may become a third relief in one small node: beam, cornice, bracket.
There is no need to automatically try to align all three elements. Sometimes it is better to end the cornice before the beam, sometimes to visually pass it behind the system, sometimes to abandon the bracket altogether.
Conflict with curtains
If the beam reaches the wall near the window area, the 61-millimeter protrusion may end up in the area where the curtain moves. Even if there is no physical contact, a large carved element can visually press on the curtain assembly.
Conflict with wall frame
A bracket 250 mm high may intersect the upper part of a molding frame on the wall. In this case, you need to either adjust the frame or not add KRPU.VRS-013 after the renovation is completed. Gluing it over an existing composition without an overall scheme is risky.
For those assembling a full ceiling system rather than a single local node, a separate catalog is useful for polyurethane ceiling decor: it shows how large elements typically work as part of a whole composition, not as random additions.
One beam and three beams — two different architectural scenarios
On one false beam, a pair of KRPU.VRS-013 works as an accent.
On three beams, six identical brackets already create rhythm. This is a different type of composition and a different level of visual load.
One beam
Here you can afford a larger decorative gesture. The pair makes the beam special and emphasizes its centrality.
This works especially well above:
-
a dining table;
-
a fireplace area;
-
island;
-
passage between two parts of the living room;
-
central axis of the room.
Several parallel beams
Here, repetition is more important than individuality. If each pair is large, the ceiling system begins to look significantly more classic and rich.
Before purchasing six or eight brackets, you need to check:
-
spacing between beams;
-
ceiling height;
-
overall color;
-
presence of other ceiling elements;
-
amount of wall decor.
The general logic of constructing beam systems is separately discussed in the STAVROS material «Декоративные фальшбалки на потолке: деревянный брусок, рейки и лепнина из полиуретана». Для нашей узкой задачи этот материал полезен как более широкий уровень перелинковки, а KRPU.VRS-013 решает уже конкретный вопрос окончания одной балки.
Как свет и тень усиливают глубину 61 мм
Глубину KRPU.VRS-013 легко недооценить, потому что в карточке товара человек прежде всего видит фронтальный резной рисунок. На потолочном узле рельеф находится высоко и часто освещается под острым углом, поэтому 61 мм глубины могут стать заметнее, чем ожидается по каталожному изображению.
Если свет идёт от центральной люстры, тень от кронштейна распределяется относительно мягко. При настенных бра или линейной подсветке вдоль потолка боковой рельеф начинает рисовать более контрастную тень. На повторяющемся ряду из шести или восьми KRPU.VRS-013 это превращается в отдельный визуальный ритм.
Поэтому цветной бумажный шаблон — только первая стадия. Для окончательной оценки полезно смоделировать хотя бы приблизительный вынос 61 мм. Достаточно лёгкого пенокартона или коробчатой заготовки, которую можно временно поставить под балкой без риска для стены.
Проверять нужно минимум в трёх световых режимах: дневной свет, основное вечернее освещение и декоративная подсветка, если она есть. Один и тот же белый кронштейн днём может почти сливаться со стеной, а вечером становиться намного рельефнее из-за длинной тени.
Есть ещё один практический эффект. Если фальшбалка находится рядом с окном, направление естественного света меняется в течение дня. Левый кронштейн утром и правый вечером могут выглядеть разными по контрасту, хотя физически они одинаковы. Это нормально, но для симметричной композиции полезно заранее увидеть, насколько сильно свет меняет пару.
Особенно осторожно стоит обращаться с контрастной окраской. Тёмный KRPU.VRS-013 на светлой стене уже выделен цветом, а глубина 61 мм добавляет к этому вторую границу — тень. На одной центральной балке такой эффект может быть выразительным. На четырёх балках восемь контрастных кронштейнов способны превратить потолок в доминирующую графическую систему.
Если потолочная композиция строится целиком, а не вокруг одной балки, полезно посмотреть более широкий материал STAVROS about false beams in the interior and their proportions. It helps to first evaluate the beam system itself, and only then decide how many additional carved accents it really needs.
How color changes the scale of KRPU.VRS-013
The same bracket 250 × 100 × 61 mm can look either very large or relatively calm — depending on the color.
Matching the wall color
If KRPU.VRS-013 is mounted on the wall and painted together with it, its volume is read through the shadow, not through the color boundary. This is one of the calmest options.
Suitable if:
-
the beam should remain the main element;
-
the bracket is needed as an architectural shadow;
-
there is already stucco of the same color on the walls.
In the color of the false beam
This way the bracket visually attaches to the beam. If the beam is white — the scheme turns out to be solid and classic. If the beam imitates wood, it should be remembered that polyurethane itself does not acquire a natural wood texture just from brown paint.
For a real visible wood texture, there is a separate wooden version of KR.VRS-013. It is useful to compare it with the polyurethane one through an official breakdown of the two materials.
In the color of the ceiling
This option can visually connect the bracket to the ceiling system, but on the wall it will be noticeable as a color spot. Its appropriateness depends on the contrast between the wall and the ceiling.
Contrast color
The contrast turns KRPU.VRS-013 into an independent dominant. On a single beam, such a move can still be used as an accent. On three beams, six contrasting brackets become a very active grid.
If 4–8 elements are planned, it is better to first model the contrast in a visualization or with paper color templates.
How ceiling height changes the perception of a 250 mm bracket
The size of KRPU.VRS-013 does not change, but the distance from the eyes to the ceiling changes its visual weight. The lower the ceiling, the closer the carved element is to a person and the stronger its height, depth, and shadow are perceived. On a high ceiling, the same 250 mm occupies a smaller share of the total vertical field of the wall.
To see this difference without an invented "standard", you can simply compare the share of the bracket height relative to the room height:
| Room height | 250 mm as a share of height | Practical meaning |
| 2.7 m | about 9.3% | the bracket noticeably extends into the upper part of the wall |
| 3.0 m | about 8.3% | the scale remains large, but there is more air |
| 3.5 m | about 7.1% | the bracket is perceived more calmly relative to the entire wall |
| 4.0 m | 6,25% | 250 mm becomes a smaller part of the overall vertical field |
These percentages are not a design standard and do not provide an automatic answer of "possible/impossible." They are needed only for comparing the same product in different rooms.
For example, in a room with a height of 2.7 m, a pair of brackets under each of the four beams creates eight decorative verticals at a level of less than three meters from the floor. They will be clearly visible and can noticeably lower the visual center of the ceiling. In a hall with a height of 4 m, the same eight elements are farther from the eye and occupy a smaller share of the wall.
Hence the practical action: templates need to be placed at the actual height, not examined on a table or on a screen. A full-size silhouette of KRPU.VRS-013, taped to the wall under the beam with painter's tape, gives more information in a few minutes than an abstract discussion of "is 250 mm large."
Viewing distance is also important. In a narrow corridor or a small kitchen, a person is almost always close to the walls, so 61 mm of depth reads sharply. In a spacious living room, the main viewpoint may be five to six meters from the bracket, and the same relief becomes part of the overall architecture rather than a separate object.
That is why for a large room with several false beams, it is useful to first assess not only the pair on the nearest wall, but the entire ceiling from a distant point. If the brackets merge into a neat repetition, the system works. If each of them visually "screams" separately, it is better to reduce the quantity, scale, or contrast.
When the ceiling is already saturated with cornices, rosettes, and other elements, you can additionally choose polyurethane ceiling decor and compare the overall decorative density before adding another repeating group of 4–8 brackets.
When two KRPU.VRS-013 look natural
A pair usually works well under a combination of conditions.
-
The false beam itself is expressive enough. The brackets do not look like huge details under a thin random slat.
-
Both junctions are visible. A person reads the symmetry rather than seeing one element and not understanding what is happening at the other end.
-
The walls nearby are free. The bracket does not have to compete with a casing, curtains, sconce, or frame.
-
The interior allows for a carved motif. In classic, neoclassical, or eclectic styles, this is more natural than in strict minimalism.
-
The ceiling height allows for a large vertical accent. 250 mm should not create the feeling that the ceiling has visually lowered.
-
The repetition on adjacent beams does not become excessive. For multiple beams, the entire system is already checked.
In such a scenario, the pair truly creates a sense of "support" and completes the node.
After a full-size fitting, you can add two decorative brackets KRPU.VRS-013 to one false beam to the order.
When a clean abutment is better than a pair of brackets
There are many cases where the best commercial advice is not to buy KRPU.VRS-013.
The beam is too thin
If a large 250-millimeter console makes the false beam visually random and weak, there is no need to try to "pull up" its scale with even more decor.
The ceiling is low
The bracket lowers the decorative motif by 250 mm along the wall. With a low ceiling, this vertical accent can intensify the feeling of pressure from above.
There are many beams
If there are five to seven beams in a room, doubling each pair turns into 10–14 large elements. Even if the budget allows such a purchase, the system may be visually overloaded.
There is already a lot of stucco on the walls
Cornices, frames, pilasters, portals, and carved overlays already form the architecture. A bracket on each beam may become an unnecessary repetition.
The beam is modern
A smooth rectangular false beam with hidden lighting or minimalist finishing often looks better without a carved classic bracket.
The junction is executed perfectly
If the end of the beam neatly enters the wall, there is no gap, no technological defect, and the composition itself is complete, a decorative bracket does not have to appear just for 'masking'.
In such cases, it is more useful to open the entire section and to choose decorative polyurethane brackets of a smaller scale or leave the node clean.
Do you need to install a pair on every beam or can you alternate?
For multiple beams, a separate question arises: is it mandatory to repeat KRPU.VRS-013 on each one.
No, but any incomplete scheme must have an explanation.
All beams are identical — all pairs are identical
This is the most predictable option. It creates a regular rhythm.
Advantage — order. Disadvantage — maximum decorative density and cost.
Only the central beam
Works if the central beam is truly architecturally highlighted. For example, it is wider, runs along the axis of a chandelier or fireplace.
Only the two outer beams
Can create a frame for the ceiling zone if the middle beams serve as a background. But such a scenario needs to be seen on a plan or in a visualization; without an overall composition, it may seem random.
Alternating every other one
For identical parallel beams, this approach is risky. It is rarely read as a classic order and is more often perceived as incomplete installation.
The main principle: do not choose an incomplete quantity just because of budget. If you want to reduce the cost, it is better to compare a more compact bracket or abandon pairs on all beams than to create a random rhythm.
Why for three or four beams it is better to buy in stages rather than the entire set at once
If there is one false beam in the room, the decision is binary: 0 or 2 KRPU.VRS-013. With three or four beams, the mistake becomes significantly more expensive. Six elements cost 59,100 ₽, eight — 78,800 ₽. The main risk is not related to the quality of the bracket itself, but to the fact that the repeating rhythm may turn out to be too saturated already after installation.
Therefore, for a large system, a phased commercial scenario is reasonable.
First, the entire ceiling is modeled with paper templates. If the idea looks convincing, you can order one pair and do a real fitting on one beam. The physical bracket will show what paper does not: the depth of the relief, the real shadow, the quality of the joint with the wall, the color after a test painting, and the perception from below.
Only after this is the decision made
Installation on an already finished wall: what to check before the glue
The scenario assumes that the false beam is already in place, and the walls and ceiling are finished. This means the work is done on top of the completed renovation.
Substrate
You need to determine:
-
paint;
-
decorative plaster;
-
wallpaper;
-
MDF panel;
-
wood;
-
Other coating.
The adhesive is selected for polyurethane and the specific substrate. It cannot be assumed that the strength of any finish layer is automatically sufficient.
The paint must hold better than the bracket
If the paint layer peels off, the mounting compound will glue KRPU.VRS-013 not to the wall, but to weak paint. Then the decor will come off together with the coating.
The pair is marked out from a single coordinate system
For symmetrical brackets, you cannot mark the left one "from the nearest corner" and the right one "from the door edge." Both positions must be tied to the axis of the same beam and identical offsets.
Dry fitting is mandatory
Before applying the adhesive, both elements are placed simultaneously. Check the top, bottom, axis, distance to the beam, and neighboring parts.
On a finished renovation, it is useful to do the marking in two passes. First, use a laser or a long level to mark the axis of the false beam itself and transfer it to both walls. Then, from this axis, build the position of the brackets. This order reduces the risk that the left and right parts end up formally "centered on their walls" but not centered on the same beam.
After that, use painter's tape to mark the outer contour of 250 × 100 mm. The tape shows not the relief, but the critical boundaries: how close the product will come to the trim, cornice, curtains, or molding frame. If it is already visible on the contour that there is little space, the physical fitting should be stopped and the composition resolved first.
If the wall has been painted recently, you cannot rely only on the surface looking strong. A local adhesion test and checking the recommendations of the mounting compound are more important than trying to compensate for a weak substrate with a large amount of adhesive. A thick adhesive layer should also not be used to correct noticeable wall curvature: first level the mounting area, then install the decor.
The sequence of installing the pair also matters. It is better not to glue the first bracket permanently and then "adjust" the second one based on the actual result. The position of both elements must be fixed by marking before applying the compound. Then the pair remains geometrically linked to the beam, not to the result of the first installation.
After fixing, check the view from below and from the main viewpoint before final joint finishing. If the decorative element can still be adjusted within the adhesive technology, it is at this stage that a slight misalignment is detected, which is especially noticeable next to the straight line of the beam.
Final painting
If KRPU.VRS-013 is painted after installation, you need to decide where the color boundary runs and how to protect the finished beam/wall. If the bracket is painted in advance, you need to plan for neat treatment of the mounting joints after gluing.
For those who want to assemble not only brackets but also related ceiling decor, it makes sense to view the entire catalog of polyurethane moldings and check which elements are already repeated in the room.
Mistakes that make the pair look worse than a clean abutment
Mistake 1. Considering 250 mm as "small decor"
Reason: on the product card, the item is shown separately and without the real scale of the wall.
Consequence: after installation, the bracket unexpectedly extends far down and draws attention away from the beam.
Check: a 250 × 100 mm template at 1:1 scale.
How to avoid: look at the pair at once and from a distance.
Mistake 2. Buying two elements without checking the 61 mm depth
Reason: the frontal image seems sufficient.
Consequence: the bracket conflicts with the cornice, curtains, or wall frame.
Check: a volumetric mockup or physical sample.
How to avoid: check the side view.
Mistake 3. Using KRPU.VRS-013 as a real support
Reason: the product's shape looks structural.
Consequence: decorative material is attempted to be included in the load-bearing scheme without confirmed calculation.
Check: separately fix the method of attaching the false beam.
How to avoid: the beam is attached independently, the bracket only decorates.
Mistake 4. Check only one end
Reason: one template is easier to apply.
Consequence: after a pair appears, the interior becomes much heavier.
Check: two identical templates at the same time.
How to avoid: make a decision only based on a pair.
Mistake 5. Multiply the pair across all beams without a common layout
Reason: if it looks good on one, it seems it will be three times better on three.
Consequence: six to eight large elements form too frequent an architectural grid.
Check: templates on at least two adjacent beams or a visualization of the entire ceiling.
How to avoid: evaluate the system, not a single node.
Mistake 6. Choosing a color based only on a small sample
Reason: on the table, the shade seems calm.
Consequence: repeated brackets under the ceiling become much more contrasting.
Check: a color template at the actual height.
How to avoid: evaluate in daylight and evening lighting.
What to buy if KRPU.VRS-013 turned out to be too large
Rejecting a specific model does not mean rejecting the idea of a decorative support.
The first logical step is to buy decorative polyurethane brackets a different scale: shorter in height, narrower, or with a smaller offset.
The second is to move from a carved console to a calmer stucco detail. In the general catalog, you can choose polyurethane molded decor to match the existing style of the room.
The third is to not install a separate bracket at all, but to solve the joint with a line of molding, cornice, or another ceiling element. In this case, the task changes: instead of imitating a support, a decorative border is created.
The fourth is if the false beam is wooden and real visible wood is needed, compare the polyurethane version with the wooden KR.VRS-013 via the official STAVROS comparison. Wood and polyurethane cannot be considered fully interchangeable just because of identical nominal dimensions.
If real wood texture is needed, the polyurethane bracket does not have to imitate it
KRPU.VRS-013 is especially logical in a stucco decor system for painting: a white wall, painted ceiling, neoclassical beam, moldings, and cornice can be united by one color. In such a composition, polyurethane works as architectural relief, not as an attempt to show wood.
But the false beam is often made to look like oak, beech, or another visible wood texture. Then there is a desire to paint the polyurethane bracket "to look like wood" and consider it a continuation of the beam. Sometimes decorative imitation suits the project, but it does not turn polyurethane into natural wood.
If real wood texture is critical, the VRS-013 line has a wooden version KR.VRS-013. It can be viewed separately as wooden bracket KR.VRS-013. You should choose between it and KRPU.VRS-013 not by the principle of "what is more expensive," but by the role of the material in the interior.
The polyurethane version is stronger where the bracket should blend with the wall or ceiling molding under a common enamel. The wooden one is where the grain pattern and joinery character are part of the design. At the same time, neither the matching dimensions nor the material itself give the right to consider a decorative bracket as a calculated load-bearing support.
Such a comparison is especially useful before a mass order for several beams. Six polyurethane brackets painted in the wall color and six wooden consoles matching the beam tone will give two completely different ceilings with the same geometric layout.
How to make a decision in ten steps
Before ordering a pair, you can go through a simple algorithm.
-
Make sure the false beam is secured independently. Decorative brackets are not included in the load-bearing scheme.
-
Measure the visible height and width of the beam.
-
Mark the free wall area under each end.
-
Make two templates of 250 × 100 mm.
-
Add an approximate overhang of 61 mm on at least one layout.
-
Place two templates on one beam simultaneously.
-
View from the entrance, center of the room, and main living area.
-
If there are multiple beams, model at least two adjacent pairs.
-
Compare the option with brackets versus a clean abutment.
-
Only after this, finalize the quantity.
If the pair truly enhances the architecture rather than weighing it down, you can order KRPU.VRS-013 250 × 100 × 61 mm in the required quantity.
Decision matrix: 0, 2, 4, 6, or 8 brackets
| Situation | Solution |
| One central false beam, high ceiling, classical composition | check a pair of 2 KRPU.VRS-013 |
| One thin modern beam | first, a version without brackets or a more compact model |
| Two identical beams and free walls | compare 4 brackets with clean junctions |
| Three beams with a large spacing and high ceilings | 6 elements are possible after the overall layout |
| Three closely spaced beams | high risk of overload, do not buy 6 automatically |
| There is already a lot of molding on the walls | more likely clean abutments or a smaller bracket |
| Only the central beam is architecturally highlighted | only one pair is allowed on it |
| A false beam requires structural support | KRPU.VRS-013 does not replace a load-bearing node |
If a wider range is needed before the final decision, catalog of polyurethane ceiling decor allows comparing not only the pattern, but also the actual scale of the future pair.
Result: two KRPU.VRS-013 are not needed for every false beam
For one ceiling false beam that ends against two walls, symmetrical design indeed requires 2 carved decorative brackets KRPU.VRS-013.
Price of a pair:
2 × 9 850 = 19 700 ₽.
For three identical beams:
3 × 2 = 6 brackets,
6 × 9 850 = 59 100 ₽.
But the arithmetic here is the simplest step. The real solution is determined by scale.
KRPU.VRS-013 has a height of 250 mm, a width of 100 mm, and a depth of 61 mm. It is a large architectural element that noticeably changes the beam-to-wall junction. On one massive false beam, a pair can look convincing. On three thin beams, the same six elements can become heavier than the ceiling system itself.
Therefore, buying two brackets for each end "by default" is not necessary.
First, make sure the beam holds without a decorative console. Then place two full-size templates on one beam, evaluate them from several points, check the 61 mm projection and adjacent elements. If there are several beams, model the entire repeating rhythm.
If after this the pair makes the junction architecturally more convincing, buying KRPU.VRS-013 to finish the false beam junction is a logical next step.
If, however, the ceiling looks cleaner without brackets, that is a fully valid design solution. There is no need to spend 19,700 ₽ on one beam or 59,100 ₽ on three just for the feeling that every junction must be filled with molding.
For further selection, you can go to the general section of polyurethane moldings or view separately Polyurethane ceiling decoration — but only after the role of the node itself is clear: whether imitation of a decorative support is needed, a calmer border, or pure geometry altogether.
FAQ
Can KRPU.VRS-013 be installed only on one end of a false beam?
Yes, if the other end is indeed arranged differently: hidden by a portal, column, built-in furniture, or integrated into another architectural node. On a regular symmetrical beam, a single bracket often looks like a lost half of a pair.
Is it necessary to leave a gap between the top of the bracket and the beam?
This depends on the chosen mounting composition and the geometry of the back surface. The card does not specify a universal decorative gap. It cannot be invented in advance: the position is verified by physical fitting on the specific node.
Can KRPU.VRS-013 be installed after the renovation is fully completed?
Yes, the scenario does allow for mounting a decorative polyurethane element on a finished wall, provided the base is solid and compatible with the chosen fastening system. On weak paint or peeling finish, the base must first be restored.
Will KRPU.VRS-013 fit a wooden false beam?
Compositionally, it may fit, but polyurethane and real wood give different textures. If visible wood is required, it is worth comparing KRPU.VRS-013 with the wooden KR.VRS-013. If everything is painted with an opaque enamel, the difference in materials is perceived differently.
Can two brackets be used as supports for a heavy beam?
There is no reason to consider KRPU.VRS-013 a load-bearing structural support. The beam must have its own fastening, designed for its material and mass.
What to do if 250 mm in height is too much?
Compare other models in the polyurethane brackets section or leave a clean abutment. Reducing KRPU.VRS-013 itself by arbitrary trimming is not allowed without a separate understanding of the product's pattern and construction.
Is it worth taking six KRPU.VRS-013 at once for three beams?
Only after a general layout. Six elements create a new repeating architectural rhythm, so the decision for one pair cannot be automatically multiplied by three.
Do all brackets need to be painted the same?
If they form a regular row under identical beams, a uniform finish usually supports the system. Different colors are possible only as a separate design concept; random differences destroy the rhythm.
Can KRPU.VRS-013 be installed next to a ceiling cornice?
Yes, if the two elements do not conflict in relief and do not create a cramped junction. With a large cornice, a full-size fitting is mandatory: the 61 mm depth and 250 mm height make the bracket a noticeable neighbor.
What is better for a modern interior: KRPU.VRS-013 or a clean beam?
If the interior is built on smooth surfaces, hidden lighting, and minimal ornamentation, a clean junction often looks more consistent. KRPU.VRS-013 has a pronounced carved character and is more logical where architectural decor is already supported by other elements.