Article Contents:
- Short answer: DD-009 is designed within the field, not stretched to full height
- Confirmed specifications of DD-009
- What the buyer receives, and what needs to be designed separately
- Why the height of 460 mm does not describe the entire composition
- How to determine the clear field for the carved module
- Formula for centered layout
- Three placement schemes for DD-009 within a tall vertical
- Centered layout
- Offset to the top panel or cornice
- Offset to the plinth or bottom panel
- Tall cabinet and built-in furniture
- Sideboard and credenza
- Display case and bookcase
- Kitchen cabinet and side panel
- Furniture portal and interior opening
- Wall panel and fireplace surround
- DD-009 and full-size furniture pilaster
- DD-009 and general-purpose overlay ornament
- DD-009 and structural column
- DD-009 and random carved blank
- DD-009 in new furniture
- DD-009 on existing furniture
- Mistake 1. Considering one DD-009 as a ready-made vertical for the full height
- Mistake 2. Buying based on a photo without scale
- Mistake 3. Subtracting 460 mm from the total cabinet height
- Mistake 4. Automatically making the post 65 mm wide
- Mistake 5. Ignoring dimension E = 50 mm
- Mistake 6. Placing paired parts from different baselines
- Mistake 7. Ordering the entire series as one line without a facade list
- Mistake 8. Mixing beech and oak without a finish decision
- Mistake 9. Choosing different preparation levels for one series
- Mistake 10. Painting before dry layout
- Error 11. Treating assembly adhesive as a universal scheme
- Error 12. Trimming a carved module to change height
- Error 13. Using an old product URL
- Error 14. Attributing the frequency of a general query to DD-009
- What size does DD-009 have?
- Is DD-009 a ready-made pilaster for the full height of the cabinet?
- How to calculate the position of DD-009 in the center?
- Can the thread be shifted up or down?
- Why can't the post be automatically made 65 mm wide?
- What does a depth of 50 mm mean?
- Is a 1:1 template needed?
- Will DD-009 be suitable for double doors?
- What wood species is DD-009 made from?
- What to choose: 'Standard' or 'Prestige'?
- Is there a version for enamel?
- Can DD-009 be trimmed in height?
- Is the base or capital included in the set?
- Can I use only mounting glue?
- How to calculate the quantity for a series of cabinets?
- Is a spare needed?
- When to do the finishing?
- Where to see other wooden pilasters?
- Which DD-009 card should be used for the link and order?
- What should I tell the STAVROS manager?
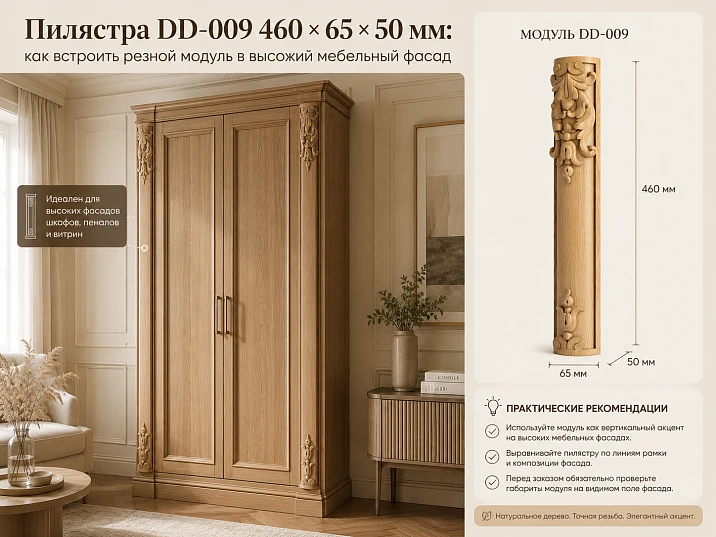
Buy wooden pilaster DD-009 for a cabinet, sideboard, display case, or interior portal only after its exact position within the entire vertical has been determined on the drawing. The size 460 × 65 × 50 mm refers to the carved piece itself, not to the finished post from base to cornice. Therefore, first measure the clean decorative field, then set the carving axis, calculate the upper and lower sections, check the protrusion in front of the facade, and only then specify the quantity, material, and preparation quality. This order is especially important for paired facades and furniture series: identical DD-009 should be at the same height, have consistent finishing, and follow a single design layout.
The main mistake arises from the word "pilaster" itself. The buyer imagines an elongated architectural vertical and expects that one product item will cover the entire height of the cabinet. In reality, DD-009 is better viewed as a fixed carved module 460 mm high. It can become the central part of a taller furniture post, an independent accent on the side panel, an insert between panels, or an element of a portal composition. The remaining sections of the vertical are designed separately; specific extensions, base, capital, or smooth backing are not included automatically just because they are needed in one of the projects.
Before purchasing, it is useful to open the category of wooden pilasters and make sure that the project needs exactly the compact module DD-009, and not a taller ready-made vertical of another article. The article helps not to choose a "beautiful pilaster from a photo," but to prepare a working specification: field dimensions, axis position, base material, facade orientation, future finishing, the number of repeating parts, and a verification layout at a 1:1 scale.
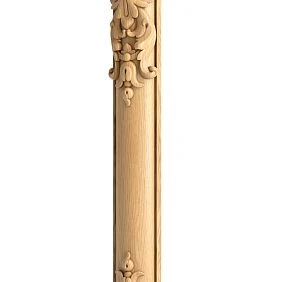
Short answer: DD-009 is designed within the field, not stretched to the full height.
DD-009 has fixed dimensions of 460 × 65 × 50 mm. If the decorative field is higher than 460 mm, the free space does not disappear and is not filled automatically. The designer must decide where the carved module is located: in the center, closer to the top panel, or closer to the plinth. Then the upper and lower fields are fixed separately. For one facade, one agreed layout is sufficient, but for a series of cabinets, a single template with the same baseline is required.
- First measure the clear height between the already defined horizontal boundaries.
- Then apply the central axis of DD-009 and check the contour at full scale.
- After that calculate the free areas and check the proximity to handles, hinges, cornice, and plinth.
- In the order indicate the material, level of preparation, quantity, base finish, and drawing version number.
- Before installation the entire batch is laid out by facades and checked against the list.
A universal height from the floor or from the door edge cannot be assigned: DD-009 is used in different furniture systems. The correct coordinate appears only within a specific drawing.




Confirmed characteristics of DD-009
| Parameter | Confirmed value | What this means for the project |
|---|---|---|
| Article number | DD-009 | In the specification, the exact designation must be preserved without abbreviations. |
| Type | Wooden pilaster, carved decorative element | Not a load-bearing post and not a ready-made vertical for the full height of the furniture. |
| A | 460 мм | Fixed height of the carved module. |
| B | 65 мм | The width of the part itself, but not necessarily the entire background post. |
| E | 50 мм | The depth dimension, purpose, and direction of which are checked against the current drawing. |
| Material | Beech or oak | The wood species is chosen together with the finishing system and adjacent wooden parts. |
| Preparation | "Standard" or "Prestige" | The level of preparation must match the finishing method and production requirements. |
| Re-gluing | Enamel finish option | The choice is confirmed in the card when specifying a particular item. |
| Manufacturing | Custom Order | Current terms and deadlines are checked before payment. |
| Main card | view DD-009 measuring 460 × 65 × 50 mm | The main URL from the carved decor section is used. |
The table provides a starting point but does not replace the DWG. Letters A, B, and E describe dimensions according to the manufacturer's scheme; the designer should not guess the direction of the dimension arrow based only on the column name. The 50 mm depth is checked especially carefully: for the facade, it is important to understand the actual projection, rear contour, and contact area with the base.
Our factory also produces:
What the buyer receives, and what needs to be designed separately
| Purchased in the DD-009 card | Not included automatically | Why this is important |
|---|---|---|
| One carved element DD-009 | Vertical across the full height of the cabinet | Product height is 460 mm. |
| Part with a width of 65 mm | Background stand of the same width | The backing may be wider due to the frame and side margins. |
| Part with a depth dimension of 50 mm | Guaranteed clearance to doors and handles | Collisions are checked on specific furniture. |
| Beech or oak | Unified finish for the entire composition | Color, tint, and finish are agreed upon separately. |
| "Standard" or "Prestige" | Automatic finish painting | Level of preparation and finished coating are different solutions. |
| One trade item | Base, capital, cornice, and extensions | Associated elements are selected only according to the project. |
| Custom-made product | Installation diagram and fasteners | Base, adhesive, and additional fixation are agreed upon separately. |
This separation protects against two opposite mistakes. The first is expecting a fully assembled pilaster from one DD-009. The second is adding a random base, capital, and molding to it in advance just because these elements appear in classical architecture. The set is formed according to the furniture drawing, not according to a general idea of style.
Get Consultation
Why a height of 460 mm does not describe the entire composition
The same DD-009 can be used in a field with a height of 700, 1000, 1300, 1600, or 1800 mm. The thread itself does not change size, but its position is perceived differently. In a short section, it almost fills the vertical. In a tall one, it becomes an accent within a calm background field. Therefore, the phrase "pilaster DD-009 with a height of 460 mm" only answers the question about the product, but not about the finished facade.
The design height is measured not by the overall height of the cabinet body, but between the actual boundaries of the decorative zone. At the bottom of the cabinet there may be a plinth, at the top a cornice, and inside a horizontal crossbar or panel. If you simply subtract 460 mm from the cabinet height, you get incorrect fields. First, all zones that do not belong to the working vertical are excluded from the drawing.
How to determine the clear field for the carved module
It is convenient to call the clear field the area within which DD-009 can actually move up or down. Its upper and lower boundaries must be set by the design, not chosen after purchasing the decor. For a furniture side panel, these can be the edge of the plinth and the bottom of the cornice; for a door, the boundaries of the panel; for a portal, the top of the base and the bottom line of the capital or frieze.
- Record the full height of the furniture section according to the approved drawing.
- Mark the plinth, cornice, horizontal rails, panels, and technical gaps.
- Exclude areas where the carving should not extend.
- Obtain the height of the clear field H.
- Place the outline of DD-009 with a height of 460 mm within this field.
- Check the top and bottom clear fields, as well as the axis along the width.
- Repeat the same coordinate system on all identical facades.
If the furniture has not yet been manufactured, the field is set in the project. If decor is added to a finished cabinet, measurements are taken from the actual part, at several points. Unevenness of the cornice, differences in the height of adjacent sections, or deviation of the assembled body may be unnoticeable in a general photo, but become obvious when installing identical carved elements.
Centered layout formula
For a symmetrical position, three values are used: H — the height of the clear field, 460 mm — the height of DD-009, T and B — the top and bottom fields. When centering, T = B = (H − 460) / 2. The formula is simple, but it can only be applied after correctly determining H.
| Clear field height H | Remainder after placing 460 mm | Top field when centered | Bottom field when centered |
|---|---|---|---|
| 700 мм | 240 мм | 120 мм | 120 мм |
| 1000 мм | 540 мм | 270 мм | 270 мм |
| 1300 мм | 840 мм | 420 мм | 420 мм |
| 1600 мм | 1140 мм | 570 мм | 570 мм |
| 1800 мм | 1340 мм | 670 мм | 670 мм |
These numbers are geometric examples, not STAVROS recommended facade sizes. They show how different the context of a single part can be. With a field of 700 mm, the carving takes up most of the vertical; with a field of 1800 mm, large calm areas form around it. Therefore, before ordering, it is useful to print the outline and evaluate it not only with a ruler, but also from the distance from which the furniture will be viewed in the room.
Three layout schemes for DD-009 within a tall vertical
Centered layout
Centering is suitable when the facade or side stile is built symmetrically and there is no strong top or bottom accent. The top and bottom margins are equal, and the carved module is perceived as an independent center of the vertical. This scheme is convenient for paired cabinets, library sections, and display cases: one coordinate can be easily repeated across multiple bodies.
Symmetry does not mean that DD-009 is automatically centered relative to the entire door. The center is taken relative to the clear field. If there is a high plinth at the bottom and a massive cornice at the top, the geometric center of the body and the center of the visible decorative zone may not coincide.
Offset toward the upper panel or cornice
Upper placement is used when the composition should support the cornice, upper panel, or pediment. The carving visually connects with the upper part of the furniture, and the lower smooth area becomes longer. The coordinate is set by the distance from the upper boundary of the clear field to the top point of DD-009. This value is recorded in the specification, otherwise installers may interpret the phrase "slightly above center" differently.
Before approval, it is checked whether the upper relief is too close to the cornice. A meaningful field should remain between the contours, otherwise the details visually merge, and it becomes harder to work with the junction during finishing and installation.
Offset toward the plinth or lower panel
Lower placement may be appropriate when the vertical should start from the base or support the lower panel. In this case, the distance from the lower boundary of the clear field to the bottom point of the carved module is recorded. This scheme requires checking handles, drawers, and the opening of adjacent facades: the lower part of the furniture more often interacts with hardware and touch zones.
None of the three schemes is universally correct. The decision is made by the project, not the product card. The main thing is to turn the chosen position into a measurable coordinate and repeat it identically across all elements of the series.
Why a width of 65 mm is not equal to the width of the entire furniture stile
Parameter B = 65 mm describes the width of DD-009, but the background vertical may be noticeably wider. Additional space is required for side margins, frame profile, moldings, technological gaps, and calm background around the carving. If the stile is made exactly 65 mm, the part contour may end up flush with the edges or visually compressed.
To check the width, the axis of DD-009 and the outer contour points are marked on the template. Then the template is applied to the actual stile. The free margins on the left and right are measured. They can be equal for a symmetrical composition or different if the module is linked to an adjacent panel. In any case, the margins are recorded numerically, not assessed with words like "approximately centered."
| Situation | What to check by width | Risk of calculating only by 65 mm |
|---|---|---|
| Narrow furniture stile | Actual contour and side margins | The carving comes too close to the edges. |
| Stile with moldings | Distance to the inner profile | The relief conflicts with the frame. |
| Double doors | Gap between leaves and mirror symmetry of axes | Elements visually diverge. |
| Cabinet side panel | Offset from front edge and wall | Part extends into passage or is hidden. |
| Portal vertical | Connection with base, capital, and opening | Thread axis does not match architectural axis. |
Depth 50 mm: a dimension that cannot be left for later
Parameter E = 50 mm requires verification against the current drawing. It affects not only the visual expressiveness of the relief but also compatibility with furniture. A long handle, adjacent door, drawer, or passage near the cabinet may intersect with the protruding part. Therefore, a 1:1 template is needed in two projections: frontal and side.
The side diagram shows the facade, substrate, DD-009, and adjacent elements. It checks the full external dimension, door opening, distance to the handle, and possibility of relief maintenance. It cannot be automatically assumed that all 50 mm protrude forward from the face plane: the dimension arrow assignment is confirmed by DWG. But ignoring this parameter is also not allowed — collisions often occur precisely in depth, which are not visible on the facade sketch.
Template DD-009 at 1:1 scale
Before starting furniture production, it is worth checking the DD-009 layout on the furniture facade using a full-size template. It does not have to reproduce every carving line; for the first stage, an accurate outer contour, axes, and key protruding points are sufficient. For final approval, the actual product drawing is used.
- Download or request the current DD-009 drawing.
- Check the print scale with a control ruler.
- Transfer the outer contour of 460 × 65 mm onto paper or cardboard.
- Mark the central vertical axis and the top/bottom boundaries.
- Prepare a side view with dimension E = 50 mm.
- Apply the template to the facade, post, or furniture mockup.
- Apply cornice, plinth, panels, handles, hinges, and opening direction.
- Photograph the approved layout and attach it to the schedule.
In a serial project, the template becomes a control document. A version number and date are placed on it. If the height of the facade or cornice has changed, the old template cannot be used silently: coordinates are recalculated, and the change is recorded in the specification.
DD-009 on paired facades
Paired doors require not just the same number of parts, but a unified coordinate system. The left and right DD-009 must be at the same height relative to a common baseline. The top of the clear field, the bottom of the clear field, or another stable reference point is chosen as the base. One part cannot be measured from the cornice and the other from the floor: small differences in the body will turn into a noticeable visual misalignment.
- same height of the top point of the carving;
- same height of the bottom point;
- equal indents from the inner or outer edges;
- matching material and preparation level;
- consistent direction of the visible wood grain;
- same finish and degree of gloss;
- checking the gap between opening leaves.
If the composition is not mirrored but repeating, this also needs to be indicated. The terms "left" and "right" cannot be invented for DD-009 without confirmation by the card; in the list, it is better to write the position of a specific part on the facade and attach a diagram.
List for a series of cabinets, display cases, or bookcases
The entry "DD-009 — 12 pieces" tells the purchasing department the quantity but does not explain where each part will go. For a series, a facade list is needed. It links the article number to the body, side, field height, installation coordinate, material, and finish. This ensures that identical parts are not randomly distributed among sections of different heights.
| Body | Position | Clear field height | Layout | Material | Preparation | Quantity |
|---|---|---|---|---|---|---|
| Cabinet No. 1 | Left post | 1300 мм | Centered: 420/420 mm | Oak | Prestige | 1 |
| Cabinet No. 1 | Right post | 1300 мм | Centered: 420/420 mm | Oak | Prestige | 1 |
| Display case No. 2 | Left vertical | 1050 мм | Top coordinate per drawing | Oak | Prestige | 1 |
| Display case No. 2 | Right vertical | 1050 мм | Same coordinate | Oak | Prestige | 1 |
| Sideboard No. 3 | Central pole | 900 мм | Axis per template B-03 | Beech | Standard | 1 |
Rows in the table are an example of structure, not a ready-made order. In a real project, finish code, drawing number, batch, room side, and acceptance mark are added. It is important that the designer, engineer, purchaser, and installer work with the same version of the list.
Where DD-009 is revealed as a carved module
Tall cabinet and built-in furniture
On a tall cabinet, DD-009 helps create an expressive vertical without needing to fill the entire height with carving. Calm top and bottom margins give the ornament space, and repetition on adjacent sections ties the cabinets into a single composition. Before ordering, not only the front view is checked, but also door opening, handle position, and hinge access.
Sideboard and credenza
For a sideboard, the height of the decorative field is often limited by the countertop, cornice, and display section. DD-009 can be linked to the door axis or central section. A mistake is centering the module by the overall furniture height, ignoring the division between the lower body and upper display. The working area is defined within the part to which the carving actually belongs.
Display case and library
In the series of display cases, the difference in heights is especially noticeable. One section may be higher due to the plinth, another may be narrower due to the corner module. The unified visual level of DD-009 is sometimes more important than the geometric center of each individual stand. This decision is made based on the overall expanded facade and is fixed with a common horizontal axis.
Kitchen tall cabinet and side panel
In the kitchen, you additionally need to account for the countertop, upper cabinets, appliances, walkways, and intensive door usage. A protruding carved element should not intersect with the handle of an adjacent tall cabinet or interfere with opening the refrigerator. The material and finish are chosen together with the facades so that the pilaster does not look like a random insert.
Furniture portal and interior opening
In a portal composition, DD-009 can become part of the vertical, but it does not replace the complete solution entirely. For a broader design context, it is useful to look at wooden pilasters and capitals for the portal и ready-made solutions for portals. The new specification should explain where the base ends, where the cornice begins, and what part between them is occupied by the module with a height of 460 mm.
Wall panel and fireplace surround
On a fixed panel, there is less risk of collision with hinges, but questions of scale, base, and finish remain. For the fireplace surround, design conditions and distances to heat sources are additionally assessed; the DD-009 card does not confirm universal suitability for any heating zone. Use is permitted only within the scope of the approved interior design project.
Beech or oak: the material is chosen together with the finish
| Parameter | Beech | Oak |
|---|---|---|
| Visual task | Calm base for a solid-color finish | Pronounced natural texture with a transparent or tinting system |
| Typical project route | Opaque enamel, painted furniture, patina on a colored base | Tinting, transparent finish, coordination with oak facades |
| What to check | Compatibility of preparation with enamel and overall color | Selection of texture and uniform grain direction on paired parts |
| Risk of random choice | The texture was expected to remain the main effect | Different parts noticeably differ in natural grain pattern |
| Commercial conclusion | Specify material and finishing system in one order line | Order comparable parts in one coordinated batch |
One cannot claim that beech is always better under enamel, and oak is always used only under transparent coating. This is practical logic of choice, not a prohibition on other systems. The decision depends on the technology of a specific furniture production. What matters is different: material DD-009 is not chosen separately from the facade, cornice, plinth, and adjacent linear parts.
For the oak series, before installation, elements are laid out nearby and the direction of the fibers, tone, and texture activity are assessed. The natural pattern cannot be photographically identical, but it can be distributed so that paired facades are perceived as coherent. For beech under an opaque finish, the main focus is on preparing the relief and compatibility with the primer and enamel.
"Standard" or "Prestige": what exactly the buyer compares
The level of surface preparation should be chosen not on the principle of "more expensive means better for everyone," but according to the finishing route. On the page quality of wooden products and surface preparation you can clarify the logic of the available options. For DD-009, the depth of carving, viewing distance, requirements for manual finishing, and who is responsible for the final finish are important.
- Will the surface be covered with an opaque enamel or will the texture remain visible?
- Who performs the final sanding and removal of marks after the fitting?
- How closely does the user examine the part?
- Should the preparation match the capitals, moldings, and facades?
- Is a trial finish on a sample provided?
- Will the parts be painted before installation or after dry assembly?
The specification cannot simply state "good quality." It must specify "Standard" or "Prestige" according to the selected product item. If production requirements exceed the product card, they are agreed upon separately, without attributing unconfirmed configuration to the product.
Re-gluing under enamel and a unified finishing system
The product data confirms the re-gluing under enamel option. For the buyer, this is a signal: the structural design and future finishing must be linked before ordering. You cannot first order a random version, then change the coating technology and expect the result to remain the same. The material, preparation, and finishing code must pass through the order card, production sheet, and acceptance certificate.
It is useful to do a test paint-out on a comparable wooden surface and evaluate not only the color but also how the coating fills the fine relief. A too-thick layer can reduce the readability of the carving, and insufficient preparation will become more noticeable under side light. The specific technology is chosen by the finishing contractor; the article does not prescribe a universal primer, glue, varnish, or enamel.
What to buy and check together with DD-009
| What to add to the project | Why this is needed | What to pay attention to | Inner page |
|---|---|---|---|
| Category of pilasters and columns | Compare DD-009 with other heights and types of verticals | Do not transfer the general category request entirely to one article | buy wooden pilasters |
| General guide to pilasters | Understand the difference between a compact module and a full vertical | Compare dimensions according to drawings | how to choose a wooden pilaster by size |
| Pilasters and capitals | Assemble a coordinated portal composition | Do not add a capital automatically without a project | How to use pilasters on a furniture facade |
| Materials for installation and finishing | Prepare a compatible mounting and finish system | The base and coating must be known before selecting materials | Materials for installing wooden decor |
| Design project | Check axes, margins, and series repeatability | Transmit the current version of the facade schedule | checking the DD-009 layout on the furniture facade |
| Payment and delivery | Coordinate batch receipt and incoming inspection | Do not fix changing deadlines and costs in the article | Manufacturing and delivery conditions for DD-009 |
The table does not mean that the buyer necessarily needs all listed items. It shows the commercial route: first the product and drawing, then the design bundle, followed by installation and delivery. If there is no confirmed pair for a specific base, capital, or molding in the original scheme, a link and mandatory recommendation are not invented.
How not to confuse DD-009 with similar solutions
DD-009 and full-size furniture pilaster
A full-size vertical can occupy almost the entire field from the base to the cornice. DD-009 has a height of 460 mm and is used as a separate carved module. The error becomes apparent after delivery: the buyer receives a part of expected quality, but significantly shorter than the mental image. Protection is provided by precise dimensions and a template on the facade.
DD-009 and general-purpose overlay ornament
The overlay can be perceived as an independent pattern on a wide panel. The DD-009 card calls it a pilaster and describes it as an element for integration into verticals. The practical boundary is drawn by the project: the axis, elongated character, and connection with the cornice/base are more important than the everyday name "overlay".
DD-009 and structural column
DD-009 is not confirmed as a load-bearing support. It cannot bear the load of a cabinet, portal, or ceiling just because of its vertical shape. The base and frame are designed separately. The decorative part is installed on a prepared field and works visually, not replacing structural calculation.
DD-009 and a random carved blank
A random blank may be similar in style, but it has no fixed article number, drawing, or repeatable specification. For a furniture series, an article-numbered element is more convenient because it can be included in the list, repeated on several facades, and ordered in an agreed material. However, this advantage is realized only if the drawing version is preserved and incoming inspection is performed.
Installation starts with the base, not with choosing the adhesive
In the related category, you can view Materials for installing wooden decor, but the presence of mounting adhesive does not confirm one universal scheme for any furniture. Solid wood, MDF, plywood, painted surfaces, and already finished restoration panels require different checks. Specific materials are selected by a responsible specialist after assessing the substrate and finish.
- material and thickness of the background panel;
- flatness of the rear surface of DD-009 and the substrate;
- actual contact area;
- compatibility with primer, enamel, varnish, or tinting;
- need for temporary fixation while strength is gained;
- possibility of hidden additional fixation, if provided by the project;
- permissibility of dismantling without damaging the facade;
- finishing order: before installation or after dry assembly.
Do not drill or trim the carved element without an approved drawing. Any intervention may alter the outer contour, weaken thin sections, or disrupt the repeatability of the series. If the project requires a non-standard operation, it must be reflected in the working documentation and confirmed before work begins.
Dry layout before finishing and final fixation
Before painting and installation, the entire batch is laid out on the corresponding facades without final fixation. Dimensions, axes, margins, material, texture, and orientation are checked. At this stage, it is easier to swap two oak parts or adjust the list. After applying individual tinting and gluing, such rearrangement becomes expensive or impossible.
- Verify the quantity against the order and the facade list.
- Check the article number and dimensions of one control part.
- Separate beech and oak, "Standard" and "Prestige".
- Lay out the elements by cabinets and sides.
- Align the central axes with the markings.
- Evaluate the fields from above, below, and on the sides.
- Check door opening and adjacent hardware.
- Photograph the approved layout.
- Only after acceptance, start finishing and installation.
How to calculate the quantity of DD-009
The base quantity equals the number of verticals on which DD-009 is actually installed according to the approved project. It is not equal to the number of cabinets: one cabinet can have two side posts, one central vertical, or no such decor at all. For paired doors, each installed piece is counted. For repeating sections, the quantity is obtained from the specification, not from the general interior image.
A universal safety margin percentage cannot be set. The reserve depends on the complexity of the finishing, the possibility of reordering, the number of identical sections, and project requirements. Sometimes a spare part is useful for a large series with individual tinting; sometimes an accurate delivery and a saved specification are sufficient. The decision is recorded as a separate line, not hiding the allowance within an approximate quantity.
| Quantity source | How to count | What to Check |
|---|---|---|
| Paired wardrobe | 2 pieces per pair of verticals, if so approved by the project | Identical coordinates and material |
| Series of five identical display cases | Number of DD-009 positions in one display case × 5 | Check for any differing end modules |
| Sideboard with central accent | Based on the actual number of central posts | Do not confuse with smooth side verticals |
| Portal | According to the drawing of left, right, and additional verticals | DD-009 is not considered a load-bearing column |
| Reserve | Separate design solution | Match of batch, material, and finish |
Order specification that can be passed to the manager
A good request links the product card to specific furniture. It contains no vague phrases like "need a pilaster like in the photo." It specifies the exact article number, dimensions, material, preparation, quantity, purpose, and an attachment with the layout. If the project includes enamel, this is reflected along with the confirmed execution option.
| Specification field | What to record |
|---|---|
| Article number | DD-009 |
| Size | 460 × 65 × 50 mm per the current drawing |
| Quantity | Per the facade list, reserve as a separate line |
| Material | Beech or oak |
| Preparation | "Standard" or "Prestige" |
| Execution for finishing | Confirm the re-lamination option for enamel if needed |
| Base | Solid wood, MDF, plywood, or other actual base material |
| Height of the clear field | Separately for each group of facades |
| Position | Center, top, or bottom coordinate per the drawing |
| Finishing | Color/tint code and responsible executor |
| Drawing | DWG/facade layout version number and date |
| Delivery | Address, acceptance method, and responsible person |
After changing furniture, the specification is updated. It is unacceptable to send the manager an old table and separately report new dimensions in correspondence: production, procurement, and installation may receive different versions.
Incoming inspection of the batch before work begins
Acceptance is not a formality. For a serial project, one incorrectly distributed part can disrupt the rhythm of several facades. The check is carried out before individual finishing to preserve the ability to correctly record discrepancies and redistribute elements.
- verify the number of packages and parts;
- check the DD-009 marking;
- measure the control dimension 460 × 65 × 50 mm using a clear method;
- compare the outer contour with the template;
- separate materials and preparation levels;
- inspect thin thread areas and edges;
- lay out oak across paired facades considering the texture;
- check that the finish has not yet hidden batch differences;
- record the result with photos and a list.
Current prices, availability, and production times are not fixed in a long-lived article. They are checked in the product card and when placing an order. For logistics, a confirmed page with terms is used: Manufacturing and delivery conditions for DD-009.
Handing over the project to the installer
The installer is given not only a box with parts. A facade list, a 1:1 template, a general furniture layout, a baseline, part numbers, and an approved fixing method are needed. On each facade, it is advisable to indicate its code in advance. Then the phrase "place in the center" is replaced with a verifiable coordinate.
For a series, a control facade is useful. On it, a dry fit is performed first and, after approval, installation. The result is compared with the project, checking shadows from side light, handle access, and door opening. Only after this is the operation repeated on the remaining sections. This order reduces the risk of a systematic error when an incorrect coordinate is transferred to all furniture at once.
Who is responsible for what in the DD-009 project
| Participant | Area of responsibility | What is passed on further | |||||||||||||||||||||||||||||||||||||||||||||||||||||||||||||||||||
|---|---|---|---|---|---|---|---|---|---|---|---|---|---|---|---|---|---|---|---|---|---|---|---|---|---|---|---|---|---|---|---|---|---|---|---|---|---|---|---|---|---|---|---|---|---|---|---|---|---|---|---|---|---|---|---|---|---|---|---|---|---|---|---|---|---|---|---|---|---|
| Designer | Composition, axes, visual rhythm, material and finish | Approved layout and visual logic | |||||||||||||||||||||||||||||||||||||||||||||||||||||||||||||||||||
| Furniture designer | Clear field, collisions, base, opening | Working drawing and installation coordinates | |||||||||||||||||||||||||||||||||||||||||||||||||||||||||||||||||||
| Specifier/purchaser | Item number, quantity, batch, order conditions | Confirmed specification | |||||||||||||||||||||||||||||||||||||||||||||||||||||||||||||||||||
FinishSame thread level on sections of different heightsIn a library or built-in furniture, adjacent carcasses may have different plinths, cornices, and clear-field heights. If each DD-009 is centered separately, the top and bottom points of the carving will end up at different levels. Sometimes this is correct if the sections are independent. But in a long frontal composition, a single horizontal rhythm is more often needed: the central axes or top points of all modules are aligned to one mark. For such a scheme, a common baseline of the room or furniture is chosen. For example, the height of the DD-009 axis is set relative to the finished floor, the lower line of the common cornice, or a design mark on the elevation. Then the individual top and bottom margins are calculated for each carcass. The margins will differ, but the carving forms a single horizontal line. This solution is especially useful for display cases separated by wall piers and for cabinets standing on different plinths. A column for the “common axis mark” is added to the schedule. The installer receives not several independent “centered” instructions, but one verifiable line. Before approval, it is necessary to make sure that in no section does DD-009 extend beyond the boundaries of the clear field. New furniture and an existing cabinet require different preparationDD-009 in new furnitureWhen the cabinet is still being designed, the field dimensions can be adapted to the module. The designer sets the width of the stile, the position of the panels, handles, and hinges, as well as the mounting base in advance. This does not mean that the furniture is adjusted to any decorative whim: ergonomics and construction are checked first, then the composition is refined. The advantage of a new project is that all coordinates go into the working drawings before the facades are cut. DD-009 on existing furnitureAn existing cabinet should not be assessed only with a tape measure along the front side. It is necessary to check flatness, surface material, old coating, actual gaps, and opening trajectories. A cornice or panel may have a slight slope, and stiles that look identical may differ in width. A full-size template is applied to each group of facades, not to one selected spot. If the existing finish is unknown, a compatible adhesive or repainting system cannot be specified in advance. First, the substrate and the condition of the coating are determined. In a restoration project, it is sometimes more reasonable to prepare a separate background panel than to attach the carved element directly to the old surface; the specific decision is made by a specialist after inspection. Version control of the DWG and facade layoutA drawing becomes a working document only when it has a version. A file named "DD-009_final" quickly loses meaning if corrections appear in the project. It is more reliable to specify the date, revision number, and author of the change. The same data is transferred to the facade schedule and the 1:1 template. Then the purchaser understands which size was checked, and the installer does not use an outdated mock-up.
Old versions do not necessarily need to be deleted: they are moved to the archive and clearly marked as inactive. This helps restore the decision history but does not create a risk of accidentally sending the wrong file to the installer. How to check DD-009 on the end panel of the cabinetThe end panel differs from the front post. It is viewed at an angle, with a passage, wall, or doorway often nearby. Size E = 50 mm becomes especially important: the relief may visually and physically extend beyond the cabinet dimensions. On the room plan, not only the facade is checked, but also the available passage width after furniture installation. The DD-009 axis on the panel can be linked to the center of the panel, the facade line, or the architectural axis of the room. The choice depends on where the furniture is visible from. If the panel is the first thing seen upon entry, the decor is evaluated from the main viewpoint. If it adjoins a wall, check whether part of the carving is hidden and whether access for finishing and cleaning remains. The end part cannot be considered automatically interchangeable with the front one. In the list, the position is recorded separately, and the template is attached in the actual orientation. Light reveals depth and layout errorsCarving is perceived not only by contour, but also by shadows. Under frontal diffused lighting, DD-009 may look calmer, while with side lighting, size E and fine relief transitions become more noticeable. Therefore, it is useful to supplement the approved paper template with a photograph of the actual or similar relief under the intended lighting. Light also reveals height differences on paired facades. Shadows from two elements installed with a deviation form a different rhythm even when the error itself is only a few millimeters. The control installation is evaluated during the day and under working artificial lighting. There is no need to invent special fixtures just for DD-009; it is important to check the already designed room scenario. With opaque finishing, the test coating is examined under the same light direction. Deep areas should not accidentally lose readability due to an excessive coating layer, but the specific application parameters are determined by the finisher. Storage before installation and protection of the carved contourAfter acceptance, parts may await finishing or furniture assembly. They must not be stacked so that load falls on protruding carved areas. Each DD-009 is marked according to the facade list and placed in a stable position with edge protection. The manufacturer's packaging is kept until incoming inspection and batch distribution are completed. In the warehouse, it is important not to lose the connection between the part and its specific position. Marking is applied to the packaging or a safe accompanying tag, not to the visible surface of the product with a random marker. After trial tinting, samples and finished parts are also not mixed: they may have different preparation stages. Exact storage conditions depend on the material, finish, and production process. The article does not prescribe universal humidity or acclimatization time without confirmed data. The responsible executor uses the production technology requirements and current supplier recommendations. How to replace one damaged part in a finished seriesReplacing one element is more complex than the initial purchase, because it is necessary to replicate not only the article number, but also the batch context. The archive must retain the material, preparation level, finish code, position template, texture photographs, and drawing version. Without this data, a new DD-009 may match in size but differ noticeably in tone or direction of the wood grain. First, the cause of damage and the method of dismantling are recorded. Then the condition of the base is checked: a new part must not be installed on a weakened or contaminated surface using the previous scheme without assessment. If the finish was done individually, it is desirable to keep a control sample or color formula. For oak, the natural difference in texture is taken into account; photographic identity is not guaranteed. After installation, the replacement is compared with adjacent facades from a working distance. A slight natural difference may be acceptable, but a violation of the axis or height is not. The coordinate is taken from the archive template, not restored "by eye" from the neighboring part. Single order and serial batch: different levels of controlFor one buffet, the customer can order one or two DD-009, but even here the size and template are needed. A serial batch requires a stricter system: unified material, preparation, drawing version, distribution across facades, and a control part. The more repetitions, the more expensive a systematic error becomes. An incorrect axis transferred by a jig to twelve sections creates a problem not on one facade, but on the entire wall.
The commercial specification also differs. In a serial order, you cannot limit yourself to the total quantity; each group must be linked to material, preparation, and purpose. Passport of the decorative vertical after project completionAfter installation, it is useful to keep a compact passport. It is not a mandatory manufacturer document, but it helps the furniture owner and the contractor during repairs. The passport includes the article DD-009, main card, size, material, preparation, finish code, installation coordinate, fixing method, photos, and contact of the responsible contractor. For built-in furniture, the passport is stored together with the general as-built documentation. For a private cabinet, a digital file and a few photos are sufficient. The main thing is not to lose data that cannot be reliably restored from appearance after several years. Size and article can be found, but the exact shade, batch, and layout version are often lost. Such an archive turns DD-009 from a one-time decorative purchase into a manageable element of the furniture system. Reordering, replacing a facade, or expanding the library is done based on facts, not memory. Why is the control measurement repeated after assembling the bodyThe design dimensions of the facade and the actual assembled furniture may differ slightly due to part tolerances, plinth adjustment, cornice installation, and door positioning. This does not mean the drawing is useless. It defines the system, and the control measurement confirms that the system has been preserved after production. Before final fixation of DD-009, the height of the clear field, the width of the background post, and the actual lines of adjacent elements are checked. For a series, there is no need to redesign each section from scratch. It is sufficient to select control points: end cabinets, corner modules, sections of different heights, and one typical middle section. If deviations fall within the system adopted by the project, a master template is used. If one section differs noticeably, a separate installation card is issued for it. It is not allowed to compensate for the difference by randomly shifting the thread without documentation: a part visually corrected on site will later fall out of the as-built documentation. Special attention is paid to the overall horizontal line in a long library. Laser or other accepted marking may help transfer the reference point, but the article does not mandate a specific tool. What matters is that the method provides verifiable repeatability, and the result is reflected in the facade list. How to coordinate the layout with the client before finishingIt is difficult for the client to evaluate coordinates in a table, so the technical layout is supplemented with clear visualization. The minimum set includes a front drawing of the furniture, a scaled outline of DD-009, two or three position options, and a photo of the template on a real facade. What is compared is not abstract "higher" and "lower," but specific top and bottom margins. During approval, it is discussed where the main decorative accent should be, how it relates to handles, panels, and cornice, whether the thread is visible from the main room viewpoint, and whether the composition becomes too busy. After selection, the option receives a number. This number is recorded in the list so that subsequent correspondence does not replace the approved scheme with a new verbal wish. Changes after ordering are possible only through updating documents and checking the impact on quantity, material, finish, and installation. Such discipline may seem excessive for a single part, but in a series it is what maintains the same thread height and protects finished facades from rework. Main errors when ordering and laying out DD-009Error 1. Treating a single DD-009 as a ready-made vertical for the entire heightThe buyer sees the word "pilaster" and does not check 460 mm against the facade height. After delivery, unfinished areas remain. Correction begins with returning to the drawing: determine the clear field and the role of the carved module. Mistake 2. Buying from a photo without scaleIn a large interior photo, 460 mm may look like a nearly full-size part. On a real cabinet, the proportion will be different. Before payment, a 1:1 outline or at least a rectangular mockup of the exact size is needed. Mistake 3. Subtracting 460 mm from the total cabinet heightThe total height includes the plinth, cornice, and other zones. Fields are calculated only within the clear decorative area. Otherwise, the carving shifts relative to the panels and horizontal lines of the furniture. Mistake 4. Automatically making the stile 65 mm wideThe product width does not equal the mandatory backing width. Side fields and a check of the full outline are needed. The decision is made after overlaying the template on the stile. Mistake 5. Ignoring dimension E = 50 mmThe front layout looks correct, but when opening, the door or handle collides with the relief. The side projection must be part of the check before manufacturing the facades. Mistake 6. Placing paired parts from different baselinesOne DD-009 is measured from the cornice, the other from the baseboard. Even a small difference turns into a noticeable misalignment. For a pair, choose one base and one coordinate. Error 7. Ordering the entire series in one line without a facade listThe quantity is correct, but the distribution is unknown. Parts end up on sections of different heights, and the installer improvises. The list links each item to a specific position. Error 8. Mixing beech and oak without a finish decisionEven the same color does not make the species visually identical under a transparent coating. The material is set for each group of facades and does not change randomly during assembly. Error 9. Choosing different preparation levels for one seriesAfter finishing, some parts look calmer, some require different refinement. "Standard" and "Prestige" are fixed in the specification, not left to the discretion of different orders. Error 10. Painting before dry layoutAfter individual finishing, it is difficult to swap elements and maintain color. First, acceptance and distribution, then a test coat and finish. Error 11. Treating assembly adhesive as a universal schemeBases and coverings differ. Choosing a fixation without checking can damage the facade or fail to provide the required result. The project must describe the actual system. Error 12. Trimming a carved module to change the heightDD-009 has a fixed contour. Trimming can destroy the pattern and thin elements. The height of the entire composition is changed through the design field or an agreed individual solution, not by random sawing off. Error 13. Using an old product URLIn the internal links of the article, the main address from the /reznoy-dekor/ section is used. The old path is not reinforced. This helps avoid distributing article semantics between two cards. Error 14. Attributing the frequency of a general query to DD-009The query "wooden pilaster" refers to the category, not to a specific article. In the article, the key is used naturally, but the indicators are not presented as demand for DD-009. Who is DD-009 suitable for
The strength of DD-009 is a fixed expressive module that can be repeated in a series. The buyer receives a specific article number, exact dimensions, and the ability to build a design field around it. This is more convenient than a random carved insert when repeatability is required. When it is better to choose another product or another composition
In these cases, it is useful to first study how to choose a wooden pilaster by size and compare other items in the category. An honest refusal of DD-009 is better than trying to stretch, trim, or install it in an unsuitable field. How to order DD-009 on STAVROS without losing project logic
Cost, availability, and production timelines may change, so they are checked in the card and upon order confirmation. The article covers project preparation but does not replace current commercial terms. Final check before payment
Frequently asked questions about pilaster DD-009What size is DD-009?Confirmed size — 460 × 65 × 50 mm. The purpose of dimension arrows A, B, and E must be matched with the actual drawing. Is DD-009 a ready-made pilaster for the full height of the cabinet?No. It is a fixed carved module with a height of 460 mm. In a tall vertical, the upper and lower fields, background, and possible accompanying elements are designed separately. How to calculate the position of DD-009 centered?Subtract 460 mm from the height of the clear field H and divide the remainder in half. For example, with H = 1300 mm, you get 420 mm at the top and bottom. Can the carving be shifted up or down?Yes, if it is provided by the overall composition. The coordinate must be specified numerically and repeated identically on all corresponding facades. Why can't the stile be automatically made 65 mm wide?65 mm is the width of the DD-009 itself. The background stile may require side fields, a frame, moldings, and technological gaps. What does the depth of 50 mm mean?This is parameter E according to the card. Its exact direction and full external offset are checked against the DWG. For furniture, lateral collision with doors, handles, and passage is important. Is a 1:1 template needed?Yes, it helps assess the real scale, axes, margins, and proximity to hardware before manufacturing or drilling the facade. Will DD-009 work for paired doors?It will work with an agreed layout. Both parts must have the same baseline, installation height, material, preparation, and finish. What wood species is DD-009 made from?Beech and oak are confirmed in the source data. The choice is linked to texture visibility and the overall furniture finishing system. What to choose: "Standard" or "Prestige"?The decision depends on the finish, viewing distance, furniture production requirements, and the amount of manual touch-up. The preparation level is specified precisely in the order. Is there an enamel option?The option for re-lamination under enamel is confirmed in the product data. The specific execution should be confirmed when ordering. Can DD-009 be trimmed in height?You should not do this yourself. Trimming changes the carved contour. Non-standard solutions are coordinated according to the drawing before production. Does the base or capital come included in the set?There is no confirmation of automatic inclusion. DD-009 is a separate product item; related parts are selected according to the project. Can I use only mounting adhesive?There is no universal answer. The fixing method depends on the base, coating, contact area, and disassembly requirements. It is determined by the responsible specialist. How to calculate the quantity for a series of cabinets?By the number of specific items in the facade list. Not by the number of cabinets or by the overall project photo. Is a reserve needed?A universal percentage is not set. The reserve depends on the scale of the series, finish, possibility of reordering, and project requirements. When should finishing be done?After incoming inspection and dry layout. This allows distributing paired parts and checking the composition before irreversible operations. Where can I see other wooden pilasters?In the confirmed category: buy wooden pilasters. Which DD-009 card should be used for the link and order?The main page in the carved decor section: DD-009 card. The old path inside the article is not used. What should be communicated to the STAVROS manager?Article number, size, material, preparation, quantity, purpose, field height, layout scheme, base, finish, and the current version of the drawing. Final check before launching furniture productionBefore cutting facades and ordering a batch, all key decisions are consolidated on a single sheet: clear field, DD-009 axis, top and bottom offsets, background post width, side overhang, material, and finish. This sheet is signed by project participants. It does not replace the full set of drawings but helps quickly detect discrepancies between the visualization, specification, and installation scheme. After such verification, the article number, quantity, and coordinates move to production without verbal additions. Result: first the field and axis, then order DD-009DD-009 should not be evaluated as a short or incomplete pilaster. It is an independent carved module of fixed size that unfolds within a correctly calculated furniture vertical. Its height of 460 mm sets the scale of the carving, width of 65 mm — the overall dimension of the part itself, and the parameter of 50 mm requires a side check against the drawing. All other composition emerges from design decisions: clean field, axis, top and bottom offset, material, preparation, and installation. For a single facade, a precise template and a verified coordinate are sufficient. For a series, a specification sheet, batch distribution, unified finishing, and control installation are needed. This approach prevents the main errors: expecting a ready-made vertical, random centering, different levels on paired doors, and relief colliding with hardware. Once the layout is approved, you can order DD-009 in beech or oak, specifying the exact project parameters. The purchase becomes the final step of a prepared specification, not an attempt to adjust the carving position after delivery. |