Article Contents:
- A chest of drawers that is shy of itself
- Why a flat facade looks cheap: anatomy of the problem
- Three reasons for the "poor" look of furniture
- Moldings for chest of drawers facades: how to create frames on a flat surface
- How to choose the width of the molding according to the size of the facade
- Indentations of the frame from the edge of the facade
- Where to place moldings on a chest of drawers: all positions
- Molding profiles for different furniture styles
- Decorative furniture overlays: an accent in the right spot
- The "one main zone" principle
- Types of decorative wooden overlays
- How to attach overlays to furniture
- Furniture handles: how one detail changes the level of furniture
- Why wooden handles work better than cheap metal ones
- Wooden handles with coating
- Wooden handles without coating
- How to choose the handle shape to match the dresser style
- Center-to-center distance: how to avoid mistakes when replacing
- Step-by-step plan for updating a dresser: from idea to result
- Step one: assessment and measurement
- Step two: selecting the molding
- Step three: choosing overlays and handles
- Step four: surface preparation
- Step five: installing moldings
- Step six: installing decorative overlays
- Step seven: priming
- Step eight: painting
- Step nine: final assembly
- Five types of dressers: specific solutions for each
- Dresser with three drawers (width 80–100 cm)
- Single-drawer console (width 100–140 cm)
- Two-door wardrobe-dresser (width 120–160 cm)
- Nightstand (width 40–60 cm, height 50–70 cm)
- Kitchen cabinet or sideboard (width 60–90 cm)
- Color solutions: painting as the final chord
- Monochrome painting: one color for everything
- Two-tone painting: body and moldings in different colors
- Patination: imitation of aged furniture
- What to buy for different tasks: summary table
- Frequently Asked Questions
- STAVROS: everything for furniture transformation





A dresser that is shy of itself
You know this type of furniture. It stands in the bedroom or living room, does its job — stores, holds, contains — but looks as if it's apologizing for its existence. Flat facades without any relief, simple plastic or metal handles, a neutral color that's neither here nor there. The furniture is present, but architecturally silent.
And next to it — good curtains, a well-thought-out lamp, a beautiful rug. Everything is invested in the interior, but the dresser looks like it's from another world. Buy a new one? Expensive. Throw it away? It's a shame — the shape is normal, the construction is sturdy. What to do?
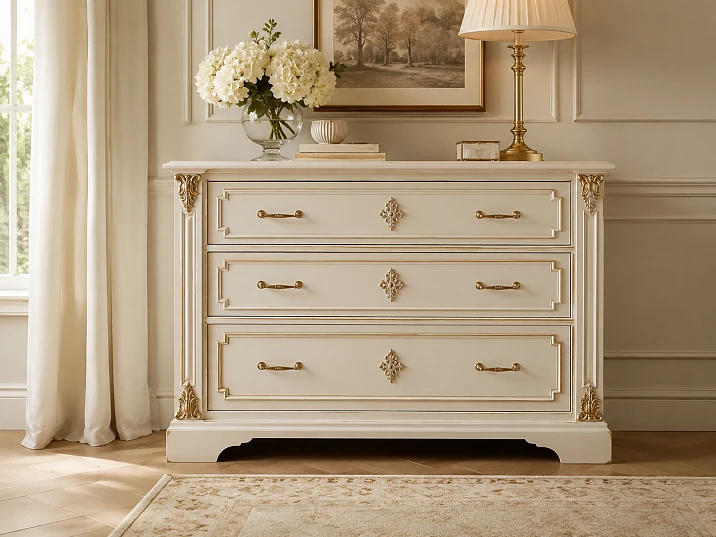
The answer is straightforward: Moldings for Furniture, Moldings for furniture and new Furniture Handles. Three categories — and the dresser changes beyond recognition. Without replacing the body, without going to a furniture maker, without a big budget.
The dresser looks more expensive when the facade gets frames made of furniture moldings, decorative inlays for furniture become an accent, the handles support the style, and a unified paint job turns scattered details into a finished furniture composition.
This is not theory. This is practice. And this article is exactly about that.




Why a flat facade looks cheap: the anatomy of the problem
Before moving on to the solution, you need to understand why exactly the dresser looks simple — even if it's made of good material and painted in a neutral color.
Our factory also produces:
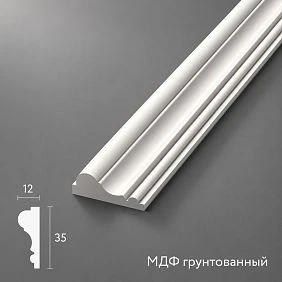
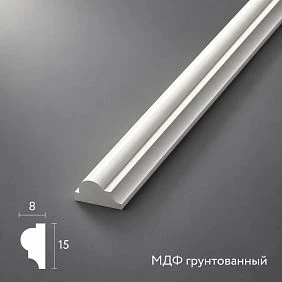
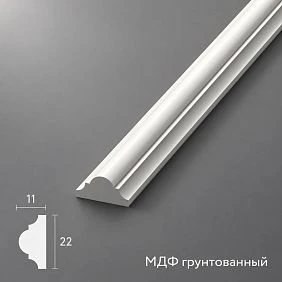


Three reasons for the "poor" look of furniture
Reason one: lack of relief. A flat facade without moldings, frames, or overlays has no chiaroscuro. Light falls on it evenly, no protrusions or recesses create a play of shadows — and the eye perceives the surface as cheap. Expensive furniture always has relief: carving, moldings, inserts, frames.
Reason two: handles as a "prominent element." A cheap plastic or thin metal handle instantly lowers the perception of the entire item. This is a psychological effect: the handle — something touched by hands — is read as an indicator of quality. If the handle is cheap, the brain makes a conclusion about the entire piece of furniture.
Reason three: no finishing. Expensive furniture always has a top cornice, a bottom apron, side overlays — elements that "frame" the body from all sides. An ordinary chest of drawers simply ends: a straight horizontal line at the top, straight at the bottom, flat sides. This is the silhouette of a box, not a piece of furniture.
Three problems — three solutions. Moldings provide relief, handles elevate the level, overlays create finishing.
Get Consultation
Moldings for dresser facades: how to create frames on a flat surface
Moldings for furniture made of natural wood — this is the main tool for transforming the facade. They create rectangular or square frames on a flat facade, which visually turn a cheap drawer into expensive furniture.
This is not a new technique. This is exactly how the facades of English-style cabinets, Louis XV-style chests of drawers, Italian wardrobes are arranged — everywhere molding creates a relief frame that makes the facade architectural.
How to choose the width of the molding according to the size of the facade
The scale of the molding should match the size of the facade and drawer. A too thin molding on a large facade is an invisible detail. A too wide one on a small drawer is an overloaded, heavy look.
| Drawer / door width | Recommended molding width |
|---|---|
| Up to 25 cm | 10–14 mm |
| 25–40 cm | 14–18 mm |
| 40–60 cm | 18–25 mm |
| 60–90 cm | 22–30 mm |
| More than 90 cm | 28–40 mm |
Molding protrusion (how much it extends above the surface): 5–12 mm for furniture fronts. Larger protrusion is appropriate on large items with wide fronts.
Frame indents from the edge of the front
This is a key parameter that determines the proportions of the frame. Rule: the indent from the edge of the front to the outer edge of the molding is 10–20% of the smaller dimension of the front.
Example: a drawer 40×15 cm. Smaller dimension is 15 cm. Indent = 1.5–3 cm. Inner frame: approximately 33×9 cm.
Another guideline: the horizontal and vertical indents should be visually equal. Optically, the bottom indent appears smaller than the top one, so the bottom is made 2–3 mm larger for optical compensation.
Where to place moldings on a dresser: all positions
On drawers. Each drawer gets its own molding frame. If drawers have different heights, the molding is the same, only the inner proportions of the frame change. A uniform molding on all drawers unifies the front into a system.
On the doors. Doors are the largest fronts of a chest of drawers or cabinet. The molding frame on the door can be single or double (frame within a frame — for very large doors from 80 cm in height).
Along the perimeter of the entire front. Horizontal molding along the top edge of the chest of drawers — like a small cornice — and along the bottom edge — like an apron. This creates the top and bottom finish of the body.
On the side walls. Vertical molding along the front edge of the side walls — a "pilaster" on the side of the chest of drawers — creates a side finish. Especially important for freestanding chests of drawers that are visible from several sides.
Around the central overlay. If a central overlay is planned in the front area decorative insert — a molding frame is installed around it. This is a "frame for accent."
Molding profiles for different furniture styles
The choice of molding profile determines the stylistic character of the result:
-
Rectangular profile with chamfer: modern neoclassicism, minimalism with a classic accent.
-
Classic S-shaped profile (OGI): traditional classic, Provence style furniture, neoclassicism.
-
Profile with bead: Baroque, Rococo, rich classic style.
-
Simple rectangular profile without chamfers: Scandinavian style, Japanese minimalism with a wooden accent.
Decorative furniture overlays: accent at the right point
If moldings are the "skeleton" of furniture decor, then decorative inlays for furniture — the "face." One correctly placed decorative element changes the character of the entire piece.
The "one main zone" principle
Decorative overlays are not for every drawer. One or two accents for the entire dresser. These could be:
-
Central overlay on the top drawer. The most visible position. An element 60–100 mm wide in the center of the top drawer. If there is a handle nearby, the overlay is placed above or below it, but not instead.
-
Central overlay on a large door. On a door 80–120 cm high — a decorative element in the upper third along the central axis. Size: 80–150 mm vertically, 60–120 mm horizontally.
-
Paired overlays on the sides. If the dresser is wide — two symmetrical elements on the sides of the central axis. They create a horizontal rhythm on the facade.
-
Overlay under the countertop. A horizontal ornamental border across the entire width of the dresser just below the countertop. This is the "upper cornice" for the entire facade — perceived as a sign of a high-end product.
-
On the console. The console — a table on four legs with one or two drawers — receives a decorative overlay on the front of the central drawer or on the decorative stretcher between the legs. This is a strong point for an accent.
Types of wooden decorative overlays
Wooden overlays are carved or turned elements made of natural wood that are glued onto the front. They come in several types:
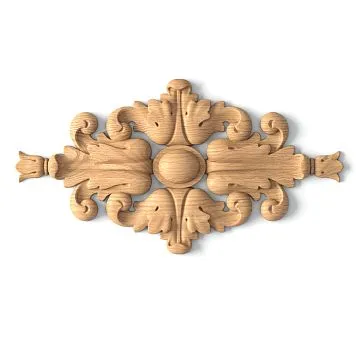
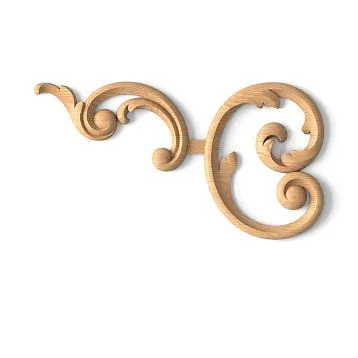
Floral overlays. Leaves, flowers, rosettes, clusters — motifs of natural ornament. Suitable for classic, baroque, Provencal interiors.
Geometric overlays. Diamonds, rectangles, shaped inserts without floral ornament. For neoclassicism, art deco, Scandinavian classic.
Corner overlays. Decorative inserts in the corners of the molding frame. They "close" the corner joints of the molding and simultaneously provide a decorative accent at four points of the frame.
Central cartouches. A large single element in the center of the front — for doors, large drawers, console pediments.
How to attach overlays to furniture
Wooden decorative overlays are glued with woodworking PVA glue or furniture contact adhesive. Algorithm:
-
The surface of the front is cleaned with fine sandpaper (240–320 grit).
-
The surface is degreased with white spirit or isopropyl alcohol.
-
Glue is applied to the overlay and the base.
-
The overlay is pressed for 5–10 minutes (can be secured with masking tape).
-
After drying — priming and painting.
Furniture handles: how one detail changes the level of furniture
This is the fastest and most noticeable change. Replacing handles on a dresser is a 30-minute operation that instantly changes the perception of the piece.
Why wooden handles work better than cheap metal ones
wooden furniture handles — it is a tactile and visual material signal. Wood is perceived as a natural, warm, expensive material. A hand grasping a wooden handle reads quality instantly — even before conscious evaluation.
A thin metal handle of budget appearance on a good dresser is like an expensive jacket with a plastic button. The overall impression is diminished by one inappropriate detail.
Wooden handles with coating
Wooden handles with coating — these are products made of natural wood, coated with varnish, stain, or special patina. The coating protects the wood, emphasizes the grain pattern, and gives the handle a finished look.
When to choose handles with a finish:
-
If the dresser is to be partially painted — handles in natural dark wood color as an accent element.
-
If the interior is in warm wood tones — handles matching the parquet or wooden details.
-
If minimal rework is planned without full painting — handles with a ready finish.
Wooden handles without coating
uncoated wooden handles — this is a "white" wooden blank, ready for painting or tinting in any color. If the dresser is completely repainted, such handles are painted along with it — as a result, the entire piece becomes monochrome and very cohesive.
It is this technique that turns an ordinary dresser into a design object: when the facade, moldings, overlays, and handles are painted in one color — the piece looks like a single production item, not a set of parts.
How to choose the handle shape for the dresser style
| Dresser style | Handle shape |
|---|---|
| Classic, neoclassic | Arched (bracket) or oval |
| Baroque, Rococo | Figural with floral relief |
| Provence | Round "button" or arched |
| Scandinavian | Horizontal rectangular or cylindrical |
| Art Deco | Rectangular with geometric relief |
| Minimalism | Narrow horizontal bracket |
Center distance: how to avoid mistakes when replacing
Before ordering new ones furniture handles measure the center distance (distance between the centers of two mounting holes). Standard values: 32, 64, 96, 128, 160 mm.
If the old handles are "knobs" with one hole and you want to switch to a bracket, you either need to drill a new hole or find a bracket handle with a single mounting point.
Step-by-step plan for updating a dresser: from idea to result
Here is the complete sequence of work — not as an abstract instruction, but as a real working plan.
Step one: assessment and measurement
Measure all facades: the height and width of each drawer and door. Take a photo of the facade and draw a rough diagram of the future frames on paper or on your phone. Determine where the molding frames, overlays, and handles will be.
Step two: selecting the molding
Choose furniture molding according to the width from the table above. The profile should match the interior style. One profile for all facades — no exceptions.
Calculate the footage: the perimeter of each frame + 15% extra for cutting corners. Molding corners are cut at 45° — each corner requires about one molding width of extra material.
Step three: choosing overlays and handles
decor for furniture — one or two elements. Write down which facade and at which point.
wooden furniture handles — according to the number of drawers and doors + 1 spare. Specify the center-to-center distance.
Step four: surface preparation
Remove the old handles. Sand the facades with fine sandpaper (180–240 grit) to remove gloss and create an adhesive layer. Wipe with a damp cloth, dry, and degrease.
If the facades are MDF with film, the surface must be thoroughly sanded or treated with a special adhesive primer, otherwise the molding and paint will not adhere well.
Step five: installing moldings
Mark the position of the frames on the facades with a pencil. Cut the molding at 45° for the frame corners. Check the joints dry before applying glue.
Apply wood glue or liquid nails to the back of the molding. Press it against the facade, secure with painter's tape until dry (1–2 hours). Fill the joints with fine wood putty, let dry, and sand.
Step six: installing decorative overlays
Using the same technique: glue, press, secure with tape. The joints between the overlay and the facade are filled with putty for a seamless fit.
Step seven: priming
Apply acrylic primer to the entire facade evenly in a thin layer. Let it dry for 2–4 hours. Sand with fine 320 grit sandpaper, wipe off dust.
Primer levels the surface, seals the pores of wood and MDF, and ensures paint adhesion. Without primer, the paint will apply unevenly.
Step eight: painting
Apply two to three thin coats of acrylic paint, drying between coats. For furniture, use paint with a semi-matte or satin finish. Glossy paint is beautiful but requires perfect application—every imperfection is visible.
Handles without coating are painted separately — after installing the moldings, before final assembly.
Step nine: final assembly
Installing new ones wooden handles through old holes (or newly drilled ones). Final inspection: all joints are covered, frames are level, surface without drips.
Five types of dressers: specific solutions for each
Dresser with three drawers (width 80–100 cm)
Standard 'workhorse' bedroom dresser. Three drawers 80 × 20–25 cm.
Decor set:
-
furniture molding 16–20 mm — frames on each drawer.
-
Horizontal molding 20 mm along the top and bottom edges of the body.
-
One decorative insert on the top drawer — center.
-
Wooden handles in the shape of a 96 mm bracket — one per drawer.
-
Painting: monochrome, matte acrylic enamel.
Console with one drawer (width 100–140 cm)
Narrow item — height 80–90 cm, width 100–140 cm, depth 30–40 cm.
Decor set:
-
Molding frame on the drawer front — double (frame within a frame) when the drawer width exceeds 90 cm.
-
decor for furniture — cartouche or horizontal ornament under the countertop.
-
Vertical moldings on the "leg"-facades of the console.
-
Handles are arched or shaped depending on the style.
Two-door chest of drawers (width 120–160 cm)
Two doors + pull-out drawers at the bottom.
Decor set:
-
Molding frames on the doors — single or double.
-
Each door has one decorative element in the upper third, centered.
-
Horizontal molding frieze at the transition between doors and drawers.
-
Handles are identical: 96 mm pulls for drawers, 128 mm vertical pulls for doors.
Nightstand (width 40–60 cm, height 50–70 cm)
A small item requires a delicate approach.
Decor set:
-
Molding 12–14 mm — a frame on the door or drawer.
-
Buy decorative stucco — for a cabinet with a beautiful design: a small appliqué 40–60 mm in the center of the facade.
-
Knob handle or small arched pull 32–64 mm.
Kitchen cabinet or sideboard (width 60–90 cm)
In the kitchen area, furniture decor is often underestimated. But it shouldn't be.
Decor set:
-
Molding 18–22 mm on doors and drawers.
-
Horizontal molding strip at the transition between upper doors and lower drawers.
-
uncoated wooden handles — painted in the color of the kitchen set.
-
Painting in the kitchen color — the entire sideboard becomes part of the set.
Color solutions: painting as the final chord
Proper painting is no less important than choosing moldings and handles. It is the single color that 'stitches' all elements into a cohesive piece.
Monochrome painting: one color for everything
Body + moldings + overlays + handles without coating — all in one color. This is the purest and most expensive-looking solution. White, cream, gray, dark green, anthracite — any color works with a monochrome approach.
Two-tone painting: body and moldings in different colors
The body is one color, the moldings and overlays are another. For example, the body is dark gray, the moldings are white. Or the body is cream, the moldings are slightly darker in tone.
This technique enhances the visibility of moldings and frames. The boundary between colors must run strictly along the molding line — precision of execution is critical.
Patination: imitation of aged furniture
After the main painting in white or a light color — applying dark patina in the corners of frames, on the relief of overlays, in the recesses of the molding. Wiped with a soft cloth — the dark pigment remains only in the recesses.
Result: the effect of furniture with history, an "antique" look. Works well for Provence, country, baroque styles.
What to buy for different tasks: summary table
| Task | What to buy |
|---|---|
| Make the facades embossed | Moldings for furniture 14–25 mm |
| Add a decorative accent | decor for furniture — 1–2 overlays |
| Make the dresser more expensive | Moldings + new Furniture Handles |
| Style the console | Molding frames + overlay under the tabletop |
| Paint furniture in one color | Glue + acrylic primer + acrylic enamel |
| full set | Moldings + overlays + Wooden handles + glue + primer + paint + 20% spare |
| Stucco on the wall next to the dresser | Buy moldings — moldings and overlays for the wall |
Frequently asked questions
Can you glue stucco to a dresser?
Yes, if the surface is properly prepared: sanded to a matte finish, degreased, primed. Wooden overlays are glued with PVA wood glue or liquid nails. Decorative stucco for polyurethane — with polyurethane mounting adhesive.
What is better for a dresser — moldings or overlays?
They solve different tasks and work better together. furniture moldings create frames and give the facade structure. decorative inlays for furniture provide a point ornamental accent. Moldings are the base, overlays are the finishing touch.
Do I need to change the handles after decorating the dresser?
Almost always yes. Old handles "give away" the budget original. After the facades have received moldings and overlays, a cheap handle becomes the only weak point. wooden furniture handles close this issue.
What to buy for a complete dresser makeover?
Moldings for furniture, buy furniture decor (1–2 overlays), Furniture Handles according to the number of drawers and doors, wood glue, acrylic primer, acrylic enamel, and 20% extra materials.
Is this method suitable for IKEA furniture?
Yes, for MDF furniture. The surface must be thoroughly sanded (or treated with an adhesion primer), as film coatings do not hold glue well. After preparation — the same technology.
Can polyurethane molding be used on furniture?
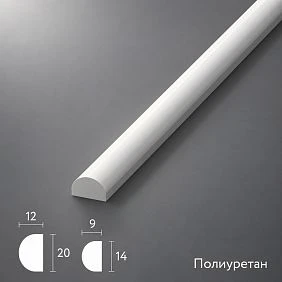
Yes, but with reservations. Buy molding Choosing polyurethane for furniture means selecting thin, delicate elements (overlays with a projection of up to 10–15 mm). Heavy polyurethane molding on a furniture facade may look disproportionate — it is good for walls, but for furniture, wooden products are better.
STAVROS: everything for furniture transformation
Updating a chest of drawers with molding is a project where every detail matters: the correct profile of the molding, a proportionate overlay, and a handle that confirms the quality of the entire product.
STAVROS offers a full range of furniture decor from natural wood: Moldings for furniture — classic and modern profiles, buy furniture decor — floral, geometric, and corner overlays, wooden furniture handles — with or without coating, ready for painting in any color.
For walls next to the updated dresser — Buy moldings made of polyurethane: molding frames, Decorative stucco for wall accents.
STAVROS. Contact us to confirm shipping to your destination. Pickup in Moscow and St. Petersburg.
Your dresser deserves a second chance. And it will get it.