Article Contents:
- Why the top of built-in furniture is the main unresolved problem in interior design
- Why this gap is so noticeable
- Where exactly the problem occurs: real zones and specific situations
- Built-in wardrobe in the bedroom
- Walk-in closet
- Kitchen up to the ceiling
- Wardrobe in hallway
- Furniture portal around a door or TV
- Bookcase and shelving
- Cabinet around the TV
- Polyurethane moldings: the most direct and precise tool
- What exactly the molding does
- Which molding to choose for the top of the cabinet
- How to calculate molding for a built-in cabinet
- Installing molding above the cabinet: what's important to know
- Ceiling molding: when you need to truly connect furniture to the ceiling
- Kitchen up to the ceiling and ceiling molding
- Ceiling molding above the cabinet in the living room
- Ceiling molding for built-in furniture in the bedroom
- Decorative molding: how to turn a furniture portal into an architectural accent
- Top lintel of the furniture portal
- Above the central section of the cabinet
- Above the mirror inside the furniture niche
- On the sides of the furniture portal
- On the fronts of the upper drawers
- Stucco decor: a point accent instead of overload
- One central element above the cabinet
- Paired accents on the sides of the portal
- Accent above the door or upper drawer
- Decor in the furniture niche
- Color and painting: how a unified paint makes furniture part of the architecture
- When the molding should match the color of the cabinet
- When the molding matches the ceiling
- Tinting with an accent
- Comprehensive solution: what the perfect result looks like
- Table: what and when to use for the top of built-in furniture
- Four ready-made purchase scenarios
- Scenario 1: "The cabinet didn't reach the ceiling"
- Scenario 2: "The kitchen up to the ceiling looks too rigid"
- Scenario 3: "The dressing room should look more expensive"
- Scenario 4: "Furniture portal around the door or TV"
- About the company
- Frequently Asked Questions
There is a special moment in renovation when it seems everything is already done. The cabinet is in place. The kitchen is assembled. The dressing room is ready. The facades are beautiful, the hardware is correct, the color is chosen. And yet something is wrong. Something prevents the result from being called complete.
Look up. There it is.
At the top — a gap. Or a rigid direct joint with the ceiling. Or a decorative strip from the furniture manufacturer that tries to cover something but looks like a technical solution, not architecture. The cabinet stands from wall to wall, it is beautiful, it is functional — but it is not part of the room. It stands in it like an object. Like a box.
It is this detail — the unfinished top — that makes even high-quality built-in furniture look less expensive than it actually is. And this is where they work Moldings made of polyurethane, Ceiling molding и Decorative stucco — turning the furniture top from a technical problem into an architectural solution.
Built-in furniture looks truly expensive not when it simply stands from wall to wall, but when its top is beautifully connected to the ceiling: a molding closes the gap, Ceiling molding gathers the line, Decorative stucco adds an accent, and Relief Decoration turns the cabinet into part of the room's architecture.
This article is a practical guide. We break down where exactly the problem arises, why it affects the perception of the interior, and what specifically to buy to solve it beautifully.


Why the top of built-in furniture is the main unresolved problem in the interior
Let's start with an honest analysis of what happens with furniture that is called "built-in."
The logic of "built-in" assumes that furniture has become part of the architecture. A cabinet from wall to wall, from floor to ceiling — it should look like a niche, like the wall itself, only with doors. This is an interior design idea, and it is correct.
But in practice, built-in furniture in 90% of cases does not reach the ceiling — or does reach it, but does not blend with it. Between the top panel of the cabinet and the ceiling remains:
-
a direct technical gap (5–15 cm) — most often due to an uneven ceiling or the standard height of the furniture body;
-
a decorative filler strip from the manufacturer — narrow, thin, technically covering the gap, but not creating any design solution;
-
a rigid joint of furniture with the ceiling without framing — when the cabinet reaches the ceiling, but the transition looks sharp and rough;
-
a dusty open storage shelf — when the cabinet intentionally does not reach the ceiling, but the space above it is not designed in any way.
Each of these options destroys the illusion of "built-in." The cabinet ceases to be architecture and becomes furniture again.


Why this gap is so noticeable
The human eye in a room moves along horizontals. The floor line, the countertop line, the windowsill line, the cornice line. The cleaner and smoother these horizontals are, the calmer and more expensive the space looks.
The top line of built-in furniture is one of the main horizontals in a room. If it is unclear, interrupted, or technically unattractive, the eye gets stuck on it. The brain registers "incompleteness" and conveys this feeling to the entire interior.
Buy molding for the top of the cabinet means giving this horizontal a proper finish. Making sure the eye doesn't get stuck but smoothly transitions from the furniture to the ceiling.
Our factory also produces:


Where exactly the problem arises: real zones and specific situations
Let's break down specific types of built-in furniture and how the top problem manifests in each case.
Get Consultation
Built-in wardrobe in the bedroom
Classic. A sliding or hinged wardrobe built into a niche or standing wall-to-wall. The height of the wardrobe is standard, 2.2–2.4 meters. The ceiling is 2.5–2.7 meters. There remains 10–30 centimeters of uncovered space on top.
This space is often used for storage (suitcases, boxes), but it looks shabby. Molding above the wardrobe solves this problem: it is mounted along the top edge of the wardrobe and on the ceiling, creating a neat cornice that visually closes the transition.
Walk-in closet
In a walk-in closet, several storage systems are located along multiple walls. The top line of this entire system is key to the perception of the space. If it is even, finished, with molding or stucco, the walk-in closet looks like a boutique. If it looks like a set of boxes at different heights without a single horizontal line, it looks like a warehouse.
Stucco decor for a dressing room — this is not only molding along the top edge. It is decorative accents that make each zone of the walk-in closet individual: above the mirror, above the pull-out sections, above the central island.
Kitchen up to the ceiling
Kitchen cabinets that go all the way to the ceiling are a more complex topic. When cabinets extend to the ceiling, the issue is not the gap, but the joint. Typically, the top edge of the cabinet simply presses against the ceiling, and this joint looks rigid.
Ceiling molding for kitchen cabinets that go to the ceiling — this is a cornice that is installed in the corner between the top end of the cabinet and the ceiling. It softens the joint, adds a decorative line, and connects the kitchen to the ceiling. The kitchen stops being "pressed" into the ceiling and begins to transition organically into it.
Wardrobe in the hallway
The hallway is the first space a person sees upon entering. A built-in wardrobe in the hallway takes up a significant part of the wall. Its top is one of the first details noticed.
Moldings for built-in furniture work here as an architectural frame. A molding along the top edge of the cabinet along the ceiling is a simple and quick solution that immediately changes the feel of the entire entry space.
Furniture portal around a door or TV
A furniture portal is a built-in furniture system that frames a doorway, TV, or fireplace. Such a portal should look like part of the wall — built-in, architectural, and complete.
Decorative molding for a furniture portal adds an architectural detail to the portal — above the central section, on the sides, in the top crossbar. Without this, even the highest quality portal looks like "a lot of furniture" rather than an "architectural element."
Bookcase and shelving
Open bookcases and shelving are a category of built-in furniture where the top is especially noticeable. Because above the top shelf is either empty space or the ceiling. And if there is no decoration there, the eye keeps returning to this "unjustified" ending.
Ceiling molding above furniture — a cornice along the top edge of the shelving creates a decorative "crown" that completes the storage vertical. The shelving begins to look like a library.
Cabinet around the TV
The TV zone is one of the most popular formats for built-in furniture. Cabinets on the sides, shelves below and above, the TV in the center. And above is space that is not utilized in any way.
Decorative stucco above the TV zone or Relief Decoration above the central section transforms the TV wall from a set of functional boxes into an accent wall with architectural character.
Polyurethane moldings: the most direct and most precise tool
If we talk about solving the problem of the top of built-in furniture, then Moldings made of polyurethane — this is the first thing to think about. Not because it's simple. But because it's precise.
Molding is a linear decorative element with a profile: flat, angular, or complex in cross-section. It is mounted along the top edge of a cabinet or in the corner between furniture and the ceiling, solving several tasks at once.
What exactly does molding do
Covers the gap. This is the most obvious function. The space between the top panel of the cabinet and the ceiling is closed with molding. Not a plug, not a chipboard strip, but a decorative profile that looks like an architectural element.
Creates a decorative horizontal line. Molding along the top of the cabinet is a clear horizontal line. It organizes the upper zone of the room, creates rhythm, and connects several cabinet sections into a single system.
Adds shadow. The molding profile creates relief. Relief creates shadow. Shadow creates depth. This is how a simple white line at the junction of furniture and the ceiling begins to look like an architectural detail of an expensive interior.
Hides technical imperfections. Uneven ceilings, small differences, gaps—all of this is neatly and permanently covered by molding.
Which molding to choose for the top of the cabinet
By width. This is the main parameter. If the gap is small (up to 5 cm), a molding width of 40–55 mm is sufficient. If the gap is 5–15 cm, a wider profile or a combination of molding with a decorative strip is needed. If the space above the cabinet is 15–30 cm, a system of molding along the cabinet edge and a ceiling cornice will be required.
By profile. For a calm, neutral solution—a flat or semi-flat profile. For a more decorative effect—a profile with relief: wave, heel, shelf with shelf. Corner molding (cornice) is mounted in the corner between the cabinet and the ceiling—it covers both elements at once.
By style. Geometric profile — for modern interiors. Classic profile with cyma or shelf — for classic and neoclassical styles. Minimalist profile — for Scandinavian, loft, and modern classic styles.
By material. Polyurethane is the optimal choice for furniture molding. Lightweight, does not deform from humidity changes, easy to cut at any angle, paints well, and does not crack over time.
How to calculate molding for a built-in wardrobe
The task is simple. Measure the length of the wardrobe along the top edge. Add 15% allowance for trimming. If the wardrobe is corner, corner inserts or 45° cuts will be required.
Example: a wardrobe 3.6 meters long with one internal corner.
-
Two straight sections: 2.1 + 1.5 = 3.6 meters.
-
15% allowance: +0.55 meters.
-
Total: ~4.2 meters of molding + 1 corner element.
buy polyurethane moldings It should be ordered with a reserve — ordering one extra meter at a different time may result in minor but noticeable differences in the batch.
Installing molding above the wardrobe: what is important to know
The molding is mounted using specialized polyurethane adhesive. The cabinet surface (typically laminated chipboard or MDF) is pre-cleaned of dust and degreased. The adhesive is applied to the back side of the molding along the perimeter or in a zigzag pattern.
If the molding is attached to both the ceiling and the top plane of the cabinet, it is important to press it against both surfaces simultaneously. For long sections, painter's tape is used for temporary fixation until the adhesive sets.
After the adhesive dries, joints and corners are treated with acrylic putty, sanded, and painted. In the color of the ceiling, the color of the cabinet, or a single neutral color.
Ceiling stucco: when you need to truly connect furniture with the ceiling
Molding is a line. Ceiling molding — is a system. The difference is significant.
When a cabinet or kitchen is the only large element in a room, molding may be sufficient. But if the room already has a ceiling cornice, a chandelier rosette, wall moldings — the molding above the furniture should be part of that system, not a separate element.
This is precisely where ceiling stucco works as an architectural "bridge." A cornice that runs along the entire perimeter of the room can smoothly transition into the upper molding above the cabinet — and then the furniture literally becomes part of the architecture.
Kitchen up to the ceiling and ceiling stucco
The kitchen is a special case. If the upper cabinets go all the way to the ceiling, the joint between the last row of facades and the ceiling is the most technically challenging transition.
Ceiling molding above the kitchen It is mounted in this corner — like a corner cornice. It softly completes the top line of the kitchen, hides possible unevenness, and adds a decorative element that "connects" the kitchen to the ceiling.
Important nuance: for the kitchen, you need to choose moisture-resistant glue options and ensure sealing of the joint in the area above the stove — where steam and splashes are possible. Outside this area, installation is standard.
Ceiling molding above the cabinet in the living room
If the living room has a built-in cabinet or shelving system, and the ceiling is decorated with a cornice — extending the cornice along the top of the furniture creates a continuous architectural line. The eye moves around the room without interruption.
This is a technique that designers call a "continuous cornice." It is especially effective in living rooms and studies, where the walls are "filled" with furniture and details.
Buy ceiling molding For the living room, you need the same profile as the main ceiling cornice — or from the same stylistic group. This preserves the unity of the architectural language.
Ceiling molding for built-in furniture in the bedroom
In the bedroom, the task is somewhat different. There is no need for grandeur — silence is needed. A delicate cornice along the top edge of the cabinet, in the color of the wall or ceiling, without bright ornament. It simply covers the transition — neatly and discreetly.
For the bedroom — profile no wider than 50–60 mm, minimal relief, painted in the color of the ceiling. Result: the cabinet is integrated into the architecture but does not attract unnecessary attention.
Decorative stucco: how to turn a furniture portal into an architectural accent
If molding is a line and ceiling stucco is a system, then Decorative stucco it is character. It adds individuality, expressiveness, and a design stance to the furniture system.
Where does decorative stucco work especially well on built-in furniture?
Top crossbar of a furniture portal
A portal is a furniture system that frames a niche, doorway, or TV. The top horizontal crossbar of the portal is the most logical place for a decorative accent.
Buy decorative stucco for the top crossbar, it should be chosen considering the width of this crossbar and the distance to the ceiling. If the crossbar is wide (15–20 cm) — one horizontal frieze or medallion in the center. If narrow — a delicate horizontal ornament.
Above the central section of the cabinet
If the cabinet consists of several sections and one of them is central — a decorative accent above it is appropriate. One stucco element along the central axis creates a "focal point" and makes the furniture system asymmetrically symmetrical: the rhythm repeats, but the center is highlighted.
Above the mirror inside the furniture niche
If a built-in wardrobe in a dressing room or bedroom includes a mirrored section, decorative stucco above the mirror works like it does above a mirror in a hallway: it connects the mirror with the surrounding furniture and creates a "framing" effect without a literal frame.
On the sides of the furniture portal
The side posts of the portal—pilasters—often remain simply smooth. A decorative overlay or a small stucco element at the top of the pilaster creates a "capital"—an element that completes the vertical line. This is a direct architectural technique that makes the furniture portal resemble a load-bearing colonnade.
On the facades of the upper drawers
buy decorative moldings for the facades of the upper drawers—means adding texture to the furniture at eye level. A small overlay in the center of the upper facade, a pattern from a molding frame—this turns chipboard into "furniture with character."
Stucco decor: a point accent instead of overload
Relief Decoration —these are individual overlay elements: medallions, cartouches, friezes, corner overlays. In the context of built-in furniture, they work where one strong accent is needed—without a system, without a perimeter, without covering the entire surface.
This is an excellent tool for those who want to add character to furniture but are afraid of overloading the space. One stucco element is not "a lot of stucco." It's a point. One point that holds the entire top of the furniture.
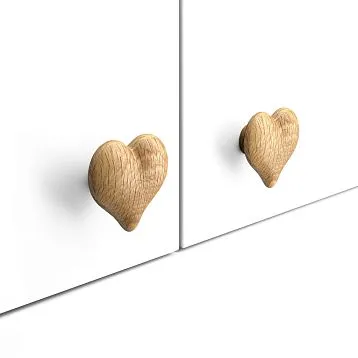
One central element above the wardrobe
The cleanest technique. One medallion or cartouche along the central axis of the top panel of the wardrobe. Nothing else. This element becomes the "apex" of the entire furniture system—a point to which the gaze rises and stops.
Size: from 1/4 to 1/3 of the cabinet width. For a 240 cm cabinet — element 60–80 cm. For a 180 cm cabinet — 45–60 cm.
Paired accents on the sides of the portal
Two symmetrical elements on the sides of the upper part of the portal create a "gate". This is a classic architectural technique — two accents that frame the center. They do not compete with the center, but direct the gaze towards it.
Buy Molded Decoration for a paired solution, you need from one SKU — to guarantee absolute identity of the elements.
Accent above the door or top drawer
A small decorative element above each door of the top row is a rhythmic system. It makes the furniture facade resemble an architectural frieze. Not every furniture manufacturer offers this option — and this is where Decorative stucco provides a unique solution that cannot be achieved with standard furniture components.
Decor in a furniture niche
If there is an open niche inside the cabinet — for decorative items, books, lighting — a decorative element on the back wall of this niche or on its ceiling creates an "interior within an interior". This works especially well in wardrobes with decorative niches and in bookcases with lighting.
Color and painting: how a uniform paint makes furniture part of the architecture
The most underestimated tool in this topic is color. Or rather, the lack of contrast.
White molding. White or milky cabinet. White ceiling. Everything is painted in a single tone — and the joint disappears. The boundary between furniture and architecture dissolves. The cabinet literally becomes part of the wall.
This is exactly how expensive built-in systems work in historic European interiors: everything is white, everything is painted uniformly, and the decor is only read through relief and shadow — without color contrast.
When the molding should match the color of the cabinet
If the cabinet is colored (gray, green, blue, beige) — the molding should be the same color or very close. White molding on a dark gray cabinet is a contrast that only emphasizes the joint, rather than hiding it.
Moldings made of polyurethane They are typically supplied white — and can be easily repainted in any color with acrylic paint. Technology: primer for polyurethane + two coats of acrylic paint in the desired color. The result — the molding perfectly matches the color of the cabinet.
When the molding matches the ceiling
If the goal is to dissolve the joint and create the illusion of a cabinet 'to the ceiling' — the molding is painted the color of the ceiling. The eye sees: cabinet, molding, ceiling — all in one tone. The boundary exists, but it doesn't scream.
Toning with an accent
A bolder option: the molding and decorative elements are painted in one color, while the cabinet itself is in another. For example, a dark blue cabinet, molding and decor — gold or copper. This is not 'disappearing' the joint, but turning it into a decorative boundary.
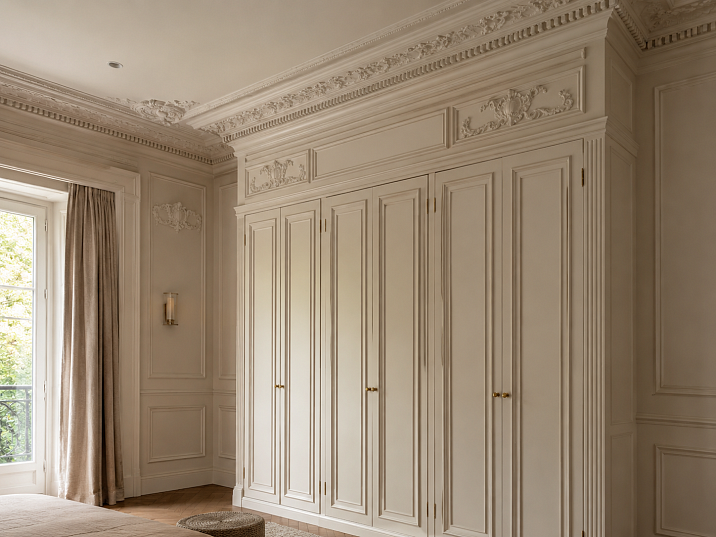
Comprehensive solution: what the ideal result looks like
Let's describe a specific result — what built-in furniture looks like after proper top finishing.
Wardrobe in the bedroom. Width 3.2 meters, height 2.2 meters, ceiling 2.6 meters. Gap — 40 centimeters.
Before:
Above the wardrobe — a dark space where boxes are stored. Uneven ceiling. The joint between furniture and wall without framing. The wardrobe looks like a large box.
After:
-
Corner cornice made of polyurethane along the top edge of the wardrobe, connected to the ceiling.
-
Decorative overlay along the central axis — one stucco medallion from the assortment.
-
Everything is painted in a single tone — the color of the ceiling.
The gaze rises to the cabinet, passes along the cornice, stops at the medallion. That's it. No emptiness, no technical gap. The cabinet has become part of the architecture.
Table: what and when to use for the top of built-in furniture
| Situation | Solution | Link |
|---|---|---|
| Gap up to 10 cm between the cabinet and the ceiling | Polyurethane molding | Moldings |
| Kitchen up to the ceiling — rigid joint | Corner ceiling molding | Ceiling molding |
| Furniture portal without decor | Decorative molding above the lintel | Decorative stucco |
| Wardrobe without character | Stucco decor + crown molding | Relief Decoration |
| Hallway cabinet — empty top | Molding + one center accent | Moldings |
| TV zone without accent | Decorative stucco element above center | Decorative stucco |
| Bookcase — no top line | Ceiling molding along the top edge | Ceiling molding |
Four ready-made purchase scenarios
Scenario 1: "Cabinet doesn't reach the ceiling"
Most common. Quick solution.
What to buy:
-
Moldings made of polyurethane — corner profile matching the width of the gap.
-
Mounting adhesive.
-
Paint matching the color of the cabinet or ceiling.
-
Acrylic putty for joints.
Installation time: a few hours.
Result: the top of the cabinet is covered with a decorative cornice. The space between the furniture and the ceiling no longer reads as unfinished.
Scenario 2: “Kitchen up to the ceiling looks too rigid”
The task is to soften the joint and add an architectural line.
What to buy:
-
Ceiling molding — cornice for the corner between the cabinet and the ceiling.
-
Corner inserts for joints.
-
Construction adhesive, putty, paint.
Installation time: one day.
Result: the kitchen up to the ceiling gets a decorative horizontal line that softens the joint and connects the kitchen to the ceiling.
Scenario 3: "The dressing room should look more expensive"
The task is to create a "boutique" feel instead of a "warehouse."
What to buy:
-
Moldings for built-in furniture — along the top edge of all storage systems.
-
Buy decorative stucco — above the mirror sections.
-
Relief Decoration — one central accent above the main section.
-
Construction adhesive, paint.
Result: the dressing room transforms from a functional space into a designed space.
Scenario 4: "Furniture portal around the door or TV"
The task is to make the portal an architectural element.
What to buy:
-
Moldings made of polyurethane — to form the portal frame.
-
Decor for Molding — corner blocks and accents for the frame corners.
-
Decorative stucco — over the central section.
-
Ceiling molding — if the portal goes up to the ceiling.
Result: the furniture portal becomes an architectural frame — not furniture against the wall, but part of the wall.
About the Company
STAVROS — a Russian manufacturer and supplier of polyurethane stucco decor with a full range for finishing built-in furniture. The STAVROS catalog includes — Moldings made of polyurethane for closing gaps and decorating the top of cabinets, Ceiling molding for connecting furniture to the ceiling, Decorative stucco for furniture portals and accent areas, Relief Decoration for point accents, Decor for Molding for corner solutions.
All STAVROS products are made of high-density extruded polyurethane — a moisture-resistant, durable, easy-to-install material that is ideal for working with furniture. to buy molding at STAVROS — means getting a consultation on selecting profiles and decor for a specific task, correct quantity calculation, and fast delivery.
Frequently asked questions
How to beautifully close the gap between the cabinet and the ceiling?
polyurethane molding or with a corner cornice. This creates a decorative line and neatly covers the joint — unlike decorative chipboard panels.
Can stucco molding be used above a built-in wardrobe in an ordinary apartment?
Yes. Stucco molding for a built-in wardrobe made of polyurethane is suitable for any apartments and houses. It is mounted with glue, requires no special tools, and is easy to paint.
How to design the top of a kitchen that goes up to the ceiling?
Ceiling molding — a corner cornice mounted in the corner between the upper cabinets and the ceiling. It hides the joint and adds a decorative line.
What to buy to make the wardrobe look more expensive?
Molding along the top edge of storage systems, Decorative stucco above the mirrored sections and one stucco accent above the main section. A unified paint finish completes the system.
How to make a furniture portal resemble an architectural element?
Moldings made of polyurethane form a frame, Decorative stucco adds an accent at the top. A single paint job dissolves the boundary between furniture and wall.
Can you install molding above a cabinet yourself?
Yes. Installing molding with glue is a one-person job. You need: glue, painter's tape for temporary fixation, acrylic putty for joints, paint.
What color of molding should I choose for a built-in wardrobe?
In the color of the ceiling — if you want to create the illusion of a cabinet flush with the ceiling. In the color of the cabinet — if the cabinet is colored and the molding should be its extension. In a single neutral tone — if the entire system (walls, cabinet, ceiling) is close in color.