Article Contents:
- Why finish transitions often ruin expensive renovations
- The difference between 'covering up' and 'styling'
- Where a molding for material transitions is most often needed
- Horizontal transition: lower and upper parts of the wall
- Vertical transition: accent zone against a general background
- Entryway: protective zone and accent top
- TV zone: frame for the room's main screen
- Bed headboard: soft material in a rigid frame
- Commercial interior: salon, restaurant, office, showroom
- Polyurethane moldings: the main tool for a clean joint
- Which profile to choose for the joint of finishes
- Paint plus wallpaper: how to make the transition not random
- Horizontal molding between the lower and upper parts
- Vertical molding for an accent span
- Frame of moldings around wallpaper
- Decorative stucco molding above the central zone
- Panels plus paint: how not to get a "glued-on insert"
- Top molding for panels: a mandatory element
- Side moldings for accent panel
- Bedroom: soft panel in a rigid frame
- Hallway: lower protection zone as part of the design
- Decorative stucco: when a simple molding is no longer enough
- In the center of the accent wall
- Above the panel: finishing the top molding
- Inside the molding frame
- At the junction of two zones
- Next to the sconce: accent near the light source
- Ceiling stucco: how to finish a combined wall from above
- Ceiling cornice as an extension of the molding system
- Chandelier rosette: the finishing touch
- When a cornice is especially needed
- Nuances of installing moldings at material joints
- Molding over wallpaper surface
- Molding at the border of panels
- Painting molding at the junction of different colors
- Ready-made scenarios: how to buy for specific tasks
- Scenario 1. Paint + wallpaper in the bedroom
- Scenario 2. Panels + paint in the living room
- Scenario 3. TV zone with different materials
- Scenario 4. Hallway with lower protective zone
- Table: which molding for which joint
- The main rule of a combined wall: unity through detail
- About the company
- Frequently Asked Questions
There is one test that instantly determines the level of renovation. Not the number of square meters of tile in the bathroom. Not the brand of plumbing fixtures. Not whether the wallpaper is Italian or domestic. But how materials are joined in this interior.
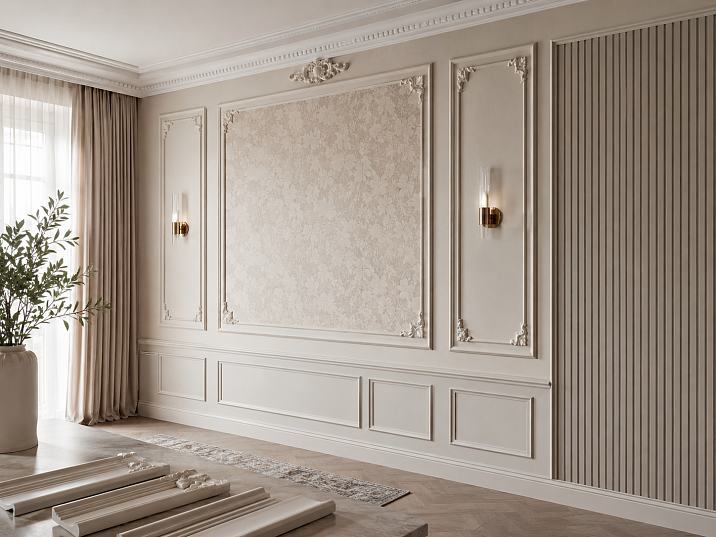
Look at the wall where paint meets wallpaper. Or where MDF slats end and a painted surface begins. Or where decorative textured plaster suddenly breaks off and a smooth white ceiling starts. If the boundary looks accidental, the entire interior loses its level. Even if each material is good on its own.
This article is about how Moldings made of polyurethane, Moldings и Decorative stucco they turn a technical joint into an architectural line. About how molding is not just decor, but a way of thinking about space. And about how a combined wall looks expensive only when materials are joined neatly: the molding covers the boundary, Decorative stucco makes the transition expressive, and Relief Decoration turns a technical joint into a well-thought-out architectural line.


Why the junction of finishes often ruins expensive renovations
Imagine a person in an expensive coat with a carelessly torn-off button. One detail — and the whole impression collapses. It's the same with interiors. You can spend a significant budget on quality materials, but if the transitions between them are not finished — the result will look incomplete.
Why does this happen? Because the junction is the point of maximum tension in design. This is where two different solutions meet face to face. And if you don't help them 'greet' each other neatly — they will conflict.
There are several typical scenarios where the junction of finishes ruins the impression of the renovation:
Wallpaper and paint without a divider. The dividing line is uneven, the seam is visible, one material slightly overlaps the other. The eye constantly catches on this boundary.
Slats or panels without a top finish. The panel ends with a straight cut, and above it — just a wall. This looks like an unfinished structure, not a design solution.
Decorative plaster with a clear boundary. The textured area breaks off abruptly, without a transition. This looks especially bad in horizontal separation.
An accent niche without framing. The niche is made of a different material, but its edges are not finished — and it looks like a cut-out hole, not a decorative element.
In all these cases, the solution is one: moldings for finish junctions — a horizontal or vertical profile that covers the border and makes it part of the design. It doesn't mask the problem but solves it architecturally.


The difference between "cover" and "design"
This is an important conceptual point. You can "cover" a joint — install a molding and forget about it. Or you can "design" a joint — plan the transition as a design element, choose a molding of the right scale and relief, add decorative molding as an accent, tie everything together with a single color.
When you design a joint — it ceases to be a problem and becomes a detail. And details are what make an interior look expensive.
Our factory also produces:


Where a molding for material transitions is most often needed
The areas where moldings for finishing joints are used most often and effectively can be grouped by room type and material combination type.
Get Consultation
Horizontal transition: lower and upper parts of the wall
This is the most common application. The wall is divided horizontally: the lower third — one solution, the upper — another. This could be:
-
paint at the bottom, wallpaper at the top;
-
MDF panels at the bottom, paint or wallpaper at the top;
-
decorative plaster at the bottom, neutral paint at the top;
-
wooden paneling at the bottom, painted wall at the top;
-
tiles on the kitchen backsplash, paint above.
A horizontal molding at the dividing line is not just a separator. It is an architectural line that "reads" as an intentional design decision. It says: "This is intended, this is not an accident."
The height of the horizontal molding for dividing zones is one of the key questions. Standard solutions:
-
At a level of 80–90 centimeters from the floor — the area of a table, console, cabinet. This is the "belt" of the interior.
-
At a level of 120–130 centimeters — eye level when sitting. A popular solution for living rooms and bedrooms.
-
At a level of 150–170 centimeters — dividing the wall into two equal parts with high ceilings.
The width of the profile for horizontal division — from 20 to 80 mm depending on the desired accent. A thin molding is a delicate border. A wide one is a statement.
Vertical transition: accent zone against a general background
Vertical molding marks the side boundaries of the accent zone: wallpaper inserts, decorative niche, area behind the sofa or bed, TV wall.
Classic example: three vertical moldings on the wall create two 'spans' — each span has wallpaper, while the rest of the wall is painted. Vertical moldings are the zone boundary that turns a random insert into a planned panel system.
Hallway: protective zone and accent top
In the hallway, the lower part of the wall is often made of more durable material — tiles, PVC panels, MDF, oilcloth wallpaper. This is practical, but without finishing it looks like a temporary solution.
A horizontal molding at a height of 90–100 centimeters from the floor — and the lower protective zone becomes a baseboard, an architectural element. buy polyurethane moldings for the hallway — one of the best investments: the effect is obvious, and the molding is completely moisture-resistant and does not deform with humidity changes near the front door.
TV zone: frame for the room's main screen
The TV wall is one of the most popular accent zones in modern interiors. It is often made of stone, tile, wood panels, decorative plaster. And almost always this zone needs side framing — otherwise it looks like a random 'patch' fragment.
Vertical moldings on the sides of the TV zone + horizontal molding at the top and bottom — this is a frame. Professional, neat, which makes the accent wall a full-fledged design element.
Bed headboard: soft material in a rigid frame
Soft panels, fabric inserts, wallpaper behind the bed — all of this needs a frame made of moldings. Without a molding, a soft insert looks like a glued piece of material. In a molding, it becomes a panel, a decorative item.
Commercial interior: salon, restaurant, office, showroom
In commercial spaces, transitions between zones solve not only an aesthetic but also a functional task: they demarcate zones, set a rhythm, and create a sense of structured space. Moldings for zoning finishes in commercial interiors — it is a tool of professional design.
Polyurethane moldings: the main tool for a clean joint
Why polyurethane, and not wood, aluminum, or PVC? Because a polyurethane molding is a unique combination: it looks like stucco, works like plastic, and is installed like a sticker.
Moldings made of polyurethane have a number of properties that make them an ideal solution for finishing joints:
Moisture resistance. Polyurethane is not afraid of moisture, does not swell, does not deform. This is critical in the hallway, bathroom, kitchen — everywhere where finish joints are especially noticeable.
Lightness. Polyurethane molding is held by assembly adhesive without dowels or screws. No need to drill through wallpaper or panels. The adhesive is applied to the profile, the profile is pressed — and after a few minutes it already holds.
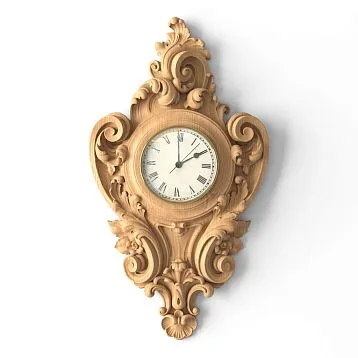
Relief flexibility. Polyurethane moldings are available with different reliefs — from a completely smooth profile to rich classical stucco. This means you can choose a molding that exactly matches the interior style.
Paintability. The molding accepts any water-based paint. It can be painted in the wall color (and it becomes a delicate line, almost invisible), in a contrasting color (and it becomes an accent), or in a shade that ties together two materials on either side of the joint.
Simple work. The molding is cut with a regular hacksaw or construction knife. Corners are trimmed with a miter box. No special tools needed.
Which profile to choose for the joint of finishes
The choice of profile is determined by the width of the joint and the desired accent:
-
Smooth rectangular profile (10–20 mm) — for minimalist interiors, a delicate border, almost invisible when painted in the wall color.
-
Profile with a lip (20–40 mm) — creates a shadow, makes the border three-dimensional.
-
Molding with relief (from 30 mm) — for classic and neoclassical styles, the border becomes an architectural element.
-
Wide frieze (from 50 mm) — for tall rooms where an expressive horizontal line is needed.
For vertical joints, a narrower profile is usually chosen — from 15 to 30 mm. For horizontal ones, it's wider because the horizontal line should "hold" the wall division.
Paint plus wallpaper: how to make the transition not random
This is perhaps the most common combination in modern interiors. One type of wallpaper serves as an accent — behind the sofa, behind the bed, in the hallway as a "runner", in a niche. The rest of the wall is painted.
Without a molding, the border between wallpaper and paint looks random even with careful installation: two different coverings meet on the same plane, and it always feels visually awkward. Molding changes everything. It turns "here's wallpaper, and here's paint" into "here's an accent zone, clearly defined."
Horizontal molding between the lower and upper part
The most classic solution for a bedroom: the lower third — dense textured wallpaper, the upper part — neutral paint in a calm tone. On the dividing line — a horizontal molding. The molding is painted to match the paint tone or the wallpaper tone.
This technique visually increases the room's height: the eye first lingers on the wallpaper texture below, then moves across the clear line of the molding — and travels upward along the calm painted wall to the ceiling.
Vertical molding for an accent span
There is a wall where an accent wallpaper insert is planned — say, a strip 1.2 meters wide in the center. The rest of the wall is painted. Without molding, it looks like a glued-on poster. With vertical moldings on the sides of the insert, it's a decorative panel.
For this technique, it's important that the moldings are attached with a slight indentation from the edge of the wallpaper: not flush against the wallpaper, but 5–10 mm further along the wallpaper edge, so the molding slightly overlaps the wallpaper edge. This hides any possible unevenness of the glued edge and makes the joint perfect.
Molding frame around wallpaper
The most effective solution for the bedroom behind the bed. Wallpaper is applied in a specific area, and this area is completely framed with a molding frame. Not just wallpaper on the wall — but a panel in a frame. This is a fundamentally different visual level.
For such a frame Buy polyurethane moldings you need extra: four sides of the frame plus 15% for cutting corners. The corners of the frame can be complemented with decor for moldings — corner blocks that turn the rectangle into a full-fledged architectural frame.
Decorative stucco above the central area
If the wallpaper occupies the central part of the wall — above it, on the painted part, you can place decorative molding. A small ornament or horizontal frieze above the accent area visually 'crowns' it, giving it completeness.
This works especially well in the bedroom above the headboard: wallpaper in a molding frame + stucco accent above + ceiling cornice — three horizontal levels that build the wall from bottom to top.
Panels plus paint: how to avoid getting a 'glued-on insert'
Wooden slats, MDF panels, moisture-resistant PVC panels, stone slabs — all these are popular accent solutions. And they all share one common problem: they have to end somewhere. Their top, side, or bottom edge is a point that needs to be finished.
A panel without a molding at the edge looks like a glued-on insert. The eye sees: "something was glued on here." A molding at the edge says: "this was planned."
Top molding for panels: an essential element
When panels cover the lower third of the wall, a horizontal molding is needed above them. It acts as a "shelf" — visually completing the lower zone. Without it, the panel looks like an unfinished structure.
The width of the top molding above panels is from 30 to 60 mm. A wider profile creates a more pronounced "shelf." The molding is painted either the color of the wall above or the color of the panels — depending on which zone it needs to be "attached" to.
Side moldings for an accent panel
If the panel occupies part of the wall (not the full width), its side edges also need finishing. Vertical moldings along the edges of the panel turn it into a complete architectural element.
This technique works especially well for a TV zone: a stone or wooden panel behind the television, framed by vertical moldings on both sides. Relief Decoration in the upper corners of the framing — and the wall acquires a completely different level.
Bedroom: a soft panel in a rigid frame
Soft headboards, fabric inserts, decorative panels behind the bed — all of this requires framing. Molding creates a clear boundary between the soft texture and the painted wall, giving the insert the status of an "object" rather than a "piece."
An important nuance: molding for a soft panel is best installed not flush against the fabric, but with a small air gap of 3–5 mm. The fabric changes size slightly with humidity changes — rigid molding installed flush can leave marks on it.
Entryway: lower protection zone as part of the design
In the entryway, the lower zone made of practical materials — tiles, PVC panels, lacquered paneling — should be framed with horizontal molding at the top. This turns a practical solution into a design element.
The height of the lower zone in the entryway is from 80 to 100 centimeters. Horizontal molding at this level: width from 30 mm, relief from simple to classic. If the entryway is small, it's better to choose a delicate profile without complex relief to avoid overloading the narrow space.
Decorative stucco: when simple molding is no longer enough
Molding covers the joint. That's its basic function. But sometimes you need not just to cover — you need to emphasize, express, make the transition memorable. That's when it comes into play Decorative stucco.
Decorative stucco is not a replacement for molding. It is its continuation. Molding creates structure, stucco creates character. They work together.
In the center of the accent wall
Horizontal molding divides the wall into two zones. At the level of this molding, in the center of the wall — buy decorative moldings in the form of a horizontal cartouche or ornamental insert. It "quotes" the molding and makes it lively, non-literal.
This works on wide walls — from 2.5 meters. On a narrow wall, a central accent on the molding will look overloaded.
Above the panel: completion of the upper molding
If there is a free part of the painted wall above the upper molding of the panels — a small stucco decor above the molding, in the center of each section, creates a feeling of "crowning" each span. This is a classic technique for halls and formal areas.
Inside the molding frame
If the wallpaper insert is framed by a molding frame, inside the frame — on the painted part of the wall, above the wallpaper — you can place decorative molding: a medallion, frieze, ornament. It connects the frame and wallpaper as a single concept.
At the junction of two zones
If the junction is not a horizontal line, but an angle (for example, the lower zone runs along two walls of the room), the corner Relief Decoration at the connection point — this is an elegant solution. It hides the corner of the molding and makes the connection point decorative.
Near the sconce: accent at the light source
A sconce located near a material joint — for example, on a molding between panels and paint — needs context. A small decorative element next to the fixture says: this is a fixture in the system, not a random outlet on the wall.
Ceiling molding: how to finish a combined wall from above
There is a common situation that reduces the effect of any work with moldings and joints: the wall is carefully designed, transitions are resolved, decor is installed — but the ceiling is bare. A white rectangle without a single line. And everything done below seems to "hang" in the air.
Ceiling molding — this is the connection between the wall and the ceiling. A cornice around the perimeter of the ceiling is a boundary that closes the space from above. Just as a baseboard closes it from below.
Ceiling cornice as a continuation of the molding system
If the walls have moldings with a specific profile, the ceiling cornice should be from the same stylistic family. This unity makes the interior cohesive — the wall and ceiling exist in the same coordinate system.
For combined walls, the ceiling cornice is especially important: it "closes" the topmost joint — between the wall and the ceiling. And it does so elegantly, without unnecessary noise.
Ceiling rosette under the chandelier: the final touch
Buy ceiling molding — means also choosing a ceiling rosette. For a room with combined walls, where there is a lot of work with moldings, the ceiling rosette should match the level of the rest of the decor. If the moldings on the walls are rich — the rosette should also be expressive. If the moldings are delicate — the rosette can be simple.
When a cornice is especially needed
-
When walls are accent and richly decorated: the cornice "closes" the system from above.
-
When the ceiling is low (up to 2.6 meters): a properly selected thin cornice optically raises it slightly, creating a clear boundary.
-
When the room is elongated: a cornice around the perimeter visually balances the proportions.
-
When the interior is classic or neoclassical: a cornice here is a mandatory element.
Nuances of installing moldings at material joints
Installing a molding at the joint of two materials has its own specifics that are important to understand before starting work.
Molding over wallpaper
If the molding is glued over wallpaper, the surface must be strong and not peeling. Glue is applied to the molding, the molding is pressed against the wallpaper and holds as well as on plaster — provided the wallpaper is securely glued. Vinyl and non-woven wallpaper hold the molding well. Paper wallpaper — worse.
Important point: do not glue molding onto fresh wallpaper. Let the wallpaper dry for at least 24 hours.
Molding at the border of panels
If the molding is installed on the top edge of MDF panels, it is attached to the wall above the panels, covering their top end. This is correct installation. If the molding is attached to the panels themselves, when the wood dries, the molding may come off along with the panel.
Painting molding at the junction of different colors
This is the most delicate point. If the molding is between two zones of different colors, what color should it be painted?
Several solutions:
-
In the color of the upper zone — the molding 'approaches' the ceiling, making the wall appear taller.
-
In the color of the lower zone — the molding 'belongs' to the lower part, creating a finish.
-
In neutral white — the molding acts as a divider, not belonging to either zone.
-
In a contrasting color — the molding becomes an independent accent, a separate detail.
There is no universal answer — it all depends on the task. But, as a rule, molding in the color of one of the zones works better than molding in a third, unrelated color.
Ready-made scenarios: how to buy for specific tasks
Scenario 1. Paint + wallpaper in the bedroom
Wallpaper behind the bed, paint on the other walls. A frame of moldings around the wallpaper area is needed.
What to buy:
-
Moldings made of polyurethane — perimeter of the frame + 15% spare.
-
Decor for Molding — corner elements, 4 per frame.
-
Decorative stucco — light accent above the frame.
-
Construction adhesive, putty, paint.
Scenario 2. Panels + paint in the living room
MDF slats on the lower third of the wall, painted surface above. A top horizontal molding + side zone limiters are needed.
What to buy:
-
moldings for finish junctions — horizontal profile along the entire length of the upper border of the panels.
-
Relief Decoration — small accents above the molding in the center of each span.
-
molding decorative elements — for corner points.
-
Glue, putty, paint.
Scenario 3. TV zone with different materials
Accent wall behind the TV made of decorative stone or wood, the rest of the wall is painted.
What to buy:
-
Moldings made of polyurethane — vertical on the sides of the TV zone, horizontal on top.
-
Decor for Molding — corner elements.
-
ceiling molding — cornice around the perimeter to connect with the ceiling.
-
Glue, putty, paint.
Scenario 4. Hallway with a lower protective zone
Tiles or PVC panels on the lower part of the hallway walls, paint above.
What to buy:
-
Horizontal molding for material transition — along the entire perimeter at the height of the upper edge of the lower zone.
-
Buy molding for the cornice at the ceiling.
-
Glue, putty, paint.
Table: which molding for which joint
| Joint type | Recommended molding | Link |
|---|---|---|
| Paint and wallpaper (horizontal) | Horizontal profile 30–60 mm | Moldings made of polyurethane |
| Paint and wallpaper (vertical) | Vertical profile 15–30 mm | Moldings made of polyurethane |
| Panels and paint (top molding) | Wide horizontal profile 40–70 mm | Moldings made of polyurethane |
| Accent zone in frame | Molding frame + corner elements | Decor for Molding |
| TV zone | Molding around zone perimeter | Moldings made of polyurethane |
| Decorative accent at the junction | Decorative stucco on the molding | Decorative stucco |
| Top finish | Ceiling cornice | Ceiling molding |
The main rule of a combined wall: unity through detail
When two materials coexist on the same wall, they create tension. This tension can work for you or against you. If the tension is resolved by the molding, it becomes an interesting contrast. If not, a conflict.
Molding is a mediator. It says: 'Here are two different worlds, but they have come to an agreement. Here is the boundary. One ends here, another begins. This is intentional.'
When something is added to the molding Decorative stucco — the mediator becomes an architect. It doesn't just fix the boundary — it makes it part of the room's story.
This is what distinguishes an expensive renovation from a merely good one. Not the budget. Not the brands. The details. The attitude towards boundaries. The ability to turn technical transitions into design solutions.
Buy decorative molding, Buy polyurethane moldings, Buy ceiling molding — it's not about buying individual elements. It's about assembling a system. A system that makes your interior cohesive — from the baseboard to the ceiling rosette.
About the Company
STAVROS — a professional supplier of stucco decor and polyurethane moldings for residential and commercial interiors. The STAVROS catalog features the full range of products for designing joints, transitions, and accent areas: Moldings made of polyurethane of various profiles and widths, Decor for Molding, Decorative stucco и Relief Decoration for accent zones, Ceiling molding for cornices and rosettes. STAVROS products are made of extruded high-density polyurethane — a material that is not afraid of moisture, is easy to cut and paint, and is mounted with glue without drilling. STAVROS provides advice on selecting moldings for specific tasks and helps calculate the amount of material for any volume of work. Buy molding и moldings for finish junctions at STAVROS means getting a ready-made solution, not a set of parts.
Frequently asked questions
How to cover the joint between wallpaper and paint?
The best solution is a polyurethane molding. A horizontal or vertical profile, depending on the type of joint. It turns the boundary into an architectural line, not a technical defect. Moldings made of polyurethane are glued with mounting adhesive, cut with a regular hacksaw, and accept any paint.
Can stucco be used between panels and a painted wall?
Yes, and this is one of the best uses for moldings and decorative stucco. A horizontal molding finishes the top edge of the panels. Relief Decoration above the molding adds an accent. The result is a panel area that looks like a design solution, not a construction structure.
What to buy for a combined wall?
Basic set: Moldings made of polyurethane for borders, Decor for Molding for corner elements, Decorative stucco for accents, assembly adhesive, putty, paint. If a ceiling cornice is planned — Ceiling molding.
How not to overload a wall with different materials?
Choose one main line — a horizontal molding at the junction of zones. Add one decorative accent in the center. Make the rest in a single color. Three levels: structure → border → accent. No more is needed.
Is ceiling stucco needed next to a combined wall?
If the wall is an accent wall — yes. Ceiling molding covers the top joint and connects the wall to the ceiling into a single system. Without a cornice, the wall 'hangs' in the air, even if impeccably designed.
How to choose the width of the molding for the joint?
For horizontal wall division — from 30 to 70 mm. The higher the ceiling, the wider the molding can be. For vertical zone delimitation — from 15 to 30 mm. For framing a small insert — 15–20 mm, delicately.
What color to paint the molding at the junction of two different wall colors?
Most often — in the color of the zone to which the molding should visually "adjoin". If a neutral divider is needed — white. If an accent is needed — a contrasting color. The main thing is not a third random color that is not related to any of the zones.