Article Contents:
- Wooden cornice KZ-012 79×105 mm: what the product card confirms
- The wallpaper is already pasted: why the cornice material is now more important than in a regular renovation
- Cornice KZ-012 made of MDF under enamel: is it the most logical option after finished wallpaper
- The main question: paint KZ-012 before or after installation
- Main painting before installation
- Practical sequence for a finished room
- In ceiling color
- In the color of furniture or doors
- Contrast color
- Should sealant be left between KZ-012 and wallpaper?
- Wall 5.1 m
- Wall 4.8 m
- Why it's better to have fewer joints on finished wallpaper
- Is it worth ordering one KZ-012 strip for testing
- How much does the full material cost using a 5.1 × 3.6 m room as an example
- MDF
- Oak
- Oak
- How to accept KZ-012 after delivery before painting and cutting
- Comparison of three real KZ-012 specifications
- Control specification of KZ-012 before payment
- How to choose between MDF, beech, and oak without a general debate about materials
- Where to place inevitable seams if the walls are already wallpapered
- Final acceptance after installation
- Short conclusion
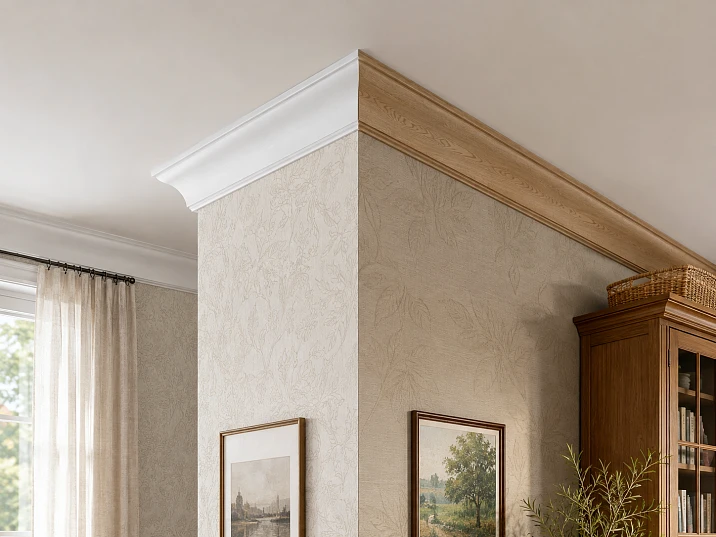
The renovation is almost complete. The ceiling is painted, expensive wallpaper is already hung, furniture is starting to be arranged — and only now it becomes noticeable that the transition between the wall and ceiling looks unfinished. KZ‑012 is brought back into the project: an expressive cornice 79 × 105 mm that can be used as a ceiling architectural profile.
At the rough finishing stage, such a choice would have been simpler: the profile could have been fitted, sanded, primed, and painted simultaneously with the wall. After wallpapering, the cost of a mistake is higher. Dust from finishing, primer, enamel, excess glue, or careless touch-up can damage the already finished decoration, which you don't want to redo for the sake of one decorative element.
Therefore, the main question is not "what is better in general — MDF, beech, or oak." You need to decide something else:
which version of KZ‑012 is more reasonable to order for an already finished room, and what part of the finishing operations should be done before installation, so that only clean fitting and minimal local touch-up remain on site.
The current KZ‑012 card confirms three versions:
-
MDF — 79 × 105 × 2600 mm, "Prestige," shown configuration "Under enamel";
-
beech — 79 × 105 × 2400 mm;
-
oak — 79 × 105 × 2400 mm.
At the time of verification, the price was:
-
MDF — 3,800 RUB;
-
beech — 8,230 RUB;
-
oak — 12,350 RUB.
These prices change, so they need to be re-checked before payment.
For an already finished room, the basic algorithm looks like this:
-
measure each wall section and each corner;
-
decide whether KZ‑012 will blend with the ceiling, match the color of doors/furniture, or remain a wood accent;
-
choose MDF, beech, or oak not by "prestige," but by finish;
-
build a cutting map for 2600/2400 mm and count the joints;
-
do a dry fit of one section or one plank;
-
perform the main painting/tinting as much as possible outside the finished room;
-
leave cuts, installation, treatment of fresh ends, and spot finishing touches on site;
-
protect the ceiling and wallpaper before the first cut and before applying the mounting compound.
If the interior is already built on a covering enamel and the cornice should become a continuation of a white or colored ceiling, MDF under enamel often turns out to be the most direct path. But this is not an automatic answer: the length of 2600 mm, the number of joints, the curvature of the walls, and the ability to neatly finish the connections after installation still need to be checked.
If the room already has visible oak — doors, furniture, panels, floor — an oak KZ‑012 may be a more logical accent. It should not be chosen just because it is more expensive: the value of oak is revealed when the wood texture remains visible or is part of the overall interior program.
Beech occupies an intermediate position: it is natural wood, but the choice of its finish and meaning compared to MDF needs to be confirmed based on the specific finishing. With KZ-012, beech and oak are 200 mm shorter than MDF, and after an already completed renovation this matters: each additional joint is another place that needs to be perfectly fitted next to the finished wallpaper.
If you are still choosing the scale of the upper profile, you can look Buy wooden ceiling baseboard and compare more restrained solutions. If KZ-012 is already approved, buy wooden cornice KZ-012 only after checking the wall map, material, and finish order.
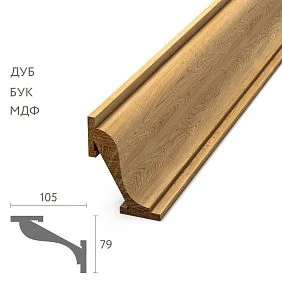
Wooden cornice KZ‑012 79×105 mm: what the card confirms
KZ‑012 is a specific architectural profile that the manufacturer allows to be used both in interiors and as a furniture crown element. For this article, the ceiling scenario is important.
| KZ‑012 execution | Size A × C × L | Price at the time of check | What is important |
|---|---|---|---|
| MDF | 79 × 105 × 2600 mm | 3,800 RUB | “Prestige”, shown preparation “Under enamel” |
| Beech | 79 × 105 × 2400 mm | 8,230 RUB | Natural wood |
| Oak | 79 × 105 × 2400 mm | 12,350 RUB | Natural wood |
The card separately indicates a rigid packaging frame of 390 RUB for safe transportation; its application and the final amount should be rechecked in the specific order.
Why 79 × 105 mm needs to be seen in scale
On screen, the profile seems more compact than in the room. 105 mm is a noticeable architectural projection, and 79 mm is a large vertical dimension in the wall-to-ceiling transition area.
If the room height is low, KZ‑012 can visually become a strong horizontal line. If the ceilings are high and there is already a tall baseboard, wide casings, and classic furniture, the scale may be appropriate.
Before placing a full order, it is useful to:
-
draw a 79 mm line on the wall;
-
make a cardboard/MDF mock-up with a 105 mm projection;
-
view the profile from the center of the room;
-
check whether it conflicts with the curtain rod, built-in wardrobe, ventilation grille, or top of the door.
MDF 2600 mm and wood 2400 mm — not a minor difference
Difference of one plank:
2600 − 2400 = 200 mm.
On a short wall, this has almost no effect.
On a wall about five meters long, these 200 mm can determine whether a third plank is needed.
The "under enamel" quality is confirmed for the shown MDF
This is a strong argument in favor of MDF if KZ‑012 must be white, colored, or match the ceiling.
But the phrase "under enamel" does not mean that the product is already painted in a finished interior color. The buyer still needs:
-
a selected primer/enamel system;
-
test coating;
-
a decision on where to paint;
-
Processing of ends after cuts.
Beech and oak require a separate decision on finishing
An open selected card does not give the right to automatically promise specific preparation of each wood finish for transparent tinting.
Therefore, before ordering beech or oak, you need to clarify:
-
in what quality the selected line is supplied;
-
whether enamel, stain, oil, or varnish is planned;
-
whether the planks should be matched by tone;
-
how the ends and joints will be processed.




Wallpaper is already pasted: why the cornice material is now more important than in a regular renovation.
When the walls are not yet finished, carpentry operations can be performed more freely. After expensive wallpaper, even a small adjustment becomes a risk.
Dust from sanding
Sanding a joint near textured or textile wallpaper can leave dust in the relief.
On a smooth washable surface, it is easier to remove. On a sensitive coating, it is harder.
primer and enamel
A drop of primer on a paintable wall is fixed along with the wall.
On finished wallpaper, an accidental stain may require local restoration or re-pasting of a strip.
Installation compound
Excess glue at the top edge can seep onto the wallpaper or ceiling.
If you start wiping it vigorously, you can damage the finish.
Painter's tape
Tape helps achieve a clean edge, but not every type of wallpaper handles it equally.
You cannot give universal advice like "seal everything with tape and remove it after a day." The adhesion of a specific tape should first be tested on an inconspicuous area or on a wallpaper sample.
Touching up joints
Each joint between two planks requires perfect geometry. If it has to be actively puttied and sanded after installation, the advantages of pre-painting are reduced.
Therefore, the material, length, and cutting plan after completed renovation become part of one task: the fewer dirty and repeated operations on the wall, the lower the risk of ruining an already finished room.
Our factory also produces:

Cornice KZ-012 made of MDF under enamel: is it the most logical option after finished wallpaper
If the cornice should visually blend with the ceiling, painted doors, or furniture, MDF under enamel indeed looks like the most straightforward solution. But the word "straightforward" does not mean "unconditionally best."
MDF has four strong arguments specifically for a late additional order.
1. Preparation for a covering finish is already included in the product card
The buyer is not trying to preserve the natural wood grain. The main goal is to achieve an even color.
This is convenient if KZ‑012 is planned:
-
white;
-
to match the ceiling color;
-
in the color of the doors;
-
to match the color of the built-in furniture;
-
contrasting, but opaque.
2. The 2600 mm length reduces the number of potential joints
On an already finished wall, every extra joint means:
-
cut;
-
fitting;
-
possible puttying;
-
local sanding;
-
touch-up painting.
MDF is 200 mm longer than beech/oak, so on some walls it really reduces the number of joints.
3. No need to match the natural pattern
If the profile is fully painted, the question "this strip is lighter than the adjacent one" goes away.
For a room with finished wallpaper, this simplifies preliminary preparation outside the room.
4. A test paint can be done separately
The plank or a short test section can be painted in the workshop.
This allows you to check in advance:
-
match with the ceiling;
-
gloss level;
-
density of the covering layer;
-
quality of painting the relief.
When MDF is not an automatic winner
If the interior is specifically built around natural oak, a covering white profile may look too "separate".
If KZ‑012 is meant to be a wooden belt between the ceiling and the wall, oak or beech may be more appropriate.
Also, you cannot choose MDF only because of length if the finish of the entire room requires visible wood.
Get Consultation
The main question: paint KZ‑012 before installation or after
For a room with already pasted wallpaper, the best answer is usually not "before" or "after," but to split the operations.
The main painting is done before installation, and minimal touch-up is left on site.
Main painting before installation
Advantages:
-
wallpaper is not near spraying/roller/brush;
-
the profile is convenient to rotate;
-
it is easier to paint complex relief areas;
-
you can work in good side light;
-
Less risk of drips on the wall.
What cannot be completely finished before installation
After cutting, the following appear:
-
Mitered ends;
-
straight joints;
-
trimmed ends;
-
areas of local finishing.
If all planks are pre-coated with a final layer and then joints are actively sanded, part of the coating will need to be restored.
Practical sequence for a finished room
Stage 1. Rough layout.
All walls are measured, lengths are recorded.
Stage 2. Preliminary cutting.
If the craftsman is confident in the geometry and has corner templates, the planks are pre-cut with a safe allowance or according to confirmed dimensions.
Stage 3. Main finishing outside the room.
The profile receives most of the finish coating.
Stage 4. Dry fitting.
On site, the following are checked:
-
angles;
-
joints;
-
junctions;
-
the ceiling;
-
Wallpaper.
Stage 5. Final trimming.
Only what needs to be adjusted.
Stage 6. Installation.
With protection of finished surfaces.
Stage 7. Local refinement.
Fresh edges, micro-seams, attachment points.
Stage 8. Spot finishing.
Minimal amount of paint in the finished room.
Why "we'll paint everything after installation" is weaker here
In a room before finishing, this method is possible.
But with ready wallpaper, it requires:
-
a large masking area;
-
on-site work;
-
more complex access to the terrain;
-
risk of damaging the wall during sanding.
If the bulk of the painting can be done outside the room, it's better to take advantage of this.
Why "we'll paint everything in advance and won't touch it again" is also risky
Joints rarely become perfect without finishing touches.
Especially on a long wall and in corners.
So leaving zero margin for correction is too optimistic.
Oak wooden cornice: when to order it instead of MDF
Oak makes sense when its visible texture is part of an already existing interior.
For example, the room has:
-
oak doors;
-
oak furniture;
-
oak floor;
-
wall panels;
-
wooden beams;
-
natural frames.
Then the oak KZ-012 can connect the upper part of the room with the rest of the wood program.
Why you shouldn't paint oak with opaque enamel just "because oak is more prestigious"
If dense enamel completely covers the texture, a significant part of the visual meaning of oak disappears.
At the same time, the price at the time of checking is significantly higher than MDF:
12,350 - 3,800 = 8,550 rubles per one plank.
If the project requires exactly an opaque white profile, this difference needs to be explained by the real task, not by the name of the material.
Oak and ready-made wallpaper
An oak plank still requires:
-
trimming;
-
end treatment;
-
finishing;
-
corner fitting.
That is, natural wood does not eliminate installation risk.
Where oak is especially strong
If KZ-012 is to remain noticeable.
For example:
-
ceiling white;
-
wallpaper calm;
-
cornice — warm oak;
-
doors — the same wood tone.
Then the profile becomes an architectural accent, not just a ceiling border.
What to check before ordering oak
-
is visible texture needed;
-
is pattern variation acceptable;
-
will there be tinting;
-
does the tone match the furniture;
-
is it possible to select several planks from the same batch;
-
how will the visible ends be processed.
Cornice KZ-012 made of beech: is it needed under enamel
Beech is natural wood, but buying it just as a "more natural version of MDF" is not always rational.
At the time of verification, the price:
8,230 RUB per slat.
That is, the difference with MDF:
8,230 − 3,800 = 4,430 RUB.
When beech is justified
-
natural material is needed;
-
the project allows visible wood;
-
certain joinery processing is required;
-
beech is already present in the furniture;
-
the craftsman prefers to work with a specific wood base.
If the finish is opaque
Need to compare:
-
cost;
-
length;
-
number of joints;
-
finish;
-
behavior of the end grains;
-
craftsman's requirements.
MDF 2600 mm can win precisely due to the longer plank and fewer joints.
Beech is 200 mm shorter
On a 5.1 m wall, this is critical.
Two beech planks:
2400 + 2400 = 4800 mm.
Missing:
5100 − 4800 = 300 mm.
A third plank will be needed, or use the remainder from another segment of the room.
Two MDF:
2600 + 2600 = 5200 mm.
Nominally enough for 5.1 m with a remainder:
5200 − 5100 = 100 mm
before accounting for cuts and joints.
This example does not prove that two MDF strips are always enough: real corners and cuts can eat up part of the margin. But it shows why a length of 2600 mm becomes a commercial factor after finished finishing.
If the walls have patterned wallpaper, should KZ-012 repeat the ceiling color
There is no single rule. There are at least three stable scenarios.
In the color of the ceiling
The cornice visually expands the ceiling area.
Advantages:
-
calm transition;
-
less competition with wallpaper;
-
large profile 79×105 is perceived as lighter.
Especially logical if:
-
the ceiling is light;
-
the wallpaper is active;
-
doors do not require a separate upper wooden line.
In the color of furniture or doors
KZ‑012 becomes an architectural belt.
This is how you can connect:
-
wooden doors;
-
built-in wardrobes;
-
furniture;
-
Cornice.
But then any joint and corner become more noticeable.
Contrast color
The most demanding option.
The profile becomes a graphic line.
Required:
-
precise corners;
-
clean joints;
-
even ceiling line;
-
neat junctions.
Why ready-made wallpaper changes the choice
On a rough wall, the entire upper band can be repainted if the color is not to your liking.
On ready-made wallpaper, adjusting the background is already difficult.
Therefore, it is better to approve the color KZ-012 on a real sample, applied directly to the wallpaper and ceiling.
How to protect ready-made wallpaper when installing cornice KZ-012
Protection should not be formal, but tailored to the specific coating.
Painter's tape
Before use, check:
-
adhesion;
-
doesn't it remove the top layer;
-
whether it leaves marks;
-
how it behaves on textured wallpaper.
Test on a sample or a hidden area.
Protective film
The film protects against:
-
dust;
-
small splashes;
-
accidental contact with a tool.
But it cannot be attached so that the adhesive part stays on sensitive wallpaper for a long time without testing.
Work in small sections
It is better to install sequentially than to immediately cover a long perimeter with glue.
This allows:
-
control excess;
-
fix the fit;
-
do not rush.
Pre-painting
The strongest way to protect is to simply not perform the main painting cycle near the wallpaper.
Ceiling protection
If KZ-012 is painted in a different color, the ceiling also needs protection.
What to do with the glue
The specific composition must match:
-
the profile material;
-
wall base;
-
weight/geometry;
-
the finish coating.
The article does not prescribe a single universal adhesive.
After choosing the technology, you can open Mounting and finishing materials and select a system together with the master.
Is it necessary to leave sealant between KZ-012 and wallpaper
An automatic answer "must be sealed" is dangerous here.
Sealant can fix a small visual gap, but it can also create a new problem: a thick, noticeable line on textured wallpaper.
When a thin seam may be appropriate
if:
-
the wall is relatively even;
-
there is a small stable gap between the profile and the wallpaper;
-
the sealant is compatible with the finish;
-
the color matches the cornice or wall;
-
the seam can be formed cleanly.
When it's better not to turn sealant into a way of "leveling the wall"
If the gap varies:
-
1 mm;
-
4 mm;
-
7 mm;
along the length of the wall, a thick strip of sealant will be more noticeable than the unevenness itself.
Then the problem is not in the finish seam, but in the geometry of the base.
Textured wallpaper
The relief prevents achieving a perfectly straight smooth line.
Sealant can get into the recesses of the pattern and make the edge "ragged."
Paper and sensitive coatings
Any wet operation near them requires caution.
You cannot assign one universal compound for all wallpapers.
What to do instead of trying to cover everything with sealant
-
fit KZ-012 as precisely as possible;
-
choose the profile position based on the actual wall;
-
reduce the number of joints;
-
make a test section;
-
only then decide whether a finishing seam is needed.
What to do if the walls are already slightly curved
On a finished room, fixing the entire upper part of the wall is late and expensive. Therefore, the geometry needs to be diagnosed before purchasing the full volume.
Checking with a long straightedge
Along the upper zone of the wall, use:
-
a straightedge;
-
a long, even lath;
-
laser control line.
Need to find:
-
bulges;
-
depressions;
-
corner tilt;
-
waves.
Why KZ-012 can highlight unevenness
Cornice is a rigid long plank.
If the wall deviates from a straight line, the profile either:
-
does not fit;
-
bends;
-
leaves a variable seam.
The larger the profile, the more noticeable the mismatch.
Conditional example
A wall 4 m long.
In the center there is a depression of 6 mm relative to the edges.
If you press the strip at both ends, a gap remains in the center.
Attempting to fill it with sealant creates a noticeable stripe.
Solution options
Local wall preparation.
If the wallpaper still allows for neat work and the problem is above its visible edge.
Division into shorter sections.
Sometimes two joints help better replicate the wall, but increase the amount of finishing work.
Accept a slight shadow gap.
If it is even and matches the design.
Decline KZ‑012.
If a large profile makes the wall defect too noticeable.
Why one test strip is especially useful on a curved wall
It shows:
-
how rigid the profile is;
-
how it sits;
-
what gap results;
-
how much local finishing will be required.
Length 2600 or 2400 mm: how many joints there will be on the finished wall
For a finished room, the length of one plank affects the cleanliness of installation almost as much as the material.
Wall 5.1 m
MDF:
2 × 2600 = 5200 mm.
Nominal reserve:
100 mm.
Beech/oak:
2 × 2400 = 4800 mm.
Missing:
300 mm.
That is, on one straight wall of 5.1 m, MDF potentially fits into two planks, while wood options require a third.
Wall 4.8 m
MDF:
2 × 2600 = 5200 mm.
Reserve:
400 mm.
Beech/oak:
2 × 2400 = 4800 mm.
Nominally exact.
But "exactly 4800" is a dangerous card: no margin for:
-
end trimming;
-
fitting;
-
saw cut;
-
imperfect corners.
In practice, two 2400 mm planks for a 4800 mm wall may be too tight a minimum.
Wall 4.6 m
Beech/oak:
4800 − 4600 = 200 mm.
Here, two planks already provide a small margin.
Why you can't count only the total length
The cornice runs:
-
internal corners;
-
external corners;
-
protrusions;
-
columns;
-
niches.
Each segment must be physically obtained from a specific plank.
You cannot join two short remnants into one long solid piece without a seam.
Why it's better to have fewer seams on finished wallpaper
Each additional seam is a separate operation next to the finished wall.
It requires:
-
precise cutting;
-
profile alignment;
-
possible adjustment;
-
local sanding;
-
finish restoration.
One long profile versus two short ones
If the wall is 2500 mm:
-
MDF 2600 — one solid plank;
-
beech/oak 2400 — at least two pieces.
This is a radical difference in finishing work.
But a solid plank also has limitations
It needs to be:
-
brought in;
-
unfold;
-
held;
-
set precisely.
On a tight object, sometimes two parts are physically easier to mount.
Where is the best place to place the joint
If it is inevitable:
-
not in the center of the main wall;
-
not in the area of strong side light;
-
not near the most noticeable corner;
-
if possible — above the cabinet or in a less noticeable place.
Why length is a commercial parameter
The buyer compares not only the price of one plank.
He compares:
-
how many planks are needed;
-
how many joints will there be;
-
how much work;
-
how difficult the finishing is.
Internal corners KZ-012: why you can't pre-cut all planks at 45° in advance
A room rarely has perfect 90° angles.
Even if the walls look straight, the actual angle may be:
-
88°;
-
91°;
-
93°.
If both planks are cut at 45° without checking, the joint will open up.
Principle
For the actual angle β the symmetrical cut of each part is approximately equal to:
β / 2
relative to the selected measurement system of the tool.
But the precise adjustment depends on:
-
the shape of KZ-012;
-
the position of the profile;
-
the saw;
-
the method of joining.
The article does not replace carpentry marking.
Why the wide geometry of KZ-012 amplifies the error
On a large profile of 79×105 mm, the angle discrepancy is more noticeable than on a thin batten.
What to do
-
measure every corner;
-
make a test cut on the leftover;
-
fit two pieces together;
-
adjust;
-
only then cut the finishing strips.
Why this block is important after finished wallpaper
Every alteration near the wall:
-
creates dust;
-
requires tools;
-
increases the risk of scratches;
-
delays the final installation.
Accurate preliminary carpentry work is especially valuable.
How to calculate KZ-012 for a room, not just by perimeter
The perimeter is only the first number.
Let's imagine a room 5.1 × 3.6 m with one door, above which the cornice still runs along the wall.
Full ceiling perimeter:
2 × (5.1 + 3.6) = 17.4 m.
MDF by net footage
17,4 / 2,6 = 6,69.
Minimum by area:
7 planks.
Total length:
7 × 2.6 = 18.2 m.
Nominal reserve:
0.8 m.
Beech/oak
17,4 / 2,4 = 7,25.
Minimum:
8 slats.
Total:
19.2 m.
Reserve:
1.8 m.
At first glance, wood gives an even larger total remainder. But the key is the segment map.
Why 7 MDF panels may not fit perfectly
Two walls of 5.1 m each require:
-
two planks each.
Two walls of 3.6 m:
-
each also longer than one plank of 2.6 m.
That is, there are joints on all four walls.
Need to distribute the leftovers.
Example of an MDF working map
Wall A 5.1:
-
2600 + 2500.
Remainder from the second plank:
100 mm.
Wall B 5.1:
-
2600 + 2500.
Another 100 mm.
Wall C 3.6:
-
2600 + 1000.
Wall D 3.6:
-
2600 + 1000.
For two-meter extensions, one plank can be used:
1000 + 1000 = 2000 mm
with a margin of 600 mm.
Total:
-
2 planks for the first long solid parts A/B;
-
2 for extensions 2500 A/B;
-
2 for long parts C/D;
-
1 for two extensions 1000.
In total, 7 planks indeed add up.
For beech/oak 2400 mm
Wall 5,1:
-
2400 + 2400 + 300.
You already need three segments if you don't use other layouts.
This increases the number of connections on the main wall.
Therefore, choosing material after a finished renovation cannot be based only on cost per meter.
Is it worth ordering one KZ-012 strip for testing?
For an already finished room, a test strip is not excessive caution if there is at least one uncertainty:
-
the real scale of 79×105 mm is unknown;
-
the wall is uneven;
-
the ceiling color is complex;
-
the wallpaper is expensive;
-
there is doubt about MDF/oak;
-
it is unknown how the profile will behave in the corner;
-
the finish needs to be approved.
What one plank checks
It allows you to see:
-
the real depth of 105 mm;
-
the relief under side lighting;
-
fit to the wall;
-
behavior in the corner;
-
the selected color;
-
quality of the trimmed end.
If MDF is chosen
A trial plank is useful as a test:
-
primer/enamel;
-
gloss;
-
color;
-
method of local touch-up.
If oak
You can check:
-
drawing;
-
tone;
-
reaction to the finish;
-
compatibility with doors and furniture.
Cost of the trial plank
At the time of checking:
-
MDF — 3,800 RUB;
-
beech — 8,230 RUB;
-
oak — 12,350 RUB.
Plus packaging and delivery under current terms.
If the plank fits, it does not become waste: it is used in the main installation.
When a trial order is especially justified
If a full project requires 7–10 planks, the cost of one check is significantly lower than the cost of redoing the entire batch.
How much the full material costs using a room 5.1 × 3.6 m as an example
Let's take the previously calculated ceiling perimeter:
17.4 m.
This is just an example, without additional protrusions and niches.
MDF (740–760 kg/m³, emission class E1/E0) provides ideal geometry, uniformity, and better base for enamel: high adhesion, smooth surface, absence of knots and cracks.
According to the map, 7 planks are required.
7 × 3,800 = 26,600 rub.
Beech
Minimum by length — 8 slats.
8 × 8,230 = 65,840 RUB
Oak
8 × 12,350 = 98,800 RUB
The difference is significant.
But the comparison cannot be reduced to the thesis “MDF is cheaper — so it’s better.”
What else is included in the real cost
-
finish;
-
cutting;
-
installation;
-
angles;
-
delivery;
-
packaging;
-
local restoration in case of an error.
Why oak can be justified despite the price
If the interior requires visible wood and oak unites doors, furniture, and flooring, its visual function differs from painted MDF.
Why beech may be the most controversial option
It is noticeably more expensive than MDF, 200 mm shorter, but can be chosen for the natural material.
If after this it is completely covered with an opaque enamel and there is no other beech wood in the room, one should honestly ask: what specific problem does the surcharge solve?
How to reduce dirty operations in an already finished room
Late installation of KZ-012 is better organized as a "final assembly" rather than a continuation of rough renovation.
All measurements — before delivery
There is no need to bring ten planks and then decide where they will go.
Maximum cuts — in the workshop
If the angles and dimensions are confirmed, a significant part of the trimming can be done outside the room.
Test cuts — on scraps
The saw is not adjusted on a finished long plank near the wall.
Grinding — local and minimal
If each joint requires prolonged abrasive work, the cut geometry is not accurate enough.
Dust removal
Even minor manual sanding near wallpaper must be done with surface protection and cleanup.
Finish — with a small tool
For spot touch-ups, have ready in advance:
-
color;
-
brush/applicator;
-
coating system.
Do not open a can for the first time after installation and check the shade directly on the cornice.
How to protect expensive wallpaper: working sequence for installation
Before the installer arrives
Prepare:
-
leftover wallpaper or a sample;
-
photo/code of ceiling paint;
-
free access around the perimeter;
-
protection for furniture.
Tape test
If using painter's tape:
-
stick a small piece to a hidden area;
-
leave it for a time close to the working duration;
-
remove at a safe angle;
-
check the surface.
Protect the top of the wall
The film/paper should protect not only 5 cm under the cornice, but the entire area where the tool might touch.
Do not place tools on furniture or windowsills.
Late installation is often done in an already furnished room. A separate work area is needed.
Check the ceiling.
If the ceiling is matte, any touch with a dirty hand or tool can leave a mark.
Remove excess compound immediately according to the technology
But do not rub it blindly into the wallpaper. You need to know how a specific compound is removed from a specific surface.
How to accept KZ-012 after delivery before painting and cutting
Even if the material and quantity are already selected, long planks cannot be immediately sent for painting or cut according to the map.
First, verify the execution
Check:
-
article KZ-012;
-
material;
-
size 79×105;
-
length 2600 or 2400;
-
surface quality;
-
quantity;
-
absence of transport damage.
Lay out all planks according to the future walls
For MDF, the task is primarily geometric.
For beech and oak, visual sorting is added.
It is useful to assign in advance:
-
long solid sections;
-
extensions;
-
planks for the main wall;
-
material for corners;
-
reserve for test cut.
Why the straightest strip is best given to the main wall
If one wall is visible from the entrance along its entire length, the joints and geometry are more noticeable there.
On a less visible area, a strip with a slight allowable deviation can be used if the craftsman considers it suitable.
For oak and beech — compare the grain before toning
Natural wood does not repeat.
If two planks meet in a single straight joint, it is desirable to see in advance how much they differ:
-
tone;
-
direction of fibers;
-
grain activity.
This does not mean mandatory matching "as a single board," but a random sharp contrast can be avoided.
Only after acceptance approve the cutting map
If one of the slats is damaged and only suitable for short pieces, the original map changes.
Therefore, the sequence:
acceptance → distribution → map → cutting → finishing.
And not:
payment → painting of the entire batch → detection of defect.
Comparison of three real specifications KZ‑012
To ensure the material is chosen not by abstract properties, consider the same
Control specification KZ‑012 before payment
After all decisions, the order should be recorded in one technical line.
For example:
KZ‑012 / MDF / 79×105×2600 mm / Prestige / Under enamel / 7 slats / color ___ / ceiling mounting / 4 internal corners / main painting before installation / local touch-up after / wallpaper already ready.
For oak:
KZ‑012 / oak / 79×105×2400 mm / 8 slats / clear or tinted finish ___ / distribute slats across walls before finishing / wallpaper ready / minimize joints.
Why fix the finishing order directly in the specification
To avoid this:
-
the painter expects clean slats after installation;
-
the installer thinks they are already finally painted;
-
the designer counts on an invisible joint;
-
the owner does not want any sanding in the room.
One line allocates responsibility in advance.
Final procurement check
Before payment:
-
price is current;
-
availability confirmed;
-
quantity matches the last card;
-
material is the same as in the approved sample;
-
packaging and delivery are clear;
-
the master knows that the walls are already wallpapered.
How to choose between MDF, beech, and oak without a general debate about materials
For an already finished room, it is more convenient not to argue about which material is “better,” but to answer four practical questions.
Is visible wood texture needed
If not, and KZ-012 must be a covering color, MDF gets a strong advantage in terms of finish logic and price.
If yes, beech and oak are compared, and the color and pattern must be coordinated with the existing wood in the room.
How critical is it to reduce the number of joints
If the room has walls of 2.5–2.6 m and 5.0–5.2 m, MDF length of 2600 mm can significantly simplify the layout.
For a room with short segments, 2400 mm may be sufficient, and this argument weakens.
How complex is local finishing
Painted MDF is easier to incorporate into a single painted band.
Natural transparent finish requires more careful work with:
-
shade;
-
edges;
-
joints;
-
the pattern of adjacent planks.
What budget is acceptable
For the same approximate perimeter of 17.4 m:
-
MDF — 26,600 RUB;
-
beech — 65,840 RUB;
-
oak — 98,800 RUB.
This spread is too large to choose a material based only on the word "natural."
Short decision matrix
| Finished interior condition | Most logical candidate |
| White/colored covering cornice, minimal dirty work | MDF |
| Natural wood without a pronounced oak program is needed | beech after a trial finish |
| The interior is built on oak and the texture should be visible | Oak |
| The main task is to minimize the number of joints | first check MDF 2600 |
| The wall is about 5.1 m | It is especially interesting to compare MDF |
| The wallpaper is very sensitive | material with a minimum number of seams and maximum pre-finishing |
This table does not replace a sample, but quickly shows which option should be tested first.
Where to place inevitable seams if the walls are already covered
When a seam cannot be avoided, its position must be determined before cutting, not where the first plank accidentally ended.
Not in the main viewing axis
If a person entering looks at the long wall as a whole, the center of that wall is a bad place for a seam.
Closer to a less noticeable area
Often it is more convenient:
-
above the tall cabinet;
-
near the curtain area;
-
in a place that is visually covered by furniture;
-
on a short section near the corner.
Not too close to the corner
A joint and a miter corner nearby create two complex operations on one short fragment.
Not where there is strong side lighting
Light along the wall highlights the slightest step.
Why the joint map should be part of the order
If for a beautiful joint position one plank needs to be 2300 mm instead of 2500 mm, the remainder can be used in another segment.
This is exactly how real material savings occur without compromising the finish.
Errors when ordering KZ-012 after wallpapering
Mistake 1. Choosing material only by price
MDF, beech, and oak solve different visual tasks.
Mistake 2. Choosing oak and then completely covering it with enamel without reason
The extra cost for natural wood loses its meaning.
Mistake 3. Calculating only the perimeter
A map of individual walls may require more slats.
Mistake 4. Not accounting for 2600 vs 2400 mm
On a 5.1 m wall, this changes the number of pieces.
Mistake 5. Painting all material before checking corners
After trimming, the finish has to be restored.
Error 6. Paint the entire cornice only after installation
The risk to finished wallpaper increases.
Error 7. Use aggressive painter's tape without testing
You can remove the top layer of wallpaper.
Error 8. Try to hide a crooked wall with sealant
You get a thick, noticeable line.
Error 9. Pre-cut all corners at 45°
Real corners are rarely perfect.
Error 10. Place the joint in the center of the main wall
It becomes a noticeable visual defect.
Error 11. Not doing a test color next to the wallpaper
A white cornice may appear warmer or cooler than the ceiling.
Error 12. Not accounting for the curtain rod
KZ‑012 may physically intersect with the existing system.
Error 13. Not checking the built-in wardrobe up to the ceiling
The 105‑mm offset may conflict with furniture.
Error 14. Ordering beech/oak from different batches without need
Natural wood may vary.
Error 15. Leaving installation without a finishing system
Fresh edges and joints must have a pre-defined treatment.
When KZ-012 is better not to buy after completed renovation
Sometimes the right decision is to refuse this profile.
Wallpaper cannot be safely protected
For example, a very sensitive coating is already damaged by the test tape and the slightest wet contact.
If installation requires extensive local finishing, the risk may be too high.
Walls are too crooked
If the 105-mm profile leaves large variable gaps and fixing the wall without re-pasting is impossible, a smaller or more visually flexible profile may be better.
Ceiling and cabinet conflict in geometry
The large overhang of KZ-012 can interfere:
-
built-in furniture;
-
curtain rod;
-
ventilation;
-
to the lamps.
The room is too low for the selected scale
This is not a strict standard, but the mockup may show that 79×105 mm visually weighs down the transition.
Need an invisible modern border
KZ‑012 — architectural profile.
If the interior is built on minimalist shadow joints, a large classic cornice may be stylistically incorrect.
No possibility to make quality joints
Better a different profile than KZ‑012 with visible seams.
What to send to the manager before ordering KZ‑012
The request should contain not just “need 20 meters”.
Product
-
KZ‑012;
-
MDF/beech/oak;
-
selected preparation;
-
Quantity.
room
-
photo of all walls;
-
photo of ceiling;
-
close-up photo of wallpaper;
-
height;
-
length of each segment;
-
number of internal/external corners;
-
built-in furniture;
-
curtain rod.
Finish
-
ceiling color;
-
door color;
-
desired color/shade KZ-012;
-
covering or transparent option.
Ready-made wording
"The room is already fully finished: the ceiling is painted, the wallpaper is applied. We plan KZ‑012 as a ceiling profile. Walls: ___ / ___ / ___ / ___ mm, corners ___. We are considering MDF 79×105×2600 under enamel or beech/oak 79×105×2400. We ask to confirm current availability, quality of the selected finish, packaging, recommendations for treating fresh ends, and the possibility of ordering one strip for a trial fitting."
After such a check, you can order cornice KZ-012 from MDF under enamel or choose another finish of the same model.
Where to buy wooden cornice KZ‑012 and when to consider alternatives
If the KZ‑012 profile has already undergone extensive fitting, the material is chosen, and the joint map is built — it makes sense to order a specific SKU.
If 79×105 mm turns out to be too large, it is better to look at buy wooden cornices of a different geometry.
If the buyer hasn't yet decided whether a pronounced cornice or a calmer ceiling profile is needed at all, you can open the general section Wooden moldings, cornices, and skirting boards.
Before installation, it's useful to check tips for finishing a wooden cornice и payment and delivery terms.
Final acceptance after installation
After installing KZ‑012, it's useful to check not only the appearance from a distance, but also all technical points under side lighting.
You need to look at:
-
joints on long walls;
-
internal corners;
-
external corners, if any;
-
the bottom line above the wallpaper;
-
the top line at the ceiling;
-
fresh cut edges;
-
areas of local touch-up painting;
-
sections near curtains and built-in furniture.
If the color of the cornice matches the ceiling, the comparison is made with artificial lighting both on and off. Different degrees of gloss can create a noticeable stripe even with the same shade.
For oak and beech, the transition of the pattern at straight joints is assessed separately. A slight natural difference is acceptable, but the joint should not look like a random connection of two different materials.
The protective film and masking tape are removed according to the technology of the selected system and only after the risk of contaminating the wall has passed. If the tape test showed sensitivity of the wallpaper, removal is done especially carefully.
The main acceptance criterion for a late additional order is simple: after installing KZ-012, the room should look as if the cornice was planned before the final finishing, not added on top of already finished wallpaper. If this requires hiding wide seams with sealant or actively repainting the top of the wall, the installation technology should have been reconsidered earlier.
Final decision tree: MDF, beech, or oak after finished wallpaper
Step 1. Does KZ-012 exactly fit the scale of 79×105 mm?
-
no → choose another profile;
-
Yes → continue.
Step 2. Should the cornice be in a covering color or with visible wood?
Covering color → MDF becomes a strong candidate.
Visible wood → compare beech/oak and existing room materials.
Step 3. Is the 2600 mm length important to reduce joints?
-
yes → check MDF map;
-
no → material is chosen by finish.
Step 4. Are the walls level enough?
-
no → test strip;
-
Yes → continue.
Step 5. Have the corners been measured?
-
no → do not cut;
-
Yes → continue.
Step 6. Can the main painting/tinting be done outside the room?
-
yes → this is the preferred scenario for ready-made wallpaper;
-
no → strengthen protection and test the coating.
Step 7. Do the material and layout provide an acceptable number of seams?
-
no → change the cutting pattern/material;
-
Yes → continue.
Step 8. Is there a solution for local touch-up after installation?
-
no → do not start;
-
yes → place the order.
FAQ
What is the size of KZ‑012?
79 × 105 mm along the profile. MDF has a length of 2600 mm, beech and oak — 2400 mm.
Is there KZ-012 made of MDF?
Yes. The current card shows MDF 79×105×2600 mm.
Is the MDF KZ-012 prepared for enamel?
Yes, the selected card configuration specifies "For enamel."
Can KZ-012 be installed after wallpapering?
Yes, if you plan the cutting, surface protection, and move painting/sanding out of the finished room in advance.
What is better after finished wallpaper — MDF or oak?
If you need a covering color and minimal seams, MDF is often more practical. If the interior requires visible oak texture, oak may be more logical.
Is beech needed under enamel instead of MDF?
Not automatically. You need to compare cost, length, number of seams, and project requirements.
Is it better to paint the cornice before installation or after?
It is reasonable to do the main finish before installation, and after that leave minimal local touch-up of joints and ends.
How to protect wallpaper?
Use appropriate protection, pre-test masking tape, and minimize dirty operations near the wall.
Is sealant needed between the cornice and wallpaper?
Not always. The decision depends on geometry, wallpaper type, and finish. Sealant should not replace fixing major curvature.
How many planks are needed for a 5.1 m wall?
MDF 2600 mm nominally allows assembling 5.1 m from two planks. For beech/oak 2400 mm, two planks are not enough.
How much KZ-012 is needed for a 5.1 × 3.6 m room?
In the given example, according to the MDF map — 7 planks. For beech/oak, the minimum calculation by length is 8, but the actual map should be built based on walls and corners.
Why can't all corners be cut at 45°?
Because the actual corners of the room may differ from 90°.
Should you buy one plank first?
Yes, if the wallpaper is expensive, the color is complex, the wall is crooked, or you doubt the scale of 79×105 mm.
What is the price of KZ‑012?
At the time of checking: MDF 3,800 RUB, beech 8,230 RUB, oak 12,350 RUB. The price needs to be checked again before ordering.
Can KZ‑012 be used on furniture?
Yes, the card allows a furniture crown molding scenario, but this article is dedicated to ceiling installation after finished finishing.
Where to order KZ‑012?
In the STAVROS product card after approval of material, quantity, and finish.
Brief conclusion
If the wallpaper is already applied and the ceiling is painted, KZ‑012 can still be added — but the project should be organized as a finishing add-on order, not as a continuation of the rough renovation.
MDF 79×105×2600 mm under enamel is especially strong where the profile needs to match the color of the ceiling or furniture and where it's important to reduce the number of joints. Beech and oak 2400 mm make sense when natural wood is truly needed for the interior, not just perceived as a "more expensive version."
Main strategy for a finished room:
precise measurement → joint map → scale test → material selection → main finishing outside the room → dry fit → installation with wallpaper protection → minimal local touch-up.
If this sequence is followed, KZ-012 can be added after the renovation is complete without re-pasting the entire room. If the profile requires a large amount of on-site sanding, the walls are too uneven, or the wallpaper cannot be safely protected, it is wiser to choose a different cornice than to risk already finished finishing.