Article Contents:
- KZ-014 consists of two finishing zones
- Confirmed characteristics of KZ-014
- Why a separate insert is an advantage, not an incomplete set
- Four working color schemes
- Solid color KZ-014: why separate painting is still useful
- Two-color cornice: where the color boundary runs
- Same shade, different gloss
- Cornice in wall color
- Contrasting frieze as a decorative belt
- Full-size section template 135 × 90 mm
- What to check with the template
- Large profile and ceiling height
- Where KZ-014 works especially convincingly
- KZ-014 as a ceiling cornice
- KZ-014 as a furniture cornice
- How to choose the size of an architectural cornice
- Calculation of planks 2600 mm long
- What should be in the cutting map
- Why the allowance cannot be set as a universal percentage
- Example of calculation logic without a universal norm
- Where not to place the joint
- Why the body and frieze should be calculated together
- Dry layout before painting
- What to check during dry fitting
- Separate preparation of MDF and polyurethane
- Preparation of the MDF body
- Preparation of the polyurethane frieze
- Can MDF and polyurethane be painted with the same paint
- How not to flood the ornament with paint
- Test paintout is mandatory
- Matte or semi-gloss cornice
- When to glue the decorative insert
- Why you can't choose glue based on general advice
- How to protect the painted frieze when gluing
- Assembly before installation or on site
- Installation KZ-014: what must be decided in advance
- Ends after cutting
- Internal and external corners
- How to match the pattern at the joint
- Marking of the body and inserts
- Why you shouldn't mix inserts after cutting
- How not to confuse KZ-014 with a wooden cornice
- How not to confuse a decorative cornice with a curtain system
- How not to confuse the KZ-014 frieze with a standalone strip
- How not to confuse a separate insert with a removable mechanism
- What to buy together with KZ-014
- Comparison of KZ-014 with a solid monochrome profile
- Practical scenario: classic living room
- Practical scenario: study and library
- Practical scenario: fireplace portal
- Practical scenario: built-in wardrobe
- Practical scenario: restaurant or hotel
- Practical scenario: door portal
- Practical scenario: separate furniture module
- Errors when ordering KZ-014
- Consider the product as a solid profile
- Calling KZ-014 wooden
- Choosing color after gluing
- Applying one primer without testing
- Counting only by perimeter
- Assign universal stock
- Do not mark inserts
- Place the joint in the center of the composition
- Paint the relief with a thick layer
- Buy finishing materials without a sample
- Do not check the cross-section with a template
- Mix pairs after cutting
- Order finishing before light approval
- Do not account for ends and corners
- What is the KZ-014 made of?
- What size is the cornice?
- Is the frieze already glued?
- Why is the insert supplied separately?
- Can the cornice be made in a single color?
- Can the body and frieze be different colors?
- Can one paint be used?
- What primer is needed?
- When to glue the frieze?
- Can I glue first and then paint?
- How to calculate the number of planks?
- How much margin should I allow?
- Where is it better not to make a joint?
- Do I need to mark the inserts?
- How to label pairs?
- Can KZ-014 be used as a curtain rod?
- Is KZ-014 suitable for a low room?
- Can I install the curtain rod above the cabinet?
- How not to lose the relief when painting?
- Do I need to paint the ends after cutting?
- Can the friezes be mixed up after painting?
- Where can I see other cornices?
- What should I check before ordering?
- Where to choose finishing materials?
- Can the frieze be used separately from the body?
- Do I need to keep the sample?
- How to accept the finished installation?
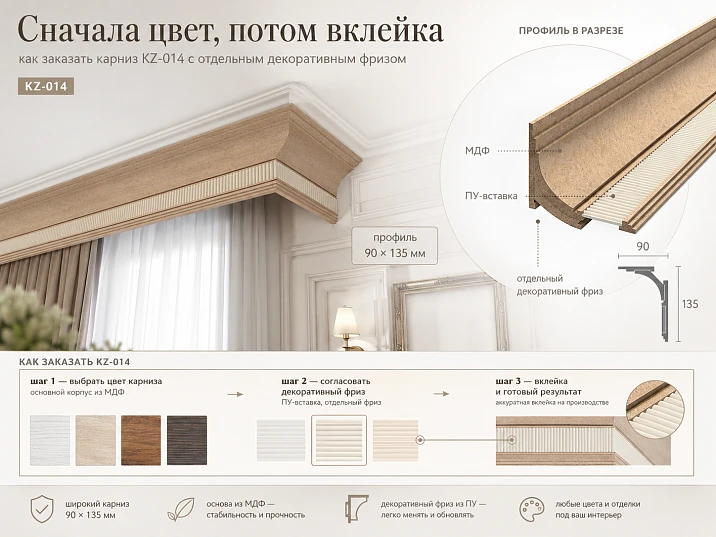
An ornamental cornice is often perceived as a ready-made solid plank: choose the length, paint the surface, and install it around the perimeter. With KZ-014, this simplified approach leads to mistakes. The profile body is made of MDF, the textured insert is made of cast polyurethane, and the decorative frieze is supplied separately and not glued into the mounting niche. This is not a configuration flaw, but an important opportunity: the two parts can be inspected, cut, prepared, and painted separately, and only joined after the color and finish quality are approved.
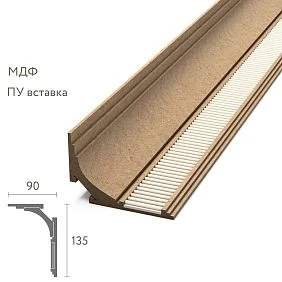
The size of KZ-014 is 135 × 90 × 2600 mm, with a "Prestige" finish quality. The profile is prominent, architectural, and designed for interiors where the top line truly needs to be readable. It is used not as a rod or track for curtains, but as a decorative cornice for ceilings, walls, furniture portals, built-in wardrobes, libraries, studies, or other representative spaces.
In the card, you can buy cornice KZ-014 with decorative frieze, but the order does not start with the number of planks. First, the 135 × 90 mm cross-section is checked in full size, the color of the body and insert is determined, then a cutting map is made for walls and furniture, joint locations are marked, the actual number of 2600 mm planks is calculated, and only then is the specification drawn up.
The main logic of the project is simple: first dry fitting and color, then separate preparation of MDF and polyurethane, then painting, fit check, frieze gluing, and final installation. If the order is changed and the two parts are joined immediately, the craftsman loses access to the inner edges, complicates painting of the relief, and deprives the project of the ability to achieve a neat two-color composition.
KZ-014 consists of two finishing zones
KZ-014 has a main body and a decorative insert. The body is made of MDF and assembled from three glued parts. Inside, there is a zone for the textured polyurethane frieze. The insert is supplied separately, so upon receipt, the buyer sees not a fully assembled profile, but a kit that needs to be inspected and prepared for finishing.
This design provides freedom of color. The body can be made calm and architectural, while the relief belt can be contrasting. Both parts can be left in the same shade, but with different levels of gloss. The cornice can be painted the color of the wall, and the texture highlighted with a darker or lighter tone. It is important that such solutions are easier to implement before gluing, when the entire surface of the frieze and the mounting niche is accessible.
Separateness also helps with cutting. A long body plank and its corresponding insert can be allocated to a specific wall, numbered, and processed as a single pair. If the frieze is already glued in, matching the pattern at corners and joints becomes more difficult to control, and the ends of the two materials have to be prepared simultaneously.




Confirmed characteristics of KZ-014
| Parameter | Confirmed value | What this means for the project |
|---|---|---|
| Article number | KZ-014 | The article number is indicated in the cutting map, marking, and order |
| Product type | Decorative cornice with a separate insert | The profile cannot be considered a ready-made solid painted strip |
| Size | 135 × 90 × 2600 mm | The cross-section is checked with a template, the length is taken into account in the cutting map |
| Body material | MDF | Priming and surface preparation are selected for MDF |
| Frieze material | Cast polyurethane | The polyurethane insert may require a different preparation system |
| Body construction | Three glued parts | When cutting and finishing, preserve the profile geometry |
| Insert state | Supplied separately, not glued in | Separate painting and pre-marking available |
| Processing quality | «Prestige» | Before finishing, acceptance and trial finishing are still performed |
| Main design feature | Separate preparation of body and frieze | First approve the color and cutting map, then join the parts |
| Product card | Cornice 135 × 90 × 2600 mm made of MDF and polyurethane | Before ordering, check the current price, availability and configuration |
The article does not specify specific primers, enamels and adhesives. Even a material declared as suitable for MDF or polyurethane must be tested in a complete system: the base, primer, paint, interlayer preparation, adhesive and room conditions must be compatible. The decision is made by the finisher or project technologist after a test sample.
Our factory also produces:
Why a separate insert is an advantage, not an incomplete set
The buyer may be wary when seeing an unglued frieze. It seems that the manufacturer left part of the work to the installer. In practice, it is the separate state that makes complex finishing manageable. The relief can be laid horizontally, the recesses can be painted calmly, excess can be removed, and it can be checked whether the texture is lost under a thick layer.
The MDF body is also more convenient to prepare without the insert. The inner edges of the niche are accessible, flat planes are easier to sand, and the contrasting color does not have to be protected with masking tape on complex relief. If the same color is planned, separate painting still helps to control the quality of each surface.
Another advantage is the ability to replace a damaged insert before final assembly. If a defect is detected after gluing, dismantling can damage the body and finish. Separate acceptance reduces this risk.
Get Consultation
Four working color schemes
| Scheme | Body | Frieze | What effect does it create | What to Check |
|---|---|---|---|---|
| Solid color | One color | Same color | The cornice looks seamless, the relief is read through light and shadow | To prevent the paint layer from filling the fine texture |
| Body in wall color | Shade close to the wall | Contrasting or accent | The architectural mass is calm, the ornament becomes more noticeable | Compatibility of contrast with furniture and ceiling |
| One color, different sheen | Matte or semi-matte | Another degree of gloss | The difference appears softly, without a change in shade | How surfaces look under side lighting |
| Local relief highlighting | Main calm color | Base color with a neat accent | The texture becomes deeper | Test swatch and absence of random variegation |
Each scheme exists only after a physical sample. The color on the screen, in the catalog, or on a small flat card does not show how it will behave on an MDF body and polyurethane relief. A test coating is made on two materials, then the samples are joined and viewed from the distance at which the finished cornice will be perceived.
Solid KZ-014: why separate painting is still useful
If the body and frieze should be the same color, it seems logical to first glue the insert and paint everything together. But this path complicates the processing of internal edges, creates a risk of drips at the landing site, and makes it difficult to control the layer thickness on the ornament.
With separate work, MDF can be prepared as an architectural profile, and polyurethane as a textured part. After drying, both parts are compared by shade and gloss. If the color differs due to the base, the problem is corrected before gluing, not on the installed cornice.
Two-color cornice: where the color boundary runs
For KZ-014, the natural boundary coincides with the frieze landing zone. This is more convenient than manually marking a complex ornament with masking tape. The body gets one color, the insert gets another, after which the parts are joined.
The contrast does not have to be sharp. A light gray body and a darker gray frieze already create depth. A milky profile and a calm beige belt support a classic interior without theatricality. Bright metal or patina require an even more careful sample, because a large profile along the entire perimeter amplifies any effect.
Same shade, different gloss
Sometimes two colors compete with furniture and walls. Then the body and frieze are painted in the same shade, but use coordinated coatings with different degrees of gloss. Under frontal light, the cornice appears monochromatic, while under side light, the textured belt begins to reflect light differently.
Such a project requires material compatibility. You cannot automatically take two random paints of the same number. The system must work properly on MDF and polyurethane, and the final gloss is checked after complete drying.
Cornice matching the wall color
A cornice in the color of the wall helps make the profile part of the architecture. The size of 135 × 90 mm remains noticeable due to its volume, but does not fragment the room with an additional strip. The decorative frieze can be left in the same color or highlighted.
This option is especially useful when the room already has a lot of wooden furniture, textiles, and metal. The cornice supports the top line but does not add another active color. Before ordering, you need to check how the wall shade looks on MDF and whether it will match the painted wall under real lighting.
Contrasting frieze as a decorative belt
A textured insert can work as a continuous belt along the wall or furniture. Contrast enhances the ornament and emphasizes the length of the room. But the higher the contrast, the more noticeable every joint and pattern mismatch becomes. Therefore, the cutting map and marking become part of the design, not just installation.
To understand the role of the decorative belt, you can study the material about cornice molding with a decorative belt. KZ-014 differs in that the frieze is part of a specific MDF body system and must be cut together with it.
Full-size section template 135 × 90 mm
Before ordering, you need to cut a 135 × 90 mm section from cardboard or thick paper. The template is applied to the top of the wall, to the cabinet, or to the intended portal line. It shows how much space the cornice will take in height and depth.
A photo of the profile does not convey its scale. In a room with a low ceiling, 135 mm can be perceived very actively. Above a built-in cabinet, 90 mm of projection may conflict with the door, ventilation grille, or light fixture. In a representative hall, the same size, on the contrary, looks cohesive and proportional.
What to check with the template
- whether the profile overloads the room height;
- whether there is enough space above the built-in furniture;
- whether the cornice blocks ventilation openings;
- whether it interferes with opening doors and transoms;
- whether it conflicts with the window slope;
- how the profile looks from the opposite side of the room;
- whether the frieze is visible from the main viewpoint;
- whether the cornice ends up too close to the light fixtures;
- how the line runs above the portal, library, or boiserie;
- is there room for installation and finishing operations.
The template is moved along all complex areas. You cannot check only one straight wall if the cornice continues over the cabinet and door portal. The geometry must be compatible with the entire route.
Large profile and ceiling height
The article does not set a minimum ceiling height for KZ-014. Perception depends on the area, wall proportions, color, and amount of furniture. A light solid profile may appear lighter than a contrasting dark one, even though the dimensions are the same.
The decision is made based on a full-size template and visualization. It is useful to mark the bottom line of the cornice along the entire perimeter on the wall. One small paper detail does not show how a continuous strip will change the room.
Where KZ-014 works particularly convincingly
| Scenario | The role of the cornice | What to Check |
|---|---|---|
| Living room | Unites the ceiling, walls, and large furniture | Scale, light, and joint placement |
| Study or library | Forms the top line above cabinets and panels | Height of built-in furniture and door opening |
| Fireplace hall | Connects the portal with the room perimeter | Do not place a noticeable joint above the central axis of the fireplace |
| Classic kitchen | Continues the furniture cornice and wall architecture | Ventilation, cabinets, and operating conditions |
| Hotel or restaurant | Creates a repeatable decorative belt | Large volume of cutting, batches, and maintenance |
| Built-in wardrobe | Finishes the furniture from above | Depth, gaps, and installation sequence |
| Boiserie or wall panel | Fixes the upper boundary of the composition | Matching the color and rhythm of the frieze |
KZ-014 as a ceiling cornice
When placed on the ceiling, the profile is viewed from below, so not only the front part but also the depth is visible. The 90 mm size must be considered near windows, built-in cabinets, niches, and lighting. The frieze should be oriented the same way on all walls.
The cornice is not a guide for curtains. It cannot be included in the cluster of ceiling rails and curtain rods. If the room has a separate curtain system, its geometry is coordinated with the decorative profile before ordering.
KZ-014 as a furniture cornice
Above a cabinet, library, or kitchen furniture, KZ-014 can act as a large finish. In this case, the length is calculated based on furniture sections, protrusions, and corners, not the room perimeter. The body must have a prepared base for installation.
It is especially important to check that the extension does not interfere with doors and lifting mechanisms. Ventilation gaps and equipment must not be covered with decorative profile without approval.
How to choose the size of an architectural cornice
KZ-014 is just one of the options. If the 135 × 90 mm template looks too massive or does not fit, do not reduce the profile by random trimming. It is better to look at how to choose the size of an architectural cornice, and switch to a model of a different cross-section.
Choosing KZ-014 is justified when the space can support its height and depth, and a separate frieze is needed as an independent finishing zone.
Calculation of planks 2600 mm long
The simple formula "total length ÷ 2.6" gives only a theoretical minimum. It does not account for corners, pattern direction, trims, short sections, joint locations, and that the body must match its insert. The correct calculation is based on a cutting map.
First, the room or furniture is divided into separate sections. For each, record the net length, type of start and end, presence of a corner, admissibility of a joint, and wall number. Then, the 2600 mm planks are distributed so that long whole pieces go to visible walls, and usable remnants to short sections.
What should be in the cutting map
| Field | What to record | Why |
|---|---|---|
| Plot code | Wall A, wall B, cabinet 1, portal 1 | Links a part to the installation location |
| Net length | Actual size per design | Defines the required blank |
| Start | Internal corner, external corner, open end | Affects cutting |
| End | Junction type | Helps distribute the planks |
| Joint | Allowed or undesirable | Manages the placement of connections |
| Housing | Plank number KZ-014 | Allows tracking the MDF part |
| Frieze | Corresponding insert number | Prevents confusion of the ornament after painting |
| Housing color | Code or verbal designation | Eliminates mixing of finishes |
| Frieze color | Code or verbal designation | Supports two-color scheme |
| Remainder | Length and possible application | Allows using material on a short section |
Why the allowance cannot be set as a universal percentage
For a simple rectangular room and a complex portal, the consumption will be different. In one project, a 900 mm remainder can be used above the door; in another, all sections are longer and the remainder is not needed. The frieze pattern further restricts the connection point.
Therefore, the allowance arises from specific cutting map solutions. First, all parts are distributed, then full planks are counted. If a separate piece is needed for a short section due to the pattern or angle, it is added justifiably. Mechanical 10 or 15 percent without a plan may either not cover the need or create excess material.
Example of calculation logic without a universal norm
Suppose there are two long walls, a short section above the door, and a cornice above the cabinet. First, the most solid segments are chosen for the long walls. Their remnants are checked for the door and cabinet. If the pattern, angle, or direction does not allow using the remnant, an additional plank is assigned.
The final quantity is obtained not from a single division, but from the layout. This scheme takes more time before ordering, but reduces the risk of a joint in the center of the wall and a shortage of the required insert on the final section.
Where not to place a joint
- on the central axis of the main wall;
- directly above the mirror;
- above the fireplace portal;
- in the center of the cabinet or furniture composition;
- at the most illuminated point;
- where the pattern has a noticeable central motif;
- on a short section that can be made solid;
- next to an existing architectural joint, if two connections create visual noise.
Sometimes a joint is unavoidable. Then it is moved to a less noticeable area, tied to a corner or furniture vertical, and the pattern match is checked in advance. The decision is made by the craftsman based on the actual profile.
Why the body and frieze should be considered together
You cannot separately order the required body length and an approximate number of inserts. Each MDF segment has its own frieze. After cutting, the parts become pairs. If an insert is lost or mixed up, the length and pattern may not match.
In the map, each pair receives one code: for example, A1-body and A1-frieze. After painting, the marking is preserved on the hidden side or packaging, so the installer can restore the original match.
Dry layout before painting
Before any finish, all planks and inserts are laid out by area. The frieze is placed in the mounting niche without glue. The length, ornament direction, fit density, and surface quality are checked.
At this stage, the left and right ends, wall, pair number, and future color are marked. If two inserts have a directional pattern, they cannot be accidentally rotated after painting. A photo of the dry layout becomes part of the installation documentation.
What to check during dry fitting
| Check | Question | Action when a problem occurs |
|---|---|---|
| Frieze installation | Is the insert correctly positioned in the niche? | Stop preparation and clarify the reason |
| Direction | Is the ornament oriented the same way? | Mark the top, bottom, left, and right ends |
| Length | Does the insert match the body? | Double-check the pair and cutting map |
| Joint | Can the pattern be aligned at the selected point? | Shift the joint or change the layout |
| Surface | Are there any damages before finishing? | Fix and resolve before painting |
| Labeling | Is the location of each part clear? | Assign a code and take a photo |
Separate preparation of MDF and polyurethane
Two materials may require different primers, sanding methods, application modes, and interlayer preparation. It cannot be stated that one composition automatically suits the entire set. Even if the finishing material manufacturer specifies both substrates, the full technology must be tested on a sample.
The MDF body has planes, edges, and an internal niche. The polyurethane frieze has a complex relief with protrusions and recesses. Tools and pressure acceptable for flat MDF may damage the texture of the insert.
Preparation of the MDF body
The body is inspected for integrity and geometry. Special attention is paid to the edges after cutting and the inner faces of the seating area. They must be prepared according to the selected finishing system.
The article does not specify a specific grit, number of layers, or drying time, because these parameters relate to the materials of a specific manufacturer. The master follows the technical data of the selected system and performs a test.
Preparation of the polyurethane frieze
The frieze is inspected under side lighting. Protruding elements, recesses, and edges are checked. The task of preparation is to preserve the texture, not to turn it into a smooth ribbon. Too aggressive sanding or a thick layer of coating can erase details.
Before painting, the insert is cleaned and prepared using a technology compatible with cast polyurethane. MDF rules cannot be applied to it just because both parts will be the same color.
Can MDF and polyurethane be painted with the same paint
The possibility depends on the entire system. The same finish enamel can be used on different substrates only with appropriate preparation and confirmation from the material manufacturer. The primer for MDF and the primer for polyurethane may differ.
The correct answer is provided by a test kit: a piece or sample of MDF, a sample of polyurethane, selected primers, paint, and glue. After drying, color, adhesion, gloss, and relief quality are compared.
How not to flood the ornament with paint
The relief is lost not from the color, but from a too thick and uneven layer. Material accumulates in the recesses, edges become soft, and small details merge. Separate painting allows changing the position of the frieze and controlling the surface from all sides.
Each layer is evaluated after drying. If the texture is already losing sharpness, you cannot build up color through uncontrolled application. The technologist adjusts the working method on a sample and then transfers it to the entire batch.
A test paint-out is mandatory
The test must include both parts. A separate MDF sample shows the body color, a separate polyurethane one shows the frieze texture. After that, they are placed side by side to see the transition.
The sample is examined in daylight and artificial light, from below and from a distance. The cornice is high, so small differences noticeable on the table may disappear, and contrast that seems calm up close may become too active around the perimeter of the room.
Matte or semi-gloss cornice
The degree of gloss affects the reading of geometry and relief. A matte surface is calmer and emphasizes irregularities less. Semi-gloss reflects light more actively and makes the frieze more noticeable. The choice depends on the walls, ceiling, furniture, and lighting.
It cannot be assumed that one degree of gloss suits two materials equally. The result is compared on a full sample. For purchasing related products, you can select primer, enamel, and installation materials, but specific compatibility is still confirmed by a technologist.
When to glue the decorative insert
The optimal sequence is determined by the project, but in KZ-014 logic, the frieze is joined to the body only after several checks: completeness, dry fit, cutting, marking, preparation, test painting, and painting. Early gluing deprives the project of its main advantage.
Before assembly, both painted parts are fitted again. They check whether the fit has changed after the coating layers, whether the color matches, whether the edges are damaged, and whether the marking is preserved.
Why you cannot choose glue based on general advice
The adhesive must work with MDF, polyurethane, primer, and topcoat. It should not damage materials, cause stains, squeeze out onto the front surface, or interfere with subsequent installation. These properties depend on the specific product and conditions.
Therefore, the article does not name a universal composition. The master checks the adhesive manufacturer's recommendations and makes a test joint on technological samples. It is especially important to ensure that painted surfaces do not lose adhesion.
How to protect the painted frieze during gluing
The finished relief can be easily scratched by tools or stained with excess glue. The workspace must be clean, and supports soft. The frieze is installed without strong bending or pressure on the protrusions.
The method for removing accidental marks is tested in advance on a sample. Do not experiment with solvent on the finished cornice. If glue gets on the front part, actions must follow the specific material's instructions.
Assembly before installation or on site
In some projects, it is convenient to join the body and frieze in the workshop after finishing. In others, long elements are safer to finally assemble closer to the installation site. The decision depends on transport, segment lengths, angles, and the risk of damaging the painted relief.
The main thing is to preserve pairs and markings. If assembly is moved to the site, each insert is packaged together with the corresponding body or given a unique code.
Installation KZ-014: what must be decided in advance
- the base and its condition;
- installation line;
- housing mounting type;
- cutting map;
- internal and external corners;
- joint locations;
- wall installation order;
- housing and frieze condition;
- painted surface protection method;
- assembly and installation sequence;
- person responsible for touching up ends and joints;
- conditions for acceptance of the finished line.
The specific installation diagram depends on the base and the project. KZ-014 cannot be installed using a random instruction for a lightweight polyurethane cornice, because the main body is made of MDF and has a large cross-section.
Ends after cutting
After cutting, the MDF and polyurethane ends are exposed. They need to be prepared according to the finishing technology and the connection point. An open decorative end requires more careful work than a hidden joint area.
The ends are marked before painting. If a segment belongs to an internal corner, it cannot be confused with an external corner or an open end. The cutting map should show not only the length but also the purpose of each end.
Internal and external corners
The corner connects the geometry of the body and the frieze pattern. An error in one material becomes noticeable in the other. Therefore, first check the body, then the separate insert, after which evaluate them together.
The article does not prescribe a universal cutting method or tool angle: real walls may deviate from ideal geometry. The craftsman performs on-site fitting and controls the ornament pattern.
How to align the ornament at the joint
The frieze has a texture, so the joint cannot be evaluated only by the straight line of the end. You need to see which elements of the pattern fit together. Sometimes shifting the joint by a small distance allows you to hit a less noticeable part of the ornament.
This task is solved before painting on a dry layout. After finishing, changing the length and rearranging pairs is more difficult.
Marking of the body and inserts
| Code | What does it mean | Example |
|---|---|---|
| Room | Room or zone | Living room |
| Wall | Perimeter section | А |
| Sequence number | Position on the wall | 01 |
| Part type | Casing or frieze | C / F |
| Orientation | Left and right end | L / R |
A pair can receive the codes "Living-Room-A-01-K" and "Living-Room-A-01-F". After painting, the parts are easy to match. Marking is applied to a hidden surface or packaging so as not to damage the finish.
Why you cannot mix inserts after cutting
Even if the original planks are identical, after cutting each insert gets its own length and pattern position. Body A1 may not match frieze B2. On site, this leads to additional trimming and a joint in an undesirable place.
Marking saves time and preserves the approved map. It is especially important in two-color finishing, when the body and inserts go through different sections of the workshop.
How not to confuse KZ-014 with a wooden cornice
KZ-014 cannot be called oak, beech, or solid wood. Its body is made of MDF, and the ornament is made of cast polyurethane. The wood cluster belongs to a neighboring category and helps compare materials, but does not describe this item.
If the buyer needs a different profile, you should look at MDF cornices for ceilings and furniture and other solutions in the category, carefully checking the material of each card.
How not to confuse a decorative cornice with a curtain system
KZ-014 is not a rod, ceiling rail, or track. It is not designed for hanging textiles. Its purpose is to decorate the top line of a wall, ceiling, or furniture.
If a room requires hiding a curtain system, the architectural design must separately provide a niche and distances. It cannot be assumed that a decorative profile will automatically replace a curtain structure.
How not to confuse the KZ-014 frieze with a standalone strip
The polyurethane insert belongs to the KZ-014 seating area. It is selected and cut together with the body. Using the frieze separately from the profile or replacing it with a random ornament requires separate verification and does not automatically follow from the card.
General principles can be found in the material about how to use a frieze at the top of a wall, but in KZ-014 the insert works as part of a specific system.
How not to confuse a separate insert with a removable mechanism
The frieze is supplied unglued for preparation and assembly. This does not mean that after installation it should be regularly removed and replaced. The final connection is made according to an agreed technology.
The article uses the expression "separate insert" and does not promise operational quick-release. This is important for customer expectations.
What to buy with KZ-014
| Position | What it's for | What to Check | Route |
|---|---|---|---|
| KZ-014 | Forms the body and seating area of the decorative belt | Number of slats, cutting map, and completeness of inserts | KZ-014 Card |
| Materials for MDF preparation | Create a compatible base for body finishing | System manufacturer recommendations and sample | Mounting and finishing materials |
| Materials for polyurethane | Prepare a relief frieze | Compatibility with cast polyurethane | Materials section |
| Finish coating | Determines color and gloss | Work on two bases and test coat | Selected according to project technology |
| Mounting compound | Connects the frieze to the body and the body to the base according to the project | Purpose of each composition and compatibility with coatings | Selected by a specialist |
| Template material | Checks cross-section 135 × 90 mm | Natural size | Manufactured on site |
| Marking and packaging | Preserve case-frieze pairs | Resistance of markings and protection of finish | Organized by the workshop |
Comparison of KZ-014 with a solid monochrome profile
| Criterion | KZ-014 with separate frieze | Solid profile without separate insert |
|---|---|---|
| Color freedom | Case and ornament easily distinguished by color | Contrast requires complex masking |
| Relief preparation | Frieze accessible from all sides | Relief processed on common profile |
| Marking after cutting | Need to keep body–insert pairs | One part is easier to mark |
| Preparation speed | More stages and control | Easier with solid color finish |
| Risk of flooding the ornament | Below with proper separate painting | Above with thick layer overall painting |
| Assembly requirements | Subsequent gluing required | No additional assembly required |
KZ-014 is not chosen for maximum simplicity. Its advantage is control over two materials and two finishing zones. If the project needs a regular solid-color line without an accent band, another profile may be more rational.
Practical scenario: classic living room
In the living room, the cornice can be painted the color of the wall, and the frieze made a shade darker. The profile will support the architecture, and the decorative band will be visible under side lighting. Joints are moved from the central wall to less noticeable areas.
Before ordering, the template is run over doors, windows, and furniture. Then a map of all four walls is created. The color is approved on a sample long enough to evaluate the relief, not on a small dot.
Practical scenario: office and library
KZ-014 can continue the top line of bookcases. If the furniture body and walls differ in color, you need to decide which system the cornice belongs to. It can match the wall and unify the room or support the furniture.
The frieze is connected to handles, lights, and other details. A contrasting metallic effect requires a particularly careful sample. The joint is not placed above the central cabinet.
Practical scenario: fireplace portal
In the fireplace area, the cornice can run along the perimeter or only finish the portal. The central axis of the fireplace is one of the most noticeable points, so joining the body and ornament here is undesirable.
The cutting map is built from the portal: first, a solid central segment is assigned, then adjacent walls are distributed. The frieze color is coordinated with the portal decor but not automatically copied.
Practical scenario: built-in wardrobe
Above the wardrobe, KZ-014 becomes a furniture cornice with a decorative band. First, check the gap to the ceiling and the 90 mm projection. If the wardrobe reaches almost to the ceiling, the profile may not fit or may cover technical zones.
Cutting is done by sections, but the central part should be as solid as possible. The body and frieze are painted in a system coordinated with the furniture.
Practical scenario: restaurant or hotel
In commercial interiors, the length and number of joints increase. A detailed map, room numbering, and batch control are needed. One total number is not enough.
Practical scenario: door portal
Above the door portal, the profile must align with the width of the architraves and the top lintel. The joint is not placed on the door axis if a whole segment can be used. The opening of the leaf, transom, and ventilation elements are checked before ordering.
The decorative frieze can continue along the wall or remain only on the portal. In the first case, the pattern and color must transition without an accidental break. In the second, neatly finished ends are needed.
Practical scenario: separate furniture module
Sometimes KZ-014 is used not around the entire perimeter, but only on one large cabinet or display case. Then the calculation is simpler by length, but the symmetry requirements are higher: the short composition is entirely in the field of view.
The body and frieze are centered relative to the furniture. The remaining plank cannot be automatically considered suitable for another item if the ornament direction or color scheme differs.
Errors when ordering KZ-014
Treating the product as a solid profile
The frieze is supplied separately. If this is not taken into account, there will be no plan for its preparation, painting, and gluing.
Calling KZ-014 wooden
The body is made of MDF, the insert is made of polyurethane. Beech and oak are not related to the article's characteristics.
Choose color after gluing
Early joining complicates contrast painting and access to internal edges.
Apply one primer without testing
MDF and polyurethane may require different preparation systems.
Count quantity only along the perimeter
Division by 2.6 m does not account for corners, joints, pattern, and usable remnants.
Assign a universal allowance
The allowance is determined by the cutting map, not a fixed percentage.
Do not mark inserts
After cutting and painting, friezes can easily be confused with other bodies.
Place the joint in the center of the composition
On a prominent axis, a mismatch in the ornament is especially noticeable.
Paint the relief with a thick layer
The texture loses its sharpness and turns into a smoothed strip.
Buy finishing materials without a sample
Color, gloss, and adhesion may differ on MDF and polyurethane.
Do not check the cross-section with a template
A 135 × 90 mm profile may be too large for the room or furniture.
Mix pairs after cutting
The length and pattern of the insert may not match the assigned body.
Order finishing before light approval
Relief and gloss level strongly depend on lighting direction. The sample must be checked under site conditions.
Do not account for ends and corners
Planks 2600 mm long must be distributed considering actual junctions, not just clear straight lengths.
Finishing errors
One of the main mistakes is evaluating color only up close. The cornice is high and forms a long line. An accent that looks neat on a 10 cm sample may become too active along the entire perimeter.
The second mistake is not accounting for the difference in gloss on two materials. Even the same paint can look different due to primer and texture. The third is touching up after gluing without protecting the adjacent area.
The fourth mistake is testing only on MDF. The body may achieve the desired color, but the polyurethane insert may turn out lighter, darker, or more glossy. Therefore, samples must come in pairs.
Installation Errors
Installation without a map leads to joints above the mirror or portal. Installation without preserving markings forces you to select friezes on site. Strong pressure on the painted insert damages the relief. Attempting to correct the body geometry using the frieze disrupts the fit.
All structural deviations of the base are corrected before final assembly. The decorative insert is not a reinforcing part. It cannot be used to close the gap between poorly fitted bodies.
Who is KZ-014 suitable for
- a buyer who needs a large architectural profile;
- a project with monochrome or two-color finishing;
- an interior where the decorative belt should be read separately;
- built-in furniture, a library, or a portal with sufficient space;
- a workshop ready to maintain a cutting map and markings;
- a commercial project with detailed finishing documentation;
- a designer who wants to control the color of the body and relief separately.
When it's better to choose a different cornice
KZ-014 may be unnecessary if the space does not accommodate a 135 × 90 mm section, the project does not require a separate frieze, or the workshop is not ready to perform separate preparation. For a simple solid-color line, another profile may be faster and more economical to work with.
Another option is needed when the buyer is looking for a rod or ceiling track for curtains. KZ-014 belongs to architectural and furniture decor. It should not be chosen just because the pattern looks nice in a photo if the room's geometry is not suitable.
Acceptance of the kit before cutting
| What to Check | How to check | Why it's important |
|---|---|---|
| Article number | Verify KZ-014 against the order | Similar cornices may have a different insert |
| Size | Check 135 × 90 × 2600 mm | Size affects the template and cutting map |
| Body material | Verify MDF | Determines the preparation system |
| Insert material | Check polyurethane | Requires own finish inspection |
| Number of bodies | Count individually | Checked against cutting map |
| Number of friezes | Match with bodies | Each segment needs a corresponding insert |
| Condition | Inspect under side light | Damage is recorded before painting |
| Installation | Perform a dry fit | Issues are resolved before finishing |
Inspection after cutting
After cutting, not only the body length but also the corresponding insert is checked. Each set must have a clear code, left and right ends, a location on the plan, and a color mark. If cutting is done before finishing, all open ends are included in the routing card.
It is better to find an error on the table than under the ceiling. If the frieze is shorter than the body or the pattern does not match at the joint, the layout is revised before painting.
Inspection after painting
The body and frieze are compared side by side under the same lighting. The shade, gloss, uniformity, relief integrity, and cleanliness of the seating areas are checked. The coating thickness should not interfere with the dry installation of the insert.
After inspection, the parts are repacked in pairs. Materials that can leave marks or damage the finish are not applied to the front surface.
Storage before finishing
Bodies and inserts are stored separately but in pairs. Strips are placed so as not to deform the profile or damage the edges. Friezes protect against pressure on the protruding ornament.
Marking is preserved. If storage and acclimatization conditions are important for the selected materials and coatings, they are determined by the project technologist.
Packaging of painted parts
After finishing, MDF and polyurethane require protection from friction. The body should not press on the relief. A clean, soft material compatible with the coating and leaving no marks is used between parts.
Each package receives a site code. A separate sheet with a cutting map is included in the kit or sent to the installer electronically.
Technical specification for the finisher
- article KZ-014;
- materials: MDF body, polyurethane insert;
- size 135 × 90 × 2600 mm;
- color and gloss level of the body;
- color and gloss level of the frieze;
- preparation system for each base;
- test paint sample;
- protection of the relief from a thick layer;
- pair marking;
- edge treatment;
- painting order;
- fit check before gluing;
- packaging rules for finished parts.
Technical specification for the installer
- room or furniture plan;
- cutting map;
- body and frieze codes;
- internal and external corner points;
- prohibited joint zones;
- installation line;
- base and mounting;
- wall order;
- insert bonding technology;
- method of protecting painted relief;
- acceptance rules for the finished line.
Technical specification for designer or assembler
The designer records not only the color, but also the relationships between the body, frieze, wall, ceiling, and furniture. The documentation specifies which part should blend with the architecture and which should stand out. If different gloss levels are used, this is recorded separately.
The assembler is responsible for ensuring that the number of slats matches the map, not the approximate perimeter. They also check for the availability of materials for trial cutting and marking.
Responsibility map by stages
| Stage | Responsible | Result |
|---|---|---|
| Scale selection | Designer and client | Approved template 135 × 90 mm |
| Measurement | Measurer | Exact lengths and junctions |
| Cutting map | Master or technologist | Number of slats and joint locations |
| Acceptance | Workshop | Verified bodies and inserts |
| Test swatch | Finisher | Approved two-material system |
| Cutting and marking | Master | Numbered pairs |
| Painting | Finisher | Finished body and frieze |
| Gluing | Technology responsible | Collected items |
| Installation | Installer | Solid top line |
| Final acceptance | Client and project representative | Checked joints, color and relief |
How to place an order for STAVROS
The first step is to open the KZ-014 card and check the current specifications, price, availability and configuration. Then make a template 135 × 90 mm and approve the application. After that, create a cutting map, not just measure the perimeter.
The specification specifies:
- KZ-014;
- number of 2600 mm planks according to the map;
- number and matching of inserts;
- rooms and areas;
- a single-color or two-color scheme;
- body color;
- frieze color;
- gloss level;
- requirements for preparing two materials;
- joint locations;
- responsible for cutting, finishing, assembly, and installation.
To compare materials and structures, it is useful to study features of MDF cornices for painting. But the final article and order must maintain the narrow scenario KZ-014: separate insert, separate painting, and subsequent gluing.
How to check an order before payment
- Verify article KZ-014.
- Check size 135 × 90 × 2600 mm.
- Approve full-size template.
- Record the number of sections.
- Create a cutting map.
- Assign joint locations.
- Count the body slats.
- Verify the number of inserts.
- Approve the body color.
- Approve the frieze color.
- Select gloss level.
- Schedule a test paintout.
- Check materials for two bases.
- Record the sequence of gluing and installation.
FAQ: questions about cornice KZ-014
What is KZ-014 made of?
The body is made of MDF, and the decorative textured insert is made of cast polyurethane.
What is the size of the cornice?
The confirmed size is 135 × 90 × 2600 mm.
Is the frieze already glued in?
No. The polyurethane insert is supplied separately from the body.
Why is the insert supplied separately?
This allows for dry fitting, cutting, marking, and separate painting of the two materials.
Can the cornice be made in a single color?
Yes. Even with one color, separate preparation helps to better paint the MDF and the polyurethane relief.
Can the body and the frieze be made in different colors?
Yes. A separate insert is convenient for a two-color scheme, but the combination needs to be checked on a physical sample.
Can one paint be used?
Only if the selected system is confirmed for both substrates with appropriate preparation. A test paint-out is necessary.
What primer is needed?
The universal composition in the scheme is not confirmed. The primer is selected separately for MDF and cast polyurethane according to the material manufacturer's recommendations.
When to glue the frieze?
After checking completeness, dry fitting, cutting, marking, preparation, test painting, and separate painting.
Can I glue it first and then paint?
Physically, this may be possible, but early gluing complicates the processing of internal edges and two-color finishing. It is better to plan project KZ-014 with separate preparation.
How to calculate the number of planks?
You need to create a cutting map for each area, taking into account corners, joints, ornament direction, and usable remnants. Simply dividing the perimeter by 2.6 m is not enough.
What margin should be allowed?
There is no universal percentage. Additional planks are determined by the specific cutting map and joint complexity.
Where is it better not to make a joint?
On the central axis of the main wall, above the fireplace, mirror, center of the cabinet, and in the most illuminated area.
Do inserts need to be labeled?
Yes. After cutting, each insert must maintain a connection to its body and installation area.
How to mark pairs?
It is convenient to use the room code, wall, segment number, and part type: for example, A-01-K and A-01-F.
Can KZ-014 be used as a curtain rod?
No. This is a decorative architectural or furniture profile, not a rod, track, or guide.
Is KZ-014 suitable for a low room?
The answer depends on proportions and color. You need to check the 135 × 90 mm cross-section with a full-size template around the entire perimeter.
Can a curtain rod be installed above a cabinet?
Yes, if the profile fits, does not interfere with doors, ventilation, and installation, and the base is prepared.
How not to lose the relief when painting?
Use a proven technology, control layer thickness, and first perform a test on a polyurethane sample.
Do I need to paint the ends after cutting?
The ends are prepared according to the joint location and finishing system. Open and hidden areas may require different levels of precision.
Can the friezes be mixed up after painting?
Yes, so marking and packaging in pairs are mandatory.
Where to see other cornices?
Related solutions are collected in the cornice category.
What should be checked before ordering?
Size, quantity per cutting map, insert completeness, color scheme, two-material technology, joint locations, and mounting base.
Where to choose finishing materials?
Related products are presented in the section materials for installation and finishing, but compatibility of a specific system must be confirmed by a specialist.
Can the frieze be used separately from the body?
The original diagram describes the insert as part of KZ-014. Independent use requires separate verification and should not be considered automatically confirmed.
Is it necessary to keep a test sample?
Yes. It will be useful for batch control, touch-ups, and subsequent interior maintenance.
How to accept the finished installation?
Check the straight top line, joints, pattern alignment, color uniformity, absence of damage, and cleanliness of junctions.
Control section before finishing the entire batch
If the project includes multiple rooms or a long perimeter, it is useful to assemble one control section at full scale. For this, a body corresponding to the frieze, selected primers, paint, and mounting system is used. The sample should show not only the color but also the full transition from MDF to polyurethane, the fit of the insert, the edge treatment, and the behavior of the relief.
The control section is evaluated by the designer, finisher, and installer. The designer confirms the proportion and contrast, the finisher confirms the surface quality, and the installer confirms the possibility of safe assembly. Only after a collective decision is the technology transferred to the remaining planks. Such a sample is especially important with a contrasting frieze, different levels of gloss, and complex patina.
If the result is unsatisfactory, the system is changed on a small fragment, not on the entire batch tens of meters long. This saves material and preserves the pattern. The approved section is photographed and signed with coating codes.
Transition of the cornice from the wall to the built-in furniture
When KZ-014 runs along the wall and continues above the cabinet, two different bases and sometimes two installation teams meet. The transition cannot be considered an ordinary joint. It is necessary to decide in advance whether the same line height is maintained, whether the projection is the same, and where the boundary of responsibility lies between the room finishing and the furniture.
On the elevation, the transition point, the thickness of the wall finishing, the actual depth of the cabinet, and access for fastening are marked. The body above the furniture may require a different base, but the face line and frieze must appear continuous. If the connection falls into a visible area, its position is coordinated with the vertical of the cabinet or panel.
The color is also checked separately. The same enamel on a wall section and a furniture base may be perceived differently. The control sample is applied immediately to both surfaces.
What to do if the project changed after ordering
After ordering, the wall length, composition of built-in furniture, door position, or color scheme may change. Already cut planks cannot be automatically redistributed. First, the map is updated, the suitability of each pair is checked, and the joints are reassigned.
If only the length of a short section has changed, it may be possible to use a suitable leftover. If the new geometry moves the connection to the center of the wall or disrupts the pattern, a new plank will be required. The decision is made based on the actual segments, not the total footage.
When changing color, check if surface preparation has begun. A new finish may require a different primer or test. An already painted frieze cannot be considered a universal blank for any subsequent system.
Finishing passport KZ-014
After completing a project, it is useful to keep a small passport. It specifies the article number, body and insert materials, color codes, gloss level, names of the systems used, cutting map, joint photos, and room markings. This document will be useful for repairs or interior expansion.
An approved physical sample is added to the passport. It shows color and texture more accurately than a photo. The sample must be stored so that the coating does not fade or become dirty.
For a commercial facility, the passport is handed over to the maintenance service. If one area is damaged, specialists can determine which material was used and where the nearest joint is. This reduces the risk of local repair with a random shade.
Final acceptance of the finished decorative belt
The finished line is viewed from several points: from the center of the room, from the entrance, from below along the wall, and with side lighting on. Straightness, uniform frieze position, corner quality, and absence of random gloss variations are checked.
Joints are evaluated separately. They should not attract more attention than the ornament itself. In a two-color scheme, the color boundary must remain clean, without drips on the body and relief. On a monochrome cornice, check if the pattern is lost under the coating.
Acceptance includes checking connections to cabinets, portals, windows, and doors. If the cornice blocks ventilation, hinders opening, or creates an unplanned gap, decorative neatness does not compensate for the structural error. Only after checking the entire system is the work considered complete.
Conclusion
KZ-014 is valuable not only for its large size of 135 × 90 × 2600 mm and decorative belt. Its main advantage is the separation of the MDF body and the textured polyurethane insert. The buyer gets the opportunity to separately prepare two surfaces, check the color, preserve the relief, and assemble a monochrome or two-color cornice without complex masking of an already glued ornament.
A proper order starts with a full-size template and a cutting map. Slats 2600 mm long are distributed along walls and furniture, joints are moved away from central zones, and each cabinet and frieze is marked as a pair. The allowance is calculated based on the actual layout, not a universal percentage. Primers, enamels, and adhesives are selected only after checking compatibility with MDF, polyurethane, and the future coating.
STAVROS allows you to order KZ-014 as a ready-made architectural decor system with a separate insert. Before purchasing, it is worth approving the color of the body and frieze, the number of slats, the cutting map, and the sequence of work. Then the formula "first color, then gluing" turns not into a beautiful headline, but into a working way to preserve the texture, joint accuracy, and a unified decorative belt throughout the entire interior.