Article Contents:
- Tall skirting board PLT-004 160×16 mm: what the current product card confirms
- Podium 150 mm and skirting board 160 mm: why the dimensions almost match, but the joint is still complex
- What needs to be drawn in the cross-section
- Scheme A. The lower skirting board ends before the step
- Scheme B. The upper PLT-004 starts separately, but both ends are visually aligned
- Scheme C. The horizontals are joined by a separate vertical decorative piece
- Why can't you simply turn PLT-004 vertically on the end of the podium
- Where to end the wooden baseboard: before the first step or on its end
- The end directly before the vertical of the podium
- The end slightly earlier
- The end at the furniture
- Bottom contour
- Top contour
- What should match
- High PLT-004 around the bed on the podium: which sections are actually visible
- Why the podium cannot be calculated only by its external dimensions
- PLT-004 made of MDF
- Beech finish
- Oak finish
- Why the straight end needs to be approved before ordering
- PLT-004 made of MDF 2600 mm: when the extra 200 mm is really useful
- Side 2500 mm
- Side 2580 mm
- Side 2700 mm
- PLT-004 2400 mm from beech or oak: when a shorter plank is more rational to lay out
- Why you cannot use any short leftover near a step
- Leftover with a miter cut
- Leftover from an oak batch
- MDF PLT-004 2600 mm: six planks indeed cover the example without additional joints
- PLT-004 2400 mm: why seven planks are mathematically enough but practically cannot be laid out
- Why this is a real practical conflict, not an arithmetic error
- Can you fit within seven 2400 mm planks if you allow one additional joint
- Example cost: MDF, beech, and oak while keeping solid pieces
- When an additional solid plank PLT-004 is more cost-effective than trying to use every leftover
- Podium adjoins the wall not at 90°: how the PLT-004 calculation changes
- How to finish the open end of PLT-004 near the first step
- Straight finished end
- Returning the profile to the wall
- Separate decorative transition
- What to do if the podium height is not 150, but 120 or 180 mm
- Podium 120 mm
- Podium 180 mm
- Podium and built-in furniture: when PLT-004 should end before the step
- If the podium starts right behind the bedroom door
- If the podium has two open steps
- If the podium is surrounded by PLT-004 on only two sides
- If the bed is not centered on the podium
- Side lighting along PLT-004: why joints at the podium become more noticeable
- PLT-004 under enamel: how to prepare the end after cutting
- PLT-004 under a transparent finish: why a test end is needed before cutting the batch
- How to calculate returns for two podium ends
- How to mark PLT-004 strips before cutting
- How to check dry layout before final finishing
- If the podium is already built and its actual height is 147 or 153 mm
- Podium with upholstered end: is a vertical PLT-004 needed there
- Podium with wooden end: when a separate smooth strip is better than a profiled transition
- Podium with lighting: why the baseboard should not cover the technical unit
- When one additional strip is needed as a technical reserve
- When buying a wooden skirting board for the entire podium is irrational
- Maintainability: why it's better to separate a short unit at the step from a long wall
- How to account for finishing costs when comparing MDF and combined wood
- When a future bed rearrangement changes today's quantity of PLT-004
- Checking the finished unit: what should be visible after installation
- Can the lower level be made of MDF and the upper level of oak PLT-004
- Production time and a single order for both levels
- Mistake 1. Considering the podium height and baseboard height as interchangeable
- Mistake 2. Considering the podium as a regular perimeter
- Mistake 3. Rotating PLT-004 vertically without a layout
- Mistake 4. Buying the same quantity of 2400 and 2600 mm
- Mistake 5. Relying only on the total footage
- Mistake 6. Using any leftover piece at the step
- Mistake 7. Buying the profile behind built-in furniture without checking visibility
- Mistake 8. Leaving an unfinished edge
- Mistake 9. Making a joint near the first step to save one plank
- Mistake 10. Not measuring the actual height of the finished podium
- Error 11. Not accounting for side lighting
- Error 12. Ordering oak/beech as a "fully solid PLT-004"
- Error 13. Adding a vertical detail just because you need to "connect lines"
- Error 14. Considering +10% as a universal reserve
- Error 15. Starting finishing before dry assembly at the step
- Checklist before payment
- What is the height of PLT-004?
- What is the profile thickness?
- What is the length of MDF PLT-004?
- What is the length of the beech and oak versions?
- Is PLT-004 in oak fully solid?
- Can PLT-004 be used next to a 150 mm podium?
- Does the baseboard height need to match the podium height?
- Can PLT-004 be turned vertically on the stair nosing?
- Where is the best place to end the lower baseboard?
- Should PLT-004 be run along the upper level behind the bed?
- When is MDF 2600 mm more advantageous?
- When can 2400 mm be more convenient?
- Why can't you simply divide the total length by 2400?
- Can a short remainder be used at a step?
- How to finish the open end?
- What to do if the podium is 120 or 180 mm high?
- When is a different profile needed?
- Do I need to buy an extra strip "just in case"?
- Where to order PLT‑004 after calculation?
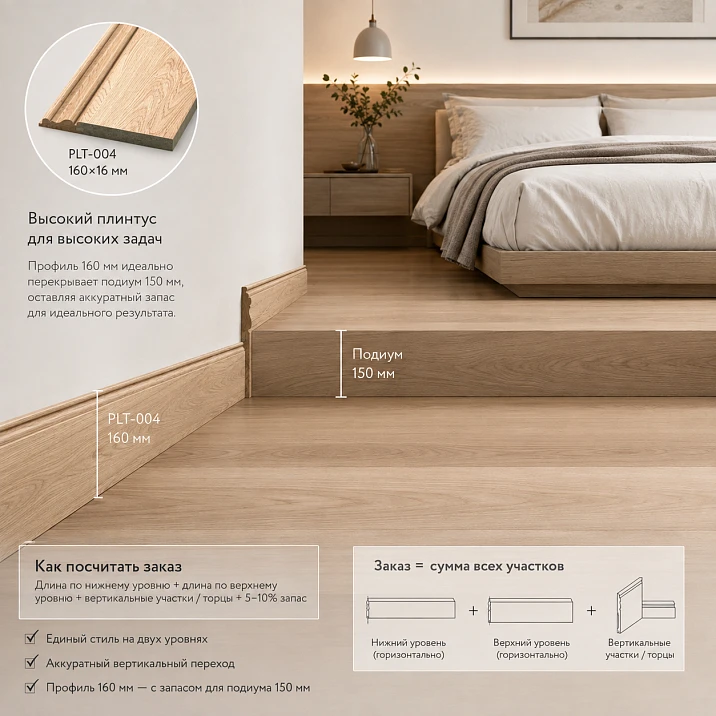
In the bedroom, a podium 150 mm high is already designed, and a tall PLT‑004 160 mm high is chosen for the walls. On the lower level, the baseboard runs along the regular wall; on the upper level, it continues the trim around the bed or another podium area. On the drawing, these two horizontals look connected, so there is a temptation to run the same profile through the step as a continuous decorative line. But the 160 mm baseboard and the 150 mm podium almost match in size only arithmetically. Geometrically, these are two different floor levels, two independent horizontal contours, and at least two visible endings.
The correct PLT-004 project at the podium starts with breaking the common perimeter into separate parts. The lower plinth usually ends at the end of the podium, the upper one starts at a new level. They can be connected with a vertical fragment only as a pre-drawn decorative unit: you cannot automatically rotate the floor PLT-004 by 90° and assume that the profile has continued correctly. When rotated, the orientation of the cross-section, the pattern, and the logic of joints change.
The difference between the podium height and the PLT-004 height is only 10 mm:
160 − 150 = 10 mm.
If the plinth model is still being compared, the working catalog allows
If the baseboard model is still being compared, the working catalog allows to buy wooden baseboard after checking available profiles. In this article, the choice has already been made: it is only about PLT-004 160×16 mm, a 150 mm podium, and a specific cutting map of 2400/2600 mm.
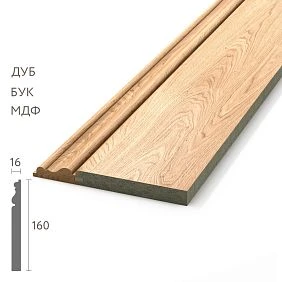
High plinth PLT-004 160×16 mm: what the current card confirms
PLT-004 has one cross-section — 160×16 mm — and three main versions. The length depends on the material. MDF is supplied in 2600 mm lengths. The beech and oak versions are 2400 mm long and have a combined construction: the lower part is made of MDF veneered with the corresponding wood, and the upper decorative profile is made of solid wood.
| PLT-004 version | Size | Price at the time of check | What is important about the podium |
|---|---|---|---|
| MDF | 160×16×2600 mm | 2 630 ₽ | Additional 200 mm of length can remove the joint on the long side |
| Beech / MDF / beech veneer | 160×16×2400 mm | 7 790 ₽ | Combined wood structure, separate 2400 mm board |
| Oak / MDF / oak veneer | 160×16×2400 mm | 9 640 ₽ | Same 2400 mm length, natural wood finish is more noticeable at the ends |
At the time of checking, the MDF version was in stock in Saint Petersburg, while the beech and oak versions showed a production time of 5–10 days. This data changes, so it needs to be re-checked before payment.
The exact product page can be opened via the link skirting board PLT-004 160×16 mm. For the article, it is fundamentally important not to mix different versions in one calculation: the cross-section geometry is the same, but 2400 and 2600 mm give different leftovers and different joint locations.




Podium 150 mm and skirting board 160 mm: why the dimensions almost match, but the joint is still complex
Let's imagine a wall section. The lower floor is at level 0. The top of the podium is at +150 mm. PLT‑004 on the lower level occupies the vertical from 0 to +160 mm. The same PLT‑004 on the podium occupies the vertical from +150 to +310 mm.
On the common wall, two decorative zones partially overlap in height by only 10 mm:
lower PLT-004: 0...160 mm;
upper PLT-004: 150...310 mm.
This is what visually creates the feeling that the profiles "almost meet." But they are on different floor planes and end near the vertical end of the step. To connect them with a single piece, one would have to simultaneously change the profile orientation and traverse a vertical plane 150 mm high. This is no longer a standard floor installation.
Our factory also produces:
What needs to be drawn in the section
Before ordering, a simple sketch is sufficient:
- lower floor;
- top of the podium +150 mm;
- vertical end of the podium;
- wall;
- lower PLT-004 160 mm;
- upper PLT-004 160 mm;
- both open ends near the step;
- possible decorative transition, if it is needed at all.
This makes it clear that the task is not about matching the numbers 150 and 160, but about the architecture of the profile ending.
Get Consultation
Three schemes for running PLT-004 near the podium
Scheme A. The lower baseboard ends before the step
The PLT-004 of the lower level approaches the podium and receives a neat end finish. On the upper level, the profile starts separately. Between them remains the vertical part of the podium, finished with the step material, wall, panel, or other specified covering.
This is the most straightforward option for cutting and repair: two horizontal contours are independent, and the podium is perceived as a separate architectural volume.
Scheme B. The upper PLT-004 starts separately, but both ends are visually coordinated
Essentially, this is also two contours, but the ends are designed as a pair: an identical straight cut, mirrored returns, or another coordinated shape. This approach is especially useful when the step is clearly visible from the bedroom entrance.
Scheme C. The horizontal elements are joined by a separate vertical decorative piece.
Such a joint is possible, but the vertical element should not automatically be considered the same PLT-004 rotated by 90°. The vertical piece must have its own geometry, joints, and finish. Sometimes it is more sensible to use a smooth strip, a furniture filler, or a specially designed element.
| Scheme | Appearance | Ends | PLT-004 consumption | Difficulty |
|---|---|---|---|---|
| Two independent endings | Clear podium architecture | 2 | Only horizontal pieces | Low |
| Paired decorative ends | A more joinery-like result | 2, but designed as a set | Additional reserve for returns | Medium |
| Separate vertical transition | Related node | Depends on the design | Count separately | High |
Ends and vertical transition PLT-004 at the first step
Why you can't simply rotate PLT-004 vertically on the end of the podium
PLT-004 has a profiled cross-section and is designed for a specific orientation relative to the floor and wall. When rotated 90°, the upper decorative part becomes the side, and the profile pattern starts working in a different direction.
Consequences:
- the profiling lines on the corners do not match;
- complex three-dimensional cuts appear;
- the top and bottom of the vertical part look different;
- it is impossible to get a neat "continuation" with a simple butt joint;
- in the combined oak/beech version, the orientation of the veneer and solid wood changes.
A vertical insert can be designed, but as a separate decorative detail. This is not a standard continuation of the floor plinth.
Where to end the wooden plinth: before the first step or on its end face
The choice depends on what the user sees first. If the podium is located to the side of the entrance and the end of the step is open, the termination of PLT‑004 becomes a noticeable detail. If a bed, nightstand, or wardrobe is nearby, part of the assembly may be hidden.
Before marking, evaluate:
- the main entry point;
- visibility of the end of the lower plinth;
- visibility of the end of the upper one;
- side lighting;
- the location of the bed and nightstands;
- future furniture rearrangement.
End directly before the podium vertical
Logical if the vertical face of the podium itself forms a strong architectural boundary. The baseboard reaches it and stops.
End slightly earlier
Sometimes a technical or visual gap is needed. But its size cannot be set universally. You need to understand what is between the end of PLT‑004 and the step and why this gap exists.
End at the furniture
If the podium starts behind built-in furniture, the baseboard can be finished at the furniture boundary rather than extending to an invisible area. This reduces material usage and the number of complex ends.
Top line of PLT‑004 on two floor levels: should it match
The podium has a fundamentally different logic than two adjacent floorings with a few millimeters difference. Here the upper floor is intentionally raised by 150 mm. If the same PLT‑004 with a height of 160 mm is installed directly from the floor on both levels, the top lines will also differ by 150 mm.
This is not a defect. The podium itself creates a new architectural horizontal line. Trying to maintain a single common top mark across the entire room would lead to a strange situation: on the upper level, the baseboard would have to be lowered below the floor or its height reduced. Therefore, for the podium, it is more correct to think in terms of two independent lines.
Lower contour
Runs along the regular floor level and ends at a podium, furniture, door, or other architectural boundary.
Upper contour
Starts on the podium surface and goes around the upper zone. Its top edge is automatically positioned 150 mm higher relative to the lower room.
What should match
Not the absolute height of the lines, but the quality of their endings: the same material, finish, neat ends, and a clear connection to the step.
High PLT-004 around the bed on the podium: which sections are actually visible
In the bedroom, the upper contour is often partially covered by the bed, headboard, nightstands, or built-in furniture. This directly affects the amount of baseboard.
Before ordering, divide the upper zone into four types:
| Section | Visibility | Is it mandatory to clad PLT-004 |
|---|---|---|
| Side aisles | High | Usually yes |
| Wall behind the headboard | Depends on the furniture | As per project |
| Area behind the cabinet | Partially hidden | Check future rearrangement |
| Fully enclosed by built-in wardrobe | No | Often not needed |
If the bed is freestanding and can be moved, saving baseboard behind it is risky: after rearrangement, an unfinished area will be exposed. If the furniture is built-in and fixed, the hidden area can be excluded from the map.
Why the podium cannot be calculated only by its external dimensions
The podium size, for example 3200×2200 mm, is not equal to the length of the upper plinth contour. One side may be completely open, another closed by a wall, a third occupied by the headboard, and a fourth by a passage. A wall schedule is needed, not the perimeter of a rectangle.
Wooden plinth near the podium: MDF, beech, and oak change the method of finishing the end.
The material does not change the height of 160 mm, but it changes the appearance of the end and the finishing technology. For a natural visual effect, you can consider natural wood baseboard in the working catalog of moldings, but the specific PLT‑004 made of beech and oak should be understood as a combined structure, not as a fully solid plank.
PLT‑004 made of MDF
Suitable for covering paint. The visible straight end can be prepared and painted in a common color. This is convenient if the plinth should blend with the wall or podium.
Beech version
The lower part is MDF with beech veneer, the upper decorative part is solid beech. With a transparent finish, the end shows several materials, so it cannot be perceived as a regular cut of solid wood.
Oak version
The same combined logic: MDF with oak veneer plus a solid upper profile. With tinting or varnish, the quality of end processing is especially noticeable.
Why the end cut needs to be approved before ordering
If the project involves an open end near the step, the workshop needs to understand in advance how the cut will look for the specific selected finish. For MDF and composite wood versions, these are different technical tasks.
PLT‑004 2400 or 2600 mm: how standard length changes cutting layout
PLT‑004 in MDF 2600 mm: when the extra 200 mm is actually useful
The difference between 2600 and 2400 mm is especially noticeable on the long sides of the podium and the walls next to it.
Side 2500 mm
MDF 2600 mm potentially covers it with one solid piece with a nominal remainder of 100 mm before final trimming.
Beech/oak 2400 mm do not cover 2500 mm entirely. An additional fragment of at least 100 mm plus a technological allowance and a joint will be required.
Side 2580 mm
MDF 2600 mm also potentially covers it with one strip, but the allowance is only 20 mm. If an angled cut is needed or the actual size is slightly larger, the integrity becomes questionable.
Side 2700 mm
Neither 2600 nor 2400 mm gives a solid piece. Both options require a joint, and the advantage of MDF is reduced to the difference in the length of the remainder.
Therefore, 2600 mm cannot be called "always more advantageous." They are only more advantageous where the actual length of the section falls into an interval that 2400 mm no longer covers, but 2600 mm still does.
PLT‑004 2400 mm from beech or oak: when a shorter plank is laid out more rationally
If there are many short parts around the podium, 2400 mm is sometimes used more efficiently than 2600 mm.
Suppose parts are needed:
- 1650 mm;
- 800 mm;
- 720 mm;
- 1100 mm.
One 2400 mm plank can yield 1650 + 720 = 2370 mm before accounting for the width of the cut and finishing allowances. Another — 1100 + 800 = 1900 mm. This results in large manageable remainders.
With 2600 mm MDF, the combinations will be different. It is not a fact that a longer workpiece will produce less waste — it all depends on the set of parts.
Why a podium cannot be considered as a regular room perimeter
The formula "perimeter minus doors" is insufficient here. The podium creates new geometry.
The calculation includes:
- the lower contour of the room;
- the upper contour of the podium;
- endings near the step;
- zones hidden by furniture;
- individual short details;
- possible decorative returns;
- if provided — a separate vertical transition.
Two projects with the same room perimeter and the same podium 3200×2200 mm may require different quantities of PLT‑004 if the bed and built-in furniture are arranged differently.
How to create a cutting map for PLT‑004 for two floor levels
First, a parts list is created. The floor level must be specified.
| Code | Level | Finished length | Visible end | Allow joint |
|---|---|---|---|---|
| L1 | Lower | … mm | No | Yes |
| L2 | Lower | … mm | Yes, at the step | Better as a whole |
| U1 | Upper | … mm | Yes, at the step | Better as a whole |
| U2 | Upper | … mm | No | Yes |
| RET | Transition | According to the drawing | Yes | Separate part |
After that, each row is laid out across whole planks of 2400 or 2600 mm. If a different material is selected, the map is rebuilt.
Only after such a layout does it make sense Buy PLT-004 in a specific quantity.
Why you cannot use any short offcut near the step
The section near the podium is often short, so it seems that any offcut would fit. But this is a visible area, and a random leftover can be worse than a whole new piece.
Check:
- the actual length after the previous cut;
- profile orientation;
- the quality of both ends;
- the veneer and solid wood pattern;
- sufficient allowance for the finish cut;
- whether this offcut is needed for a more important section.
Offcut with a miter cut
It may nominally be 800 mm, but the usable length to a clean straight edge is less. In the offcut list, you need to record the actual usable length.
Remainder from the oak batch
May differ in pattern and shade from the adjacent piece. This is more noticeable on a step due to the open end and side lighting.
Example of a bedroom with a podium 3200×2200 mm: how to move from geometry to a parts list
Let's take an illustrative project. A podium measuring 3200×2200 mm adjoins the far wall of the bedroom. The bed stands on the upper level, part of the back wall is covered by the headboard. The lower contour of the room and the upper contour of the podium are already divided into visible sections after subtracting doors and built-in furniture.
After measuring, the following list of finished parts PLT‑004 was obtained:
| Code | Level | Length | Why it is desirable to be solid |
|---|---|---|---|
| L1 | Lower | 2100 мм | View wall from the door to the podium |
| L2 | Lower | 2100 мм | Symmetrical section opposite |
| L3 | Lower | 1850 мм | Wall near the wardrobe |
| L4 | Lower | 1450 мм | Short wall |
| U1 | Upper | 1400 мм | Side passage by the bed |
| U2 | Upper | 1300 мм | Visible section behind the cabinet |
| U3 | Upper | 1300 мм | Second side section |
| U4 | Upper | 1200 мм | Part of the wall behind the headboard |
| U5 | Upper | 1150 мм | Passage near the step |
| R1 | Transition | 650 мм | Short section near the first step |
Total length:
2100 + 2100 + 1850 + 1450 + 1400 + 1300 + 1300 + 1200 + 1150 + 650 = 14,500 mm.
If you look only at the sum, for MDF 2600 mm the minimum is:
14,500 ÷ 2600 ≈ 5.58 → minimum 6 planks.
For beech/oak 2400 mm:
14,500 ÷ 2400 ≈ 6.04 → mathematical minimum 7 planks.
But then the practical cutting begins.
Practical cutting example: 6 planks of 2600 mm vs 8 planks of 2400 mm
MDF PLT‑004 2600 mm: six planks indeed cover the example without additional joints
The list can be laid out as follows:
| Plank 2600 mm | Parts | Used | Remainder |
|---|---|---|---|
| 1 | 2100 | 2100 мм | 500 мм |
| 2 | 2100 | 2100 мм | 500 мм |
| 3 | 1850 + 650 | 2500 мм | 100 мм |
| 4 | 1450 + 1150 | 2600 мм | 0 мм |
| 5 | 1400 + 1200 | 2600 мм | 0 мм |
| 6 | 1300 + 1300 | 2600 мм | 0 мм |
This is a good example of nearly perfect cutting: four planks are used fully or almost fully, two leave 500 mm each. If corner cuts and finishing allowances are already accounted for in the given lengths, six MDF planks are sufficient without splitting view details.
At the current MDF price at the time of checking:
6 × 2 630 = 15 780 ₽.
This is the cost of the profile in the example, without finishing, installation, packaging, and delivery.
PLT‑004 2400 mm: why seven planks mathematically suffice but practically cannot be laid out
Seven planks of 2400 mm give a total length:
7 × 2400 = 16,800 mm.
This is 2300 mm more than the net requirement of 14,500 mm. By total, it seems more than enough. But ten parts cannot be arbitrarily "poured" into seven blanks: each view detail must remain whole.
Two parts of 2100 mm each almost completely occupy two planks. The 1850 mm part does not combine with the 650 mm part because:
1850 + 650 = 2500 mm > 2400 mm.
1450 + 1150 = 2600 mm — also does not fit. 1400 + 1200 = 2600 mm — does not fit. Two parts of 1300 mm each together give 2600 mm and also require different blanks.
As a result, without additional joints, this particular list requires eight planks of 2400 mm, despite the mathematical minimum of seven.
Why this is a real practical conflict, not an arithmetic error
Arithmetic only counts the total length. Installation counts whole visible parts and the compatibility of their sizes within a standard plank. That is why the master estimate rule sounds like this: the mathematical minimum is only a lower bound, not the quantity to order.
Is it possible to fit into seven planks of 2400 mm if one additional joint is allowed
Yes. For example, one of the 2100 mm parts can be deliberately split into two segments of 1050 mm each. Then a denser packing option appears:
- 2100;
- 1850;
- 1450 + 650 = 2100;
- 1400;
- 1300 + 1050 = 2350;
- 1300 + 1050 = 2350;
- 1200 + 1150 = 2350.
Seven planks are now sufficient. But saving one plank is paid for by a new visible joint in an area that was originally planned as solid.
For beech, the current difference between 7 and 8 planks is the cost of one additional plank, 7,790 ₽. For oak — 9,640 ₽. The buyer must decide what is more important: to keep a solid visible part or to add one joint to reduce the budget.
Example cost: MDF, beech and oak while preserving solid parts
| Execution | Quantity per practical map | Price of one plank | Profile cost |
|---|---|---|---|
| MDF 2600 mm | 6 | 2 630 ₽ | 15 780 ₽ |
| Beech/MDF/veneer 2400 mm | 8 | 7 790 ₽ | 62 320 ₽ |
| Oak/MDF/veneer 2400 mm | 8 | 9 640 ₽ | 77 120 ₽ |
These numbers do not mean that MDF is "better" for the podium. They show how much the material, standard length, and solidity requirements change a specific cart.
If a natural wood texture is essential, the higher cost may be fully justified. If PLT-004 will be painted with an opaque enamel and solid sections matter more, MDF 2600 mm in this example has a strong cutting advantage.
When an additional solid PLT-004 plank is more beneficial than trying to use every leftover
It is reasonable to save material as long as it does not worsen the most visible joint. On a podium, errors concentrate near the step, where the end grain, level difference, and the start of the top contour are simultaneously visible.
An additional plank is justified if:
- otherwise, a joint will have to be made near the first step;
- a reserve is needed for a trial decorative return;
- The species area must be solid;
- The remainder has an unsuitable pattern;
- An error in a short part will stop the entire installation;
- For oak/beech, one batch of material is important.
There is no need to automatically add a "10% reserve." In one project, a large remainder of 500 mm is sufficient; in another, a critical part has a length of 1350 mm and requires a full additional blank.
The podium adjoins the wall not at 90°: how the calculation of PLT‑004 changes
If the end of the podium approaches the wall at an actual angle different from 90°, the finished length of the plinth at the long and short points differs. This is especially important for a high profile of 160 mm: the higher the part, the more noticeable the cutting error.
You need to:
- measure the actual angle;
- Make a template on an inexpensive offcut;
- Determine the long and short cutting points;
- Only after a trial fit transfer the measurement to the finishing strip.
The article does not turn into a general textbook on miter cuts. To calculate an order, it is enough to understand that an angled cut requires an additional allowance and reduces the useful length of the remainder.
How to finish the open end of PLT-004 near the first step
Straight finished end
The most compact option. Suitable if the cut is neatly prepared and the material allows for a finished look. For MDF, the end is prepared for the chosen finishing system. For combined beech/oak, the transition of MDF, veneer, and solid wood must be considered.
Returning the profile to the wall
A short piece can complete the decorative pattern and remove the open cross-section from direct view. However, a return requires additional material and precise cuts. It cannot be considered a "zero-length" piece.
Separate decorative transition
Sometimes it is better not to force PLT-004 to handle the vertical step. A smooth end element of the podium can be designed to visually accept both endings. This is especially useful if the profile is complex and the vertical turn looks overloaded.
What to do if the podium height is not 150, but 120 or 180 mm
The principle does not change. The height of PLT-004 does not have to match the height of the podium.
Podium 120 mm
The plinth at 160 mm is 40 mm higher than the vertical end. If you try to connect the lines with one vertical piece, the mismatch becomes even more obvious. Two independent contours usually look more logical.
Podium 180 mm
The podium is already 20 mm above the baseboard. This is not a problem in itself. The upper contour starts at +180 mm and lives separately.
Conclusion: the coincidence of the numbers 150 and 160 is not a compatibility criterion. Proportions, visible ends, and cutting matter.
When a high PLT-004 baseboard for a podium is better not to buy
A high profile does not have to suit every bedroom with a podium. You should refuse the purchase or compare another model if:
- there are too many short fragments around the podium;
- 160 mm visually overload a low podium;
- the step adjoins complex built-in furniture;
- the vertical end turns out to be disproportionate;
- under the bed and cabinets, most of the profile is never visible;
- the project requires a very thin modern line;
- a different profile height connects better with doors and furniture.
In that case, it is more reasonable to open the working catalog and buy a tall baseboard of a different geometry after re-checking the entire assembly.
Practical bedroom scenarios: furniture, walkways, lighting, and additional steps
Podium and built-in furniture: when PLT-004 needs to end before the step
If a wardrobe, cabinet, or built-in headboard approaches the end of the podium, the baseboard does not have to continue behind the furniture. Sometimes the furniture itself becomes the natural endpoint.
Before ordering, you need to check:
- whether the side of the furniture will remain in a permanent position;
- whether there is a technical gap between the furniture and the wall;
- Is the plinth visible behind the base;
- Can the furniture be dismantled in the future;
- Does PLT‑004 not add an extra 16 mm thickness behind the built-in element.
If the furniture is stationary and completely covers the wall, buying an expensive oak profile behind it just for the formal 'continuous contour' may be pointless.
If the podium starts immediately behind the bedroom door
The position of the first step relative to the entrance greatly affects the perception of the end. If a person enters and immediately sees the side edge of the podium, the open end of PLT‑004 becomes one of the first details of the interior.
In this case:
- The straight end must be especially clean;
- A decorative return may be justified;
- The joint of the long plank is better moved away from the entry point;
- A random short offcut near the step is undesirable.
If the podium is located deep in the room and the end is hidden by the bed, the requirements for decorative finishing may be more lenient.
If the podium has two open steps
Some bedrooms use not one 150 mm vertical, but two lower steps. Then PLT‑004 meets multiple levels and the number of open ends increases.
There is no need to try to connect each level with vertical profile pieces. More often, independent horizontal contours work cleaner, and the vertical ends of the steps are finished with their own material.
For calculation, each new step creates:
- a separate end of the lower baseboard;
- a separate start of the next level;
- a new short section;
- an additional risk of losing useful leftover.
If the podium is surrounded by PLT‑004 only on two sides
This is a typical case: the back side adjoins the wall with the headboard, one side is closed by furniture, and only the passage and the end side are visible. Then the upper plinth contour is significantly shorter than the geometric perimeter of the podium 3200×2200 mm.
Such a project is especially advantageous to calculate by details. If the upper level really needs only 1400 and 2100 mm, buying the profile "for the entire podium perimeter" means significant overspending.
If the bed is not centered on the podium
Furniture asymmetry changes the visibility of the plinth and the distribution of joints. One side may have a wide passage and a fully open PLT‑004, the other may be almost closed by a nightstand.
There is no need to force symmetrical segments. Solid strips are better given to the side that is more visible from the entrance, and the joint should be moved to a less noticeable area.
Side lighting along PLT‑004: why joints at the podium become more noticeable
If lighting or a window directs light along the wall, even a well-executed joint can cast a micro-shadow. The high 160 mm profile amplifies this effect.
With this scheme:
- the main visible side should preferably be made solid;
- the joint is better shifted behind furniture or into a darker area;
- the ends near the step are checked with a physical sample;
- For MDF, the finish is especially carefully refined.
Finish, returns, and dry fitting PLT-004
PLT-004 under enamel: how to prepare the edge after cutting
For MDF and paintable combined versions, the fresh cut must be part of the painting technology. You cannot leave an untreated edge just because it is on the side of the podium.
The working sequence is determined by the chosen coating system, but generally includes a clean cut, surface preparation, priming/sealing according to the technology, and a finish matching the front part.
Specific primers, layer thicknesses, and adhesives cannot be specified without the technical data sheet of the applied system.
PLT-004 under a transparent finish: why a test edge is needed before cutting the batch
For the beech and oak versions, the edge shows the structure of the combined product. If the project leaves it exposed, it is better to make a sample on a technological offcut in advance.
Check:
- how the veneer looks on the edge;
- how the solid top part is tinted;
- does the end grain differ in saturation;
- is a decorative return needed instead of a straight cut.
If the straight end grain is visually unsatisfactory, the solution is changed before purchasing the entire batch, not after installation.
How to calculate returns for two ends of the podium
If the lower and upper PLT-004 receive decorative returns, each return is a separate piece. Its length depends on the cross-section and the chosen scheme, so you cannot simply add a conditional 50 mm.
In the bill of materials, it is convenient to highlight:
- RET-L — return of the lower contour;
- RET-U — return of the upper;
- a spare piece for a test cut.
Returns can often be obtained from short offcuts, but only if the offcut has sufficient usable length and proper end condition.
How to mark PLT-004 planks before cutting
When there are two levels in the bedroom, the risk of mixing up parts is higher than usual. It is useful to assign codes in advance:
- L — lower level;
- U — upper level;
- S — area near the step;
- RET — return;
- R — reserve.
For example, L1 2100 mm, U2 1300 mm, S1 650 mm. Such marking protects a long decorative workpiece from being accidentally used on a short section.
How to check the dry layout before final finishing
Before installation, it is useful to place the cut pieces in their positions without final glue. Not only the length is checked.
You need to see:
- how does the bottom line end;
- how does the top start;
- does the finish match;
- does the end face conflict with furniture;
- does the transition look too heavy;
- where all the longitudinal joints are located.
For a podium, a dry fit is especially useful: an error in one short piece visually affects two levels at once.
Actual podium height and finish: edge cases
If the podium is already built and its actual height is 147 or 153 mm
The design 150 mm needs to be rechecked on the finished object. After laying the covering, the top may end up at a different elevation.
If the actual height is 147 mm, the difference from PLT-004's 160 mm is 13 mm. If it's 153 mm, it's 7 mm. But this still doesn't provide automatic vertical connection.
The actual height is needed primarily for the correct facade sketch and the proportion of the end assembly.
Podium with soft upholstery on the end: is a vertical PLT-004 needed there?
If the vertical face of the podium is covered with fabric, leather, or a soft panel, a wooden vertical transition is often not needed at all. The lower and upper baseboards end at the soft volume, and the step itself becomes an independent material.
Attempting to run PLT-004 through it can complicate both the decorative and installation systems.
Podium with a wooden end: when a separate smooth strip is better than a profiled transition
If the vertical of the podium is finished with wood, it makes sense to connect it with PLT-004 in color and material. But the vertical piece can be smooth, not profiled.
This preserves:
- a unified wood palette;
- a clean transition;
- clear orientation of the floor profile;
- simplicity of joints.
If the project requires a different profile or an additional part, you can compare Wooden trim in the working catalog, but you cannot replace PLT‑004 with a random molding without checking dimensions.
Podium with lighting: why the baseboard should not cover the technical unit
If there is LED lighting, a profile, a power supply, or a service cover in the vertical part of the step, PLT‑004 must not block access. The decorative finish should be tied to the equipment.
In this case, first fix:
- the position of the light profile;
- the trajectory for removing the diffuser;
- access to the wiring;
- only then the end face of PLT-004.
This is not a topic for electrical calculations, but engineering access takes priority over a beautiful continuous baseboard.
When one additional plank is needed as a technical reserve
The reserve is justified if the joint is being done for the first time, there are two complex end cuts, several oblique angles, or a transparent finish on oak/beech. One plank does not have to be considered a mandatory purchase in all cases, but for complex carpentry work it reduces the risk of stopping the installation.
It is especially important to distinguish:
- reserve in length;
- reserve for a test end cut;
- reserve from the same wood batch.
These are different reasons, and each must be recorded in the specification.
When buying a wooden baseboard for the entire podium is not rational
If the natural finish is important only on the open passage, and most of the contour is hidden by the built-in bed and furniture, a full wooden perimeter may be excessive. Sometimes it is better to shorten the contour or reconsider the architecture of hidden areas.
If the material is still being selected, you can buy a wooden baseboard after comparing all available profiles and then return to the map of specific details.
How to accept PLT-004 before cutting: especially important for combined oak and beech
Before finishing and cutting, the entire batch must be checked. After a plank is shortened or toned, some of the original characteristics are already difficult to assess, and the distribution across sections becomes irreversible.
Acceptance includes:
- article PLT‑004;
- execution and length;
- immediately make the full upper contour and maintain versatility;
- deliberately reduce hidden sections and accept that a reorder and local installation will be needed upon rearrangement.
- the bottom and top lines are each stable at their own level;
- the transition at the step is perceived as intentional;
- there is no random vertical piece of profile;
- the ends have a finished finish;
- the joints are not concentrated near the first step;
- the furniture does not expose untreated areas;
- the lighting does not reveal curved connections.
Reserve, future rearrangement, and maintainability of the assembly
Maintainability: why it is better to separate a short assembly at the step from a long wall
The podium can be repaired independently of the wall: the floor covering, lighting, soft upholstery of the end, or the bed can be changed. If the complex PLT-004 transition is made as part of a long 2500-millimeter piece, any change to the step forces intervention in a large section.
Sometimes it is more reasonable to end the long baseboard before the step and make a separate short end piece. Then, when remodeling the podium, only the local element is replaced. This is especially useful for painted MDF, where a small piece is easier to re-prepare and repaint.
How to account for finishing costs when comparing MDF and engineered wood
The profile price is only one part of the estimate. For a clear oak or beech finish, color matching, test samples, and more careful work with the ends may be required. For MDF under enamel — priming, sanding, and a covering topcoat.
Therefore, the example of 15,780 ₽ versus 62,320/77,120 ₽ shows only the cost of the slats themselves according to the current card. The final gap for a completed project may be different. To compare fairly, the workshop must provide an estimate for the same end result — a finished lower and upper contour with finished ends.
When a future bed rearrangement changes today's quantity of PLT‑004
If the podium is designed for a specific bed, it is easy to exclude the baseboard behind the headboard and nightstands. But if the furniture is not built-in, it may be replaced with a narrower one or moved after a few years.
There are two approaches:
For oak and beech, the second option is riskier due to possible batch differences. For painted MDF, a late reorder is easier to match to the same color if the finish formula is preserved.
Checking the finished assembly: what should be visible after installation
Acceptance is performed from several points. Up close, the ends and joints are checked. From the entrance — the overall composition of the two levels. From the bed level — the upper contour and previously hidden areas.
A good result looks like this:
Can the lower level be made of MDF and the upper level of oak PLT-004
The same cross-section of 160×16 mm technically makes such a combination visually possible, but these are already two different materials and two finishing systems. If the lower plinth is painted with enamel and the upper one is left with a clear oak finish, the separation by the podium can look intentional: the lower level relates to the room's architecture, the upper one to the wooden zone of the bed.
If both levels must look absolutely identical in color and surface, mixing materials complicates the task. A combined oak profile and MDF are prepared differently and accept the finish differently. Before ordering, a physical sample of both versions side by side is needed.
The cutting plan also changes: the lower level will have to be calculated at 2600 mm, the upper at 2400 mm. Offcuts between the two materials can no longer be freely redistributed. Therefore, a mixed project is only beneficial when the material itself is part of the design concept, not an attempt to use randomly leftover stock.
Production time and a single order for both levels
If MDF is chosen, the current product card at the time of checking shows it in stock. Beech and oak versions can be made to order in 5–10 days. For a bedroom with two levels, it is better to place a single order after the final measurement whenever possible, especially if a natural finish is needed.
Placing a separate additional order for the upper contour later creates a risk of wood tone differences and increases logistics. If the podium is not ready yet but deadlines are tight, it is wiser to first finalize the exact geometry and not order an "approximate perimeter" just to speed things up. An error in two end pieces and one long visible piece can cost more than a few days of waiting.
Practical mistakes when ordering PLT‑004 for a podium
Mistake 1. Treating the podium height and the plinth height as interchangeable
150 and 160 mm differ by only 10 mm, but this does not mean the profile automatically connects two levels. Two horizontal contours and their endings need to be designed.
Mistake 2. Treating the podium as a regular perimeter
In the calculation, the upper sections, short ends, and returns are lost. Each finished piece must be calculated separately.
Error 3. Turn PLT-004 vertically without a layout
The profile changes orientation, joints become complex, the decorative pattern breaks. The vertical transition is designed as a separate part.
Error 4. Buy the same quantity of 2400 and 2600 mm
Standard length changes the cutting layout. Each version needs its own map.
Error 5. Focus only on total footage
In the example, 14,500 mm mathematically requires seven 2400 mm strips, but without an extra joint, the practical map requires eight.
Error 6. Use any leftover at the step
The offcut may have an incorrect cut, direction, or pattern. The visible part is assigned in advance.
Error 7. Buy profile behind built-in furniture without checking visibility
The material remains completely hidden and provides no interior value.
Error 8. Leave the end face untreated
For MDF and combined wood versions, the cut requires the specified finishing.
Error 9. Make a joint next to the first step to save one plank
The most visible area gets an additional connection line. Sometimes a whole extra piece is more rational.
Error 10. Not measuring the actual height of the finished podium
After coating, 150 mm per the project may become 147 or 153 mm. The end assembly changes.
Error 11. Not accounting for side lighting
Joints and unevenness on a high profile become more noticeable under grazing light.
Error 12. Ordering oak/beech as "fully solid PLT-004"
The card describes a combined construction: MDF with veneer in the lower part and a solid decorative profile on top. This is important for end treatment.
Error 13. Adding a vertical detail just because you need to "connect lines"
A transition can overload the step. Two independent ends are often cleaner.
Error 14. Treating +10% as a universal reserve
A percentage doesn't know the length of a critical part. The reserve is determined by the map and the complexity of the nodes.
Error 15. Starting finishing before a dry assembly of the step
After adjusting the end, new cuts appear that need to be processed again.
Decision tree: how to run PLT-004 across two floor levels
| Question | If yes | If no |
|---|---|---|
| Is the podium perceived as a separate architectural zone? | Dividing the baseboard into lower and upper contours | Developing a special transition |
| Are both ends of the step visible? | Align them as a paired node | Simplify the hidden ending |
| Is a straight end acceptable? | Don't complicate with a return | Make a trial return |
| Is there a long section of 2401–2600 mm? | MDF 2600 can eliminate the joint | Compare maps by other parts |
| Is natural texture mandatory? | Count 2400 mm and end finish | Compare MDF for enamel |
| Are short parts made from useful leftovers? | Don't buy an extra plank | Add a backup blank |
| Does the vertical transition look heavy? | Leave two independent endings | Approve a separate transition part |
What to send to manager STAVROS before ordering PLT-004
For an accurate order, prepare not only the total footage. A specification is needed:
- article PLT‑004;
- execution — MDF, beech/MDF/veneer or oak/MDF/veneer;
- podium size;
- actual podium height after finishing;
- bedroom plan;
- lower plinth contour;
- upper contour;
- position of the bed and built-in furniture;
- visible end faces;
- solution for the straight end or return;
- presence of a vertical decorative transition;
- list of all parts;
- cutting map 2400 or 2600 mm;
- number of whole planks;
- finish;
- photos or sketches of the unit.
This way the manager sees exactly the product and quantity needed for the project, and the installer receives a clear parts map.
Final specification PLT-004 for the bedroom with podium
| Parameter | What to fix |
|---|---|
| Product | PLT‑004 |
| Cross-section | 160×16 mm |
| Material | MDF / beech-MDF-veneer / oak-MDF-veneer |
| Length | 2600 mm or 2400 mm |
| Podium | Actual height and size |
| Lower level | List of finished parts |
| top level | List of finished parts |
| Edges of the step | Straight / returns / other node |
| Vertical transition | Yes / no; separate drawing |
| Areas hidden by furniture | Excluded or included deliberately |
| Quantity | According to the practical cutting map |
| Reserve | According to specific critical parts |
| Finish | Covering / transparent / tinting |
Checklist before payment
- actual podium height measured;
- lower and upper contours separated;
- all visible end faces drawn on sketch;
- vertical PLT-004 not used automatically;
- end scheme at first step approved;
- areas hidden by furniture checked;
- material selected considering end face and finish;
- 2400 and 2600 mm calculated as separate maps;
- mathematical minimum verified by practical layout;
- short leftovers are assigned to specific parts;
- beveled angles are accounted for;
- the reserve has a specific purpose;
- price and production time have been rechecked.
FAQ about PLT‑004 on a podium and two floor levels
What is the height of PLT‑004?
160 mm.
What is the profile thickness?
16 mm.
What is the length of MDF PLT‑004?
2600 mm.
What is the length of the beech and oak versions?
2400 mm.
Is PLT‑004 made of oak entirely solid?
No. The card describes a combined construction: the lower part is made of MDF with oak veneer, the upper decorative profile is made of solid wood.
Can PLT-004 be used next to a 150 mm podium?
Yes, if the lower and upper contours and their endings are designed in advance.
Does the height of the skirting board need to match the height of the podium?
No. PLT-004 160 mm and the podium 150 mm can work together normally as different architectural elements.
Can PLT-004 be turned vertically at the end of the step?
It should not be considered a standard continuation. When turned, the orientation of the profile changes; the vertical element needs to be designed separately.
Where is the best place to end the lower skirting board?
Most often directly before the vertical face of the podium or at another clear architectural boundary.
Is it necessary to run PLT-004 along the upper level behind the bed?
If the area can become visible after rearranging furniture — usually yes. Behind a permanent built-in structure, the profile can be excluded per the project.
When is MDF 2600 mm more advantageous?
When there are visible sections longer than 2400 mm but not exceeding 2600 mm that can be covered with a single plank.
When might 2400 mm be more convenient?
When the project consists of several short pieces that combine well within 2400 mm.
Why can't you simply divide the total footage by 2400?
Because individual visible pieces may not fit into a mathematical minimum without extra joints.
Can a short leftover piece be used at a step?
Yes, if it has sufficient usable length, correct orientation, and a suitable edge.
How to finish the open end?
With a straight finished cut, a return, or a separate decorative element — after a trial fitting of the selected material.
What to do if the podium is 120 or 180 mm high?
Use the same two-circuit principle. The baseboard height does not have to match the podium height.
When is a different profile needed?
If 160 mm overloads the podium, there are too many short fragments, or the end joint cannot be made neatly.
Do I need to buy an extra plank "just in case"?
No. The reserve is determined by specific complex parts, not by an automatic percentage.
Where to order PLT-004 after calculation?
In the product card after approving the material, cutting map, and end joints.
Where to order the tall PLT-004 after calculating the podium
When the podium is measured, all parts have codes, and the layout is confirmed, you can order high skirting board PLT-004 in the required finish. Before payment, re-check the current price, availability, or production time.
Result: a 150 mm podium creates two skirting contours, not one "broken" PLT-004 line
PLT-004 with a height of 160 mm can be confidently used in a bedroom with a 150 mm podium if you abandon the false task of "connecting everything with one continuous strip." The lower floor and the top of the podium are two different levels. At each level, PLT-004 works as a normal horizontal skirting board, and near the step, both contours receive pre-designed endings.
The difference 160−150=10 mm is useful for understanding the proportion, but it is not an installation formula. There is no need to vertically turn the profiled strip without a separate drawing. More often, two end cuts—straight or with returns—work more neatly.
The quantity is calculated only after the parts list. In the illustrative example with a net requirement of 14,500 mm, six MDF strips of 2600 mm indeed cover all solid parts. For 2400 mm, simple arithmetic promises seven strips, but a practical cutting plan without an additional joint requires eight. This is why you should calculate not the total perimeter, but the specific cutting layout.
The correct sequence: actual podium height → lower and upper contours → visible end cuts → decision on returns → list of finished parts → separate 2400/2600 mm cutting plan → check of leftovers → material and finish → quantity → order.