Article Contents:
- One FUR-001 kit is a mount for one leg, not the whole table
- Quick quantity calculation
- Stud M8×60: two halves with different jobs
- Insert M8×13: a small part that takes the load of the connection
- Why knowing only the diameter is not enough
- How not to drill through the tabletop
- Why the stud must go along the axis
- Why the threaded insert cannot be placed too close to the edge
- Solid wood
- Plywood and plywood embedded insert
- MDF
- Particleboard
- Thin countertop
- When to choose FUR-001
- When to look at FUR-012
- When a common wooden plate is needed
- Table with aprons
- Apronless table
- Table with metal underframe
- What to consider for furniture that is frequently disassembled
- Dining table on four wooden legs
- Coffee table on three legs
- Console with two front legs and wall mounting
- Chest of drawers on six supports
- Bed with four corner and two center legs
- Bench or ottoman
- Furniture for a cafe, store, or hotel
- The foot pad does not eliminate play in the top mounting
- Is a spare FUR-001 needed
- FUR-001 — stud plus insert nut
- FUR-001-1 — stud only
- First, find the source of the play
- Can a threaded insert be installed into an old hole
- How to replace a leg without damaging the base
- Buy one set for four legs
- Deciding that 6.5 and 10 mm are interchangeable options
- Drilling the tabletop without finding the load-bearing zone
- Not controlling the depth
- Marking according to the outer center of a carved leg
- Screw in the stud at an angle
- Install the insert at the very edge
- Automatically assign FUR-001 for particleboard
- Consider M8 sufficient proof of compatibility
- Forget that the stud may already be entering the leg
- Use FUR-001 instead of a stiffening node
- Mix different fasteners on identical legs without calculation
- Tighten until the wood is destroyed
- Use a foot cap as a repair method
- Example of a precise request
- What a trial installation shows
- Why you cannot check stability on one installed leg
- Cart
- Compatibility
- Marking and installation
- How many FUR-001 are needed for a table with four legs?
- Is one FUR-001 designed for one leg or for the entire table?
- What is included in the FUR-001 set?
- Why are the 6.5 and 10 mm holes specified in the description?
- Where is the stud installed?
- Where is the insert nut installed?
- Which wrench is used to install the insert nut?
- Can FUR-001 be used in MDF?
- Can the insert nut be placed in particleboard?
- What is the difference between FUR-001 and FUR-012?
- When is it better to choose FUR-012?
- Can I buy just the pin without the bushing?
- Will the new FUR-001 help if the leg is wobbly?
- Can the legs be made detachable using FUR-001?
- Do I need to buy glides along with FUR-001?
- Is FUR-001 included in the price of the furniture leg?
- How do I check the price of FUR-001?
- Is a spare set needed?

A table can be perfectly calculated in height, legs can perfectly match the style and material, and the tabletop can have the right proportions. But the whole structure will still remain unreliable if the furniture leg attachment is chosen on a residual basis. It is at this point that a simple but fundamental question often arises: how many FUR-001 sets need to be ordered for a table with four legs — one for the whole item or one for each support?
The direct answer is this: in the typical scheme of an individual threaded connection one FUR-001 set is designed for one mounting point of one furniture leg. For four legs, you usually need four sets; for six, six; for eight, eight. However, before buying, you cannot rely on arithmetic alone. You need to make sure that the hanger bolt is not already installed in the leg, that the fastener is not included with another product, that the base is thick enough for the threaded insert, and that the design is actually intended for a direct threaded fit without a mounting plate.
There is also a second question that stops the buyer after opening the product page: why are two diameters listed for one fastener — 6.5 and 10 mm? There is no contradiction here. The 6.5 mm hole refers to the self-tapping part of the hanger bolt, while the 10 mm hole refers to the metal threaded insert. These are two different parts that are installed in different parts of the future connection and then joined by an M8 metric thread.
To avoid having to return to the order because of one missing hanger bolt, to avoid damaging a thin tabletop, and to avoid confusing FUR-001 with a set that uses a mounting plate, let's break down the fastener as a system. The buyer should leave the page not only understanding the principle, but also with a ready specification: how many legs, how many sets, what base material, what insertion depth, whether a foot pad is needed, and whether FUR-012 or a universal mounting plate would be a better choice for a specific piece of furniture.
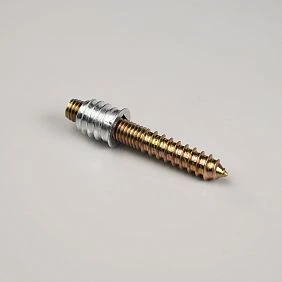
One FUR-001 set is the fastener for one leg, not for the whole table
The word “set” is often understood as a kit for an entire piece of furniture. A person sees one item in the cart and assumes it contains everything needed for four legs. In the case of FUR-001, the word means something different: it is a set of parts for one threaded connection. It contains one hanger bolt and one threaded insert. They form one pair, and one pair connects one leg to one corresponding point in the furniture base.
Imagine an ordinary table with four separate supports. Each leg has its own upper mounting point. You cannot use one threaded insert to receive four hanger bolts at once, just as you cannot use one hanger bolt to connect four corners. Therefore, the calculation starts with the number of supports, not the number of pieces of furniture.
For the standard layout, a simple ratio applies:
number of individual legs = number of individual FUR-001 kits.
This formula is convenient to use as a first filter, but not as a final decision. If a table has four legs, there should indeed be four FUR-001 in the cart — provided, that each support is attached specifically with an M8 stud to a separate threaded insert. If the legs are connected to a common frame, underframe, wooden mounting plate, or metal frame, the kit composition will be different.
For a buyer who has already selected the legs and confirmed a direct threaded connection, you can immediately purchase the FUR-001 kit with an M8×60 stud and threaded insert in a quantity equal to the number of installed supports. In the product card, you need to check the current price, availability, and kit composition at the time of ordering: this data cannot be carried over from an old estimate or someone else's project.




Quick quantity calculation
| Number of furniture legs | Base quantity of FUR-001 | What to check before payment |
|---|---|---|
| 1 | 1 set | Is the pin not pre-installed |
| 2 | 2 sets | Are both nodes identical and does the base fit the bushings |
| 3 | 3 sets | Is a three-point scheme provided by the furniture design |
| 4 | 4 sets | Is a common frame or mounting plate not used |
| 6 | 6 sets | Is the thickness and density of the base sufficient at all points |
| 8 | 8 sets | Is it not more advantageous to move to a underframe or common mounting system in the design |
The table provides the correct logic for ordering, but it does not replace the drawing. For example, a long table may have six legs, but the central supports are attached differently than the corner ones. A chest of drawers may stand on four legs, but the rear positions may connect to a separate support frame. A bench may look like furniture on four supports, although two legs are part of the finished side panels. Therefore, first count the actual individual connections, and only then transfer the number to the cart.
Our factory also produces:


What is included in FUR-001 and what task each part performs
The FUR-001 set consists of two metal elements: a galvanized stud M8×60 and a galvanized insert M8×13. Externally, this is small hardware, but inside the furniture joint, each part has its own job. The stud connects the leg to the base, and the insert creates a strong internal M8 thread in the base, into which the metric part of the stud is screwed.
| Element | Confirmed parameters | Its role in the joint |
| Screw | M8×60, total length 60 mm | Connects the leg to the insert |
| Self-tapping part of the stud | Length 30 mm | Screws into the prepared wooden part of the leg or another element provided by the project |
| Metric part of the stud | Length 30 mm, thread M8 | Screws into the internal thread of the insert nut |
| Threaded insert | Metal, zinc-plated, M8×13 | Forms the mating threaded point in the furniture base |
| Pilot hole for the stud | 6.5 mm | Centers and facilitates installation of the self-tapping part of the stud |
| Mounting hole for the insert nut | 10 мм | Accepts the body of the metal insert nut |
| Tool for threaded insert | Hex key 8 mm | Allows screwing the threaded insert into a prepared hole |
Here it is important to note what is not included by default. FUR-001 does not mean a ready-made furniture leg, tabletop, apron, common mounting plate, foot, or tool set. It should also not be perceived as universal fastening for any base. This is a specific pair of "stud plus threaded insert" with M8 thread, and its applicability is determined by the leg geometry and the material of the mating part.
Get Consultation
Stud M8×60: two halves with different functions
The stud appears to be a single rod, but structurally it is divided into two equal parts of 30 mm each. The first has a screw, or self-tapping, profile. It is designed for fixation in wood after preparing a central pilot hole. The second has metric M8 thread and connects to the threaded insert.
This difference cannot be ignored. If the sides are mixed up, trying to seat the metric part directly into wood or enlarge the hole for the self-tapping part to the diameter of the threaded insert, the assembly will stop working as intended. The thread must engage with a suitable material, and the axis of the stud must align with the axis of the leg. The slightest misalignment at the top of the support turns into a noticeable deviation at the bottom, especially for a tall leg.
If during repair only the stud is damaged, and the threaded insert and seat are preserved, a new full set is not always needed. In such a situation, you can check whether the stud M8×60 for furniture leg FUR-001-1. But a separate stud is purchased only after checking the thread, length, and condition of the threaded insert. Replacing one part will not help if the mating insert spins, the hole is broken, or the base has crumbled.
Futorca M8×13: a small part that takes the load of the connection
The futorca is a metal threaded insert 13 mm long with an internal M8 thread. It forms a predictable mating point in the furniture base. Without it, the metric part of the stud will not get the correct thread, and the demountable connection will be impossible to assemble properly.
The futorca is installed into a hole with a diameter of 10 mm using a 8 mm hex key. But these numbers do not allow drilling any tabletop. Before work, check the thickness of the base, the distance to the edge, the location of other holes, the direction of the grain, the presence of an insert, and the remaining material thickness under the seating. The 13 mm length of the futorca does not mean that a base exactly 13 mm thick is sufficient: a margin is needed to prevent the drill from exiting and damaging the opposite surface.
Why two diameters are specified: 6.5 mm for the stud and 10 mm for the futorca
The most common mistake when reading the card is perceiving 6.5 and 10 mm as two options for the same hole. The buyer starts choosing: "Which diameter is correct?" Both are correct, because they refer to different seating locations.
The connection scheme looks like this:
-
In one part, a central pilot hole with a diameter of 6.5 mm is prepared for the self-tapping part of the stud.
-
The stud is screwed in with its self-tapping part to the specified depth.
-
In the mating base, a seating hole with a diameter of 10 mm is prepared.
-
The futorca M8×13 is installed into it using a 8 mm hex key.
-
The metric part of the M8 stud is connected to the internal thread of the insert.
The diameter of 6.5 mm is smaller than the outer diameter of the threaded part for a reason: the thread must enter the material and hold in it, not spin freely. The diameter of 10 mm refers to the body of the insert and ensures its seating. These holes cannot be combined, made with a single drill, or swapped.
Why knowing only the diameter is not enough
A hole has not only width, but also depth, axis, position relative to the edge, and wall quality. Even a perfectly chosen drill will not save the joint if the craftsman deviates from the center of the leg, drills through the base, or hits an old worn-out hole.
Before drilling, determine:
-
the exact axis of the leg;
-
the thickness of the upper mounting part;
-
the allowable depth of entry for the self-tapping part;
-
the thickness of the base under the insert;
-
the safe remaining material;
-
distance to the edge of the tabletop or mounting plate;
-
absence of hidden fasteners, knots, cracks, and voids;
-
ability to tighten the connection without damaging the decorative part of the leg.
If the leg is carved, shaped, or has a narrow top platform, it is especially dangerous to rely only on the external center. The geometric center of the decorative shape may not coincide with the center of the load-bearing section. The correct point is taken from the drawing or marked according to the mounting plane.
How not to drill through the tabletop
The problem arises not because of the FUR-001 itself, but due to the lack of depth control. A limiter or a visible mark is placed on the drill, but first the allowable depth is calculated based on the actual thickness of the base. The size of the insert is known, but a technological allowance is added to it, and a sufficient layer of material must remain on the opposite side.
A thin decorative tabletop cannot automatically be considered a suitable base. In furniture construction, the insert is often installed not in the face panel, but in the under-table, apron frame, wooden mounting plate, or reinforced platform. That is why the phrase "attaching table legs to the tabletop" does not always mean literally drilling the top panel itself. The mating part is determined by the design.
Where the stud is installed and where the insert is installed
In a typical scheme, the self-tapping part of the stud is secured in the wooden furniture leg, and the insert is installed in the mating base of the furniture. After that, the leg is screwed onto the insert using the metric part of the stud. This logic is convenient because the leg can be removed for transport, repair, or finishing without pulling the fastener out of the wood during each disassembly.
However, the word "typical" is fundamental here. Different legs may have their own mounting assemblies, ready-made studs, plates, inserts, or limitations. You cannot take the general description of FUR-001 and drill the product without opening the card of the specific support. First, check whether the selected leg is designed for M8, then determine where its mounting center is and what depth is allowable.
Understanding the place of FUR-001 in the overall system is helped by material on what a complete furniture leg assembly consists of. In it, the pin, threaded insert, mounting plate, and foot pad are separated by function. This is important: the top fastener is responsible for connection to the body, the foot pad works at the floor, and the leg itself transfers load between them.
Why the pin must go along the axis
If the pin is tilted, the leg tries to take an incorrect position when tightened. On a tall support, the deviation amplifies: the top point is shifted by fractions of a millimeter, while the bottom already moves noticeably to the side. As a result, furniture may wobble, corners turn out uneven, the crossbar experiences stress, and the thread gradually loosens.
Central marking is not for beauty. It allows the load to pass closer to the leg axis and reduces the risk of splitting. The hole must be perpendicular to the mounting plane, unless the project specifies a special tilt. For angled legs, appropriate plates or a pre-calculated assembly are used, rather than trying to achieve the angle with crooked drilling.
Why the threaded insert cannot be placed too close to the edge
The threaded insert creates expansion and transfers force into the surrounding material. If the hole is near the edge, the side wall may crack or chip. The risk is higher in thin panels, near old holes, and in materials with non-uniform density.
Therefore, before installation, not only the vertical thickness is assessed, but also the margin around the hole. For a corner leg, one might want to move the fastener as close to the tabletop edge as possible to increase the support base. But the gain in placement should not destroy the seating area. If space is limited, it is more correct to reconsider the base design or choose a plate-mounted fastener.
Is FUR-001 suitable for solid wood, plywood, MDF, and particleboard
Fasteners for wooden furniture legs are chosen not only by thread. The second half of the decision is the base material. The same insert behaves differently in solid wood, dense plywood insert, MDF, and loose chipboard. Therefore, the question "can FUR-001 be installed in MDF" cannot be honestly closed with a single word "yes" or "no". You need to know the thickness, density, load direction, hole position, and the construction of the entire piece of furniture.
Solid wood
Solid wood usually provides a clear environment for threaded seating, but even here there is no automatic guarantee. The wood species, grain direction, moisture content, presence of cracks, and distance to the end grain matter. An insert installed across a weak edge or near a wood defect can split the surface. In a thin apron, even dense material does not compensate for the lack of volume around the hole.
For a table, it is wiser to provide a separate load-bearing zone: an underframe, an apron belt, or an insert of sufficient thickness. Then the leg attachment on an M8 stud works within a structural element, and the visible tabletop does not take on the entire load at a single point.
Plywood and plywood insert
Dense multi-layer plywood can be a convenient base if its thickness, quality, and orientation are confirmed by the project. Cross-laminated layers distribute force better than a loose single-layer board, but the hole still cannot be placed at the very edge. It is important that the insert goes into full material and does not cross a void, delamination, or the edge of a small glued-in pad.
A plywood insert is often used when the tabletop itself is too thin or made of a material not designed for such a threaded insert. The insert increases local thickness and creates a separate mounting zone. But its dimensions, gluing, and connection to the body must be calculated in advance. You cannot glue a small piece after drilling and consider the reinforcement complete.
MDF (740–760 kg/m³, emission class E1/E0) provides ideal geometry, uniformity, and better base for enamel: high adhesion, smooth surface, absence of knots and cracks.
MDF has a homogeneous structure and is easy to machine, but its ability to hold a specific insert depends on density and thickness. In a thin board, the threaded insert may come out on the reverse side or weaken the area around itself. Repeated unscrewing and misalignment are also dangerous: a destroyed seating in a fibrous material is harder to restore than it seems.
If the base is made of MDF, you need to check:
-
the actual thickness of the part;
-
the presence of a load-bearing insert;
-
distance from the hole to the edge;
-
direction of load;
-
ability to safely install a 13 mm long threaded insert;
-
is a distribution mounting plate required;
-
whether hardware, wiring, or another component is hidden inside.
The phrase "MDF of such-and-such thickness is exactly suitable" without assessing the structure would be too crude. The same sheet can serve as a facade, decorative cover, or part of a reinforced under-table — the fastening requirements differ in these cases.
Chipboard
Weak or thin chipboard is one of the riskiest scenarios for direct threaded insert installation. Large chips and voids around the hole reduce engagement quality, especially near the edge. If the joint has already been repaired, the material may be damaged even when the surface looks neat.
This does not mean that any chipboard completely rules out FUR-001. The correct conclusion is different: direct installation cannot be assigned automatically. The specific board, thickness, insert, and loads need to be assessed. For a questionable base, a mounting plate, separate under-table, or reinforced pad that distributes force over a larger area is more often considered.
Thin tabletop
A thin tabletop may be strong as a surface, but may not have sufficient depth for a threaded insert. Natural stone, glass, thin compact laminate, hollow panels, and decorative boards with honeycomb filling are especially dangerous. FUR-001 does not turn them into a suitable threaded base.
In such projects, legs are attached to the underframe, frame, embedded parts, or special plates. The top material itself remains the tabletop, while the load-bearing unit is located below. The buyer must distinguish between the outer layer and the load-bearing part of the furniture: they may coincide, but they do not have to.
FUR-001, FUR-012, or mounting plate FUR-020: what to choose
All three solutions relate to attaching furniture legs, but they are arranged differently. FUR-001 connects a stud with a threaded insert installed inside the base. FUR-012 uses an M8×60 stud and a round metal mounting plate with a diameter of 37 mm. FUR-020 is a wooden mounting plate that creates a common platform and can be used for a different load distribution principle.
You cannot choose by the name "kit" or by the minimum number of parts. First, look at the furniture design.
| Criterion | FUR-001 | FUR-012 | FUR-020 |
| Basic scheme | M8×60 stud + M8×13 threaded insert | M8×60 stud + round metal plate d37 mm | Wooden mounting plate with prepared threaded points |
| Where the mating thread is located | In the threaded insert inside the base | In a separate round plate | In the threaded elements of the mounting plate |
| The main question before choosing | Can a bushing be reliably installed | Is there room for the round plate and its fastening | Does the size of the overall plate and the leg layout fit |
| Advantage | Compact hidden unit | Does not require installing the bushing directly into the base | Distributes the fastening through a separate wooden platform |
| Limitation | Requires sufficient thickness and density of the base | Requires mounting space and suitable plate fasteners | Changes the underframe geometry and does not fit every piece of furniture |
| When to check especially thoroughly | Thin MDF, chipboard, old holes | Narrow top platform, tabletop edge | Dimensions, number of supports, position of stretchers, and height of the assembly |
When to choose FUR-001
FUR-001 is appropriate when the leg is designed for an M8 stud, the base allows reliable installation of the insert, and a neat detachable assembly without a visible plate is needed. This could be a table, console, chest of drawers, nightstand, bed, or bench — the name of the item is secondary. The decision is determined not by the furniture style, but by the structure of the mounting area.
The advantage of a straight insert is compactness. The mating thread is hidden in the base, and after removing the leg, a small metal insert remains underneath. But compactness requires precision: all the load is concentrated in a limited area, so the material around the hole must be solid.
When to look at FUR-012
If the insert cannot be reliably seated in the base, or it is more convenient to secure the mating thread through a separate metal plate, consider the FUR-012 kit with a round mounting plate. The plate has a diameter of 37 mm and M8 thread, and the kit includes an M8×60 stud.
FUR-012 is not an "improved version" of FUR-001 for every case. The plate needs space. It must be properly secured, positioned relative to the edge, and aligned with the top platform of the leg. If the base is narrow, with aprons or decorative relief nearby, even a small round plate may not fit.
When a common wooden plate is needed
For some tables and consoles, it is more convenient to use not four separate inserts in the tabletop, but a separate mounting component. Before choosing, you can review the wooden mounting plate FUR-020 and check the available sizes, the number of threaded points, and the method of attachment to the furniture.
A common plate helps separate the legs from a thin decorative surface, but it adds its own thickness and affects the height. It must become part of the frame, not a random spacer. Long tables require special attention: a common platform does not replace stiffness calculations and does not eliminate the need for aprons or an underframe.
How to choose leg attachments for a table based on construction, not a photo
The photo shows what the leg looks like, but says almost nothing about the top joint. Two outwardly similar wooden supports can have different end areas, different centers, a ready-made stud, a hole for fasteners, or a completely different mounting scheme. Therefore, selection starts with the leg card and drawing.
If the supports have not been chosen yet, it is rational to first select legs and fasteners in one order. This route allows comparing height, material, shape of the top platform, and recommended hardware, rather than trying to adapt an already purchased set to a random leg.
Table with aprons
In an apron construction, the leg fits into the corner of the frame, and horizontal parts connect the supports to each other. Here, the load is distributed not only through the point at the tabletop. FUR-001 can participate in the connection, but it cannot be considered a replacement for the apron joint. You need to understand what exactly holds the leg from lateral swaying and how the fastener interacts with the frame.
For a massive dining table, one stud per leg should not be assigned without checking lateral rigidity. Even if the thread holds vertical load, the table may sway when pushed. The designer evaluates aprons, corner blocks, underframe, and the contact area.
Table without aprons
In a frameless scheme, the leg is attached directly to the base or mounting plate. Here, the choice between a threaded insert and a plate becomes especially noticeable. The base must absorb not only the weight but also the lever from a tall leg. The longer the support and the smaller its top platform, the higher the requirements for accuracy and rigidity of the connection.
FUR-001 may be a suitable solution for compact furniture with a sufficient mounting area. For a long or heavy table, the calculation must be separately confirmed. You cannot transfer the scheme of a coffee table to a dining table just because the threads of both legs are marked M8.
Table with a metal underframe
A metal frame usually has its own holes, threaded inserts, flanges, or bolted connections. A threaded insert for a wooden base may be unnecessary. In such a project, FUR-001 is purchased only when a wooden leg actually connects to a provided mating part via M8.
If the frame already has internal M8 threads, only a compatible stud may be needed. If a bolt, welded nut, or flange is used, the scheme changes completely. Buying a full FUR-001 "just in case" is irrational: an extra threaded insert will not solve the compatibility issue.
Detachable legs: when FUR-001 facilitates transportation and repair
Threaded connections are valued not only for their hidden appearance. They allow legs to be removed without constantly unscrewing self-tapping screws from the body. This is important for a table that must fit through a narrow doorway, fit in an elevator, be regularly transported to exhibitions, or be stored disassembled.
Removability only works with careful use. The leg cannot be used as a lever, rocked while unscrewing, or tightened with excessive force. During disassembly, the stud must remain securely fixed in the leg, and the threaded insert in the base. If one of the parts starts to spin, further force destroys the fit.
What to consider for furniture that is frequently disassembled
-
the same direction of rotation and clear marking of the legs;
-
access to each support without removing decorative parts;
-
protective covers for studs during transportation;
-
separate sockets or packaging so that the thread does not hit the wood;
-
checking the threaded inserts before each assembly;
-
prohibition on tightening by the thin carved part of the leg;
-
layout diagram of the supports if they differ in angle or decor.
For an exhibition table or a mobile trade stand, it makes sense to order a spare stud, but the spare should not replace preventive maintenance. If the connection regularly loosens, the problem may be in misalignment, insufficient frame rigidity, or an incorrect base.
Practical scenarios: how many FUR-001 to put in the cart
Dining table on four wooden legs
The buyer chose four separate supports, each designed for an M8 stud. The base is made of a solid under-table with four prepared zones for threaded inserts. The fasteners are not included with the legs. In this scenario, the basic specification is four legs and four FUR-001.
Before payment, they check that the stud length fits the mounting part of the support, the M8×13 threaded insert fits into the base with a safe margin, and the glides are selected according to the bottom end of each leg. Drilling is done according to the drawing, not by the external center of the tabletop.
Coffee table on three legs
The three-point scheme is inherently stable on uneven floors, but only if it is provided for by the design. For three separate threaded assemblies, three FUR-001 units will be needed. You cannot buy four sets out of habit and add a fourth point without recalculating the proportions.
The base of a coffee table is often thinner than that of a dining table. Therefore, the area under the insert is checked especially carefully. If there is no direct fit, plates or a separate under-table are chosen.
Console with two front legs and wall mounting
A wall-mounted console may have two decorative front supports, while the rear load is taken by the wall or the body. If each front leg is connected with its own FUR-001, two sets are needed. However, the console's wall mounting is calculated separately and is not part of the FUR-001 logic.
It is a mistake to assume that two legs and two inserts automatically make the console stable. The wall assembly must withstand the overturning moment, and the base under the legs must not fail under lateral loads.
Chest of drawers on six supports
Six legs do not always mean six identical connections. Four corner supports may be removable, while two central ones may be adjustable or built into the plinth. First, a list of actual assemblies is compiled. If all six legs are wooden, separate, and attached with a stud to the insert, six FUR-001 units are needed. If the central ones are arranged differently, the quantity decreases.
For a long chest of drawers, central legs help combat sagging, but their height must exactly match the corner ones. Glides of the same thickness become part of the calculation: different lower elements can alter the plane of the furniture.
Bed with four corner and two central legs
A bed experiences variable loads, so a simple formula requires structural verification. Corner legs may fit into the side rail frame, while central ones support the longitudinal beam. If all six supports have the same threaded assembly, six sets will be required. In practice, central ones are often attached differently.
FUR-001 does not replace the connection of the tsars and does not calculate the rigidity of the bed. It is responsible for a specific attachment point of the leg. The buyer must separate the frame, the upper fastening, and the lower floor protection.
Bench or pouf
For upholstered furniture, the upper mounting zone is hidden by the upholstery and base. Before ordering, check whether there is a wooden frame or plywood insert inside. A thin bottom, technical fabric, or fiberboard sheet is not suitable as a load-bearing platform just because it is located underneath.
For four legs with four futorokas, four FUR-001 are needed. If the frame manufacturer has already installed threaded inserts, a full set may not be necessary — compatible studs or ready-made legs with fasteners are sufficient.
Furniture for a cafe, store, or hotel
Serial furniture requires not so much spare sets as a repeatable specification. For ten tables with four legs each, the basic calculation will give forty FUR-001. But before the batch, one sample is first assembled, checking the base, disassembly, stability, and maintenance. Only after the unit is approved is the quantity multiplied by the series.
A reserve in a commercial project is justified if the furniture is regularly transported or repaired. Its size is determined by the workshop, not by random rounding. Studs, futorokas, and documents with hole dimensions are stored separately so that staff do not replace M8 with a visually similar part.
What to buy together with FUR-001 to get a complete assembly
Even correctly calculated four sets of FUR-001 do not turn a set of parts into a finished table. The fastener connects the leg to the base, but does not select the support itself, does not protect the floor, does not reinforce a weak tabletop, and does not replace the finishing of wooden elements. Therefore, the cart is assembled in layers: leg, upper assembly, load-bearing part of the furniture, lower protection, and preparation materials.
Before purchasing, it is convenient to open the category furniture for furniture legs and check which studs, sockets, plates, and glides your project actually needs. This category is useful not as a "just in case" showcase, but as a way to see the whole assembly and avoid mixing parts with different functions.
| What to add to the order | Why is this needed | When to buy | What to check |
| Wooden furniture legs | They support furniture and define its height, style, and proportions | For new assembly or complete replacement of supports | Height, top plate, thread, material, quantity |
| FUR-001 | Connects one leg to one socket in the base | When the direct M8 pattern is confirmed | Number of joints, base thickness, leg completeness |
| FUR-001-1 | Replaces a separate M8×60 stud | For repair or if the socket is already installed | Thread, length, fit condition |
| FUR-012 | Provides a response thread through a round mounting plate | When a threaded insert in the base is undesirable or not provided | Space for the plate, its fastening, position at the edge |
| FUR-020 | Creates a separate wooden mounting platform | For a suitable table base design | Plate size, assembly height, number of threaded points |
| Floor protectors | Protect the bottom end of the leg and the floor | After selecting the shape and size of the lower part of the support | Diameter, fastening method, same thickness on all legs |
| Finishing materials | Protect unpainted legs and define the appearance | If supports are supplied without a finished coating | System compatibility, test coating, edge treatment |
| Spare set | Simplifies repair of serial or mobile furniture | Only when objectively necessary | Same article number, storage conditions, actual need |
The floor glide does not eliminate play in the top mounting
The floor glide is placed at the bottom and works at the point of contact with the floor. It can protect parquet, reduce noise, cover the end, or compensate for floor surface features, but it does not tighten the stud or hold a rotating insert. If the leg wobbles, check the top assembly, crossbars, frame, and base condition.
Before ordering, it is worth understanding, when to use a stud, plate, and floor glideThis order helps avoid buying a lower protection instead of an upper fastener and not expecting a foreign function from one part.
Is a spare FUR-001 needed?
For one home table, a spare is not necessary if the kit is tested and installation is done carefully. An additional set is justified for serial production, frequent moves, exhibition furniture, or a project at a remote site where repeated delivery of one part would cause a noticeable delay.
A spare cannot be used as an excuse for inaccurate marking. If a craftsman regularly ruins futorok or strips studs, the tool, drilling axis, and technology need to be fixed. Extra parts do not turn an unstable process into a quality one.
How not to confuse FUR-001 with a separate stud, futorok, and a kit through a plate
In furniture hardware cards, similar designations are found, M8 thread and the same M8×60 stud. Because of this, a buyer sometimes puts the wrong composition in the cart. The main way to check is to read not only the article number but also the list of parts.
FUR-001 — stud plus futorok
This is a complete kit for one joint, where the mating thread is created by a metal futorok M8×13. The package should contain one M8×60 stud and one futorok. If you need four identical joints, the quantity of the kit is four.
FUR-001-1 — only stud
A separate article is needed when the futorok is already available or only a damaged stud is being replaced. It is not equal to the full FUR-001. For new furniture, buying four separate studs without futoroks will leave the project without mating thread if it is not provided in the base.
Repairing an old connection: when a new FUR-001 will help and when it won't
With a loose leg, you just want to replace the metal parts. Sometimes that's enough: the old stud is bent, the thread is damaged, but the wood and the insert are intact. But more often, the play is related to the mounting seat. The insert spins, the hole is enlarged, the edge is chipped, or the leg has been working at an angle for a long time.
First, find the source of the play
Hold the furniture securely and check where the movement occurs:
-
the stud moves inside the leg;
-
the metric part is loose in the insert;
-
the insert spins together with the leg;
-
the base has cracked around the insert;
-
the mounting plate itself is coming away from the body;
-
the leg is rigid, but the whole frame wobbles;
-
Different heights of the support pads create a play effect.
The new FUR-001 helps if old metal parts are worn out and the material can accept a standard connection. It will not restore damaged chipboard or glue a crack in solid wood. For a damaged base, a repair insert, relocation of the mounting point, a plate, or reworking of the frame is required.
Can a threaded insert be installed into an old hole
Only if the diameter, wall condition, and hole position match the new insert. If the insert fits loosely, spins, or deviates from the axis, reinstallation without repair is pointless. Enlarging the hole by eye is also not allowed: you can reach the edge or weaken a thin area.
How to replace a leg without damaging the base
The detachable connection is valued because the leg is removed via metric thread. But before unscrewing, you need to ensure that the stud remains in the leg and the insert remains in the base. If they start moving together, stop and secure the problematic element. Forceful rotation of a long leg creates a large lever and destroys the fit faster than a short tool.
Mistakes that turn the correct FUR-001 into a weak fastening
Buy one set for four legs
One FUR-001 contains one stud and one insert. Four individual joints require four sets. The missing three are discovered during assembly, and work stops.
Decide that 6.5 and 10 mm are interchangeable options
The diameters relate to different parts. The 6.5 mm hole is prepared for the self-tapping part of the stud, and the 10 mm hole is for the insert nut. Replacing one size with another destroys the connection logic.
Drilling the tabletop without finding the load-bearing zone
The front top panel may be too thin or decorative. Legs are often attached to the underframe, aprons, or embedded blocks. First determine the structural part, then mark the hole.
Not controlling the depth
Diameter without depth guarantees nothing. A hole that is too deep comes out on the front side, one that is too shallow does not allow the part to be installed at the required depth. The stop is set after measuring the actual thickness.
Marking by the outer center of a carved leg
The decorative shape may be asymmetrical. The mounting axis is determined by the mounting plate and the drawing, otherwise the leg will be installed with a skew.
Screwing in the stud at an angle
A skew creates stress during tightening, shifts the bottom end, and provokes loosening. A tall leg amplifies even a small error in the axis.
Placing the insert nut too close to the edge
The material around the hole must absorb the thrust. At the edge, the array may crack and the plate may chip. The arrangement of legs cannot be expanded at the cost of destroying the seating area.
Automatically assign FUR-001 for chipboard
The density and thickness of the boards vary. A weak base may not hold the insert. For it, an embedded plate, a plate, or another connection is designed.
Consider M8 sufficient proof of compatibility
The same thread does not confirm the length, installation location, and leg design. The entire assembly needs to be checked, not just the letter and number.
Forget that the stud may already be included in the leg
Some products have their own configuration. If you buy a full FUR-001 without checking, some parts will remain extra. Before ordering, open the card of the selected leg.
Use FUR-001 instead of a stiffening assembly
The stud and insert connect parts, but do not always protect a tall table from lateral rocking. Aprons, frames, and underframes solve a different structural task.
Mix different fasteners on identical legs without calculation
If two supports are fixed through threaded bushings and two through plates, their height, rigidity, and position may differ. A mixed scheme is only possible as a deliberate design.
Tighten until the wood is crushed
Stronger is not always more reliable. Excessive force can strip the threads in the wood, spin the bushing, or crush the mounting plate. The joint is tightened to a snug fit without force.
Using a floor protector as a repair tool
A floor protector does not fix upper play. It protects the floor and the bottom end. If the furniture wobbles, first check the geometry and fastening.
Who FUR-001 suits, and who needs a different option
FUR-001 suits a buyer who assembles furniture on individual wooden legs, has confirmed M8 threading, and has sufficient mounting space for a threaded bushing. The kit is convenient for collapsible tables, consoles, cabinets, dressers, benches, and other furniture where a compact joint is hidden in the base.
It is especially useful for workshops that want to standardize one joint: the same stud, a clear bushing, fixed hole diameters, and calculation by the number of supports. For a series, this reduces the likelihood that a batch will contain random bolts, different sleeves, and incompatible threads.
FUR-001 is not automatically suitable if the base is too thin, made of weak particleboard, has voids, or is already damaged. It is also not needed when the leg comes with ready-made fasteners, the frame has its own threaded points, a metal underframe is used, or the project is designed for a mounting plate.
Another option is better when the legs must be angled, the load requires distribution over a larger area, the furniture has a complex apron frame, or a direct hole for a bushing conflicts with the decorative surface. In these cases, trying to keep FUR-001 at any cost makes the joint more complex and weaker.
What should not be assembled from random parts if there is a ready-made kit
Self-assembly of furniture does not mean that every stud, insert, and threaded pair needs to be selected separately in different stores. Externally similar elements may differ in thread pitch, length, coating, and the geometry of the self-tapping part. The error is discovered late: the stud goes in for two turns, the insert spins, or the leg does not reach the base.
The ready-made FUR-001 removes some of the uncertainty: the M8×60 stud and the M8×13 insert are already combined into one product kit. The buyer only needs to check compatibility with the leg and base, calculate the quantity, and prepare the correct mounting holes.
Do not:
-
replacing the insert with a random nut hidden in loose material;
-
gluing the metric part of the stud directly into wood without calculation;
-
selecting a thread "approximately M8";
-
drilling one hole with an average diameter between 6.5 and 10 mm;
-
assembling four legs on parts of different lengths;
-
using an unverified plate instead of a suitable mating part;
-
hoping that a thick layer of glue will compensate for the misalignment.
A reasonable route for independent work looks like this: choose the legs, check the drawing and thread, determine the base type, select a ready-made kit, do one test fit, evaluate disassembly, and only then repeat the operation on the remaining supports.
How to buy FUR-001 on STAVROS without extra or missing parts
Start not with the order button, but with the list of supports. Write down the number of legs and next to each one indicate the type of top mounting. If all items are identical and designed for an M8 stud with a threaded insert, the quantity of FUR-001 will match the number of legs. If one or more supports are arranged differently, split the specification.
Then open the product page and look at the contents of the FUR-001 kit: one M8×60 stud, one metal M8×13 threaded insert, pilot hole 6.5 mm, mounting hole 10 mm, and insert installation with an 8 mm wrench. Current price and availability are checked immediately before placing the order.
After that, match the kit with the leg. In the support's product page, look for recommended hardware, drawing, top plate size, and information about ready-made fasteners. If there is not enough information, in the request to the manager specify the leg article, material and thickness of the base, number of supports, and the intended scheme.
Example of a precise request
"We are selecting fasteners for four wooden legs art. __ to a tabletop made of __ with a thickness of __ mm. We plan to use four FUR-001 kits: the M8×60 stud is installed into the leg, the M8×13 threaded insert into the mating base. Please confirm compatibility with the selected leg, sufficient mounting area, completeness, and the need for floor glides. The base drawing is attached."
Such a request is more useful than the phrase "will the fastener fit the table." It allows checking a specific combination and does not force the manager to guess the material, thickness, and article.
Test assembly of one leg: a check that is cheaper than rework
Even when the part numbers match, the quantity is calculated, and the base material seems suitable, you should not immediately install all four or six sets. The first assembled leg should serve as a reference sample. It shows how accurately the axis is chosen, how the threaded insert fits into the base, whether the length of the metric part is sufficient, and whether the top plate presses tightly against the furniture.
The test assembly is carried out before final finishing and before repeating the holes on the remaining positions. First, one unit is prepared, the stud and threaded insert are installed, then the leg is screwed on without excessive force. After tight contact, the position of the support is checked in two directions. The leg should not noticeably deviate, rotate together with the threaded insert, or leave a gap between the top plate and the base.
The reverse operation is also checked. The leg is removed, observing which part remains stationary. The stud should maintain a secure fit in the support, and the threaded insert in the base. If, during the first disassembly, the metal insert starts to come out together with the stud, such a unit cannot be repeated on the remaining legs. First, find the cause: incorrect diameter, weak material, insufficient depth, misalignment, or an unsuitable scheme.
What the trial installation shows
-
whether the actual position of the leg matches the drawing;
-
whether there is enough space for the tool;
-
whether the upper part of the support hits the apron or decorative element;
-
whether the stud extends deeper than the allowed zone;
-
whether the threaded insert protrudes above the mounting plane;
-
Is it possible to remove the leg without rotating the insert;
-
Is the same height maintained taking into account the glider;
-
Will it be convenient to assemble the furniture after painting and packaging.
After checking, it is useful to record the drilling depth, the position of the stop, the tool used, and the actual assembly sequence. For one home table, this seems excessive, but it is precisely a short note that prevents confusing the drill or depth on the third leg. For a workshop, such a card becomes a technology that can be repeated in a month without guesswork.
Why you cannot check stability on one installed leg
One joint shows the quality of the fit, but not the stability of the entire piece of furniture. The table cannot be placed on one support and loaded to try to assess strength. After a successful test assembly, the remaining points are made according to the same marking, then the furniture is placed on a flat surface and the diagonals, plane, and lateral rigidity are checked.
If the item wobbles after full assembly, you should not immediately tighten one leg more forcefully. The cause may be a difference in the length of the supports, unequal seating depth, floor curvature, different gliders, or a skewed frame. Increased tightening hides the symptom for a short time and can damage the thread.
How to create a specification for a workshop, designer, or private order
The phrase "fastening for four legs" is clear in conversation, but too vague for production. In a specification, each item is named separately. This is especially important when a project is passed from a designer to a structural engineer, then to a carpentry workshop, and to the site. At each stage, the everyday word "fastener" can be understood differently.
A working line might look like this: "FUR-001 — set of M8×60 stud and M8×13 insert nut, 4 pcs.; pilot hole for stud 6.5 mm; seating hole for insert nut 10 mm; wrench for installing insert nut 8 mm." Next to it, the leg article number, material, and thickness of the mating base are indicated, as well as a reference to the current drawing.
For six or eight supports, it is useful to assign numbers to the positions. Then, during a trial assembly, it becomes clear that the corner legs use FUR-001, while the central supports have a different assembly. The specification ceases to be a simple shopping list and turns into an assembly map.
Good documentation also protects against incorrect replacement. If repair is needed after a few years, the technician will see not just a "stud," but the exact size M8×60 and the matching insert M8×13. He won't have to remove an entire part just to measure it or buy several similar options to try.
Checklist before payment and drilling
Cart
-
The actual number of individual legs has been counted.
-
The number of individual threaded assemblies has been counted.
-
One FUR-001 is allocated for each confirmed assembly.
-
It has been checked whether the stud is included in the leg kit.
-
It has been checked whether the insert is pre-installed in the frame.
-
Individual FUR-001-1 items are not confused with complete kits.
-
FUR-012 is selected only where a round plate is needed.
-
Feet are counted by the number of installed legs.
Compatibility
-
Thread of the leg and mating part is M8.
-
Stud length of 60 mm fits the project.
-
Self-tapping part with a length of 30 mm fits within the mounting area.
-
Insert M8×13 has sufficient seating thickness.
-
The base is not hollow and is not damaged.
-
A safe margin of material remains to the edge.
-
For thin MDF or particleboard, reinforcement or an alternative scheme is provided.
-
The fastening does not conflict with the apron, guide, wiring, or decor.
Marking and installation
-
The attachment point is taken from the drawing or mounting platform.
-
The hole axis is perpendicular to the plane, unless tilt is not provided by the project.
-
The 6.5 mm drill is intended for seating the self-tapping part of the stud.
-
The 10 mm drill is intended for the insert nut.
-
The depth of both holes is calculated separately.
-
A depth stop is installed on the drill.
-
An 8 mm hex key is prepared.
-
A test assembly of one leg is performed.
-
After checking, the operation is repeated on the remaining positions.
Frequently asked questions about the FUR-001 mounting kit.
How many FUR-001 are needed for a table with four legs?
If each leg is attached with a separate M8 stud to its own insert nut, four FUR-001 kits are needed. Before ordering, check whether the stud is already installed in the leg and whether the fastener is included with the frame kit.
Is one FUR-001 designed for one leg or for the entire table?
For one individual leg assembly. The kit includes one M8×60 stud and one M8×13 insert nut. For multiple supports, the number of kits is calculated based on the number of such connections.
What's included in the FUR-001 Set?
Galvanized M8×60 stud and metal galvanized M8×13 insert nut. The stud has a self-tapping part 30 mm long and a metric part 30 mm long.
Why are 6.5 mm and 10 mm holes specified in the description?
These are not two options for one hole. The 6.5 mm diameter refers to the pilot hole for the self-tapping part of the stud, and 10 mm refers to the mounting hole for the insert nut.
Where is the stud installed?
In the typical scheme, the self-tapping part of the stud is installed into a prepared hole in the furniture leg. The exact position and allowable depth should be checked against the drawing of the specific support.
Where is the insert nut installed?
The insert creates a mating M8 thread in the furniture base: under-table, embedded part, or another component specified in the design. It cannot be automatically installed into a thin face tabletop.
Which wrench is used to install the insert?
For the confirmed insert FUR-001, an 8 mm hex wrench is used. The tool must fit evenly, without misalignment or stripping of the edges.
Can FUR-001 be used in MDF?
The possibility depends on thickness, density, distance to the edge, and the presence of an embedded part. For thin MDF, direct installation cannot be assigned without checking the design.
Can the insert be installed in particleboard?
Not automatically. Loose or thin particleboard may hold the insert poorly, especially near the edge or in an old hole. Sometimes a reinforced embedded part or mounting plate is required.
How does FUR-001 differ from FUR-012?
In FUR-001, the mating part is an M8×13 insert installed in the base. In FUR-012, a round mounting plate with a diameter of 37 mm with M8 thread and an M8×60 stud are used.
When is it better to choose FUR-012?
When the insert cannot or should not be installed directly into the base, but there is a suitable area for the round plate and its reliable fastening. The decision is confirmed based on the furniture design.
Can I buy just the stud without the insert?
Yes, for this there is FUR-001-1. A separate stud is useful for replacement or when the mating thread is already installed. Before purchasing, check M8, length 60 mm, and the condition of the existing insert.
Will the new FUR-001 help if the leg is wobbly?
Only if the cause is a damaged stud or insert, and the mounting points are intact. If the base has crumbled, the hole is broken, or the frame has lost rigidity, one new set is not enough.
Can legs be made removable using FUR-001?
The threaded design allows the leg to be unscrewed from the insert, so it is suitable for disassemblable furniture. You need to ensure a precise axis, reliable seating of both parts, and careful reassembly.
Do I need to buy glides along with FUR-001?
This depends on the bottom part of the chosen leg and the floor covering. The glide is not part of the top mounting function, but is often needed to protect the end and the floor. It is selected by size and installation method.
Is FUR-001 included in the price of the furniture leg?
This cannot be assumed for any model. The contents are checked in the specific leg's product card or clarified with a STAVROS manager. FUR-001 is presented as a separate product.
How to check the price of FUR-001?
Open the current product card before placing an order. Price, availability, and terms may change, so old estimates and screenshots should not be a source of current data.
Is a spare set needed?
For one household item, an exact quantity is usually sufficient. A spare is justified for a series, display furniture, frequent transportation, or a remote site where repeat delivery would cause a serious delay.
Conclusion: you need to count not tables, but individual components
The main logic of FUR-001 fits in one phrase: one leg with an individual threaded connection — one set of stud and insert. Therefore, a table on four such supports usually requires four FUR-001, a console on two — two, and furniture on six separate legs — six. But the correct cart appears only after checking the design.
The M8×60 stud consists of two parts of 30 mm each: the self-tapping part goes into the prepared wooden area, the metric part connects to the insert. Hence two diameters: 6.5 mm for the pilot hole for the stud and 10 mm for seating the M8×13 insert. They do not compete and do not replace each other.
Before drilling, you need to confirm the thickness and material of the base, the position of the load-bearing area, the distance to the edge, the depth of the holes, and compatibility with the specific leg. For thin MDF, weak particleboard, a metal frame, or furniture with a separate under-table, FUR-012, FUR-020, or another design component may be needed. The fastening is chosen not by habit and not by photo, but by the furniture's construction.
STAVROS allows you to assemble an order sequentially: select wooden supports, check the recommended hardware, order FUR-001 in the required quantity, and, if necessary, add a separate stud, mounting plate, and floor glides. This approach avoids two extremes — extra parts in the box and a stalled assembly due to one missing connection. First count the legs, then confirm the type of each component, and only then place the full set.