Article Contents:
- Short answer: orientation is not determined by a photo
- What can be decided right away
- What needs to be confirmed before payment
- Why the height of 160 mm also requires design verification
- Why "Prestige" does not mean a ready color
- Formula for preliminary clearance
- Side field formula
- Why the center doesn't decide everything
- Front left support
- Front right support
- Rear supports
- It's better to keep the part number until installation is complete
- Why you can't drill by the rectangle
- Full-size fitting is better than a screen
- Four templates are needed simultaneously
- Which layers are useful in an installation template
- Why you need to check the drawing version
- The front side cannot be assigned based on a nice angle
- Closed facade
- Body line
- Countertop or lid overhang
- Visual offset formula
- Outer side panel line
- Room baseboard
- Opening of adjacent cabinet
- Cleaning and robot vacuum
- Bottom pull-out drawer
- Swing door
- Recessed plinth
- Soft upholstery
- Vertical position
- Slightly tilted position
- Why the four tilts should be mirrored
- What to specify in the project
- When the 73 mm side along the facade seems logical
- When the 92 mm side along the facade may work better
- The decision is made not by a number, but by a mockup
- Front indent is read from the bed
- Check the bottom drawer
- Paired order
- Commercial route
- Four or six legs
- The central support also has an orientation
- Cables and ventilation
- Equal rhythm along the length
- Bench
- Pouf
- Sofa
- Cannot transfer the dresser scheme to the sofa
- Beech for opaque finish
- Oak to preserve the pattern
- Why it's better not to split one batch
- Material selection table
- What to check before primer and tinting
- Marking must survive the finishing process
- A test coat is needed for enamel too
- Basic formula
- Example for two nightstands
- Example for a long dresser
- Is one test leg needed
- Quantity formula
- Five millimeters cannot be thoughtlessly added to the height
- The self-tapping screw goes into the foot plate card
- What questions to ask the manager
- Why you cannot pick a random stud
- When to open the hardware section
- Three baskets instead of one
- Replacing old supports
- Chest of drawers restoration
- Serial furniture
- Commercial interior
- Relying only on the product photo
- Taking 73 × 92 mm as the mounting plate
- Marking one corner and repeating it without mirroring
- Painting first, then thinking about orientation
- Adding the glider to the height without checking
- Buying four legs in different orders
- Not check the bottom drawer
- Not accounting for the wall baseboard
- Considering the glider as the top fastener
- Set the tilt angle "by eye"
- Suitable
- Better to choose a different model
- Example for one cabinet
- Example for two paired cabinets
- Why the phrase "orient identically" is bad
- Check from above
- Check from the front
- Side check
- Check in motion
- Photo reference
- Quantity and article numbers
- Geometry and surface
- Completeness of the upper part
- Batch marking
- Storage before finishing
- First, the specific model card
- Then the parent category
- After that, thematic selection
- Fittings are added according to the confirmed scheme
- Delivery is arranged after the final specification
- The cabinet depth increased
- The facade type changed
- An overhang of the top cover was added
- A plinth appeared between the legs
- The bottom thickness changed
- The project became paired
- Green zone
- Yellow zone
- Red zone
- What one MN-232 gives
- When it makes sense to order four at once
- When a sample reduces risk
- Reserve does not replace a sample
- Signature on the jig itself
- Protection against flipping
- First part after setup
- Control in the middle of the game
- What size does the furniture leg MN-232 have?
- What do 73 and 92 mm mean?
- Which side should MN-232 be placed facing the facade?
- Can MN-232 be rotated 90 degrees?
- Why do four identical legs look different?
- How to make a preliminary template for MN-232?
- Can I drill along a 73 × 92 mm rectangle?
- How much does the edge change when rotated?
- How many MN-232 are needed for a cabinet?
- Is a central leg needed for a long dresser?
- Is the stud included with MN-232?
- Is an additional dowel included?
- Can MN-232 be installed at an angle?
- Which foot cap is specified for MN-232?
- How many FUR-021 should be ordered for four legs?
- What is included in the FUR-021 set?
- Should I choose beech or oak for enamel?
- Do all legs need to be ordered in one batch?
- Can the legs be painted first and then decide where to place them?
- Will MN-232 be suitable for a sofa?
- Where to check the price and availability of MN-232?
- What should be specified in the order besides the article number?
- Is a spare leg needed?
- How to check the side overhang before ordering?
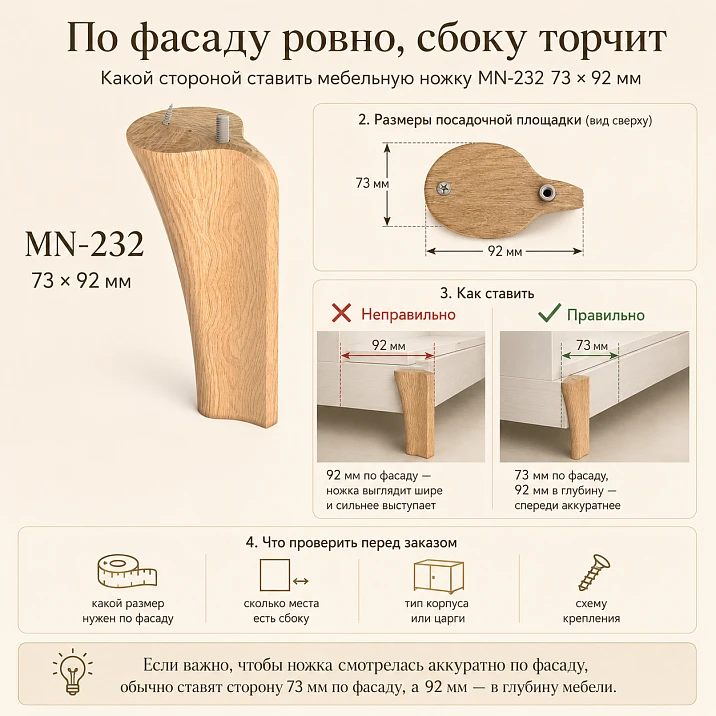
Four identical legs do not yet guarantee the same appearance of the furniture. MN-232 has two transverse dimensions that differ: the width is 73 mm, the depth is 92 mm. The difference of only 19 mm seems small until one support extends further beyond the side panel, another moves closer to the facade, and the front pair begins to look different from the rear pair. That is why before you buy the furniture leg MN-232 160 × 73 × 92 mm, you need to determine not only the quantity and material, but also the position of each part under the cabinet.
The problem is especially noticeable with a narrow bedside table, a compact dresser, a TV stand, a bench, or a small sofa. There, every millimeter of overhang is noticeable next to the straight line of the facade. You turn the leg 90 degrees — and its outer contour occupies a different area. The identical mounting centers may remain at the same coordinates, but the visual result changes.
The main commercial request is Buy wooden furniture legs — too broad to answer such a task. The buyer needs not a general catalog, but an exact check of a specific model: where is the width of MN-232, where is the depth, which side should face the facade, how to lay out four corner templates, what to clarify about the top mounting, and how many support feet to add to the order.
There is no direct universal answer like "place it with the 73 mm side forward" or "turn the 92 mm side along the facade" without a drawing. The leg shape is not a simple rectangle, and the external dimensions do not reveal the mounting plate, the position of the pin, the dowel, and the direction of the bend. The correct path is different: first build a simplified diagram, then replace it with an exact contour from the current drawing, and only then transfer the coordinates to the furniture.
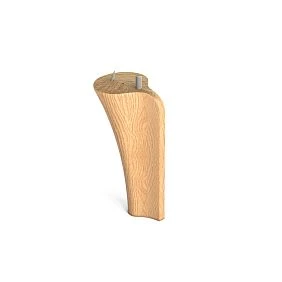
Short answer: orientation is determined not by a photo
MN-232 cannot be laid out under the cabinet as four conditional squares. The product card indicates the size 160 × 73 × 92 mm, where 160 mm is the height, and 73 and 92 mm are different transverse dimensions. Rotation changes the occupied space, so the position of each support must be tied to the facade and the side panel.
For a preliminary check, cut out four paper rectangles 73 × 92 mm. Label on each the facade side, the side panel side, and the corner number: front left, front right, rear right, rear left. Lay out the templates under the cabinet and see where space remains to the edge, plinth, bottom drawer, and wall. This operation shows the scale of the problem but does not replace the drawing.
For final marking, an exact contour of the product and the mounting assembly is needed. The external rectangle 73 × 92 mm does not indicate where the pin axis is, how the additional dowel is positioned, whether the material allowance is the same on all sides, and whether the standard mounting allows a 90-degree rotation. Before drilling, these questions must be resolved by the card, DWG, and confirmation of the order composition.




What can be decided immediately
Without additional assumptions, four things can be determined:
-
the difference between width and depth is 19 mm;
-
rotating the leg changes the external dimension relative to the facade and the side panel;
-
four parts need to be laid out in the corners mirror-symmetrically and marked;
-
the foot and the top mount are considered separately from the decorative material choice.
This is enough to avoid placing an order blindly. But it is not enough to drill the body or declare one side as the "front."
Our factory also produces:
What needs to be confirmed before payment
Before ordering, it is useful to request or download the current drawing and record:
-
direction B = 73 mm and C = 92 mm relative to the shape;
-
position of the main mounting axis;
-
position and purpose of the additional dowel;
-
actual contour of the upper part;
-
permissibility of vertical and slightly inclined mounting;
-
ability to rotate the part by 90 degrees;
-
delivery set of the upper mounting;
-
compatibility with the material of a specific cabinet body.
Such a list protects the buyer from two mistakes at once: incorrect orientation and incomplete delivery.
Get Consultation
Confirmed parameters of MN-232 without speculation
The card of the modern furniture leg MN-232 provides enough data to choose the size and material, but does not replace the design check of the mounting. Basic characteristics are convenient to collect in one table.
| Parameter | Confirmed value | What this means for the order |
|---|---|---|
| Article number | MN-232 | This exact article number should be specified in the specification |
| Type | Modern furniture leg | Suitable for furniture projects where expressive support geometry is important |
| Height A | 160 мм | Affects the cabinet lift and the overall silhouette of the furniture |
| Width B | 73 мм | One of the two external transverse dimensions |
| Depth C | 92 мм | Second external dimension, 19 mm larger than the width |
| Material | Beech or oak | Beech is chosen for opaque finishes, oak — when you want to preserve the wood grain pattern |
| Sanding | «Prestige» | Detailed surface preparation, but not a finished top coat |
| Beech | For enamel | Tonal differences in lamellas are covered by an opaque finish |
| Oak | For tinting | The selection is designed for a finish that preserves texture |
| Required fittings | FUR-021 is specified in the product card | The number of support pads is calculated based on the number of confirmed installation points |
| Top mounting | Requires verification | The composition, axes, and connection method must be confirmed against the drawing and order |
The value 73 × 92 mm cannot automatically be called the size of the upper mounting plate. This is the overall footprint of the product. The mounting contour may be smaller, offset relative to the external shape, or have its own geometry. Hence the main rule: a rectangular template is suitable for checking the occupied space, but not for drilling.
Why the height of 160 mm also requires a design check
The leg height helps estimate the clearance under the cabinet, but the finished furniture does not always rise exactly 160 mm. The result is affected by the recess or protrusion of the mounting part, the bottom construction, possible inclined installation, the foot cap, the thickness of the intermediate plate, and the point from which the cabinet manufacturer measures the height.
Therefore, the formula "cabinet height plus 160 mm" is only suitable for a preliminary estimate. In the working drawing, you need to determine the finished floor level, the bottom plane of the cabinet, and the actual height of the assembled unit.
Why "Prestige" does not mean a ready color
The quality of sanding describes the surface treatment, not the finish. A beech leg for enamel still requires an agreed primer and coating system. Oak for tinting needs a test stain, because the shade depends on the composition, the number of layers, and the natural grain of each piece.
To understand the difference between wood species and preparation, it is useful to to choose beech for enamel or oak for tinting, rather than making a decision after receiving the batch.
Nineteen millimeters: a small number, a noticeable overhang
The calculation is simple:
92 − 73 = 19 mm.
But it must be interpreted carefully. These 19 mm show the difference in the full dimensions of the two axes. They do not mean that after rotation the edge of the leg will necessarily protrude exactly 19 mm. If the conditional rectangle is centered on one point, the distance from the center to the edge will change from 36.5 to 46 mm, that is, by 9.5 mm on each side.
For a simplified diagram:
73 ÷ 2 = 36.5 mm;
92 ÷ 2 = 46 mm;
46 − 36.5 = 9.5 mm.
It turns out that with a fixed center, rotating the conditional rectangle can shift its edge by 9.5 mm along one axis and free up the same amount along the other. On a compact cabinet this is already clearly visible. However, the actual shape of MN-232 may be asymmetric relative to the mounting axis, so the exact protrusion is calculated from the DWG contour, not just from halves of the overall size.
Preliminary clearance formula
For a rectangular model, the free field can be estimated:
Clearance to the facade = distance from the mounting center to the facade line − half of the overall size along the facade axis.
If from the center to the facade is 50 mm:
-
with a side of 73 mm, 50 − 36.5 = 13.5 mm remains;
-
with a side of 92 mm, 50 − 46 = 4 mm remains.
On paper, both positions fit. In real furniture, the second may be too close to the facade, especially if the lower drawer has an overhang, the door opens downward, or the leg shape widens unevenly.
Side margin formula
Similarly, the distance to the side is calculated:
Side clearance = distance from center to the outer line of the side − half the dimension along the side axis.
This formula is not for final drilling, but for quick screening. If the result is negative, the simplified contour already extends beyond the body. If a few millimeters remain, an accurate template and verification of the actual profile are required.
Why the center doesn't solve everything
A craftsman can position four centers absolutely symmetrically. But if two legs are oriented with the 73 mm side along the facade, and two with the 92 mm side, the outer contours will differ. The mounting coordinates will match, but the visual edges will not.
Therefore, the mounting map must contain not only the center point, but also the direction of axes B and C. Without these arrows, identical marking remains incomplete.
Four corners — four labeled positions
The phrase "place all legs identically" sounds simple until the part has a directional shape. On a rectangular body, the positions must be mirrored relative to the central axes of the furniture. If the same rotation is mechanically repeated at all corners, some supports may face inward, some outward, or occupy different zones near the facade.
For the mounting map, it is convenient to use four designations:
-
PL — front left;
-
FR — front right;
-
RP — rear right;
-
RL — rear left.
Front left support
The template must show the facade line and the left side panel. It marks the center, the 73 mm axis, the 92 mm axis, and the direction of the shape. After approval, the template cannot be rotated arbitrarily: its position becomes part of the project.
Front right support
This is a mirror pair of the front left. Simple copying without reflection may result in both legs being directed to the same side. The external overhang at the edges of the body will then be different.
Rear supports
The rear pair is checked against the rear wall, room baseboard, cable ducts, and distance to the wall. For a cabinet placed flush against the wall, an incorrect rotation can push the body forward or cause a leg to touch the baseboard.
It is better to keep the part number until installation is complete
If the legs are finished in one batch, markings are often removed too early. After painting, the parts look identical again, and the craftsman has to guess the position. It is safer to keep the number in a hidden area or on a temporary tag until final installation.
Paper template 73 × 92 mm: what it shows and what it does not show
The fastest way to see the problem is to cut out four rectangles 73 × 92 mm. You can use thick paper, cardboard, or thin plastic. On each template, draw two axes, mark the center, and label the sides.
The simplified template helps answer practical questions:
-
does the outer dimension fit under the body;
-
does it extend beyond the side panel;
-
how close does it come to the front;
-
does it conflict with the recessed plinth;
-
is there enough space near the wall;
-
do the four corners look the same;
-
does the support not fall into the trajectory of the bottom drawer.
Why you cannot drill according to the rectangle
The rectangle shows only the outline of the dimensions. It says nothing about the location of the metal pin, additional dowel, technological holes, or the actual support area. If you transfer the center of the rectangle to the cabinet without checking, the fastener may end up misaligned.
For drilling, you need an exact template from the drawing or an approved map from the furniture manufacturer. The simplified model is a filter, not an installation document.
Full-size fitting is better than a screen
On the monitor, the leg seems like a standalone object. At furniture scale, its width, tilt, and overhang read differently. A full-size template shows how large the support is relative to a narrow cabinet, whether it conflicts with handles, and whether it makes the bottom of the cabinet visually heavier.
Four templates are needed simultaneously
One rectangle confirms that one leg physically fits. It does not show overall symmetry. Only simultaneous layout of all four corners allows seeing whether the front offsets are identical and whether the side margins have drifted apart.
An exact outline from DWG replaces guesswork
After a rough fitting, they move on to working geometry. The product card includes drawings of the item; before ordering and especially before drilling, the current version must be used. If a designer designs the furniture, the file is imported into the cabinet model and intersections are checked.
Which layers are useful in the mounting template
It is convenient to divide the working template into several line types:
-
outer contour of the leg;
-
contour of the top abutment;
-
axis of the stud;
-
axis of the additional dowel;
-
safe mounting zone in the cabinet;
-
facade line;
-
side line;
-
opening area;
-
plinth position;
-
corner number and part direction.
The more accurate this map, the lower the chance that the cabinet will need to be re-drilled after finishing.
Why you need to check the drawing version
Product cards and production documentation may be updated. A previously downloaded file cannot automatically be considered current for a new order. It is useful to specify the date or version of the drawing used for marking in the specification.
The front side cannot be assigned based on a nice angle
Product photos are chosen to show the shape, not to convey the mounting axis. Angle, shadow, and perspective can hide size differences. The front is determined by the drawing and the layout of the specific furniture.
Facade line: where to measure the front overhang
The word "facade" in a furniture project can denote several different planes. For proper layout, you need to choose one control line.
Closed facade
For a hinged door or drawer, the front edge may protrude in front of the body. If the leg is aligned with the bottom, it will still be recessed relative to the facade. This may be an intentional decision, but the amount of offset needs to be assigned deliberately.
Body line
Sometimes supports are tied to the front end of the side panel or bottom panel. This method is convenient in production, but does not always give an equal visual offset from the front parts.
Countertop or lid overhang
For a dresser, the top lid may protrude forward and on the sides. Evaluating legs only by its edge is incorrect: from below, the relationship with the body and facades is read, not just with the top part.
Visual offset formula
For a preliminary scheme:
Visible offset = distance from the facade reference line to the center of the leg − distance from the center of the mounting to the extreme point of the contour.
The second value is taken from the exact drawing. Substituting half of 73 or 92 mm is only acceptable for a rough rectangular check.
Side panel and wall: where "sticks out to the side" appears
The side protrusion is especially noticeable when the cabinet stands next to a wall, wardrobe, or tall baseboard. Even a few millimeters can change the furniture's fit.
Outer line of the side panel
If the leg protrudes beyond the side panel, it is not always a mistake. In some models, the outward rotation supports the shape of the body. But the protrusion must be the same on the left and right and not interfere with adjacent items.
Room baseboard
A rear leg turned with its long side toward the wall may hit the floor baseboard before the body does. As a result, the cabinet will move away from the wall, and the countertop or back panel will lose its planned position.
Opening of an adjacent cabinet
The side support must not fall into the path of the door of adjacent furniture. In tight arrangements, the layout is checked not only in plan but also with the facades open.
Cleaning and robot vacuum
A height of 160 mm usually creates a noticeable gap, but the accessibility of the space is not determined by height alone. A protruding leg changes the passage along the side and can create a narrow zone where the attachment or robot turns worse. This is not a reason to abandon the model, but another reason to check the actual plan.
Lower drawer, door, and plinth: hidden conflicts
The leg may not protrude beyond the body and still interfere with furniture. The conflict arises within the external dimension.
Lower pull-out drawer
The drawer front often extends below the bottom of the body. When opened, it passes near the front supports. You need to check not only the closed position but the entire trajectory.
Hinged door
The hinge defines the arc of movement. If the leg is close to the corner, the outer part of the front may approach it when opening. Pay special attention to doors that open more than a right angle.
Recessed plinth
The decorative plinth is sometimes located between the legs. Rotating MN-232 changes the free length between the inner edges of the supports. Nominally, the centers have not moved, but the visible opening has become narrower.
Soft upholstery
For a bench or sofa, the fabric, piping, and bottom trim may extend beyond the rigid frame. The layout relative to the wooden frame must be matched with the finished outer contour of the upholstery.
Vertical or slightly inclined: two different projects
The MN-232 description allows vertical and slightly inclined use. This phrase expands the model's capabilities but does not grant the right to assign the angle independently. The inclination changes not only the appearance. It shifts the bottom point relative to the top mounting, increases the occupied space, and creates a different load transfer scheme.
Vertical position
In a vertical installation, it is easier to match the top and bottom projections. But even here, one cannot assume that the entire outer contour is symmetrical relative to the pin. First, check the exact drawing, then assign the front axis and reflect the positions at the corners.
Slightly inclined position
Inclination requires a confirmed mounting assembly. One cannot automatically use a random angle bracket just because it appears in the hardware catalog. The bracket angle, inclination direction, pin, and dowel must work as a coordinated system.
When inclined, the bottom point may extend further beyond the front or side than the top part. Therefore, a 73 × 92 mm rectangle at the mounting level is insufficient. A projection of the entire part in its working position is needed.
Why the four inclinations must be mirrored
Front legs are more often aligned consistently relative to the facade, rear legs — mirrored relative to the longitudinal axis. But the specific scheme depends on the product design and furniture. If all four parts are tilted in one direction, the body may look skewed, even when geometrically it stands level.
What to specify in the project
The mounting map for the tilted option should contain:
-
nominal angle;
-
direction of inclination;
-
position of each angle;
-
fastener coordinates;
-
bottom projection;
-
actual dimension beyond the body;
-
type of top connection;
-
stability check of the entire furniture.
If this data is missing, it is safer to consider only a preliminary visual fitting and not proceed to drilling.
Comparison of four orientation options
With a model having different B and C, the buyer actually chooses not one but several layout options. The table helps to see which issue each option solves without designating it as universally correct.
| Option | What runs along the facade | What runs along the side | Possible result | What to check |
| А | 73 мм | 92 мм | More compact along the facade axis, takes up more space along the side | Gap to the wall, baseboard, and side edge |
| Б | 92 мм | 73 мм | Takes up more space along the facade, more compact along the side axis | Offset to the facade and drawer trajectory |
| В | Mirror reflection A | Mirror reflection A | Paired symmetry in directional form | Match of left and right protrusion |
| Г | Mirror reflection B | Mirror reflection B | Another paired composition | Match of front and rear pair |
The table describes the size envelope, not a finished instruction. The actual position depends on the shape of MN-232, the axis of the pin, and the additional dowel. After selecting a preliminary option, it is checked against the exact drawing.
When the 73 mm side along the facade seems logical
Such a rotation may be convenient for a narrow cabinet where the front clearance is limited. But it increases the space occupied along the side. If the furniture stands near a wall or a high baseboard, the gain at the front may turn into a conflict at the side.
When the 92 mm side along the facade may work better
The longer axis along the facade sometimes supports a wide horizontal of a dresser or bench. At the same time, it is necessary to check whether the support extends too close to the door, whether it reduces the free opening between the front legs, and whether it interferes with the lower drawer.
The decision is made not by a number, but by a layout
Both orientations may be acceptable in different projects. The choice is considered complete only after checking four templates, opening the facades, and agreeing on the mounting.
MN-232 under the bedside table
The bedside table is one of the most sensitive scenarios. The body is small, so a leg 160 mm high and with a transverse dimension of up to 92 mm becomes a noticeable part of the silhouette.
The front offset is read from the bed
A person looks at the table from the side and from above. If the front leg protrudes further than the facade than the rear leg relative to the side panel, the asymmetry is immediately visible. In a pair of tables, the error is repeated in a mirror image and becomes even more noticeable.
Checking the lower drawer
In the bedside model, the lower drawer can occupy almost the entire height of the body. Its facade and guides need to be shown in a side section. The outer contour of the leg must not enter the movement zone.
Paired order
For two identical cabinets, eight legs are more often required. But the quantity cannot be determined simply by multiplying four by two if the design provides for a different frame or additional supports. After approving the scheme, it is useful to order the entire batch at once so that the material and preparation for finishing are coordinated.
Commercial route
A buyer who chooses supports specifically for cabinet furniture will find it more convenient to first buy legs for a dresser and cabinet in a themed selection, and then open the MN-232 card and compare the size 160 × 73 × 92 mm with their own body.
MN-232 under a dresser and a long TV cabinet
A long body creates a different task. Four corner supports can provide a beautiful open gap, but the structure sometimes requires additional central points. The solution depends on the length, bottom material, partitions, load, and frame scheme.
Four or six legs
The number of corners does not equal the sufficient number of supports. For a compact rigid body, four legs may match the project. For a long cabinet, the designer may assign a fifth or sixth support. The article cannot replace the calculation of the load-bearing scheme.
The central support also has an orientation
If an additional MN-232 is installed in the middle, its outer contour may be visible between doors or drawers. You need to decide whether it should match the front pair, be directed along the body, or remain hidden behind the plinth.
Cables and ventilation
At the TV cabinet, the rear legs are adjacent to cables, outlets, and ventilation openings of the equipment. Rotating the long axis backward can reduce space near the wall. Checking with a template helps identify the conflict before manufacturing the cabinet body.
Equal rhythm along the length
For six supports, it is important to measure not only the extreme offsets but also the distances between centers. If the central pair is shifted relative to the partitions, visual regularity is lost, and the load may be transferred to where there is no rigid vertical.
MN-232 under a bench, ottoman, and sofa
Upholstered furniture hides part of the structure but does not eliminate the need for precise orientation. The leg is perceived next to edges, fabric folds, and the bottom trim.
Bench
For a bench, the body is usually narrow. The difference between 73 and 92 mm can determine whether the leg will look like an extension of the side panel or a separate protruding object. The template should be applied to the finished external dimension, taking the upholstery into account.
Pouf
For a square ottoman, the temptation is great: since the body is symmetrical, the supports can be rotated arbitrarily. But the directional shape of MN-232 can create a rotational pattern or random inconsistency. All four positions must be assigned in advance.
Sofa
Under a sofa, some legs are perceived from a large distance. An incorrect rotation may be less noticeable, but the requirements for fastening and dynamic load are higher. Category buy wooden sofa legs helps compare models by purpose, but the application of MN-232 under a specific frame is still confirmed by the designer and the drawing.
The cabinet layout cannot be transferred to a sofa
In case furniture, the leg is attached to a rigid panel or base. In upholstered furniture, the unit is connected to the frame, side rail, and upholstery. Identical appearance does not mean identical fastening.
Beech for enamel or oak for tinting
The material changes not the geometry of 73 × 92 mm, but the surface character and finishing requirements. In one batch, all legs must be ordered in the same material and the same preparation category.
Beech for opaque finish
Beech prepared for enamel is chosen when the color needs to cover natural differences in wood. This is convenient for white, black, gray, and colored facades. But the word "for enamel" does not mean the leg is already painted.
Before finishing, the craftsman coordinates the primer, enamel, and technology with the paint and varnish material manufacturer. A test coating is done on a sample or an invisible area, especially if the leg must exactly match the cabinet.
Oak for preserving the grain
Oak under tinting is chosen for its pronounced texture. Four legs may differ in grain, and this is a normal property of natural material. Before finishing, they are arranged by corners to consciously distribute more active and calmer surfaces.
Why it is better not to split one batch
If you buy two legs now and two later, the wood shade and finishing result may differ. For a symmetrical product, it is wiser to order the entire set at once and conduct a test on one coating system.
Material selection table
| Task | Beech | Oak |
| Opaque enamel | Preferred card scenario | Possible only after separate approval of the technology |
| Preserve texture | The drawing is less expressive | Main scenario for tinting |
| Match the painted facade | Convenient base for a covering color | The texture may remain noticeable |
| Assemble natural furniture | Requires a deliberate transparent finish | Well supports the visible grain of the wood |
| Order four parts with identical preparation | Yes, one batch | Yes, one batch with pattern layout |
Prestige sanding and preparation before finishing
Prestige means detailed surface sanding. This reduces the amount of manual finishing, but does not cancel incoming inspection after delivery and the final finishing technology.
What is checked before primer and tinting
Each leg is inspected under side light. Edges, shape transitions, bottom end, upper mounting area, and possible transport damage are checked. If a defect is found, the issue is resolved before painting and installation.
Marking must survive finishing
PL, PP, ZP, and ZL are better applied to temporary tags. An inscription on the part itself may be covered by primer or tinting. After finishing, the craftsman must return each leg to its approved place without guessing.
A test coat is needed for enamel too
Even an opaque color depends on primer, layer thickness, and gloss. If the body is already painted, the sample is compared under the actual lighting of the room. The same color code on different materials may be perceived differently.
How many MN-232 to order for specific furniture
The quantity starts not with the cart, but with the structural scheme. Corner furniture may have four visible supports, but a long body — additional hidden ones. For upholstered furniture, the quantity is determined by the frame and load.
Basic formula
The quantity of MN-232 = the number of confirmed support points per the project.
If the project contains four points, order four pieces. If six — six. Reserve is added not automatically, but for an objective reason: serial production, complex finishing, remote site, or the need to keep a spare part for the future.
Example for two cabinets
Two identical cabinets with four supports each:
2 × 4 = 8 legs.
If the designer confirms four points on each body, the specification lists eight MN-232 and eight places for floor glides. But the top fastening is checked separately.
Example for a long dresser
The dresser has four corners and two central supports:
4 + 2 = 6 legs.
Central positions must be mapped. You cannot simply add two parts in the middle without reference to partitions and the direction of the shape.
Is one trial leg needed?
For a new project, it is reasonable to first check one part, if this does not disrupt deadlines and batch production. A sample helps assess the actual scale, drawing, and finish. But one leg does not show paired symmetry, so after checking, a complete mockup is still needed.
Glide FUR-021: a small item counted per piece.
Card MN-232 specifies a round glide FUR-021. Its confirmed size is 19 × 19 × 5 mm. It is supplied with a galvanized self-tapping screw 3.5 × 20 mm and belongs to the SUPER GLIDE series.
Quantity formula
If a glide is provided on each support:
Quantity of FUR-021 = quantity of MN-232.
For four legs — four glides. For six — six. The formula works only after confirming that the bottom end and the project actually allow this option.
Five millimeters cannot be thoughtlessly added to the height
The height of the foot cap is 5 mm, but the actual change in the furniture's level depends on seating and contact. Do not promise that the finished cabinet will become exactly 5 mm taller without checking the assembly.
The self-tapping screw goes into the foot cap card
This is useful for configuration, but does not confirm the fastening of the upper part of MN-232. The foot cap works from below, while the stud and dowel connect the leg to the cabinet. These tasks cannot be mixed.
The customer can buy a round foot cap FUR-021 with a diameter of 19 mm together with the legs, but the compatibility of the bottom end and the quantity must be specified in the order.
Upper mounting: where the card cannot be interpreted at random
The extended description of MN-232 mentions a metal stud and an additional dowel that helps prevent rotation. At the same time, a separate block of required hardware shows only FUR-021. This page structure requires a written check of the configuration.
What questions to ask the manager
Before payment, clarify:
-
Does a metal pin come with each MN-232;
-
Is it installed by the factory;
-
Is an additional dowel included;
-
Are the holes pre-drilled;
-
What are the dimensions and coordinates of the fasteners;
-
Is the assembly compatible with the housing material;
-
Is a 90-degree rotation allowed;
-
What needs to be ordered separately;
-
Which drawing version corresponds to the delivery.
Why you cannot pick a random pin
Thread, length, seating depth, and housing material must be agreed upon. An element that is too long can damage the part, while one that is too short may not provide the required fit. There is no universal stud for every housing.
When to open the hardware section
After confirming the mounting diagram, you can Buy hardware for furniture legs and select support feet, studs, or plates based on precise parameters. First determine the assembly, then fill the cart — not the other way around.
What to buy together with MN-232
The set depends on the project. The buyer does not need a long list of random small items; they need items, each of which covers a specific assembly.
| What to add | Why | When needed | What to check |
| MN-232 in one batch | Gather all support points in one material | For a cabinet, dresser, bench, or sofa | Quantity, material, orientation |
| FUR-021 | Protect the contact of the bottom end with the floor | If confirmed for each leg | Installation center, bottom end, floor type |
| Top mounting | Connect the leg to the body | Always, but the composition depends on the project | What is included, thread, length, coordinates |
| Mounting template | Move four positions without rotation | For serial and custom furniture | Drawing version, mirroring |
| Finishing materials | Get approved color and protection | For beech under enamel or oak under tinting | System compatibility and test coating |
| Spare part | Keep replacement from the same batch | For a series or remote object | Is a reserve actually needed |
Three baskets instead of one
Convenient to split the order into three groups:
-
visible wooden parts;
-
top mounting;
-
bottom protective hardware.
This makes it easier to check completeness and not mistake a thrust bearing for a full mounting kit.
How not to confuse MN-232 with a regular symmetrical leg
Not every furniture support requires a complex rotation map. For a model with identical
Replacing old supports
Here, existing holes are examined first. Matching height does not mean matching mounting assembly. Old holes may be too close to the edge or not correspond to the MN-232 stud. The decision is made by the technician after inspecting the cabinet body.
Restoring a dresser
In an old dresser, the bottom and corners may be weakened. A beautiful external rotation does not compensate for insufficient rigidity. First, the base is assessed, then the mounting is designed, and only after that the placement is chosen.
Serial furniture
For a series, repeatability is important. One approved jig is made, along with separate templates for PL, PP, ZP, ZL, and a control sample. The first assembled unit undergoes inspection before the entire batch is launched.
Commercial interior
In a hotel, salon, or restaurant, furniture is moved more often and used more intensively. Along with appearance, the structure, floor protection, and the ability to replace one damaged part are checked. A reserve from the same batch may be justified, but its quantity is assigned by design.
Mistakes that make identical legs look different
The problem rarely arises from one major mistake. More often, several small oversights accumulate.
Rely only on the product photo
The photo shows the shape but does not convey the exact contour and mounting axes. Perspective changes the visible proportions. A drawing is needed for marking.
Assume 73 × 92 mm as the mounting plate
This is the external dimension. The upper zone may have a different shape. Drilling at the corners of a conditional rectangle is not justified.
Mark one corner and repeat it without mirroring
Copying one template to four corners may cause all legs to rotate in the same direction. Left and right sides must be matched as mirror pairs.
Paint first, then think about orientation
After finishing, labels are lost and similar parts get mixed. Layout and marking are done before the finish.
Add the foot to the height without checking
The height of FUR-021 is known, but the actual fit of the assembly requires verification. You cannot promise an exact increase in finished furniture based only on a catalog number.
Buy four legs in different orders
Even with a single article, wood batches may differ in grain. For symmetrical furniture, it's better to assemble the set at the same time.
Do not check the bottom drawer
The support may be within the cabinet's footprint but fall into the facade's path. Opening is checked on a mockup.
Not accounting for the wall baseboard
The rear leg touches the baseboard, the cabinet moves away from the wall, and the front line changes. This error is often discovered only in the room.
Treating the floor glide as the top fastener
FUR-021 is installed from below. It does not replace a stud, dowel, or mounting plate.
Setting the tilt angle "by eye"
A slightly tilted installation must match the design and stability. A random angle changes the projection and load.
When MN-232 is truly appropriate
The model deserves attention when the leg shape should be a noticeable part of the furniture, and the project allows for precise marking.
Suitable
MN-232 may be suitable:
-
for a cabinet with an open gap;
-
for a dresser where the legs support modern geometry;
-
for a bench with a rigid frame;
-
for upholstered furniture after confirming the joint;
-
for furniture to be enameled made of beech;
-
for a project with oak under tinting;
-
for a serial product with a manufactured jig;
-
for a cabinet where there is space for the dimension 73 × 92 mm.
Better to choose a different model
Another option is needed if:
-
there is no space under the body for an external shell;
-
the mount cannot be placed safely;
-
the bottom drawer conflicts with the support;
-
the furniture must be placed flush against the baseboard;
-
the project requires a strictly square symmetrical leg;
-
there is no way to obtain an accurate drawing;
-
the client is not ready to agree on the orientation;
-
the design requires a different height or load-bearing scheme.
An honest refusal of an unsuitable shape is better than trying to save the project with shifted holes.
Specification: what to write besides "MN-232 — 4 pcs."
A good specification removes questions before payment and before installation. It records not only the article number.
Example for one cabinet
Furniture leg MN-232 — 4 pcs.
-
size: 160 × 73 × 92 mm;
-
material: beech;
-
sanding quality: "Prestige";
-
preparation: for enamel;
-
positions: FL, FR, BR, BL;
-
orientation: according to mounting map MN232-01;
-
drawing version: specify date or number;
-
thrust bearing FUR-021 — 4 pcs., after compatibility confirmation;
-
top stud: confirm availability in delivery;
-
additional dowel: confirm availability and coordinates;
-
finish color: according to approved sample.
Example for two paired cabinets
The number of legs increases to eight. Add the cabinet number to the positions: T1-PL, T1-PP, and so on. This prevents mixing of parts after finishing.
Why the phrase "orient identically" is bad
It does not indicate where the front is and which axis is directed forward. Better to attach a diagram with arrows B and C. One drawing is more accurate than several ambiguous words.
Control of the first assembly before launching the entire batch
In serial production, you cannot immediately drill dozens of housings. First, a control sample is assembled.
Top check
Compare the distances from the outer contours of the legs to the front and side panels. All mirror pairs should look consistent.
Front check
Assess the height, tilt, visible offset, and uniformity of the front pair. If one leg seems closer to the center, check not only the coordinates but also the rotation.
Side check
Check whether the front or rear support protrudes beyond the side panel. Check the distance to the wall and baseboard.
Motion check
Open all doors and drawers, move the furniture within the intended limits, check the contact of the glides with the floor. Only after this is the jig approved.
Photo reference
The control sample is photographed from four sides and from below. Images are attached to the assembly card so that the craftsman sees not only dimensions but also the expected result.
Acceptance of legs and hardware after delivery
Inspection is carried out before painting, drilling, and installation. After modifying the product, resolving a return issue becomes more difficult.
Quantity and article numbers
They verify MN-232, material, number of parts, and FUR-021. Glides are counted individually, screws are checked against the card contents.
Geometry and surface
Parts are laid out nearby. Visible damage, sanding condition, and overall shape match are checked. Exact tolerances cannot be invented; in case of doubt, contact the supplier.
Completeness of the top part
The actual presence of the stud, dowel, and holes is checked against the agreed invoice. If the description and delivery differ, installation does not begin until clarification.
Batch marking
The box, delivery note, and order number are kept. For oak, it is useful to take a general photo of the layout before toning.
Storage until finishing
Wooden parts are stored in stable conditions, protected from water, heat, and mechanical damage. Sharp humidity fluctuations before installation are undesirable.
How to buy MN-232 without an incomplete cart
It is convenient to assemble the order in a specific sequence.
First, the card of a specific model
Open the product, select the material, and check the current parameters. You can order four MN-232 legs only after the four positions fit on the layout.
Then the parent category
If the dimensions or shape do not fit, compare other unpainted models. The category helps avoid trying to force MN-232 into the cabinet at any cost.
After that, a thematic selection
For cabinet furniture, it is useful to study wooden supports for cabinet furniture, and the broad selection principle is explained by the material about, how to choose wooden legs for a dresser, nightstand, and console.
Hardware is added according to a confirmed scheme
FUR-021 is calculated by the number of supports. Top elements are added only after checking the thread, length, and delivery contents.
Delivery is arranged after the final specification
When the quantity, material, glides, and fastening are agreed upon, you can order delivery of STAVROS furniture legsThe application specifies the article number, size, material, quality, and quantity, and the mounting map is attached to the project's working documentation.
What to recalculate if the cabinet body was changed after selecting the legs
A furniture project rarely remains unchanged from the first sketch to production. The client may request a deeper cabinet, the designer may increase the side panel thickness, the technologist may shift a partition, or the designer may make the front overlay instead of inset. Each such change can affect the position of MN-232, even if the article number and quantity of legs remain the same.
The cabinet body depth increased
Additional depth does not mean that the old coordinates are automatically suitable. The front supports may maintain their position relative to the front, while the rear ones may get a different offset from the wall. If the centers were distributed symmetrically between the front and rear lines, the entire scheme changes.
Need to check again:
-
distance from the front legs to the front;
-
distance of the rear pair to the baseboard;
-
position relative to internal partitions;
-
access to fasteners;
-
external side overhang.
The facade type has changed
An overlay facade protrudes beyond the body line, while an inset facade is located inside the opening. When switching from one type to another, the visible offset to the leg changes, although the bottom remains the same. The mounting map should be tied to the new reference line, not keep the old number without explanation.
An overhang of the top cover has been added
The overhang affects visual perception, but should not always become the base for mounting. The line of the cover, body, and facade should be shown separately. Then it is clear relative to which element the support is aligned.
A plinth has appeared between the legs
The plinth occupies the space between the inner contours. When rotating MN-232, the passage may narrow. The distance between precise contours is recalculated, not between centers.
The bottom thickness has changed
The new thickness affects the choice of fasteners and the depth of safe drilling. Even if the pin is included in the delivery, its compatibility with the updated body must be confirmed. The old hole pattern cannot be used just because the external shape of the furniture has not changed.
The project has become paired
One cabinet has turned into two bedside tables. Now not only internal symmetry of each unit is needed, but also mirror symmetry of the pair. The mounting map adds the body number so that the front left leg of the first cabinet is not accidentally installed on the second.
After any change, it is useful to repeat a short chain: update the body model, apply the precise MN-232 contour, check the four positions, open the facades in the model, clarify the fasteners, and only then release a new version of the drawing.
Decision matrix: when orientation can be approved
It is convenient to make a decision not by a single criterion, but by a set of checks. The table below turns the subjective "seems to look fine" into a clear control.
| Check | Positive result | If the result is negative |
| The outer contour fits under the body | No entry into prohibited zones | Change orientation, coordinates, or model |
| The front offset is the same for the pair | The facade line reads evenly | Check mirroring and B/C axes |
| Side overhang is the same on left and right | The body looks symmetrical | Fix the rotation of one of the parts |
| Drawers and doors open freely | The contour does not enter the trajectory | Move the support only after checking the fasteners |
| The rear pair does not rest against the baseboard | The furniture occupies the design position | Change the position or choose a different size |
| Top mounting confirmed | Composition and coordinates recorded | Do not drill until written confirmation |
| FUR-021 fits the bottom edge | Quantity is counted by the number of legs | Choose a different floor protection |
| Material and finish approved | All parts can be processed with one system | Make a new sample and test paint |
| Number of supports confirmed by the designer | The load is transferred according to the project | Recalculate the housing and add points |
| The first assembly has been accepted | The jig can be put into production | Fix the template before the remaining housings |
Green zone
The orientation can be considered approved when the precise contour does not conflict with the housing, all four positions are marked, the fastening is confirmed, and the test assembly shows equal gaps.
Yellow zone
If the simplified template fits but there is a small gap or no final DWG, the order can be discussed, but drilling is postponed. In this area, one physical sample is especially useful.
Red zone
A negative gap, a conflict with the facade, an unknown top node, or the need to shift the fastening to the very edge of the housing mean that the project is not ready. Purchasing a full set before fixing creates unnecessary risk.
One test leg or all four at once
The buyer often chooses between a sample and a full batch. Both approaches make sense, but they solve different tasks.
What one MN-232 gives
A physical sample allows you to see the actual shape, fit it to the cabinet, check surface quality, compare beech and oak, measure actual zones, and discuss mounting with a cabinetmaker. This is stronger than a paper photo.
One piece does not show:
-
mirror symmetry of the left and right pair;
-
the overall rhythm of the four corners;
-
differences in wood grain within the batch;
-
behavior of a long cabinet on all supports;
-
the final set of glides.
When it makes sense to order four at once
A full set is justified if the drawing is verified, the cabinet is designed, deadlines do not allow two stages, and the material and finish are already approved. Then four legs are made in one batch and immediately laid out by positions.
When a sample reduces risk
A trial purchase is useful when replacing old legs, unknown body construction, complex painting, or scale uncertainty. After fitting, you cannot silently transfer parameters: you need to update the working documentation and order the remaining parts according to the same specification.
A reserve does not replace a sample
A fifth leg in the basket does not fix the incorrect orientation of the four main ones. A reserve is for replacement, and a sample is for checking the project. These decisions cannot be mixed.
Jig control: one error multiplies across the entire series
A jig speeds up production but makes an error repeatable. If the 73 and 92 mm axes are mixed up in it, all bodies will get equally incorrect holes.
Signature on the jig itself
The following must be clearly marked on the working tooling:
-
"FACADE";
-
"SIDE PANEL";
-
PL, PP, ZP or ZL;
-
drawing version;
-
article MN-232;
-
B-axis direction;
-
C-axis direction.
Tilt protection
A good jig has stops that prevent it from being applied upside down. If the design is symmetrical and flipping is possible, a physical key or contrasting marking is added.
First part after setup
After manufacturing the jig, one control housing is drilled, legs are installed without final tightening, and all clearances are checked. Only a signed sample provides the basis to continue the series.
Mid-batch inspection
Even approved tooling can shift or wear out. For a long series, coordinates and appearance are periodically compared with the reference. Inspection frequency is set by production, not by an article.
FAQ: questions before ordering and marking MN-232
What size does the furniture leg MN-232 have?
Confirmed size is 160 × 73 × 92 mm. Height A is 160 mm, width B is 73 mm, depth C is 92 mm.
What do 73 and 92 mm mean?
These are two different external cross-sectional dimensions. They should not be automatically interpreted as the size of the top mounting plate.
Which side should MN-232 be placed facing the facade?
The universal side is not assigned without a drawing. You need to align axes B and C with the facade, check the exact contour, and approve four mirrored positions.
Can MN-232 be rotated 90 degrees?
Rotation externally changes the occupied space, but its acceptability for standard mounting needs to be confirmed against the current DWG and with the manager.
Why do four identical legs look different?
Most often, the two parts are rotated differently. With dimensions of 73 and 92 mm, the outer contour after rotation occupies a different area relative to the front and side panel.
How to make a preliminary template MN-232?
Cut out four rectangles 73 × 92 mm, mark the centers, axes, and corner numbers. For drilling, replace them with precise templates from the drawing.
Can you drill using a 73 × 92 mm rectangle?
No. The rectangle shows only the outer dimension and does not contain the coordinates of the pin, dowel, and mounting contour.
How much does the edge change when rotated?
The difference in full dimensions is 19 mm. For a centered simplified rectangle, the distance from the center to the edge changes by 9.5 mm, but the actual shape is checked against the DWG.
How many MN-232 are needed for a cabinet?
The quantity equals the number of support points confirmed by the design. For many compact cabinets, four are considered, but this is not a universal standard.
Is a central leg needed for a long dresser?
Possible if required by the housing calculation. The decision depends on the length, bottom material, partitions, and load.
Is the stud bolt included in the MN-232 delivery?
The description mentions a metal stud bolt, but the actual contents of a specific order need to be confirmed in the invoice and product card before payment.
Is the additional dowel pin included?
The description mentions an additional dowel pin to prevent rotation. Its presence, position, and prepared holes need to be checked against the current delivery.
Can MN-232 be installed at an angle?
The product card allows a slightly angled option, but the exact angle and mounting system cannot be specified without a project.
Which base plate is specified for MN-232?
The required hardware includes a round FUR-021 measuring 19 × 19 × 5 mm.
How many FUR-021 should be ordered for four legs?
If the foot plate is confirmed for each support, four pieces are needed. The quantity is calculated one to one.
What is included in the FUR-021 kit?
The foot plate card specifies a universal galvanized screw 3.5 × 20 mm. This is the foot plate fastening, not the top leg fastening.
Should I choose beech or oak for enamel?
For opaque enamel, the card provides beech for enamel. Oak is chosen when a pronounced texture under tinting is desired.
Do all legs need to be ordered in one batch?
For one piece of furniture, this is rational. It makes it easier to coordinate the material, surface preparation, and the overall finishing result.
Can the legs be painted first and then decide where to place them?
It is better to first approve the layout and marking. After painting, identical parts are easy to mix up.
Will MN-232 be suitable for a sofa?
Use is possible only after checking the frame, fastening, and load. The cabinet scheme cannot be automatically transferred to upholstered furniture.
Where can I check the price and availability of MN-232?
Current data is available in the product card. Do not include a fixed price or stock level in the article, as they change.
What should be specified in the order besides the article number?
Size, material, quality of sanding, quantity, glides, composition of the top mounting, and a link to the approved installation map.
Is a spare leg needed?
For single pieces of furniture, a reserve is not automatically required. It may be useful for a series, a remote site, or complex finishing, but the decision is made separately.
How to check the side overhang before ordering?
Lay out four full-size templates under the cabinet and measure the distance from the exact contour to the side panel, wall, baseboard, and adjacent furniture.
First the map of four corners, then order MN-232 in STAVROS
MN-232 should be chosen not only for its 160 mm height and expressive modern shape. Its 73 mm width and 92 mm depth create a real design fork: one turn changes the area the support occupies along the front and side panel. Therefore, the main document before purchase is not a photo, but an installation map with four mirrored positions, an exact contour, mounting axes, and an opening check.
Before ordering, record the number of supports, material, finish, position of PL, PP, ZP, and ZL, compatibility of FUR-021, and the actual completeness of the stud with the dowel. If the model does not fit without dangerous displacement of the fastener, choose a different support rather than adjusting the body after drilling.
STAVROS company provides the opportunity to assemble a coherent order: choose MN-232 from beech or oak, match the model with the catalog of wooden legs, add confirmed hardware, and arrange delivery. But the final quality of the furniture is born before the cart—at the moment when all four templates lie correctly under the body, and every millimeter of overhang has a clear reason.