Article Contents:
- First, the answer: what exactly needs to be checked before drilling
- Confirmed specifications of Halo HL-069M
- 160 mm diameter circle: simple geometry that is often forgotten
- Field 150 mm wide
- Field 180 mm wide
- Field 240 mm wide
- Field 300 × 500 mm
- 1:1 template: the circle must appear on the facade before the handle
- Checking print scale
- Temporary fixation
- Check from a distance
- Smooth facade: even the simplest case requires marking
- External gap formula
- Frame facade: frame and panel live on different levels
- Panel is already 160 mm
- Panel wider than 160 mm, but support zone crosses the profile
- Mounting falls into the thin part
- Chamfer, milling, and molding: checking the relief, not the photo
- What happens if part of the Halo falls on a transition
- Swaying
- Misalignment during tightening
- Uneven shadow
- Facade damage
- Two Halos on a double-door cabinet: the circles may meet
- Full check of paired doors
- Corner cabinet: adjacent facades move toward each other
- Distance to the wall and side panel
- Halo on a dresser drawer: large circle and hand movement
- Halo on a kitchen facade: scale is checked together with the work area
- Halo for a wardrobe: the handle becomes part of the facade architecture
- Halo for a cabinet: don't forget about the small weight of the furniture
- Four wood options: color is chosen after geometry
- American walnut
- Zebrano
- Wenge
- Rosewood
- Satin stainless steel links the handle with other hardware
- Ready-made finish means: the handle is not adjusted with a saw
- One Halo test before the full set
- Handle count: count after fitting, not by the number of doors
- Why it's better to order the full set at once
- Mounting: what to clarify before ordering
- FUR-033: useful plug, but not an automatic part of the order
- What to buy together with Halo
- When Halo 160 mm is too large
- Halo or a more compact surface-mounted handle
- Halo or a recessed handle
- Who is the Halo HL-069M suitable for
- When it's better to choose a different handle
- Drill in the center without a template
- Treating 96 mm as the center-to-center distance
- Assess only the front-facing photo
- Press the handle through the chamfer
- Check only one closed door
- Forget about the 22 mm thickness
- Order the entire set before the sample
- Mix finishes without a specification sheet
- Trim the finished circle
- Add FUR-033 automatically
- Do not check the inner side of the facade
- Use one template for different facades
- Facade work card
- Asymmetric facade: the center of the furniture and the center of the handle may not coincide
- Vertical composition of the cabinet
- Chest of drawers with drawers of different heights
- Facade with decorative insert
- The 3D model helps to see the conflict before manufacturing the furniture
- What to pass to the designer or constructor
- Ergonomics: a large handle should be comfortable not only in the picture
- Left-handed and right-handed
- Children's and family furniture
- Light and shadow: a 160 mm circle changes the facade more than a color sample
- Batch acceptance: identical article numbers must be checked before installation
- Layout of handles across facades
- Reserve
- Transferring a project to furniture production
- Control before painting
- Control after body assembly
- Practical scenarios: four facades — four solutions
- Wide smooth wardrobe door
- Framed sideboard door
- Tall dresser drawer
- Corner kitchen module
- Final check before the first hole
- Check after installation: a beautiful fit must remain functional
- Re-check after a few days
- Handle passport: data useful for repairs and reordering
- Why keep the 160 mm template
- Spare handle and its storage
- If the furniture is not yet manufactured, it is better to design the facade together with Halo
- What is the size of Halo HL-069M?
- What does D 96 mm mean?
- What is the radius of the outer circle?
- How wide should the flat panel be?
- Can Halo be installed on a frame facade?
- What will happen if the edge falls on the bevel?
- Do I need to make a template?
- Is it enough to check one mounting point?
- Can Halo be trimmed?
- What finishing options are available?
- What metal is the base made of?
- Is Halo suitable for a cabinet?
- Can two Halo handles be installed on double doors?
- Is the handle suitable for a dresser?
- Can Halo be used in the kitchen?
- How many handles should I order?
- Is the FUR-033 plug needed?
- How do I check two handles for collision?
- Can Halo be installed on a thin panel?
- Where to see smaller handles?
- Where to buy Halo HL-069M?
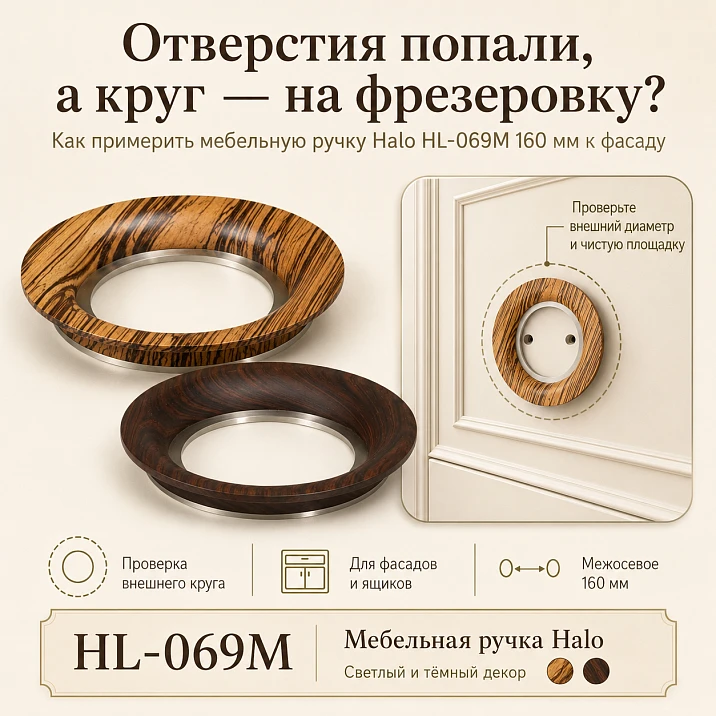
The center of the future handle is marked precisely. The drill went through the right point, the mounting matched the marking, and the door opens. Yet the result looks wrong: the edge of the large circle overlapped the frame, part of the handle ended up above the recessed panel, and the metal base did not sit against the facade as expected. The problem was not in the hole coordinate. The buyer checked the point but did not check the entire area occupied by the surface-mounted furniture handle.
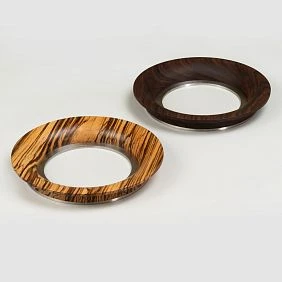
Halo HL-069M has an external size of 160 × 160 mm. This means that from the geometric center, the circle extends approximately 80 mm in all directions. On a smooth facade, this scale reads as a standalone decorative disc. On a framed door, the same 160 mm can cross a bevel, molding, routing, or the boundary of a flat panel. The alignment of the mounting point does not prove that the handle will fully lie on a flat surface.
Before buy furniture handle Halo HL-069M, you need to check three different contours: the mounting coordinates, the actual support surface on the back side, and the full external circle of 160 mm. Then you should open adjacent doors and drawers, assess the movement trajectory, choose one of the four wood options, and only after a physical trial consider the set for the entire furniture.
This approach is especially important for an already manufactured facade. An error on a paper template is corrected by moving the circle. An error after drilling leaves a hole, damages the coating, and may require reworking the door. Therefore, a control Halo or an accurate 1:1 scale template is not unnecessary caution but a way to protect finished furniture.
First, the answer: what exactly needs to be checked before drilling
Halo cannot be tried on like a small knob handle, where the main focus is around a single point. The model has three independent check zones.
| Contour | What is being checked | What error occurs |
|---|---|---|
| Fastening | Coordinates of the hole or holes according to the drawing | Screw does not match the handle |
| Support | Part of the back side that directly adjoins the facade | Handle wobbles or presses with a skew |
| External | Full circle 160 × 160 mm | The disc overlaps the frame, bevel, adjacent handle, or door edge. |
The customer usually starts with the first contour and finishes on it. For Halo, this is not enough. The center may be on a flat panel, while the outer edge is already on a drop. Conversely, the circle visually fits, but the actual base lands on complex milling.
The working order is as follows:
-
obtain the drawing and dimension breakdown;
-
determine the mounting coordinates;
-
find the actual support area;
-
cut out a circle with a diameter of 160 mm;
-
mark the axes and mounting zone on it;
-
apply the template to the facade;
-
check the closed and open positions;
-
only then mark the drilling.




Confirmed specifications of Halo HL-069M
| Parameter | Confirmed data | How to use when selecting |
| Article number | Halo HL-069M | Specify in the request and the list |
| Type | Furniture handle overlay with ready-made coating | Do not plan mortising or self-finishing |
| External size | 160 × 160 mm | Check the full circle on the facade |
| Thickness | 22 мм | Consider the handle volume and access for grip |
| Additional parameter D | 96 мм | Decode according to the current DWG |
| Wood options | American walnut, zebrano, wenge, rosewood | Match with the facade and the entire furniture series |
| Base | Satin stainless steel | Consider the metallic shade next to other hardware |
| Drawing | Provided in the card | Check markings and mounting |
| 3D model | Provided in the card | Include in the furniture project |
| Condition | Ready-made handle with coating | Do not trim, sand, or change the shape |
Current price, availability, and available options need to be see in the Halo card 160 × 160 mm before placing an order. The article does not fix the price and does not replace a technical drawing.
Our factory also produces:
Circle with a diameter of 160 mm: simple geometry that is forgotten
The external size of Halo is 160 mm in width and height. The radius of the outer circle is 80 mm. If the handle must be completely inside a rectangular flat field, its center must be located no closer than 80 mm to each boundary.
For a field of width W, the allowable range for the center horizontally:
from 80 mm to W − 80 mm
For a field of height H, the allowable range vertically:
from 80 mm to H − 80 mm
If an additional visible gap G is required, the formula changes:
distance from the center to the boundary ≥ 80 + G
This is the calculation of the outer contour. It does not show the size of the support part and does not replace the DWG, but it immediately cuts off obviously cramped zones.
Get Consultation
Field width 150 mm
A full circle of 160 mm does not fit. Even with perfect centering, the edges will extend beyond the boundaries by 5 mm on each side.
Field width 180 mm
After centering, only 20 mm of total margin remains — 10 mm on each side. The handle fits geometrically, but looks almost equal to the field width. Need to evaluate the frame, chamfer, and visual density.
Field width 240 mm
The free remainder is 80 mm — 40 mm on each side. This scale gives the circle space, but the final position depends on the handle, hinges, and adjacent facades.
Field 300 × 500 mm
The zone of acceptable centers for a full circle without additional clearance has the size:
(300 − 160) × (500 − 160) = 140 × 340 mm
The center can be moved inside this rectangle without the outer circle extending beyond the boundaries of the flat field. But each position is still checked along the opening trajectory.
Why the hole center can be correct, but the handle is not
A point has no area. A handle does. On a frame facade, the center is easy to place in a flat spot, especially if you align with the middle of the door. But at a distance of 60–80 mm from the center, the bevel or frame already begins.
Example: a flat panel has a width of 130 mm. The center is exactly in the middle. To each side boundary is 65 mm. The Halo outer circle requires 80 mm. 15 mm on each side extend to the adjacent level.
The fastener may hold, but other problems arise:
-
part of the base does not get even support;
-
the handle tilts when tightened;
-
the edge presses on the bevel;
-
the facade coating receives local stress;
-
the circle looks offset relative to the panel;
-
An uneven shadow appears between the handle and the surface.
In a photo, a frontal skew may be almost invisible. Under side lighting, it becomes apparent immediately.
The parameter D = 96 mm cannot be interpreted at random.
The card specifies an additional dimension D of 96 mm. Without markings on the drawing, it cannot automatically be called the center distance, the diameter of the metal base, the size of the mounting part, or the mounting coordinate.
One incorrect interpretation changes the entire facade preparation. Therefore, before drilling, you need to open the drawing and the 3D model of Halo and check:
-
which points the 96 mm refers to;
-
where the fasteners are located;
-
how many mounting points are provided;
-
what the contact contour with the facade is;
-
which screw is needed;
-
what is the allowable facade thickness;
-
are there any installation restrictions.
The production card records not only the number 96, but also its technical meaning. The wording "D = 96 mm per card, purpose to verify against DWG" is safer than a confident but unconfirmed interpretation.
Full-scale facade: from template to real door
1:1 template: the circle must appear on the facade before the handle
The most understandable tool is a paper or cardboard circle with a diameter of 160 mm. It can be cut by hand, but it is more accurate to print it from the drawing at 100% scale.
The template is marked with:
-
horizontal axis;
-
vertical axis;
-
geometric center;
-
mounting points per DWG;
-
actual bearing surface;
-
top direction, if provided;
-
finish option name;
-
facade number.
The flat circle shows the outer contour. To feel the 22 mm depth, add a side mockup made of cardboard or foam of the corresponding thickness. Then it will become clear how much the handle protrudes relative to the adjacent door, wall, and hand.
Print scale check
The “fit to page” setting reduces the drawing. After printing, the diameter may turn out to be not 160, but 148 or 152 mm. Such a template creates a false sense of margin.
Checking procedure:
-
select 100% print;
-
disable scaling;
-
measure the control line;
-
make sure the diameter is 160 mm;
-
only then cut out the circle.
Temporary fixation
The template is applied with masking tape that does not damage the coating. Aggressive adhesive must not be used on finished enamel or veneer. Before fixing, the surface is cleaned in a gentle manner.
Checking from a distance
The circle is assessed not only up close. Step back two to three meters, look at the cabinet frontally, then at an angle. A large Halo changes the proportions of the entire facade, so precise placement and visual scale must match.
Smooth facade: the simplest case also requires marking
On a flat door there is no frame or transition, but edges, adjacent modules, hinges, internal mechanisms, and the composition of the entire furniture remain.
For a smooth facade, record:
-
width;
-
height;
-
thickness;
-
material;
-
distance from the center to the four edges;
-
hinge position;
-
internal drawers;
-
adjacent handle;
-
opening angle.
If Halo is placed in the center, the circle may look confident on a wide door and overly large on a narrow drawer. Centering is not a universal rule.
Outer gap formula
With a facade width W and central placement, the side gap is:
(W − 160) ÷ 2
For a 400 mm facade:
(400 − 160) ÷ 2 = 120 mm
For a 240 mm facade:
(240 − 160) ÷ 2 = 40 mm
For a 180 mm facade:
(180 − 160) ÷ 2 = 10 mm
The number helps compare options, but the decision is made based on the template.
Frame facade: the frame and panel live on different levels
On a frame door, the flat central part is often recessed. Between the panel and the frame there is a bevel or profile. If Halo crosses this boundary, one part of the handle ends up higher than the other.
This position cannot be considered normal just because the screw tightens. A surface-mounted handle must rest on the intended surface.
Before marking, measure:
-
the width of the flat panel;
-
the height of the flat panel;
-
frame width;
-
the depth of the offset;
-
the shape of the bevel;
-
the distance to the center;
-
the thickness of the facade at the mounting point.
The general principle of checking a frame facade is revealed in the material about, why a thin panel needs to be checked before drilling. Halo refers to overlay handles, but the risk of level difference remains the same.
The panel is already 160 mm
The full outer circle does not fit inside the flat area. This does not automatically mean a ban on the handle, but requires a technical solution confirmed by the drawing and facade construction. You cannot press the disc through the chamfer yourself.
The panel is wider than 160 mm, but the support area crosses the profile
The outer circle may visually fit, but the metal base may fall on the transition. Therefore, the contact surface is always marked on the template according to DWG.
The fastening falls into the thin part
Even if the handle lies flat, the thickness of the central panel may not be suitable for the chosen screw or load. Check the facade from the back side and do not assign fasteners without data.
Chamfer, milling, and molding: check the relief, not the photo
A milled facade may look almost flat on screen. In reality, a groove several millimeters deep runs exactly under the edge of the handle. When tightened, the knob gets uneven support.
Molding creates another problem: it not only rises above the plane but also forms a visual frame. A halo partially resting on the molding is perceived as a randomly placed disc.
For a complex facade, create a relief map:
| Section | Level relative to the main plane | Can the handle be supported |
| Smooth field | 0 мм | Checked against DWG |
| Recessed panel | ___ mm | Checking |
| Chamfer | Transition | Do not count as a flat zone |
| Milling | ___ mm | Checked by form |
| Overlay molding | +___ mm | Usually creates a difference |
| Material joint | ___ | Requires separate assessment |
A filled map turns the photo into a technical basis for decision-making.
What happens if part of Halo falls on a difference
The result depends on the design, but four typical problems are possible.
Wobble
The handle rests on high points and has a gap above low ones. Even a slight play is felt with every opening.
Misalignment during tightening
The screw pulls the base toward the facade, while the relief resists. The handle tilts, and the coating experiences local pressure.
Uneven shadow
One edge fits tighter, the other pulls away. On satin metal and a round silhouette, such a shadow is noticeable.
Facade damage
A rigid edge can press through enamel, veneer, or a soft coating layer. The difference cannot be compensated by over-tightening.
None of these problems is solved by a longer screw on its own.
Movement of facades and adjacent elements
Two Halo handles on a double-door cabinet: the circles may meet
On paired doors, handles are often placed symmetrically near the central gap. For compact hardware, this is a common layout. Two circles of 160 mm take up significant width.
If the distance between centers is S, the gap between the outer circles in the closed position is:
S − 160 mm
When S = 160 mm, the circles touch along the contour.
When S = 180 mm, 20 mm remains between them.
When S = 140 mm, the outer contours overlap by 20 mm.
However, the closed position is only the first stage. When opening, the handles move in space. Their volume is 22 mm, and the position of the hinges and the rotation angle affect the trajectory.
Full check of paired doors
-
attach two templates;
-
close the cabinet;
-
assess symmetry;
-
open the left door fully;
-
open the right door;
-
open both simultaneously;
-
check hands and fingers;
-
assess the gap between handles;
-
check collision with the cabinet frame;
-
transfer the result to the report.
Corner cabinet: adjacent fronts move towards each other
In a corner composition, the distance between handles in the closed state may be sufficient. When the door rotates, the circle approaches the adjacent front or handle along an arc.
A paper template on closed furniture does not show depth. For such an area, a control Halo or a volumetric mockup 160 × 160 × 22 mm is useful.
Check:
-
angle between facades;
-
hinge side;
-
maximum opening;
-
side panel;
-
adjacent countertop;
-
protruding cornice;
-
hand position.
Distance to wall and side panel
The outermost cabinet door may open toward the wall. A large handle increases the required clearance. Even if the circle does not extend beyond the facade, it can touch the wall before the door opens fully.
To check:
-
measure the distance from the plane of the closed facade to the wall;
-
mark the position of the center;
-
take into account the thickness of 22 mm;
-
open the door according to the real hinge;
-
check the edge of the circle;
-
assess finger access.
An opening limiter sometimes solves the collision but reduces access to the cabinet. Such a solution is agreed upon with the furniture maker, not added after a random fitting.
Halo on different types of furniture
Halo on a dresser drawer: a large circle and hand movement
On a wide drawer, Halo can become a central decorative element. But the handle must not only look beautiful but also withstand the usual opening force.
Check:
-
box width;
-
facade height;
-
weight of the filled box;
-
guide travel;
-
palm position;
-
adjacent drawers;
-
vertical distance between circles;
-
internal facade structure.
If Halo is installed on each drawer, the vertical center step must account for the 160 mm diameter. With a step less than 160 mm, the circles will visually intersect.
For a tall stack of drawers, you can use one Halo on the central facade and more compact handles on the others, but this is a separate composition. Random mixing of models without a project looks disjointed.
Halo on a kitchen facade: scale is checked together with the work area
A round handle with a finished finish can be used in a furniture project, but the kitchen imposes additional requirements for placement and care. The article does not assign universal compatibility with any kitchen facade.
Before ordering, check:
-
distance to the countertop;
-
adjacent drawers;
-
corner module;
-
oven and dishwasher;
-
hand position;
-
cleaning possibility;
-
contact frequency;
-
proximity to heat and moisture sources;
-
care card recommendations.
On the lower front, a large circle may be close to the hip. On the upper one, change the comfortable grip height. The template should be checked in a real posture, not just by the center of the door.
Halo for cabinet: the handle becomes part of the facade architecture
On a tall door, a circle with a diameter of 160 mm does not look like a small dot, but like an independent plane. Its position affects the proportions of the cabinet.
Different layouts are possible:
-
centered by width and a comfortable height for the hand;
-
offset toward the central gap;
-
one large Halo on an accent door;
-
paired circles;
-
repeated across several modules.
In each layout, geometry is checked first, then rhythm. For a general understanding of hardware types, you can look at what wooden furniture handles are available, but the decision on Halo is made based on the 160 mm circle and the specific facade.
Halo for a cabinet: don't forget about the small mass of the furniture
A large handle creates a convenient, noticeable grip point, but a light cabinet may shift when opened. This is not about the quality of Halo, but about the mass of the item, the slides, and the supports.
Need to check:
-
opening force;
-
cabinet stability;
-
wall mounting, if provided;
-
handle position;
-
drawer movement;
-
contact with knee or clothing.
The handle does not fix a weak frame and does not replace slide adjustment.
Finish, metal, and visual weight of the handle
Four wood options: color is chosen after geometry
Halo is offered in the following options:
-
American walnut;
-
zebrano;
-
wenge;
-
rosewood.
These names refer to confirmed wood finish options for the finished handle. They should not be automatically interpreted as a promise of a specific solid wood species without checking the product card.
American walnut
The warm brown range helps connect Halo with walnut furniture, veneer, dark beige facades, and warm metal. With satin stainless steel, a contrast arises between the wood grain and the cool base.
Zebrano
The expressive striped texture makes the circle more dynamic. On a facade with its own strong pattern, the two directions may compete. Before ordering, a sample is placed against the furniture and viewed from a distance.
Wenge
The dark option emphasizes the graphic of the circle. On a black or very dark facade, the silhouette may be read through the metal base and light, rather than through the color of the wood part.
Rosewood
The rich wood grain suits compositions where the handle should be a separate decorative accent. Adjacent materials are checked against real samples.
Choose Halo from walnut, wenge, zebrano, or rosewood better after the template has confirmed the size. Color does not compensate for an improper fit.
Satin stainless steel ties the handle to other hardware
The metal base should be matched with:
-
hinges, if they are visible;
-
legs;
-
plinth;
-
lighting fixtures;
-
mirror frame;
-
decorative caps;
-
other furniture hardware.
Exact matching of all metals is not always necessary, but a random mix of polished chrome, warm bronze, and satin steel requires a design explanation.
The sample is evaluated in daylight and artificial light. The satin finish may appear lighter or darker depending on the direction of lighting.
Finished coating means: the handle is not adjusted with a saw
Halo is in the section of handles with coating. It is a finished product, not a blank for self-modification.
Not recommended:
-
cutting the circle;
-
grinding down the edge;
-
cutting a groove in the base;
-
drilling the handle;
-
removing the metal part;
-
repainting the wood surface without approval;
-
fix the conflict with the frame by changing the shape of the product.
If 160 mm does not fit, choose a different position or a more compact model. Compare Halo with more compact models safer than ruining the finished handle.
Set, mounting, and associated hardware
One test Halo before the full set
The paper template checks the outline. The real handle shows what is not on paper:
-
volume;
-
weight;
-
tactile grip;
-
metal reflection;
-
real wood finish;
-
mounting surface;
-
fasteners;
-
hand position;
-
interaction with the adjacent door.
For a single cabinet, a control sample may seem unnecessary. For a kitchen, walk-in closet, or series of dressers, it protects the entire order.
The control handle is applied to all types of facades. If the cabinet contains wide doors, narrow drawers, and a corner module, one Halo position may not fit everywhere.
Handle list: count after fitting, not by the number of doors
The number of handles does not always equal the number of facades. A pair of doors may have two handles, a wide drawer may have one, and a decorative panel may have a different model. Some facades open by push-to-open.
The list must include:
| № | Furniture | Facade | Facade size | Halo position | Finish option | Quantity |
| 1 | Cabinet | Left door | ___ × ___ mm | ___ | ___ | 1 |
| 2 | Cabinet | Right door | ___ × ___ mm | ___ | ___ | 1 |
| 3 | Commode | Upper drawer | ___ × ___ mm | ___ | ___ | 1 |
| 4 | Commode | Lower drawer | ___ × ___ mm | Does not fit / different model | ___ | 0 |
| 5 | Reserve | — | — | — | Same batch | ___ |
After filling, each finish is summed separately. Mixing wenge and walnut randomly is not allowed.
Why it's better to order the full set at once
One order helps to preserve:
-
the same finish option;
-
a uniform metal shade;
-
one product revision;
-
the same configuration;
-
a common delivery time;
-
reserve for future replacement;
-
unified visual rhythm.
Current availability is checked before payment. Full match of later add-on purchases cannot be guaranteed without batch confirmation.
Mounting: what to clarify before ordering
The card and source data confirm the handle size and presence of a drawing, but do not give the right to invent the screw type, number of fasteners, or fastener length.
In the card and DWG, check:
-
number of points;
-
hole diameter;
-
screw type;
-
thread;
-
length;
-
allowable facade thickness;
-
need for a washer;
-
access from the reverse side;
-
method of covering the head;
-
configuration.
Pay special attention to frame facades and drawers with an inner wall. The screw must work in the actual structure, not just pass through the front panel.
FUR-033: useful plug, but not an automatic part of the order
FUR-033 measures 14 × 14 × 3 mm, has a nickel color, and is designed for an M4 screw with a pan head. It can be used as finishing hardware if the Halo mount actually has a compatible visible screw.
Before adding to cart, you need to confirm:
-
whether M4 is used;
-
what type of screw head;
-
whether it remains visible;
-
how many attachment points one Halo has;
-
whether the decorative cover is included in the set;
-
whether the nickel matches the project.
Only after this check can you view decorative plug FUR-033. The general principle is explained in the material about how to cover the fasteners of a furniture handle.
What to buy together with Halo
| Position | When needed | What to check | Inner page |
| Halo HL-069M | A 160 mm circle fits the facade | DWG, finish, configuration | Order a large round handle for the facade |
| Control Halo | Before serial ordering | All types of facades and trajectories | View Halo dimensions 160 × 160 mm |
| More compact handle | Halo extends onto the frame | Size, shape, finish | View ready-made handles for cabinet and dresser |
| Surface-mounted model of a different scale | Need the same logic without the 160 mm circle | Mounting area | Choose a surface-mounted handle for the front |
| FUR-033 | Visible compatible M4 screw | Head and quantity | Nickel-colored plug for M4 fastener |
| Facade drawing | Complex frame or milling | Flat field and thickness | Handle mounting on facade with level difference |
| General guide | Handle type selection not yet made | Overlay, inset, or profile scheme | Select wooden hardware based on facade type |
The table does not mean all items are needed simultaneously. The set is formed after fitting Halo and checking fasteners.
When Halo fits and when another format is needed
When the Halo 160 mm is too large
Signs of an inappropriate scale:
-
the flat field is already 160 mm;
-
the circle crosses the chamfer;
-
the handle covers most of the drawer;
-
two Halos collide;
-
the door touches the wall;
-
the hand is cramped between the circle and the countertop;
-
the metal base lands on the relief;
-
the visual disc conflicts with the facade pattern;
-
The handle overlaps the molding;
-
On a series of facades, it is impossible to maintain a unified rhythm.
In this case, there is no need to prove that the large model "will fit anyway." It is more correct buy surface-mounted furniture handles after comparing several sizes and shapes.
Halo or a more compact surface-mounted handle
| Criterion | Halo 160 mm | Compact model |
| Decorative role | Large independent circle | A calmer grip point |
| Flat field requirement | High | Usually smaller, depends on model |
| Risk of frame crossing | Higher | May be lower |
| Paired facades | Require large distance | Easier to place |
| Visual accent | Strong | Moderate |
| Template check | Required | Also needed, but contour is smaller |
| Suitable for narrow drawer | Not always | Probability is higher |
The decision is made not by the principle "bigger means more expressive," but by the proportions of the furniture and the seating surface.
Halo or recessed handle
Halo is installed on top of the facade and remains a visible volume. The recessed model requires a prepared recess and works on a different logic.
| Parameter | Halo HL-069M | Recessed handle |
| Type | Overlay | Inset |
| Visible volume | Circle 160 mm | Depends on the model, part is recessed |
| Facade preparation | Drilling according to the drawing | Milling of the mounting seat |
| Main risk | Intersection of relief and adjacent details | Insufficient thickness and sampling error |
| Repairability | Depends on holes | Requires precise groove alignment |
| Decorative role | Accent | More integrated |
If a large surface-mounted handle doesn't fit, a recessed one doesn't automatically become a replacement. First, the facade construction is checked.
Who Halo HL-069M suits
Consider this model when:
-
the facade has a sufficiently flat field;
-
a 160 mm circle matches the scale of the furniture;
-
The outer contour does not intersect the frame;
-
The support surface is confirmed per DWG;
-
Adjacent doors open freely;
-
One of the four finishes suits the project;
-
Satin steel is coordinated with the metals;
-
The handle does not require rework;
-
The set is calculated after the sample;
-
The fastener is compatible with the facade thickness.
When it is better to choose a different handle
Another option is needed if:
-
The flat field is smaller than required;
-
the facade has deep milling;
-
the handle crosses the molding;
-
the two doors collide;
-
the outermost door hits the wall;
-
the drawer is too low;
-
the internal mechanism interferes with the screw;
-
no access from the back side;
-
the large circle overloads the composition;
-
a nearly invisible grip is needed;
-
the project requires a different metallic shade.
Mistakes that turn an expensive pen into a problem
Drill in the center without a template
The mounting matches, the outer circle extends onto the frame.
Treating 96 mm as the center-to-center distance
Purpose D not verified against DWG.
Assess only the front-facing photo
The bearing surface is not visible.
Press the handle through the chamfer
Misalignment and local load occur.
Check one closed door
When opening, Halo touches the adjacent facade.
Forget about the 22 mm thickness
The handle hits the wall or the adjacent module.
Order the entire set before the sample
The error repeats on all doors.
Mix finishes without a specification sheet
Walnut, wenge, and rosewood are distributed randomly.
Trim the finished circle
The coating and shape are damaged.
Add FUR-033 automatically
Screw compatibility not confirmed.
Do not check the inner side of the facade
Fastener hits the drawer mechanism or thin panel.
Use one template for different facades
Wide door and narrow drawer require separate solutions.
From check to order
Facade work card
| Parameter | Value | |||||||||||||||||||||||
| Article number | Halo HL-069M | |||||||||||||||||||||||
| Outer circle | 160 × 160 mm | |||||||||||||||||||||||
| Thickness | 22 мм | |||||||||||||||||||||||
| D | 96 mm, decipher per DWG | |||||||||||||||||||||||
| Front width | ___ mm | |||||||||||||||||||||||
| Facade height | ___ mm | |||||||||||||||||||||||
| Flat field | ___ × ___ mm | |||||||||||||||||||||||
| Frame width | ___ mm | |||||||||||||||||||||||
| Panel drop | ___ mm | |||||||||||||||||||||||
| Milling | Yes / no | |||||||||||||||||||||||
| Distance to edge | ___ mm | |||||||||||||||||||||||
| Distance to adjacent handle | ___ mm | |||||||||||||||||||||||
| Wall or side panel | ___ mm | |||||||||||||||||||||||
П
Asymmetric facade: furniture center and handle center may not coincideNot every facade is built around one obvious axis. The frame may have a wide side stile, decorative routing may have an offset pattern, and the door may be adjacent to an open shelf or vertical profile. The geometric center of the door in such cases does not always give the best result. To check, apply several axes to the template:
Then compare three or four positions. One may be technically convenient but visually fall out of line. Another beautifully continues the furniture line but brings the circle closer to the chamfer. The third provides a good grip but interferes with the adjacent door. The working solution is where three conditions coincide: the handle is fully supported by the facade, remains comfortable for the hand, and continues the overall composition. Centering for symmetry should not force the metal base to rest on the relief. Vertical composition of the cabinetOn a tall facade, the handle can be placed below the geometric center to make it easier to reach. Then the position of all Halo handles is set by a single height line, not by the individual center of each door. Dresser with drawers of varying heightsIf you center the circle on each drawer, the distances between handles change. Sometimes it's better to set a common vertical axis and check the spacing separately. On a low drawer, Halo may be too large, so some fronts get a different model. Front with decorative insertThe circle cannot be placed over the ornament just to align axes. Decorative and functional elements must have their own space. The 3D model helps spot the conflict before furniture is manufacturedThe Halo card offers a 3D model. For new furniture, this is a chance to check the handle not after painting the front, but at the design stage. The following must be transferred to the project model:
Three-dimensional checking is especially useful for corner kitchens, cabinets with side walls, drawers under hinged doors, and furniture with protruding cornices. It reveals collisions that cannot be seen in a frontal layout. However, the 3D model does not replace a control handle. Visualization does not convey tactile grip, real coating, and minor installation deviations. The correct sequence is as follows: the digital model eliminates obvious conflicts, the paper template verifies natural scale, and the sample confirms fit and comfort. What to communicate to the designer or constructorDo not limit yourself to a product reference. Provide the article number, model file, DWG, selected finish, and the requirement to check three contours. In the drawing note, write: "The outer circle of 160 mm must not intersect the frame and adjacent elements; the support area must be entirely on one plane." Ergonomics: a large handle should be comfortable not only in the pictureA diameter of 160 mm creates a noticeable surface, but comfort depends on the grip shape, installation height, and adjacent obstacles. One user grabs the edge of the circle, another uses the lower part, a third pulls the door with the whole palm. The control sample shows whether the real scenario is suitable. The check is carried out in the position in which the furniture will be used:
Evaluate:
The article does not prescribe a universal installation height. It depends on the furniture and users. For a series of cabinets, it is reasonable to conduct a full-scale test on one door or a temporary stand. Left-handed and right-handedOn a symmetrical door, the difference may be small. On a corner module or a facade near a wall, the direction of hand movement changes convenience. Test opening with both hands, especially if several people use the furniture. Children's and family furnitureA large handle is noticeable, but this does not automatically mean safety or convenience for a child. Height, opening force, protrusion, and furniture construction are assessed separately. Light and shadow: the 160 mm handle changes the facade more than a color sampleHalo combines a wood surface and satin-finished metal. Under side lighting, the metal base creates a subtle shadow, and the wood finish pattern becomes more noticeable. On a dark facade, the handle may look more compact; on a light one, more contrasting and larger. A template made of white paper shows geometry but not color weight. Therefore, after choosing a position, it is useful to make a color mockup or apply a control sample under several lighting scenarios:
Zebrano and palisander are checked especially carefully: an active pattern can become the main accent. American walnut and wenge also change perception depending on the background. The color decision cannot be made based only on an enlarged photo on the screen. Acceptance of the batch: the same article number must be verified before installationWhen the full set is delivered, first check the goods, not start drilling. For each box, record the article number, finish option, quantity, and condition. Acceptance procedure:
Natural wood grain may vary between pieces. This should be distributed across the furniture before installation. A more active texture can be used on the central front, calm handles on the side ones, if such a composition is approved. Random order from the box does not guarantee an even rhythm. Handle layout across frontsPlace all Halo handles next to numbered door photos. Assign each handle a specific position: Ш1-Л, Ш1-П, К1, К2. Transfer the numbers to the list. After that, the installer will not choose the finish and pattern on site. ReserveThe spare Halo handle is stored with the order data. Its finish must match the main batch. The reserve is not used to fix an error on an unsuitable front. Transferring the project to furniture productionFor the furniture manufacturer, the phrase "place the handle in the center" is insufficient. The working package must include exact coordinates and constraints. Pass on:
On the facade elevation, the circle is drawn completely, not as a conventional small icon. This way, the designer sees the intersection with the frame and adjacent elements. Control before paintingFor new furniture, holes and fit are checked on a trial facade or technological sample before final finishing. It is easier to correct an error on an unfinished part than on finished enamel or veneer. Control after cabinet assemblyThe door trajectory is finally checked after installing hinges and adjustment. Even an accurate model may differ from the real position by a few millimeters due to gaps and settings. Drilling is performed according to the approved project technology. Practical scenarios: four facades — four solutionsWide smooth wardrobe doorThe 600 × 2200 mm facade provides enough space for the circle. The main task is to determine a comfortable height, the offset from the central gap, and the contact with the wall when opening. Halo can work as a large accent if the finish supports the interior. Cabinet frame doorThe overall facade is large, but the flat panel is 145 mm wide. A full circle does not fit inside it. Moving the center to the frame also does not guarantee even support. For such a facade, one first looks for a different position or a more compact surface-mounted handle. Tall dresser drawerA facade 260 mm high allows placing a circle with noticeable margins. The travel of the guides, opening force, and vertical step to the next handle are checked. If the adjacent drawer is lower, the same Halo can disrupt the rhythm. Corner kitchen moduleIn the closed position, the circles do not intersect, but when opening, one handle moves toward the adjacent door. Here, a 3D check and a control sample are mandatory. A simple template on the closed facade is not enough. Final check before the first holeBefore drilling, the craftsman must get an unambiguous answer for each item:
If at least one critical point remains unknown, drilling is postponed. A few minutes of checking are cheaper than repairing a finished facade. Post-installation check: a beautiful fit must remain functionalInstallation is complete, screws are tightened, circles are in place. Control does not end here. Halo works as a handle, meaning it regularly receives force from the hand. An error that was not noticeable at the time of installation may appear after several openings. First, inspect each handle under side light. There should be no uneven gap between the base and the facade. Then carefully grasp Halo as you would use the furniture, and open the door or drawer several times. The handle should not wobble, rotate relative to its axis, or produce a new sound. Check five states:
After the check, inspect the coating around the circle. If the edge of the handle presses on the chamfer, a mark may not appear immediately. Any change in shadow, local indentation, or play requires stopping and disassembling the assembly by a specialist. Additional tightening should not become a universal answer: if the base rests on a difference in height, stronger pressing only increases the load. Re-check after a few daysNew furniture and fasteners go through the first cycles of use. After a few days, it is useful to check the play and trajectories again. For a wardrobe, open all doors in the combinations that occur in everyday use. For a dresser, pull out adjacent drawers. For a kitchen, check the fronts near the corner module and appliances. If the handles remain stationary and the front coating does not change, the result can be considered confirmed. During serial installation, control of the first group is performed before completing all furniture. Handle passport: data that will be useful for repairs and additional purchasesAfter a few years, the owner will need to replace a damaged handle, order another door, or replicate furniture in an adjacent room. Without saved data, Halo will have to be identified again by photo. Create a small project passport. It includes:
It is better to save documents in two forms: a digital folder and a paper package together with the furniture project. Photograph not only the front side, but also the mounting on the back of the facade. This way the future craftsman will see the actual joint, rather than disassembling the furniture blindly. Why store the 160 mm templateA cardboard circle with marked mounting points helps quickly check a new facade or the position of a spare handle. Label the template with the drawing version and finish to avoid confusing it with another model. Spare handle and its storageThe spare Halo is protected from scratches, moisture, and contact with hard metal. The label is left in the packaging. The spare should not be used as a sample for construction work, on which a drill or abrasive is tested. The spare is especially useful for a large composition where one missing handle disrupts the entire rhythm. However, the number of spare items is determined by the scale of the project and the availability of the model, not by a universal percentage. If the furniture is not yet manufactured, it is better to design the facade together with HaloThe safest moment to choose a large overlay handle comes before cutting and finishing the facades. Then the design can be adapted to the actual 160 mm circle, rather than looking for free space after the furniture has been manufactured. The designer receives Halo as a mandatory component of the project. The frame width, panel size, milling position, and internal reinforcements are calculated considering the outer and support contours. If the handle must be placed on the central panel, the flat field is laid out with sufficient size. If Halo is positioned on the frame, the stile width is checked against the DWG and load. At this stage, you can change:
After manufacturing, such changes become expensive or impossible. Therefore, the handle is not left "for later" as a final decorative touch. It participates in the facade geometry from the very beginning. For testing, it is useful to produce a facade fragment or a technological sample with a real level difference. The control Halo is applied, the base, drilling, and tightening are checked. Then the approved assembly is transferred to the entire series. This order is especially important for custom-made furniture, where the same handle is repeated dozens of times. One mistake in the drawing turns into a systemic issue. Conversely, one verified sample sets a clear standard for production, painting, and installation. Questions and answers about Halo HL-069MWhat is the size of Halo HL-069M?The confirmed external size is 160 × 160 mm, thickness is 22 mm, and the additional parameter D is 96 mm. What does D 96 mm mean?The purpose of the parameter should be checked against the current DWG. It cannot be automatically considered the center-to-center distance. What is the radius of the outer circle?Approximately 80 mm from the geometric center to the outer edge. How wide should the flat panel be?At least 160 mm is required for a full outer circle without exceeding the boundaries. Separate DWG data is needed for the support surface. Can Halo be installed on a frame facade?Installation can be considered if the external and support areas are fully compatible with the flat section and the mounting. What will happen if the edge falls on a bevel?Misalignment, wobbling, uneven shadow, and pressure on the coating are possible. Is it necessary to make a template?Yes. The 160 mm circle at full size shows the real scale before drilling. Is it enough to check just one mounting point?No. You need to check the fastener, the support surface, and the full outer circle. Can Halo be trimmed?No. It is a finished handle with a coating and a metal base. What finish options are available?American walnut, zebrano, wenge, and rosewood. What metal is the base made of?Base confirmed in satin stainless steel. Does Halo fit a cabinet?Yes, if the 160 mm circle matches the front and adjacent doors open without collision. Can two Halo units be installed on double doors?Yes, after checking the center distance and full opening trajectory. Is the handle suitable for a chest of drawers?Not suitable for every drawer. Front height, opening force, and vertical pitch need to be checked. Can Halo be used in the kitchen?The scenario requires checking placement, care, adjacent modules, and current card recommendations. How many handles should I order?First fill out the front specification sheet. Then add the approved allowance for the project. Is the FUR-033 cap needed?Only if the Halo mounting uses a compatible visible M4 screw with a semi-circular head and the plug is not included in the kit. How to check two handles for collision?Attach the templates, open both doors one at a time and simultaneously, then repeat the check with the control handle. Can Halo be installed on a thin panel?Thickness and mounting need to be confirmed. External size match does not prove mounting strength. Where to see smaller handles?You can compare large and compact surface-mounted models in the corresponding category. Where to buy Halo HL-069M?In the card, you can Order a large round handle for the facade after checking the template and DWG. The circle must fit before the hole appearsThe Halo HL-069M cannot be chosen only by its beautiful finish or drilling point. The main dimension of the model is the outer circle 160 × 160 mm. It must align with the flat field, frame, milling, adjacent fronts, and opening path. The support part is checked separately according to the DWG, and the D 96 mm parameter receives a technical breakdown before marking. Start with a paper circle, then check one real handle. Only after that choose American walnut, zebrano, wenge, or rosewood, calculate the entire set, and clarify the fasteners. STAVROS offers Halo with a ready wood finish and a satin stainless steel base, as well as categories for comparing surface-mounted models. This order helps keep the front intact: first the circle on the template, then the control handle, and only then drilling and the full order. |