Article Contents:
- Short answer: what to check before ordering MN-243
- What MN-243 is
- Confirmed specifications of MN-243
- The correct sequence for reading a drawing
- How to check the scale
- Why too-long fasteners are dangerous
- Why too-short fasteners are also unsuitable
- How not to confuse patterns
- Signs that the project needs an additional node
- Ordering a set in one batch
- Oak
- Oak
- With a pin leg
- With a leg on a separate metal plate
- With a ready-made frame or underframe
- With a decorative overlay support
- With any leg height of about 740 mm
- New solid wood dining table
- MDF tabletop with enamel finish
- Reconfiguration of an existing tabletop
- Long work table
- Table for a cafe, office, or conference room
- Round table
- Small table with a minimalist tabletop
- Order only by height 740 mm
- Drill according to the photo
- Use the support as a template without checking
- Mix up mirror orientation
- Fail to measure local thickness
- Use a screw that is too long
- Using too short fasteners
- Hit a void or recess
- Drill all positions first
- Assume a table without a tsarga is automatically rigid
- Buy legs at different times
- What to check on each tabletop
- Why you cannot constantly mark from the previous part
- What furniture is MN-243 intended for?
- What size does MN-243 have?
- Why are both 764 and 740 mm specified?
- How is MN-243 attached?
- Is a separate mounting plate included?
- Where are the three holes located?
- Can the holes be marked using the leg itself?
- What is the 1:1 template for?
- How to choose the screw length?
- Can MN-243 be installed on MDF?
- Will MN-243 fit a solid wood tabletop?
- Is an apron needed?
- How many MN-243 should I order?
- Will MN-243 fit a heavy tabletop?
- Can MN-243 be used for a round table?
- What to choose: beech or oak?
- What does the "Prestige" finish mean?
- When should the legs be painted?
- Do I need to order a spare leg?
- Where can I see the price and current specifications for MN-243?
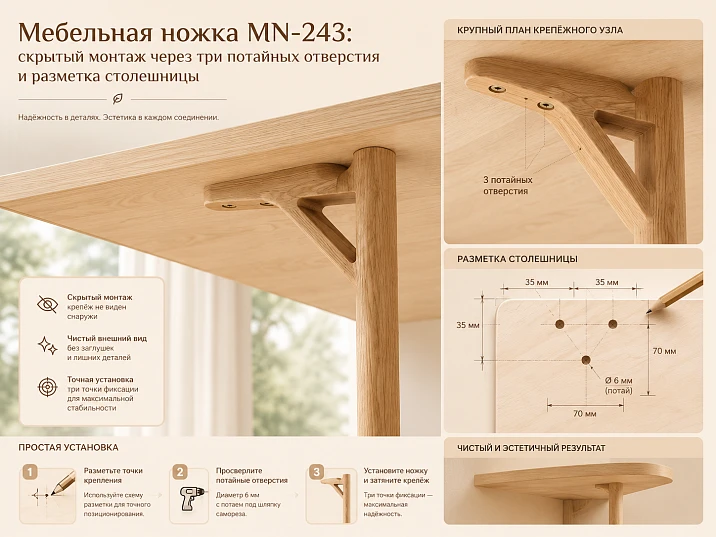
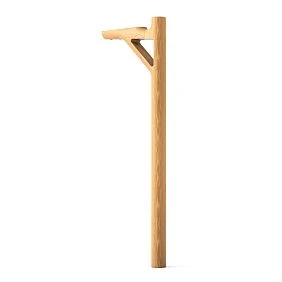
The MN-243 furniture leg is designed for an apronless table scheme and attaches directly to the underside of the tabletop through three countersunk holes in its own mounting part. This feature determines the entire selection process. It is not enough to decide that the support matches the style and has the required height. Before ordering, you need to understand the geometry of the part from the drawing, determine the orientation of each leg, check the bottom surface of the tabletop, calculate edge offsets, and prepare a precise drilling template.
Incorrect marking is especially unpleasant because the MN-243 has no separate universal plate that could be rotated, replaced, or slightly shifted after drilling. The three mounting points belong to the support itself. If the holes are transferred inaccurately, the leg may sit at the wrong angle, end up too close to the edge, conflict with internal cutouts in the tabletop, or disrupt the symmetry of the entire table.
Therefore buy furniture leg MN-243 it is reasonable after preparing the mounting map. It should specify not only the number of supports and material, but also the drawing version, the contour of the mounting part, the coordinates of the three holes, the direction to the outer edge of the tabletop, the base thickness, and the scheme for direct or mirrored transfer of the template.
The main goal of this article is not to provide a universal instruction for all furniture legs, but to show how to prepare specifically MN-243 for installation without approximate marking. The buyer should move from the product photo to a precise specification: drawing → 1:1 template → tabletop check → trial connection → serial marking → ordering the kit.
Short answer: what to check before ordering MN-243
MN-243 is designed for a table without a traditional apron. The support has three countersunk holes through which the fasteners enter the tabletop. Before drilling, it is necessary to:
-
Open the current drawing of MN-243 and check the purpose of parameters A, B, C, and D.
-
Do not mix the values 764 and 740 mm: these are different dimensional parameters, not two versions of the same height.
-
Take from the drawing the contour of the mounting part and the coordinates of all three holes.
-
Make a full-size template with a mark of the outer and inner side of the support.
-
Check the thickness and internal structure of the tabletop.
-
Make sure the holes do not fall into the end glue joint, void, recess, insert, or existing fastener.
-
Calculate the offsets from the end and the longitudinal edge.
-
Check the free space for legs and the position of the supports relative to the seating locations.
-
Perform a trial connection on a piece of material or a test part.
-
Only after checking the first support, transfer the markings to the remaining positions.
This order is more important than the question of "which leg is prettier." In a table without aprons, individual supports simultaneously shape the appearance, seating geometry, and structural stability. An error at one point affects the entire table.




What is MN-243
MN-243 is a modern wooden furniture support for a table without aprons. It is not a ready-made underframe, frame, or a set of four legs. The card covers one product item, and the quantity is determined by the project.
The confirmed dimensional line is 764 × 240 × 45 × 740 mm. In the product table, the parameters are marked with letters A, B, C, and D. You cannot automatically assign household names like "full height," "mounting length," or "platform thickness" without checking the drawing. Only the correspondence of numbers to letters is known:
-
A — 764 mm;
-
B — 240 mm;
-
C — 45 mm;
-
D — 740 mm.
The material is chosen between beech and oak. Surface preparation is marked as "Prestige". Installation is done through three concealed holes in the mounting part of the support. The model is associated with a table construction without an apron, but this does not mean that four legs automatically suit any tabletop in terms of weight, length, and rigidity.
Our factory also produces:
Confirmed characteristics MN-243
| Parameter | Confirmed value | What to check before purchasing |
|---|---|---|
| Article number | MN-243 | Match of the article number in the card, drawing, and order |
| Product type | Wooden furniture leg | Does a separate support fit the chosen table construction |
| Purpose | Table without apron | Are hidden ties, a frame, or other reinforcement needed |
| Size A | 764 мм | Purpose of the dimension arrow per DWG |
| Size B | 240 мм | Which part of the support corresponds to this dimension |
| Size C | 45 мм | Position of the dimension on the front or side view |
| Dimension D | 740 мм | How does the parameter differ from A |
| Full string | 764 × 240 × 45 × 740 mm | Cannot be replaced with a single number "height 740 mm" |
| Material | Beech or oak | Future finish and combination with the countertop |
| Preparation | «Prestige» | Amount of additional preparation for the selected covering |
| Mounting | Three countersunk holes | Coordinates, diameter, countersink, and permissible fasteners per the drawing |
| Mounting diagram | Directly to the tabletop | Thickness, material, and internal structure of the tabletop |
| Quantity | As per project | Four supports are not automatically included in one product item |
| Drawing | Required for precise marking | Use the current version before making the template |
After the table, it is useful to immediately separate confirmed data from design conclusions. The presence of three concealed holes and the dimension line are confirmed. Universal hole coordinates in the article text, screw diameter, permissible load in kilograms, minimum edge offset, and suitability for any tabletop are not confirmed. These parameters cannot be assigned from a photograph.
Get Consultation
What is included in the purchase and what remains part of the project
The buyer often perceives a furniture leg as an almost finished table: it is enough to order four parts, attach them at the corners, and secure them. For MN-243, this approach is dangerous. The product card describes the support, not the entire assembly.
| What the buyer receives | Should not be considered automatically included |
| One support MN-243 | Ready-made table |
| Specific product geometry | Ready drilling map for a specific countertop |
| Three countersunk holes in the support | Universal screw kit for any material |
| Choice of beech or oak | Automatically matched countertop wood species |
| Preparation of "Prestige" | Ready finish coating, if not separately confirmed |
| Support for a frame-less scheme | Calculation of table rigidity of any size |
| One product item | Four legs by default |
| Possibility of precise installation according to the drawing | Drilled tabletop |
| Wooden part | Hidden frame, ties, or apron |
This boundary helps to correctly form the order. The specification separately indicates the quantity of MN-243, separately the tabletop material, its thickness, dimensions, expected load, and reinforcement scheme. If the design requires hidden ties, a metal frame, or another frame, such elements are considered as an independent part of the project.
Why a clear article title is more important than a beautiful metaphor
For the buyer, the topic should be readable without decoding. Therefore, the title "Furniture leg MN-243: hidden installation through three countersunk holes and tabletop marking" is more accurate than a figurative formula about "second marking." It immediately communicates:
-
which article is being referred to;
-
what type of mounting is used;
-
how many holes need to be transferred;
-
to which part is the installation performed;
-
what problem the material solves.
This title matches the real search intent. A person has already chosen or is considering MN-243 and wants to understand how to secure it, why the dimensions simultaneously include 764 and 740 mm, whether the support can be used without a stretcher, and how not to damage the tabletop.
How to read the dimension 764 × 240 × 45 × 740 mm
The dimension line looks simple, but it cannot be turned into a household description without DWG. It is especially important not to claim that 740 mm is the only full height of the product. The card simultaneously contains A = 764 mm and D = 740 mm. The difference between them is 24 mm, but the arithmetic itself does not explain the geometry.
Parameter A may refer to one external contour, D to another line or working height. The purpose is determined by the location of the arrows on the drawing. Until the drawing is opened, the correct wording is as follows: the vertical parameter D is 740 mm, the overall parameter A is 764 mm; the actual position of these dimensions is checked against DWG MN-243.
Correct sequence for reading the drawing
First, the general shape of the product is determined. Then the front and side projections are compared. After that, the following are noted:
-
the surface that adjoins the tabletop;
-
the outer edge of the support;
-
the inner side facing the center of the table;
-
part axis;
-
three holes and their countersinks;
-
dimension arrows A, B, C, and D;
-
possible asymmetry;
-
installation direction.
Only after this can the 240 mm dimension be used as a specific mounting size, if it is designated as such in the drawing. In the card text, the number itself does not prove that it equals the length of the platform, the overhang, or the distance from the edge.
For accurate verification, it is useful to look at the dimensions MN-243 together with the drawing and do not transfer data from another furniture leg, even if it looks similar externally.
Three blind holes are not three arbitrary mounting points
A blind hole has not only a center, but also a top shape designed for a specific type of head. For a precise connection, the following are important:
-
diameter of the through part;
-
countersink diameter;
-
angle or seating shape of the head;
-
countersink depth;
-
center coordinates;
-
distances between centers;
-
distance from the holes to the edge of the wooden mounting part;
-
position of each hole relative to the support axis;
-
allowable fastener length;
-
depth of its entry into the tabletop.
If at least one parameter is missing from the text card, it should not be restored "by eye." Two visually identical countersunk screws may be designed for different heads. A head that is too large will not sit flush, one that is too small will rest on a limited area, and an unsuitable angle will create local pressure on the wood.
The three points also work together. You cannot arbitrarily shift one of them to bypass a void in the tabletop and consider the joint equivalent to the original. Changing the fastening scheme requires separate approval, because it changes the load distribution and the position of the support.
How MN-243 differs from a leg on a stud or a separate plate
For a furniture leg on a central stud, the main coordinate is often defined by a single point. Plate mounting may allow replacing the plate or choosing a different orientation if the system provides for it. MN-243 works differently:
| Feature | MN-243 | Leg on a central stud | Leg with a separate plate |
| Basic mounting principle | Three countersunk holes in the support itself | One central point or threaded assembly | Several holes in a separate plate |
| Marking error | Affects the position of the entire support | Often associated with one axis | Sometimes compensated by replacing or rotating the plate |
| Template | Need a contour and three centers | Often a center and an axis are sufficient | Need a plate template |
| Orientation | Requires DWG verification | May be axisymmetric | Depends on plate shape |
| Node transfer possibility | Limited by already drilled holes | Sometimes simpler | Depends on plate dimensions |
| Countertop edge control | Along the full support contour | Along the leg axis | Along the plate contour |
This comparison does not mean that one mounting method is always better than another. MN-243 is chosen for its specific geometry and kingpin-free composition. However, its installation requires more disciplined preparation: drawing, template, test setup, and only then series drilling.
Mounting map MN-243: what it should contain
A mounting map is not a drawing of four rectangles at the corners of the tabletop. It is a document that links the geometry of the support to a specific base.
For each position in the map, specify:
-
support number;
-
direct or mirrored orientation;
-
distance from the reference axis to the longitudinal edge;
-
distance from the reference axis to the end face;
-
mounting part contour;
-
centers of three holes;
-
direction to the outer edge;
-
direction to the center of the table;
-
thickness of the tabletop in this area;
-
base material;
-
presence of cutouts, inserts, or ties;
-
type and length of fasteners after approval;
-
DWG version number;
-
template approval date.
For a serial product, additionally specify the tolerance, inspection method, and drilling order. Even for a single table, it is useful to label templates as "front left", "front right", "back left", "back right". Such names reduce the risk of accidental part rotation.
Full-size 1:1 template
The template is not for decoration or as a spare drawing. It transfers DWG data onto the actual countertop. The scale must be checked with a control dimension, otherwise even a correctly printed file may be reduced by the printer driver.
On the template, mark:
-
outer contour of the mounting part;
-
three hole centers;
-
shape or nominal diameter of the countersinks;
-
support axis;
-
countertop edge line;
-
direction to the outer side;
-
inner side;
-
article number;
-
drawing version number;
-
control dimension for checking scale;
-
signature of direct or mirrored variant;
-
approval date.
Paper is suitable for initial fitting, but serial marking is better done with a rigid jig if justified by the number of items. A paper template can stretch, wrinkle, or shift. A rigid template preserves distances between centers, but it should also be checked against the current drawing first.
How to check the scale
Do not rely on the "100%" label in the print dialog. After printing, measure the control segment with a ruler. If it is 100 mm on the drawing, it should also be 100 mm on paper. An error of even a few millimeters can disrupt the alignment of the three holes.
Checking the underside of the tabletop
A tabletop that looks even on the outside is not necessarily uniform underneath. Before marking, the entire mounting area must be examined.
Possible obstacles:
-
end grain glue joint;
-
cross rail;
-
metal tie;
-
embedded plate;
-
technological recess;
-
cable duct;
-
groove for backlighting;
-
hole from temporary fastening;
-
section with reduced thickness;
-
void in lightweight panel;
-
junction zone of several materials;
-
near edge, prone to cracking.
| What is found below | Why this is important | How to proceed |
| Solid wood | Fastener works in wood, but there remains a risk of emerging on the face side | Measure thickness and perform a test joint |
| MDF | Holding depends on density, diameter, and thread depth | Do not automatically transfer recommendations for solid wood |
| Laminated chipboard or chipboard | Edge and loose zones are sensitive to re-drilling | Check distance to edge and fastener type |
| Void | Self-tapping screw may not achieve working engagement length | Move the node only after the design solution |
| Metal insert | Standard drilling may damage the tool or insert | Coordinate the fastening scheme |
| Sampling | Local thickness is less than the overall thickness of the countertop | Measure actual remainder |
| End grain glue joint | Different grain direction affects drilling | Check hole position relative to joint |
| Cable duct | Hole may hit a utility line | Modify project before drilling |
| Old hole | Re-fastening nearby weakens material | Do not consider section equivalent to full base |
It is convenient to compare a detailed general check with the material how to check the compatibility of legs with a tabletop. For MN-243, these rules turn into a specific map of three points and the contour of one model.
Tabletop thickness and fastener length
The base thickness is one of the parameters that cannot be assessed by appearance. A tabletop may have an overall size, for example, along the edge, and a smaller actual thickness in the mounting area due to routing or a lightweight design. Therefore, the exact section where the three fasteners will go is measured.
Fastener selection is based not on the installer's habit, but on the specific joint:
-
measure the actual tabletop thickness in each mounting area;
-
determine the countersink depth in MN-243;
-
clarify the head shape allowed by the hole;
-
calculate the working thread length that enters the base;
-
leave a safe margin to the front surface;
-
take into account the tabletop material;
-
check whether a pilot hole is required;
-
perform a test connection on a similar material.
You cannot simply subtract a few millimeters from the total thickness and declare the result a universal screw length. The head may sit at different depths in the countersink, and the working part of the fastener does not start from the upper plane of the support. In addition, solid wood, MDF, and particleboard hold threads differently.
General principles can be clarified in the material how to choose fasteners based on tabletop thickness. But the final length and diameter for MN-243 should be tied to the actual drawing, the actual base thickness, and the result of the test connection.
Why overly long fasteners are dangerous
The obvious risk is breaking through to the front surface of the tabletop. But this is not the only problem. If the fastener hits a dense insert or the bottom of the recess before the head seats in the countersink, the craftsman may continue tightening and create excessive pressure on the wooden mounting part of the leg. This can result in a dent, crack, or misalignment.
Why too-short fasteners are also unsuitable
A short threaded portion may not provide the necessary engagement. Under lateral load, the joint begins to work in pull-out and loosening. It is especially dangerous to take first-day stability as proof of reliability: a table may stand level without load, but start to move after repeated use.
Pre-drilling and depth stop
A pre-drilled hole reduces the risk of splitting and helps guide the fastener along the axis. But its diameter and depth depend on the material and the chosen fastener. You cannot use one drill bit for all tabletops.
Practical checks include:
-
a test on a scrap of the same material;
-
setting the depth stop;
-
checking the perpendicularity of drilling;
-
removing chips without enlarging the hole;
-
checking the edge and end zones;
-
Same mode for the entire series.
Drilling the underside of the countertop "on the fly" is inconvenient and inaccurate. The part is fixed with its face side on a clean, flat base, protecting the coating and ensuring a stable position. The template must not shift when the drill touches it.
The first support defines the geometry of the entire table
Before marking the four positions, one reference support is selected. Its position is checked especially carefully, because the remaining coordinates will be built from it.
After temporary installation of the first MN-243, evaluate:
-
distance to the longitudinal edge;
-
distance to the end;
-
direction of the support;
-
alignment with the longitudinal axis of the table;
-
position of the outer contour relative to the corner;
-
free leg space;
-
distance to the adjacent support;
-
visual tilt or rotation;
-
possibility of mirror transfer;
-
absence of conflict with ties and other components.
One cannot limit oneself to a top view. The table is placed in the working position and viewed from the end, side, and diagonally. A modern support may have expressive geometry, so a slight rotation is more noticeable than with a simple square leg.
If the first position is approved, its coordinates are fixed numerically. The phrase "approximately 80 mm from the edge" is not suitable for an installation map. It is necessary to specify from which line the dimension is taken: from the edge of the tabletop to the axis, to the outer contour, or to the center of a specific hole.
Direct and mirror orientation
Copying a template and mirroring it are different actions. If the geometry of MN-243 is asymmetric, a simple rotation of the paper template may change the location of holes relative to the outer edge.
Before serial marking, check according to DWG:
-
Is the mounting part symmetrical?
-
Do the holes align when rotated 180 degrees?
-
Is there a distinct outer and inner side?
-
Are the front and rear supports oriented the same way?
-
Is a separate right and left template required?
For clarity, it is useful to draw an arrow "towards the edge of the countertop" and a second arrow "towards the center" on the template. A single label "top" is not enough, because the countertop lies face down during drilling, and the visual direction changes.
How not to confuse templates
Each template gets a position name, not just a number. For example:
-
front left;
-
front right;
-
rear left;
-
rear right.
Before drilling, the installer places the template on the countertop and checks the arrows against the overall diagram. Such simple control is especially important when working with several identical tables.
Edge offsets cannot be assigned based on a photo
The offset from the edge simultaneously affects strength, appearance, and convenience. Too close a position increases the risk of damage to the end zone and makes the leg visually pressed against the corner. Too large an offset reduces the support base, increases the countertop overhang, and may interfere with seating.
To determine the offset, consider:
-
countertop shape;
-
material and thickness;
-
size of the mounting part MN-243;
-
position of the three holes;
-
distance to the end splice;
-
knee clearance;
-
distance between supports;
-
expected lateral load;
-
presence of a hidden frame;
-
table composition.
The minimum value cannot be called universal. It depends on the specific base and mounting scheme. The correct result is recorded on the countertop drawing and checked with a full-size template.
Legroom and seating positions
A frameless design is often chosen for free space under the table. But a wide or inward-facing mounting part can take up more space than it seems from the front photo.
For a dining table, check:
-
distance between the inner contours of the front legs;
-
distance between supports along the long side;
-
position of the seated person relative to the corner;
-
ability to place the chair close to the tabletop;
-
absence of knee contact with the support;
-
space for end seating positions;
-
placement of legs relative to the central axis.
If the table is designed for several chairs along the long side, the layout must account not only for corner symmetry. Sometimes a slight shift of supports improves seating, but any change is checked simultaneously for rigidity and edge clearances.
Is additional rigidity needed for a table without an apron
The phrase "for tables without aprons" describes the purpose of MN-243, but does not replace the calculation of the entire structure. The absence of an apron changes the transfer of lateral forces. The tabletop and mounting points must hold four separate supports in the specified geometry.
Check:
-
length of the tabletop;
-
width;
-
thickness;
-
material;
-
mass;
-
possible deflection;
-
distance between legs;
-
lateral loads;
-
intensity of use;
-
assumed rearrangement of the table;
-
need for hidden ties;
-
possibility of using a frame or other reinforcement.
A heavy stone, massive, or multi-layer tabletop does not become compatible just because it visually matches wooden legs. The load includes not only its own weight, but also people, objects, impacts, movement, and floor misalignment.
The article helps to understand the limits of an individual support when individual legs require additional rigidity. For MN-243, the conclusion is made after evaluating the specific tabletop, not by the general number of "four legs".
Signs that the project needs an additional node
Additional reinforcement is considered when:
-
the tabletop is long and has a noticeable span;
-
the material is prone to deflection;
-
the supports are significantly shifted toward the center;
-
the table is used in a commercial space;
-
frequent lateral loads are expected;
-
the table is regularly moved;
-
the fastening works on a non-uniform base;
-
there is no confirmed rigidity of the apronless scheme.
This does not mean a mandatory open apron. The reinforcement can be hidden, but its geometry must be coordinated with the mounting zone MN-243 and the three holes.
Final table height: why 740 mm is not enough
Height D = 740 mm does not automatically determine the final height of the finished table. The dimension line simultaneously includes A = 764 mm, and the tabletop construction adds its own dimension. First, you need to understand from the DWG which surfaces define A and D.
The working calculation logic is as follows:
final height = support position per drawing + tabletop thickness + additional mounting assembly elements
If the support partially fits into a recess, a shim is used, or a hidden frame is present, simply adding 740 mm and the tabletop thickness will be incorrect. This issue should be resolved before furniture manufacturing, but it should not become the sole topic for choosing MN-243.
How many MN-243 legs to purchase
For a typical rectangular table, four separate supports are often considered, but the card for one leg does not mean a set of four. The quantity is specified in the order.
Four MN-243 units are suitable as an initial scheme if the project confirms:
-
stability;
-
sufficient support base;
-
allowable tabletop span;
-
no need for an intermediate support;
-
possibility of symmetrical or design-based arrangement;
-
compatibility of all four mounting zones.
For non-standard shapes, the quantity may differ. You cannot add a fifth leg only to the geometric center without checking how it affects deflection, seating, and level. The additional support must be included in the calculation and the mounting map.
Ordering the set in one batch
Even when each leg is finished with a covering enamel, it is better to order the set at the same time. This helps to achieve:
-
one wood species;
-
close geometry;
-
identical preparation "Prestige";
-
a single control sample of the coating;
-
agreed marking;
-
identical orientation of parts;
-
a backup support, if provided by the project.
With transparent or tinted finishes, simultaneous ordering is especially important due to differences in wood texture and shade.
Rectangular tabletop: basic scenario
For a rectangular table, it is convenient to set two longitudinal and two transverse control lines. But even here, you cannot simply measure the same distance from all four corners. First, check whether all mounting zones are arranged identically.
Project verification procedure:
-
record the final size of the tabletop;
-
mark the longitudinal and transverse axes;
-
apply possible cutouts and tie-downs;
-
place the contours of four MN-243;
-
check equal edge margins;
-
assess the space for legs;
-
check straight and mirrored templates;
-
approve the centers of holes;
-
perform a test installation of one leg;
-
transfer the coordinates to the remaining positions.
If the tabletop is assembled from several sections, the location of glue seams is also marked on the map.
Round or oval tabletop
On a round tabletop, the concept of "indent from the corner" is absent. The position of the supports is set relative to the center, radial axes, and outer contour.
Check:
-
same installation radius;
-
rotation of each leg relative to the center;
-
position of three holes with radial orientation;
-
sufficient distance to the edge;
-
free space between supports;
-
stability under load on the edge;
-
possibility of placing chairs.
The query "buy legs for a round table" belongs to a broad category, so not every round tabletop automatically fits MN-243. First, build a scale diagram, then check the model on the actual contour.
Large tabletop and long span
For a long table, the main issue may not be the leg attachment, but the sagging of the tabletop between supports. Moving MN-243 closer to the center reduces the cantilever overhang, but shortens the support base along the length. Moving toward the ends increases the span between legs.
The decision is made jointly:
-
based on the tabletop calculation;
-
by the location of seats;
-
by mounting zones;
-
by the need for hidden reinforcement;
-
by the permissible orientation of MN-243.
In such a project, the mounting map becomes part of the general table drawing, rather than a separate sheet only for drilling.
Beech or oak for MN-243
Both wood species are confirmed for the model. The choice of material is linked not to an abstract rating, but to the tabletop finish, the character of the interior, and the method of final treatment.
Beech
Beech is reasonable to consider when:
-
an opaque enamel is planned;
-
the legs must match the color of the painted tabletop;
-
wood texture is not the main visual element;
-
a calm, uniform surface is required;
-
the entire set will be finished with one system.
This does not mean that beech is always used only under enamel. The final finishing method is determined by the project. It is important that the test coating is done on the same wood species and with the same surface preparation.
Oak
Oak is chosen when:
-
the texture must remain readable;
-
oil, stain, clear varnish, or semi-transparent tinting are provided;
-
the legs must match the oak tabletop or other oak elements;
-
the wood grain participates in the composition;
-
the shade of each support is controlled before installation.
With a transparent finish, one cannot expect complete identity of the natural pattern. The task of the set is not to turn the wood into an artificially uniform material, but to select pieces that are perceived as one group.
| Scenario | Beech | Oak |
| White or colored enamel | Often convenient as a base under a covering finish | Possible, but the texture will be hidden |
| Transparent coating | Requires a preliminary sample | Emphasizes the pronounced texture |
| Tinting to match the countertop color | Checked with a test swatch | Checked especially carefully due to the pattern |
| Modern monochrome table | Allows making the legs visually calm | Suitable if a natural texture is needed |
| Table with oak top | Possible painting in a separate color | Allows connecting materials of the same species |
Before ordering, you can order MN-243 in beech or oak, but the decision should be made after approving a sample of the future coating.
What does "Prestige" preparation mean
"Prestige" preparation refers to the quality of wood part processing, but should not be automatically interpreted as a finished topcoat. Before finishing, check the surface, edges, hidden joints, and visible faces of each support.
For the set, it is important:
What to buy and prepare together with MN-243
Purchasing supports is only one line of the project. For a completed table, a tabletop, agreed fasteners, a template, control tools, and, if necessary, hidden reinforcement are required. Links to specific products are placed only where they are confirmed by the SEO scheme; other items are described as project categories without a fictional article number.
| What to add to the project | Why is this needed | What to check | Useful section |
| Tabletop | Forms the base and final size of the table | Material, thickness, internal cutouts, deflection | Verification is performed according to the project |
| Fastening | Connects three concealed holes with the base | Diameter, head, length, working depth | Materials for mounting furniture supports |
| Template 1:1 | Transfers precise coordinates | Scale, DWG version, direct and mirrored variant | Manufactured according to drawing MN-243 |
| Depth stop | Protects the front side of the countertop | Actual thickness at each point | Matches the tool |
| Test sample of material | Allows checking drilling and fastening | Full match with countertop material | Needed before serial marking |
| Hidden tie or frame | Increases rigidity if required by calculation | Conflict with mounting zone of supports | Determined by the project |
| Control sample | Checks the color and behavior of the coating | Same wood species and surface preparation | Performed before finishing the entire batch |
| Mounting map | Fixes the positions of the supports | Axes, indents, orientation, and holes | Appendix to the table project |
For a wide selection, you can open the section buy wooden table legs. It is needed not to replace MN-243 with a random model, but to compare different mounting methods and geometries before the final decision.
How not to confuse MN-243 with similar solutions
With a stud-mounted leg
A stud-mounted leg usually has one main mounting axis. MN-243 uses three countersunk holes. The templates and marking order are not interchangeable.
With a leg on a separate metal plate
A separate plate has its own outline and hole pattern. For MN-243, the mounting holes are in the leg itself. You cannot order a universal plate expecting it to automatically become part of the standard assembly.
With a ready-made frame or underframe
The underframe connects the legs into a common structure. MN-243 is a separate leg for a trestle-free design. The rigidity of the finished table depends on the tabletop, the fastening, and any hidden elements.
With a decorative overlay leg
MN-243 participates in supporting the table, not just covering a corner. It cannot be mounted as a decorative piece without checking the load and the base.
With any leg about 740 mm high
The same vertical size does not mean the same mounting geometry. Another model will have different holes, outline, orientation, and edge offset requirements.
The overall choice of shapes and purposes reveals the material choose wooden table legs by shape and purposeIn the article on MN-243, the focus remains on the specific three-point mounting.
Practical selection for different situations
New solid wood dining table
First, the thickness and direction of the tabletop lamellas are determined. Then adhesive joints are applied and it is checked whether the three holes fall into a problem area. For an oak tabletop, MN-243 in oak can be considered, but the shade and texture are agreed upon with a sample.
MDF tabletop under enamel
The main question is not only color. It is necessary to check how the chosen fastener works in the specific MDF, what engagement depth it provides, and whether the holes are located too close to the edge. Beech may be convenient for covering enamel if the entire set is painted with one system.
Retrofitting an existing tabletop
Old holes, inserts, and traces of the previous underframe may remain on the underside. The mounting map is built anew. Old points cannot be used just because they already exist.
Long work table
Deflection and lateral rigidity are checked. Four MN-243 units may require hidden reinforcement. It is also important to preserve space for several seating positions.
Table for a cafe, office, or meeting room
Intensity of use increases the value of lateral loads. The decision on a tsarga-free scheme is made after a structural check. The finish is selected considering frequent maintenance, but a specific coating is not assigned without a project.
Round table
A radial scheme is built, checking the identical rotation of all supports and stability under load on the edge. A rectangular corner template is not suitable here.
A small table with a minimalist tabletop
Even if the load seems small, the thickness of the base and the actual working length of the fasteners are checked. A thin tabletop may be more complex to install than a heavy thick part.
When MN-243 is suitable, and when it is better to choose another solution
MN-243 is suitable when the buyer needs a modern table on separate wooden supports without a visible tsarga, and the project allows precise marking of three attachment points and confirmation of base rigidity.
It is worth considering the model if:
-
a specific modern geometry is needed;
-
the tabletop is designed simultaneously with the supports;
-
an up-to-date DWG is available;
-
It is possible to make a 1:1 template;
-
The base material allows for reliable fastening;
-
The frameless scheme is confirmed by calculation;
-
A choice between beech and oak is required;
-
The set will be finished in one batch.
It is better to choose a different system if:
-
The tabletop is too thin for the agreed fasteners;
-
The underside contains voids at the required points;
-
The project requires a ready-made rigid underframe;
-
There is no possibility to perform precise marking;
-
Installation is planned based on a photo;
-
A very heavy or long countertop without calculation is expected;
-
A quick-release universal plate is needed;
-
The structure must be disassembled multiple times without assessing the condition of the holes.
Order sheet MN-243
Before contacting the manager, it is useful to prepare a table. It does not replace a drawing, but reduces the risk of an incomplete request.
| Field | What to specify |
| Article number | MN-243 |
| Full dimension line | 764 × 240 × 45 × 740 mm |
| Material | Beech or oak |
| Preparation | «Prestige» |
| Quantity | As per project |
| DWG version | File number or date |
| Tabletop size | Length × width × actual thickness |
| Tabletop material | Solid wood, MDF, chipboard, or another confirmed base |
| Mounting positions | Diagram with axes and offsets |
| Orientation | Direct/mirrored for each position |
| Fastening | Coordinate diameter, head, and length |
| Finishing | Specify the design variant |
| Trial installation | Provide before drilling the entire batch |
| Additional rigidity | Specify frame, ties, or absence after calculation |
A ready-made request formulation might look like this:
Application template: Furniture legs MN-243 are required for a trestle table. Dimension line 764 × 240 × 45 × 740 mm. Material — ____. Quantity — ____ pcs. Tabletop: ____ × ____ × ____ mm, material ____. I attach the current DWG, the support layout diagram, and the template for three holes. Please check the compatibility of the mounting scheme, the orientation of the supports, and the fastener requirements.
Main mistakes when ordering and installing
Order only by height 740 mm
The card also has A = 764 mm. Without a drawing, it is impossible to understand how these parameters participate in the overall geometry.
Drill according to the photo
The photo does not provide the coordinates of the centers, the hole diameter, or the countersink shape. Even a high-quality image distorts the scale with perspective.
Use the support as a template without control
Attaching a real leg to the tabletop can be used to check the contour, but transferring holes with one support for the entire series is risky. The part may shift, and the drill may damage the countersink. A verified template or jig is needed.
Confuse the mirror orientation
Externally, the table may seem symmetrical, but the holes and the shape of the support may require separate right and left templates.
Cannot measure local thickness
Overall edge thickness does not guarantee the same thickness over each hole.
Using a screw that is too long
It may come out on the face side or create pressure before the head seats in the countersink.
Using fasteners that are too short
Insufficient working thread length increases the risk of loosening.
Hitting a void or cutout
A point on the plan may turn out to be unsuitable after inspecting the actual countertop.
First drill all positions
It is better to install one reference leg, check the geometry, and only then transfer the template.
Considering a legless table automatically rigid
Assigning a support does not replace the calculation of a specific tabletop and lateral loads.
Buying legs at different times
Different batches are harder to match in texture, preparation, and finish.
How to buy MN-243 on STAVROS
The buyer's journey starts with the product card. In it, you need to open the drawing of the MN-243 support, check the dimension line, material, and current conditions.
Then:
-
compare the DWG with the tabletop drawing;
-
determine the quantity;
-
choose beech or oak;
-
prepare a scheme of direct and mirrored positions;
-
agree on fasteners;
-
check the need for reinforcement;
-
perform test marking;
For a complex project, you can check the placement of MN-243 according to the tabletop drawing. Such a check is especially useful for a round, long, or composite table, where the position of supports affects not only the appearance but also the seating, span, and rigidity.
Serial marking of several tables
When MN-243 is used not for a single table but for a furniture series, the accuracy of the first mounting template becomes especially important. A small error, repeated on ten tabletops, turns into a systemic defect of the entire batch. Therefore, serial work begins not with speeding up drilling, but with approving the reference standard.
The reference kit includes:
-
current DWG of the support;
-
approved drawing of the tabletop;
-
rigid drilling jig;
-
straight and mirrored versions of the template;
-
one control tabletop;
-
four marked MN-243;
-
agreed fasteners;
-
hole inspection card;
-
finish sample;
-
a photo of a correctly assembled unit.
The first table is assembled completely and checked before starting the remaining parts. If the geometry, fit, edge offsets, and stability are confirmed, it is used as a control sample. But even after this, one cannot assume that every subsequent tabletop is automatically identical. The actual thickness is measured, the position of internal cutouts is checked, and the condition of the material is verified.
What to check on each tabletop
For each part, the following is recorded:
-
length and width after finishing;
-
thickness in four mounting zones;
-
position of technological grooves;
-
absence of defects near holes;
-
orientation of the face and bottom side;
-
number of the direct or mirrored template;
-
pre-drilling depth;
-
result of control measurement between centers;
-
performer's signature;
-
operation date.
Such a log seems redundant only until the first mistake. If one support is installed with a skew, the records help understand whether the template was shifted, the drilling depth was changed, or a different version of the drawing was used.
Why you cannot constantly mark from the previous part
Chain transfer accumulates error. If the second tabletop is marked from the first, the third from the second, and the fourth from the third, each small mistake becomes a new starting point. All parts must be marked from a single reference jig and the same control axes.
Disassembly and reassembly of the table
A table without a tsarga sometimes has to be disassembled for transport. This does not mean that fasteners can be repeatedly unscrewed and returned without assessing the holes. A wooden or board base may lose holding capacity after repeated cycles.
Before disassembly, each support is marked according to the mounting map. The front left and rear right legs cannot be swapped, even if they look the same. The actual holes and minor fit features are already associated with a specific position.
After removing MN-243, check:
-
condition of threaded channels in the tabletop;
-
absence of chips around the entry;
-
integrity of countersinks in the support;
-
condition of fastener heads;
-
absence of deformation of the mounting surface;
-
preservation of the finish;
-
compliance of the support with its marking.
If the fastener no longer holds as well as during the first assembly, this cannot be compensated by excessive tightening or a longer screw without verification. Changing the diameter, length, or type of fastening alters the joint and requires a separate decision.
During transportation, legs are packed so that mounting parts do not hit each other. Countersunk holes and edges are protected from damage, and the fastener kit is stored separately with marking. The mounting card is attached to the furniture; otherwise, at a new location, the assembler will again have to determine orientation by appearance.
Care without interfering with the fastening unit
Daily care for wooden legs depends on the chosen finish. However, regardless of the finish, prolonged moisture in the area adjacent to the tabletop must not be allowed. Water and cleaning agents must not seep into hidden areas or between the mounting surface and the base.
If wobbling appears over time, first check the floor level, the condition of the tabletop, and all four joints. Do not tighten only one visible leg without comparing the others. Uneven tightening can alter the table's geometry.
Periodic inspection includes:
-
position of each MN-243;
-
absence of a gap at the tabletop;
-
condition of the coating near the mounting;
-
absence of cracks;
-
stability under a light lateral check;
-
condition of the hidden frame or ties;
-
absence of tabletop deformation.
Thus, MN-243 remains not just a decorative support, but a controlled part of the furniture structure throughout its entire service life.
Acceptance of the kit before drilling the tabletop
The tabletop cannot be drilled immediately after receiving the box with supports. First, the entire MN-243 kit is accepted and it is verified that the actual parts match the project. This check is especially important because the mounting map is built for a specific geometry, not for a conditional leg of similar shape.
During acceptance, the following are checked sequentially:
-
number of supports;
-
article number on documents and markings;
-
selected wood species;
-
preparation of "Prestige";
-
absence of transport damage;
-
condition of mounting surfaces;
-
cleanliness of the three countersunk holes;
-
coincidence of the overall geometry of the parts;
-
conformity to the current drawing;
-
the ability to distribute supports across straight and mirrored positions.
It is useful to place four legs side by side on a flat surface and compare the mounting parts. This does not replace measurement control, but helps to notice an accidentally mixed-up model, a damaged edge, or a difference in orientation. Then each support receives its own number, matching the mounting map.
If a transparent finish is planned, the set is also reviewed by wood grain pattern. Supports can be distributed so that the closest in tone parts work as a pair on one visible side of the table. With an opaque enamel, this criterion is less noticeable, but uniform surface preparation still remains important.
Any discrepancy is clarified before drilling. After the tabletop has received three holes for a specific position of MN-243, changing the article or mounting scheme becomes significantly more difficult.
Trial assembly without final tightening
Trial assembly is needed not only to check whether the holes match. It shows how four separate supports work as a single system.
The table is assembled on a clean surface, without bringing the fasteners to final tightening. After installing all legs, check the diagonals, position relative to the edges, uniformity of orientation, and contact of mounting surfaces with the tabletop. Then the structure is carefully moved to the working position.
At this stage, evaluate:
-
whether the table stands on all supports on a flat surface;
-
is there any noticeable skew of one leg;
-
do the gaps from the corners look the same;
-
is space for knees preserved;
-
does the direction of the supports match the drawing;
-
does wobbling appear under light lateral force;
-
is adjustment of hidden reinforcement required;
-
is the fastener accessible for subsequent final assembly.
Trial assembly is not a test of ultimate load. Do not place heavy objects on the table until the joint is approved and the fasteners are tightened according to the accepted technique. Its purpose is to find a geometric error at a stage when work can still be stopped and the design checked.
After disassembly, inspect the holes. If the material crumbles, the fastener goes in at an angle, or the head does not seat in the countersink, the problem cannot be masked by additional tightening. The pre-drill diameter, head shape, and fastener compatibility with the base material should be clarified.
Control after final installation
After coating application and final assembly, the geometric check is repeated. The finish layer must not interfere with the tight fit of the mounting part, and excess material must not fill the recesses.
Inspection includes:
-
visual inspection of each support;
-
comparison of edge offsets;
-
check of contact with the tabletop;
-
inspection of fastener heads;
-
assessment of stability on a level floor;
-
re-check of diagonals;
-
control of hidden reinforcement, if provided;
-
recording of the final scheme for subsequent maintenance.
The mounting card and DWG version are saved together with the furniture documents. If the table is later disassembled, this data helps return each MN-243 to its original position rather than reassembling the structure by trial and error.
FAQ: questions about MN-243
For which furniture is MN-243 intended?
The model is positioned as a furniture support for a table without an underframe. Applicability to a specific tabletop is confirmed by the project, because the length, material, mass, and lateral loads differ.
What size does MN-243 have?
The confirmed line is 764 × 240 × 45 × 740 mm, corresponding to parameters A, B, C, and D. The purpose of each size is checked against the current DWG.
Why are both 764 and 740 mm indicated?
These are two different parameters A and D. They should not be considered an error or two height options. You need to look at the position of the dimension arrows on the drawing.
How is MN-243 attached?
The support is attached through three countersunk holes in its own mounting part directly to the underside of the tabletop.
Is a separate mounting plate included?
In the confirmed scheme, the main attachment is made through the holes of the support itself. The universal plate should not be considered part of the kit without separate confirmation.
Where are the three holes?
Their coordinates must be taken from drawing MN-243. Centers cannot be determined from a photo or the overall size of 240 mm.
Can the holes be marked directly on the leg itself?
The actual support can be used for a trial fit, but for serial marking it is safer to use a verified 1:1 template or a rigid jig.
Why is a 1:1 template needed?
It transfers the contour of the mounting part, the axis, and the three hole centers onto the tabletop without approximate measurements. It also marks the direction to the edge and the DWG version.
How to choose the screw length?
Measure the actual thickness of the tabletop, take into account the depth of the countersink, the base material, and the required working thread length. There is no universal size without this data.
Can MN-243 be installed on MDF?
The source confirms the support, but not the universal suitability of any MDF. You need to check the density, thickness, hole placement, and fasteners on a similar material.
Will MN-243 fit a solid wood tabletop?
It depends on thickness, glue joints, grain direction, edge clearances, and weight. Solid wood does not eliminate the need for test drilling.
Is an apron needed?
The model is designed for an apronless table. However, a specific project may require hidden ties, a frame, or other reinforcement if dictated by stiffness calculations.
How many MN-243 units should I order?
The quantity is determined by the design. For a typical rectangular table, four supports are often considered, but one product card does not mean a set of four.
Will MN-243 fit a heavy tabletop?
Without data on weight, size, material, and reinforcement scheme, this cannot be stated. The entire assembly needs to be checked, and hidden rigidity added if necessary.
Can MN-243 be used for a round table?
This is only possible in design after radial layout, checking support orientation, edge clearance, stability, and chair placement.
What to choose: beech or oak?
Beech is often considered under an opaque enamel, oak — under a transparent or tinted finish. The final decision is made based on the sample and the combination with the tabletop.
What does the "Prestige" preparation mean?
This is a confirmed surface preparation option. It should not automatically be considered a ready-made topcoat.
When should the legs be painted?
First, it is useful to do a dry fit and a test connection. After checking, the parts are removed, marked, finished in one batch, and then installed in a final manner.
Do I need to order a spare leg?
For a single table, the need for a reserve is determined by the project. For a series or a complex specially mixed finish, a reserve may be useful, but the quantity is specified deliberately.
Where can I see the price and current parameters of MN-243?
They are checked in the product card before ordering. Price, availability, and conditions may change, so they are not fixed as a number in the article.
Conclusion
MN-243 cannot be selected and installed as an abstract leg with a height of 740 mm. It is a specific wooden support for a table without aprons with a dimensional line of 764 × 240 × 45 × 740 mm and three hidden holes in the mounting part. Its main advantage is revealed only with precise project preparation.
A reliable route looks like this: get the current DWG, understand parameters A–D, build the support contour, transfer the three centers to a 1:1 template, check the tabletop, choose the fasteners, install the first control leg, and only then drill the remaining positions.
Before order MN-243 in beech or oakIt is worth approving not only the color and quantity, but also the entire mounting map. This approach helps preserve the tabletop, maintain equal indents, provide legroom, and know in advance whether a frame-less structure needs additional rigidity. In this route, STAVROS acts not just as a point of purchase for a single part, but as a source of a specific model, drawing, and related sections for preparing a complete furniture project.