Article Contents:
- Wooden cornice KZ-004 60×60 mm: what is confirmed by the current product card
- KZ-004 made of MDF 60×60×2600 mm
- Beech KZ-004 60×60×2400 mm
- Oak KZ-004 60×60×2400 mm
- Why 60×60 mm is convenient to apply to the working section
- Scheme A. KZ-004 runs continuously above the entire kitchen
- Scheme B. KZ-004 ends at the side panel of the kitchen
- Scheme C. Ceiling KZ-004 transitions into furniture top
- Why the final cabinet height depends on the chosen scheme
- Do not automatically count 60 mm as a "gap to the ceiling"
- KZ-004 and kitchen furniture cornice: one visual line does not necessarily mean one product
- Same color, different profiles
- One profile on wall and furniture
- Why the same RAL does not guarantee visual matching
- When oak is especially appropriate
- When oak under opaque enamel requires separate justification
- Termination along the outer plane of the side panel
- Termination before the decorative side panel
- Termination after the tall pantry cabinet
- Termination at the portal
- Why you cannot leave the end without a design solution
- Layout A — continuous KZ‑004
- Layout B — KZ‑004 stops at the kitchen
- Layout C — ceiling profile and furniture top are counted separately
- Full perimeter 18,600 mm: how many KZ-004 pieces are needed in MDF 2600 mm
- Full perimeter 18,600 mm: how many KZ-004 pieces are needed in oak or beech 2400 mm
- Why less waste does not automatically mean the best option
- If KZ-004 stops at the kitchen: calculation of only three free walls
- MDF 2600 mm
- Beech/oak 2400 mm
- What changed compared to the continuous layout
- Scheme A — full perimeter, MDF
- Scheme B — cornice without kitchen wall, MDF
- Scheme A — full perimeter, beech
- Scheme B — without kitchen wall, beech
- Scheme A — full perimeter, oak
- Scheme B — without kitchen wall, oak
- KZ-004 price: comparing a ready-made system, not a single plank
- Why furniture integration can be more expensive than a continuous ceiling line
- Wall 5200 mm and MDF
- Wall 5200 mm and solid wood
- Why you cannot optimize only waste
- When it is better to make a separate furniture base
- When it is better to leave KZ-004 exclusively on the wall
- Facades open upward: KZ-004 must not fall into the trajectory
- Blind decorative top
- Lift-up facade
- Hood, air duct, and tall tall cabinet: the technical zone can break the cornice before the furniture
- Exhaust duct to ceiling
- Tall cabinet to ceiling
- Service panel above refrigerator
- Uneven ceiling and kitchen to ceiling: square 60×60 mm do not hide any geometry
- If the ceiling is lower on one edge
- If KZ‑004 must run strictly horizontally
- If the kitchen has a decorative side panel: the end point of KZ-004 must coincide with its actual plane
- Both arms to ceiling
- One arm is tall, the second is lower
- The corner is open to the living room
- If the kitchen is built between two walls: KZ-004 can end symmetrically
- Advantage
- Risk
- If the kitchen adjoins only on one side: one open end of KZ-004 becomes the main one
- When it is easier to continue over the entire wall
- When the break looks natural
- When you do not need to buy KZ-004 above the kitchen
- When is KZ-004 better to continue above the kitchen
- When is furniture integration of KZ-004 justified
- Reserve KZ-004: a separate strip is not always needed
- MDF full perimeter
- Solid wood full perimeter
- When a separate reserve is useful
- Cabinets are only approved but not yet cut
- Cabinets are already manufactured, facades are not yet
- The kitchen is already assembled in the workshop
- The kitchen is already installed at the site
- Why "sawing the cabinet from the top by 60 mm" is a bad universal idea
- Full-size mockup 60×60 mm: how to choose between schemes A, B, and C before purchasing KZ-004
- Test of scheme A — continuous above the kitchen
- Test of scheme B — stop at the side panel
- If a technical gap remains above the kitchen: KZ-004 may be visible but not furniture-related
- If the top of the kitchen has its own lighting: two horizontal accents may compete
- Mistake 1. Calculating the full perimeter before approving the kitchen
- Error 2. Decide the final KZ-004 on-site for the installer
- Error 3. Consider 60 mm as a simple gap between the cabinet and the ceiling
- Error 4. Call the ceiling KZ-004 a ready-made furniture cornice
- Error 5. Not checking the trajectory of the lift-up fronts
- Error 6. Not accounting for the ventilation or service duct
- Error 7. Comparing only the total length
- Error 8. Placing a short 400-millimeter solid wood filler in the center of the kitchen
- Error 9. Painting the kitchen and KZ-004 independently
- Error 10. Ordering oak just because it is "more expensive and natural"
- Error 11. Not checking the ceiling unevenness
- Error 12. Forget about two end points on a partially occupied wall
- Error 13. Not recalculating the package after changing the quantity
- Error 14. Using an old cutting map after switching from MDF to oak
- Error 15. Not fixing the scheme in the furniture drawing
- Wooden trim products in the kitchen-living room: KZ-004 should not live separately from the rest of the decor
- What is the size of KZ-004?
- Can KZ-004 be run above the kitchen cabinets?
- Is it mandatory to stop KZ-004 at the furniture?
- Can KZ-004 be used directly as a curtain rod for furniture?
- What should be designed first — the top of the kitchen or the ceiling cornice?
- Is it necessary to leave exactly 60 mm between the cabinet and the ceiling?
- Can cabinets be installed almost flush against KZ-004?
- Where is the best place to end KZ-004 if it does not run above the kitchen?
- Where is the best place to position the straight joint above the kitchen?
- How many KZ-004 units are needed for a room of 5200×4100 mm?
- Why do MDF and oak give the same quantity but different joints?
- Which material to choose for enamel?
- When is an oak KZ-004 appropriate?
- Can KZ-004 and the kitchen be painted the same color?
- Do I need to buy a spare plank?
- What to do if the ceiling is uneven?
- Where can I find general information about curtain rods for furniture?
- Where can I see the current price of KZ-004?
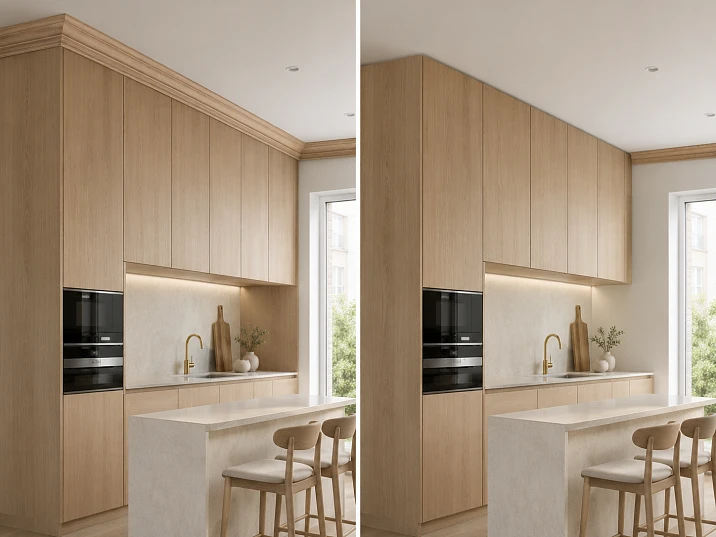
The kitchen-living room is designed as a single space. Along the free walls, KZ-004 with a square cross-section of 60×60 mm has already been selected. The upper cabinets of the kitchen set should reach almost to the ceiling, and this is where a fork appears that is better resolved before furniture production and before purchasing the linear profiles: does the ceiling cornice KZ-004 run continuously above the kitchen, end at the furniture side panel, or become part of a specially designed furniture top?
There is no universally correct layout. If the kitchen should visually blend into the room's architecture, a continuous ceiling line often looks logical. If the set is perceived as a built-in block from floor to ceiling, stopping KZ-004 at the side panel may be cleaner. The option where the ceiling KZ-004 is physically installed on the furniture requires separate coordination with the furniture maker and the profile manufacturer: the product card confirms the ceiling cornice but does not grant the right to consider it a ready-made structural furniture element for any cabinet.
Therefore, first choose the ending layout, then fix the height of the upper cabinets, the facade overhang, and the joint points, and only then calculate the required length. If you simply measure the full perimeter of the room before coordinating the kitchen, you might buy several meters of KZ-004 that later turn out to be hidden behind the cabinets or, conversely, underbuy the section above the set.
After coordinating the joint, you can buy wooden cornice KZ-004 already in a specific material and quantity. Below are three working schemes, an example calculation for each, and a list of questions to be resolved with the cabinetmaker before starting the kitchen.
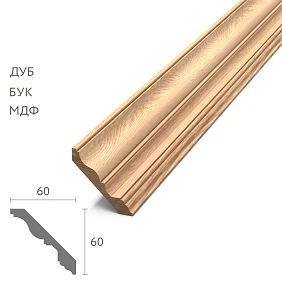
Wooden cornice KZ-004 60×60 mm: what is confirmed by the current product card
KZ-004 has a square cross-section of 60×60 mm in all current versions. The standard length differs: MDF — 2600 mm, beech and oak — 2400 mm. At the time of checking, the product card shows the following options.
| KZ‑004 execution | Dimension A×C×L | Price at the time of check | Availability at the time of check |
|---|---|---|---|
| MDF | 60×60×2600 mm | 1 530 ₽ | St. Petersburg — 24 pcs. |
| Beech | 60×60×2400 mm | 4 580 ₽ | St. Petersburg — 60 pcs. |
| Oak | 60×60×2400 mm | 6 630 ₽ | St. Petersburg — 46 pcs. |
For MDF, the product card shows the sanding quality "Prestige" and the lamination "Under enamel". The manufacturer adds a rigid packaging frame to the order at a cost of 390 ₽; for solid wood products, the card specifies a standard of up to two pieces per frame, while MDF is always packed due to transportation in a horizontal position. The average production time for out-of-stock items is 5–10 days. Prices and stock change, so they need to be rechecked before issuing an invoice.




KZ-004 made of MDF 60×60×2600 mm
This option is naturally considered for a kitchen where the ceiling molding should be painted in a solid color. The length of 2600 mm sometimes allows reducing the number of direct joints on a long kitchen wall.
Our factory also produces:
Beech KZ-004 60×60×2400 mm
Beech retains the same square cross-section, but the standard plank is 200 mm shorter. If the profile remains with visible wood texture, it is better to coordinate the color and finish with a physical sample in the same field as the kitchen fronts.
Get Consultation
Oak KZ-004 60×60×2400 mm
Oak suits projects where the upper wooden line needs to connect with oak fronts, doors, panels, or countertops. If the entire kitchen is covered with dense enamel and natural wood is hidden, the need for expensive oak must be separately justified.
Why 60×60 mm is convenient to apply to a working section
The square cross-section is easy to read in CAD and in section: 60 mm along the wall and 60 mm down from the ceiling area. But geometric simplicity does not mean automatic compatibility with furniture. The cabinet body, front, top cover, and mounting rail have their own dimensions, so the actual joint is still designed.
Kitchen up to the ceiling and KZ-004: first, choose one of three principal schemes
Before calculating the quantity, an architectural decision must be made. A kitchen that occupies one wall almost up to the ceiling has three logical scenarios.
Scheme A. KZ-004 runs continuously above the entire kitchen
The ceiling cornice maintains a single line of the room. It runs along free walls, then above the kitchen unit, and continues further. The kitchen is visually "under" the architectural cornice of the room.
This scheme is especially convincing if:
- the kitchen and living room should read as a single architectural shell;
- color KZ-004 matches the ceiling or the overall trim;
- the top of the furniture does not conflict with the 60-millimeter profile;
- behind the cornice there remains a full base for installation;
- cabinets do not block access to the fastening zone.
Scheme B. KZ-004 ends at the side of the kitchen
The kitchen is perceived as a standalone built-in volume. The ceiling line approaches the outer side, where it receives a deliberate ending and does not pass over the cabinets. On the opposite side of the kitchen, the profile either reappears, or the entire furniture block becomes a natural break in the perimeter.
This option is often more logical if the upper cabinets truly reach the ceiling and there is no space above them. There is no point in buying and hiding 60×60 mm of trim behind a closed furniture box just for the sake of an abstract "continuous perimeter."
Scheme C. Ceiling KZ-004 transitions into the furniture top
The most complex option. The visible line of KZ-004 must align with the crowning part of the cabinet set, or the profile itself is intended to be mounted directly on the furniture. Here, one cannot limit oneself to an interior facade. A separate furniture cross-section, mounting, rear geometry, allowable overhang beyond the facade, and coordination with the cabinetmaker are required.
Important: KZ-004 in the product card is a ceiling cornice. The article does not claim that it can be used without additional verification as a load-bearing or structural furniture cornice on any cabinet.
Ceiling KZ-004 above upper cabinets: what dimensions the cabinetmaker needs
The phrase "there will be a 60 mm cornice on top" is too imprecise. The cabinetmaker needs a cross-section of the entire upper zone.
It shows:
- finished ceiling level;
- actual wall;
- the top cover of the housing;
- facade;
- external side panel;
- KZ‑004 60×60 mm;
- its position relative to the facade;
- installation area;
- gap between the furniture and the ceiling, if provided;
- lighting or cable, if present;
- decorative strip/cornice of the kitchen.
Why the final cabinet height depends on the selected scheme
If KZ‑004 runs along the wall above the furniture, the cabinet body can end lower and not touch the profile. If the cornice is to become the visible top of the kitchen, the furniture body and mounting strip are adjusted to its actual geometry. If the profile stops at the side panel, the cabinet height can generally be determined independently of it.
Do not automatically treat 60 mm as a "gap to the ceiling"
KZ‑004 has a cross-section of 60×60 mm, but this does not mean the cabinet should simply be made 60 mm lower than the ceiling. The profile can be positioned on the wall, partially overlap the decorative frieze, or protrude relative to the cabinet body. A specific joint detail is needed, not arithmetic subtraction.
Material, furniture top, and finish of KZ-004
KZ-004 and the kitchen furniture cornice: one visual line does not necessarily mean one single product
In classic and neoclassical kitchens, the top of the cabinet set often has its own crowning element. It can be related to the ceiling KZ‑004 in color and scale, but physically remain a separate furniture piece.
Five things need to be decided:
- should the ceiling and furniture cornices match in color;
- should their bottom edge align;
- is it necessary to repeat the same profile;
- what overhang over the facade is acceptable;
- should the two lines be physically connected or only visually.
If a broader context on furniture is required, the existing article furniture cornices and moldings examines the overall system of furniture and architectural profiles. We do not repeat it here: the question has already narrowed down to the specific KZ‑004 and a kitchen that breaks the ceiling perimeter.
Same color, different profiles
A working option for modern classic: the ceiling KZ‑004 60×60 mm preserves the architectural line of the room, while the kitchen gets a more compact furniture top in the same enamel. The eye reads the kinship through color and height, but the structures are independent.
One profile on the wall and furniture
Possible only after checking the attachment of KZ‑004 directly to the furniture top. It cannot be assigned automatically because the product card does not describe a universal mounting system for a kitchen cabinet.
KZ-004 made of MDF 60×60×2600 mm: when enamel helps unite the kitchen and ceiling
For a white or colored kitchen, it makes sense to consider KZ-004 made of MDF 60×60×2600 mm, if the entire top line should be perceived as a painted architectural detail.
The advantage here is not that MDF is 'better than wood,' but in the controlled opaque finish and the 2600 mm length. If the kitchen and ceiling cornice are painted in one color, you still need to separately coordinate:
- the exact color code;
- gloss level;
- the primer and painting system;
- the color of furniture fronts;
- the finish of adjacent moldings;
- the appearance of fresh cut edges after cutting.
Why the same RAL does not guarantee visual matching
One color on a smooth furniture facade and on a profiled KZ-004 is perceived differently due to light and shadow. The difference in gloss can also be more noticeable than a slight shade difference. Therefore, the final sample is viewed under kitchen lighting.
Oak KZ-004 60×60×2400 mm: when a natural line above the kitchen looks intentional
If the kitchen is built around natural wood, oak KZ-004 60×60×2400 mm can connect the ceiling with oak doors, panels, table, or facades. In this case, the profile becomes an independent material line, not just a white ceiling finish.
When oak is especially appropriate
- upper facades have natural oak or veneer in a similar range;
- there are oak trims and moldings nearby;
- the ceiling line should contrast with the painted wall;
- transparent/tinted finish is approved with a physical sample.
When oak under opaque enamel requires separate justification
If all wood grain will be hidden, the more expensive solid wood is not purchased for its visible pattern. This may be a deliberate project requirement, but it should not happen out of inertia.
STAVROS materials and quality: finish KZ-004 is to be approved before kitchen production
Before painting or tinting, it is useful to cross-check STAVROS materials and quality. On the MDF card KZ‑004 is listed as "Prestige / Under enamel"; for solid wood, parameters of the specific batch and finish need to be agreed upon for the desired visual result.
This is important precisely before kitchen production. If facades are already painted in a complex shade and sample KZ‑004 is not yet approved, achieving identical perception after installation is more difficult.
If KZ-004 ends at the kitchen: where exactly to make the termination
The decision "not to run the cornice above the cabinets" still requires a precise termination point. The phrase "end at the kitchen" leaves too much freedom to the installer.
Termination along the outer plane of the side panel
The most readable boundary. The ceiling cornice approaches the vertical plane of the unit and ends on its axis. The kitchen is perceived as a separate built-in block.
Ending before a decorative side panel
If the furniture side panel protrudes and has its own top profile, KZ-004 can be ended earlier so the two parts do not collide. The exact distance is determined by the working cut.
Ending after a tall cabinet
If the kitchen edge forms a tall refrigerator/oven cabinet, the ceiling profile can run over it or stop before the cabinet body. The decision depends on whether the cabinet reads as part of the wall or as separate furniture.
Ending at a portal
Sometimes the kitchen is enclosed between decorative pilasters, trims, or wall panels. Then KZ-004 can be finished at the architectural portal, which looks more convincing than an abrupt break in the middle of a free wall.
Why you cannot leave the end without a design solution
The visible end of the profile must be neatly finished and aligned with the geometry of KZ-004. If the decorative end remains visible, its finish and position matter no less than a direct joint.
Kitchen occupies the entire wall: do you need to buy KZ-004 behind cabinets if it is not visible
There is no automatic reason to cover the ceiling perimeter with a hidden profile if the furniture completely covers the area and KZ-004 is not involved in either the visible line or the structural joint. In such a situation, the purchase may be a pure overspend.
But there are exceptions:
- part of the cornice will be visible above the low section of the kitchen;
- the cabinet set may be dismantled in the future, but the architectural line must remain;
- the profile is part of the approved building structure;
- an open technical gap remains above the cabinets;
- the cornice runs in front of the furniture, not behind it.
So the solution depends on the actual cross-section. The rule "the cornice must always run along the full perimeter" does not apply here.
Example of a kitchen-living room 5200×4100 mm: three schemes give different lengths KZ-004
Let's take a rectangular kitchen-living room 5200×4100 mm. One long wall of 5200 mm is fully occupied by the kitchen cabinet set. The other three walls are free. In the calculation, we do not account for door openings or other gaps — this is a deliberately simplified model for comparing three architectural schemes.
Full ceiling perimeter:
5200 + 4100 + 5200 + 4100 = 18,600 mm.
Perimeter without kitchen wall:
4100 + 5200 + 4100 = 13,400 mm.
Scheme A — continuous KZ‑004
Material is purchased for all 18,600 mm.
Scheme B — KZ‑004 stops at the kitchen
Only 13,400 mm is purchased for three free walls. 5,200 mm of visible/invisible profile is saved depending on the project.
Scheme C — ceiling profile and furniture top are calculated separately
Architectural KZ‑004 on free walls remains 13,400 mm. The kitchen wall receives a separate furniture specification up to 5,200 mm long, but it should not automatically be included in the KZ‑004 order until the furniture maker confirms the physical use of this profile.
Full perimeter 18,600 mm: how many KZ-004 pieces are needed in MDF 2600 mm
Mathematical minimum:
18,600 ÷ 2600 ≈ 7.15 → minimum 8 planks.
In a rectangular room 5200×4100 mm, the cutting layout becomes especially clear.
| Wall | MDF layout 2600 mm | Direct joints |
|---|---|---|
| 5200 мм | 2600 + 2600 | 1 |
| 4100 мм | 2600 + 1500 | 1 |
| 5200 мм | 2600 + 2600 | 1 |
| 4100 мм | 2600 + 1500 | 1 |
For two walls of 4100 mm each, two separate extensions of 1500 mm are needed. They cannot be obtained from one 2600 mm plank, because 1500+1500=3000 mm. Therefore, eight whole planks are not only a mathematical but also a practical minimum for this simple map.
Nominal purchase footage:
8 × 2600 = 20,800 mm.
Nominal remainder:
20,800 − 18,600 = 2200 mm.
It actually arises as two separate remnants of about 1100 mm each after the 1500 mm extensions. These pieces may be useful for short returns, but they are not a single 2200 mm part.
Full perimeter 18,600 mm: how many KZ-004 in oak or beech 2400 mm
Mathematical minimum:
18,600 ÷ 2400 = 7.75 → minimum 8 planks.
In this example, the number of whole planks matches the MDF, but the joint map is different.
| Wall | Layout 2400 mm | Direct joints |
|---|---|---|
| 5200 мм | 2400 + 2400 + 400 | 2 |
| 4100 мм | 2400 + 1700 | 1 |
| 5200 мм | 2400 + 2400 + 400 | 2 |
| 4100 мм | 2400 + 1700 | 1 |
Six full 2400-mm pieces go to the long sections. The remaining two purchased whips can yield:
- 1700 + 400 = 2100 mm;
- 1700 + 400 = 2100 mm.
In total, eight whole planks are indeed enough. Nominal remainder:
8 × 2400 − 18 600 = 600 mm.
But there are already six direct joints instead of four for MDF. So, with the same number of purchased items, 2600-mm MDF gives a cleaner top line in this particular room.
Why less waste does not automatically mean a better option
For solid wood, the remainder is only 600 mm; for MDF, it is 2200 mm. If you look only at material utilization rate, solid wood seems more efficient. If the priority is the number of joints on the visible kitchen wall, MDF seems stronger. The choice depends on the material, finish, and architectural task.
If KZ-004 stops at the kitchen: calculation of only three free walls
The length of the free walls is 13,400 mm.
MDF 2600 mm
Mathematically:
13,400 ÷ 2600 ≈ 5.15 → minimum 6 planks.
Map:
- 4100 = 2600 + 1500;
- 5200 = 2600 + 2600;
- 4100 = 2600 + 1500.
Six planks, three straight joints. Purchase length:
15,600 mm.
Nominal remainder:
2200 mm.
Beech/oak 2400 mm
Mathematically:
13,400 ÷ 2400 ≈ 5.58 → minimum 6 planks.
Map:
- 4100 = 2400 + 1700;
- 5200 = 2400 + 2400 + 400;
- 4100 = 2400 + 1700.
Two extensions of 1700 mm and one of 400 mm fit into the two remaining sticks: 1700+400=2100 and 1700. Total six planks. Straight joints — four.
Nominal remainder:
6 × 2400 − 13,400 = 1000 mm.
What changed relative to the continuous layout
The KZ‑004 stop at the kitchen reduced the order by two whole planks in both MDF and solid wood in our example: from eight to six. But this is not a universal effect. In another room, a 5200-mm kitchen wall may be covered by offcuts, and the quantity will change differently. Therefore, the decision is first architectural, then cutting-related.
Cost of three layouts: why a kitchen to the ceiling can affect the budget more than the material of one joint
We use current prices only as a reference as of the check date.
Scheme A — full perimeter, MDF
8 × 1 530 = 12 240 ₽.
Scheme B — cornice without kitchen wall, MDF
6 × 1 530 = 9 180 ₽.
The difference is only in the profile:
3 060 ₽.
Scheme A — full perimeter, beech
8 × 4 580 = 36 640 ₽.
Scheme B — without kitchen wall, beech
6 × 4 580 = 27 480 ₽.
The difference:
9 160 ₽.
Scheme A — full perimeter, oak
8 × 6 630 = 53 040 ₽.
Scheme B — without kitchen wall, oak
6 × 6 630 = 39 780 ₽.
The difference:
13 260 ₽.
These figures do not include finishing, packaging, installation, furniture refinement, and possible separate furniture cornice. They are needed to see the scale: the decision to run the profile above the kitchen can cost more than it seems, especially in solid wood.
KZ-004 price: comparing a complete system, not a single plank
Current KZ-004 price must be checked immediately before ordering. The full estimate must have separate lines:
- the KZ‑004 itself;
- rigid packaging;
- finishing;
- installation;
- additional furniture top, if used;
- kitchen design changes;
- delivery;
- reserve for specific complex parts.
Why furniture integration can be more expensive than a continuous ceiling line
Even if the profile length is the same, option C requires separate work from the furniture maker: embedded rail, top cover, facade overhang, installation, and coordination. It cannot be estimated only by KZ‑004 meters.
If KZ-004 runs over the entire kitchen: where to place the straight joint
The straight joint should be tied to the vertical geometry of the furniture set, not placed randomly in the center of a wide facade.
Check position relative to:
- sides of the tall pencil case;
- vertical pilaster;
- boundary of two furniture sections;
- edge of the refrigerator block;
- center of the extractor hood;
- symmetry of the main composition.
Wall 5200 mm and MDF
2600+2600 places the joint exactly in the center of the wall. This can be ideal if the extractor hood or the symmetrical axis of the kitchen is in the center. But if the center falls on a smooth wide cabinet, the connection may be noticeable. Then you can build a different layout, for example 2500+2700 is impossible from two 2600s, so shifting the joint will require three parts or redistribution from leftovers.
Wall 5200 mm and solid wood
2400+2400+400 gives two joints. A short 400-millimeter extension piece is better routed to an architectural vertical or edge, rather than placed in the center of the composition.
Why you can't optimize only waste
A map with less waste may place a small extension piece above the most noticeable central facade. For a kitchen-living room, visual logic is often more important than saving a few hundred millimeters of material.
Can the ceiling KZ-004 be installed directly on a kitchen cabinet
Such a solution cannot be considered standard just because KZ-004 has a convenient square cross-section. The product card describes a ceiling cornice; furniture installation requires separate technical confirmation.
The furniture maker must check:
- whether there is sufficient support surface on top of the cabinet;
- where the fasteners will go;
- whether hinges, lift mechanisms, or ventilation elements interfere;
- what overhang of KZ-004 results beyond the facade;
- doesn't the profile block the opening of the upper fronts;
- can the cabinet or cornice be removed without damaging the adjacent finish;
- isn't the cornice used as a part that mistakenly receives the load of the furniture body.
When is it better to make a separate furniture base
If KZ‑004 is needed only as a visible crowning profile, the cabinetmaker can design their own top panel/insert, to which the decorative element is then attached. The specific scheme depends on the kitchen construction.
When is it better to leave KZ‑004 exclusively on the wall
If the kitchen body and the ceiling molding should be serviced independently, separate installation is simpler. Then the kitchen can be removed or adjusted without dismantling the ceiling line.
Fronts open upward: KZ-004 must not fall into the trajectory
Tall kitchens often use lift-up fronts or mechanisms where the door extends above the body. The square profile 60×60 mm may be in the movement zone if the furniture is brought too close to the ceiling.
Before ordering, the actual opening trajectory of the selected mechanism must be obtained from the cabinetmaker. A universal gap from the front to KZ‑004 cannot be set without documentation of the specific hardware.
Blind decorative top
If the top row of facades is regular hinged and does not extend into the ceiling zone, there may be no conflict. But this is still checked in the cross-section.
Lifting facade
It must be ensured that in the fully open position it does not touch KZ-004 and the furniture cornice. The error is detected not when the kitchen is closed, but during operation.
Hood, air duct and tall cabinet: the technical zone can break the cornice before the furniture
Above the kitchen wall, elements that are hidden in the visualization often pass: the hood box, ventilation duct, service panel, cable route. If KZ-004 must run continuously, these elements must be routed away from its installation zone.
Exhaust duct to the ceiling
It can become a natural architectural vertical, near which it is acceptable to place a direct joint or end a section of KZ-004.
Tall cabinet to the ceiling
If it protrudes from the general line of facades, the continuation of the cornice above it must be shown separately. It cannot be assumed that 60×60 mm will "pass by itself" over any furniture depth.
Service panel above the refrigerator
If it needs to be removable, the ceiling cornice should not block disassembly. In this case, it is better to leave the ceiling profile independent or design a removable furniture element.
Uneven ceiling and kitchen up to the ceiling: square 60×60 mm does not hide any geometry
If the upper cabinets almost touch the ceiling, even a slight difference becomes noticeable. KZ‑004 can visually align the line, but should not be used as a random shim to compensate for curvature.
Before the final kitchen height, measure:
- the finished height at the beginning of the kitchen wall;
- in the center;
- at the end;
- marks on adjacent walls where KZ‑004 runs;
- the difference in level.
If the ceiling is lower on one edge
Furniture height is set according to the actual geometry, and KZ‑004 is mounted along the agreed line. You cannot simply reduce the cabinet by 60 mm around the entire perimeter if the difference is local.
If KZ‑004 must run strictly horizontally
Between the profile and the ceiling/wall, areas may appear that require painting preparation. They cannot be passed on to the furniture maker without a common scheme.
If the kitchen has a decorative side panel: the end point of KZ-004 must coincide with its actual plane
The design body may have one depth, for example, while the finished decorative side panel may protrude forward relative to it. It is better to anchor the ceiling profile to the visible architectural plane rather than to the hidden body.
On the facade, you need to choose:
- the body line;
- the decorative side panel line;
- the facade line;
- line KZ-004.
If they do not match, the ending must be deliberate. It is especially bad when KZ-004 ends a few centimeters before the side panel only because the measurement was taken on the rough carcass.
Corner kitchen: the ceiling cornice can have different solutions on the two arms
If the kitchen occupies not one but two walls, the solution becomes more complex. It is not necessary to run KZ-004 identically over both arms.
Both arms up to the ceiling
You can perceive the kitchen as a single built-in block and stop the architectural profile at the entrance to the furniture zone.
One arm is tall, the other is lower
The ceiling KZ-004 can run over the tall row, while a separate line appears above the low section. Such a project requires a facade check, otherwise the cornice "jumps" between different heights.
Corner open to the living room
The direct joint and the end of the profile should be oriented with the main viewpoint in mind, not just installation convenience.
If the kitchen is built between two walls: KZ-004 can end symmetrically
For a niche or built-in cabinet, scheme B is especially clear: the ceiling cornice approaches the left portal/partition, disappears above the furniture, and reappears on the right. Then the kitchen reads as a standalone insert.
Advantage
There is no need to route the molding into the complex furniture area, and endings occur at natural verticals.
Risk
If the left and right partitions differ in width or the kitchen facade is offset, the gap may look asymmetrical. This is checked on the overall wall facade.
If the kitchen adjoins only on one side: one open end of KZ-004 becomes the main one
When the cabinet starts in a corner and ends with a free side panel, only one stopping point is visible from the room. It is this point that needs to be drawn especially carefully.
Options are possible:
- the end of KZ-004 coincides with the face of the decorative side panel;
- ends at a vertical pilaster;
- makes a small return to the wall according to the design;
- continues above a separate tall pencil case.
There is no universal beautiful ending; it depends on the profile and furniture.
Cluster articles: what has already been explained separately and does not need to be repeated
The general choice of profile for different tasks has already been covered in the material how to choose a wooden cornice for furniture and interior. It compares ceilings, walls, portals, and furniture. Here the model is already selected — KZ‑004.
A narrow technical case with a ceiling island is also published separately: KZ-004 next to an acoustic ceiling island. It checks the physical gap of 75 mm. The new article does not repeat this intent.
If the kitchen occupies only part of the wall: you need to calculate the actual section, not the entire wall
Suppose the wall is 5200 mm, but the kitchen unit occupies only 3800 mm, leaving 1400 mm of free wall nearby. Then solution B "stop KZ‑004 at the kitchen" does not mean subtracting all 5200 mm from the perimeter. Only the furniture section is excluded, if it is precisely that section that does not receive the ceiling profile.
Possible logic:
- It runs from the corner to the start of the KZ‑004 kitchen;
- absent above the kitchen;
- reappears after the kitchen on the remaining 1400 mm.
In this case, two visible endings are formed, not one. They need to be evaluated together: sometimes two breaks look worse than a continuous cornice, and saving 3800 mm does not justify the architectural gap.
When it is simpler to continue over the entire wall
If the kitchen does not reach the adjacent wall and a calm ceiling band remains above it, a continuous line can connect the two free parts better than two short endings.
When the break looks natural
If the unit is designed as a tall built-in portal with its own side panels, the ceiling KZ‑004 can end at the left post and reappear behind the right one.
When to stop, continue, or integrate KZ-004
When KZ-004 above the kitchen does not need to be purchased
It is rational not to include the kitchen wall in the order if:
- cabinets and the decorative top completely cover the ceiling area;
- KZ‑004 would be hidden behind the furniture;
- the kitchen is perceived as a self-contained built-in volume;
- the visible continuation creates a conflict with the facades;
- the profile blocks opening, service, or ventilation of the furniture;
- the furniture cornice already resolves the top line;
- after the break, natural vertical endings remain.
Such a block is commercially important: you do not need to buy an additional KZ‑004 just for a formal full perimeter if it does not participate in the finished interior.
When is it better to continue KZ-004 above the kitchen?
A continuous line is stronger if:
- the kitchen-living room is conceived as a single architectural shell;
- the cornice is visible above the cabinets;
- the furniture does not reach flush to the ceiling;
- the color and finish of KZ-004 match the overall upper trim;
- the joints can be placed neatly;
- the installation area behind the furniture is accessible;
- the cornice does not interfere with the facades and service.
If the KZ-004 model has not yet been fixed, it is better to conduct a broad commercial inquiry not for a single card: buy a wooden cornice It is possible after comparing the entire category. But after the approval of KZ-004, the choice is already between the schemes of its application.
When furniture integration of KZ-004 is justified
Option C makes sense if the designer wants the kitchen to look like part of the room's architecture, and the furniture maker is ready to design a support structure for the profile.
Before production, the following must be confirmed:
- rear geometry of KZ-004;
- attachment point;
- overhang above the facade;
- connection with side panels;
- corners;
- possibility of dismantling;
- agreed material;
- Color and finish.
If these points are not closed, it is better to use a separate furniture top and leave the ceiling KZ‑004 on the construction part.
Packaging and delivery of KZ-004: the kitchen layout changes the number of slats and transport spaces.
When switching from eight slats of the full perimeter to six slats of free walls, not only the product total changes. Packaging and delivery need to be re-checked. The KZ‑004 card indicates a rigid frame at 390 ₽, for solid wood — up to two items per frame, for MDF rigid packaging is mandatory.
For oak/beech in our example:
- 8 slats → at least 4 frames according to the maximum solid wood norm;
- 6 slats → at least 3 frames.
Frame cost under this model:
4 × 390 = 1560 ₽ versus 3 × 390 = 1170 ₽.
Actual configuration is confirmed by the seller. Terms payment and delivery of wooden moldings Need to check after the final quantity and material.
Reserve KZ-004: a separate strip is not always needed
After the cutting map, remnants appear. They need to be assessed before automatically adding "+10%."
MDF full perimeter
Two fragments of approximately 1100 mm remain. They can already replace a short damaged section or cover a local return.
Solid wood full perimeter
Nominal total remnant is about 600 mm. If the project has external corners and complex visible parts, a full reserve strip may be more justified.
When a separate reserve is useful
- there are complex corner cuts;
- the kitchen is installed after other heavy work;
- re-delivery of one long truck is expensive;
- natural oak must be preserved from the same batch;
- the critical section is longer than any existing remainder.
If the kitchen is already designed or manufactured: how to check KZ-004 without reworking all the furniture
Ideally, the top cornice should be resolved before producing the furniture set, but in practice the furniture project may already be approved. Then the task changes: not "design the kitchen around KZ‑004", but check whether the selected profile is compatible with the existing geometry.
Cabinets are only approved, but not yet cut
This is still a good time for adjustments. The furniture maker can change the height of the top cover, decorative side panel, or top frieze without physically reworking finished parts. Only a new revision of the drawings needs to be issued.
Cabinets are already manufactured, facades are not yet
Changing the cabinet height becomes more expensive, but the facade top and decorative details can still be coordinated for KZ‑004. The option of stopping at the side panel is often simpler than trying to fit 60×60 mm into an already finished furniture box.
The kitchen is already assembled in the workshop
It is useful to do a control fitting of a real or full-size mockup of KZ‑004. The top plane, overhang, opening of facades, access to fasteners, and the visual joint with the side panel are checked. If the profile conflicts, there is no need to force the furniture maker to cut finished cabinets without a new project.
The kitchen is already installed at the site
The most limited scenario. If the ceiling cornice has not been purchased yet, you can choose scheme B and finish KZ‑004 at the furniture set, or check the continuous option only on the free wall area above the furniture. Physical furniture integration should not be added post-factum without confirmed support and fastening.
Why "sawing the cabinet down from the top by 60 mm" is a bad universal idea
In the upper part of the cabinet, there may be fasteners, lifting mechanisms, ventilation, electrical wiring, or structural connections. Rework should be based on furniture documentation, not on the size of the cornice.
Full-size mockup 60×60 mm: how to choose between schemes A, B, and C before purchasing KZ-004
The square cross-section of KZ‑004 allows quickly making a simple physical template 60×60 mm from a neutral material. It does not replace the real profile in terms of relief and finish, but it shows the volume, overhang, and end line well.
Test of scheme A — continuous above the kitchen
The template is applied along the ceiling line above the upper cabinets. From the main points of the kitchen-living room, it is assessed whether the profile looks too heavy, whether there is enough space between it and the facades, and whether the upper part of the kitchen is visually covered.
Test of scheme B — stopping at the side panel
The template is finished exactly along the intended vertical of the decorative side panel. Then look
If a technical gap remains above the kitchen: KZ-004 may be visible, but not furniture-grade
Some tall kitchens do not quite reach the ceiling: a narrow technical band remains, which is covered by a frieze or shadow gap trim. In such a case, KZ-004 can run along the wall above the kitchen without being attached to the cabinet body.
Need to check:
- is the profile visible from the usual viewing point;
- can it be installed before or after the cabinets;
- is there access to the wall for mounting;
- does the furniture frieze block the cornice;
- can the top frieze be removed without dismantling KZ-004.
This option often combines the advantages of schemes A and B: the architectural line is preserved, but the furniture remains structurally independent.
If the top of the kitchen has its own lighting: two horizontal accents may compete
The furniture may have lighting from above, below, or in a decorative frieze. Then KZ‑004 and the light line form two adjacent horizontals.
Before ordering, you need to assess:
- whether the furniture LED lights the bottom edge of KZ‑004 too harshly;
- whether a shadow from the 60-millimeter overhang occurs;
- whether the ceiling cornice seems like a separate "second furniture top";
- whether the color of KZ‑004 matches the illuminated facade.
The article does not set universal distances for LED: they depend on the specific lighting equipment. But the conflict itself needs to be seen before fixing the furniture height.
Typical mistakes when ordering KZ-004 for a kitchen up to the ceiling
Mistake 1. Calculating the full perimeter before approving the kitchen
A hidden section behind cabinets ends up in the order, or there is not enough profile above the furniture set.
Error 2. Deciding the KZ-004 termination "on site" for the installer
The end turns out to be not on the architectural vertical, but at a random point.
Error 3. Treating 60 mm as a simple gap between the cabinet and the ceiling
The actual assembly includes the body, facade, mounting, and the position of the profile itself.
Error 4. Calling the ceiling KZ-004 a ready-made furniture cornice
The card does not confirm universal mounting to furniture. A separate project is needed.
Error 5. Not checking the trajectory of lift-up facades
An open door may hit the profile.
Error 6. Not accounting for the ventilation or service duct
KZ-004 blocks access or forces cutting the cornice after installation.
Error 7. Compare only the total footage
MDF and solid wood may require the same number of slats, but a different number of joints.
Error 8. Place a short 400-millimeter solid wood extension in the center of the kitchen
The cutting is economical, but the facade composition is weak.
Error 9. Paint the kitchen and KZ-004 independently
The same code can look different in gloss and light-and-shadow.
Error 10. Order oak just because it is "more expensive and more natural"
If everything is covered with opaque enamel, its advantage may not be utilized.
Error 11. Not checking the unevenness of the ceiling
Cabinets calculated almost flush conflict with the actual geometry.
Error 12. Forgetting about two end points on a partially occupied wall
The plan looks good only from one edge of the kitchen.
Error 13. Not recalculating the packaging after changing the quantity
The delivery estimate remains from the old perimeter.
Error 14. Using an old cutting map after switching from MDF to oak
2600 and 2400 mm give different joint locations.
Error 15. Not fixing the scheme in the furniture drawing
The furniture maker and the finisher work with different ideas about the top line.
Decision tree: continue KZ-004 above the kitchen or stop
| Question | If yes | If no |
|---|---|---|
| Is there a visible ceiling area above the cabinets? | consider continuous KZ-004 | check stop near furniture |
| Should the kitchen be read as a built-in block? | Scheme B is often more logical | preserve architectural perimeter |
| Should KZ-004 physically stand on furniture? | need a separate furniture unit | leave on wall/ceiling zone |
| Do lift-up fronts cross the profile? | change height/unit | move on |
| Is there a service/ventilation above the cabinets? | provide access | the unit is simpler |
| Are the material and finish approved? | Build the cutting layout | first a sample |
| Are the endpoints and joints marked? | Count the planks | do not place the order |
What to convey to the STAVROS manager and the furniture maker before ordering
Both parties must receive the same final information.
| Parameter | What to fix |
|---|---|
| Article number | KZ‑004 |
| Cross-section | 60×60 mm |
| Material | MDF / beech / oak |
| Plank length | 2600 / 2400 mm |
| Diagram | A — above the kitchen / B — stop / C — integration |
| finished ceiling height of the room | according to the control measurement |
| height of upper cabinets | according to the furniture project |
| end points | on the facade and plan |
| direct joints | according to the cutting map |
| Finish | Approved sample |
| Quantity | after the final scheme |
| packaging/delivery | Confirm |
After that, you can order KZ-004 60×60 mm in a specific configuration.
Wooden linear products in the kitchen-living room: KZ-004 should not live separately from the rest of the decor
If the room already has trim, wall moldings, floor baseboards, or decorative slats, KZ-004 is better checked as part of the overall system. Catalog wooden trim items needed not to add even more decor, but to understand which adjacent elements should match in material, color, and profile character.
For example, white MDF KZ‑004 can continue painted trims and moldings, while oak KZ‑004 can tie in with oak doors. If the kitchen is chosen in a different material, that is not a problem in itself, but the transition should look intentional.
Before launch, it is useful to issue one final revision of the drawings, where the A/B/C scheme is described in words and shown graphically. Old variants with a different KZ‑004 ending should be marked as outdated. This is especially important if the ceiling molding is ordered by a supplier and the kitchen is produced by a separate company: the same date and revision number on the furniture facade and cutting list prevent a situation where the cornice has already stopped at the side panel while the furniture shop continues making the top for a continuous profile.
Checklist before launching the kitchen and KZ-004 into production
- KZ‑004 is finally selected;
- material confirmed;
- 60×60 mm applied to the working section;
- A/B/C scheme resolved;
- actual room height measured;
- height of upper cabinets agreed;
- facade trajectories verified;
- service and ventilation elements are not blocked;
- end points of KZ-004 are marked on the facade;
- straight joints are aligned with kitchen verticals;
- cornice on furniture, if planned, has a separate technical solution;
- color and finish approved on sample;
- map 2600/2400 mm built;
- remainders assessed before purchasing reserve;
- packaging and delivery recalculated;
- furniture maker and finisher use the same project version.
FAQ about KZ-004 and ceiling-height kitchen
What is the size of KZ‑004?
Current cross-section is 60×60 mm. MDF has a length of 2600 mm, beech and oak — 2400 mm.
Can KZ‑004 be run above kitchen cabinets?
Yes, if the working section confirms space for the profile, mounting, facade opening, and service. A continuous cornice is not a mandatory solution for every kitchen.
Is it necessary to stop KZ‑004 at the furniture?
No. Stopping is logical if the kitchen is perceived as a built-in volume and the area above the cabinets is fully enclosed. If the ceiling line must be continuous, KZ‑004 can be extended according to the design.
Can KZ‑004 be used directly as a furniture cornice?
Only after separate approval. The card confirms the ceiling profile, but not a universal mounting point to the furniture body.
What should be designed first — the top of the kitchen or the ceiling cornice?
Better to do both simultaneously. First, fix KZ‑004 and the chosen ending scheme, then finally set the height and top structure of the cabinets.
Do I need to leave exactly 60 mm between the cabinet and the ceiling?
No. 60 mm is the size of the profile, not a universal furniture gap. The actual distance depends on the cut and the installation method.
Can cabinets be installed almost flush against KZ‑004?
Only if it does not interfere with fronts, fasteners, ventilation, or dismantling. The card does not specify a universal minimum gap.
Where is the best place to end KZ‑004 if it does not run above the kitchen?
At a clear vertical boundary: a decorative side panel, pilaster, portal, or tall tall cabinet. The point needs to be marked on the front.
Where is the best place to position a straight joint above the kitchen?
If possible, near an architectural vertical — a section boundary, pilaster, or tall cabinet. It is not necessary to place it exactly in the center of the wall if that worsens the composition.
How many KZ‑004 are needed for a room of 5200×4100 mm?
In a simplified example, a full perimeter of 18,600 mm requires 8 strips in both MDF 2600 and solid wood 2400. If the kitchen wall of 5200 mm is excluded, 13,400 mm remains, and the practical map gives 6 strips. The actual order depends on openings, corners, and endings.
Why do MDF and oak give the same quantity but different joints?
Because purchase lengths differ: 2600 vs 2400 mm. In our full perimeter, MDF gives four straight joints, solid wood gives six.
What material to choose for enamel?
MDF KZ-004 in the current card has preparation "Under enamel." Oak and beech can also have agreed finishing, but material choice should match the project task, not just color.
When is oak KZ-004 appropriate?
When the natural wood grain line is part of the design and is related to facades, doors, panels, or other visible wood.
Can KZ-004 and the kitchen be painted in one color?
Yes, but you need to agree not only on the color code but also on the gloss level and coating technology. On different surfaces, one color may look different.
Do I need to buy a spare plank?
Only after the cutting map. If large usable fragments remain, an additional whole strip may be unnecessary.
What to do if the ceiling is uneven?
First, take actual measurements and agree on the horizontal level of KZ-004 and the height of the furniture. The cornice should not be used as a random compensator for curvature.
Where can I view general information about furniture cornices?
In a separate cluster article about furniture moldings and cornices, to avoid mixing the general profile selection with a specific kitchen unit up to the ceiling.
Where can I see the current price for KZ‑004?
In the product card, right before placing the order.
If after the control measurement at least one wall length, kitchen height, or end point at the side panel changes, the cutting plan must be updated before ordering. You cannot only adjust the furniture drawing and leave the old KZ‑004 specification: even a change of 100–150 mm can make a specific remnant suitable or unsuitable, shift a straight joint, and change the number of full planks. The final specification is considered valid only together with the current room plan and furniture facade of the same revision.
Final specification KZ-004 for the kitchen-living room
| Parameter | What should be recorded |
|---|---|
| Article number | KZ‑004 |
| Cross-section | 60×60 mm |
| Material | MDF / beech / oak |
| Length | 2600 / 2400 mm |
| kitchen layout | A / B / C |
| kitchen wall | included / not included in the ceiling footage |
| end points | marked on the facade |
| Joints | tied to the kitchen architecture |
| furniture integration | if present — confirmed by the cabinetmaker |
| Finish | Approved sample |
| Quantity | according to the final cutting plan |
| Reserve | only justified |
| packaging/delivery | confirmed |
Result: a kitchen up to the ceiling first changes the architectural scheme, and only then the quantity of KZ-004
KZ‑004 has a simple square cross-section of 60×60 mm, but the situation with a tall kitchen is not solved by a single size. The main question is who owns the top line: the entire room, the furniture volume, or a shared junction of ceiling and furniture moldings.
If KZ‑004 runs continuously, the kitchen remains within the architectural frame of the room. If the profile ends at the side panel, the unit reads as a standalone built-in object. If KZ‑004 must transition directly onto the furniture, separate approval of the mounting and construction is required — the ceiling cornice card does not replace the furniture project.
An example room of 5200×4100 mm shows the practical scale of the solution. The full perimeter of 18,600 mm requires eight KZ‑004 strips in both MDF and solid wood; omitting the profile above the kitchen wall reduces the practical order to six. With the same quantity, MDF at 2600 mm gives fewer direct joints than solid wood at 2400 mm. This means material and scheme answer different questions: the scheme determines where the cornice is needed at all, while the material and length determine how that section will be assembled.
Working sequence: KZ‑004 selected → determine A/B/C → make a furniture section → check fronts, side panels, and service → approve material and finish → mark endings and joints → build a 2600/2400 mm map → assess offcuts and reserve → recalculate packaging and delivery → only then launch the kitchen and cornice into production.