Article Contents:
- Wooden ceiling plinth PLT-001 120×15 mm: what exactly to consider before ordering a kitchen
- Why not only 120 mm matters, but also the real geometry of the profile
- Beech PLT-001 for painting
- Oak PLT-001 for natural or tinted finish
- Strip 2000 or 2400 mm — what to calculate even before purchase
- Cabinet fits flush against the side wall
- Between the cabinet and the wall there remains a gap
- The upper cabinet does not reach the ceiling
- The tall cabinet fully occupies the vertical of the wall
- The kitchen cornice and PLT-001 meet at a single point
- Why 11,800 / 2400 = 4.92 does not mean "buy five planks"
- Formula for the open perimeter
- Which parts require 2400 mm
- Which parts fit into 2000 mm
- For oak, the current situation is the opposite
- Straight finished end
- Return to the wall
- Specification of a training example for a book
- For oak
- What must be recorded before payment
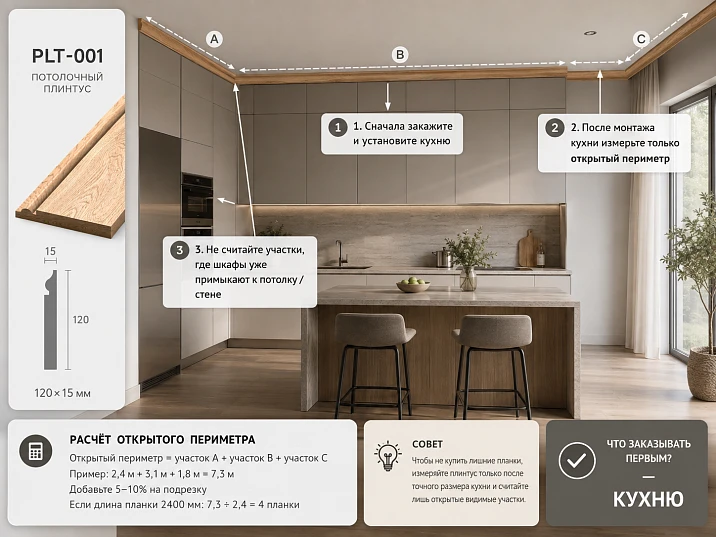
A kitchen up to the ceiling and ceiling molding cannot be ordered as two independent products. If you first calculate PLT-001 along the full perimeter of the room, and then install cabinets up to the very ceiling, part of the expensive wooden profile will end up behind the furniture or will be cut off after installation. If, on the contrary, you order the kitchen without understanding the top line, it may turn out that the side panel, tall cabinet, or furniture cornice leaves no clear space for PLT-001 to end.
Therefore, the sequence should be as follows:
final room measurement → final kitchen geometry → fixing visible and hidden sections of the ceiling contour → PLT-001 termination diagram → map of 2000/2400 mm planks → plinth order.
That is, the kitchen project is fixed before the quantity of PLT-001, and the ceiling plinth itself is reasonably ordered after the actual dimensions of upper cabinets, tall cabinets, decorative side panels, and the finished ceiling line are known.
If the kitchen is still only being designed, there is no need to buy molding "for the entire perimeter with a reserve." First, mark where the wooden profile will remain visible after furniture installation. If the kitchen is already manufactured but not installed, use its working drawings and a re-measurement of the room. If the set is already in place, calculate based on the actual open sections.
After such a check, you can buy the wooden ceiling plinth PLT-001 no longer as an abstract room footage, but as a set of specific parts.
The main formula of the article:
open ceiling contour = sum of actually visible segments + provided endings and returns.
It is more useful than the formula:
room perimeter − kitchen length,
because furniture does not always completely hide the ceiling line. Sometimes the profile behind the cabinet is visible from the side, sometimes a short return is needed, sometimes there is a wall section left between the tall cabinet and the wall, and sometimes the furniture cornice already serves as the top finish and PLT‑001 is not needed there at all.
Wooden ceiling plinth PLT-001 120×15 mm: what exactly to consider before ordering a kitchen
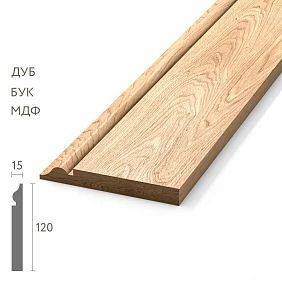
The current PLT‑001 card confirms the cross-section 120×15 mm, materials beech and oak, and two lengths — 2000 and 2400 mm.
At the time of checking, the card shows:
| PLT‑001 | Size, mm | Price at the time of check | Status |
|---|---|---|---|
| Beech | 120×15×2000 | 2,984 RUB at warehouse discount | in stock, St. Petersburg — 4 pcs. |
| Oak | 120×15×2000 | 5,530 RUB. | Custom Order |
| Beech | 120×15×2400 | 3,560 RUB at warehouse discount | in stock, St. Petersburg — 30 pcs. |
| Oak | 120×15×2400 | 5,192 RUB at warehouse discount | In stock, St. Petersburg — 105 pcs. |
The product card separately warns that the discount applies only to warehouse stock. Therefore, the current price of the long oak SKU may be lower than the price of the 2000-mm item made to order. Before payment, you need to check the card again: stock and discounts change.
wooden ceiling skirting PLT-001 — a specific product, and it is its two lengths that determine the purchase map.




Why not only 120 mm matters, but also the actual profile geometry
120 mm is the cross-section size by which the profile is perceived as a tall ceiling element. But near the kitchen, the following are also important:
-
the actual position of the profile relative to the wall and ceiling;
-
thickness 15 mm;
-
the location of the finished end;
-
the angle at which the profile ends at the side panel;
-
the presence of a furniture cornice or an upper filler panel.
You can't solve a knot with words:
"A cabinet up to the ceiling means the plinth will simply butt against it."
You need to see the side view.
If PLT‑001 ends in the plane of the decorative side panel of the kitchen, the end becomes a visible part of the interior. If the profile is hidden behind a protruding furniture element, the requirements for the ending are different.
Our factory also produces:


Beech PLT-001 for painting
The card shows versions with preparation for enamel. Beech is especially logical where the ceiling profile must be painted to match the color of the ceiling, wall, or kitchen cabinetry.
In a kitchen up to the ceiling, this gives several scenarios:
-
PLT‑001 white, like the ceiling;
-
PLT‑001 in the color of the facades;
-
The profile and the upper furniture filler panel are painted with the same system.
But the same color does not make two parts one structure. You need to decide in advance where the furniture ends and the architectural molding begins.
Get Consultation
Oak PLT-001 for natural or tinted finish
Oak is chosen when the wood texture should be visible.
In such a project, the following are especially noticeable:
-
ends near tall cabinets;
-
the joint with a painted furniture side panel;
-
the difference in shades between slats;
-
straight connections on long walls.
It is useful to check before ordering quality of wooden products for enamel and tinting and agree on the finish before cutting.
Plank 2000 or 2400 mm — what to consider before purchasing
Don't automatically choose one length for the entire room.
PLT-001 2000 mm is convenient for segments that are significantly shorter than two meters.
PLT-001 2400 mm is needed for:
-
parts longer than 2000 mm;
-
joining two short segments;
-
reducing the number of straight joints.
In some projects, the best layout is a mixed one.
Kitchen up to the ceiling and wooden baseboard: what to order first
Here it's important to separate the design order, the purchasing order, and the installation order. These are not the same thing.
First, the kitchen is fixed as a geometry.
Before calculating the quantity of PLT-001, the following must be known:
-
length of upper cabinets;
-
position of tall pantry units;
-
decorative side panels;
-
depth of cabinets;
-
upper fillers;
-
furniture cornice, if present;
-
gaps to walls;
-
actual ceiling level.
This does not mean that the kitchen must necessarily be physically installed. An approved project and final measurement are sufficient, if the dimensions will no longer change.
Then an open ceiling contour is built.
On the room plan, a line for the future PLT-001 is drawn.
Each section receives a status:
-
OPEN — the profile is visible and needed;
-
HIDDEN — completely covered by stationary furniture;
-
CHECK — possibly visible from the side or through a gap;
-
END — a finished end is required;
-
RETURN — a short return is needed;
-
CONFLICT — there is a furniture cornice or another upper profile here.
Only after such marking does the actual length become apparent.
Then lengths of 2000/2400 mm are selected.
First, long visible parts.
Then short partitions.
Then ends and leftovers.
And only after that, place the order.
An ideal phrase for a manager is not:
"Room 18 meters around the perimeter, calculate the baseboard."
But:
"PLT-001, beech, open parts A-H, three segments require 2400 mm, three fit into 2000 mm; map attached."
The installation order may be different.
In one project, PLT-001 is more convenient to install before the kitchen, because the cabinets then approach the finished architectural line.
In another case — after the kitchen, so that the end is precisely aligned with the side panel.
Therefore, the article does not establish a universal installation sequence. It establishes a more important rule:
the quantity of PLT‑001 cannot be fixed before the kitchen geometry is determined.
Where the ceiling plinth PLT-001 should end near the kitchen cabinet
The ending near furniture is the main junction of the entire topic. It determines whether to subtract the section from the perimeter and whether a separate short piece is needed.
The cabinet fits tightly against the side wall
If a tall cabinet occupies the entire wall from floor to ceiling and its side panel adjoins the adjacent wall without a visible gap, PLT‑001 usually ends at the furniture boundary.
You need to decide:
-
whether the end coincides with the front plane of the side panel;
-
whether the profile should extend beyond it;
-
whether the junction is visible from the passage.
If the profile is completely hidden behind the furniture and does not serve a future function, buying it for that section just for the sake of a formal continuous perimeter is irrational.
A gap remains between the cabinet and the wall.
For example, the upper kitchen ends 760 mm before the corner.
These 760 mm are a full-fledged open ceiling segment.
It cannot be lost when subtracting the total kitchen length.
If a short section remains nearby, it can be combined with the 760 mm within a single 2000/2400-mm plank.
The upper cabinet does not reach the ceiling.
Then the kitchen is formally not "to the ceiling" in the architectural sense, even if the gap is small.
PLT-001 can:
-
pass over the cabinet;
-
end before it;
-
conflict with the upper furniture filler;
-
turn out to be too large for the remaining gap.
A cutaway is needed.
The length of such a cabinet cannot be automatically subtracted from the ceiling contour.
The tall cabinet fully occupies the vertical of the wall
A tall cabinet often creates a clean architectural boundary.
PLT-001 can be finished at it with a straight prepared end or according to an agreed return.
For oak, such an end is especially noticeable and must be included in the finishing map before tinting.
The kitchen cornice and PLT-001 meet at one point
If the set has its own furniture top cornice, two decorative lines can:
-
meet;
-
overlap;
-
compete in height.
The hierarchy must be determined before ordering.
Options are possible:
-
PLT‑001 ends at the furniture cornice;
-
the furniture cornice ends earlier;
-
both profiles are designed as a single unit.
Randomly overlapping two different profiles almost always looks worse than one deliberate ending.
How to buy wooden ceiling moldings and correctly calculate the open perimeter
The full ceiling perimeter of the room is only the initial geometry.
Suppose the room has dimensions:
5000×4000 mm.
Full perimeter:
2×(5000+4000)=18,000 mm.
The kitchen up to the ceiling occupies:
-
3600 mm of one wall;
-
2600 mm of the adjacent one.
If these sections indeed fully cover the ceiling line and do not require a hidden profile, we preliminarily subtract:
3600+2600=6200 mm.
remains:
18,000−6,200=11,800 mm.
This is closer to a real order, but the final number of 11.8 m cannot be considered. Now we need to break down the open contour into individual parts.
In the training example, after accounting for cabinets, doors, partitions, and endings, the following segments were obtained:
| Detail | Purpose | Finished length |
|---|---|---|
| A | main open wall | 2280 мм |
| B | open wall | 1870 мм |
| C | Section above the door | 940 мм |
| D | partition near the kitchen | 760 мм |
| E | second long wall | 2140 мм |
| F | open part near the window | 1450 мм |
| G | short return/partition | 560 мм |
| H | another open segment | 1800 мм |
Sum:
2280+1870+940+760+2140+1450+560+1800=11,800 mm.
So the arithmetic of the open perimeter matched.
But now the real cutting begins.
Why 11,800 / 2400 = 4.92 does not mean "buy five planks"
Five planks of 2400 give:
12,000 mm.
Total theoretical margin:
200 mm.
At first glance, there is enough material.
But parts A=2280 and E=2140 already take up a separate plank each.
H=1800 can be combined with G=560:
1800+560=2360 mm.
F=1450 and C=940:
1450+940=2390 mm.
Remaining are B=1870 and D=760.
In one plank:
1870+760=2630 mm — they do not fit.
It turns out:
-
A=2280;
-
E=2140;
-
H+G=2360;
-
F+C=2390;
-
B=1870;
-
D=760.
Actually, 6 original rods are needed, although the pure arithmetic of the total length showed 5.
This is a precise example of why for a kitchen up to the ceiling you need to count parts, not just meters.
Formula for open perimeter
Working model:
Popen = Σ of open segments + Σ of returns + Σ of individual finishing ends requiring material.
There is no need to try to reduce everything to one universal formula "total perimeter − kitchen".
Because one cabinet:
-
fully covers the profile;
another:
-
leaves the side section visible;
Third:
-
has its own cornice.
Why furniture cannot be subtracted automatically
If the upper cabinets run along a 3200 mm wall, it seems that 3200 mm should be subtracted.
But if the kitchen ends 150 mm before the side wall, an open niche appears.
If the decorative side panel does not reach the ceiling, a visible strip may appear at the top.
If the profile is visible from the passage behind the side panel, the hidden segment becomes partially open.
Therefore, each furniture zone needs to be checked from three points of view:
-
from the entrance;
-
from the center of the room;
-
from the side of the outermost cabinet.
Wooden ceiling plinth: why a strip is sometimes still needed behind the cabinet
The rule "we don't put anything behind the cabinet" doesn't always work.
There are several real exceptions.
The cabinet doesn't reach the wall
If even a small open wall section remains between the furniture and the corner, the top line is visible there.
The profile is needed at least on the open section.
The side of the cabinet doesn't cover the entire depth of the line
From the front, it seems that the cabinet completely covers the ceiling plinth.
But from the side passage, part of the wall behind the furniture may be visible.
If PLT-001 suddenly ends there, the ending is read as a construction flaw.
There is a shadow gap.
In some kitchens, a narrow architectural gap is left between the top of the cabinets and the ceiling.
Then PLT-001 may be visible in the depth of this gap.
You need to decide:
-
the profile is really needed;
-
it is replaced by a furniture filler;
-
the gap should remain clean without trim.
The kitchen may be dismantled in the future.
If the furniture set is considered stationary for decades, the hidden profile can be omitted.
If furniture is potentially removable or changeable, continuous wall and ceiling finishing behind it can simplify future renovations.
This is not a reason to automatically purchase hidden PLT-001.
This is a separate decision about future maintainability.
View through the upper niche
Sometimes a kitchen up to the ceiling has an open upper niche or decorative glazing.
Through it, the upper wall line is visible.
Then the baseboard behind the furniture is no longer hidden.
How to make a decision
For each furniture section, ask the question:
After kitchen installation, will there be at least one normal viewpoint from which the absence of PLT-001 is visible?
If yes, the section cannot be automatically deducted.
Open kitchen perimeter: four types of furniture zones
It is useful to divide the entire kitchen into four categories.
| Zone type | PLT‑001 | What to Check |
|---|---|---|
| Fully hidden | usually not needed | no side visibility |
| Partially visible | needed locally | exact length of open section |
| Technically conflicting | resolved separately | furniture cornice, doors, top filler |
| Future service/demolition area | As per project | is continuous finishing needed |
Zone 1. Fully hidden
Tall cabinet:
-
stands flush against the wall;
-
reaches the ceiling;
-
has a decorative side panel;
-
not visible from the side.
The most obvious candidate for subtraction from the perimeter.
Zone 2. Partially visible
For example, the cabinet ends 420 mm before the window.
These 420 mm are a separate piece.
If there is still 760 mm left nearby, the two short pieces can be attempted to be combined into one plank.
Zone 3. Conflict
Kitchen cornice, top plank, ventilation duct, lighting.
Here, the number of PLT-001 cannot be determined without a separate node.
Zone 4. Future
For example, a built-in kitchen in an apartment where the designer wants to preserve full room finishing regardless of furniture.
Then hidden trim can be part of long-term architecture.
But the buyer must understand that they are paying for material hidden today for future versatility.
How to calculate PLT-001 with lengths of 2000 and 2400 mm without overpaying for offcuts
Let's return to the eight open segments:
2280 / 1870 / 940 / 760 / 2140 / 1450 / 560 / 1800 mm.
We have already found that five planks of 2400 do not provide a real map.
The minimum is six.
Now let's compare which exact lengths are better to buy.
Which parts require 2400 mm
A=2280 mm — 2000 is too short.
E=2140 mm — 2000 is too short.
Pair H+G:
1800+560=2360 mm — also requires 2400 if we want to get two pieces from one rod.
That is, at least three strips of 2400 mm.
Which parts fit into 2000 mm
B=1870.
F=1450.
C+D:
940+760=1700 mm.
They can be distributed across three 2000-mm rods:
-
B=1870;
-
F=1450;
-
C+D=1700.
Total mixed map:
3×2400 + 3×2000.
Purchased length:
3×2400 + 3×2000 = 13,200 mm.
Nominal total balance:
13,200−11,800 = 1400 mm.
If you buy six strips of 2400 mm
Purchased length:
14,400 mm.
Remainder:
2600 mm.
Mixed cutting reduces the purchase length by:
1200 mm.
This is already real material savings.
But in terms of money, the result depends on current prices
For beech:
-
2000 mm — 2,984 RUB;
-
2400 mm — 3,560 RUB
Mixed map:
3×2984 + 3×3560 = 19,632 RUB.
Six 2400:
6×3560 = 21,360 RUB.
The difference:
1,728 RUB in favor of the mixed cutting.
For oak, the current situation is the opposite
2000 mm custom order:
5,530 RUB
2400 mm at warehouse discount:
5,192 RUB
Mixed map:
3×5530 + 3×5192 = 32,166 RUB
Six 2400:
6×5192 = 31,152 RUB
It turns out that in the current listing, six long oak planks are cheaper than the mixed basket by 1,014 RUB, despite the larger remaining stock.
This is an important commercial conclusion:
minimum waste and minimum cost are not always the same basket.
First, a technically feasible cutting layout is constructed.
Then, the actual SKU prices are compared.
How to read the remainder: not every offcut is a useful stock
After a mixed beech board map, the total remaining is 1400 mm.
But this does not mean one piece of 1400 mm.
The remainders can be:
-
120 mm;
-
260 mm;
-
130 mm;
-
550 mm;
-
300 mm;
-
40 mm.
The sum exists.
There is no new part of 760 mm.
Therefore, the map needs a "remainder" column
| Source whip | Detail | Remainder | Usefulness |
|---|---|---|---|
| 2400 | 2280 | 120 | technical |
| 2400 | 2140 | 260 | sample/end face |
| 2400 | 1800+560 | 40 | Practically none |
| 2000 | 1870 | 130 | technical |
| 2000 | 1450 | 550 | short section/sample |
| 2000 | 940+760 | 300 | Sample |
Why a 550 mm remainder can be more valuable than 900 mm
If a 900 mm piece already has an inconvenient angled end face and after removing it only 480 mm remains, while a 550 mm remainder is clean, the latter is more useful.
Marking after cutting
On each usable remainder:
-
material;
-
length at the useful point;
-
existing end;
-
source plank number;
-
intended purpose.
So short pieces really start saving on the next purchase.
Buy a wooden skirting board PLT-001 made of beech or order an oak profile
The material should be chosen not after cutting, but together with the finishing task.
PLT-001 made of beech and oak has the same cross-section of 120×15 mm and the same standard lengths of 2000/2400 mm. The geometry of the layout is therefore comparable. The difference shows in the finish, texture, cost, and distribution of planks across visible areas.
Beech: when the ceiling profile should visually blend in
Beech is rational if PLT-001 is planned under a covering enamel.
In a kitchen up to the ceiling, this is especially convenient when:
-
the facades are painted;
-
ceiling white;
-
the profile should be part of a unified joinery line;
-
natural wood texture is not the goal.
Oak: when the top line should remain wooden
Oak PLT-001 works better in interiors that already have:
-
oak facades;
-
a countertop or island with natural wood;
-
door trims;
-
a tall floor plinth;
-
Wall panels.
In such a project, it is worth ordering the PLT-001 plinth in oak after all open details and direct connection points have been determined.
Why the oak batch should be distributed across walls before cutting
Segments with different visibility require different materials.
The main open wall A=2280 mm is one of the first candidates for the best-grained log.
A short hidden or side section D=760 mm may get a less expressive part.
If you start cutting in unpacking order, the best oak pattern can easily go to a short partition, and the view wall will remain from two more contrasting planks.
Why current prices change the choice of length, but not the material
Currently, oak 2400 mm at warehouse discount is cheaper than oak 2000 mm made to order.
This can make the 'all 2400' basket cheaper than the mixed one.
But this does not mean that you need to change beech to oak or oak to beech because of price.
First, the material answers the interior task.
Within the selected material, current SKUs are compared.
Wood ceiling plinth: how to link PLT-001 with kitchen facades
Ceiling profile and kitchen can be linked in different ways. There is no requirement that PLT-001 must necessarily repeat the facade material.
Scenario 1. The plinth wood matches the kitchen wood
For example:
-
oak facades;
-
oak PLT-001;
-
oak trims.
Advantage — a unified material system.
Risk — an "almost matching" tone looks worse than a deliberate contrast.
If the kitchen and PLT-001 are from different batches of oak, compare samples after the intended tinting.
Scenario 2. PLT-001 is painted in the ceiling color
Then the kitchen remains an independent object, and the plinth forms an architectural frame for the room.
This option is especially strong when:
-
facades are dark;
-
tree is active;
-
don't want to add another horizontal wooden strip.
Scenario 3. Natural oak PLT-001 becomes a separate top line
For example, the kitchen is painted gray/milky, and oak is repeated in:
-
countertop;
-
the island;
-
the doors;
-
PLT‑001.
Here the cornice does not have to match the facades. It ties the whole room together with wood.
What to check at the junction of the kitchen and PLT-001
Not just color.
Need to compare:
-
the thickness of the cabinet side panel;
-
protrusion of the furniture cornice;
-
height of the upper extension;
-
end point of the 120-mm profile.
If the furniture side panel has a strict modern surface, the classic PLT-001 may be too active right at the joint. Sometimes it is better to end it earlier and leave a small section of the wall.
How to finish PLT-001 at a tall cabinet: straight end, return, or hidden termination
The visible end is one of those elements that determines the amount of material more than it seems.
Straight finished end
The simplest.
The profile is cut perpendicularly and finished.
Suitable if:
-
the end faces the furniture side panel;
-
the profile ends in an inconspicuous area;
-
the cross-section shape looks neatly open.
Return to the wall
A short piece covers the profile.
Looks more architectural from the outside.
But requires:
-
an additional corner joint;
-
a short piece;
-
a separate calculation.
This piece can be 100–300 mm or have another length — there is no universal size. It needs to be built according to the specific cross-section and joint.
Hidden ending
If a furniture cornice or side panel protrudes forward, PLT‑001 can go behind them and visually disappear.
Then an open end is not needed.
Why the type of ending is fixed before the quantity
One return can use the remainder.
Two returns may require opening a new bar.
Therefore, "how to finish the profile" is not only a design question, but part of the cutting layout.
The upper cabinet does not reach the ceiling: three scenarios that cannot be mixed
Sometimes the kitchen is called "up to the ceiling," but there is a technical or decorative gap between the top furniture panel and the ceiling.
PLT-001 passes above the furniture
Suitable if:
-
the gap is sufficient;
-
the profile does not interfere with the doors;
-
the top line is visually needed;
-
Mounting base is available.
The furniture filler closes the gap.
Then PLT-001 may run out before the kitchen.
PLT-001 and the furniture filler form one composite belt.
The most complex option.
A sectional view is needed.
It cannot be resolved with only a front view.
Why the open perimeter changes
If PLT-001 runs above the furniture, the length of cabinets is not subtracted.
If the top is covered by a furniture filler, the section may be subtracted entirely.
A tall cabinet goes into the ceiling cornice: how to avoid two competing lines
A tall pencil case can have:
-
a smooth top;
-
frieze;
-
its own cornice.
If PLT‑001 120 mm is nearby, you need to choose which system is the main one.
PLT-001 is the main one
The furniture ends more simply and fits the architectural profile.
The furniture cornice is the main one
PLT‑001 is interrupted.
Two profiles meet
Possible only after a detailed drawing.
A random "on-site docking" usually creates:
-
different heights;
-
different overhangs;
-
weak end panel.
What to measure in the kitchen up to the ceiling before calculating PLT-001
The buyer needs not only a facade plan.
Minimum measurement sheet:
-
total length of each wall;
-
actual kitchen length along the wall;
-
position of the outermost tall cabinet;
-
distance from its side to the corner;
-
distance from the top furniture to the ceiling;
-
dimensions of decorative side panels;
-
furniture cornice/frieze;
-
position of doors and architraves;
-
visible ceiling piers;
-
internal and external corners.
Why measuring should be done after finishing
If plaster, tiles, or decorative panels are not ready yet, the dimensions of the pier may change.
For the long segment of 2280 mm, this is important:
A 2400 mm whip leaves only 120 mm of nominal clearance.
If after finishing the part becomes 2340 mm, the clearance is already 60 mm.
Why the kitchen per the design is not enough
The furniture drawing shows the dimensions of the cabinets.
It does not always show the actual curvature of the wall and the finished corner.
PLT-001 is linked specifically to the real room.
Three control lines on the kitchen drawing
To prevent the ceiling molding from getting lost among the furniture sheets, draw three lines.
Line 1. Finished ceiling
The base for all the upper architecture.
Line 2. Top of furniture
Shows whether the set actually reaches the ceiling.
Line 3. PLT-001
Separate profile.
If the PLT-001 line passes through furniture, this must be a deliberate design decision.
If it ends at furniture, the endpoint is marked with a dimension.
Why the kitchen must be finalized before ordering, but PLT-001 does not necessarily have to wait for its installation
This is an important distinction.
PLT-001 can be purchased before the kitchen is installed if:
-
the working drawings of the furniture are final;
-
the room has been measured to final dimensions;
-
endpoints confirmed;
-
furniture cornice/extensions will not change.
Advantage of early ordering
Allowed:
-
pre-tint the wood;
-
synchronize painting works;
-
avoid waiting after kitchen installation.
Risk
If the furniture maker changes:
-
width of the end cabinet;
-
decorative side panel;
-
top frieze,
An already purchased layout may no longer match.
Practical criterion
Do not ask:
"Is the kitchen already installed?"
Ask:
"Are the kitchen geometry and the clean termination points of PLT-001 already frozen?"
If yes, the product can be calculated.
What to do if the kitchen and PLT-001 are ordered simultaneously
This is a normal scenario for an expensive project.
A single coordination sheet is needed.
| Parameter | Kitchen specialist | Finisher/PLT-001 |
|---|---|---|
| Ceiling height | confirms | uses |
| Top of pencil case | sets | checks ending |
| Decorative side panel | sets | attaches end face |
| Furniture cornice | sets | excludes conflict |
| Open walls | Takes into account | counts |
| Final cutting layout | receives for verification | issues |
Who is responsible for the end point
This needs to be assigned.
Otherwise, the cabinetmaker thinks the plinth will be "trimmed on site," and the finisher thinks the kitchen will be fitted to the finished profile.
What to sign
Mark directly on the plan:
END PLT‑001 HERE
with the dimension from the base corner.
This eliminates most disputes on site.
When it's better to keep the PLT-001 remnant rather than use it at any cost
A good oak or beech remnant has value as a repair material.
Especially if:
-
natural batch;
-
complex tinting;
-
rare profile;
-
stationary kitchen.
Don't insert the remnant into a visible wall just because it's there
For example, two pieces remain:
-
820 mm;
-
760 mm.
And the open part:
1450 mm.
You can make it from two offcuts with a joint.
But a solid 2000 plank will give:
-
one element;
-
fewer visible joints;
-
simpler finish.
Where offcuts are really strong
-
a short wall section;
-
section above the door;
-
hidden return;
-
test coating;
-
repair.
Tips for finishing wood products before installation near the kitchen
The finish system must be agreed upon before cutting.
In the section Tips for finishing wooden products it is useful to check the manufacturer's general recommendations and pass them on to the contractor.
For an article, a few principles are enough.
Fresh edges appear after cutting
Even if the face is prepared perfectly, new surfaces arise after trimming.
They need to be included in the same finishing system.
For oak, the sequence of staining is important
It is better to first distribute the parts across the walls, then do a test finish.
Otherwise, after staining, two adjacent planks may turn out noticeably different.
For painted beech, the geometry of the joint is important
Enamel evens out the color but does not hide a step or gap between two parts.
PLT-001 for complex angles and kitchen: where this article ends
If the ceiling has:
-
attic fractures;
-
non-standard angles;
-
complex sloped surfaces,
the topic already goes beyond the kitchen up to the ceiling.
For such nodes, there is a separate material PLT-001 for complex ceiling angles.
Here, only one rule is important:
a non-standard angle creates a separate pre-cut part, and it cannot be considered inside the kitchen as a regular straight remainder.
How much can you overpay if you calculate PLT-001 along the full perimeter of the room?
Let's return to the training room 5000×4000 mm.
Full ceiling perimeter:
18,000 mm.
After the kitchen up to the ceiling and checking visibility, the open contour:
11,800 mm.
The difference:
6200 mm.
If the buyer does not subtract the furniture zone and takes only 2400-mm strips along the full perimeter:
18,000 / 2400 = 7.5 → 8 strips.
According to the real open map, 6 strips are required.
That is, the preliminary overbuy:
2 whole strips of 2400 mm.
For beech at current warehouse price
2×3560 = 7120 RUB
For oak at current warehouse price 2400 mm
2×5192 = 10,384 RUB
This is an illustrative calculation of the current product price. It does not mean that savings on any kitchen will be exactly this amount.
But it shows the scale of the error:
"just in case, calculate the full perimeter" is not a harmless margin, but potentially two extra long planks.
Why these two planks will not necessarily become a useful reserve
If after kitchen installation the open walls are already covered, the extra 4800 mm of PLT-001 may lie unused for years.
For natural oak, this is a good repair reserve, but two whole planks are too expensive a reserve if it was not needed for the project.
When a full perimeter is still justified
If the client deliberately wants:
-
to finish the wall continuously behind the furniture;
-
to preserve the finish in case of future dismantling;
-
to use the same slats in the adjacent room.
Then the purchase is not a mistake
If the kitchen edge can shift by 100–200 mm, the open segment will change, and possibly the entire 2000/2400 layout.
2. It is unknown whether there will be a furniture cornice
It can completely replace PLT‑001 on the furniture wall.
3. The decorative side panel is not approved
The side panel determines where the end of the ceiling profile is visible.
4. The ceiling is not yet finished
Irregularities and level changes may affect the joint.
5. The ending of PLT-001 is not resolved
A straight end and a return require different amounts of material.
Two more common stop factors
The future dismantling of the kitchen is unknown.
If the client wants full finishing behind the cabinets, the hidden perimeter needs to be calculated differently.
The corners have not been checked.
A borderline piece of 2280 mm from 2400 may lose its comfortable margin after the actual corner joint.
What to do if at least one question is open
Don't buy 'with a reserve'
Fix the parameter
Recalculate
This is cheaper than compensating for uncertainty with whole oak planks
The kitchen is already ordered, but the dimensions changed after measuring: how to recalculate PLT-001
This is a common situation
For example, the end cabinet was 600 mm, but after engineering adjustment it became 650 mm
The open wall space decreased:
760 → 710 mm
On the total footage, only 50 mm is lost.
But in the cutting pair:
940+760=1700 mm
changes to:
940+710=1650 mm.
In this case, nothing critical.
Another example
Long segment A increased:
2280 → 2370 mm.
Remainder of 2400:
120 → 30 mm.
This is already a borderline part.
She may require:
-
another control point;
-
a new whip;
-
a change of joint.
Conclusion
After any change to the kitchen project, the parts must be recalculated, even if the total length has changed little.
If the kitchen is already installed: the simplest way to recalculate the open contour
Required:
-
laser/tape measure;
-
room plan;
-
segment marking.
Walk the ceiling line clockwise.
Each open section gets an index:
A, B, C...
Record not a continuous "perimeter," but:
from corner to furniture; from furniture to door; above the door; from door to next corner.
Why this is easier after installation
No more design assumptions.
It is visible:
-
where the furniture actually ended;
-
where the side panel protrudes;
-
what is visible through;
-
what finishes are needed.
Disadvantage
The plinth will have to be ordered later, and the finishing may drag on.
Therefore, it is optimal to calculate PLT-001 after freezing the kitchen design, but before installation — if the project is precise.
Kitchen not yet ordered: how to include PLT-001 in the furniture project
In the technical specification for the kitchen manufacturer, you need to specify:
-
ceiling profile PLT-001;
-
height of 120 mm;
-
its end point;
-
desired visibility;
-
furniture cornice — yes/no.
Why the furniture maker needs to know PLT-001
So that they do not design:
-
the side panel directly through the profile;
-
the top frieze with conflicting geometry;
-
the door that will hit the decorative element.
Why a finisher should know about furniture
To avoid running PLT‑001 to a place where a pencil case will cover it in a month.
Checking PLT-001 visibility before purchase: a simple cardboard mockup
If the joint with the kitchen is unclear, make a full-scale profile fragment.
No need to copy the entire relief.
A control dimension of 120×15 mm according to the confirmed cross-section is enough.
What to check
-
what the end of the side panel looks like;
-
Is the profile visible from the aisle?
-
Does it seem too large?
-
Where is it better to move the ending.
Why this saves material
One mockup can show that PLT-001 is better finished 300 mm earlier.
This immediately changes the open perimeter and the cutting layout.
Mistakes when ordering PLT-001 for a kitchen up to the ceiling
Mistake 1. Buying by the full perimeter
Reason: it seems safe.
Consequence: the slats end up behind the furniture.
Prevention: map of open segments.
Mistake 2. Subtract the entire kitchen length automatically
Reason: furniture "covers the wall."
Consequence: not enough profile for the wall section or visible side area.
Prevention: check visibility.
Mistake 3. Fix the quantity before the furniture project
Consequence: changing the tall cabinet breaks the cutting layout.
Mistake 4. Not deciding the ending
A straight end and a return require different lengths.
Mistake 5. Buying only 2000 mm
Details 2140/2280 will get unnecessary direct joints.
Error 6. Buying only 2400 mm without comparison
For beech, this can increase both waste and current cost.
Error 7. Counting oak at the same price as yesterday
Warehouse discounts are dynamic.
Error 8. Using total footage instead of bin-packing parts
11.8 m seems to fit into five 2400s, but the actual set requires six.
Error 9. Giving the best oak whip to a short partition
The showcase wall gets the worst pattern.
Error 10. Leaving a joint under side light
It becomes more noticeable.
Mistake 11. Considering a hidden profile mandatory "for the future"
This is an expensive reserve without a confirmed task.
Mistake 12. Not accounting for the curtain rod
The two top lines conflict.
Mistake 13. Painting before final trimming
Fresh ends will require re-treatment.
Mistake 14. Not checking leftover material at the ends
In total, there is a lot of material, but no single solid piece.
Mistake 15. Buying when five project questions are still open
Better to reschedule the order.
Final specification PLT-001 before payment
Before ordering, consolidate the project into a single table. It should describe not the room in general, but specific details.
| Parameter | Value |
|---|---|
| Product | PLT‑001 |
| Cross-section | 120×15 mm |
| Material | Beech / Oak |
| Finish | ___ |
| Full room perimeter | ___ mm |
| Hidden by kitchen | ___ mm |
| Open segments | ___ |
| Returns | ___ |
| Internal corners | ___ |
| External corners | ___ |
| Planks 2000 | ___ pcs. |
| Planks 2400 | ___ pcs. |
| Reserve | ___ |
| Remains | purpose ___ |
Specification of a training example for beech
PLT-001 / beech / 120×15 / A 2280 / B 1870 / C 940 / D 760 / E 2140 / F 1450 / G 560 / H 1800 / preliminary 3×2400 + 3×2000 / open footage 11,800 mm / full perimeter 18,000 mm / closed by kitchen 6,200 mm / finish ___.
For oak
The geometrically mixed map remains valid.
But at current prices, you need to compare:
-
3×2400 + 3×2000;
-
6×2400.
Today, the second basket is cheaper, even though the purchased length is greater.
What must be fixed before payment
You cannot leave formulations like:
-
"the pier is approximately 70 cm";
-
"the pencil case probably reaches the ceiling";
-
"we are still choosing the kitchen cornice";
-
"we will attach the remainder later."
Each uncertainty can change the number of whips.
Order wooden ceiling plinth PLT-001 after the final kitchen measurement
The final order must be placed after two checks.
The first is technical:
-
the kitchen is frozen in dimensions;
-
the open contour is measured;
-
the endings are approved;
-
the cutting layout is done.
The second is commercial:
-
current price;
-
availability;
-
production time;
-
material;
-
finishing.
If you need to view adjacent products before the final decision, you can to buy wooden baseboard in the general category and compare profile scales.
But if PLT-001 is already approved, changing the article number just so one plank fits better into the cutting layout is not worth it without re-checking the design.
What to write to the manager
"Need PLT-001 120×15 mm. Kitchen up to ceiling covers ___ mm of ceiling contour. Open parts: ___. Material: ___. Preliminary map: ___ planks of 2000 and ___ planks of 2400. Please confirm current price, availability, surface preparation, and lead time."
Why it is useful for the manager to see the map
He can confirm that the selected lengths are actually available in the required material.
But the seller himself should not decide from a single photo of the kitchen which hidden area to subtract.
Final decision tree: kitchen first or PLT-001 first
Step 1. Is the kitchen project already final?
-
no → kitchen first;
-
Yes → continue.
Step 2. Are the finished ceiling and walls measured?
-
no → wait for the final measurement;
-
Yes → continue.
Step 3. Is it known where the furniture reaches the ceiling?
-
no → clarify;
-
Yes → continue.
Step 4. Is there a dedicated furniture cornice?
-
yes → determine the meeting point with PLT-001;
-
No → continue.
Step 5. Are all furniture-hidden sections truly invisible?
-
no → return visible parts to the open perimeter;
-
Yes → continue.
Step 6. Are the endings of PLT-001 defined?
-
no → choose a straight end/return/hidden ending;
-
Yes → continue.
Step 7. Are open segments recorded separately?
-
no → do not count the total length;
-
Yes → continue.
Step 8. Are details longer than 2000 mm assigned to 2400?
-
no → fix the map;
-
Yes → continue.
Step 9. Are short pieces joined by leftovers?
-
no → optimize;
-
Yes → continue.
Step 10. Are current prices for both lengths checked?
-
no → compare;
-
Yes → continue.
Step 11. Only now place the order.
FAQ about wooden ceiling plinth PLT-001 and kitchen up to the ceiling
Do I need to install PLT-001 behind kitchen cabinets up to the ceiling?
Not always. If the area is completely covered by stationary furniture and is not visible from the side, the profile can be skipped. If there is a wall section, shadow gap, future dismantling, or side visibility, the decision is reconsidered.
What to order first — the kitchen or PLT-001?
First, the kitchen geometry must be fixed. PLT-001 itself can be ordered before the physical installation of the furniture, if the kitchen dimensions and end points are already final.
Can PLT-001 be calculated as the full perimeter of the room minus the kitchen length?
Only as a preliminary calculation. Then you need to return visible piers, endings, and other open details.
Why doesn't 11.8 m of open perimeter fit into five 2400 mm planks?
Because the specific segments don't pack into five rods. In the training example, two long pieces and several medium ones require six separate blanks.
When is 2000 mm more advantageous?
When the piece is significantly shorter than two meters and the 2400 mm remainder isn't used for another segment.
When is 2400 mm more advantageous?
When the segment is longer than 2000 mm, you need to combine two short pieces or remove a direct joint.
Can you mix 2000 and 2400 mm in one order?
Yes, if it's one material and the needed SKUs are available. For beech in the training example, the mixed layout is more economical at the current price.
Why is six 2400 mm pieces for oak currently cheaper than the mixed layout?
Because the current warehouse stock of 2400 mm has a discount, while oak 2000 mm is made to order at a higher price. This is a temporary commercial situation, and it needs to be checked before payment.
Do we need to make a 10% allowance?
Not necessarily. For discrete lengths, it is better to calculate a specific reserve: a separate 2000 or 2400 mm plank for the actual risk.
How to join wooden ceiling plinth in kitchen corners?
The actual angle is measured, a test cut is made, and only then the final piece is cut. If the corners are complex or attic-style, use a separate specialized scheme.
Can PLT-001 be painted to match the color of kitchen fronts?
Yes, if the appropriate material and compatible finishing system are selected. The finish and treatment of fresh ends need to be agreed upon in advance.
What is better next to a painted kitchen — beech or oak?
If a covering color is needed, beech is often more rational. If a natural texture is needed — oak. But the final choice depends on the specific product specification and finishing system.
Where to end PLT-001 at a tall cabinet?
At a pre-approved architectural boundary: at the side panel, under the furniture cornice, or through a prepared return. Do not leave the endpoint "to the installer's discretion."
Is PLT-001 needed above upper cabinets if there is a gap to the ceiling?
Possible. If the profile fits and is part of the overall top line, it can run above the kitchen. If the gap is covered by a furniture filler panel, PLT-001 may be unnecessary there.
Can PLT-001 be installed first, and then the kitchen?
Yes, if the kitchen dimensions are final and the cabinet maker has confirmed the abutment to the finished profile.
Can the kitchen be installed first, and then PLT-001?
Also yes. This is convenient for precise trimming to the actual side panel. But finishing work will be completed later.
What to do if the open segment turns out shorter after kitchen installation?
Recalculate the layout before the first cut. A short segment can become part of the remainder of another plank and reduce the quantity.
What to do if the segment turns out longer than 2000 mm?
Assign it to 2400 mm or design a direct joint if the length exceeds 2400.
Is a separate return strip needed?
Not always. The return often comes from the remainder. But its size needs to be determined before ordering.
Where can I check other ceiling profiles?
In the general molding category and in the article about choosing ceiling plinths. You need to compare the actual cross-section at the furniture, not just the picture.
Short conclusion
A kitchen up to the ceiling changes the very calculation principle of PLT‑001.
What you must not do:
full room perimeter → division by 2 or 2.4 m → order.
Correct sequence:
final kitchen → visible and hidden ceiling zones → PLT‑001 termination points → open segments → 2000/2400 map → remainders → current prices → order.
In the training room, the full perimeter is 18,000 mm, but the actual open area after the kitchen is 11,800 mm. Purchasing by the full perimeter would give 8 strips of 2400 mm, whereas the open geometry requires 6. Moreover, even 11.8 m cannot simply be divided by 2400 to get five: the specific pieces do not fit into five rods.
For beech, a mixed board:
3×2400 + 3×2000
now it is more profitable both in material and in price.
For oak, the current warehouse discount changes the commercial conclusion: 6×2400 is cheaper than a mixed board, although there is more waste.
That is why the kitchen and the open ceiling contour are designed first, and only then PLT‑001 is ordered. This way, the buyer does not pay for hidden meters behind cabinets, does not end up without a short wall section, and does not have to adjust expensive wooden profile after furniture installation.