
























































Article Contents:
- Wooden cornice KZ‑006 55×20/22 mm: current dimensions before ordering
- KZ‑006 made of MDF
- Beech KZ‑006
- Oak KZ‑006
- Ceiling molding made of wood and projector screen: why you cannot compare only two heights
- When 30 mm may be sufficient
- When 30 mm clearly doesn't solve the problem
- What exactly is measured as 85 mm: without this, the calculation 85−55 is meaningless
- How to write the size correctly
- Why access to the screw is important even after successful adjustment
- Why electrical components also belong to the service zone
- Why the KZ‑006 screen fabric exit gap cannot be closed
- KZ‑006 runs continuously above the housing
- The cornice ends before the screen and starts after it
- The entire wall with the screen remains without KZ-006
- Where to end KZ-006 before the projector screen
- Symmetrical ending at the edges of the cassette
- Ending at the architectural boundary, not at the housing
- When a short fragment is better not to install at all
- How to finish two open ends of wooden KZ-006 near the cassette
- Straight finished end
- Returning the profile to the wall
- Separate decorative finishing
- Can the screen cassette be hidden by the KZ-006 itself
- Why you cannot glue a decorative element to the housing of a motorized screen
- Why this matters for warranty and service
- If the screen is built into a ceiling niche: what changes
- When KZ‑006 can run continuously
- When a niche does not help
- Screen 2400 mm wide: where to place KZ‑006 joints on this wall
- KZ‑006 made of MDF 2600 mm: how the screen changes the layout of a long wall
- Why 50 mm is too tight a margin
- Oak KZ‑006 2400 mm: can both sides of the screen be obtained from one plank
- Natural wood skirting board KZ-006: oak or beech for a home theater
- Oak
- Oak
- KZ-006 made of MDF in the color of the ceiling: when it is better to make the cornice almost invisible
- How to make a corner on a wooden ceiling skirting board if the screen is placed near the corner
- How to join the ceiling KZ-006 after a gap near the screen
- When it is worth choosing a different wooden cornice
- What to measure before buying KZ-006 near a motorized screen
- Which photos are especially useful
- Full-size KZ-006 template: what to check before purchasing
- What to do if 85 mm is measured to the top cover, but the mounting is higher
- What to do if 85 mm is measured to the bottom edge of the housing
- If the cassette is mounted on the wall rather than the ceiling
- If the cassette is suspended from the ceiling on brackets
- If the screen is hidden in furniture or a decorative box
- Screen installed near an inner corner: when it's better to remove the short KZ-006
- Screen spans almost the entire wall: is it necessary to keep KZ-006 only 300-400 mm from the edges
- If the screen is offset from the center of the wall
- Acoustic panels near KZ-006 and the screen
- Speakers and KZ-006: why a technically small profile can still interfere
- Hidden screen wiring: where you can't drill the cornice "by eye"
- Practical cutting of MDF KZ-006 2600 mm for the 9750 mm example
- Practical cutting of beech/oak 2400 mm for the same example
- Why you can't change the part length for the sake of a nice table
- Screen 2400 mm wide on a 5200 mm wall: symmetrical scenario
- MDF 2600 mm
- Beech/oak 2400 mm
- Screen 2400 mm wide on a 6000 mm wall: when one side is longer
- MDF
- Beech/oak
- Screen takes up almost the entire wall: 450 mm on the left and 600 mm on the right
- Cost of KZ-006: how a screen can reduce an order
- Rigid packaging frame: how to account for it after calculating slats
- Delivery of KZ-006 2400/2600 mm: the screen changed the cutting layout but not the packaging length
- How to accept KZ-006 before cutting and painting
- How to mark parts after a break at the screen
- If after installation the screen needs to be replaced with a wider one
- If the screen needs to be removed for engine repair
- If the service cover is removed downward: why this is the simplest scenario for KZ-006
- If the cassette needs to be shifted upward before removal
- If the screen can only be removed sideways
- If the electrical connection is at the end of the cassette
- If the cassette is black and the KZ-006 is white
- If the cassette is completely hidden behind the curtain
- If there is a TV and a projection screen on the wall
- Connection of KZ-006 with the rest of the room's trim
- When wooden trim should be planned together with the entire room
- Step 1. Fix the standard position of the housing
- Step 2. Find all removable parts
- Step 3. Perform standard opening
- Step 4. Simulate full disassembly
- Step 5. Only now install the KZ‑006 template
- Why the 30 mm margin cannot be transferred to another screen of the same width
- If the screen installer says "30 mm is enough": what exactly to ask to confirm
- If KZ-006 has already been purchased and a service conflict is found on site
- Photo documentation of the service test: what to save along with the specification
- Mistake 1. Treating 30 mm as a ready-made service gap
- Mistake 2. Not clarifying what exactly was measured as 85 mm
- Mistake 3. Blocking the fabric exit gap
- Mistake 4. Covering the adjustment screw
- Mistake 5. Gluing KZ‑006 to the cassette housing
- Mistake 6. Accidentally making two ends 20-30 mm from the housing
- Mistake 7. Assuming the wall is solid when cutting
- Error 8. Considering one 2600 plank sufficient for 1200+1350 without allowances
- Error 9. Transferring the MDF template onto oak
- Error 10. Placing a longitudinal joint next to the cassette end
- Error 11. Choosing a different cornice only by height
- Error 12. Not checking the wiring
- Error 13. Cutting a long plank for the elevator without a map
- Error 14. Buying an extra plank "just in case" instead of calculating precisely
- Error 15. Consider a wall with a screen mandatory for the cornice
- Checklist before payment
- What is the size of KZ-006?
- Will 85 mm to the ceiling be enough?
- Is the remaining 30 mm sufficient?
- What is the screen service gap?
- Can the screen housing be covered with a cornice?
- Can the fabric exit slot be blocked?
- How to remove the screen after installing KZ-006?
- Where to interrupt the cornice?
- How to finish the open end?
- Is it necessary to leave the entire wall with the screen without a cornice?
- What to choose — MDF, beech, or oak?
- What is the length of KZ-006 made of MDF?
- What is the length of oak and beech?
- Can one strip be used for two sides of the screen?
- When is it better to choose a different cornice?
- Can KZ‑008 be used instead of KZ‑006?
- Where to buy KZ‑006?
- Where to buy KZ‑006 after checking the service area
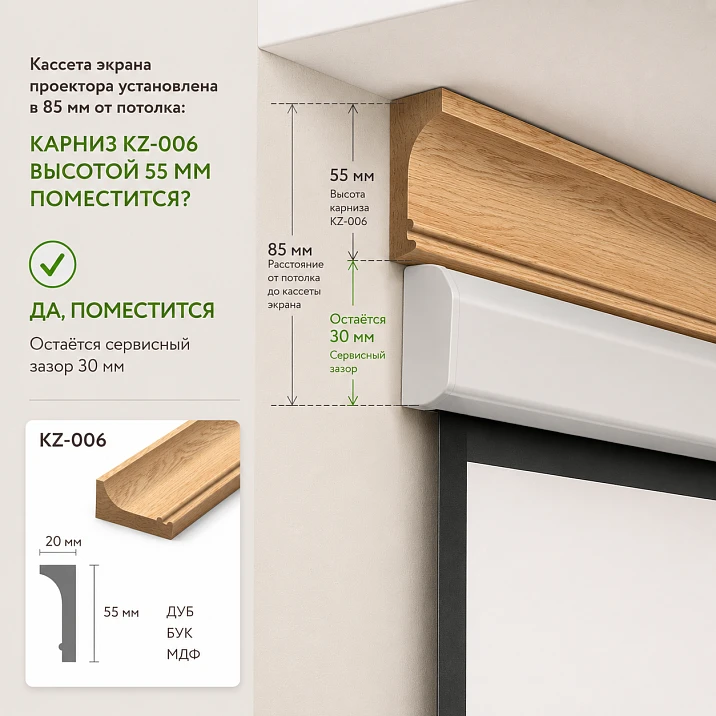
The motorized screen is already mounted, power is connected, and the fabric lowers and returns to the cassette properly. After that, a wooden ceiling cornice KZ-006 was added to the project. At first glance, compatibility seems obvious: the top of the cassette is approximately 85 mm from the ceiling, the height of KZ-006 is 55 mm, so 30 mm remains.
But the calculation 85 − 55 = 30 mm confirms only the geometric clearance, not the possibility of installation. The screen has a housing, end caps, mounting hardware, electrical components, a slot for the fabric to exit, and its own removal scheme. For one model, the service cover is removed downward, for another — backward or sideways; one housing can be removed from the brackets with a vertical motion, another must first be shifted relative to the wall. Therefore, before ordering KZ-006, you need to check not only the visible gap, but also the service volume of the specific cassette.
If the cornice ends up inside this trajectory, the technically "fitted" 30 mm are useless: the screen cannot be removed, adjusted, or serviced without dismantling the decorative profile. Even worse, if KZ‑006 comes so close to the fabric exit slot that the screen touches wood or a painted surface during movement.
The correct sequence is as follows: find the instructions for your specific screen, determine what exactly is measured as 85 mm, map out the service trajectory, make a template of KZ‑006 55×20/22 mm, decide whether the cornice runs continuously or must be interrupted at the cassette, and only then calculate the 2400/2600 mm planks. If you are still comparing the upper molding as a whole, you can Buy wooden ceiling baseboard after checking the entire wall architecture; here, the specific KZ‑006 is considered.
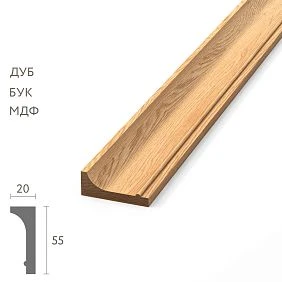
Wooden cornice KZ‑006 55×20/22 mm: current dimensions before ordering
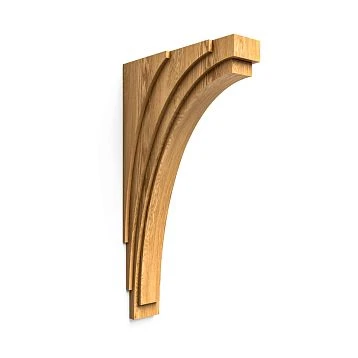
KZ‑006 has three current versions. The height is the same for all — 55 mm. The depth and standard length depend on the material.
| Execution | Size | Price at the time of check | Availability at the time of check |
|---|---|---|---|
| MDF | 55×22×2600 mm | 1 850 ₽ | SPb — 49 pcs. |
| Beech | 55×20×2400 mm | 3 530 ₽ | SPb — 53 pcs. |
| Oak | 55×20×2400 mm | 5 040 ₽ | SPb — 52 pcs. |
The card indicates for MDF the preparation "for enamel", a rigid packaging frame 390 ₽, Contact us to confirm shipping to your destination., and an average production time of 5–10 days for the unavailable item. Price and stock are dynamic — they need to be checked again before payment.
Exact product — Wooden Cornice KZ-006. For the projector scenario, the difference in depth is especially important: MDF protrudes by 22 mm, beech and oak — by 20 mm. The difference is only 2 mm, but in a dense service unit, you cannot automatically transfer the template of one material to another.




KZ‑006 made of MDF
55×22×2600 mm. A longer plank is convenient on solid walls, and the covering paint allows making the cornice visually calm in a home theater room.
Our factory also produces:

Beech KZ‑006
55×20×2400 mm. Natural wood with a separate cutting map and open ends, if the cornice is interrupted at the screen.
Get Consultation
Oak KZ‑006
55×20×2400 mm. With a transparent or tinting finish, it is especially important to decide in advance how the two ends near the cassette look.
Node geometry: profile, cassette, and service area
Wooden ceiling plinth and projector screen: why you can't compare only two heights
In household search, KZ‑006 may be called a ceiling plinth, but structurally we have a wooden cornice. To check it next to a motorized screen, three independent zones are needed:
- decorative zone KZ-006 — actual profile 55×20/22 mm;
- cassette dimensions — body, ends, mounting, and fabric exit;
- service zone — space needed for access, adjustment, and removal of the body.
If the first two parts do not physically intersect, this does not yet mean compatibility. The cornice may overlap the third zone, which is invisible during normal operation.
The cassette hangs 85 mm from the ceiling, KZ-006 has a height of 55 mm: what the remaining 30 mm mean
Suppose 85 mm is measured from the finished ceiling to the top edge of the screen body. Then:
85 − 55 = 30 mm.
If KZ‑006 is installed directly under the ceiling and occupies 55 mm of the wall downward, the bottom line of the cornice will be 30 mm above the top edge of the cassette.
These 30 mm can only be considered a geometric remainder. They are not a "service gap" until the screen manufacturer has confirmed that this space is sufficient for removing the cover, body, and mounting.
When 30 mm may be sufficient
If the cassette is serviced from below, the end caps are removed sideways, and the housing itself is dismantled without lifting to the ceiling. But this is checked against the passport of the specific model.
When 30 mm clearly do not solve the task
If to remove the housing it must first be lifted up on the brackets, if there is a cover or mounting screw on top, or access to the electricals is done through the upper part of the cassette.
What exactly is measured as 85 mm: without this, the calculation 85−55 is meaningless
On site, the phrase "the screen hangs 85 mm from the ceiling" can mean different dimensions. Before ordering, two measurement points need to be agreed upon.
85 mm can be:
- to the top edge of the metal housing;
- to the mounting plate;
- to the decorative end cap;
- to the lower slot for the fabric exit;
- to the cassette axis;
- to the external protruding part of the housing.
For KZ-006 compatibility, the top point of the cassette and the service trajectory are usually most important, and for the fabric itself, the position of the lower exit slot.
How to record the size correctly
For example: "From the finished ceiling to the upper metal plane of the cassette — 85 mm; to the axis of the mounting screw — 102 mm; the service cover is removed downward." Such a record already allows discussing a specific unit.
Motorized screen: which parts must remain accessible after installing KZ-006
Different screens have different designs, so a universal diagram cannot be published. But in the instructions for a specific model, all serviceable parts need to be found.
Checked:
- end caps;
- end position adjustment screws;
- motor;
- electrical connection;
- terminal compartment;
- mounting plate or brackets;
- service cover;
- housing latches or screws;
- full cassette removal path.
Why access to the screw is important even after successful adjustment
The screen may require adjustment after transportation, changes in final position, or motor maintenance. If a decorative cornice covers the screw, any simple operation turns into dismantling the trim.
Why electrical work also belongs to the service area
If the terminal cover is located on top or at the end of the cassette, KZ‑006 must not block its opening. The cornice and screen power supply must remain independent systems.
Movement of the fabric and independence of the decorative cornice from the equipment
Why the KZ‑006 must not cover the screen fabric exit slot
The fabric must exit the housing freely, lower, and return without touching decorative parts. The screen edge must not rub against wood, MDF, enamel, or the lower end of the cornice during movement.
Even weak constant contact is dangerous for several reasons:
- marks appear on the fabric;
- the edge may deviate;
- scuffs appear on the painted cornice;
- the motor operation gets extra resistance;
- The defect only manifests during movement, although statically everything looks "to size."
The check is performed in a full cycle: the screen is fully lowered and raised several times with the KZ‑006 mockup installed.
The cornice passes above the cassette, or the cassette must remain an independent element
KZ‑006 runs continuously above the housing.
Only suitable when both the geometric and service clearances are confirmed. The cornice does not touch the cassette and does not interfere with dismantling.
The cornice ends before the screen and starts after it.
The most serviceable option: the cassette remains independent. But two open ends and a new cutting layout appear.
The entire wall with the screen remains without KZ‑006
Sometimes this is visually cleaner if the cassette occupies most of the wall, and two short sections at the edges would look random.
Where to end KZ‑006 before the projector screen
If the cornice is interrupted, the endpoint should not appear randomly 20–30 mm from the housing just because "it's more convenient to cut." The assembly is read across the entire wall, so the end must be tied to the architecture.
Check:
- width of the cassette;
- center of the wall;
- window position;
- TV/projection furniture;
- speakers;
- acoustic panels;
- nearest inner corner;
- location of the fixtures;
- viewpoint from the sofa area.
Symmetrical ending at the edges of the cassette
If the screen is strictly centered, two identical ends on the left and right often look calmer. But symmetry only makes sense after checking the service zone: if additional access to electricals is needed on the left, the distances may differ.
Ending at an architectural boundary rather than at the casing
For example, a cornice may end at an acoustic panel, cabinet, or side niche, rather than directly at the edge of the screen. This reduces the number of short fragments and makes the break logical.
When it's better not to install a short fragment at all
If 100–150 mm remains between the cassette and the corner, a small piece of KZ‑006 may look like a scrap and complicate maintenance. In such a case, it's better to leave this section without a cornice or change the entire wall layout.
Ends and decorative finishing after a cornice break
How to finish two open ends of wooden KZ‑006 near the cassette
After a break in the continuous ceiling line, two ends appear. For MDF under enamel, they are treated differently than for natural oak or beech.
Straight finished end
The most compact option. For MDF, a fresh cut needs to be prepared for the chosen painting system. For solid wood, the pattern of the end grain and the future transparent/tinted finish are assessed.
Returning the profile to the wall
A short piece allows removing the cross-cut from direct view. The return requires additional material and precise cuts, so it should be a separate line in the cutting plan.
Separate decorative finishing
If there is an acoustic panel, speaker, or furniture portal nearby, the cornice can be finished on a specially prepared vertical element. Such a joint is designed on a case-by-case basis, not from a universal template.
Can the screen cassette be hidden by KZ‑006 itself?
There is no universal solution. KZ‑006 is a decorative ceiling cornice, not a housing, access cover, or niche for motorized equipment. If the goal is to completely hide the cassette, a separate niche or box with service access must be designed according to the screen manufacturer's requirements.
Attempting to "adapt" KZ‑006 as a housing can lead to three problems:
- the fabric exit gap is blocked;
- the cornice becomes part of the equipment dismantling process;
- the decorative piece begins to bear load or touch the housing.
Why you cannot glue a decorative element to the housing of a motorized screen
The cassette is serviceable equipment. KZ‑006 must not transfer load to it, block fasteners, hinder cover removal, or turn the decorative cornice into part of the housing.
If supporting KZ‑006 requires resting on the cassette, the joint is already incorrectly designed. The cornice must be attached to its own wall/ceiling base, and the screen to its own structural system.
Why this matters for warranty and service
The screen mounting organization must be able to remove the device in the manner prescribed by the manufacturer. If the decorative element is glued to the housing, the service scenario changes and may require damage to the finish.
If the screen is built into a ceiling niche: what changes
In the KZ‑006 niche, it may interact not with the cassette itself, but with the edge of the box or ceiling structure. This potentially simplifies the task, but only if service access is provided separately.
Checked:
- niche edge;
- niche depth;
- service cover;
- cassette removal direction;
- inspection hatch;
- position of the fabric exit slot;
- distance from wall to cassette;
- ability to access the fasteners.
When KZ‑006 can run continuously
If the niche completely separates the screen from the cornice, and KZ‑006 runs along the wall below/outside the service zone. Then the cornice does not interfere with the equipment and works like a regular ceiling profile.
When the niche doesn't help
If the cassette is removed through the same opening that KZ-006 covers, or if the cornice covers the inspection hatch.
Joints, 2400/2600 mm, and KZ‑006 material after the break at the screen
Screen width 2400 mm: where to place KZ‑006 joints on this wall
Screen width affects not only the appearance but also the cutting. If the cassette occupies the central 2400 mm of the wall, and the cornice is interrupted before it, two independent segments remain.
Bad places for the joint:
- exactly above the center of the screen — if the cornice still runs continuously;
- flush to the end of the cassette;
- on a short 100–150-millimeter section;
- where side light emphasizes the joint.
It is better to first get both visible sides of the screen as whole pieces, and place longitudinal joints on other walls or hidden areas.
KZ‑006 from MDF 2600 mm: how the screen changes the cutting of a long wall
Let the wall have a length of 5000 mm, and after the accepted break, the screen has two cornice sections left — 1200 and 1350 mm.
Total:
1200 + 1350 = 2550 mm.
One MDF plank 2600 mm long can theoretically provide both segments:
2600 − 2550 = 50 mm of nominal remainder before accounting for the width of the cut and finishing allowances.
This is a completely different commercial logic than for a solid 5000 mm wall. Without the screen, two MDF planks would be needed; after the break, one plank potentially covers both sides.
Why 50 mm is too tight a margin
Two ends of the screen, corner cuts, and kerf width may require more. Therefore, mathematical compatibility of 1200+1350=2550 does not necessarily mean that one 2600-mm plank should be considered sufficient. Real finished dimensions of parts are needed.
Oak KZ-006 2400 mm: can two sides of the screen be obtained from one plank
If one side requires 1200 mm and the other 1100 mm:
1200 + 1100 = 2300 mm.
From one 2400 mm plank, theoretically 100 mm remains. But you need to consider:
- kerf width;
- finishing allowances;
- condition of both ends;
- orientation of the decorative profile;
- need for return;
- wood grain pattern.
If two sides are visually symmetrical, it is useful to choose one plank with a uniform pattern in advance and cut it into paired pieces.
Natural wood baseboard KZ‑006: oak or beech for a home theater
If natural wood is part of the interior, natural wood baseboard and the cornice can work in the same material system. But the specific KZ‑006 remains a cornice, and the choice between oak and beech depends on the finish and neighboring elements.
Oak
It is logical with a transparent or tinting finish, when the natural texture is visible. The ends near the cassette need to be prepared especially carefully.
Beech
It is suitable both for a transparent finish and for an opaque system. If the cornice is painted to match the ceiling or wall color, the natural texture may be less important.
KZ-006 made of MDF in the ceiling color: when it is better to make the cornice almost invisible
In a room with a projector, the equipment and screen are usually more important than decorative molding. MDF KZ-006 can be painted to match the ceiling area so that the profile does not conflict with the cassette and acoustic equipment.
Scenarios:
- white matte cornice in the ceiling color;
- dark graphite profile in a home theater room;
- one RAL matching the wall and ceiling frieze;
- accent profile, but without natural texture.
Preparation "Under enamel" does not mean a finished painted product. The final color, gloss, and edge treatment remain part of the project.
Corners and short segments near the cassette
How to make a corner on a wooden ceiling plinth if the screen is placed near the corner
If the edge of the cassette is close to the inner corner, the short section KZ‑006 between them must be calculated after the miter cut. The nominal 620 mm from the corner to the housing does not mean that a 620 mm blank is sufficient.
Work sequence:
- measure the actual wall angle;
- make a template;
- perform a test miter cut;
- fit the part without final fixation;
- after that, mark the end face at the screen.
Thus, a confirmed query like "how to make an angle on a wooden ceiling plinth" receives a practical answer specifically in the context of the screen, rather than turning the article into a general installation manual.
How to join ceiling KZ‑006 after a break near the screen
The screen changes the usual joining scheme. If previously a long wall could have one central joint, after the break two short independent sections appear. It is better to make each one solid, if the length of 2400/2600 mm allows.
The query "how to join wooden ceiling plinth in corners" here applies not to the cutting technique itself, but to planning: the joint needs to be moved to where it is less noticeable and does not conflict with the screen's service unit.
When KZ-006 should not be bought for a wall with a screen at all
Even the compact profile with a height of 55 mm is not always suitable. You should refuse to buy KZ‑006 for a specific wall if:
- the cornice overlaps the service cover;
- the screen fabric may touch it during movement;
- the cassette cannot be removed without dismantling the cornice;
- the electrical compartment turns out to be inaccessible;
- after the mandatory service zone, short meaningless fragments remain;
- the cassette and KZ-006 visually compete;
- the screen housing must be removed upward, and 30 mm is not enough;
- the screen instructions require a larger mounting clearance.
In this case, the correct commercial conclusion is not to "trim KZ-006," but to leave the wall without it or choose a different architecture.
Alternatives to KZ-006 and the boundary of purchase feasibility
When it makes sense to choose a different wooden cornice
If KZ-006 with a height of 55 mm still conflicts with the cassette or, on the contrary, looks too weak on the other walls, it is useful to compare Wooden ceiling cornices.... But the new profile must pass the same service check.
Separate material KZ-006 or KZ-008 already analyzes the general choice of scale between a compact and more expressive cornice. There is no point in repeating that comparison in this article: here the compatibility of the already selected KZ‑006 with a specific motorized screen is being decided.
What to measure before purchasing KZ‑006 next to a motorized screen
For ordering, one size of 85 mm is not enough. Prepare a full set of measurements:
- room height;
- distance from the ceiling to the top point of the cassette;
- distance to the bottom point of the housing;
- cassette depth from the wall;
- housing width;
- position of the fabric exit slot;
- size and location of the service cover;
- direction of cover removal;
- trajectory of dismantling the entire cassette;
- position of the power supply and terminal compartment;
- distance from the housing to the nearest corners;
- lengths of the remaining wall segments;
- material KZ-006 — MDF, beech, or oak;
- selected type of cornice ending.
Which photos are especially useful
Frontal view of the entire wall, close-up of the cassette end, upper zone between the cassette and ceiling, housing mounting, and photo of the screen in fully lowered state. From these, the installer sees not only numbers but also the actual shape of the assembly.
Checking with template and cassette mounting options
Full-size template KZ‑006: what to check before purchase
For a tight assembly, a cross-section template is useful. For MDF — 55×22 mm, for solid wood — 55×20 mm. The template must be rigid and safe for the screen fabric.
Check:
- apply the template to the intended location of the cornice;
- make sure it does not overlap the screen gap;
- check access to covers and screws;
- lower and raise the fabric;
- simulate the direction of cassette removal;
- check the visibility of the end face in case of a tear;
- compare the knot with adjacent walls.
If after the mock-up the decision is confirmed, you can buy a wooden cornice already based on real geometry, not on two numbers 85 and 55.
What to do if 85 mm is measured to the top cover, but the mounting is higher
This scenario is especially dangerous for a simplified calculation. The enclosure may start 85 mm below the ceiling, but the mounting bracket or screw head may extend into the free strip above the cassette. KZ‑006 then does not physically intersect the enclosure, but blocks access to the mounting.
The solution is to include in the drawing not only the enclosure, but the entire mounting assembly. If the fastener requires a screwdriver from above, space must be left not only for the screw, but also for the tool.
What to do if 85 mm is measured to the bottom edge of the enclosure
Then the original calculation does not apply to the upper service zone at all. The cassette may occupy a significant portion of these 85 mm, and KZ‑006 will intersect it directly. The distance to the very top point of the enclosure needs to be remeasured.
This is an example of why the specification cannot simply say "cassette 85 mm from the ceiling." Two measurement points must always be specified.
If the cassette is mounted on the wall rather than on the ceiling
Wall mounting can bring the enclosure closer to the same plane where KZ‑006 should be. Then the depth of 20/22 mm becomes especially important.
Check:
- how far the enclosure protrudes from the wall;
- where are the brackets;
- can the cassette be removed from the wall after installing the curtain rod;
- Is KZ-006 not directly above the mounting plate;
- can the end caps be opened.
If the cassette is suspended from the ceiling on brackets
The suspended scheme adds extra geometry: the brackets can be located above the housing and occupy those 30 mm that seemed free.
Need to mark on the drawing:
- top of the cassette;
- suspension;
- screws;
- ceiling attachment point;
- direction for removing the housing.
Sometimes the cornice can be run behind or in front of the suspension, but only after checking in plan and section.
If the screen is hidden in furniture or a decorative box
Then KZ-006 interacts with a furniture or drywall box. The service cover must be designed so that it can be removed independently of the cornice. The cornice should not become the cover of the box unless this is provided for by a separate project.
Wall composition: short fragments, acoustics, and hidden wiring
Screen installed near an internal corner: when a short KZ-006 is better omitted
Suppose there is only 180 mm from the cassette end to the corner. Technically, such a fragment can be cut, but it will have two complex ends: a miter cut at the corner and an open end at the screen. For a profile 55 mm high, this may look like too short an insert.
Often it is visually cleaner to omit this 180-mm piece and end the cornice on the adjacent wall. But if the upper line of the room requires a closed corner, the solution is verified with a mock-up.
Screen spans almost the entire wall: should KZ-006 be left only 300-400 mm from the edges
If the cassette occupies most of the wall, two short segments may be decoratively weaker than a wall completely free of the cornice. In a home theater room, this is especially logical: the screen is the functional center, and the upper line can be deliberately interrupted across its entire width.
If the screen is offset from the center of the wall
With an asymmetric cassette, the left and right KZ-006 segments will be of different lengths. There is no need to artificially make equal indents from the housing if this creates a strange short piece at the corner.
It is better to tie the endings to architectural boundaries: a corner, a cabinet, an acoustic panel, a niche, or furniture symmetry.
Acoustic panels next to KZ‑006 and the screen
In a home theater, the wall is often complemented with acoustic panels. Their top edge can become a natural place for the KZ-006 to end. Then the cornice does not need to be extended to the cassette, and the two materials meet on a clear vertical line.
Before ordering, check the thickness of the panel and whether it covers the cornice mounting.
Speakers and KZ-006: why a technically small profile can still be in the way
Wall-mounted or ceiling speakers require mounting, a rotation angle, and sometimes cable access. If KZ-006 runs nearby, its end should not block the bracket or hinder removing the acoustics.
Hidden screen wiring: where you cannot drill the cornice "by eye"
The power supply for a motorized screen is often routed to the upper area of the wall. If the route is hidden, you need to know its path before installing KZ-006. Do not drill or drive fasteners based only on the assumption that the wire "should go up."
The best source is the as-built diagram, photos taken before finishing, or verification by a specialist. The article does not prescribe a universal fastener spacing and does not assume the wiring location.
KZ-006 cutting map after the screen tore the ceiling contour
While the cornice was considered a regular perimeter, the wall with the projector could look like a single 5000 mm section. After the KZ-006 service check, it is interrupted, for example, at the width of the cassette and its maintenance. Two new segments appear in the schedule.
Example:
| Section | Finished length | Purpose | Priority |
|---|---|---|---|
| A | 2550 мм | Main wall without screen | Solid |
| B-L | 1200 мм | Left of the cassette | Solid |
| B-R | 1350 мм | Right of the cassette | Solid |
| C | 2300 мм | Second wall | Solid |
| D | 1700 мм | Wall by the door | can be from the remainder |
| E | 650 мм | Short section | From the remainder |
total net length:
2550 + 1200 + 1350 + 2300 + 1700 + 650 = 9750 mm.
Practical cutting of 9750 mm and wall control scenarios
Practical cutting of MDF KZ-006 2600 mm for example 9750 mm
Mathematical minimum:
9750 ÷ 2600 ≈ 3.75 → minimum 4 planks.
But let's check the actual parts.
| Plank 2600 mm | Parts | Used | Remainder |
|---|---|---|---|
| 1 | A = 2550 | 2550 | 50 мм |
| 2 | C = 2300 | 2300 | 300 мм |
| 3 | B-L 1200 + B-R 1350 | 2550 | 50 мм |
| 4 | D 1700 + E 650 | 2350 | 250 мм |
By nominal lengths, four planks do cover the project. But the first and third planks have only 50 mm of waste each. If the finished sizes 2550 and 1350 do not already include a cutting allowance, this scheme is too tight. Before ordering, the installer must confirm that all lengths are indeed finished.
At the current MDF price:
4 × 1 850 = 7 400 ₽.
Practical cutting of beech/oak 2400 mm for the same example
Mathematical minimum:
9750 ÷ 2400 ≈ 4.06 → at least 5 strips.
But part A=2550 mm no longer fits into one blank. If it must remain solid, 2400 mm is technically insufficient and a joint is needed. That is, the comparison of materials affects not only the quantity but also the architecture of the main wall.
If one joint on A is acceptable, the remaining parts can be distributed across five or six planks depending on the joint location and leftovers. For example, 1200+1100 = 2300 mm fit well together, but the original B-R is 1350, so the size rearrangement must match the actual wall, not optimization "in a vacuum."
Why you cannot change the length of a part for the sake of a neat table
The cutting layout must obey the object. You cannot reduce a 1350 mm section to 1100 mm just because it is more convenient to fit two parts into 2400 mm. If installation requires 1350 mm, that exact size participates in the calculation.
Screen 2400 mm wide on a 5200 mm wall: symmetric scenario
Let the cassette and service zone occupy exactly the central 2400 mm of the 5200 mm wall. Remainder:
5200 − 2400 = 2800 mm.
With symmetry:
2800 ÷ 2 = 1400 mm on the left and right.
MDF 2600 mm
1400+1400=2800 mm, so one plank is short by 200 mm. Two planks will be needed if both sections must be solid.
Beech/oak 2400 mm
Same situation: 1400+1400=2800 mm. Also two planks.
Here, a longer MDF does not reduce the number of strips at all. The screen split the wall into two segments, each of which is less than 2400 mm.
A screen 2400 mm wide on a 6000 mm wall: when one side is longer
Suppose the screen is offset: 1100 mm remains on the left, 2500 mm on the right. The total cornice length is 3600 mm.
MDF (740–760 kg/m³, emission class E1/E0) provides ideal geometry, uniformity, and better base for enamel: high adhesion, smooth surface, absence of knots and cracks.
The right section of 2500 mm is covered by one 2600 mm plank. The left 1100 mm is covered by a second plank or a suitable leftover from another wall.
Beech/oak
2500 mm is already longer than the standard length of 2400 mm. The right section gets a joint of at least 100 mm. Here, the 200 mm difference in length becomes important again.
The screen takes up almost the entire wall: 450 mm on the left and 600 mm on the right
In total, KZ-006 needs only 1050 mm. Mathematically, any material has a large margin. But the main question is no longer cost: are two short cornices even needed?
If they look cut off and end near the cabinet, it is better to leave the wall without KZ-006. If both segments continue the cornice from adjacent walls through internal corners, they may be necessary for the integrity of the room.
Cost of KZ‑006: how a screen can reduce the order
According to the current card, one strip costs:
- MDF 2600 mm — 1,850 RUB;
- beech 2400 mm — 3,530 RUB;
- oak 2400 mm — 5,040 RUB.
For example, if after a break the screen's practical layout requires four slats:
| Material | 4 slats |
|---|---|
| MDF | 7 400 ₽ |
| Beech | 14 120 ₽ |
| Oak | 20 160 ₽ |
If five are required:
| Material | 5 planks |
|---|---|
| MDF | 9 250 ₽ |
| Beech | 17 650 ₽ |
| Oak | 25 200 ₽ |
This is only the cost of the cornice at the time of checking. Finishing, installation, delivery, and packaging are not included.
Packaging, delivery, acceptance, and marking KZ-006
Rigid packaging frame: how to account for it after calculating slats
Card KZ-006 indicates the frame cost of 390 RUB and the packaging standard: up to five MDF products or up to two solid wood products per frame.
If the project requires four MDF slats, according to the stated standard they can fit into one frame. If four oak ones — at least two frames will be needed if packaging is formed at the upper standard. However, the actual number of packages must be confirmed with the seller: "up to two" is not a promise that any two slats will always be combined.
Delivery KZ‑006 2400/2600 mm: the screen changed the cutting layout, but not the package length
Even if after the interruption the screen needs short pieces of 1200 and 1350 mm, the product arrives as standard planks of 2400/2600 mm. Before ordering, check the elevator, stairs, doorways, and storage space.
Sawing a new strip near the entrance just to bring it in is only possible when the transport cut exactly matches already approved parts. Otherwise, savings on logistics will create an unnecessary joint.
How to accept KZ‑006 before cutting and painting
Check:
- article KZ-006;
- the material;
- length;
- depth of 20 or 22 mm;
- straightness;
- profile damage;
- end condition;
- for solid wood — the pattern and shade of adjacent pieces.
After acceptance, the strips are distributed to specific walls. The most even and visually uniform ones are given to the main area near the screen.
How to mark pieces after a break near the screen
It is convenient to use codes:
- SCR-L — to the left of the screen;
- SCR-R — right;
- W1, W2 — regular walls;
- RET-L/RET-R — returns;
- R — reserve;
- TEST — trial corner/end fragment.
This way, a short remainder intended for the right end of the cassette will not accidentally go to another section.
Future service and replacement of the motorized screen
If after installation the screen needs to be replaced with a wider one
This is a good argument in favor of a serviceable gap. A new screen may have a longer cassette and require a larger service area. If KZ-006 ends with two independent end caps, they are easier to shorten or replace than reworking a single complex assembly.
If the cornice "hugs" the old cassette tightly, future equipment replacement becomes more expensive.
If the screen needs to be removed for engine repair
Before purchasing KZ-006, it is useful to remove the cassette once or at least ask the installer to show the standard removal sequence. This test best reveals hidden requirements for free space.
If removal requires first lifting the housing to the ceiling by 40-50 mm, the remaining 30 mm immediately become insufficient. If the cassette is removed downward after disconnecting two bottom latches, the situation is different.
How the cassette removal direction changes the allowable cornice
If the service cover is removed downward: why this is the simplest scenario for KZ-006
When the cover opens downward and does not require lifting the housing, the free strip above the cassette may hardly participate in maintenance. In this case, 30 mm between the bottom line of KZ-006 and the top of the housing is potentially sufficient vertically, but lateral access to screws and end caps still needs to be checked.
Compatibility condition:
- the cornice does not overlap the fasteners;
- the cover opens completely;
- the tool reaches the screws;
- the blade does not touch the profile;
- the cassette can be removed in the standard way.
If the cassette needs to be shifted upward before removal
Then the simple 30 mm clearance becomes critical. If the manufacturer requires lifting the housing, for example, by more than 30 mm, KZ‑006 blocks disassembly even without direct contact with the cassette.
In such a situation, there are three options:
- interrupt the cornice to the width of the service zone;
- change the position of the cassette, if the installation instructions allow it;
- refuse KZ‑006 on this wall.
Move the screen after its final adjustment only together with the installer, because the image height, canvas position, and possibly the electrical wiring will change.
If the screen can only be removed sideways
Vertical 30 mm may be sufficient, but there is a requirement for free space on the left or right. Then the end of KZ-006 needs to be moved away from the housing specifically on the removal side.
This is a good example of why symmetrical gaps are not always correct. For aesthetics, you want 50 mm on both sides, but service may require 150 mm only on the right. Function takes priority.
If the electrical connection is located at the end of the cassette
It is necessary to leave access not only to the connector, but also to the cover, cable, screws, and the wire bending radius. The cable cannot be pinched between KZ-006 and the housing just because it
If the cassette is black and KZ-006 is white
Contrast emphasizes both objects. Two ends of the cornice on the sides of a black cassette can form a neat frame, but the slightest asymmetry will be more noticeable.
Before ordering, it is useful to create a frontal mock-up of the wall with real widths.
If the cassette is completely hidden behind the curtain
Then the visual conflict is reduced, but the service geometry remains. The curtain is not a reason to consider the cassette "non-removable." KZ‑006 must still maintain access.
If there is a TV and a projection screen on the wall
In a hybrid TV zone, the screen may lower in front of the TV. KZ‑006 must account for the position of the TV panel, cables, and acoustics. The cornice should not create additional shadow or visually conflict with the central axis.
Connection of KZ‑006 with the rest of the room's trim
When wooden trim is better planned together with the entire room
If KZ‑006 is combined with baseboards, door casings, moldings, and acoustic frames, it is useful to gather everything in advance Wooden trim into a single list. This helps coordinate material and color, but each profile is still counted as its own map.
How to check the service clearance of the screen without guessing about millimeters
The most reliable pre-order check is not to try to come up with a "normal gap," but to reproduce the actual maintenance. For this, you need the screen's datasheet and a lightweight template of KZ‑006 of the selected material.
Step 1. Fix the standard position of the housing
The screen must be fully installed and aligned. Measurements of a temporarily suspended cassette are useless: after final tightening of the brackets, the housing may shift.
Step 2. Find all removable parts
According to the instructions, mark covers, end elements, screws, connectors, and the cable exit point. It is useful to temporarily mark them on the wall with painter's tape so that nothing is forgotten when the cornice is applied.
Step 3. Perform standard opening
The service cover is opened as intended by the manufacturer. If rotation on a hinge is required, not only the final position but also the arc of movement is measured.
Step 4. Simulate full disassembly
If the instructions allow the cassette to be removed by the user or a service technician, the first mandatory maneuver must be understood: lift, lower, slide sideways, move away from the wall. This maneuver defines the invisible service zone.
Step 5. Only now place the KZ‑006 template
The template is positioned in the actual line of the future cornice. Then the opening and disassembly operations are repeated. If the tool, cover, or housing hits the template, the continuous KZ‑006 is not compatible with the current assembly regardless of how many millimeters remain visually.
Checking the claim "30 mm is enough" and actions in case of conflict after purchase
Why a 30 mm margin cannot be transferred to another screen of the same width
Two cassettes 2400 mm wide can have completely different service architectures. One has the motor serviced from the end, another has adjustment from below; one is removed vertically, another slides along the mounting rail. Therefore, screen width and distance to the ceiling do not form a universal compatibility table.
Even a new modification of the same brand can get a different cover or mounting. When replacing the screen after a few years, the check must be repeated.
If the screen installer says "30 mm is enough": what exactly to ask to confirm
A useful answer should relate not to subjective assessment, but to specific operations. Ask to confirm that with the KZ‑006 installed:
- the panel comes out and returns without contact;
- all standard adjustments are accessible;
- the electrical compartment opens;
- the housing can be removed from the mountings;
- No movement into the cornice area is required for removal;
- Warranty service does not require dismantling the decorative profile.
If only the phrase "the housing does not touch the cornice" is confirmed, that is not enough: static compatibility and service compatibility are different checks.
If KZ-006 has already been purchased and a service conflict is discovered on site
Do not automatically cut all strips at the cassette. First, reassemble the layout. Perhaps two long pieces planned for the wall with the screen are better moved to other walls, and the short side sections can be obtained from their offcuts.
Procedure:
- stop installation at the screen;
- record the required service zone;
- determine new left and right segments;
- recalculate all offcuts across the room;
- only then assign strips to new pieces;
- if necessary, buy one additional rod rather than cutting several whole ones without a plan.
Thus, a compatibility error does not automatically turn into maximum material overconsumption.
Photo documentation of the service test: what to save along with the specification
After a successful check, it is useful to save four photos: the cassette with the lid closed, the cassette with the service area open, the position of the KZ‑006 template, and the moment of standard removal/shift of the housing. Dimensions and screen model are attached to them. Such simple documentation helps the cornice installer not to change the agreed gap on site.
If the screen is replaced after a few years, these materials will make it clear what service volume was originally planned and whether a new housing can be installed without reworking the trim. Photos do not replace the equipment passport, but they preserve the actual geometry of the already assembled unit.
Practical mistakes when ordering KZ‑006 next to a motorized screen
Mistake 1. Considering 30 mm as a ready service gap
30 mm is only a geometric remainder. Service depends on the specific cassette.
Mistake 2. Not clarifying what exactly was measured as 85 mm
The dimension to the bottom edge and the dimension to the top of the housing lead to completely different conclusions.
Error 3. Close the fabric exit gap
The screen starts rubbing against the decorative profile.
Error 4. Overlap the adjustment screw
Simple adjustment requires removing the cornice.
Error 5. Glue KZ-006 to the cassette body
The decorative and engineering systems become inseparable.
Error 6. Make two ends randomly 20-30 mm from the body
The gap looks like an installation error, not an architectural solution.
Error 7. Consider the wall as solid when cutting
After interruption, the screen's 2400/2600 mm map changes completely.
Error 8. Consider one 2600 plank sufficient for 1200+1350 without allowances
Only 50 mm remain, which can go to finish cuts.
Error 9. Transfer the MDF template to oak
Depth differs: 22 mm vs 20 mm.
Error 10. Place the longitudinal joint next to the cassette end
Too many lines concentrate in one zone.
Error 11. Choose a different cornice only by height
The new profile has its own depth and service conflict.
Error 12. Do not check the wiring
Mounting fastener KZ-006 hits the hidden power route of the screen.
Error 13. Cut a long plank for the lift without a map
Transportation cutting can destroy an entire species segment.
Error 14. Buying an extra strip "just in case" instead of precise calculation
Percentage margin does not know the real lengths of parts.
Error 15. Considering a wall with a screen mandatory for the cornice
Sometimes a wall completely free of KZ-006 looks and is maintained better.
Decision tree: can KZ-006 be installed near a screen
| Question | If yes | If no |
|---|---|---|
| Are 85 mm measured to the top point of the cassette? | Check service | Remeasure |
| Are the remaining 30 mm sufficient according to the screen instructions? | Check the gap of the panel | Interrupt/change the node |
| Does KZ‑006 not cover the fasteners and electrical? | Check dismantling | Offset the ends |
| Can the cassette be removed without the cornice? | Decide the cutting layout | Do not make continuous KZ‑006 |
| Do short sections look intentional? | Include them in the map | Leave the wall without a cornice |
| Is the 2400/2600 mm map assembled? | Calculate price | Do not determine quantity by perimeter |
What to send to STAVROS manager and screen installer
One set of source data is needed:
- article KZ-006;
- the material;
- model of the motorized screen;
- passport/instructions;
- cassette photo;
- housing size;
- exact 85 mm reference;
- fabric slot position;
- service covers;
- demolition direction;
- electrical connection;
- wall width;
- distances to corners;
- cornice ending scheme;
- cutting map 2400/2600 mm;
- calculated number of slats.
Final specification KZ-006 for wall with screen
| Parameter | What to fix |
|---|---|
| Product | KZ‑006 |
| MDF | 55×22×2600 mm |
| Beech/oak | 55×20×2400 mm |
| Screen | Exact model |
| 85 мм | Between specific signed points |
| Geometric remainder | 30 mm with correct measurement |
| Service zone | Per screen instructions |
| Fabric gap | Completely free |
| Dismantling | Possible without removing KZ-006 |
| Ends | Straight / returns / other solution |
| Layout | By segments after break |
| Quantity | By practical map |
| Packaging | Confirm number of frames |
Checklist before payment
- screen model is known;
- passport read;
- 85 mm measured to the correct point;
- service cover opens;
- fasteners accessible;
- electrics accessible;
- fabric exit gap is not blocked;
- fabric does not touch the cornice;
- the cassette is removed as standard;
- KZ-006 end caps approved;
- short segments are visually justified;
- 2400 and 2600 mm calculated separately;
- price and availability have been rechecked;
- Delivery of long planks verified.
FAQ about KZ-006 near a motorized screen
What is the size of KZ-006?
MDF — 55×22×2600 mm, beech and oak — 55×20×2400 mm.
Will 85 mm to the ceiling be enough?
If 85 mm is measured to the top point of the cassette, after KZ‑006 there will be 30 mm left. This is not enough for removal without service verification.
Is the remaining 30 mm sufficient?
Only if the specific screen's instructions allow maintenance and disassembly in such a space.
What is the service clearance of the screen?
The free space required for access to covers, screws, electrical components, and removal of the housing. It is determined by the design of the specific model.
Can the screen housing be covered with a cornice?
Not as a universal solution. KZ-006 is not a housing or inspection cover for the screen.
Can the gap for the fabric exit be covered?
No. The fabric must move freely without touching.
How to remove the screen after installing KZ-006?
According to the manufacturer's standard instructions. If this requires dismantling the cornice, the assembly should be reconsidered before purchase.
Where to interrupt the cornice?
According to the confirmed service zone and wall architecture, not randomly a few centimeters from the housing.
How to finish the open end?
With a straight clean cut, a return, or a separate decorative finish.
Is it necessary to leave the entire wall with the screen without a cornice?
Sometimes yes — if the cassette takes up most of the wall or short side segments look bad.
What to choose — MDF, beech, or oak?
After resolving the service geometry. MDF is longer and convenient for enamel; beech and oak are chosen for natural wood.
What is the length of KZ-006 made of MDF?
2600 mm.
What is the length of oak and beech?
2400 mm.
Can one plank be used for two sides of the screen?
Yes, if the sum of finished parts, cuts, and allowances fits within the standard length.
When is it better to choose a different cornice?
When KZ-006 blocks the service or short fragments near the screen do not work visually.
Can KZ-008 be used instead of KZ-006?
Only after a new calculation: KZ-008 is significantly larger and is not an automatic replacement.
Where to buy KZ-006?
In the product card after checking the screen and cutting map.
Where to buy KZ‑006 after checking the service area
When geometry and maintenance are confirmed, you can buy KZ-006 55×20/22 mm in the selected material and calculated quantity.
The final step is to order a wooden cornice KZ-006 only after the cassette remains serviceable, the fabric gap is free, and the 2400/2600 mm map is checked.
Result: 85−55=30 mm — this is the start of checking KZ-006, not permission for installation
KZ‑006 is indeed more compact than many wooden cornices: a height of 55 mm allows it to be built into a tight upper zone. But with a motorized screen, it is not enough to see 85 mm and subtract 55. The remaining 30 mm say nothing about the service cover, screws, electricals, or the cassette removal trajectory.
First, you need to determine what exactly is measured as 85 mm, then check the screen's datasheet and physically simulate maintenance with the KZ‑006 template. If the cornice does not interfere with the movement of the fabric or dismantling, it can be installed continuously. If it does interfere, interrupt it at the service zone or leave the wall without a cornice altogether.
After this, the commercial calculation changes. A wall of 5000–6000 mm can turn into two short segments, and a long plank of 2600 mm is then used in a completely different way. Sometimes one plank covers both sides of the screen, and sometimes even 2600 mm does not offer an advantage over 2400 mm.
Working sequence: screen model → precise measurement points for 85 mm → datasheet and service trajectory → KZ‑006 template 55×20/22 → decision "continuous / break / no cornice" → end caps → 2400/2600 mm map → cost and packaging → order.