


Article Contents:
- What is a connecting socket: not electrical, not a ceiling medallion
- Seven places where a connecting socket is indispensable
- Corners of frames made from moldings
- Joints of moldings on the wall when creating panels
- Transitions from pilaster to horizontal molding
- Joints of casings with wooden trim
- Decorative frames around mirrors
- Beams and columns in a classic interior
- Molding joints in complex wall transitions
- When a rosette is better than a 45-degree miter cut
- STAVROS connecting rosettes: RS series
- Connecting rosette RS-004
- RS-001, RS-002, RS-003
- How to choose the right size connecting rosette
- Choosing by interior style: the ornament should speak the same language as the space
- Classic and neoclassic
- Baroque and Rococo
- Modern interior and minimalism
- Russian classic and Empire
- Wood, MDF, polyurethane: what to choose
- How to properly integrate a rosette into a decorative system
- Installation: how to glue a connecting rosette correctly
- 10 mistakes when working with molding joints and choosing rosettes
- What to buy together with a connecting rosette: a systematic approach
- Frequently Asked Questions

There is one injustice in interior renovation that is not usually spoken aloud. You spent time and money on quality molding, chose the right profile, selected the linear footage — and everything would look magnificent if not for one corner. The joint of the moldings on the wall did not align. A two-millimeter gap. A slightly crooked cut at forty-five degrees. And now this tiny flaw draws the eye more than all the rest of the work.
The problem is not the molding. The problem is the joint.
It is at this point — where one profile meets another, where a pilaster transitions into a horizontal molding, where a frame changes direction, where a casing goes around a corner — that the main technical and aesthetic difficulty arises. And it is here Connecting rosette does what neither a skilled hand nor an expensive tool can do: it turns the joint from a problem into a decoration.


What is a connecting rosette: not electrical, not a ceiling medallion
Before moving forward, we need to clearly define what we are talking about. Because the word "rosette" in Russian has multiple meanings, and search engines confirm this — search results mix together electrical sockets, cable boxes, ceiling medallions, and fastening elements.
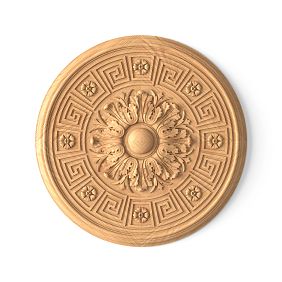
A connecting rosette in the context of interior decor is a small carved decorative element whose function is to cover the junction, intersection, or corner between several lines of linear molding, moldings, pilasters, columns, beams, or frame profiles. It is not a ceiling accent for a chandelier. It is not the center of an ornamental composition. It is a neat node at the joint — small but fundamental.
The difference from a decorative ceiling rosette is fundamental. A ceiling rosette works as a self-sufficient object: it is visible on its own, like a medallion, like an ornamental circle in the center of a space. A connecting rosette is a system element. It is invisible when everything is correct. And irreplaceable when a joint needs to be covered.
In the STAVROS catalog, connecting rosettes are presented in the section pilasters, columns, and connecting rosettes: articles RS-001, RS-002, RS-003 and RS-004. All are made of solid wood, all with carved relief, all with specific dimensions that need to be matched to the profile width.
The nature of decorative rosettes made of solid wood is described in detail in the article Solid Wood Rosettes: The Focal Point of Ceiling and Wall Compositions. This article is not about the center. It is about the corner.


Seven places where a connecting rosette is indispensable
Our factory also produces:


Corners of frames made of moldings
Frame wall division is a technique that gives the space structure. Horizontal and vertical moldings form rectangular panels, inside which the wall can be painted, wallpapered, textured with relief, or simply left in one color.
But here's where the difficulty arises: at the corners of this frame, two profiles must meet precisely, at a right angle, with a perfect joint. In practice, walls are not perfectly level, the profile does not always behave predictably, and cutting at forty-five degrees requires experience, good tools, and no mistakes. If one of the four corners of the frame doesn't turn out, the entire panel looks sloppy.
A decorative corner for molding in the form of a connecting rosette is a solution. It covers the intersection point, turning a technical joint into a decorative node. The frame receives corner accents that not only mask the joint but also add ornamentation to the entire panel.
Get Consultation
Joints of moldings on the wall when creating a panel
A panel of moldings is a large frame that designs part of the wall as an independent architectural element. Here, moldings can run not only along the perimeter but also intersect inside: creating a more complex ornamental pattern with several cells or a central accent.
At the intersection point of several moldings, making an invisible joint is especially difficult. Here, one profile meets another not at a corner, but in the middle of its path. A connecting rosette covers this intersection: it covers the meeting point, making it a visible decorative element rather than a technical seam.
So the joints of moldings cease to be a problem — they become part of the ornamental language.
Transitions from a pilaster to a horizontal molding
A pilaster is a vertical decorative element. A molding is a horizontal profile. When they meet on the same wall, their connection point must be designed separately. This is precisely why the connecting rosette was originally created in classical architecture: it marked the transition between the vertical and horizontal axes of the decor.
Wooden pilasters in combination with horizontal trim and connecting rosettes between them — this is a classic scheme for a dining room, living room, study, or hall. The rosette here works as a decorative core that holds the vertical and horizontal together.
Together with pilasters, they are used bases for pilaster BS-001 и BS-004 — lower transition elements that decorate the base of the vertical. Connecting rosettes cover the upper or intermediate transitions.
Joints of architraves with wooden moldings
A door opening with wooden architraves often interacts with a horizontal molding on the wall. The architrave runs vertically, the molding runs horizontally — and at their meeting point, a joint of wooden moldings occurs that needs to be finished.
Cutting in this place is complex: profiles can have different reliefs, different widths, different projection depths. A connecting rosette is an elegant solution. It covers the transition point and turns it into an accent node.
Decorative frames around mirrors
A mirror with a frame made of wooden molding or wooden molding — is both a piece of furniture and decor. But in the corners of such a frame, the joints of moldings are especially noticeable: the mirror surface doubles the viewing angle and makes any inaccuracy more visible.
Corner connecting rosettes in a frame around a mirror — this is both a practical solution (to cover the joint) and a design one (to add rhythm and character to the frame). A small decorative element in each of the four corners makes the frame complete.
Beams and columns in a classic interior
In classic interiors, horizontal beams meet vertical columns. This intersection is an architectural accent. But in modern decorative structures made of wood and MDF, this point requires equally careful design: a careless joint destroys the feeling of thoughtfulness.
A connecting rosette at the intersection of a decorative beam and a column is a detail that has existed in architecture for thousands of years. It is called differently in different traditions, but the meaning is always the same: a nodal element that unites the vertical and horizontal.
Joints of trim in complex wall transitions
Niches, arches, wall-to-wall transitions, corridor corners with wooden profiles — everywhere where wooden trim changes direction or meets another profile, a connecting rosette can solve the problem without complex cutting. This is especially valuable in already finished rooms where redoing the corner is not possible.
When a rosette is better than a 45-degree miter cut
This question is practically important, so we will answer it honestly.
A 45-degree miter cut is a classic way to finish molding corners. It gives a clean, almost invisible joint if done precisely. But that's the key: if.
Situations where a miter cut does not work:
-
No experience. Precise cutting at 45 degrees requires a good miter saw and confident skill. With an error of half a degree, the joint creates a gap that cannot be hidden.
-
The wall is not level. In real apartments and houses, walls are far from perfectly perpendicular. The molding lies on the wall at one angle, the ceiling goes at another — and the precise miter cut stops working.
-
The profile is complex. Moldings with multi-level relief, protruding edges, and curved cross-sections are difficult to miter at a corner without visible misalignment.
-
A repeatable joint is needed. If a room has a dozen frames and each has four corners, that's forty joints. A rosette makes each of them identical without forty precise cuts.
-
The joint needs to become an accent. Sometimes a corner is not a problem to hide, but a point where you want to make an accent. A small decorative element at the corner turns technique into ornament.
-
An already made mistake. If the corner has already been cut and the joint turned out uneven, a connecting rosette saves the situation.
Practice shows: in the hands of a professional, a miter cut is faster. In the hands of a home craftsman without experience and special tools, a rosette is more reliable, more beautiful, and gives a more predictable result.
You can read about how decorative design of pilasters and connecting elements works in classical schemes in the article pilasters and capitals: how to choose decorative elements for the interior.
STAVROS connecting rosettes: RS series
In the STAVROS catalog, connecting rosettes are presented in the pilasters and columns section. This is no coincidence: historically, rosettes of this type are elements that connect vertical and horizontal decorative structures. The catalog features four basic SKUs: RS-001, RS-002, RS-003, and RS-004.
All are made of solid wood. All have carved ornamentation. They differ in size, profile, and richness of relief, which allows you to choose the right option for a specific task.
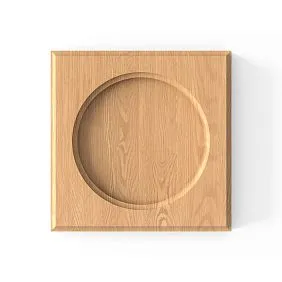
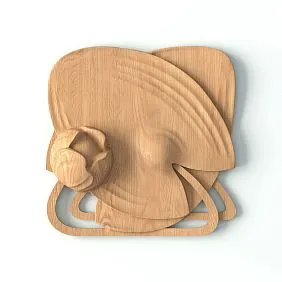
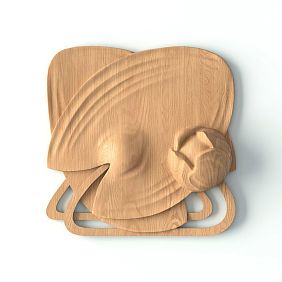
Connecting rosette RS-004
Connecting socket RS-004 — one of the key articles in the series. It is a square decorative element with a carved relief. Its purpose is to cover a corner joint or the intersection point of moldings. It is installed directly at the intersection of profiles over their ends — so that the joint is completely hidden.
Before ordering RS-004, you need to ensure that the size of the rosette covers the width of both moldings at the intersection point. If the molding is wider than the side of the rosette, the joint will be visible. If the rosette is significantly wider than the molding, it will look like a large detail on a thin profile.
For exact dimensions and ornament options, check the current product card.
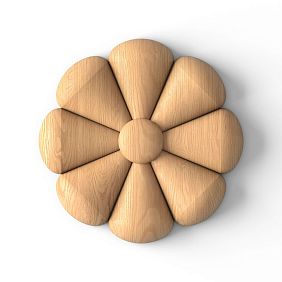
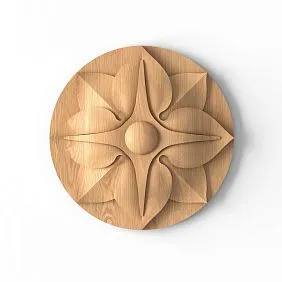
RS-001, RS-002, RS-003
The other SKUs in the series differ in ornament and proportions. The choice between them depends on the interior style and the width of the moldings used:
-
RS-001 — typically a more compact option for thin profiles and delicate frames.
-
RS-002 — medium in scale.
-
RS-003 — with a richer ornament for expressive pilasters and wide moldings.
All four SKUs can be used in the same space if the same one is used at each repeating point. Mixing different RS in one frame is a style mistake.
How to choose the right size for a connecting rosette
Size is the main parameter when choosing. A mistake in size leads to the socket either not covering the joint or looking disproportionate.
A practical rule: the socket must completely cover the joint.
If you have a corner intersection of two moldings each 60 mm wide — the socket should be at least 60×60 mm, and preferably 70–80 mm, so that the decorative border is visible and not flush.
When moldings are of different widths — focus on the wider one.
For pilasters — the socket can be more expressive: the width of the pilaster is usually significantly greater than the width of the molding, and here the socket works as a full-fledged accent node, not just a plug.
For thin frame profiles and mirror frames — choose the minimum size. A too large socket on a narrow wooden baguette looks like a mismatch of scales.
The thickness of the socket is no less important parameter. The socket should be no thinner than the relief of the molding. If the profile protrudes from the wall by 15 mm, and the socket has a thickness of 8 mm — it will sink behind the plane of the molding and will not create the desired effect.
Table of approximate correspondences:
| Molding width | Recommended rosette size |
|---|---|
| Up to 40 mm | RS-001, minimum option |
| 40–70 mm | RS-001 or RS-002 |
| 70–100 mm | RS-002 or RS-003 |
| Pilaster, column | RS-003 or RS-004 |
| Wide molding + pilaster | RS-004 |
Check specific item sizes in product cards — STAVROS managers can help with selection if needed.
Choose by interior style: the ornament should speak the same language as the space
The shape of the rosette and the character of its ornament are the second most important parameter after size. A rosette is not a neutral element. It has character. And that character must match the overall tone of the space.
Classicism and neoclassicism
For a classic interior, a rosette with a floral ornament is suitable: acanthus, laurel, floral rosette, leaf basket. Soft, symmetrical relief. Nothing sharp or geometric.
For neoclassicism — a more restrained version: less relief, calm symmetry, without overload. Neoclassicism does not like ornamental crowding.
Baroque and Rococo
If the interior leans toward opulence, the rosette can be expressive, with a developed relief, curls, and emphasized volume. Here, the contrast of light and shadow on the ornament's surface is important.
Modern interior and minimalism
Minimalism does not mean abandoning the rosette. It means choosing a version with minimal relief and a geometric ornament. Such a rosette is painted the color of the wall — and it works as an architectural solution, not as a decorative object. The corner becomes clean, the joint disappears, but the structure remains.
Russian classic and Empire
Geometrically strict ornaments, laurel wreaths, stars, palmettes. A rosette in this style is a quote from the architectural language to which all the decor of the space belongs.
Wood, MDF, polyurethane: what to choose
STAVROS carved decor is presented in different materials. For connecting rosettes of the RS series, the material is solid wood. This is fundamentally important in several scenarios.
When to choose solid wood:
-
If the rosette connects wooden moldings — the material must match. A wooden rosette next to a wooden solid wood moldings — is one world. A rosette made of a different material is a dissonance.
-
If the surface will be coated with oil or varnish — only solid wood. Polyurethane under oil gives a different effect.
-
If the naturalness of materials is fundamentally important in the interior — only wood.
When to consider polyurethane:
-
If the entire composition is painted in one color (for example, white for painting), the polyurethane element can work on par with a wooden one. The difference in material under the enamel is invisible.
-
For ceiling and wall systems where ease of installation is important, polyurethane is lighter.
But an honest advice: if you have wooden moldings and wooden pilasters, choose a wooden rosette. Decorative wooden inlays и Trimming Items STAVROS is made of solid wood. A connecting rosette made of solid wood is a unified material world.
How to properly integrate a rosette into a decorative system
A rosette does not work in isolation. It is part of a decorative system. And that is why it should be chosen not separately, but in the logic of the entire project.
Step 1. Identify all joint locations.
Draw a diagram of the wall with moldings, pilasters, and trim. Mark every place where two elements meet. These are potential points for rosettes.
Step 2. Decide where to hide the joint and where to emphasize it.
Not every joint requires a rosette. Where the molding is neatly cut at 45 degrees and the joint is invisible, a rosette is not needed. Where the joint is imperfect or where an architectural node should be highlighted, a rosette is appropriate.
Step 3. Choose the size of the rosette.
According to the rules described in the section above: no less than the width of the molding, with a margin of 10–20 mm.
Step 4. Check consistency.
If rosettes are used in multiple frames within the same room, they must all be the same article. Different rosettes in different frames of the same room create ornamental chaos.
Step 5. Coordinate with the baseboard, casing, and pilaster.
If the space has Decorative pilasters with bases BS-001 or BS-004 — the rosette's ornament must be in the same stylistic register as the pilaster's ornament.
Step 6. Calculate the quantity before ordering.
One frame with four corners — four rosettes. Three frames — twelve. Plus transitions from pilasters to moldings. Calculate exactly and order one or two extra pieces as a reserve.
Installation: how to glue a junction socket correctly
The junction socket is mounted with glue — in most cases without mechanical fastening.
For mounting a wooden socket on a wooden or MDF molding, use KUDO High Tack mounting adhesive. The high initial tack of the adhesive allows you to immediately secure a small element without backup: apply — press — done.
Full arsenal STAVROS installation and finishing materials also includes transparent mounting adhesive for cases where seam invisibility is important.
Practical rules for socket installation:
-
The surface must be dry and clean. Dust or grease under the socket will ruin adhesion.
-
Apply the adhesive in dots on the back of the socket — not in a continuous layer.
-
Press for a few seconds with moderate pressure.
-
If necessary, secure with masking tape for 20–30 minutes.
-
After drying — if necessary, fill micro-gaps with putty and paint to match the molding color.
If the rosette will be coated with oil together with the wooden molding — apply the coating already in the installed position so that the tone is uniform.
10 mistakes when working with molding joints and choosing rosettes
Error analysis is a practical section that helps avoid typical miscalculations.
Mistake 1: buying a rosette without measuring the molding width. The most common and most frustrating. The rosette turns out to be smaller than the joint — and the joint is still visible at the edges.
Mistake 2: choosing an ornament that does not match the style of the space. A baroque rosette in a minimalist interior is not eclecticism, it is a mistake.
Mistake 3: mixing different RS articles in one room. Three frames — three different rosettes — three different ornaments. This is visual disarray that destroys unity.
Mistake 4: using a rosette where the joint is actually fine. If the cut is done accurately and the joint is invisible — the rosette only adds an unnecessary element. There is no need to cover what is not there.
Error 5: not accounting for the socket thickness. A socket thinner than the molding relief will be "recessed" — visually it will appear not on the surface, but inside.
Error 6: confusing a connecting socket with a ceiling socket. A large-diameter ceiling medallion on a molding corner is a mismatch of scales and functions.
Error 7: selecting a socket separately from pilasters and moldings. If the project includes Wooden pilasters and moldings — the socket should be chosen in the same order so that the pattern, material, and tone match.
Error 8: not buying a spare. One extra element in an order costs little. One chipped or incorrectly installed socket without a replacement costs a lot.
Error 9: mounting on a dusty surface. Adhesion of glue to a dusty molding end is significantly worse. The socket may come off after a few weeks.
Error 10: not checking the frame diagonals. If a frame made of moldings has a deviation — a corner socket won't save it. First check the frame's squareness, and only then install corner elements.
What to buy together with a connecting socket: a systematic approach
A connecting socket is always part of a set. Buying it separately from other elements of the decorative system makes no sense. Here's what a professional order includes.
Pilasters, columns, and connecting sockets STAVROS — a section that contains the entire system: pilasters, bases, rosettes. Choose everything from one source.
Pilaster Base BS-001 и BS-004 — lower transition elements for decorating the base of a pilaster. Together with connecting rosettes, they create a complete decorative system for the vertical element.
Wood and MDF moldings — moldings, baseboards, cornices. The main "line" that the connecting rosette works with.
Wooden baguette and moldings — for frames, mirror surrounds, and decorative panels. Paired with corner rosettes, it forms a ready-made framing system.
Decorative wooden inlays — if the wall decor is built not only from moldings but also from three-dimensional decorative elements.
STAVROS carved decor — a complete catalog of carved interior products. Here you can select additional decorative accents to match the connecting rosettes.
KUDO High Tack mounting adhesive — for reliable fixation. No need to search for glue separately — it is available in the STAVROS catalog.
STAVROS installation and finishing materials — everything needed for installing decor: adhesives, oils, primers.
Frequently asked questions
What is a connecting rosette?
This is a small carved decorative element made of solid wood that covers the joint, corner, or intersection of wooden moldings, trim, pilasters, or frame profiles. It is not an electrical outlet or a ceiling medallion.
What is the difference between a connector rosette and a decorative ceiling rosette?
A ceiling rosette is an independent decorative object, often large in diameter, functioning as a central medallion under a chandelier. A connector rosette is a small corner or junction element in a molding system. It does not draw attention to itself but makes the system clean.
Can a connector rosette cover the joint of polyurethane moldings?
Yes, if the rosette is made in the same style and fits in size. It is preferable to match the material: a wooden rosette with wooden moldings, polyurethane rosettes with polyurethane moldings — or all under the same paint.
Does a connector rosette need to be painted separately?
If the moldings are painted, the rosette should be painted the same color after installation. If the moldings are oiled, treat the rosette with oil together with them after installation so that the tone is uniform.
How many rosettes are needed for one room?
It depends on the number of frames, intersections, and transitions. For one rectangular frame — four corner elements. For each transition from a pilaster to a molding — one rosette. Count all joints according to the diagram and add one or two elements as a reserve.
How to choose the size of a rosette?
The rosette should overlap the width of the molding at the joint with a margin of 10–20 mm. If the moldings are of different widths, focus on the wider one. Check the dimensions of specific items in the STAVROS product cards.
Where to buy the RS STAVROS connector socket?
In the STAVROS online catalog in the section pilasters, columns, and connecting rosettes with delivery across Russia, as well as in showrooms in Moscow and St. Petersburg.
Are connector sockets suitable for DIY installation without a professional?
Yes. It is one of the easiest decorative elements to install: glue — press — done. The main challenge is choosing the right size and coordinating it with the molding profile before ordering.


