Article Contents:
- Sixteen millimeters that make the cabinet pull away from the wall
- First, choose not the cut location, but the type of junction
- Method one: end PLT-004 exactly at the cabinet side
- Where to place the ending point
- Why ending two to three centimeters from the cabinet looks bad
- When this method is not suitable
- The furniture maker needs a profile, not just two numbers
- Where to perform the sampling
- The decorative panel simplifies the task
- The control template is mandatory
- Why a large margin is not always useful
- When a passage behind the cabinet is justified
- The gap cannot be calculated only based on the 16 mm thickness
- What will happen to the cabinet mounting
- What will happen after dismantling
- Equal height is not required
- Thickness changes the position of the facade
- The finish should explain the transition
- The removable plinth cannot be blocked
- In the middle of a free wall section
- A few centimeters from the side panel
- In front of the external corner
- Next to the decorative trim
- In the side light zone
- Near the short furniture plinth
- In the place of possible furniture rearrangement
- Built-in wardrobe from wall to wall
- Kitchen set
- Tall freestanding shelving unit
- Sliding wardrobe
- Wardrobe system
- Furniture in a commercial space
- Furniture has not been ordered yet
- The cabinet is already made, the plinth is not installed yet
- PLT-004 is already installed, furniture is just arriving
- Both the furniture and the plinth are already installed
- Record the finished floor level
- Mark the exact position of the cabinet
- Measure the distance to the back wall of the furniture
- Check the depth of the plinth recess
- Take a profile of the wall
- Mark the utilities
- Make a side view
- MDF option
- Beech and beech veneer
- Oak and oak veneer
- Length 2400 or 2600 mm
- Open areas
- Areas up to the side panel
- Passages behind the body
- Sections without profile
- Side returns
- Internal and external corners
- Visible ends
- Reserve
- Spare plank
- Dry fitting of furniture and profile
- The end is cut only after confirming the plane
- Finish treatment is taken into account
- They do not pull furniture to the wall through the baseboard
- They preserve the removability of technical elements
- The baseboard was chosen after measuring the furniture
- The furniture maker was only informed of the height of 160 mm
- The cutout was drawn as a rectangle
- The wardrobe was moved back exactly 16 mm
- The baseboard ended before the side panel
- The end was left open
- The load-bearing side panel was trimmed on site
- Did not account for the furniture plinth
- Blocked the removable kitchen plinth
- Ran the profile behind the built-in cabinet without an extension
- Removed the baseboard behind freestanding furniture
- Made too large a cutout
- Did not check the finished floor level
- Ordered material without an overall layout
- Chose a length of 2400 mm for a section longer than the plank
- Did not leave a reserve for a complex end
- Painted the entire profile before fitting
- Did not check the wall vertically
- Forgot about the socket behind the cabinet
- Gave different drawings to the installers
- What size does PLT-004 have?
- What lengths of PLT-004 are available in the product card?
- What is PLT-004 made of?
- Why does the wardrobe not fit flush against the wall because of the baseboard?
- Do I need to remove the baseboard behind the built-in wardrobe?
- Where is it better to finish PLT-004 in front of the cabinet?
- Is it possible to leave a few centimeters between the baseboard and the cabinet?
- What is a cutout for the baseboard?
- Is a cutout of 160 × 16 mm sufficient?
- Who should make the cutout: the furniture manufacturer or the installer?
- Can the finished side panel be cut out on site?
- Can PLT-004 be run behind the cabinet?
- How far will the cabinet move away from the wall?
- Is this method suitable for a freestanding shelving unit?
- What to do near the kitchen unit?
- Should PLT-004 and the kitchen plinth be the same height?
- Can the plinth be finished at the front edge of the kitchen?
- What to do if the cabinet has already been manufactured without a cutout?
- What to do if PLT-004 is already installed?
- How to check the joint before manufacturing the cabinet?
- Do I need to account for the finished floor?
- What to do with an uneven wall?
- Can the gap be sealed with sealant?
- How to treat the visible end of PLT-004?
- Can the cabinet be placed on top of the plinth?
- How to calculate the quantity of PLT-004?
- Should the area behind the built-in wardrobe be included in the calculation?
- What spare quantity should I order?
- What should I choose: a 2400 or 2600 mm strip?
- Can I combine lengths of 2400 and 2600 mm?
- How do I choose the PLT-004 material?
- Is PLT-004 suitable for painting?
- When should the skirting board be installed: before or after the wardrobe?
- Should I keep a spare strip after installation?
- Where can I buy the wooden floor skirting board PLT-004?
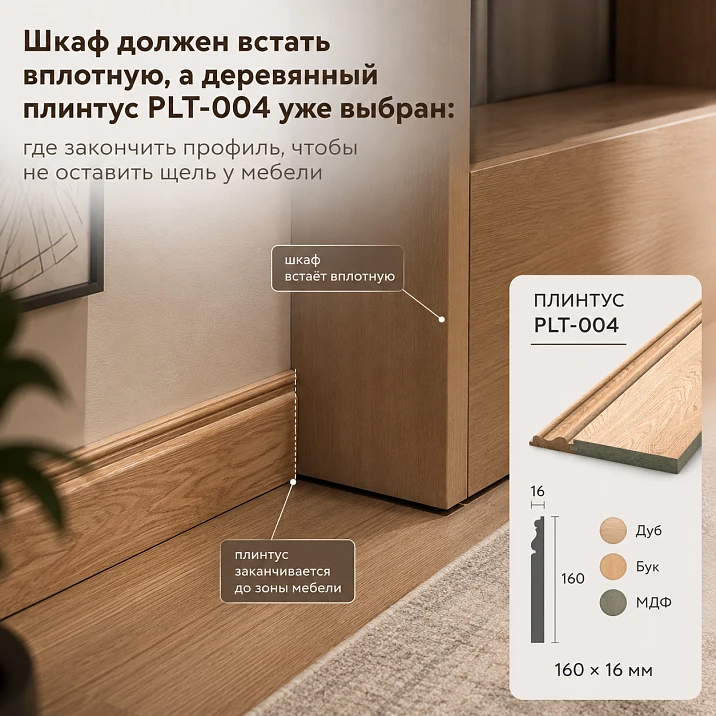
The cabinet was calculated precisely against the wall. Kitchen columns should rise from floor to ceiling without a side gap. A tall shelving unit should be placed so that dust doesn't collect behind it and a few centimeters of useful depth aren't lost. But along the wall, a tall wooden baseboard with a thickness of 16 mm is already planned. If you simply run it behind the furniture, the cabinet body will move away from the wall. If you stop the profile too early, an empty section will remain between the decorative line and the side panel. If you cut the baseboard on site without a pre-approved joint, the expensive profile may end with a random end cut.
This is exactly how the question arises that cannot be solved with a general phrase like "the baseboard is installed before the furniture" or "the cabinet is trimmed on site." Where should the decorative line end? Do you need to remove the baseboard behind the cabinet? Should you make a cutout in the side panel? Can the profile be passed behind the cabinet body? How do you connect a tall floor baseboard with a kitchen plinth so that one element doesn't look cut off next to another?
Before buying a wooden baseboard and ordering built-in furniture, you need to coordinate two independent projects. The first is responsible for the continuous line along the floor. The second is for the position of the cabinet body relative to the wall. If each contractor sees only their own part, the conflict is discovered on installation day: installers place the cabinet in position, find an obstruction at PLT-004, and suggest urgently cutting out the profile. At that moment, the customer is forced to choose not between good solutions, but between several ways to hide an already made mistake.
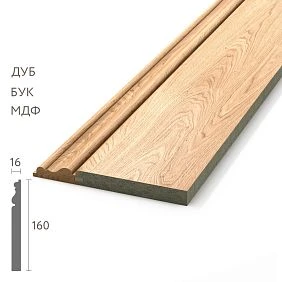
Wooden skirting board PLT-004 has dimensions of 160 × 16 mm. The card shows strips with lengths of 2400 and 2600 mm. The lower part of the profile is made of milled MDF with veneer, and the upper decorative element is made of solid wood. This design forms a noticeable classic line along the floor. The height of 160 mm affects the scale of the interior, and the thickness of 16 mm creates a specific technical constraint: furniture designed to the plane of the wall will not be able to take its place if a continuous baseboard remains between the cabinet body and the wall.
The good news is that PLT-004 does not interfere with the built-in cabinet by itself. The problem is created by the lack of a pre-selected method of abutment. The buyer has four working scenarios: end the profile at the side panel, make a cutout in the cabinet body, pass the baseboard behind the furniture with a provided gap, or connect it with the furniture plinth. Each option can look neat. Each one can ruin the interior if the termination point is determined only after the furniture is delivered.
Sixteen millimeters that cause the cabinet to move away from the wall
On the plan, the thickness of the baseboard seems insignificant. Sixteen millimeters is less than two centimeters. Against the background of a cabinet with a depth of 600 mm, such a value is easily lost. But furniture is perceived not by the ratio of the baseboard thickness to the total depth of the cabinet body, but by the specific gap near the wall.
If PLT-004 passes behind the side panel, the cabinet is moved away by at least the thickness of the profile. To this can be added wall unevenness, an installation gap, the protrusion of the upper decorative part, and the thickness of the fastening layer. As a result, a dark vertical strip appears on the visible side. Light gets into it, dust accumulates there, and the cabinet body no longer looks built-in.
The problem is especially noticeable with furniture that goes up to the ceiling. The cabinet can fit tightly against the ceiling filler, but move away from the wall at the bottom. The vertical of the side panel becomes slanted, or an additional strip has to be installed between it and the wall. What started with 16 mm turns into a new furniture joint that wasn't in the project.
In the kitchen, the consequences are even more complex. If a tall cabinet is moved away from the wall, the position of neighboring modules, the countertop, the wall panel, and the upper cabinets may change. A few millimeters in one section translate into a noticeable shift of the entire line.
Therefore, thickness cannot be considered a secondary characteristic. Before ordering furniture, it is useful to separately select the thickness of the plinth and provide the designer with the exact cross-section of PLT-004. The word "high" describes the visual appearance but does not tell the furniture maker what cutout to make and how many millimeters the cabinet will be offset from the wall.
| Parameter PLT-004 | Confirmed value | Why this matters near furniture |
|---|---|---|
| Height | 160 мм | Determines the height of the cutout, end, or furniture base |
| Thickness | 16 мм | Shows how far the profile protrudes from the wall |
| Length of strips | 2400 and 2600 mm | Affects cutting of sections up to furniture and behind cabinets |
| Lower part | Milled MDF with veneer | Requires careful handling of the visible end face |
| Top profile | Solid wood | Forms a decorative finish and is noticeable during accidental trimming |
| Purpose | Tall floor baseboard | Works as a continuous interior line, not as an inconspicuous technical strip |
The main conclusion from the table: the PLT-004 ending cannot be assigned only based on the lower part of the cabinet. The shape of the entire profile must be understood. A rectangular cutout with a height of 160 mm may be insufficiently accurate if the furniture cutout replicates only the overall dimensions but does not account for the decorative cross-section.




First choose not the cutting location, but the type of junction
Installers often ask: “Where to cut the plinth?” It sounds practical, but it comes too late. Before the cutting point, it is necessary to determine the role of the furniture side panel.
It can be:
-
visible decorative surface;
-
technical wall hidden by an extension;
-
with a side panel that reaches the wall;
-
with a cabinet body with a pre-made cutout;
-
with a kitchen part with a separate plinth;
-
with a base for a surface-mounted panel;
-
with an element that does not touch the wall due to utilities.
The same PLT-004 next to these structures ends differently.
| Junction method | When it fits | Main advantage | Main risk |
|---|---|---|---|
| End PLT-004 at the side panel | The side panel fully covers the transition and reaches the wall | No need to cut the cabinet body | The visible end may turn out to be random |
| Make a selection in furniture | The cabinet must stand directly against the wall | A continuous baseboard line is maintained | An incorrect cutout shape will leave a gap |
| Run the profile behind the cabinet | A gap is provided in advance in the design | The baseboard remains continuous | The body will move away from the wall if the gap is not calculated |
| Connect to the furniture plinth | The kitchen or cabinet has its own bottom line | You can create a unified architectural bottom | Different heights and thicknesses will create a step |
| Stop earlier and cover with an extension panel | A side panel or extension covers the transition | The joint can be made visually clean | An incorrectly calculated extension will emphasize the gap |
You cannot declare one method correct for all projects. A built-in cabinet and a freestanding shelving unit require different solutions. A kitchen has adjustable legs and a removable plinth. A sliding wardrobe has a bottom rail. For a solid wood library, the side panel may be part of the design and does not allow rough cutting.
Our factory also produces:
Method one: end PLT-004 exactly at the cabinet side panel
The clearest solution is to bring the profile up to the furniture and stop it where the side panel begins. The plinth does not pass behind the cabinet, so the cabinet can be placed close to the wall. The furniture does not need to be cut to match the profile shape.
Such a node looks neat under three conditions.
First, the side panel really fits against the wall. If a mounting gap remains behind it, the end of PLT-004 will be visible through the slit. Instead of a clean abutment, you will get a dark niche inside which the profile ends.
Second, the end point coincides with a clear vertical line. The skirting board must end along the line of the front, rear, or specially created edge of the side panel. You cannot stop it "approximately nearby," leaving a few centimeters of bare wall.
Third, the end is prepared as a visible part of the product. PLT-004 is not a simple rectangular strip. The lower veneered part and the upper solid wood element form a complex cross-section. A transverse cut shows the internal structure of the profile. If such an end remains open, it must be treated according to the chosen finish.
Get Consultation
Where to place the end point
The best place is directly in front of a plane that completely covers the end when viewed from the front and side. Usually this is the rear edge of a decorative side panel or a special extension.
Imagine a cabinet installed in a niche. On the left, its side panel is hidden by the wall; on the right, a decorative panel is visible. PLT-004 can approach the right panel and end behind its plane. Then, from the room side, the transition is almost imperceptible.
Another case is a freestanding tall cabinet. Its side panel is fully visible, and the body does not touch the wall due to a rear technical gap. If the skirting board ends at the rear edge, the end will be noticeable from the side. Here, either a decorative finish or another method of abutment will be required.
Why ending two to three centimeters from the cabinet looks bad
The installer may leave a small gap "for adjustment." From a technical standpoint, the allowance is convenient: the cabinet can be moved slightly. Visually, a short uncovered section is perceived as a measurement error.
The eye expects one of two solutions: a continuous line passes behind the furniture, or the baseboard meets the side panel. An intermediate pause does not explain itself. Such a gap is especially noticeable on a painted wall and with side lighting.
When the method is not suitable
Do not end PLT-004 at the side panel if:
-
the furniture may be rearranged;
-
the side panel does not reach the wall;
-
the end cannot be hidden;
-
utilities run between the cabinet and the wall;
-
the side panel has a plinth setback and does not cover the upper part of the profile;
-
the baseboard must be preserved after furniture removal;
-
the line continues into the adjacent open space.
In these situations, a solution that is convenient on the day of installation may work poorly after several years. After removing the cabinet, a section without a baseboard will remain on the wall.
Method two: make a cutout in the body and keep PLT-004 continuous
A cutout is a pre-planned notch in the lower rear part of a side panel or another furniture element. The baseboard passes through this notch, while the main plane of the body approaches the wall.
This approach is often chosen for a built-in wardrobe, a tall shelving unit, or a decorative kitchen side panel. It allows preserving two lines at once: the baseboard remains continuous, and the furniture looks installed flush.
But a good cutout is not equal to a 160 × 16 mm rectangle drawn from memory.
A furniture maker needs a profile, not two numbers
Height and thickness define the external dimensions. The shape of PLT-004 is more complex. The upper decorative element may require additional space, and the lower part may need precise contact. Therefore, the designer is given a cross-section drawing, a photo of the end, or a physical sample.
If the cutout is made only according to a rectangular frame, two results are possible. A too-small cutout will not allow the furniture to be placed in position. A too-large one will leave a noticeable gap above the profile and ruin the feeling of a precise fit.
Where to make the cutout
The cutout can be located:
-
in the side panel of the body;
-
in the decorative overlay panel;
-
in the rear filler strip;
-
in the plinth;
-
in combination of the side panel and plinth;
-
in a separate mounting plate.
The solution depends on the furniture design. You cannot cut out a load-bearing element on site without understanding its role. In some cabinets, the lower part of the side panel bears the load. In others, the side panel rests on adjustable legs, and the cutout does not affect stability. This must be determined by the furniture maker.
The decorative panel simplifies the task
If the body has a technical side panel and a separate overlay panel, the recess can be made in the decorative element. The body is installed according to its own mounting logic, and the panel covers the gap and follows the shape of PLT-004.
Such a unit is easier to adjust than cutting out the finished main side panel. However, the panel increases the thickness of the furniture and requires space. Its position must be taken into account in the overall dimension.
Control template is mandatory
Before producing all furniture, it is useful to make a cross-section template of PLT-004 at a 1:1 scale. It is applied to the drawing and, if possible, to a test fragment of the side panel.
The template must show:
-
height of 160 mm;
-
maximum protrusion of 16 mm;
-
shape of the upper profile;
-
possible finish layer;
-
Mounting allowance;
-
position relative to the finished floor.
If the floor is not yet laid, the cutout cannot be considered final. A change in floor level by a few millimeters will raise or lower the profile relative to the cutout.
Why a large allowance is not always useful
A furniture maker may enlarge the cutout to ensure the cabinet passes through. Technically, this reduces the risk of contact. Aesthetically, a dark cavity appears between PLT-004 and the cabinet body.
On light-colored furniture, the gap is especially noticeable. Dust gets into it. When viewed from the side, it seems as if the side panel was cut roughly.
The allowance should compensate for actual tolerances of the floor, wall, finishing, and installation, not replace precise measurement.
Method three: run the baseboard behind the furniture
Sometimes a buyer reasons like this: the baseboard already runs along the entire wall, let it also pass behind the cabinet. The line will remain continuous, and when dismantling the furniture, there will be no need to restore the missing section.
This option is possible, but only when the furniture design is initially intended to have a gap from the wall.
When running behind the cabinet is justified
The profile can be left behind the cabinet if:
-
the cabinet is not declared as built-in flush;
-
a technical gap is provided behind the furniture;
-
the back panel should not touch the wall;
-
the 16 mm protrusion does not interfere with the mounting;
-
the gap is closed with a side extension;
-
the furniture has an adjustable installation depth;
-
the baseboard does not conflict with the supports;
-
the room allows for a loss of a few millimeters.
For a freestanding shelving unit, this method is often simpler. The body still does not press against the wall due to the back panel, fasteners, or design features. PLT-004 passes behind it, and a small gap does not disrupt the concept.
For a built-in wardrobe, the situation is the opposite. If the side panel must blend with the wall, a profile running behind will create a gap. It will have to be closed with an extension, and the furniture will effectively become wider.
The gap cannot be calculated based only on the 16 mm thickness
The wall may have a deviation from vertical. The baseboard is installed on an adhesive or other mounting layer. The upper decorative profile has its own shape. The body is also not always perfectly straight.
Therefore, the design gap is determined after an on-site inspection. You cannot write "16 mm offset from the wall" in the order and consider the task solved.
What will happen to the cabinet mounting
Tall furniture is often fixed to the wall. If the cabinet is moved away, standard fasteners may not fit. A mounting rail, spacer element, or another component will be required.
This issue is especially important for a tall shelving unit. The baseboard should not become a reason to forgo safe furniture fixation.
What will happen after dismantling
The advantage of the passage behind the furniture becomes apparent when the cabinet is removed. The wall remains with a continuous PLT-004. There is no need to search for a profile from the same batch and restore the section.
This argument is important for rented spaces, commercial interiors, and freestanding furniture. For a built-in cabinet designed for long-term use, future dismantling is usually less significant than a precise fit today.
Method four: connect PLT-004 to the furniture baseboard
A kitchen set, built-in cabinet, and some shelving systems have their own baseboard. It covers the supports and forms the bottom line of the furniture. There is a temptation to simply run the floor baseboard up to the furniture baseboard.
The joint can be expressive, but heights, thicknesses, and finishes must be coordinated in advance.
Equal height is not required
The furniture plinth may be lower than 160 mm. This is not a mistake in itself. What matters is that the transition looks intentional.
For example, PLT-004 fits against the decorative side panel of the cabinet, while the furniture plinth starts already behind its front plane. Then the lines do not clash directly: the high skirting finishes the wall, the low plinth works within the furniture volume.
A bad option occurs when both elements meet on the same plane and form a random step.
Thickness changes the position of the facade
PLT-004 protrudes 16 mm from the wall. The furniture plinth may be located deeper than the front line of the body. If the joint is not shown from the side, the skirting will end up in front of the plinth or, conversely, sink behind it.
The finish should explain the transition
Veneered PLT-004 can be tied to a wooden side panel. A painted profile — to the wall or facades. The furniture plinth can match the body, facade, or floor.
There is no need to achieve a complete match of all materials. A clear hierarchy is needed. If PLT-004 continues the wall, it ends at the furniture boundary. If the skirting and plinth are perceived as one line, their color and position require particularly precise coordination.
The removable plinth must not be blocked
The kitchen plinth is often removed for access to supports and utilities. PLT-004 must not interfere with its dismantling. The joint is designed so that the furniture strip can be removed without damaging the floor profile.
Fifth scenario: stop the plinth earlier and cover the transition with an extension panel
This method is useful when the cabinet does not fit against the wall with its own side panel, but a separate decorative panel is installed nearby. The extension panel can cover the area from the furniture to the wall, hide the end of PLT-004, and form a clean vertical line.
The key is not to use the extension panel as an improvised plug. Its width should be part of the furniture design.
If the extension panel is too narrow, it looks like an attempt to cover up a mistake. A too-wide element visually enlarges the cabinet and shrinks the room. In a kitchen, a wide extension panel can disrupt the symmetry of the facades.
In such a joint, the plinth ends behind the plane of the extension panel. The end is not visible from a normal viewing angle. The furniture body may have its own installation gap.
The extension panel is especially useful near an uneven wall. Instead of fitting the finished side panel to every wave of plaster, the installer adapts a separate strip. However, the bottom cutout for PLT-004 is still made according to the template.
Where the termination of PLT-004 will look sloppy
An unsuccessful ending point is much more noticeable than a regular joint between two strips. The reason is simple: the decorative line suddenly disappears.
In the middle of a free wall section
If there is an open surface between the end of the plinth and the furniture, the eye asks the question: why did the profile end exactly here? Such a solution has no architectural explanation.
A few centimeters from the sidewall
The short gap looks like a measurement error. It is too small to become an independent wall section and too large to disappear into the joint.
In front of the external corner
The tall profile leads the eye to the corner but stops short. The exposed section becomes noticeable from both sides.
Next to the decorative architrave
If PLT-004 is already meant to align with the door trim, adding a furniture end cap nearby is risky. Too many transitions accumulate on the short wall segment.
In the side-light zone
Light from a window or linear fixture emphasizes every protrusion and edge. Even a neatly finished end can cast a noticeable shadow.
Near the low furniture plinth
Two lines of different heights and lengths create visual noise. Better to separate them onto different planes or connect them via a side panel.
In the place of possible furniture rearrangement
If the cabinet is not built-in, it can be removed. Then the area without the baseboard will become exposed. For freestanding furniture, it is often more reasonable to keep the profile behind the body.
Built-in wardrobes, kitchens, and shelving units require different solutions
The problematic request is one — furniture flush against the wall with a baseboard. But the same joint cannot be transferred from one type of furniture to another.
Built-in wardrobe from wall to wall
Here, the feeling of being built-in is most important. Side gaps are covered with filler panels, and the body is fixed to the walls and ceiling.
Most often, one of two methods is chosen:
-
PLT-004 ends behind the decorative filler panel;
-
a precise cutout is made in the filler panel or side panel.
Running the profile behind the entire wardrobe makes sense only with a pre-calculated depth. Otherwise, the body will shift forward, and the door line will no longer match the design.
Before developing the node, it is useful to look cabinets and design ideas, to evaluate different ways of working with side panels, plinths, and decorative panels. A ready example does not replace measurement, but helps to understand which furniture elements can hide the end of the skirting board.
Kitchen set
The kitchen has its own furniture plinth, adjustable supports, countertop, and connection to utilities. Shifting the body by 16 mm can affect several adjacent parts.
On open walls, PLT-004 can run continuously. Near the kitchen side panel, it is either terminated or passed through a cutout in the decorative panel.
Behind lower cabinets, the floor profile is often not visually needed, but the decision depends on the project. If the kitchen is ever dismantled, the absence of the skirting board will be revealed. A built-in kitchen is usually designed for long-term use, so the aesthetics of the current node may be more important than future rearrangement.
At a column with a refrigerator or oven, the side panel is especially noticeable. The end of PLT-004 needs to be hidden behind it, not left in front of the plane.
Tall freestanding shelving unit
The shelving unit does not always have to literally touch the wall. A small gap can be part of the design. Then PLT-004 can pass behind it without issue.
However, a tall cabinet requires fixation. It is necessary to check how the mounting will overcome the gap. You cannot choose to run the skirting board behind the shelving unit and then refuse the mounting due to an inconvenient distance.
If the shelving unit has an open side, the gap behind it is visible. In this case, a notch is made or a rear decorative panel is used.
Wardrobe
The bottom guide and the position of the side panels create their own constraints. The baseboard must not interfere with the installation of the track or the movement of the doors.
If the cabinet completely fills the niche, PLT-004 is usually terminated before the inner area and the end is hidden behind the side element. Running a tall profile under the guide without a separate drawing is not allowed.
Walk-in closet system
Open racks and shelves do not always cover the wall. If the baseboard is removed behind the system, the absence of the line may be noticeable between the supports.
In such a design, a continuous PLT-004 often looks better, and the racks or panels are adapted to its cross-section. But this requires checking the fasteners and the depth of the shelves.
Furniture in a commercial space
Cabinets and shelving units in a showroom or store may be rearranged. Here, maintaining a continuous baseboard behind the furniture makes practical sense. The room will not be left with an unfinished wall after changing the display.
At the same time, the load and safe fixation of tall structures must be taken into account.
First the cabinet or first the plinth
There is no universal sequence. It depends on the readiness of the object and the type of furniture.
Furniture has not been ordered yet
This is the most convenient situation. The PLT-004 section is given to the furniture maker before the drawings are approved. The project immediately shows:
-
the wall line;
-
finished floor;
-
profile 160 × 16 mm;
-
body;
-
side panel;
-
cutout;
-
furniture plinth;
-
end point.
The plinth can be installed before the furniture if the cutout is confirmed against a sample. Sections can be left unsecured until the fitting. The key is that the sequence is written down, not discussed verbally on the day of installation.
The cabinet is already manufactured, the plinth is not yet installed
First, the furniture is placed against the wall or its exact dimensions are studied. Then the end point of PLT-004 is chosen.
If the cabinet does not have a cutout, do not automatically cut out the finished side panel. It may be simpler to end the plinth behind a decorative panel or install an extension.
PLT-004 is already installed, the furniture is only arriving
A dry installation of the cabinet body must be performed and the actual conflict zone marked. After that, a decision is made:
-
remove a section of the plinth;
-
carefully shift the end point;
-
make a cutout in a separate panel;
-
preserve the profile and increase the furniture extension;
-
Change the position of the cabinet body.
The profile cannot be cut before fitting. The furniture size according to the documents may differ from the actual fit due to walls and floor.
Both the furniture and the baseboard are already installed.
If the cabinet stands away from the wall, first determine the cause. It may be not only PLT-004 that interferes, but also an uneven wall, an outlet, a pipe, or rear fasteners.
Removing the baseboard makes sense only after a full diagnosis. Otherwise, the cabinet body still won't fit against the wall, and the decorative line will already be damaged.
Measurements that need to be taken before ordering PLT-004
One wall length is not enough. For a correct calculation, a map of open and closed sections is required.
Record the finished floor level
The height of PLT-004 is 160 mm from the finished surface. If the floor is not yet laid, take into account the future thickness of the covering, underlay, and adhesive.
A cutout in the furniture made from the subfloor will end up higher or lower than the profile after finishing.
Mark the exact position of the cabinet
On the wall, draw a vertical line for the future side panel. Separately show the decorative panel and the technical body if their planes do not coincide.
Measure the distance to the back wall of the furniture
Some bodies have a back wall that is recessed inward. The plinth may fit behind it but press against the side panels.
Check the depth of the plinth recess
For kitchens, the fronts are located in front of the supports. The furniture plinth is recessed. PLT-004 may end in an area not visible from the front but noticeable from the side.
Take a profile of the wall
The cabinet may touch the wall at the top and pull away at the bottom. Or vice versa. The laser line and checking multiple points will show the actual geometry.
Mark the utilities
Sockets, pipes, and cables may require additional clearance. Furniture cannot be designed flush if a connected plug remains behind it.
Make a side view
The front view does not show the thickness. For node PLT-004 and furniture, a side section is needed.
Example of a technical note for a cabinetmaker
The verbal phrase "take into account the high plinth" is too vague. A working note might look like this:
Floor profile PLT-004, height 160 mm, maximum thickness 16 mm. Installation location — wall A. Cabinet Sh-01 must be adjacent to the wall. In the decorative right side panel, provide a cutout according to the actual template of PLT-004. Check the top of the cutout after the finished floor is installed. Hide the end of the plinth behind the side panel. Before starting furniture production, agree on the cross-section based on the sample.
Such a formulation answers the main questions: which profile, where it is located, what the furniture should do, in which part the cutout is made, and when the height is checked.
For a kitchen set, the note will be different:
PLT-004 runs along the open wall up to the decorative side panel of the tall cabinet. It is not installed behind the lower modules. The end is hidden by the plane of the side panel. The furniture plinth starts behind the front line of the side panel and remains removable.
The more accurately the node is described, the fewer decisions installers will have to make on site.
What to pass on to the furniture maker
For design, not only the numbers from the card are needed.
Pass on:
-
article PLT-004;
-
size 160 × 16 mm;
-
drawing or image of the cross-section;
-
photo of the actual sample;
-
selected material;
-
expected finish;
-
thickness of the finish layer, if it affects the fit;
-
finished floor level;
-
end point;
-
connection method;
-
position of the furniture plinth;
-
the need to remove the plinth;
-
location of sockets and pipes;
-
wall tolerances;
-
the side from which the unit will be visible.
The furniture maker also needs to know who performs the trimming: the production or the installation team. Factory trimming is usually more accurate but requires final data. On-site trimming allows for the actual wall to be taken into account, but increases the risk of damage to the finish.
What to provide to the STAVROS manager
To purchase PLT-004 not as abstract footage but as a calculated set, prepare:
-
room plan;
-
lengths of open walls;
-
areas where the profile runs behind furniture;
-
end points at cabinets;
-
number of internal corners;
-
number of external corners;
-
short returns;
-
selected material option;
-
length of slats 2400 or 2600 mm;
-
assumed layout;
-
need for a control sample;
-
object readiness deadlines;
-
storage method before installation.
The manager does not replace a furniture designer, but detailed data helps to correctly form the order and check whether areas near cabinets are not lost.
Which PLT-004 option to choose
The PLT-004 card combines several material solutions. They cannot be selected only by price. The high profile takes up noticeable space, and near furniture, color, pattern, and edge treatment are especially important.
MDF option
MDF is considered for painted interiors and smooth opaque finishes. It allows PLT-004 to be tied to the wall, trims, or furniture facades of the same color.
If the profile ends at a cabinet, the visible end requires careful preparation. You cannot assume that the side panel will automatically cover the entire cut. First, check the line of sight.
Before painting, clarify the preparation of the specific item and the compatibility of the chosen finishing system. The phrase "floor plinth for painting" does not mean that any surface can be coated without primer and a test sample.
Beech and beech veneer
The beech version suits projects where a natural wood character and corresponding finish are needed. At a height of 160 mm, the pattern is clearly visible.
Near a cabinet made of another material, it is important to determine whether PLT-004 should continue the floor, doors, or furniture. Accidental shade mismatches are most noticeable at the junction point.
Oak and oak veneer
The oak option supports a massive classic line and pairs with wooden doors, flooring, and furniture. But the same species name does not guarantee a complete match in shade.
If the cabinet has an oak side panel, samples are compared side by side and in the lighting where the furniture will stand. Sometimes a slight difference looks natural. Sometimes two close but mismatched tones clash more strongly than a well-thought-out contrast.
Length 2400 or 2600 mm
The choice of length depends on the layout, not just on delivery convenience.
A 2600 mm plank can cover a long section without an additional joint. A 2400 mm plank sometimes distributes better between short walls and ends near furniture.
You cannot automatically order the longest pieces. If the room consists of small sections, long planks will produce more awkward leftovers.
How to calculate the quantity of PLT-004 taking furniture into account
The usual room perimeter does not show the actual consumption. You need to divide all walls into types.
Open sections
These are walls where PLT-004 is fully visible. Their length is measured from corner to corner, doorway, or furniture.
Sections up to the side panel
If the profile ends at a cabinet, the measurement is taken to the exact plane of the hidden end. You cannot use an approximate size of future furniture.
Passages behind the body
They are included in the calculation only when the decision to leave the baseboard behind the furniture is approved.
Sections without profile
Behind a built-in kitchen or cabinet, the baseboard may be absent. These lengths are subtracted, but short returns and endings are accounted for separately.
Side returns
If the profile goes around a protrusion or niche, additional short elements appear. They are easy to forget in the total perimeter.
Internal and external corners
Angles affect cutting. An external angle requires particularly careful trimming, so it cannot be planned from a random short leftover.
Visible ends
Every open end requires a quality fragment and additional processing. Such places are better assigned to a whole piece rather than a minimal leftover.
Allowance
The allowance is calculated after the cutting map. A room with four straight walls and one cabinet differs from a room with niches, columns, and several furniture blocks.
Spare strip
For a complex room, a separate reserve plank may be more reasonable than a small percentage allowance. It will come in handy if a long visible section is damaged or the end point at the furniture changes.
Example of a statement:
| Section | Visibility | Decision at the furniture | Calculated length | Cutting feature | |||||||||||||||||||||||||||||||||||||||||||||||||||||||||||||||
|---|---|---|---|---|---|---|---|---|---|---|---|---|---|---|---|---|---|---|---|---|---|---|---|---|---|---|---|---|---|---|---|---|---|---|---|---|---|---|---|---|---|---|---|---|---|---|---|---|---|---|---|---|---|---|---|---|---|---|---|---|---|---|---|---|---|---|---|
| Wall A | Fully open | No furniture | By measurement | One long plank preferred | |||||||||||||||||||||||||||||||||||||||||||||||||||||||||||||||
| Wall B | Up to the cabinet | End hidden by side panel | By exact mark | Clean cross cut needed | |||||||||||||||||||||||||||||||||||||||||||||||||||||||||||||||
| Wall B | Behind the shelving unit | Profile runs continuously | Full wall length | Check gap and fastening | |||||||||||||||||||||||||||||||||||||||||||||||||||||||||||||||
| Wall G | Kitchen | Baseboard ends at panel | To the rear plane of the panel | Align furniture plinth | |||||||||||||||||||||||||||||||||||||||||||||||||||||||||||||||
| Niche | Partially open | Two endings | Across three sections | Many short elements | What to buy and check together with PLT-004
| What to include in preparation | Why this is needed | When it is especially useful | Confirmed page |
| PLT-004 | Choose specific material and length of strips | For final calculation | Wooden skirting board PLT-004 |
| Alternative profiles | Compare thickness and height if the cabinet is already made | When PLT-004 does not fit into the finished assembly | Wooden baseboards and floor profiles |
| Thickness check | Assess protrusion from the wall and scale | Before ordering furniture | select the thickness of the plinth |
| Installation preparation | Align joints, corners, and endings | When installing near side panels and baseboards | Installation of Wooden Skirting Board |
| Acceptance | Check parts before cutting and finishing | For long open walls | Check the geometry and moisture of the baseboard |
| Storage | Do not damage or deform the planks before installation | If furniture and baseboard are installed at different times | storage rules for wooden decor |
The table does not mean that additional decorative parts must be purchased for PLT-004. The main accompanying value here is accurate information. It helps to order a profile of the required length and not lose material when fixing the unit with the cabinet.
Acceptance before cutting: a long line does not forgive random geometry
After receiving, you need to Check the geometry and moisture of the baseboard before painting, cutting, and installation.
On an open wall several meters long, even a slight deviation becomes noticeable. Near the cabinet, it can change the point of contact: the top of the profile meets the side, while the bottom leaves a gap.
Check:
- matching of the article number;
- section size;
- length of each plank;
- condition of the veneer;
- top element made of solid wood;
- straightness;
- ends;
- matching of the profile between parts;
- quantity;
- pattern and shade;
- absence of damage;
- possibility to lay out the parts along the walls.
Planks are distributed before cutting. The best ones in terms of pattern and geometry are kept for long open walls. Fragments near furniture can be selected separately, but the visible end also requires quality material.
Storage before furniture installation
The plinth and cabinet often arrive at different times. PLT-004 may remain on site for several weeks. Use storage rules for wooden decor and do not leave long planks vertically leaning against the wall near heating.
The material is placed on a flat support, protected from moisture, dirt, and impacts. Parts with approved end points are labeled.
Useful labeling:
- A-1 — long wall;
- A-2 — end at the cabinet;
- B-1 — area behind the shelving unit;
- K-1 — junction with the kitchen;
- R — reserve.
This system prevents the installer from accidentally using a part intended for the visible end on a hidden section.
Installation of PLT-004 near furniture
General rules are covered in the material about Installation of Wooden Skirting Board. In the unit with the cabinet, several checks are added.
Dry fitting of furniture and profile
The plinth is applied without final fixation. The side panel or furniture template is placed in the design position. The front and side views are checked.
If the cabinet has not been delivered yet, a full-size template of its side panel is used.
The end is cut only after confirming the plane
You cannot measure the length along the wall if the decorative panel is not yet installed. The actual position of the side panel may differ from the drawing.
They take into account the finishing trim
Paint or varnish adds a thin layer and changes the appearance of the end. The precise fit is checked on a prepared surface.
Do not pull furniture to the wall through the baseboard
If the cabinet body presses against PLT-004, do not tighten the fastener hoping to press the profile down. This creates tension, deforms the side panel, or damages the baseboard.
Keep technical elements removable
The kitchen plinth, access panel, or outlet access must remain functional.
Mistakes that cause a gap near the cabinet
The baseboard was chosen after the furniture was measured
The designer did not know about the 16 mm thickness and calculated the cabinet flush to the wall plane. Before installation, one has to choose between a gap and trimming.
The furniture maker was only informed of the 160 mm height
Without thickness and cross-section, it is impossible to make the correct cutout.
The cutout was drawn as a rectangle.
It does not follow the decorative profile. Above PLT-004, there remains an extra cavity, or the furniture does not sit in place.
The cabinet was moved exactly 16 mm.
The wall unevenness, fasteners, and mounting layer were not taken into account. The gap still appeared.
The baseboard ended before the side panel.
The short wall section looks unfinished.
The end was left open.
The cut reveals the profile structure and an unprepared surface.
The load-bearing side panel was trimmed on site.
Changed the furniture design without approval from the manufacturer.
Did not account for the furniture plinth.
The two bottom lines collided and formed a step.
Blocked the removable kitchen plinth.
To access utilities, PLT-004 must be removed or damaged.
Ran the profile behind the built-in cabinet without an extension piece.
The cabinet moved away from the wall, leaving the vertical gap open.
Removed the baseboard behind freestanding furniture.
After rearranging, an unfinished section of wall was discovered.
Made too large a cutout.
The furniture was installed, but a dark gap remained above the profile.
The finished floor level was not checked
The cutout turned out to be higher or lower than PLT-004.
The material was ordered without a general layout
There was not enough of a whole plank for the long open section.
A length of 2400 mm was chosen for a section longer than the plank
An extra joint appeared next to the furniture.
No reserve was left for the complex end
After a cutting error, one plank had to be purchased from another batch.
The entire profile was painted before fitting
Fixing the end and the recess has become more difficult.
Did not check the wall for verticality
The cabinet touches the wall at the top but pulls away at the bottom, even though the baseboard has already been removed.
Forgot about the outlet behind the cabinet
The plug pushed the furniture further out than PLT-004.
Gave different drawings to the installers
The baseboard was calculated to one plane, but the furniture was installed to another.
When PLT-004 is especially appropriate near built-in furniture
A tall profile works well in interiors where the bottom line should be architecturally prominent. It supports large casings, tall doors, classic panels, and massive furniture.
PLT-004 is worth considering if:
- furniture is designed simultaneously with the finishing;
- the exact cross-section can be provided to the manufacturer;
- side panels or extensions can hide the ends;
- the room allows a height of 160 mm;
- the chosen finishing supports doors, floor, or cabinet;
- there is an option to make a control template;
- end points are defined before ordering;
- lengths of 2400 and 2600 mm conveniently lay out along the walls;
- the client wants to preserve an expressive line along the floor.
PLT-004 looks especially convincing next to ceiling-height furniture. The high horizontal of the floor balances the large vertical of the cabinet. But it is precisely in such a project that the gap near the wall is most noticeable, so the joint requires precision.
When is it better to compare another floor profile
Another option is worth considering if:
- the finished cabinet cannot be trimmed;
- the side panel must touch the wall, but there is no extension piece;
- the baseboard is already installed and removing it will damage the finish;
- the height of 160 mm conflicts with the furniture plinth;
- the thickness of 16 mm creates an unacceptable gap;
- the layout often changes;
- the room consists of short sections and complex endings;
- there is no way to obtain an accurate template;
- the selected furniture does not allow a hidden end;
- a lower or thinner profile solves the task more simply.
In this case, it is useful to compare Wooden baseboards and floor profiles before placing the order. Changing the profile before purchase is a normal design decision. Replacement after painting and installation is significantly more expensive.
How to order PLT-004 taking into account the built-in wardrobe
A commercial order begins not with the number of meters, but with an approved scheme.
Prepare a table:
| Room | Wall | Length of the open section | Section behind the furniture | Ending method | Material | Plank length |
| Bedroom | А | By measurement | No | Behind the cabinet side panel | Selected option | 2400 or 2600 mm |
| Living room | Б | By measurement | Full length behind the shelving unit | Without ending | Selected option | By layout |
| Kitchen | В | Up to the pencil case panel | No | End hidden by panel | Selected option | By layout |
| Office | Г | By measurement | Partially | Cutout in the side panel | Selected option | By layout |
Then open the card wooden plinth PLT-004 and check the material, available lengths, and current parameters of the specific item.
Before placing an order, please clarify:
- availability of the selected option;
- actual length;
- surface preparation;
- finishing requirements;
- quantity;
- possibility to obtain a sample;
- delivery conditions;
- acceptance rules.
Do not order skirting board "by total perimeter" if part of the wall is occupied by built-in furniture. Excess length may be useless, and one correct plank for the visible area will not be enough.
FAQ: PLT-004, built-in wardrobe and skirting board end point
What size does PLT-004 have?
PLT-004 has dimensions of 160 × 16 mm. The profile height is 160 mm, and the thickness is 16 mm. Both figures are needed for joining to furniture.
What lengths of PLT-004 are shown in the product card?
The product card specifies strips with lengths of 2400 and 2600 mm. The specific length is chosen after layout along walls and areas near furniture.
What is PLT-004 made of?
The lower part is made of milled MDF with veneer, the upper decorative profile is made of solid wood. The specific material option is checked in the product card of the selected item.
Why doesn't the wardrobe fit flush against the wall due to the baseboard?
The profile protrudes from the wall by 16 mm. If no recess or technical gap is provided behind the cabinet body, the side panel rests against PLT-004.
Is it necessary to remove the baseboard behind the built-in wardrobe?
Not always. The baseboard can be ended at the side panel, routed through a recess, left behind the cabinet with a calculated gap, or connected to the furniture plinth.
Where is the best place to end PLT-004 in front of the wardrobe?
The end is best hidden behind the side panel, an extension piece, or a decorative panel. The ending should not remain in the middle of a visible wall section.
Can a few centimeters be left between the baseboard and the wardrobe?
Technically possible, but visually such a gap usually looks like a measurement error. It's better to bring the profile to a clear furniture boundary.
What is a plinth cutout?
This is a cutout in the lower rear part of a side panel, panel, or base. It allows the furniture to be closer to the wall while preserving PLT-004.
Is a cutout of 160 × 16 mm sufficient?
Not always. The cutout must account for the actual profile shape, finish, floor level, and installation allowance. It's better to use a cross-section template.
Who should make the cutout: the furniture manufacturer or the installer?
The preferred option depends on the readiness of the site. Production works more accurately according to an approved template, while the installer can account for the actual wall. Responsibility should be defined in advance.
Can a finished side panel be cut out on site?
Only after agreement with the furniture manufacturer. The side panel may be load-bearing or have a finish that is difficult to restore.
Can PLT-004 be run behind the cabinet?
Yes, if the design allows for a gap, the furniture attachment remains safe, and the side gap is closed or not visible.
How far will the cabinet move away from the wall?
At least by the thickness of the profile, but the actual distance may be greater due to wall unevenness, the shape of PLT-004, fasteners, and the mounting layer.
Will this method work for a freestanding shelving unit?
Often yes. If a small offset is acceptable and wall attachment is provided, the profile can be left continuous.
What to do near a kitchen unit?
Usually PLT-004 is brought up to the decorative side panel or a cutout is made in the panel. The furniture plinth must remain removable.
Should PLT-004 and the kitchen plinth have the same height?
No. What matters is not equal heights, but a clear transition between the lines. The elements can be placed on different planes.
Can the skirting board be finished at the front edge of the kitchen?
Such an ending will be too noticeable. Usually the end is hidden closer to the wall behind a decorative panel.
What to do if the cabinet has already been made without a cutout?
First, try on the cabinet body. Then compare options: remove a section of the baseboard, add an extension piece, make a cutout in a separate panel, or change the position of the furniture.
What to do if PLT-004 is already installed?
Do not cut the profile before installing the furniture template. First, mark the actual side panel and check whether only the baseboard is in the way.
How to check the fit before manufacturing the cabinet?
Make a 1:1 scale template of PLT-004 and a side drawing of the furniture. Even more accurate is to give the cabinet maker a physical sample.
Do I need to take the finished floor into account?
Definitely. The height of the cutout is calculated from the finished surface. After laying the covering, the position of the profile will change relative to the rough base.
What to do if the wall is uneven?
Provide an adjustable extension or a separate decorative panel. The baseboard will not correct the wall deviation.
Can the gap be sealed with sealant?
Sealant does not replace the furniture joint. It does not correct the 16 mm body offset and rarely looks neat on a long vertical gap.
How to finish the visible end of PLT-004?
The method depends on the material and finish. The end must be prepared as a decorative surface, not left as after a regular construction cut.
Can a cabinet be placed on top of a baseboard?
The body must not rest on a protruding profile unless this is provided for by the design. Furniture must have its own stable support.
How to calculate the quantity of PLT-004?
Divide the walls into open sections, passages behind furniture, and areas without baseboard. Then create a cutting plan taking into account lengths of 2400 and 2600 mm.
Should the area behind a built-in cabinet be included in the calculation?
Only if the profile actually runs behind the body. If PLT-004 ends at the side panel, the hidden section is not included.
What stock should I order?
Stock depends on corners, short returns, visible ends, and material. For a complex room, one spare plank is sometimes more useful than a formal percentage.
What to choose: a 2400 or 2600 mm plank?
Choose the length that reduces the number of joints and distributes better across all walls. The longest plank is not always the most economical cut.
Can I combine lengths of 2400 and 2600 mm?
If the needed items are available and have the same material and preparation, combining can be convenient for layout. Compatibility must be confirmed before ordering.
How to choose material PLT-004?
Focus on the floor, doors, furniture, and future finishing. Evaluate the sample next to the cabinet side, not separately on a table.
Will PLT-004 be suitable for painting?
The possibility and preparation of a specific option should be clarified in the product card or with a STAVROS manager. Do not apply the finish without a test sample.
When to install the plinth: before the cabinet or after?
Both options are possible. The main thing is to approve the end point, the cutout, and the sequence of work in advance.
Is it necessary to keep a spare plank after installation?
For a large project, this is useful. Later, finding a fully matching material and shade may be more difficult.
Where to buy the wooden floor plinth PLT-004?
The specific profile can be ordered on the STAVROS website. Before purchasing, prepare the layout, choose the material, and coordinate the junctions with the furniture.
The plinth should end where a clear furniture boundary begins.
A gap between the cabinet and the wall rarely appears unexpectedly. Its cause is known in advance: PLT-004 protrudes by 16 mm, and the cabinet body is designed up to the wall plane. What remains unknown is only the solution—until the client, the furniture maker, and the installer choose it together.
A tall plinth can be neatly finished at the side panel, run through a cutout, left behind a freestanding piece of furniture, or connected to the furniture base. None of these methods require giving up the expressive 160 mm line. What is required is something else: show the profile on the furniture drawing before production and mark the end point before cutting the planks.
Before ordering, compare PLT-004 with the finished floor, side panel, extension, base, and the actual wall. Determine whether the end will be visible. Decide whether the plinth should remain after furniture dismantling. Create a layout for planks of 2400 and 2600 mm. Only after this, calculate the quantity.
STAVROS company offers a ready-made PLT-004 with a specific cross-section, materials, and length options. This certainty allows you not to improvise on site, but to build a precise joint in advance. When the profile ends behind a clear vertical line, and the cabinet occupies a calculated space, the furniture truly fits flush — without a random gap, rough cut, or lost decorative line.