
























































Article Contents:
- Wooden bracket KR-065: we buy decor, not shelf repair
- Bracket under a ready-made shelf: full-size fitting
- Two wooden brackets: we choose the placement, not the number of load-bearing supports
- Beech or oak: we order brackets to match the existing finish
- Installing a decorative bracket: own fastening and access to the shelf
- Price of two KR-065: calculating the finished result
- When it's better not to buy wooden brackets
- How to order KR-065 for a ready-made shelf
- Questions before purchasing wooden brackets
- Can I leave a gap between the top of the bracket and the shelf?
- Do I need to look for left and right versions for the two sides?
- Can I order one piece first for a trial fit?
- Will the scheme work if the shelf is made of laminated chipboard?
- What to do if the wall under one part is uneven?
- Can the LED backlight under the shelf be preserved?
- Will it be possible to remove the brackets during the next renovation?
- Can towels or a bag be hung on the new parts?

The walls were repainted, the furniture was replaced, but the wall shelf was decided to keep: its dimensions, capacity, and reliable hidden mounting are satisfactory. For the new decor, two smooth wooden brackets KR-065 are being considered. They are needed as decorative additions to the existing structure. The purchase condition is that the parts fit, receive their own secure mounting, and do not interfere with servicing the existing shelf. If it sags or wobbles, the structural issue is addressed first.
For those who are going to buy wooden bracket KR-065, it is worth starting with a fitting, not with choosing a tint. The order is as follows: check the space occupied, approve the placement, select the wood and finish, agree on installation, then calculate the final result. Neither the absence of drilling nor savings relative to a new shelf can be promised in advance. Here we are discussing an order of exactly two parts of the same size: the main variables remain the wood species, quality of preparation, finish, and method of their installation.
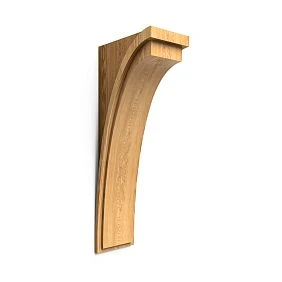
Wooden bracket KR-065: we are buying decor, not a shelf repair
In this project, the shelf continues to work on its standard hidden mounting. The new parts change its appearance: instead of a thin horizontal line, a composition with pronounced vertical elements appears. Two pieces were chosen for decoration, not calculated as the number of load-bearing supports.
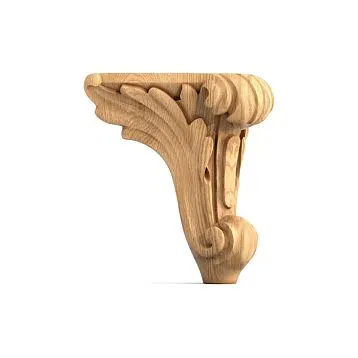
According to the STAVROS card, the selected model has the following parameters:
| Parameter | KR-065 data | What to write in the order |
|---|---|---|
| Product | Smooth wooden bracket | Item number KR-065 |
| Size A × B × C | 350 × 80 × 142 mm | Full size without rearranging numbers |
| Wood | Beech or oak | One selected wood species for both parts |
| Sanding | "Standard" or "Prestige" | Same quality of two products |
| Regluing of the base version | For enamel | Agreed option for future finishing |
| Quantity in the project under consideration | 2 pieces | Two separate items of the same article |
The decorative role here does not mean that KR-065 cannot in principle be used otherwise. It means a narrower condition: we do not assign it additional load capacity without calculating a specific structure. After the update, you should not fill the shelf with heavier items just because visible brackets have appeared under it.
Before trying it on, remove items and inspect the shelf without a strength test. Noticeable sagging, movement relative to the wall, an opening gap, or damage near the mounting is a reason to contact the installer. The absence of external defects also does not replace information about the permissible load of the original system. If the installation history is unknown, it should be determined before reworking.
Attempting to prop up a sagging middle with a decorative part, fitting it "in tension," is especially unsuccessful. This is already a change in the structure's operation, not decoration. It requires a separate solution and verification of the base; buying two items you like does not by itself solve the problem.




Bracket under a ready-made shelf: full-scale try-on
A product photo helps choose the shape but poorly shows the scale in a room. For a preliminary assessment, two views are needed: front and side. Start with overall rectangles, and transfer the exact contour from the manufacturer's dimension diagram. The rectangle indicates the maximum occupied space; it cannot be passed off as the silhouette of KR-065 or a mounting template.
For the try-on diagram, the position is further assumed where 350 mm is directed vertically, 80 mm along the shelf, and 142 mm from the wall. Before making an exact template, confirm that dimensions A, B, C match this orientation according to the seller's drawing. A dimension name in your own markup is more useful than three numbers without explanations.
With this orientation, the front overall mock-up is 350 × 80 mm, and the side one is 350 × 142 mm. Assemble them at a right angle from light cardboard, or hold them alternately in the intended location. If temporary fixation to a finished wall is needed, first test the chosen method on an inconspicuous area: the try-on should not leave marks.
A conditional example: between the lower plane of the shelf and the top of the cabinet there is 420 mm. After placing a part 350 mm high, 420 − 350 = 70 mm remains. Geometrically, it fits. However, these 70 mm say nothing about the ability to open the cabinet lid, remove a tall vase, or wipe the surface. Check the real actions for which the furniture is used.
Another measurement is depth. For a shelf 250 mm deep with a designed part protrusion of 142 mm from the same wall plane, the front edge will be further by 250 − 142 = 108 mm. This is a check of external mutual positioning, not an allowed overhang or a strength calculation. A mounting pad, shelf offset from the wall, or another attachment scheme will change the result.
If the bounding rectangle intersects with a neighboring object, this is not always a final rejection: inside the rectangle there may be a free zone formed by the bend of the product. Here, a further check is needed — the exact silhouette and volume of the part. The reverse error is more dangerous: declaring that an object "will pass under the bend" based only on a photo, without checking its thickness and movement trajectory. For a final decision, use a confirmed contour.
Do not limit yourself to opening doors. Under the shelf there may be a coffee machine with a removable tank, a container with a flip lid, or a desk lamp. During fitting, remove the tank, open the container, turn the lampshade. A small remaining space sufficient for a stationary object may block its maintenance. Moving the item is acceptable, but it should remain convenient for daily use.
Try on both mockups simultaneously, turn on the backlight, and open adjacent fronts fully. Check not only the socket but also the inserted plug, the cable, and the ability to remove them. Look at the composition from the entrance and from the usual place at the table. Photograph the approved option from the front and side, keeping a ruler or dimensional marks in the frame.
If the dimension interferes with using the furniture, it is more reasonable buy a wooden shelf bracket another suitable size after a new fitting. Do not plan in advance to shorten KR-065: modifying the part requires separate approval, and its proportions after trimming may no longer be satisfactory.
Our factory also produces:
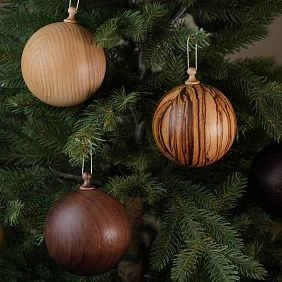
Two wooden brackets: we choose the placement, not the number of supporting posts
A convenient starting point is symmetry relative to the shelf. But it is not mandatory: under the shelf there may be an offset cabinet, next to it a tall wardrobe, and on the wall a socket. First, choose a compositional reference point, then check technical constraints. There is no universal offset of "ten percent from the edge" for such an update.
Let us show a method for recording coordinates on a conditional shelf 1200 mm long. For the design frontal dimension of each bracket of 80 mm, outer margins of 150 mm are chosen. All distances are measured from the left end of the shelf, not from the corner of the room.
| Mark on the sketch | Left bracket | Right bracket |
|---|---|---|
| Left boundary of occupied lane | 150 мм | 970 мм |
| Lane axis | 190 мм | 1010 мм |
| Right boundary of occupied lane | 230 мм | 1050 мм |
| Outer field to the corresponding shelf end | 150 мм | 150 мм |
Check: 150 + 80 + 740 + 80 + 150 = 1200 mm. Between the overall lanes, 740 mm remains, between the axes — 820 mm. These values describe only the selected layout. Hole coordinates do not follow from them: fasteners may be positioned differently inside the part.
To avoid confusion, label what each dimension refers to: "to the axis," "to the left boundary," or "to the outer edge." The command "offset by 150 mm" without specification can shift the entire element by half its width relative to the intent.
To verify future rework, save not only a nice photo but also a sketch with a date. If after fitting the shelf height, cabinet width, or outlet position changes, the previous approval no longer describes the room. Repeating the entire wood selection is not required, but part coordinates and access to connections are rechecked. This way, the finisher and installer will not work from different project versions.
With asymmetric placement, do not try to preserve nice arithmetic at any cost. Shifting both parts relative to the furniture can be more convincing than leaving one strictly at the edge and moving the other only because of an outlet. But the new layout again undergoes frontal and side fitting.
On the approved sketch, show the lower plane of the shelf, the top and bottom of parts, standard fasteners, and areas inaccessible for drilling. Separately mark the space for tools and the direction of shelf removal. These are service zones, not just screw points: an open fastener head is useless if a tool cannot be brought to it.
Get Consultation
Beech or oak: ordering brackets for existing finish
First, decide what surface the new parts should support. You can match the shelf color, bring them closer to the wall, or choose a deliberate contrast. For the first option, determine the material of the existing shelf: solid wood, veneer, painted board, and decorative film set different initial conditions for selection. The label "oak" in the color name does not necessarily mean oak wood.
The wood species should not be chosen in isolation from the finish. For an opaque coating, compare the cost of beech and oak along with surface preparation. For a translucent one, look at physical wood samples and the result of applying the chosen composition. The promise "same species means same color" is unreliable: the order should be based on an agreed sample, not the material name.
In the STAVROS quality description, "Standard" means machine preparation, and "Prestige" includes detailed manual sanding. Before calculating the work, it is useful compare sanding "Standard" and "Prestige". "Prestige" does not mean that the bracket is already primed, painted, or varnished.
Re-gluing is another parameter. In the "under enamel" execution, lamellas are not matched by identical color and pattern; the "under tinting" option assumes such matching but allows natural differences. Therefore, the base execution of the card should not be automatically chosen for a transparent coating. Confirm the possibility of the required re-gluing for your specific order and its cost with the seller.
To choose a wooden pair without overpaying, compare two complete order options. In the first, the wood grain is covered by an opaque finish: the result is evaluated by color, gloss, and surface quality. In the second, the grain remains visible: matching of re-gluing and acceptable difference between the two parts are added to the same conditions. These are different tasks for the workshop, even when the buyer calls both by one word "paint."
Give the finisher a sample or access to the existing shelf, the desired color, and gloss level. Ask them to assess the preparation of both parts considering the chosen sanding. Do not automatically include identical full re-sanding in both compared quotes: the scope of work should match the surface being obtained.
Check the color swatch next to the shelf in daylight and evening lighting. It is useful to look both directly and at an angle: color matching does not guarantee gloss matching. Sign the approved sample and keep it until acceptance. A photo will remain a convenient reference but will not replace physical comparison.
Send both parts for finishing together with one approved specification. Mark their positions in the layout on the packaging; do not use the face wood for marking without coordinating with the finisher. After applying the coating, compare the pair side by side, not separately in different rooms. If one surface differs, it is a finishing acceptance issue that is easier to resolve before installation and closing access to the part.
If a precise hit requires repainting the shelf itself, recalculate the scope of the update. Contrasting finishing of the brackets sometimes allows preserving the old surface without attempting to imitate it. This is a design choice that is better made before ordering than explaining an accidental mismatch to them after installation.
Installation of a decorative bracket: its own fastening and access to the shelf
New elements must have their own agreed-upon fastening. Do not hang them from the underside of the shelf just because it avoids touching the wall: then their mass becomes an additional load on the original system. Such a scheme is possible only after a separate check of the shelf, its material, and connections.
For preparation, the installer needs information about the wall base, the condition of the finish, the actual mass of the items, possible fixation points, and the location of utilities. When data is missing, it is obtained by inspection and from documentation, not replaced with the word "decor." A bulky wooden part requires reliable retention even when it supports nothing.
Official tips for finishing and installing wooden decor The size of the product and the condition of the surfaces to be bonded are distinguished. This memo helps formulate questions but does not confirm the safety of a specific KR-065 on any wall. From the general table, one cannot conclude "any mounting adhesive will work, including over old wallpaper."
The finisher and installer must agree on the sequence of work. If the selected joint requires areas without finish coating, they are marked in advance and prepared according to the agreed technology. If fixation is mechanical, the location of holes and visible fastening points are clarified before painting. This prevents drilling the finished face surface unexpectedly for the customer.
Keep access to the shelf's standard connections. When a decorative part covers a screw, the removal path, or the tool access point, a change in layout or an alternative mounting solution may be needed. Sometimes the shelf will have to be temporarily removed. This is not equivalent to replacing the shelf, but it adds work that needs to be included in the estimate.
After choosing the fixation method, you can buy materials for installing wooden decor according to the installer's list. The number of fasteners, screw length, anchor type, and compound consumption are determined by the specific joint. Separately agree on the temporary holding of parts and the moment when protection can be removed; there is no universal time for all adhesive systems.
Price of two KR-065: calculating the finished result
As of September 5, 2026, the price table in the KR-065 card shows four combinations of wood and sanding. Below, the cost of two individual items is calculated; this is not the price of a special pair set.
| Wood and sanding | One item | Calculation of two items | Items only |
|---|---|---|---|
| Beech, "Standard" | 7 150 ₽ | 2 × 7 150 ₽ | 14 300 ₽ |
| Beech, "Prestige" | 8 950 ₽ | 2 × 8 950 ₽ | 17 900 ₽ |
| Oak, "Standard" | 9 810 ₽ | 2 × 9 810 ₽ | 19 620 ₽ |
| Oak, "Prestige" | 11 830 ₽ | 2 × 11 830 ₽ | 23 660 ₽ |
Budget formula: two items + necessary preparation and finishing + mounting materials + labor + delivery. If temporary removal of a shelf or restoration of a wall section is required, these operations are also included in the quote.
| Expense item | What needs to be agreed upon |
|---|---|
| Two KR-065 | Wood species, sanding, re-gluing, and price of the selected finish |
| Preparation and coating | Trial painting, finishing, materials, work on two parts |
| Installation materials | List after selecting the base and mounting method |
| Installation | Marking, fixing, furniture protection, if necessary removal and return of the shelf |
| Delivery | Recipient, address, packaging, and agreed cost |
| Possible additional work | Only identified operations, without double counting in other lines |
Clarify the unit of each price. In one sentence, "painting a bracket" may mean one piece, in another, "preparing a pair" may mean the entire order. Delivery should not be doubled following the number of items if both parts are sent as one agreed shipment. Conversely, two routes—to the workshop and then to the site—should not be quietly combined into one unverified total. The estimate becomes comparable after clarifying the composition of each line.
For two beech parts, the surcharge for "Prestige" is 3,600 ₽, for oak — 4,040 ₽. Compare it with the difference in the cost of further preparation. If the craftsman actually reduces the volume of paid finishing, more expensive sanding may be justified. If the rate does not change, ask for an explanation of which operations remain the same.
Example of a budget limit: with a conditional limit of 20,000 ₽, after purchasing two beech KR-065 in "Prestige", 2,100 ₽ remains for other expenses. This is not confirmation that the money will suffice. Until finishing, installation, and delivery are estimated, the total cost is unknown. An unknown estimate line cannot be equated to zero.
Comparing an update with a new shelf should be done based on two real quotes of identical composition. The price of finished installed furniture and the cost of only wooden parts refer to different outcomes. Before payment, re-check the price of the selected finish in the product card and invoice.
When it's better not to buy wooden brackets
The shelf requires repair. First, restore its mounting or replace the faulty structure. If after that a different thickness, height, or depth appears, the previous decorative layout may lose its meaning.
The layout interferes with using the furniture. Colliding with an opening lid, fork, or regularly used items cannot be considered a minor issue. Change the placement or choose a different size. An order with the intention of "we'll trim it later" shifts the problem onto the already purchased product.
A nice position does not allow the part to be securely fastened. Do not pay for the set until the installer suggests an acceptable option. If it requires opening the wall and such repair is unacceptable, it's better to decline this update.
The coating sample is unsatisfactory. Order a new sample or reconsider the color combination. Do not hope that the installed pair will look different from the approved swatch just because of its proximity to the shelf.
The total amount exceeds the budget. You can simplify the finishing, reconsider the sanding together with the workshop, or leave the shelf without additions. You cannot save by giving up the necessary mounting and checking the base.
How to order KR-065 for an existing shelf
By the time of ordering, three documents must match: the approved placement sketch, the product specification, and the finishing proposal with installation. Check that all of them list the same quantity, material, and size. The words "two brackets" without an article number and finish are insufficient.
Example of a request that you can fill in for your project:
Please calculate KR-065, size A × B × C 350 × 80 × 142 mm, beech, "Prestige" sanding, re-gluing for the agreed opaque finish, quantity 2 pieces. Application — decorative addition to an existing shelf; the standard hidden mounting is retained. Please confirm the finish, cost, and package contents, provide a dimensional diagram and data needed by the installer to mount the parts themselves. Delivery address: ____. Finish performed by: ____. Installation performed by: ____. Desired delivery date: ____.
Attach photos of the shelf, side view, layout, and coating sample data. Separately clarify which work the seller actually performs: supplying wooden items does not automatically include painting and installation.
Before confirming the request, study terms of payment and delivery of brackets. Specify the recipient: the customer and the finishing workshop may be at different addresses. Schedule installation after agreeing on delivery and readiness of the coating, not based on the expected shipping day.
Upon receipt, check the article number, finish, size, and two units of the product against the documents; inspect the packaging and surfaces. Record visible damage before further processing and discuss it with the seller. Then conduct a trial fitting of the actual products. Final fixation — after accepting the coating and checking the availability of standard connections.
If one of the two received parts raises questions about the finish or coating, do not rush to finally secure the second one. Record the difference with a general photo of the pair and separate close-ups, and specify the exact issue in a message to the seller or finisher. This will allow discussing exactly the compliance with the order, not a vague impression of "it doesn't look right." It is advisable to get a decision on the disputed part before completing the entire composition.
Select material and order two KR-065
Questions before purchasing wooden brackets
Can a gap be left between the top of the bracket and the shelf?
The gap is assessed on the side mockup and agreed with the installer. For a decorative project, contact should not be forced to prop up or straighten the shelf. The feasibility of the chosen position depends on the independent attachment of the part and the desired appearance.
Do I need to look for left and right versions for the two sides?
The application in question provides for two pieces of one KR-065, not a mirror pair of different part numbers. Show the orientation of both parts in the sketch. If a strictly mirror contour is required, first confirm it against the product appearance, rather than assuming an L/R set is included.
Can I first order one part for fitting?
Yes, the product card allows for piece-by-piece purchase. However, one unit does not show the full composition: mark the second position with a mock-up. When ordering the second part later, re-confirm the finish and execution; the terms of the two deliveries may differ.
Will the scheme work if the shelf is made of laminated chipboard?
The shelf material itself does not rule out decorative updating. But attaching new elements to its lower surface without checking is not allowed. First, the installer determines whether the connection to the wall will be self-supporting or whether additional load on the shelf needs to be considered.
What to do if the wall under one part is uneven?
Show the unevenness when approving the installation. Do not force the product against the surface and do not assign an arbitrary adhesive layer thickness. Possible base preparation or a mounting shim must be accounted for both in the fastening and in the side fitting.
Can the LED backlight under the shelf be preserved?
Yes, if the new layout leaves room for the profile, wires, and equipment maintenance. Also check the light with the mock-ups installed: brackets may block part of the lighting. Moving electrical components is coordinated separately, do not hide the problem behind decor.
Will it be possible to remove the brackets during the next renovation?
This depends on the chosen connection. The possibility of dismantling without damaging the wall does not follow from the product name. If reversibility is needed, include it in the installer's task before choosing an adhesive or mechanical solution.
Can towels or a bag be hung on the new parts?
Such use adds loads not intended for the decorative scenario. KR-065 in this project does not replace a proven hook or holder. The additional function needs to be agreed upon separately, not considered safe after installation.