Article Contents:
- Wooden skirting board PLT-005 120×16 mm: which versions to check before ordering
- Parquet and porcelain stoneware: why you cannot compare only the thickness of the coverings themselves
- Actual floor difference: how to measure ΔH and not calculate by covering thickness
- How to measure the floor difference before buying PLT-005
- Why you need to measure from both sides of the doorway
- The top line follows the floor
- The top line is kept uniform
- The mark change occurs within the doorway
- Why it is better to design the height transition in the doorway
- Wooden baseboard and door casing: who should accommodate the floor level difference
- PLT-005 ends at the casing
- PLT-005 runs under the casing
- A separate heel or plinth block is used
- Can the bottom edge of PLT-005 be trimmed by 4 mm
- When a compensation pad under PLT-005 is worse than modifying the door assembly
- Natural wood skirting board PLT-005: why the oak transition is more noticeable after tinting
- Why the oak grain complicates a short door extension
- What to check before cutting oak or beech
- PLT-005 from MDF under enamel: when a complex transition is easier to hide visually
- Why the same color of PLT-005 in two rooms helps tie together different floorings
- Do you need to buy PLT-005 in one batch for both rooms at once
- Mathematical minimum for MDF 2600 mm
- Математический минимум для бука/дуба 2400 мм
- How to build a cutting layout for two rooms with a door transition
- Why a short piece near the door cannot be automatically cut from any leftover
- Example: floor difference of 4 mm and a 380 mm wall near the door
- Separate 380-millimeter piece at the new floor level
- Keep the top line at 380 mm and make the transition in a hidden area
- Move the level change directly under the trim
- Why you can't make a smooth diagonal transition PLT-005 without a design solution
- How to count the number of PLT-005 if two rooms have different floor levels
- When to buy an additional PLT-005 strip specifically because of the door transition
- When it's better not to use a single PLT-005 across two rooms at all
- How to choose the PLT-005 material specifically for two coverings
- Regular MDF
- Moisture-resistant MDF
- Beech or oak
- Door without threshold: where to hide a 4 mm difference if the coverings meet in the same plane
- Door with threshold: when the threshold itself removes part of the visual problem
- Hidden door frame: why the PLT-005 transition becomes more noticeable
- If parquet is 4 mm higher than porcelain stoneware
- If porcelain stoneware is 4 mm higher than parquet
- Why 4 mm is a small value for the floor, but noticeable for a straight top line
- Facade layout of the doorway: the simplest way to choose the unit
- Section through the doorway: why one facade is not enough
- Parquet expansion gap and PLT-005: do not use a skirting board to fix the floor
- Porcelain tile and the joint at the wall: why the bottom end of PLT-005 should not mask poor geometry
- When a 4-millimeter difference is better corrected with a floor leveler rather than a skirting board
- When the floor difference exceeds 4 mm: the article ceases to be a direct instruction
- If the difference is only 1-2 mm: is it worth complicating the joint at all
- When the transition coincides with the door opening direction
- When there is no door and only an open portal exists
- How to use the useful remainder after a long wall for a door assembly
- Test case for MDF 2600 mm: can the door transition be closed with remnants
- Test case for oak/beech 2400 mm: the same project behaves differently
- Project cost: how to compare materials after cutting
- How to mark a single top line PLT-005 across two rooms
- Why the top line cannot be aligned only visually by the trim
- If PLT-005 is already installed in one room
- If both rooms are already finished and the floor cannot be changed
- If the parquet will be replaced in the future
- If porcelain stoneware continues only in the doorway
- If a metal transition floor profile is installed in the doorway
- If the floors have different colors but the same level
- If the difference is 4 mm, practical installation order: how not to lose the agreed difference on site
- Practical installation order: how not to lose the agreed difference on site
- Why a short offcut is useful first, rather than a whole plank
- When the top line matters more than the bottom line, and vice versa
- How to maintain the repairability of the transition piece
- Control cost of material: why one extra plank due to the transition is more noticeable for oak
- Can one solid PLT-005 plank be run through the entire doorway?
- When two separate pieces are better than one continuous one
- How to hand off the door assembly to the installer without ambiguity
- Mistake 1. Calculating the difference based on the thickness of parquet and tile
- Mistake 2. Placing both PLT-005 units directly on the floor and noticing a step after installation
- Mistake 3. Making the transition in the middle of an open wall
- Mistake 4. Raising the baseboard by 4 mm without addressing the bottom gap
- Mistake 5. Sanding down the smooth wedge without a drawing
- Mistake 6. Using an oak offcut with a different grain pattern at the visible transition
- Error 7. Counting 2400 and 2600 mm as one map
- Error 8. Buying a separate strip for 380 mm without checking stock
- Error 9. Using any leftover without checking the ends
- Error 10. Not accounting for the trim
- Error 11. Thinking paint can fix geometry
- Error 12. Ordering both rooms separately without a common map
- Checklist before payment
- What is the size of PLT-005?
- What is the length of PLT-005 made of MDF?
- What is the length of oak and beech?
- Can one PLT-005 be used in two rooms with different floors?
- What happens if the parquet is 4 mm higher than the porcelain tile?
- Is it mandatory for the top line to be the same?
- Where is the best place to make the height transition?
- Can the transition be hidden under the trim?
- Can PLT-005 be trimmed from the bottom by 4 mm?
- Can I simply put a shim under the baseboard in the lower room?
- What is simpler for a complex transition — MDF or oak?
- How to calculate the quantity for two rooms?
- Is a separate strip needed for the short section near the door?
- Can the 420 mm remainder be used for a 380 mm part?
- When is it better to completely interrupt the baseboard in the doorway?
- How does a hidden door frame affect it?
- Where to buy PLT-005?

In two adjacent rooms, different finished floor coverings have already been selected: in the living room — parquet, in the hallway or kitchen — porcelain stoneware. The doorway connects these zones, and one baseboard is planned — PLT-005 with a height of 120 mm and a thickness of 16 mm. After installation, it turns out that the finished floor level differs by 4 mm. If the same profile is placed directly on both floors, the top line of the baseboard will also shift by the same 4 mm. A noticeable step will appear in the doorway.
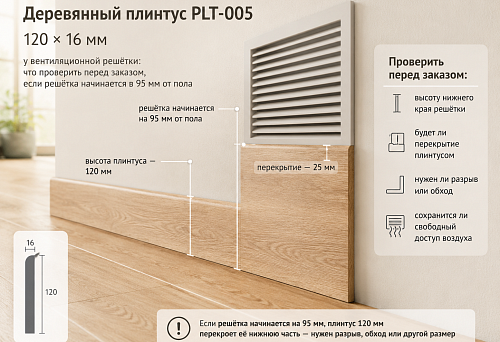
To maintain a calm top line of PLT-005, you need to decide in advance where exactly the level change will occur: along the bottom edge of the baseboard, inside the doorway, under the trim, or in a separate transition piece. The material itself — MDF, moisture-resistant MDF, beech, or oak — does not fix this geometry. All versions of PLT-005 have the same cross-section of 120×16 mm. The length of the strip, finish, and processing nature change, but not the original problem of the difference.
The main mistake is to first calculate the total perimeter of two rooms, order the baseboard, and then come up with the transition during installation. The door unit affects the length of individual pieces, the position of ends, and even whether a short remainder can be used. Therefore, the correct sequence is different: measure the actual difference in finished floors, decide the transition architecture, determine the lengths of all segments on both sides of the opening, and only then build the cutting layout of 2400 or 2600 mm.
If the profile is not yet finally selected, you can first to buy wooden baseboard after comparing the entire category. But this article is based on a narrower situation: PLT‑005 already fits in height and shape, and the task is to run it through two rooms with different floor levels without an accidental jump along the top line.

Wooden skirting board PLT‑005 120×16 mm: which versions to check before ordering
The current PLT‑005 card confirms the same 120×16 mm cross-section for all materials. MDF and moisture-resistant MDF have a length of 2600 mm, beech and oak — 2400 mm.
| Execution | Size | Price at the time of check | What matters for a doorway transition |
|---|---|---|---|
| MDF | 120×16×2600 mm | 2 050 ₽ | 200 mm longer, convenient under a covering finish |
| Moisture-resistant MDF | 120×16×2600 mm | 2 550 ₽ | Same geometry and length, different service class |
| Beech | 120×16×2400 mm | 5 140 ₽ | Natural wood, visible end requires attention |
| Oak | 120×16×2400 mm | 7 030 ₽ | Natural texture, 2400 mm changes the cutting map |
Key fact for this topic: the height of 120 mm and thickness of 16 mm do not change when switching from MDF to oak. Therefore, a 4-millimeter floor difference cannot be "fixed by choosing a more expensive material." The joint itself needs to be addressed.
The exact model can be viewed via the link wooden skirting board PLT-005. Before purchasing, it is important to determine not only the material, but also where each plank will end in the doorway.




Parquet and porcelain stoneware: why you cannot compare only the thickness of the coverings themselves
If the parquet has a thickness of 15 mm and the porcelain stoneware is 10 mm, you cannot immediately conclude that the difference will be 5 mm. The finished level depends on the entire floor structure.
The actual height includes:
- screed;
- leveling layer;
- Glue;
- substrate;
- plywood;
- the covering itself;
- local tolerances of the base.
For PLT-005, only one final parameter is needed — the actual difference between already finished surfaces. In this article, example ΔH=4 mm.
Our factory also produces:


Actual floor level difference: how to measure ΔH without counting by covering thickness
Get Consultation
How to measure the floor level difference before purchasing PLT-005
Measurement is performed after the final installation of both coverings is complete. It is advisable to use a laser level or a single horizontal reference mark.
- Select a reference horizontal line above both floors.
- Measure the distance from it to the parquet.
- Measure the distance to the porcelain stoneware.
- Subtract the values.
- Repeat the check at both edges of the doorway.
If the difference is 4 mm, this is the value to be incorporated into the joint. Not the catalog thickness of the coverings, nor the design dimension before installation.
Why measuring should be done on both sides of the opening
The floor may have a local slope. If the difference on the left is 3 mm and on the right is 5 mm, the transition cannot be designed as a perfectly horizontal step of 4 mm without checking. The actual geometry of the entire line needs to be known.
PLT-005 baseboard in two rooms: three fundamental ways to handle a 4 mm difference
The top line follows the floor
The simplest technically feasible option: PLT-005 stands on each covering with its own bottom edge. Then, in the room with the higher floor, the top line of the baseboard rises by 4 mm. A step appears in the doorway.
This solution is acceptable if the transition is hidden by furniture, is very short, or the designer consciously accepts the change in level. But if the doors and baseboard form a single architectural composition, the jump is noticeable.
The top line is kept as one
Then the bottom of PLT-005 in the lower room cannot simultaneously lie on the floor and maintain the same top elevation. A bottom gap, local trimming, or another joint must be designed. This solution is more complex, but the top line remains clean.
The elevation change occurs within the doorway
Most often this is the most logical architectural scenario. The opening already separates rooms and floor coverings. The transition can be tied to the casing, threshold, or hidden part of the door frame.
| Scheme | Top line | Bottom edge | When it fits |
|---|---|---|---|
| Follow the floor | 4 mm jump | On both coverings | When the difference is not visually critical |
| Keep the top | Unified | A separate node is needed | When a continuous architectural line matters |
| Make the transition in the doorway | In the rooms, it is uniform | The change is hidden in the architectural boundary | Most often, the best visual scenario |
The doorway as the main transition zone between two levels
Why it is better to design the height transition in the doorway
The doorway is already a natural point of change. Here, the room, flooring, and sometimes the threshold, trim, and lighting change. Therefore, a slight change in the geometry of PLT‑005 is easier to make intentional here than in the middle of a long wall.
If the transition is moved 300–500 mm away from the door, the eye sees a random step on a straight line. If it aligns with the vertical of the trim, the node is perceived as part of the door composition.
Wooden baseboard and door casing: who should accommodate the floor level difference
There are several practical junction details.
PLT‑005 ends at the casing
One baseboard meets the casing from the parquet side, the second starts after the casing from the porcelain tile side. The casing itself visually separates the levels. This is a clean option if the vertical element is wide enough.
PLT‑005 passes under the casing
Then you need to decide where exactly the bottom line changes. The transition may be hidden by the thickness of the vertical element, but the geometry still needs to be drawn.
A separate heel or plinth block is used
Such an element can absorb the level change and make it deliberate. However, the dimensions of a specific heel must be checked separately; you cannot assume it automatically solves any difference.
Can the bottom edge of PLT‑005 be trimmed by 4 mm
There is no universal 'yes'. Trimming the bottom part changes the profile geometry, and for natural wood it also exposes a new end grain.
Before such a decision, you need to check:
- drawing PLT‑005;
- which part of the profile the processing will affect;
- whether the bottom line will remain visually straight;
- how the new end face will be processed;
- whether the part will be weakened;
- how the MDF or wood will be protected after cutting.
Removing 4 mm along the short door section is technically simpler than forming a long wedge over several meters. But this is still a design node, not a household hack.
When a compensation pad under PLT‑005 is worse than changing the door assembly
If on a lower floor the baseboard is raised by 4 mm, the top line will align. But a gap will appear at the bottom. It cannot be considered "invisible" without a mockup.
You need to decide:
- what closes the gap;
- does dust and water get in there during cleaning;
- does the lower shadow look like an installation error;
- does the contact of the baseboard with the wall change;
- can the solution be executed uniformly along the entire length of the room.
For a short transition section, it is sometimes more reasonable to change the geometry directly at the door rather than raising the entire baseboard in the room.
Material and finish PLT-005: MDF, moisture-resistant MDF, beech or oak
Natural wood baseboard PLT-005: why the oak transition is more noticeable after tinting
With transparent or semi-transparent finishing of oak and beech, the door assembly becomes especially demanding. On the trimmed lower edge, fresh wood is exposed, and the end grain accepts oil, stain, or varnish differently than the longitudinal surface. If the 4 mm transition is formed by local treatment, it cannot be left "for later" — the end grain sample must be made before installation.
If the project fundamentally requires natural wood, one can consider natural wood baseboard as a separate material system. But the floor level difference itself remains the same. Oak does not compensate for 4 mm — it only makes the intervention site visually more noticeable if the finish is transparent.
Why oak grain complicates a short door extension
A short insert of 300–500 mm can be obtained from the remainder of a long plank, but if the wood grain differs sharply from the adjacent piece, the transition becomes more noticeable. With opaque enamel, this problem almost disappears; with oil or tinting, it intensifies.
What to check before cutting oak or beech
- grain direction;
- the shade of adjacent pieces;
- the location of the future end;
- the finishing method for the fresh cut;
- whether a trial transition piece is needed.
PLT‑005 from MDF under enamel: when a complex transition is easier to visually hide
MDF does not solve geometry, but it simplifies the visual finishing of a complex joint. If the bottom edge is locally trimmed, the end can be prepared, primed, and painted in the same color as the entire plank. With quality painting work, the transition attracts less attention.
If a covering finish is selected, you can buy MDF skirting board after comparing available models. But paint does not fix poor geometry. A step, gap, or wedge-shaped bottom clearance will remain visible even under perfect enamel.
Why the same color PLT-005 in two rooms helps tie together different surfaces
Parquet and porcelain tile can differ greatly in texture and tone. A unified PLT-005 in one color acts as a continuous architectural frame and makes the transition between surfaces calmer. This is why it is especially important not to allow a jump in the top line: color unites rooms only when the geometry also looks intentional.
If the baseboard is painted to match the wall, a 4-millimeter step near the door may be less noticeable than on a contrasting oak profile. But in side light and next to a vertical casing, it is still visible. It is better to fix the geometry rather than rely on color.
Do you need to buy PLT-005 in one batch for both rooms at once
For one continuous project, a single order is often more rational. This provides:
- one material;
- one batch by tone;
- identical geometry;
- one cutting plan;
- ability to use leftovers between rooms;
- lower risk of finish difference with late reordering.
For oak and beech this is especially useful due to the natural grain. For MDF, a single paint batch is more important. But a combined order only makes sense after the door transition is already designed: otherwise you can buy the correct total length but the wrong distribution of whole planks.
PLT‑005 2400 or 2600 mm: why the door transition changes the cutting layout
Let's imagine two rooms. In the first, sections of 3250, 2180, and 1650 mm are needed. In the second — 3900, 2420, and 1350 mm. Plus the door transition creates a separate short piece.
Total length without the door insert:
3250 + 2180 + 1650 + 3900 + 2420 + 1350 = 14,750 mm.
Mathematical minimum for MDF 2600 mm
14 750 ÷ 2600 ≈ 5,67.
Minimum by total length — 6 planks. Six give 15,600 mm, nominal reserve 850 mm.
Mathematical minimum for beech/oak 2400 mm
14 750 ÷ 2400 ≈ 6,15.
Minimum — already 7 planks. Seven give 16,800 mm, nominal reserve 2050 mm.
But these numbers are not yet ready for ordering. You need to check how the long sections are distributed. The 3900 mm wall requires a joint in both options. The 2420 mm section is covered by one MDF plank of 2600 mm, but not by one wooden 2400 mm. This is where the difference in standard length affects the number of joints.
Cutting map for two rooms: segments, remnants, and a short door piece
How to build a cutting map for two rooms with a door passage
Proper calculation divides the project not by rooms, but by specific pieces. Each has:
- finished length;
- the material;
- end type — corner, edge at trim, joint;
- allowance for longitudinal joining;
- visibility;
- priority of using a full-length plank.
For example:
| Detail | Length | Role | Can it be made from the remnant |
|---|---|---|---|
| A1 | 3250 мм | Main wall of the living room | No, one neat joint is needed |
| A2 | 2180 мм | Side wall | Yes, if the remainder is whole |
| A3 | 1650 мм | Wall by the door | Yes |
| B1 | 3900 мм | Main wall of the second room | No, the design joint |
| B2 | 2420 мм | Viewing area | For MDF — solid, for solid wood — an extension is needed |
| B3 | 1350 мм | Short wall | Yes |
| D | As per actual | Door transition | Only after approval of the assembly |
Only after such a table is it possible buy PLT-005 120×16 mm in a quantity that corresponds not to the total length, but to the actual layout.
Why a short piece near the door cannot be automatically cut from any leftover
On paper, everything is simple: a door insert with a length of, say, 380 mm means any offcut longer than 380 mm fits. On site, this is not the case.
The remainder may have:
- an angled cut for an internal corner;
- a damaged end;
- an unsuitable profile orientation;
- insufficient allowance for a finish cut;
- a sharply different oak grain pattern;
- an already assigned purpose for a more important visible section.
Therefore, the door unit is approved first, then the short piece gets a specific remainder. Not the other way around.
Example: a floor level difference of 4 mm and a 380 mm wall section next to the door
Suppose PLT-005 from the parquet side approaches the trim, and between the trim and the corner of the second room there is a 380 mm wall section. The floor in this room is 4 mm lower.
Three solutions are possible.
A separate 380-millimeter piece at the new floor level
Simple to install, but the top line changes by 4 mm immediately after the trim. If the trim fully separates the zones, this may be acceptable.
Keep the top line at 380 mm and make the transition in a hidden area
Then the lower part of the short piece requires design compensation. On such a short section, it is easier to make a precise custom joint than on the entire wall.
Move the level change directly under the trim
The most architecturally clean option if the dimensions of the vertical element allow hiding the level change. But this needs to be drawn in section.
For all three options, the same PLT-005 strip can yield a 380 mm piece. What differs is not material consumption, but the quality of the joint.
Why a smooth diagonal transition of PLT-005 cannot be done without a design solution
The idea of "grinding down 4 mm over a length of one meter" seems gentle: the top line remains almost level, and the bottom gradually adjusts to the other floor. But this method has serious consequences.
- the lower edge becomes wedge-shaped;
- the profile geometry changes;
- at one end the part is higher relative to the floor than at the other;
- installation to the wall becomes more complicated;
- for oak and beech, a long fresh machined surface appears;
- for MDF, additional sealing and painting are required.
Therefore, a smooth wedge should not be presented as a standard solution. If a designer really needs such an effect, it is designed separately and a test piece is made.
How to calculate the quantity of PLT‑005 if two rooms have different floor levels
Incorrect formula:
perimeter of room A + perimeter of room B − doors.
The right approach:
- room A segments;
- room B segments;
- internal and external corners;
- door end caps;
- transition piece;
- acceptable and unacceptable joints;
- cutting to 2400 or 2600 mm;
- real reserve.
Thus, the floor level difference becomes part of the specification, not a random adjustment after delivery.
When to buy an additional PLT-005 plank specifically because of a door transition
The additional plank is justified not by the mere fact of a 4 mm difference, but by the complexity of the specific joint.
It may be needed if:
- a trial transition piece is required;
- a short door segment cannot be obtained from a suitable leftover;
- using the leftover destroys a solid visual section;
- an external corner requires additional allowance;
- for oak, the grain pattern needs to be matched;
- an error at the transition will halt the entire installation.
The automatic "plus 10%" rule is weaker here than a real map. Sometimes one large leftover already covers the entire door unit, and an extra plank is not needed.
When a single PLT-005 across two rooms is better not to be done at all
Sometimes it is more correct to honestly split the systems in the doorway. For example:
- The floor level difference is significantly more than a few millimeters;
- There is a high threshold;
- In one room, the baseboard should be moisture-resistant MDF, in another — natural oak;
- The door portal itself forms a separate architectural frame;
- A single top line can only be maintained with complex wedge-shaped processing;
- One room requires fundamentally different finishing.
Then a deliberate ending of PLT-005 at the trim looks better than trying at all costs to extend one line through incompatible levels.
How to choose PLT-005 material specifically for two coverings
The material does not solve the level difference, but it affects operation and finish.
Regular MDF
Rational for dry rooms and covering paint, if both rooms have the same requirements.
Water-resistant MDF
May be logical if one zone is closer to the entrance, kitchen, or regular wet cleaning. But the choice must be uniform for a long line if consistent geometry and finish are important.
Beech or oak
Suitable if natural wood is part of the design. With a transparent finish, the transition end needs to be designed especially carefully.
If the project includes not only the baseboard but also other profiles, you can look in advance Wooden trim and check whether the entire door composition is built with one system.
Door type and opening architecture: without threshold, with threshold, hidden frame
Door without threshold: where to hide the 4 mm difference if the coverings meet in the same plane
The most demanding case is a modern doorway without a high threshold. Parquet and porcelain stoneware meet almost in one line, and the vertical trim visually connects both rooms. Here, there is nowhere to "hide" the 4 mm behind a massive threshold piece, so the transition point must be chosen in advance.
Practically, three zones are considered:
- directly under the vertical trim;
- inside the thickness of the door frame;
- on a short section of the baseboard inside the opening.
It is best when the change in the lower level coincides with a vertical architectural boundary. Then the top line of PLT-005 in each room remains visually stable, and the 4 mm difference does not "creep" onto the open wall.
Door with a threshold: when the threshold itself removes part of the visual problem
If there is a noticeable threshold or floor transition profile in the opening, it already shows the user the change in materials and levels. In this case, PLT-005 does not necessarily have to depict an absolutely continuous line through the entire opening.
You can end the baseboard at the casing on each side and let the door unit separate the two systems. This is often simpler and cleaner than trying to cut a complex 4-millimeter step into one long piece.
But the threshold itself does not determine the height of the baseboard. You need to check how it meets the casing and whether a triangular gap appears between the bottom end of PLT-005 and the new floor level.
Hidden door frame: why the PLT-005 transition becomes more noticeable
A hidden frame may not have a wide traditional casing that visually absorbs the change in level. Then the two baseboard lines approach almost the same vertical plane.
If you simply install PLT-005 on each floor, the 4-millimeter difference at the top will be clearly visible. Here it is especially useful to draw the wall elevation in advance at scale and decide where to interrupt the profile.
Possible solutions:
- finish both baseboards up to the hidden box;
- make a small shadow gap;
- form a transition within the thickness of the slope;
- use a separate short transition piece.
The specific joint depends on the door system. A universal shadow gap size cannot be given without its drawing.
Boundary scenarios: which floor is higher and how noticeable the difference is
If the parquet is 4 mm higher than the porcelain stoneware
Assume the living room with parquet is higher, and the hallway with porcelain stoneware is lower. If both PLT‑005 are on the floor, the top line in the living room is 4 mm higher.
To preserve the top, you can:
- lower the bottom line on the parquet side with local treatment;
- raise the plinth in the porcelain stoneware area with the designed lower node;
- move the difference under the architrave;
- separate the two systems with a doorway.
Of these solutions, the most universal is not to "trim everything indiscriminately," but first to check the door assembly. Often the vertical element already provides a place where the geometry can be changed without lengthy processing.
If the porcelain stoneware is 4 mm higher than the parquet
The situation is mirrored, but not visually identical. The higher porcelain stoneware is often in the hallway or kitchen, where the risk of wet cleaning is higher. If PLT‑005 is raised on the side of the lower parquet, a bottom gap appears underneath it — precisely in the area where dust can collect.
Therefore, the solution of "raising the low plinth by 4 mm" should be evaluated not only by the top line, but also by operation. Sometimes it is better to accept a local change in elevation in the opening than to create a long gap along the entire wall.
Why 4 mm is a small value for the floor, but noticeable for a straight top line
Over the area of a room, 4 mm is hardly perceived as a difference. But at PLT‑005, the top edge forms a long horizontal line 120 mm above the floor. Next to a vertical architrave, even a few millimeters are read as a geometry error.
The more contrasting the plinth is relative to the wall, the more noticeable the jump is. Dark oak on a light wall emphasizes the line. White MDF matching the wall color can soften it, but on close inspection the difference still remains.
Layout and section of the door unit before the first finish cut
Front elevation layout of the doorway: the simplest way to choose the unit
Before purchasing, it is useful to draw the opening from the front to scale. No complex 3D project is needed. It is enough to note:
- floor of room A;
- floor of room B;
- difference of 4 mm;
- top of PLT‑005 on both sides;
- casing or hidden frame;
- point of change of the lower edge;
- ends of the baseboard.
This immediately shows where the top line is preserved and where a step appears. The mockup also helps to understand whether a separate transition piece is needed at all.
Section through the doorway: why one facade is not enough
The frontal drawing shows heights but does not show the 16 mm thickness and the position of the floor relative to the frame. Therefore, the second mandatory sketch is a top or side section.
On it, mark:
- wall;
- the frame;
- platband;
- PLT-005 with a thickness of 16 mm;
- parquet;
- porcelain stoneware;
- threshold or joint of coverings.
Sometimes it turns out that the trim itself protrudes further than the baseboard and completely hides the transition end. In another project, the baseboard comes out almost flush with the trim, and any step is visible.
Floor coverings and operational limitations of the door transition
Parquet expansion gap and PLT-005: do not use the baseboard to fix the floor
Parquet flooring may have its own requirements for expansion gaps around the perimeter and in doorways. PLT-005 must cover the intended finishing joint, not clamp the flooring or replace the floor installation technology.
Before installation, check the parquet manufacturer's instructions and the actual gap. If maintaining the top line requires lowering the baseboard so that it starts pressing on the flooring or covering the movement joint in a non-standard way, the solution must be coordinated with the floor installer.
The article does not prescribe a universal expansion gap size, as it depends on the specific flooring material and installation system.
Porcelain tile and the wall joint: why the bottom edge of PLT-005 should not mask poor geometry
If the tile meets the wall unevenly, a tall baseboard can hide part of the defect. But at a door transition, a clean support line is important. If the bottom edge of PLT-005 must follow the floor, a large local adhesive buildup, joint, or base unevenness will cause rocking and a gap.
Before calculating the transition, clean and check the floor line itself at the wall. You cannot design a precise 4-millimeter compensation over a surface where local deviations exceed this value.
When a 4-millimeter difference is better eliminated with the floor level rather than the baseboard
If the flooring work is not yet finished and the difference is detected at the design stage, it may be more reasonable to adjust the floor layers. For example, change the thickness of the underlayment, adhesive layer, or leveling—but only within the technology of the specific coverings.
The baseboard joint becomes primary only when the finished floors are already specified or their levels cannot be rationally leveled. If it is possible to eliminate the difference before finishing without violating the technology, this is usually simpler than creating complex PLT-005 geometry.
When the floor difference is more than 4 mm: the article ceases to be a direct instruction
The example of 4 mm is chosen because it is a small but visually noticeable jump. At 8, 12, or 20 mm, the solution may become fundamentally different. A too-large difference already relates not to local trimming, but to a full level transition, threshold, or another architectural element.
Therefore, one cannot mechanically scale the advice: "if we did it this way at 4 mm, then at 12 mm we simply triple the trimming." The larger the difference, the more important a separate drawing becomes.
If the difference is only 1–2 mm: is it worth complicating the joint at all
A small difference can sometimes be visually accepted, especially if it is under a wide casing and is not noticeable along the top line from the main viewing point. But the decision must be deliberate.
It is useful to place two short offcuts of PLT-005 on both sides of the opening and look at them from a distance of 2–3 m. A physical mock-up sometimes shows that complex rework for the sake of 1 mm does not provide a noticeable improvement.
When the transition coincides with the door opening direction
An open door leaf can hide one side of the opening most of the time. This does not eliminate the need for a neat joint, but it affects the priority of visibility. The most complex transition detail is best placed where it is less noticeable, if this does not compromise the structure.
This choice is especially useful for oak, where a fresh end grain and wood pattern are more visible.
When there is no door and only an open portal exists
Without a door leaf and often without casings, the opening is completely open. A 4-millimeter step at the top becomes more noticeable. In this scenario, a single top line PLT-005 is usually more important, and the transition is better hidden in the thickness of the portal or a separate architectural detail.
If the portal is wide, it is sometimes easier to divide the baseboard into two complete systems and not try to run a continuous horizontal line through the entire opening.
Control calculations of leftovers and cost for 2600 and 2400 mm
How to use the useful leftover after a long wall for a door assembly
Suppose a 2180 mm part is cut from an MDF strip of 2600 mm. The nominal leftover is 420 mm. If the door jamb requires 380 mm, it seems to fit perfectly.
But you need to leave a margin for the final cut and check the condition of both ends. If one end already has a miter cut, the useful length may decrease. Therefore, in the cutting plan, you should not just write "leftover 420", but:
R1 = 420 mm, one end is straight, the second is after an angled cut.
Only after this is the leftover assigned to the door part.
Control example for MDF 2600 mm: can the door transition be covered by leftovers
Let's take the parts:
- 2420 mm;
- 2180 mm;
- 1650 mm;
- 1350 mm;
- 380 mm door element.
Plank 2600 → 2420 + 180 mm remainder.
Plank 2600 → 2180 + 420 mm remainder.
Plank 2600 → 1650 + 950 mm remainder.
Plank 2600 → 1350 + 1250 mm remainder.
The 380 mm part can be conveniently obtained from the 420 mm remainder if finish cuts allow. Then a separate plank for the door transition is not needed.
Control example for oak/beech 2400 mm: the same project behaves differently
A 2420 mm part no longer fits into one plank. An extension and a new joint are needed. The rest:
- 2180 mm leaves about 220 mm;
- 1650 mm leaves about 750 mm;
- 1350 mm leaves about 1050 mm.
A door part of 380 mm can be obtained from the remainder of 750 or 1050 mm, but the question arises: is this large remainder needed for the extension of the 2420 mm wall. Therefore, the order of distribution of offcuts changes.
This is the reason to consider MDF 2600 and wood 2400 as separate maps.
Project cost: how to compare materials after cutting
If the map shows, for example, 7 MDF planks and 8 oak ones, the current profile cost will be:
7 × 2,050 = 14,350 ₽ for regular MDF.
8 × 7,030 = 56,240 ₽ for oak.
This is not the "average cost of two rooms," but an example based on current card prices. In a real project, the quantity depends on wall lengths and the selected door unit.
Comparison should be done after cutting. The price of one plank without quantity says almost nothing about the final order.
Installation marking: how to maintain the top line and repairability
How to mark a single top line for PLT‑005 across two rooms
If the project requires maintaining the top line of the baseboard, marking starts not from the floor but from a common horizontal reference. This is especially important with a 4 mm difference.
Practical procedure:
- select one control reference mark with a laser;
- mark the future top of PLT‑005 on both sides of the doorway;
- check the height from this line to the parquet;
- check the height to the porcelain tile;
- record where the difference in the bottom edge occurs;
- move the transition point to the door unit.
This way, the installer sees the problem before cutting. If you start with the rule "we always place the baseboard on the floor," the top step will be discovered too late.
Why the top line cannot be aligned only visually by the trim
The vertical trim itself may be installed with a slight deviation, and its bottom point depends on the floor. Therefore, relying on a single decorative element is risky. The laser horizontal line provides a common base for two rooms.
The trim is then used as a transition point, but not as the only measuring tool.
If PLT‑005 is already installed in one room
This scenario often occurs during phased renovations. In the living room, the baseboard is already installed on the parquet, while the porcelain tile in the second room is finished later. Then the top line of the first room becomes the actual reference mark.
Before ordering the second batch, you need to:
- measure the actual height of the top of the existing PLT‑005;
- check the actual level of the new floor;
- compare color and finish;
- resolve the transition under the trim;
- do not calculate the new line only from the nominal 120 mm.
The installed profile may be 1–2 mm above or below the theoretical level due to the floor and installation. Therefore, the new batch is adjusted to the actual condition.
If both rooms are already finished and the floor cannot be changed
Then the baseboard assembly becomes the only available place for visual correction. It is most rational to work within the doorway rather than redo long wall sections.
First, make a trial transition piece from a PLT‑005 offcut. If the solution is satisfactory, only then cut the final material. For oak and beech, the trial piece is especially useful due to the finish of the fresh end.
If the parquet will be replaced in the future
Today the difference is 4 mm, but during the next renovation the floor thickness may change. A too complex wedge-shaped piece, precisely fitted to the current covering, may become unusable.
A more maintainable node is one where the elevation change is concentrated in a short zone at the doorway and, if necessary, can be replaced with a separate part without dismantling long wall sections.
If porcelain stoneware continues only in the doorway
Sometimes the tile covering extends 100–200 mm into the opening, and the room itself starts further. Then the transition point PLT‑005 should be tied not only to the floor material but also to the door. If the elevation change occurs earlier or later than the trim, the short part may be visible from both rooms.
It is useful to view the node from both sides: from the room with parquet and from the porcelain stoneware area. What is hidden by the trim on one side may be exposed on the other.
If a metal floor transition profile is installed in the doorway
The transition profile between parquet and porcelain stoneware already creates a horizontal boundary. PLT‑005 does not have to continue this part in shape, but its end must not conflict with the metal element.
Check:
- where the metal profile ends relative to the wall;
- whether it protrudes under the baseboard;
- whether it interferes with the mounting of PLT‑005;
- how the corner of three materials looks: wall, baseboard, threshold.
In this place, a large-scale template of 120×16 mm is especially useful.
If the floors have different colors but the same elevation mark
Then the 4 mm problem is absent, and PLT‑005 can be run along a single geometry. This is a useful control scenario: changing the floor material itself does not require changing the baseboard. The complexity arises precisely from the elevation mark, not from the fact that one room has parquet and another has tiles.
If the difference is 4 mm, no
Practical installation order: how not to lose the agreed difference on site
Even a good drawing can be ruined if the installer starts from different floors independently. For a joint with a 4 mm difference, a unified sequence is useful.
- Check the finished floor marks and record ΔH.
- Mark the common top line of PLT‑005 with a laser through both rooms.
- Install control short offcuts at the doorway without final fixing.
- Check where the bottom edge stops aligning with the floor.
- Align the position of the transition piece relative to the trim.
- Only after this, mark the long wall pieces.
- Perform a dry assembly of the door unit.
- Check the top line from a distance and from both rooms.
- Make final cuts and finish the ends.
- After confirmation, install the entire contour.
This way, long planks are not held hostage by a decision that hasn't been tested on a short door section.
Why a short offcut is useful first, rather than a full plank
On the offcut, you can check the 4-millimeter compensation, the method of finishing the new bottom end, and the fit against the trim. An error on a test piece costs significantly less than redoing a full plank 2400 or 2600 mm long.
When the top line matters more than the bottom line, and when it's the other way around
In a representative living room with a wide PLT-005, the eye most often reads the upper horizontal line, especially if the baseboard contrasts with the wall. In a hallway with frequent wet cleaning, the lower contact with the floor may be more operationally important.
Therefore, the solution cannot be formulated as "the top must always be level." For a specific object, a priority must be established:
- visual continuity of the upper line;
- tight lower contact;
- maintainability;
- compatibility with the door casing;
- ease of future floor replacement.
If these requirements conflict, the doorway becomes a compromise zone, not a long open wall.
How to maintain the maintainability of the transition piece
A short element near the door should reasonably be designed so that when replacing parquet or tiles in the future, several meters of PLT-005 do not need to be dismantled. For this purpose, it is useful to separate the transition piece from the long wall segment with a natural joint under the casing or in the shadow of the doorway.
This is especially justified if the coverings have different expected service lives. Parquet can be sanded or replaced, while porcelain stoneware can be left. A local door element is easier to adapt to a new level than redoing the entire contour.
Control cost of material: why one extra plank due to the transition is more noticeable for oak
For the current card, one PLT-005 plank costs 2,050 ₽ in MDF, 2,550 ₽ in moisture-resistant MDF, 5,140 ₽ in beech, and 7,030 ₽ in oak. If a complex door assembly forces adding a separate full plank, the cost of an error differs significantly.
Therefore, for oak it is especially beneficial to first check whether the transition piece can be obtained from a large offcut. For MDF, the price of an additional plank is lower, but an extra purchase is still unnecessary if the cutting already yields a suitable fragment.
Before payment, the price is checked again because it is dynamic.
One solid piece or two independent ones: what is better for a door assembly
Can a single solid PLT-005 plank be run through the entire doorway
Sometimes the wall geometry allows physically running one long element through the opening. But with a 4 mm difference, this is not necessarily the best option. A solid piece must simultaneously align two different lower levels, meaning either its bottom becomes stepped or a wedge-shaped treatment appears.
If the doorway is short and the casing still separates the rooms, two separate pieces are often more maintainable and easier to manufacture. A solid plank is justified only when the architecture truly requires continuity and the assembly is precisely designed.
When two separate pieces are better than one continuous one
Splitting PLT-005 into a parquet side and a porcelain tile side is especially logical if:
- the trim fully covers the ends;
- the floors can be repaired independently;
- different rooms have different operating conditions;
- a short transition element is easy to replace;
- a long one-piece part would require complex bottom processing.
This approach does not mean "breaking a single line." The top elevations of the two independent parts can be set using one laser, and the geometric difference can be hidden in the door assembly.
How to convey the door assembly to the installer without ambiguity
One phrase "make the top level" is not enough. On the installation sheet, it is useful to specify:
- the top elevation of PLT-005;
- ΔH=4 mm;
- the point of changing the lower mark;
- which part belongs to the room with parquet;
- which one — to porcelain stoneware;
- which end is hidden by the casing;
- which end remains visible;
- which remainder is assigned to the transition piece.
If the node is complex, a photo of the doorway with drawn lines is attached to the drawing. This reduces the risk that on site the craftsman will choose a different method simply because it is faster.
Errors when ordering PLT-005 for two floor levels
Error 1. Calculating the difference based on the thickness of parquet and tiles
Adhesive, backing, and base change the final mark. Finished surfaces need to be measured.
Mistake 2. Place both PLT-005 directly on the floor and notice a jump after installation.
The top line will mirror the floor difference. The joint needs to be designed in advance.
Mistake 3. Make a transition in the middle of an open wall.
The step looks random. A doorway usually handles a change in level better.
Mistake 4. Raise the baseboard by 4 mm without addressing the bottom gap.
A gap and an operational problem appear.
Mistake 5. Sand a smooth wedge without a drawing.
The geometry of the bottom edge changes and installation becomes more complicated.
Mistake 6. Use an oak offcut with a different pattern at a visible transition.
A short detail stands out more than the transition itself.
Mistake 7. Treating 2400 and 2600 mm as the same panel
A 2420 mm wall is fully covered by MDF 2600, but not by oak/beech 2400.
Mistake 8. Buying a separate strip for 380 mm without checking leftovers
A door element can often be obtained from a useful offcut.
Mistake 9. Using any leftover without checking the ends
The leftover may have an angled cut or insufficient finishing allowance.
Mistake 10. Not accounting for the trim
Its width is exactly what can allow hiding the transition.
Mistake 11. Thinking paint is a way to fix geometry
The enamel hides the end material, but not the step or gap.
Error 12. Ordering both rooms separately without a common map
The ability to use leftovers and keep one batch is lost.
Decision tree: how to document PLT-005 with a 4 mm floor level difference
| Question | If yes | If no |
|---|---|---|
| Is the level difference confirmed on finished floors? | Proceed to the door unit | Measure first |
| Is there a wide trim/threshold? | Check the transition inside it | A separate facade unit is needed |
| Is a single top line mandatory? | Do not place both baseboards directly on the floor | A step can be accepted |
| Can the bottom edge be processed locally? | Make a test piece | Consider separating the systems |
| Is there a suitable leftover for the door element? | Use after verification | Add the piece to the cutting plan |
| Is the difference too large for a neat local solution? | Separate the baseboard systems | Keep a single PLT-005 |
What to send to STAVROS manager before ordering PLT-005
Prepare:
- article number PLT-005;
- the material;
- photos of both rooms;
- photo of the doorway;
- actual floor level of room A;
- actual floor level of room B;
- ΔH — in our example, 4 mm;
- type of trim or hidden box;
- presence of a threshold;
- lengths of all walls;
- end point of each baseboard segment;
- solution for the transition piece;
- cutting map of 2400 or 2600 mm;
- finish;
- calculated quantity.
If after this the material is still compared, you can buy a wooden baseboard after checking available versions. But the geometry of the door transition should be equally clear for any material.
Final specification PLT-005 for two rooms
| Parameter | What to fix |
|---|---|
| Product | PLT‑005 |
| Cross-section | 120×16 mm |
| Material | MDF / moisture-resistant MDF / beech / oak |
| Length | 2600 or 2400 mm |
| Floor A | Parquet, actual elevation |
| Floor B | Porcelain tile, actual elevation |
| Drop | 4 mm in the example |
| Top line | Uniform / jump allowed |
| Transition point | Casing / box / separate part |
| Short door part | Length and source of remainder |
| End face | Finish after processing |
| Quantity | Per map 2400/2600 mm |
| Reserve | By the actual complexity of the node |
Before payment, it is useful to print one final sheet with the door opening facade, section, PLT-005 top mark, and two actual floor levels. On the same sheet, indicate which 2400/2600 mm strips are assigned to each wall and from which remnant the transition piece is taken. Then the manager sees the quantity and material, the finisher sees the required ends and finish, and the installer sees the level change point. If after a re-measurement ΔH changes by at least 1–2 mm, the node is reviewed before cutting, not adjusted on site on an already finished part.
Checklist before payment
- both finished floors are completed or their marks are reliably confirmed;
- the difference is measured in at least two points of the opening;
- the top line of PLT-005 is defined;
- the transition point is in a clear architectural zone;
- the casing/frame is drawn on the drawing;
- there is no long random gap under the baseboard;
- local trimming is checked on a sample, if used;
- MDF 2600 and solid wood 2400 calculated separately;
- the door piece is assigned from a specific remnant;
- Ends and finish are agreed;
- The quantity is calculated by segments, not just by perimeter;
- Price and availability rechecked before payment.
FAQ about PLT-005 between parquet and porcelain stoneware
What is the size of PLT-005?
The cross-section of all versions is 120×16 mm.
What is the length of PLT-005 made of MDF?
2600 mm.
What is the length of oak and beech?
2400 mm.
Can one PLT-005 be used in two rooms with different floors?
Yes, if the transition between different finished floor levels is designed in advance.
What will happen if the parquet is 4 mm higher than the porcelain stoneware?
If both baseboards are placed directly on the floor, the top line on the parquet side will be 4 mm higher.
Must the top line be the same?
No. It's a design decision. But if a continuous architectural line is needed, the difference must be compensated in the door unit.
Where is the best place to make the height transition?
Most often in the doorway, at the trim, frame, or a separate short piece.
Can the transition be hidden under the trim?
Yes, if the geometry of the specific trim allows it. This needs to be checked in the cross-section.
Can PLT-005 be trimmed from the bottom by 4 mm?
Local processing can be considered only after checking the profile, end, and finish. There is no universal recommendation.
Can I simply put a shim under the baseboard in the lower room?
Only if the bottom gap and operation are decided in advance. Otherwise, a noticeable gap will appear.
What is easier for a complex transition — MDF or oak?
MDF is easier to finish under an opaque enamel, but it does not correct geometry. Oak requires particularly careful treatment of the visible end grain.
How to calculate the quantity for two rooms?
By individual segments, the door transition, corners, and the map of full planks 2400/2600 mm.
Is a separate plank needed for the short section near the door?
Not necessarily. First check the useful leftovers from the long walls.
Can a 420 mm leftover be used for a 380 mm piece?
Yes, if there is enough allowance for the final cut and the condition of the ends is suitable.
When is it better to completely interrupt the baseboard in the doorway?
When the difference is large, the joint is too complex, or the two rooms require different materials/finishing systems.
How does a hidden door frame affect things?
Without a wide casing, the transition is more noticeable, so the point of level change requires separate detailing.
Where to buy PLT-005?
In the product card after measurements and calculation of the required configuration.
Where to order PLT‑005 after checking the door transition
When the geometry is confirmed and the quantity is calculated, you can order PLT-005 in the required material. Before payment, you need to re-check the current price, availability, and production time.
Bottom line: the 4 mm needs to be resolved in the door unit before PLT‑005 goes into cutting.
PLT‑005 has the same cross-section of 120×16 mm in all versions, so switching from MDF to oak or beech does not eliminate the difference between parquet and porcelain stoneware. If both profiles are placed on the floor, the top line will mirror the 4 mm difference.
The cleanest solution usually appears in the doorway: the casing, frame, threshold, or a separate short piece takes on the change in level. After that, each room gets a calm top line, and the transition is not brought out onto an open wall.
Only after the node is approved is the cutting map built. MDF 2600 mm long and oak/beech 2400 mm are counted separately; a short door part is assigned from a specific useful offcut. An additional strip is needed not because of the height difference itself, but only if the actual map and the test piece require it.
The correct sequence: finished floors → actual ΔH → facade and door opening section → top line decision → transition point → test piece → 2400/2600 mm map → edge finishing → order.