Article Contents:
- Short answer: for a 1400 mm pediment, first check the scheme with two KRPU-010
- What exactly we are buying: decorative bracket KRPU-010
- Two ordering schemes and their real cost
- Why the pediment width of 1400 mm by itself does not answer the question "two or three"
- First find the window axis, not the middle of the product itself
- How to place two KRPU-010: the edge elements do not have to stand at the very ends of the pediment
- What a third bracket in the center will change
- A window with two sashes: when the central KRPU-010 is especially clear
- A single-leaf or visually integral window more often benefits from two extreme brackets
- If the window has side pilasters, align the extreme brackets with them
- When a wide sandrik really starts to look "empty" between two supports
- 243 mm in height is a noticeable element, not a small modillion
- A width of 77 mm affects the rhythm more than it seems
- A depth of 77 mm is important for the shadow and neighboring details
- Symmetry is more important than equal spacing between three details
- How to check the left and right overhang of the sandrik
- How much free space to leave between the bracket and adjacent decor
- Two KRPU-010 are better when the facade is already saturated with verticals
- Three KRPU-010 brackets are justified when the window and facade are already built on a three-part composition
- If the facade is designed with a series of identical windows, the decision should not be made based on a single opening
- What to do if windows on one facade have different widths
- When the third bracket interferes with the keystone or central accent
- Why the decorative KRPU-010 cannot be used as a basis for calculating the load-bearing capacity of the cornice
- How to make a full-size template before ordering
- Why the mockup should be evaluated from a distance, not just from a ladder
- In what color two and three brackets are perceived differently
- If the cornice is already installed, check not only the dimensions but also its lower plane
- Pre-purchase check: what to measure on the facade
- Order check after receipt: do not apply glue until dry fitting
- Five mistakes when choosing two or three KRPU-010
- Mistake #1: ordering three pieces just because 1400 mm seems like a large length
- Mistake #2: attaching the outer brackets to the ends of the sandrik, ignoring the window
- Mistake #3: not accounting for the actual height of 243 mm
- Mistake #4: thinking that three decorative elements make the mounting safer
- Mistake #5: evaluating only one window and forgetting about the rhythm of the entire facade
- Outdoor use requires coordinating the finish and installation, rather than relying on the word "polyurethane"
- When two brackets are the most rational outcome
- When three brackets are the most convincing outcome
- When it is better to leave the cornice without KRPU-010 altogether
- What to put in the cart after making a decision
- Can I first order two KRPU-010 units and buy the third one later?
- Do I need to place the central bracket exactly under the window impost?
- Can I rotate the KRPU-010 differently so it takes up less height?
- What matters more: the same offset from the ends of the sandrik or matching the architraves?
- Can the central KRPU-010 replace the keystone?
- Do I need to install the same number of brackets on adjacent windows?
- Is it worth buying a third bracket as a spare?
- What should I do if after installing two brackets the center still seems empty?
- Can KRPU-010 be installed on a facade with insulation?
- How can I tell when three brackets are already overloading the window?
Short answer: for a 1400 mm sandrik, first check the scheme with two KRPU-010
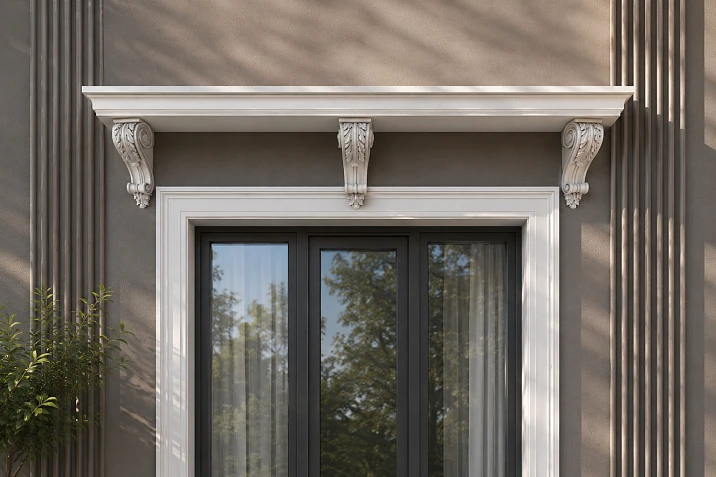
If a straight sandrik 1400 mm wide is already installed and decorative supports need to be added under it, the basic scheme to check is two identical KRPU-010 brackets, positioned symmetrically on the left and right. A third bracket in the center should not be added automatically just because the horizontal element seems long. In this task, the quantity is chosen based on the facade composition, window position, casing width, sash pattern, and distances between decorative elements.
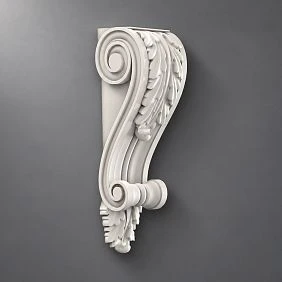
KRPU-010 is specifically a decorative polyurethane bracket. It has one size option: 243 × 77 × 77 × 43 × 73 mm. In the STAVROS catalog, size A for this product group is designated as height, B as width, and C as depth. Therefore, to assess the facade rhythm, you can confidently assume that the visible width of each bracket is 77 mm and the height is 243 mm. Additional parameters D and E are needed for a precise description of the product geometry, but without a drawing, you should not assign them a different purpose on your own.
The current price of KRPU-010 is 7,270 ₽ per piece. Thus, two items cost 14,540 ₽, three — 21,810 ₽. The difference between the schemes is 7,270 ₽. This makes the quantity question not a decorative trifle, but a real decision before placing an order.
At the same time, the bracket in the composition under consideration cannot be considered a load-bearing support for the sandrik. The sandrik itself must be installed according to its intended technology and have its own reliable fastening. KRPU-010 adds visual support: it connects the upper cornice with the window framing, creates shadow, a vertical accent, and a classic rhythm. If, after removing the decorative brackets, the sandrik physically cannot stay in place, the task goes beyond decorative design and requires a structural solution.
Before purchasing, it is useful to make not one, but two full-size mockups: a scheme with two brackets and a scheme with three. They should be applied to the facade frontally, and evaluated not only up close, but also from the usual approach point to the house. From a distance, it is immediately visible whether the central element helps or, on the contrary, breaks the calm horizontal line of the sandrik.
Another check before ordering is to look at the window under different lighting. In the morning, afternoon, and evening, the shadow from the relief changes, and the depth of KRPU-010 is 77 mm. If the facade is well lit from the side, even two brackets can cast strong vertical shadows. On the north side or with constantly diffused lighting, the same composition is perceived more calmly. For the decision, there is no need to conduct a complex lighting study: it is enough to take photos of the mockup at the time of day when the facade is usually visible to owners and guests. This adds another real variable to the quantity choice and helps avoid evaluating volumetric decor only from a frontal drawing.




What exactly we are buying: decorative bracket KRPU-010
This article discusses one specific product — KRPU-010. This is important because the word "bracket" in construction can mean a metal load-bearing part, a fastening console, or part of an engineering structure. Here, we are talking about a molded decorative element made of polyurethane, which works primarily as part of the architectural pattern of the facade.
| Parameter | KRPU-010 |
|---|---|
| Product type | Decorative bracket |
| Material | Polyurethane |
| Size A | 243 mm, height |
| Size B | 77 mm, width |
| Size C | 77 mm, depth |
| Full set of dimensions | 243 × 77 × 77 × 43 × 73 mm |
| Price per 1 pc. | 7 270 ₽ |
| Options for sandrik 1400 mm | 2 or 3 pcs. |
You can buy a specific model in the product card decorative bracket KRPU-010 made of polyurethane. If after trying it on it turns out that KRPU-010 is too massive or, on the contrary, not expressive enough for a particular facade, it is more logical not to change the quantity at random, but to compare other decorative polyurethane brackets.
The key characteristic for this article is not only the height of 243 mm. The width of 77 mm is also important, because it determines how often the facade will be "cut" by vertical decorative supports. Two elements occupy 154 mm of total width along the front, three — 231 mm. But these values cannot simply be subtracted from 1400 mm and declare the remaining size the "correct gap": the actual composition depends on where the outer brackets are located, what the overhangs of the sandrik are, and where the center of the window falls.
That is why the article does not boil down to the formula "1400 divided by two or three." In architectural decor, the same number of elements can look different on two windows of the same width if one window has two identical sashes, while the other has a central mullion, a wide casing, or side pilasters.
Our factory also produces:

Two ordering schemes and their real cost
First, it is worth dividing the question into two ready-made configurations.
| Diagram | Quantity of KRPU-010 | Cost of brackets | What changes visually |
| Two at the edges | 2 pcs. | 14 540 ₽ | the pediment reads as a single horizontal line, with accents concentrated on the sides |
| Two at the edges + one in the center | 3 pcs. | 21 810 ₽ | a central axis appears, the horizontal line is divided into two spans |
From a financial perspective, the difference is absolutely transparent: the third piece increases the cost of the set by exactly the price of one KRPU-010 — 7,270 ₽. But architecturally, this is no longer "the same option, just richer." With three brackets, the composition acquires a different structure.
With two extreme elements, the eye sees one pediment and two support points. The center remains free, so the top of the window is perceived as calm. This is especially useful when the window opening itself already has many verticals: two sashes, frequent mullions, developed architraves, or side pilasters.
With three elements, the central bracket creates an additional axis. This technique can be strong if the window itself has a pronounced center and the facade requires emphasizing it. For example, a central mullion, a vertical line between two sashes, or a symmetrical composition of architraves gives the third bracket a clear reference point. If there is no vertical reason below the center of the pediment, the central detail risks looking added only because "there was empty space left."
Therefore, you should compare not only the cost of 14,540 and 21,810 rubles. The question is this: will the third element provide a new architectural function that the two extreme ones lack? If yes, the additional purchase is justified. If no, two brackets can give a more cohesive result while saving 7,270 rubles of the budget for other decor or installation.
Get Consultation
Why the pediment width of 1400 mm by itself does not answer the question "two or three"
The number 1400 mm seems like a convenient starting point: you want to divide the length into equal segments and get a ready answer. But the decorative composition is not built on the length of the plank as such. The pediment is connected to the window, so first you need to understand what part of these 1400 mm the window opening itself occupies and what side overhangs remain relative to its vertical boundaries.
Let's imagine two facades. In the first, the window has an external width of 1100 mm, and the 1400 mm pediment protrudes 150 mm on each side. In the second, the window is 1250 mm wide, and the side overhangs are only 75 mm each. The pediment is the same, the bracket is the same, but the extreme mounting points will feel completely different. In the first case, there is room for calmly placing the brackets within the overhangs or in relation to the architraves. In the second, the 77-mm bracket almost entirely occupies the side allowance, and its position has to be coordinated especially precisely.
The third bracket does not fix incorrect positioning of the extreme ones. If the side elements are placed randomly—for example, one aligned with the edge of the pediment and the other with the edge of the architrave—the central detail will only make the inconsistency more noticeable.
Therefore, before choosing the quantity, you need to obtain at least five dimensions: the full width of the pediment; the external width of the window opening or finished framing; the left and right overhang of the pediment; the width of the side architraves or pilasters; the position of the central axis of the window. These values allow you to see the composition as a whole.
A buyer's mistake occurs when 1400 mm is perceived as a separate wall shelf, not connected to the window. For a facade, this almost never works. The bracket must have a visual connection with the architecture below: continue the side post, align with the axis of the architrave, support the edge of the pediment, or, in the case of the third element, continue the center of the window.
First, find the axis of the window, not the middle of the product itself
If the sandrik is installed perfectly symmetrically relative to the window, its geometric center and the axis of the window opening will coincide. But on the finished facade, it is better to verify this by measurement rather than take it on faith. Even a slight shift becomes noticeable after installing the third bracket, because the central piece acts as an indicator: it literally shows the viewer where, by design, the center of the entire composition should be.
To check, mark two vertical lines: the center of the sandrik and the center of the window frame. If they coincide, the central KRPU-010 can be fitted along the common axis. If not, a choice arises between two imperfect options: subordinating the bracket to the sandrik or subordinating it to the window. There is no need to automatically purchase a third element in such a situation.
With a slight discrepancy, it is often better to keep the scheme of two outer brackets. It is less demanding on a perfect central axis: the side elements can be tied to the trim or the boundaries of the opening without emphasizing the center mismatch. The third bracket, however, turns a barely noticeable error into a readable vertical line.
If the difference is significant, it is worth first figuring out why the sandrik turned out to be shifted. Perhaps the composition is deliberately tied not to the window frame but to the overall facade grid. Perhaps the width of the side elements differs. Perhaps one side of the window is limited by a building corner, rustication, or a downspout. In such cases, "mathematical symmetry" may be less important than alignment with the facade architecture.
The main practical conclusion is simple: a third bracket in the center is appropriate only when the center truly exists as a readable axis. If it has to be artificially invented between mismatched elements, the two-point scheme is usually safer.
How to place two KRPU-010: the outer elements do not have to stand at the very ends of the sandrik
The phrase "two brackets at the edges" is often understood too literally: one piece is placed almost under the left end of the sandrik, the second under the right. For a 1400-millimeter horizontal, this is only one option, and far from always the best.
The outer brackets can be tied to three different reference points. The first is the outer edges of the sandrik. This approach emphasizes its length and forms distinct support points at the ends. The second is the side boundaries of the window opening. Then the brackets are perceived as a continuation of the window, and the sandrik overhangs extend beyond them outward. The third is the axes of the side trims or pilasters. This is often the most architecturally connected option if the window framing is already developed.
With a KRPU-010 width of 77 mm, it is useful to mark on the facade not a single central line but the entire rectangle of the future element. A narrow pencil line does not show the real visual weight. A strip 77 mm wide already allows you to understand whether the bracket will be too close to the slope, trim, or end of the sandrik.
If the two outer elements stand slightly inside the ends of the sandrik, short cantilever overhangs appear outside. They can be visually useful: the sandrik looks like an independent horizontal slab resting on decorative consoles, rather than a bar squeezed between them. But the overhangs on the left and right should be perceived equally or have an asymmetry explainable by the facade.
Therefore, before ordering two pieces, it is better to determine not "place them at the edges" but a precise anchoring system: by the sandrik, by the window, or by the architraves. After that, the scheme becomes reproducible on other windows of the house.
What the third bracket in the center will change
The third KRPU-010 divides the free horizontal into two visual spans. This is the main change. It adds a new axis and thereby changes the way the entire upper part of the window is read.
Two brackets create a composition of "support — long horizontal — support." Three give "support — span — center — span — support." On a classical facade, the second rhythm can look convincing if the window is wide, the center is expressed, and other elements support symmetry. On a more laconic facade, it may turn out to be too fragmented.
Particular caution should be exercised with the third element if the KRPU-010 itself has a rich relief. The height of 243 mm makes it a noticeable vertical accent, not a small dot under the cornice. Three identical accents over a length of 1400 mm are perceived as significantly denser than three small modillions.
The central piece is useful when a specific visual problem needs to be solved. For example, the sandrik looks like a too-long "hanging" line, and the window below is divided in half and asks for the central axis to be continued. Or the entire facade is built on repeating a three-part rhythm. In such a case, the third KRPU-010 completes an already existing system.
If the central bracket is installed only out of fear that 1400 mm is "too much for two," it is better to stop. In a decorative scheme, there is no rule that every conventional 400–500 mm must have a separate console. Such a rule could apply to the calculation of load-bearing supports for a specific structure, but here we are talking about decorative stucco. Architectural logic is more important than a mechanical step.
A window with two sashes: when the central KRPU-010 is especially understandable
A two-sash window provides a natural central vertical. If the sashes are equal and there is a pronounced mullion between them, the third bracket can be placed exactly above that line. Then it does not arise from emptiness but continues the window's structure upward and connects it with the sandrik.
But even here, the third element is not mandatory. You need to look at how many verticals are already present in the framing. If there are wide architraves or pilasters on the sides, the two outer KRPU-010s continue their axes, and the central one continues the mullion. This results in five strong vertical directions: two side framing elements, two brackets, and the center. On a facade with rich classical plasticity, such a rhythm may be appropriate. On a calm facade, it is overloaded.
There is another criterion: the relative width of the sashes. If the window is visually divided into two equal parts, the center is perceived strongly. If one sash is wide and functional, and the other is narrow, the mathematical center of the frame may not coincide with the visual axis. Then a bracket installed "by the ruler" can emphasize asymmetry rather than correct it.
A full-size template helps to check this better than any general rules. Cut out three rectangles approximately 243 × 77 mm from paper or thin cardboard, mark the direction of the relief on them, and temporarily attach them under the sandrik. Step back 8–15 meters. If the central element is perceived as a continuation of the window, the scheme works. If the eye first notices three separate "legs" and only then the window, the decor has become too active.
A single-sash or visually integral window more often benefits from two outer brackets
For a solid window field without a pronounced central mullion, the third bracket has fewer architectural justifications. It may end up exactly above the middle of the glass, but below it there is no line that it continues. In such a case, two outer elements often look calmer: they frame the window's boundaries and leave the central part free.
This is especially noticeable on windows with large solid glass. The large plane works as a visual pause. If a bracket is placed in the center above, it will create a vertical axis where the window structure itself does not support it. This is not forbidden, but it should be a deliberate decision, for example, if such an axis continues a pediment, keystone, or another central element above.
For a modern neoclassical facade, a scheme with two brackets often provides the right balance: the sandrik gets classical support, but there is still enough air. For a richer historical style, a central element may be justified even above a solid window if the entire portal is built on an axial composition.
Therefore, the formal criterion "width 1400 mm" yields to a stronger criterion — whether the window has a center that the viewer reads as an architectural axis even without a bracket. If not, the third element requires additional justification.
If the window has side pilasters, align the outer brackets with them
Pilasters or wide vertical casings already form a load-bearing-by-meaning structure of the window portal. Even if they are decorative, the eye perceives them as vertical supports. Therefore, KRPU-010 is logically placed above their axes or so that its position clearly continues this vertical.
This approach is more useful than tying to the ends of the sandrik. Imagine that the sandrik extends beyond the side pilasters by 100–150 mm. If the brackets are moved to the very ends, a gap will appear between them and the pilasters, and the upper part will start to live separately from the rest of the framing. If the brackets are left above the pilasters, the sandrik gets clear side supports, and the outer overhangs remain as the completion of the horizontal.
In this system, the third central KRPU-010 should be compared not with an empty 1400-millimeter sandrik, but with a pair of side verticals. If the composition below has a center — for example, a keystone, a central impost, or a pronounced panel — the third support can gather three axes into a single rhythm. If not, the two outer brackets usually maintain a clearer hierarchy.
A useful check: mentally remove the sandrik and look only at the verticals. If two KRPU-010 look like a natural continuation of the pilasters, the basic scheme is already architecturally complete. The third one should add a new semantic foundation; filling the free gap by itself is not enough.
When a wide sandrik really starts to look "empty" between two supports
The emptiness between the two outer brackets is not a defect in itself. It can emphasize the length and calmness of the horizontal line. The problem arises when the central part visually seems weaker than the sides, and the eye perceives the sandrik as an unjustifiably long strip without connection to the window.
This effect more often appears under several conditions simultaneously. The sandrik noticeably protrudes beyond the window, has a massive profile and a strong shadow. The side brackets stand far apart from each other. The window below has a pronounced central axis. The facade is executed in a rich classical style where the repetition of supports is expected. Then the free center can be perceived as incompleteness.
The third KRPU-010 helps if it is precisely the one that connects the center of the window and the sandrik. But if the feeling of emptiness is caused by another reason — for example, the sandrik is too massive relative to the entire portal — adding a console may only increase the heaviness. Sometimes it is better not to increase the amount of decor, but to simplify neighboring elements or leave a longer free span.
The emptiness should be assessed from a facade distance. At 30 centimeters from the wall, any gap seems large because a person sees details separately. From a distance of 10–20 meters, the elements merge into a single silhouette, and two brackets may turn out to be quite sufficient.
Therefore, before buying a third piece, one specific question is needed: what exactly looks unfinished — the center of the window, the sandrik itself, or the entire composition? Only if the answer is related to a missing central axis does KRPU-010 in the center become a logical solution.
243 mm in height is a noticeable element, not a small modillion
The height of KRPU-010 is 243 mm. For facade decor, this is a size that reads well at a distance and forms a vertical shadow. Therefore, the number of such elements cannot be chosen in the same way as the number of small dentils or modillions that create a frequent repeating band.
Two brackets 243 mm high create strong side accents. They can visually extend the architraves downward from the pediment or form independent corbels. Adding a third creates a full three-part system. This change is noticeable even when the color matches the wall.
If the space between the top of the window and the pediment is small, check whether the 243-mm piece might be too tall. The bracket must not press against the upper glass line, overlap the decorative architrave, or "sit" on another molding without a designed joint. On the finished object, the actual free vertical space under the pediment matters, not just the nominal horizontal width.
This is where a full-size template is especially useful. A 243 × 77 mm rectangle shows the real dimensions better than a product photo on screen. If three such elements in the layout start to visually cover the upper part of the window, the third is unnecessary regardless of how symmetrically it is placed.
The 77 mm width affects the rhythm more than it seems
Frontally, each KRPU-010 takes up 77 mm. Two pieces give two relatively compact vertical strips; three give three. But what matters is not their total size, but the interval between them.
With two outer brackets, the central zone remains long and continuous. The eye reads the pediment primarily as a horizontal line. With three, the middle element breaks this zone, and the rhythm becomes an alternation of vertical accents and gaps. The richer the relief of KRPU-010 and the stronger the contrast of its color, the more noticeable this effect.
If the brackets are painted in the color of the wall or pediment, 77 mm works more softly: the form is mainly defined by light and shadow. If they are highlighted with a contrasting color, each element becomes an independent graphic strip, and a three-piece scheme may look significantly denser. Therefore, the decision on quantity cannot be fully separated from the future finish.
There is a useful evaluation method: print or cut out not only the bracket outline, but also fill it with an approximate color. A white template on a dark wall and a gray template on a gray wall give completely different feelings of saturation. What looks harmonious in monochrome may become overloaded with contrast.
If you look only at the frontal width of the elements, two KRPU-010 total 154 mm, which is about 11% of the 1400 mm pediment length. Three take up 231 mm — roughly 16.5%. This percentage cannot be turned into a standard, but it explains well why the third piece noticeably changes the pattern: the amount of vertical decor increases not by a "negligible detail," but by half relative to the two-element scheme. At the same time, the free horizontal line does not decrease evenly — it is divided by the central corbel into two independent spans.
It is useful to compare photos of mockups in black and white. Color stops distracting, and the rhythm becomes visible: how strongly three 77 mm strips break up the 1400-mm horizontal line. If the three-piece version looks like a dense picket fence, the third element is unnecessary. If it gathers the two halves of the window around the center, the additional vertical works to the point.
The depth of 77 mm is important for the shadow and adjacent details.
Size C for the STAVROS bracket category is designated as depth; for KRPU-010 it is 77 mm. On the facade, this technical figure directly affects light and shadow and volume. The protruding relief forms its own shadow, especially under side sunlight. Three elements will create more repeating shadow accents than two, and this can noticeably change the character of the window.
Before installation, you need to check whether the bracket protrusion conflicts with the drip edge, flashing, the profile of the cornice itself, or other overlay details. If the cornice has a complex lower profile, the junction point must be clear in advance. You cannot assume that the polyurethane element will "somehow fit" just because its face width matches.
Depth is especially important on facades with closely spaced shutters, awnings, downspouts, or decorative lighting. The bracket may not intersect with them in the frontal view, but may collide in volume.
The third element adds another point of such spatial control. If a cable, camera, light fixture, or other facade element runs along the center of the window, the central console may be undesirable even with perfect symmetry.
Symmetry is more important than equal spacing between the three pieces
When a person chooses three brackets, there is a temptation to simply divide 1400 mm into two equal intervals. Such a calculation may be useful as a rough layout, but should not become the main rule. The facade is read not by a ruler, but by the mutual position of the cornice, window, and vertical framing elements.
For two brackets, first determine the axes of the outer pieces. If they are tied to casings, pilasters, or window boundaries, their position is already set by the architecture. After that, you can measure the distance between their axes. Only then does it become clear where a potential third element would fall.
If the midpoint between the outer KRPU-010 brackets coincides with the window axis, the three-piece layout becomes natural. If not, there is a conflict: either the central element will not be centered on the window, or the gaps on the left and right will become different. In such a situation, it is better not to mask the problem with a third piece.
With two elements, slight asymmetry in the finished cornice is sometimes almost unnoticeable. With three, it is amplified because the central bracket gives the viewer a reference vertical. That is why the third element requires more precise initial geometry than the two outer ones.
It is practically useful to apply three types of markings to the facade at once: the window axis, the sandric axis, and the axes of future brackets. If the lines align into a single system, you can proceed to the mockup. If they start to conflict with each other, purchasing a third piece is premature.
How to check the left and right overhang of the sandric
For an already installed sandric, it is important to measure not only the total width of 1400 mm, but also how much it extends beyond the window or its decorative frame on the left and right. Theoretically, the overhangs should be symmetrical, but on a real facade deviations are possible due to installation features, finishing thickness, or neighboring architectural elements.
Measure the distance from the left end of the sandric to the chosen vertical boundary of the window, then do the same on the right. Use the same geometric line as a reference: for example, the outer edge of the casing on both sides. You cannot measure to the slope on the left and to the edge of the decorative pilaster on the right — you will get incomparable values.
If the overhangs are equal, the outer brackets can be placed symmetrically relative to this system. If they differ by a few millimeters, the issue is usually resolved with careful marking. If the difference is noticeable, you need to determine what is more important for perception: symmetry relative to the window or maintaining an equal offset from the ends of the sandric.
The third bracket should not be used as a way to "balance out" different overhangs. It is placed in the center and does not correct the lateral geometry. Moreover, it can emphasize it. Therefore, with significant asymmetry, you should first decide the placement of the two outer pieces and only then return to the option with three.
How much free space to leave between the bracket and adjacent decor
For KRPU-010, there is no universal standard gap to the casing, pilaster, or edge of the sandric without reference to a specific profile. But a working principle can be formulated: between independent ornamental elements, enough free surface should remain so that they read as separate forms and do not look randomly superimposed on each other.
If the bracket almost touches the side casing, their reliefs may merge. If, on the contrary, the gap is too large, the feeling that the console belongs to the window portal disappears. Therefore, the optimal position is sought by visual fitting, not by an abstract number.
Here, a paper template 77 mm wide and 243 mm high helps. By moving it a few centimeters, you can quickly see where a visual connection with the casing arises and where the necessary pause is maintained. This method is much more reliable than looking at a reduced photo of the product in the card.
For the third bracket, the neighboring "decor" may be a central keystone, rosette, mascaron, or another accent. If such an element already exists, two central accents may compete. Then it is better to abandon the third KRPU-010 or reassemble the central composition entirely.
Two KRPU-010 are better when the facade is already saturated with verticals.
There are facades where the window itself contains many vertical lines: narrow sashes, frequent mullions, side architraves, pilasters, rustication near the opening. In such an environment, a third bracket may create another vertical without necessity.
Two outer elements work differently. They gather the composition on the sides and leave the central part relatively calm. The pediment remains the main horizontal accent, and the brackets help it visually rest on the window portal.
This is especially valuable when there is an additional cornice above the window or rusticated pilasters run between windows. The facade needs a hierarchical order: main cornice, window pediment, architraves, local decorative details. If all levels are filled with frequent brackets, the eye will stop understanding what is the main element.
Therefore, "richer" does not always mean "better." The third detail costs 7,270 ₽ and has the right to appear only when it improves the structure. If it simply increases the amount of ornament, two elements turn out to be a more rational and often more architecturally pure choice.
Three KRPU-010 are justified when the window and facade are already built on a three-part composition.
The opposite situation is a facade where a three-part rhythm already exists. For example, the central axis of the window is emphasized by a mullion, a symmetrical pediment is located above the window, and pilasters run along the sides. In such surroundings, two outer brackets may leave the center compositionally empty.
Then the third KRPU-010 does not invent a new system but continues an existing one. It connects the central axis of the window with the lower plane of the pediment, while the two side elements support the edges. The result is a consistent scheme: left edge — center — right edge.
But even here it is important to check the scale. The height of each bracket is 243 mm. If there is little space between the pediment and the top of the window, three large details may cover too much of the free field. The three-part logic is correct only when the geometry allows it to fit properly.
In such a situation, a frontal mockup of the entire composition is especially useful. Not three separate pieces of paper, but a single sheet or layout where the window, the sandrik, and all three KRPU-010 are shown simultaneously. This eliminates the error where each element looks good individually, but together they become too dense.
If the facade is designed with a series of identical windows, the decision should not be made based on a single opening
A house often has several windows that are identical or similar in size. Then the question of 2 or 3 KRPU-010 needs to be resolved for the entire series at once. A single individually designed opening may look convincing with three elements, but ten windows with three brackets each will give thirty large vertical accents. Across the whole facade, this is a completely different level of saturation.
A scheme with two on each window creates a sparser rhythm and emphasizes the side boundaries of the openings. Three on each window strengthen the centers and form a frequent repetition. If the facade is long and symmetrical, such repetition can work well. If the walls are already saturated with rustication, pilasters, and cornices, it may become excessive.
There is also a budget effect. For one window, the difference between two and three KRPU-010 is 7,270 ₽. For five identical windows, that's already 36,350 ₽ in additional costs just for the central elements. For ten, it's 72,700 ₽. These amounts do not say that the third bracket is "too expensive," but they force a systematic check of its necessity.
If a series of windows is being designed, it's better to do a trial fitting on one opening, photograph the facade from two or three distances, and simulate the repetition of that scheme on the others. The decision should improve the entire facade, not just the nearest window.
What to do if windows on the same facade have different widths
It is not necessary to use the same number of brackets on windows of different widths. The mistake is to assume that a unified style requires literally identical configuration for each opening. In architecture, unity can be maintained with the same KRPU-010 model, the same attachment to the architraves, and a common principle, while the number of elements changes according to the window's scale.
For example, on standard windows, two outer KRPU-010 may be sufficient, but on one wide central window, three. Such a decision even strengthens the facade's hierarchy: the main opening gets an additional central accent, while secondary ones remain calmer.
But the difference must be explainable. If two adjacent windows are almost identical, and one has two brackets underneath while the other has three without a visible reason, the composition will become random. Therefore, before ordering, it is advisable to compile a simple list of all windows: sandrik width, opening width, number of sashes, presence of a center, and the planned number of KRPU-010.
This approach simultaneously helps calculate the overall budget and avoid unnecessary items. It is especially useful if part of the decor is already installed and part is only being ordered.
When the third bracket interferes with the keystone or central accent
In classic window design, the center is often already occupied by another element: a keystone, cartouche, rosette, mascaron, or decorative overlay. If such an accent is located directly under the pediment or on the window axis, the central KRPU-010 may compete with it.
Instead of one clear vertical line, the viewer will see two relief elements located close to each other. If the shapes differ in style or scale, the center becomes overloaded. In such a composition, two side KRPU-010 brackets are usually more logical: they frame the central accent and help it remain the main element.
A third bracket makes sense only if it is structurally and visually intended as part of the central assembly. It cannot be automatically placed on top of existing decorative logic.
Before ordering, it is useful to draw a vertical section of the center: what is located from top to bottom — the pediment profile, bracket, keystone, casing, impost. If two large-relief elements end up almost one above the other, the composition should be simplified.
Why the decorative KRPU-010 cannot be used as a basis for calculating the load-bearing capacity of the pediment
This is a fundamental section for safety and correct selection. In this article, the number of KRPU-010 brackets is determined by the architectural pattern, not by load calculation. The product card data cannot be used to derive the permissible load-bearing capacity, the spacing of support posts, or the ability to hold a pediment of a certain mass.
If the pediment is already installed, its fastening must remain independent and reliable regardless of whether there are two decorative brackets underneath, three, or none. One cannot reason as follows: "1400 mm is longer than a meter, so a third bracket is needed for strength." Such a conclusion would require information about the material and mass of the pediment, the wall base, fasteners, adhesive system, wind loads, and the calculated function of the KRPU-010 itself. The decorative element's card does not provide such grounds.
If there is doubt about the fastening of the pediment, first check the mounting system and, if necessary, consult a designer or facade installation specialist. Only after resolving the structural part is the decorative scheme selected.
This distinction is also commercially useful: it protects against mistakenly buying a third piece "just in case." KRPU-010 for 7,270 ₽ should be added when it improves the composition, not when it replaces unknown fasteners.
How to make a full-size template before ordering
For this task, the template is one of the most valuable tools. It costs almost nothing and allows you to see in advance the difference between a 14,540 and 21,810 ₽ order.
Cut three rectangles measuring 243 × 77 mm from thick paper, cardboard, or thin foam material. If possible, print a front view of KRPU-010 at 1:1 scale—even better: you'll see not only the dimensions but also the ornament. Mark the central vertical line on each template.
First, secure the two outer elements with masking tape at the chosen points. Photograph the window strictly from the front. Then add the third one in the center and take a second shot from the same point. After that, repeat the photos from the usual approach point to the house and from a farther position.
You should compare not "where there's more decor," but four signs: whether the window reads as a whole; whether the pediment remains the main horizontal line; whether the center supports the real lines of the window; and whether the upper zone becomes too heavy.
If the difference isn't obvious from the photos, it's wiser to order two. The third one is worth buying when its advantage is visible before installation, not when you have to convince yourself that "three is probably more correct."
Why the mockup should be evaluated from a distance, not just from a stepladder
Facade decor is designed to be perceived from a distance. Standing directly under the window, a person sees the depth of the relief, individual curls, and gaps between details. From ten or twenty meters, these details merge into a silhouette and rhythm.
Because of this, close-up fitting often pushes toward extra decor: the empty space seems too large, and you want to fill it with a third element. At a normal distance, the same emptiness may turn out to be a necessary pause, thanks to which the pediment reads as a whole.
There is also the opposite situation. On a large facade, two KRPU-010 units can almost get lost, especially if they are painted the same color as the wall and are far from the edges of the window. Then a third central element helps tie the composition together and makes the axis noticeable.
A good check is three distances: close for joints and dimensions, medium for one whole window, and far for the entire facade. The decision on quantity is made primarily based on the medium and far distances, while installation details are based on the close distance.
How two and three brackets are perceived differently depending on color
Identical geometry can look completely different depending on the paint color. If the KRPU-010, the cornice, and the wall are close in color, the form is read mainly through shadow. In such a case, three brackets can be perceived softly and not overload the facade.
If the brackets contrast with the wall, each one becomes a graphic sign. Three such signs over a length of 1400 mm create a much more active rhythm. Therefore, the color scheme should be included in the fitting in advance.
The calmest option is a unified paint color for the cornice and brackets. Then they form a single decorative unit. Contrasting highlighting of the brackets is justified if the facade is already built on a two-color system and similar elements in other places are also highlighted.
You cannot choose a third element on a white cardboard template for a dark wall if the actual paint color will match the wall: the mockup will show a deliberately stronger contrast. It is better to bring the template color closer to the real finish.
If the cornice is already installed, check not only the dimensions but also its lower surface
A finished cornice may have a profiled bottom, protrusions, steps, or areas where the decorative bracket physically cannot be placed flush. The frontal width of 1400 mm says nothing about the geometry of the attachment point.
Before purchasing, you need to inspect the lower surface and determine the actual zones where the upper part of the KRPU-010 can reach. If the profile is complex, verification against the product drawing and installation recommendations will be required. You should not trim a new decorative bracket on site just because the connection was not checked in advance.
The same applies to facade finishing. If there is decorative plaster with a pronounced relief under the sandrik, the surface for adhesion may require preparation. If a joint of the insulation system passes through, the location of the fastening should be coordinated with the facade technology.
For the variant with three such junction points, there are three; for the variant with two, there are two. Therefore, the third part increases not only the cost but also the amount of marking, fitting, and finishing work.
Pre-purchase check: what to measure on the facade
Before adding KRPU-010 to the cart, gather a short set of actual dimensions. This is enough to eliminate most errors.
-
The full width of the installed sandrik — confirm the stated 1400 mm in reality.
-
The width of the window opening, including the decorative framing to which the brackets will be attached.
-
The left and right overhang of the sandrik relative to one chosen vertical boundary.
-
The free height under the sandrik for an element with a height of 243 mm.
-
The free depth zone for an element with dimension C of 77 mm.
-
The position of the center of the window and the center of the sandrik.
-
Position of impost, pilasters, architraves, keystone, and other decorative axes.
-
Presence of engineering obstacles: lights, cameras, downspouts, cables, awnings.
After taking measurements, don't immediately count the quantity, but draw two diagrams. This order disciplines the choice: first the object, then the composition, then the cart.
Check the order after receiving it: do not apply glue until a dry fit.
Even if the decision for two or three brackets is made in advance, after receiving the goods it's worth doing a dry fit again. The photo in the catalog and the paper rectangle do not convey the real plasticity of the relief, the depth of shadow, and how the product interacts with the specific profile of the sandrik.
Unpack all elements, compare them with each other, check for noticeable damage, and re-measure key dimensions. Then apply KRPU-010 to the intended places without permanent fastening. For three elements, it's especially important to ensure that the central one is truly on the chosen axis and does not conflict with the window relief.
If after a real fit three elements look too dense, there's no need to mount the third just because it's already purchased. It's better to change the composition before applying glue than to secure a knowingly questionable solution.
During the dry fit, it's useful to check one more thing: whether the ornament of all elements is oriented the same way and whether they all fit equally to the lower profile of the sandrik. Even a slight difference in angle or height on a symmetrical facade composition is more noticeable than on a separate interior element. If the parts have to be compensated with different seating, first find out the reason — the geometry of the base, the sandrik profile, or the features of the product itself — and only then proceed to permanent fastening.
Five mistakes when choosing two or three KRPU-010
Mistake #1: ordering three pieces just because 1400 mm seems like a large length
The reason for this error is the transfer of the supporting construction logic to the decorative composition. The buyer sees a long pediment and assumes that the center must necessarily be "supported."
The consequence is an extra detail for 7,270 rubles and a more fragmented facade rhythm. In the worst case, the central bracket does not align with the window axis and makes a slight asymmetry noticeable.
The check is simple: temporarily remove the central element from the layout. If the composition remains complete and the pediment does not look visually lost, the need for the third element is not proven.
Mistake #2: attaching the outer brackets to the ends of the pediment, ignoring the window
Such installation can give perfect equal indents from the edges of a 1400-mm element, but it breaks the connection with the architraves and pilasters. The brackets will end up "under the plank" rather than being part of the window portal.
To avoid this mistake, first select the vertical lines of the window that the brackets should continue. Only then check the distance to the ends of the pediment. If the two systems do not match, the architectural connection with the opening usually takes priority, but the final decision depends on the entire facade composition.
Mistake #3: not accounting for the actual height of 243 mm
In the product card photo, the bracket may seem compact. On the facade, 243 mm is almost a quarter of a meter. If the free zone above the window is small, the element can visually lower the pediment and make the top of the portal heavy.
A way to avoid this mistake is a full-size vertical template. Do not replace it with a small printed image without scale.
Mistake #4: assuming that three decorative elements make the mounting safer
This is no longer an aesthetic but a fundamental error. The number of KRPU-010 in this article is not a calculation of load-bearing capacity. If the sandrik requires additional structural fastening, it is selected based on a different task and different initial data.
Not using a decorative purchase as a substitute for an engineering check is the most important way to avoid this mistake.
Mistake #5: evaluating only one window and forgetting about the rhythm of the entire facade
Three brackets can look great on a single large opening, but become excessive when the pattern repeats on six or eight windows. Before ordering a series, it is useful to make a photomontage or at least schematically repeat the chosen rhythm across the facade.
If the central element is needed only for the main window, this can be turned into an architectural hierarchy rather than a problem of uniformity.
When it is better not to buy either the second option or the third, but to reconsider the KRPU-010 itself
Sometimes the problem is not in the quantity. If a full-size template shows that an element 243 mm high is too large for the free zone under the sandrik, buying two instead of three will not resolve the scale conflict. Similarly, if a width of 77 mm looks too thin on a massive portal, a third identical bracket will not make the side elements visually larger.
In these cases, it is more useful to open the category and compare Polyurethane brackets and capitals. The task is to find a model that better matches the scale of the window, and only then determine the quantity.
There is another sign of an incorrect model choice: you have to place the outer KRPU-010 in strange places just to make them "fit." If normal alignment with pilasters, casings, or opening edges is impossible due to the shape or depth of the product, it is better to change the bracket than to break the architectural rhythm.
Commercially, this is an important conclusion. The article should not at any cost lead to the purchase of exactly two or three KRPU-010. The correct result may also be this: specifically for this sandrik, the model is not suitable in scale or interface, so the order is postponed and another decorative element is chosen.
Scheme of two: step-by-step marking route
If after fitting the scheme of two KRPU-010 is chosen, the sequence of actions can be made very simple.
First, mark the window axis and two verticals to which the outer brackets should relate. These can be the axes of side architraves, pilasters, or other symmetrical lines. Then check that the upper part of each bracket can indeed adjoin the lower zone of the sandrik without conflicting with its profile.
On each side, apply the contour of 243 × 77 mm, not just the center line. Compare the left and right positions relative to the window and the ends of the sandrik. Take a frontal photo. After that, check the view from a normal distance.
If everything looks balanced, the final configuration is two KRPU-010 costing 14,540 ₽. You can order them through the product card KRPU-010, but permanent installation should be performed only after checking the base, the chosen adhesive/fastening system, and the requirements for exterior finishing.
Scheme of three: additional check of the central axis
For three elements, the first steps are the same, but one more mandatory check is added. After marking the two outer KRPU-010, connect their axes with a mental or real horizontal line and find the midpoint between them. Compare it with the center of the window and the center of the sandrik.
If all three points coincide, the central element gets a clear position. If not, you cannot simply choose the "average value." You need to understand the reason for the mismatch and decide which axis the entire window portal is subordinate to.
After placing the third template, evaluate the two gaps on the left and right. They do not have to have mathematically identical free width down to the millimeter if the facade itself is asymmetrical, but the visual imbalance must be deliberate, not accidental.
The final configuration is three KRPU-010 units for 21,810 ₽. This scheme costs 7,270 ₽ more and requires more precise marking, but with a properly expressed central axis, it can make a wide sandrik more cohesive.
Installation on a finished facade begins with checking the base
The article examines the decorative composition, but the condition of the actual facade cannot be ignored. Before gluing or other permanent fastening, the base must be suitable for the chosen installation system. On finished plaster, check the strength of the coating, the absence of peeling areas, contaminants, and materials that may impair adhesion.
If the facade is insulated, the decorative element cannot be attached "as to a regular wall" without considering the system layers. The specific installation method depends on the base, the materials used, and the manufacturer's recommendations. The same applies to exterior painting and sealing of joints.
The KRPU-010 card shows the product and its dimensions, but does not provide grounds for independently inventing a universal fastening scheme for any facade. Therefore, the article correctly separates two decisions: where the decor should be located and how exactly to safely secure it on a specific base.
This approach is especially important for an already installed sandrik. It does not need to be dismantled or used as the sole support for a new bracket just for the sake of a decorative addition.
Exterior use requires coordinating the finish and installation, not relying on the word "polyurethane"
The material KRPU-010 is polyurethane. But the material name alone does not replace the technology of a specific facade. For exterior use, surface preparation, compatible adhesive or fasteners, sealing of joints, and a protective-decorative coating suitable for outdoor service are important.
On the STAVROS website, KRPU-010 is present in materials about window facade decor, which makes such a composition thematically justified. But before installation on a specific insulation or plaster system, it is still worth verifying the technology with the manufacturer and the base materials.
This is especially relevant if the house is in a zone of high moisture, near a drainpipe, or on the windy side. The number of brackets does not compensate for improper surface preparation.
How to combine KRPU-010 with a straight sandrik without excessive decorativeness
A straight sandrik itself provides a strict horizontal line. KRPU-010 adds plastic relief and vertical accents. The simpler the sandrik profile, the more noticeable the bracket ornament becomes. Therefore, two elements often provide sufficient richness even on a classic facade.
If the sandrik already has a complex molded profile, dentils, a rich cornice, or additional overlays, the third bracket should be introduced more cautiously. It can become another level of detail in an area where there is already enough information.
A good composition is built on a contrast of roles: the sandrik is responsible for the horizontal line, the brackets for the supporting verticals, and the architraves for framing the opening. When each element performs its function, the facade reads clearly. When all details simultaneously try to become the main decoration, visual noise arises.
A broader overview of window framing combinations can be seen in the STAVROS material about Facade window decor made of polyurethane. For this article, it is useful as the next informational level, while the current task remains narrow — to choose two or three KRPU-010 for an already finished sandrik.
Final fork: two, three, or none KRPU-010
When two brackets are the most rational outcome
Choosing two KRPU-010 is especially convincing if most of the following conditions are met: the outer elements are well tied to the architraves or pilasters; the window does not have a strong central accent; the sandrik looks complete even without the third detail; the upper zone is already saturated with stucco; the facade should remain calm; the central pattern seems added rather than necessary.
In this configuration, the buyer gets a clear composition for 14,540 ₽. The savings compared to three items is 7,270 ₽, but the main argument remains not the price, but the absence of an extra vertical.
Two elements are also easier to repeat on a series of windows. They create a stable side rhythm and depend less on the exact alignment of the central axis of each sandrik with the frame.
When three brackets are the most convincing result
Three KRPU-010 units are reasonable when the central axis of the window is expressed and truly requires continuation upward; the sandrik is wide and visually falls apart without a center; the side and central elements form a balanced rhythm; a height of 243 mm fits normally under the sandrik; there is no competing keystone or other large decor in the center; repeating the pattern on the facade does not overload it.
Then the additional element for 7,270 ₽ gives a concrete result: not "more stucco," but a three-part architectural structure. That is sufficient reason to purchase the third piece.
When it is better to leave the sandrik without KRPU-010 altogether
There are situations where a ready-made straight sandrik is self-sufficient. For example, the facade is modern, window openings are narrow, trims are minimalist, and decorative corbels clash with the overall language. Or there is not enough free height under the sandrik. Or the relief of the lower part does not allow a neat connection of KRPU-010.
In such a case, the absence of brackets is better than a forced composition. A commercial article should allow the reader to decline the product if it does not suit the object.
If a different type of stucco solution is required, you can go to the general section moldings from polyurethane and choose an element that matches the scale and style of the facade.
Final algorithm for choosing the quantity before ordering
For a 1400 mm sandrik, the decision-making sequence looks like this.
-
Check the actual width of the sandrik and its position relative to the window.
-
Find the window axis and compare it with the center of the sandrik.
-
Determine what the two outermost KRPU-010 elements will be anchored to: architraves, pilasters, opening edges, or sandrik edges.
-
Check the free height for the 243 mm element and the depth space for size C 77 mm.
-
Make two full-size templates and evaluate the basic two-element scheme.
-
Add a third template exactly on the axis and see if there is real benefit.
-
Evaluate both versions from three distances and in a photograph.
-
If the third element only fills a void, order two.
-
If it continues the expressed central axis and improves the three-part rhythm, order three.
-
If the KRPU-010 itself does not fit in scale or connection, do not change the quantity, but choose a different model.
As a result, the purchase becomes a consequence of the layout, not a guess.
What to put in the cart after making a decision
If the layout confirmed the two-point scheme, the cart should contain 2 × KRPU-010. The cost of the decorative brackets themselves at the current price is 14,540 ₽.
If the check showed that the central axis is indeed needed, the set is 3 × KRPU-010 costing 21,810 ₽.
Before placing an order, it is worth separately checking the current price and availability in the product card, because commercial terms may change. You also need to determine in advance the mounting and finishing materials for the specific facade base, rather than adding them automatically without checking compatibility.
You can order the selected quantity in the product card of the KRPU-010 bracket. If other sizes and ornament styles are needed, first compare the entire section decorative polyurethane brackets.
FAQ: additional questions before purchasing KRPU-010
Can I first order two KRPU-010 and buy the third one later?
Technically, the purchase can be split if the item remains available, but for identical decorative design, it is better to check current availability, lead times, and the possibility of receiving the same model in advance. From a compositional standpoint, this approach is only reasonable after a full fitting of the two elements. If the doubt is not related to appearance but to the sandrik's mounting, buying a third one "for strength" is not advisable.
Should the central bracket be placed exactly under the window's mullion?
If the mullion is a pronounced central axis and the scheme is based on three elements, alignment usually makes the composition clearer. But first, you need to check the alignment of the mullion axis, the center of the entire window frame, and the center of the sandrik. If they diverge, mechanical alignment with one line may emphasize another asymmetry.
Can the KRPU-010 be rotated differently to take up less height?
You should not change the intended orientation just to make the product fit. For the STAVROS category, size A is designated as height, and for KRPU-010 it is 243 mm. If the free space is smaller or the shape does not align with the sandrik, it is better to check the drawing and choose another element rather than invent a new orientation.
What is more important: the same indentation from the ends of the sandrik or alignment with the casings?
For a window composition, the connection with the verticals of the opening itself—casings or pilasters—usually works more strongly. But the final decision depends on the facade. The main thing is not to mix two systems without reason. If the bracket on the left is tied to the casing and on the right to the end of the sandrik, the asymmetry will almost certainly be noticeable.
Can the central KRPU-010 replace the keystone?
These are different types of decorative elements and different compositional roles. The bracket is perceived as a support under the horizontal, while the keystone is seen as the central accent of the framing. Using one instead of the other is only appropriate in a specially designed composition, not as a mechanical replacement.
Is it necessary to install the same number of brackets on neighboring windows?
Not necessarily, if the windows differ in status and scale. The main window of the facade may have three KRPU-010, while smaller ones may have two. But the difference should be systematic and clear. For nearly identical neighboring windows, a random change in quantity looks worse than a consistent repetition of one scheme.
Should I buy a third bracket as a spare?
If there is no confirmed place for its use, this is not the best way to stock up. This particular product has a high cost, and the decorative need for a third piece is determined by the layout. It is more rational to decide the composition in advance and order the required quantity, taking into account the current availability of the product.
What should I do if, after installing two brackets, the center still seems empty?
First, evaluate the window from a working distance and in a photograph. If the problem is indeed the absence of a central axis and there is physical space for KRPU-010, a third element can be considered. If the emptiness is caused by a too massive pediment or a weak connection with the architraves, an additional bracket may not solve the cause.
Can KRPU-010 be installed on a facade with insulation?
The mere presence of insulation does not provide a universal answer regarding fastening. The specific facade system, substrate, adhesives, possible mechanical fastening, and finishing layers must be considered. Compositionally, KRPU-010 can be tried on such a facade, but the permanent installation technology should be coordinated with the requirements of the system and the material manufacturer.
How can you tell that three brackets are already overloading the window?
The main sign is that the decor begins to be perceived before the window itself: the eye catches on three large vertical details, while the horizontal line of the sandrik falls apart. The second sign is that the central bracket does not continue any line below. The third is that there are almost no visual pauses left between the elements and the neighboring stucco. In such a situation, two outer KRPU-010 units usually give a clearer result.
Conclusion
For a straight sandrik 1400 mm wide, two KRPU-010 units are the correct starting scheme for testing, not a simplified or "economy" option by default. They form two side decorative supports and allow the sandrik to remain a solid horizontal line.
A third KRPU-010 should only be added with a specific basis: the window has a strong central axis, it coincides with the center of the sandrik, a large element 243 mm high fits normally in the free zone, and the three-part rhythm improves the facade and does not compete with other central decor. Then the additional 7,270 RUB meaningfully changes the composition.
If the central template simply fills an empty space, it is better to leave two elements. For a decorative bracket, the quantity is not a load-bearing calculation: the sandrik must have its own reliable mounting regardless of the chosen scheme.
The practical route before ordering is short: measure the facade → find the axes → try two full-size templates → add a third → compare with distances → choose 2 or 3 KRPU-010 units → check the mounting system → place the order. This sequence allows you to resolve the issue before payment, rather than fixing the composition after the decor has already been glued.