Article Contents:
- What exactly the customer is ordering
- One set — one rack, not the entire partition
- What is confirmed for KON-003
- Why the same list of parts does not guarantee the same pattern
- KN-003 creates an elongated accent
- KN-004 has the strongest impact on the silhouette
- KN-005 forms a small repeat
- KN-006 adds graphics
- KN-007 creates horizontal pauses
- Why item-by-item specification is more important than the total number
- A reference layout turns a constructor into a repeatable system
- Top and bottom must be marked, even if the stand can be flipped
- All stands repeat the reference
- Stands are assembled in mirror pairs
- How to change the standard composition and not get different sets
- Same row and one accent stand
- Beech for opaque coating
- Oak for finishing with visible texture
- Sanding and preparation for finishing must not differ
- Dry assembly before glue reveals errors without rework
- Fixation on axis: accuracy is more important than speed
- A large figure can block the connection of two axes
- Packing on racks reduces the risk of confusion
- Marking should be understandable without verbal explanations
- How many racks are needed for a partition
- Between the Living Room and Dining Room
- In the entryway
- Between the kitchen and dining room
- In a bedroom or study
- KON-003 for a restaurant, hotel, or salon
- What to buy together with KON-003
- How KON-003 differs from other kits in the series
- KON-003 and individual construction set elements are not the same
- What has already been done by the manufacturer and what remains for the buyer
- The order only specifies the number of kits
- All modules are packed in common boxes
- Top and bottom are not marked
- The composition is changed directly on site
- The disputed total number of figures has not been verified
- Beech and oak are mixed in one row
- Figures are painted before fitting
- Landing channel is not protected
- Axis joint moved to another figure
- Reference is taken at an angle
- Faces of KN-006 are oriented randomly
- No spare part<Care for finished partition
- Care for finished partition
- Size 2800 mm must be checked for each installation line
- Width 170 mm affects not only the appearance
- Light changes the perception of identical shapes
- What to coordinate with the designer before changing the standard composition
- How to check the first assembled rack before repeating
- Example of an order formulation
- At the order stage
- In the workshop
- At the site
- Why three racks and seven racks require different organization
- Handing over the project to another team without losing the concept
- When a control rack is needed before ordering the entire batch
- What constitutes project readiness for ordering
- How many racks are included in one KON-003 set?
- What is the size of an assembled rack?
- What is included in KON-003?
- Why does the article not specify the total number of figures?
- Can I change the standard composition?
- Do I need to order one set first?
- What is a reference layout?
- Do I need to mark the top and bottom?
- Can I install the posts mirrored?
- Which material should I choose — beech or oak?
- Can I mix beech and oak in one partition?
- When to paint the parts?
- Why can't I paint a hole with a diameter of 34 mm?
- How to fix the modules?
- Where do the axes of MLD-060 connect?
- Can I replace a damaged module separately?
- Do I need to buy a spare?
- How to pack multiple kits?
- Is KON-003 suitable for self-assembly?
- Can the racks be installed between the floor and ceiling?
- How to choose the distance between racks?
- Is KON-003 suitable for a narrow room?
- Can part of KN-005 be removed?
- What to do if the kits arrived without separation by racks?
- Where can I see other models?
- Can I order only individual elements?
- What to check upon receipt?
- How to replicate the partition after several years?
- How does KON-003 differ from a ready-made solid rack?
- Why the same SKU does not guarantee the same result?
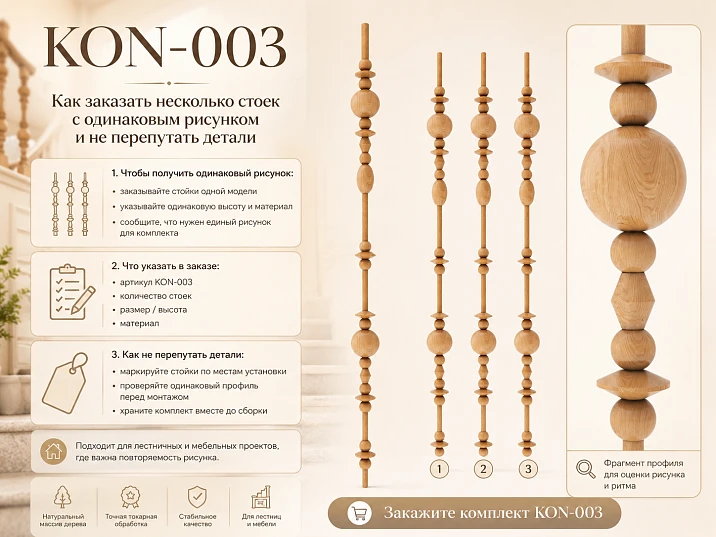
One decorative stand can look convincing even with some assembly freedom. But place three, five, or seven stands next to each other — and any difference becomes noticeable. In one composition, a large ball will be higher, in another the central figure will shift downward, and a third might be assembled in the reverse direction. Formally, the parts will be the same. Visually, the row will cease to be uniform.
Therefore order identical sets of the KON-003 stand — is not the same as simply selecting several identical items in the product card. For a serial order, one approved scheme is needed: identical composition, a single sequence of figures, designated top and bottom, one material, one preparation for finishing, and clear labeling of each set.
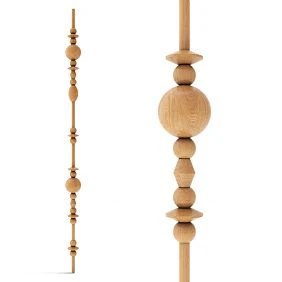
KON-003 is designed for assembling one vertical decorative stand measuring 2800 × 170 × 34 mm. The composition uses a round axis MLD-060 with a diameter of 34 mm and five types of wooden figures KN. The set can be ordered in beech or oak. It is supplied unassembled, and the composition allows changes: individual figures can be excluded or their quantity changed. For one custom stand, this provides freedom. For a row of identical stands, each change must be documented in writing.
For a buyer who wants to buy a wooden partition for room zoning as a complete interior system, it is important to immediately distinguish the product from the finished project. One KON-003 is not the entire partition in the photo, but a set for one vertical. The number of stands, the distance between them, the total width, and the mounting are determined separately. A properly prepared order should answer not only the question "how many sets are needed" but also the question "how exactly should each of them look after assembly."
What exactly the buyer is ordering




One set — one stand, not the entire partition
Interior photos often show a row of several verticals. This creates the impression that one SKU refers to the entire structure from wall to wall. In reality, KON-003 corresponds to one assembled stand. If the project involves six verticals, six sets will be needed, or a separately agreed set of parts for six identical stands.
This clarification affects everything: budget, number of packages, acceptance, painting, and installation. You cannot order one set and expect the entire decorative partition to be inside.
| What the buyer sees | What is actually ordered |
|---|---|
| A series of decorative verticals | Several separate KON-003 sets |
| One solid partition | A project of independent posts |
| Repeating pattern | One scheme to be repeated in each set |
| A single painted structure | Multiple items finished with one system |
| Total zoning width | Number of posts, spacing, and side offsets per project |
Before placing a batch, it is useful to check the dimensions of the KON-003 post and transfer them to the project sheet. The dimension 2800 × 170 × 34 mm refers to one assembled composition. It does not define the distance between adjacent posts and does not replace the calculation of the entire partition.
Our factory also produces:

What is confirmed for KON-003
| Parameter | Confirmed data | What this changes in the order |
| Article number | KON-003 | Specified without abbreviations |
| Type | Kit for one decorative post | Not equal to the entire partition |
| Size | 2800 × 170 × 34 mm | Checked against room height and project |
| Material | Beech or oak | It's better to order one row from the same species |
| Sanding | «Prestige» | The finish must match across the entire batch |
| Preparation | The card shows options for enamel and tinting | The choice is linked to the future coating |
| Load-bearing part | MLD-060 with a diameter of 34 mm | All modules are assembled on a common axis |
| Shapes | KN-003, KN-004, KN-005, KN-006, and KN-007 | Their order creates a pattern |
| Delivery condition | Disassembled | A control layout is needed |
| Change of composition | Allowed | Changes are recorded before production |
| Installation of figures | Wood glue; temporary fixation and micro pins are possible | The technology is agreed upon before finishing |
| Painting and tinting | After full assembly and installation | Landing channels protect against coating |
The table helps quickly understand the product but does not replace the specification. For several identical racks, not only the list of SKUs is important, but also the exact height position of each figure.
Get Consultation
Why the same list of parts does not guarantee the same pattern
Imagine two boxes with completely matching items. In the first rack, large balls are placed closer to the center; in the second, they are spread to the top and bottom. All modules are present, but the compositions look different.
The result is influenced by:
-
sequence of figures on the axis;
-
distances between large elements;
-
position of the central accent;
-
alternation of compact modules;
-
orientation of faceted figures;
-
direction of the entire rack;
-
length of exposed sections of the axis;
-
junction of two MLD-060 segments;
-
total height;
-
position of the upper and lower mounts.
The list "KN-003, KN-004, KN-005, KN-006, KN-007" indicates which shapes are involved in the composition, but does not explain their order. For a single product, the master can decide on the spot. For a series of identical racks, the decision must be made once and then repeated without improvisation.
Five types of figures and their role in the composition
KON-003 features a complex pattern. Modules of different scales are combined here: large rounded shapes, an elongated accent, compact repeating elements, faceted transitions, and low wide washers. They are compatible with a 34 mm mounting hole, but visually work differently.
KN-003 sets an elongated accent
Central geometric figure KN-003 has dimensions 175 × 105 × 105 mm and a 34 mm hole. Its elongated shape connects large and small modules and helps the eye find the semantic center of the stand.
The word "central" describes the figure's role in the drawing, not a universal prohibition on other placements. The exact position is taken from the approved layout. If the standard composition is changed, the new position of KN-003 is fixed for all stands in the batch.
KN-004 has the strongest influence on the silhouette
Large wooden ball KN-004 with a 34 mm hole has dimensions 167 × 170 × 170 mm. This is the widest element of the composition. It determines the maximum overall size of the stand, affects the distance between adjacent verticals, and attracts attention first.
If one ball is at eye level, and in the adjacent stand it is noticeably higher, the row will start to "jump." Therefore, the coordinates of KN-004 are marked in the standard before the position of small parts.
KN-005 forms a fine repeat
Compact figure KN-005 measuring 66 × 76 × 76 mm supports a dense rhythm between large accents. Individually, such modules seem secondary, but it is their sequence that makes the composition continuous.
Small figures are best distributed across kits in advance. A common box increases the risk that one stand will have more modules and another fewer.
KN-006 adds graphic quality
Faceted element KN-006 has dimensions of 90 × 72 × 72 mm. Its surface reflects light differently than rounded shapes. Rotation around the axis can change the pattern of highlights, especially after painting or clear finishing.
For a strict row, it is better to align the position of the facets. The reference photo marks the side that should face the main viewpoint.
KN-007 creates horizontal pauses
Decorative washer KN-007 with dimensions of 44 × 120 × 120 mm is noticeably wider than compact figures, but lower than large elements. It separates groups, creates pauses, and prevents the stand from turning into a solid column of balls.
If washers in one composition are gathered in a dense group, and in another are evenly distributed, the overall row ceases to be repetitive. It is useful to indicate neighboring positions on the diagram, not just the number of the KN-007 itself.
MLD-060 connects all parts into one vertical
The figures are assembled on a round wooden rod. round wooden axis MLD-060 with a diameter of 34 mm is provided available in lengths of 1000 and 2400 mm. Both segments are used in the kit, and the final height of the stand is 2800 mm.
The total length of the two blanks is greater than the finished product. This is not a mistake: the axes are joined, go inside large shapes, and are trimmed to fit the project. You cannot simply subtract the height of decorative modules from 3400 mm and get a universal formula. The seating depth, connection point, and fastening unit must be reflected in the diagram.
Before assembling a batch, check:
-
which segment is located at the bottom;
-
where the axis connection runs;
-
which shape covers the joint;
-
what allowance is left for trimming;
-
how the height of 2800 mm is achieved;
-
where the top and bottom fastenings are located;
-
whether the solution is repeated identically in all kits.
If replacement is necessary, you can buy the MLD-060 molding for the prefabricated post separately. The material, length, and preparation must match the main batch.
How to fix one pattern before assembly
Why an itemized specification is more important than a total number
In the KON-003 card, there is a discrepancy: the text states one total number of turned elements, but the sum of quantities per individual lines gives a different value. The buyer should not have to guess which number is correct. Before launching the order, request the current specification for each item.
In the article, it is safe to use the following wording:
Wording for the request: the composition of each KON-003 must match the current approved specification. Before launching the batch, confirm the items and quantity of each geometric shape.
This way, the buyer receives a document for acceptance. If something is missing or an extra item is present in the package, the dispute is resolved based on the agreed list, not from memory.
| Position | Confirmed size | Quantity | Position in the pattern | Verified |
| MLD-060, 2400 mm | 34 × 34 × 2400 mm | Per specification | Main axis | □ |
| MLD-060, 1000 mm | 34 × 34 × 1000 mm | Per specification | Axis extension | □ |
| KN-003 | 175 × 105 × 105 mm | Per specification | Accent position | □ |
| KN-004 | 167 × 170 × 170 mm | Per specification | Large accents | □ |
| KN-005 | 66 × 76 × 76 mm | Per specification | Fine rhythm | □ |
| KN-006 | 90 × 72 × 72 mm | Per specification | Faceted transitions | □ |
| KN-007 | 44 × 120 × 120 mm | Per specification | Horizontal pauses | □ |
Quantity is filled after confirmation by a manager or technologist. The publication should not replace the actual card data.
The reference layout turns the constructor into a repeatable system
A reference is one rack assembled dry and approved before gluing the entire batch. It shows the order of elements, direction, connection point of axes, and actual distances.
The layout is performed horizontally on a long flat surface. Figures are strung without glue, axes are temporarily connected, and the silhouette is checked from a distance. Has a heavy group formed in one part? Is KN-003 lost? Is there enough air between large balls? Does the height match the project?
In the reference, the following are fixed:
-
designation of top and bottom;
-
numbers of all positions;
-
article of each figure;
-
distances between key modules;
-
position of the MLD-060 joint;
-
total height;
-
material;
-
finishing option;
-
project number;
-
approval date;
-
responsible person.
The photo is taken strictly from above. A shot at an angle distorts distances. Place a tape measure or scale next to it. After approval, this photo becomes a working document for packaging, painting, and installation.
Top and bottom must be marked, even if the rack can be turned over
At a single rack, a flip may not disrupt the technical assembly. The issue appears in a row. If one composition is installed in the reverse direction, large elements end up at a different height, and the overall pattern is thrown off.
The "top" arrow does not mean the product cannot be rotated. It fixes an agreed position for a specific project. This sign is especially important when parts are painted the same color, installation is done by another crew, and packages arrive on site without the layout designer.
Marking is needed if:
-
large elements are arranged asymmetrically;
-
racks are visible from both sides;
-
the row is divided between several rooms;
-
some products are mirrored;
-
one vertical is used as an accent;
-
the finish hides differences in wood;
-
installation occurs after long-term storage.
The inscription is applied to the tag and packaging, not to the front surface of the wood.
Repetition and mirroring are different design solutions.
Two approaches are possible for the KON-003 series.
All posts repeat the reference.
Large figures are placed at the same height, KN-006 are oriented identically, all compositions have one top. This option creates a strict, calm rhythm and is suitable for a long partition.
The posts are assembled in mirror pairs.
The second vertical is rotated relative to the first according to a pre-prepared scheme. The technique can work on the sides of an opening, entrance area, or central axis. But mirroring must be intentional.
The phrase "make it symmetrical" is too vague. In the request, it is better to write: "posts 1, 3, and 5 repeat the reference; posts 2 and 4 are mirrored relative to it." Then the manufacturer and installer understand the task the same way.
Composition change: standard and project version
How to change the standard composition and not get different sets
The card allows you to exclude some figures or change their quantity. This is convenient when the standard pattern seems too dense, you need to adjust the height, or add your own accent. But after modification, KON-003 becomes a project version.
Safe work procedure:
-
assemble one standard rack dry;
-
determine exactly what you want to change;
-
remove or add a specific item;
-
redistribute the distances;
-
check the axis joint;
-
measure the new height;
-
photograph the modified version;
-
assign it a separate designation;
-
Repeat the pattern across the entire batch.
Do not give the installer a verbal request to "remove a few small details on site." One master will exclude KN-005 at the bottom, another at the top, and a third will keep the standard composition. As a result, the same SKU will produce three different patterns.
If one post must be special, it is listed as a separate line: KON-003-А. The rest are marked as KON-003-СТ. The accent package must not be mixed with standard ones.
Same row and one accent post
| Criterion | Repeating row | Accent version |
| Composition | One for all posts | Separate specification |
| Direction | Unified | May differ |
| Labeling | Rack 1, 2, 3… | Additional index "A" |
| Packaging | Same pattern | Separate from standard |
| Risk of error | Low with reference | High without separate drawing |
| Where appropriate | Partition, long rhythm | Center, entrance, axis of composition |
An accent is justified only where the difference is perceived as intentional. One randomly changed rack in the middle of a strict row looks like an assembly error.
Beech or oak: the material must be uniform for the entire batch
KON-003 is made from beech and oak. The species differ in texture and surface character. In a repeating row, mixing materials without a specific intent creates visual inconsistency even before assembly.
Beech for opaque coating
Beech is often chosen for enamel. A monochrome coating unifies shapes and axes, making the silhouette the main focus. For a long row, this is a rational option: the eye reads large and small forms rather than the grain pattern.
However, enamel does not hide compositional errors. On a calm, monochrome surface, the varying height of KN-004 becomes especially noticeable.
Oak for finishes with visible texture
Oak is chosen when the natural grain is to be preserved. On large spheres and the elongated KN-003, the texture becomes part of the decorative effect.
Before transparent or tinted finishing, the posts are laid out side by side and the natural variation is assessed. Sharply differing parts are arranged so that transitions appear intentional. Spare elements should ideally be finished together with the entire batch.
| Task | Beech | Oak |
| Covering enamel | Suitable for uniform color | Possible, but texture is concealed |
| Natural grain | More calm | Expressive |
| Long repeating row | Convenient for color concept | Requires sorting by tone |
| Transparent finish | Need a trial sample | Trial sample is especially important |
| Commercial interior | Good for brand color | Good for natural concept |
Before ordering, you can buy KON-003 from beech or oak, but the material of all repeating posts is fixed with one specification line.
Preparation, assembly and fixation
Sanding and preparation for finishing must not differ
The card indicates the sanding quality "Prestige". For the series, it is important that the axes and modules have the same preparation. If some parts are processed differently, the surface may differ in smoothness, absorption, and gloss after painting.
The order records:
-
material;
-
sanding quality;
-
preparation for enamel or tinting;
-
color sample;
-
gloss level;
-
application method;
-
need for masking holes;
-
painting order.
Do not paint the figures before the test assembly. The paint layer can reduce the mounting channel and make installation on the axis difficult. It is recommended to paint or tint after full assembly and installation, and protect the holes from coating.
Dry assembly before gluing shows errors without rework
Test assembly answers questions that are not visible in the table:
-
whether all modules fit freely on the MLD-060;
-
whether the order matches the reference;
-
whether the joint location matches;
-
whether the height is maintained;
-
whether the edges are oriented the same;
-
whether there are any damages;
-
whether there is enough space for mounting;
-
is the top correctly marked;
-
are the packages not mixed up;
-
does the composition match the specification.
First, assemble one rack. Then, lay out the second one next to it and compare them like two long rulers. After that, add the rest. This method is faster and more reliable than measuring already glued products.
Fixation on the axis: accuracy is more important than speed
Card KON-003 recommends PVA D3 wood glue. During polymerization, fixation with masking tape is acceptable, and micro-pins may also be used. The specific solution depends on the project and the responsibility of the executor.
Work sequence:
-
check the fit without glue;
-
mark the positions of the figures;
-
protect the surface;
-
apply the compound without excess;
-
install the module according to the mark;
-
remove the protruding glue;
-
temporarily fix;
-
compare with the standard;
-
re-measure the distances;
-
wait for the strength to develop.
Figures may shift slowly while the compound remains mobile. Therefore, the stand cannot be left without rechecking immediately after assembly.
A large figure may cover the connection of two axes
The stand is assembled from MLD-060 segments 2400 and 1000 mm long. A large module can serve as a connection node: both axes enter inside it, and the connection remains hidden.
The joint location must match across the entire row. Otherwise, the insertion depth, length of exposed shaft sections, final height, and position of decorative figures will differ.
On the diagram, the connection is marked with a separate symbol. During acceptance, the installer immediately sees which figure performs this function and does not move the node to a more convenient location.
Packaging and batch organization
Packaging by racks reduces the risk of confusion
For the warehouse, it may seem convenient to put all KN-005 in one box, all KN-007 in another, and pack the shafts separately. For the installer, this is inconvenient: first, the modules have to be redistributed, and the error is only discovered at the end.
It is more reliable to create a separate package for each rack:
-
project number;
-
vertical number;
-
material;
-
preparation for finishing;
-
list of parts;
-
copy of the diagram;
-
up arrow;
-
check mark.
If items still arrive by article, they are first divided into complete sets at the site, and only then assembly begins.
Marking should be understandable without verbal explanations
The project goes through several hands: manager, production, packaging, finisher, installation team. Marking should retain its meaning at each stage.
| Designation | Value |
| Project 27 | Order or object number |
| Rack 1 | Specific set |
| Top | Approved direction |
| Bottom | Lower part |
| Position 01 | Figure position in sequence |
| Joint | MLD-060 connection |
| Oak / beech | Material |
| Color 1 | Approved finish |
Tags are attached to packaging or temporary protective film. Marker on the front surface of the wood may appear after finishing.
How many posts are needed for a partition
This article focuses on pattern repeatability, not the overall opening calculation. But the buyer still needs to determine the number of kits. It depends on the width of the zone, the maximum dimension of the figures, the distance between axes, edge offsets, and the mounting method.
You cannot simply divide the room width by 170 mm. This is the maximum post width, and a design gap must remain between adjacent elements.
For the calculation you need:
-
width of the zoned area;
-
number of verticals;
-
distance between axes;
-
side offsets;
-
passage width;
-
viewing direction;
-
cleaning requirements;
-
fastening diagram;
-
traffic safety;
-
visual density.
After approving the quantity, you can order the required number of identical racks and attach a single layout to the application.
How KON-003 works in a residential interior
A decorative partition should not only look beautiful in the visualization. It changes movement through the room, distributes light, and creates a new boundary between zones. Therefore, an identical pattern of racks is only part of the task. It is important to see the entire row in a specific room.
Between the living room and dining room
KON-003 can separate the sofa group from the dining table without a solid wall. Light passes between the posts, but the space gets a clear structure.
Large KN-004 form a noticeable silhouette. With a small step, the partition looks dense and sculptural. With a large distance, each post is perceived separately. Both options are acceptable, but they need to be checked in visualization before ordering.
The plan marks the passage, the position of the table, the backs of the chairs, and the trajectory of movement. The large sphere should not end up where it will be constantly bumped by the shoulder.
In the hallway
A row of posts can block a direct view of the living area, separate a wardrobe, or mark a place for a console. In the hallway, the partition is viewed from close range, so any differences between the verticals are especially noticeable.
Solid enamel emphasizes the geometry. Transparent finish adds texture. In both cases, you need to decide in advance which side of KN-006 faces the entrance and where the central accent is located.
Between the kitchen and the dining room
In this area, maintenance and access between the posts are important. Wooden elements should not be placed so tightly that it is impossible to clean dust or accidental dirt between them.
The card confirms the finishing options, but the specific protective system is chosen according to the room conditions. The posts should not be in the zone of direct contact with water, steam, or working contaminants without a separate design solution.
In the bedroom or study
The partition can separate a dressing room, a workspace, or a small relaxation area. In a calm room, the complex rhythm of KON-003 becomes an independent decorative object. Therefore, do not overload the adjacent wall with numerous panels and moldings.
In the bedroom, check the distance to the bed and nightstand. In the study, check the position of the chair, desk, and walkway. A beautiful row should not interfere with everyday movement.
KON-003 for a restaurant, hotel, or salon
In a commercial space, repeatability is especially important. One partition may include ten or more racks, and a similar composition may be repeated on different floors or in several rooms.
For such an order, the reference becomes the project standard. Along with it, the following are saved:
-
composition version number;
-
item-by-item composition;
-
coordinates of key figures;
-
layout photograph;
-
material;
-
finishing sample;
-
color code;
-
mounting type;
-
packaging rules;
-
spare parts.
If a year later you need to add another rack, the documentation will allow you to replicate the original configuration. Without it, the new composition would have to be reconstructed from a photo of the interior, where some details may be hidden by furniture.
What to choose and what to add to KON-003
What to buy with KON-003
The standard kit already includes the main modules of one rack. Additional items are not always needed. They become useful when the pattern changes, a spare part is required, or the project involves a non-standard length.
| What to look at | Why | When needed | Commercial transition |
| KON-003 | Base of one vertical rack | For each partition post | Check the contents of the KON-003 kit |
| Constructor category | Other kits and individual modules | When comparing and changing the pattern | Wooden construction set for posts and partitions |
| MLD-060 | Spare or additional axle | For a different length or replacement | Check the length of the support axle |
| KN-003 | Elongated large accent | For the modified standard | Central geometric figure KN-003 |
| KN-004 | The widest ball | To enhance large accents | Large wooden ball KN-004 with a 34 mm hole |
| KN-005 | Compact repeat | For a denser fine rhythm | Compact figure KN-005 |
| KN-006 | Faceted transition | For a graphic accent | Faceted element KN-006 |
| KN-007 | Low wide washer | For horizontal pauses | Decorative washer KN-007 |
The table does not mean that additional parts should be automatically purchased for each KON-003. First, the design is approved. Then only those items that are provided for by the new scheme are added.
How KON-003 differs from other kits in the series
KON-003 is one of the models of the wooden construction set. Its character is defined by large spherical elements, a maximum width of 170 mm, and a combination of five types of shapes. For a narrow area, a calm interior, or a smaller step, a different composition may be suitable.
Before deciding, it is useful to compare the KON-001–KON-007 stand sets. The general material helps to choose the silhouette. The current article addresses the following question: how to replicate the selected KON-003 in multiple copies.
| Task | KON-003 | When to look at another set |
| Large accents are needed | Suitable | If a thinner silhouette is required |
| A complex pattern is needed | Suitable | If easy assembly is important |
| Width is limited | Need to account for 170 mm | If the post spacing should be smaller |
| Few types of parts required | The composition includes five types of shapes | If a concise composition is needed |
| An author's modification is planned | The composition can be adjusted | If it's easier to start from a different base |
| Installation is performed by an inexperienced crew | A detailed diagram is needed | A simpler kit reduces risk |
KON-003 and individual construction elements are not the same
A disassembled kit can easily be mistaken for a box of decorative blanks. But KON-003 has a specified dimension, selected types of parts, and a purpose — assembling a vertical stand.
Individual modules offer more freedom but require independent design. To understand the system's capabilities, it is helpful to read how to use wooden spheres, cubes, and shaped modules.
The difference looks like this:
-
KON-003 — a ready-made starting composition;
-
individual KN — modules for your own design;
-
MLD-060 — a common axis;
-
partition — a project of several stands;
-
a standard is a document that makes a project repeatable.
The customer can buy individual geometric elements and assemble a custom stand. But then he is responsible for the proportions, height, sequence, and compatibility of the finish.
What the manufacturer has already done and what remains for the buyer
KON-003 eliminates the most complex preparatory work. There is no need to independently machine five different shapes, find a shaft of the required diameter, and check whether the mounting holes match.
The manufacturer offers compatible modules and a basic composition. The buyer only needs to:
-
determine the number of stands;
-
check the room height;
-
choose beech or oak;
-
agree on a standard or modified pattern;
-
approve the standard;
-
prepare the marking;
-
perform a dry assembly;
-
organize finishing and installation.
This path is more predictable than assembling from random parts that look like photos but do not match in fit and scale.
Errors that cause the row to lose a unified pattern
The order only specifies the number of kits
The phrase "five KON-003" does not specify the direction, standard, or composition change. The card defines the product but does not replace the project scheme.
All modules are packed in common boxes
Installers distribute the shapes across the racks by eye. Shortages or surpluses are only discovered at the last vertical.
Top and bottom are not marked
One rack is installed in the reverse direction. Large elements shift relative to adjacent ones.
The composition is changed directly on site
Different modules are excluded in each composition. Fixing a row after gluing is difficult.
The disputed total number of figures has not been verified
The buyer and supplier refer to different parts of the card. The problem is solved by item-by-item specification before payment.
Beech and oak are mixed in one row
After transparent finishing, the species differ noticeably. Even under enamel, uneven preparation can show on the surface.
Figures are painted before fitting
Coating gets into holes. Parts fit poorly on the axle, and the finish is damaged during adjustment.
Landing channel is not protected
Coating thickness reduces the free diameter. The module has to be reworked after painting.
The axis joint has been moved to another shape
The landing depth and position of adjacent elements change. The post ends up being a different height.
The reference was taken at an angle
Perspective distorts intervals. The installer copies the photo but gets a different result.
Edges of KN-006 are oriented randomly
Light reflects differently on adjacent posts, especially with side lighting.
No spare part<Care for the finished partition
The care method depends on the finish coating. The general principle is not to use random aggressive agents and not to leave moisture in the joints.
Dust between the figures is removed with a soft attachment or dry cloth. The KN-006 relief and the areas above KN-007 are checked separately: horizontal surfaces collect more dust.
If the stand is loose, do not simply add glue from the outside. First, determine where the movement occurred: in the attachment to the floor or ceiling, in the joint of the axes, or between the figure and the MLD-060.
The 2800 mm size must be checked along each installation line.
The total room height does not always match the distance at the point of a specific stand. The floor may have a slight slope, the ceiling a difference, and the decorative partition may be located next to a duct, beam, or tension structure. Therefore, a single measurement near the wall is not enough.
The measurement is taken where the axis of each vertical will pass. For a row of five stands, five values are obtained, not one average figure. If the difference is noticeable, the designer decides how to maintain the common top level: trim the axes on site, change the lower node, or adjust the partition location.
| Stand | Height from finished floor to finished ceiling | Design height | Solution |
| 1 | ___ mm | ___ mm | ___ |
| 2 | ___ mm | ___ mm | ___ |
| 3 | ___ mm | ___ mm | ___ |
| 4 | ___ mm | ___ mm | ___ |
| 5 | ___ mm | ___ mm | ___ |
You cannot automatically reduce all sets to the minimum value. Such a solution may leave noticeable gaps at other points. First, determine the design of the top and bottom mounts, then link it to the layout of the figures.
Be especially careful when changing the height if a large module is located near the joint of the axes. Trimming one segment can shift KN-003 or KN-004. To keep the pattern consistent, either modify the same section of all posts, or pre-create individual schemes by numbers.
A width of 170 mm affects not only the appearance
The maximum post width is determined by the large KN-004. On the plan, the partition may be shown with thin axis lines, and then the actual volume of the balls is underestimated. In the room, it is the wide modules that determine the free passage and the distance between adjacent verticals.
A useful check before ordering is to make a simple mockup. Cut a circle with a diameter of 170 mm from cardboard and apply it at the point where the large figure will be located. For several posts, place the mockups with the design step. This method quickly shows how dense the row will become.
Check three distances:
-
between the outer edges of adjacent KN-004;
-
from the outermost figure to the wall or furniture;
-
from the most protruding part to the path of passage.
If the posts are spaced far apart along the axes, but the large balls almost touch, the partition will look significantly denser than on the linear drawing. If the gap is too large, the verticals may lose connection and be perceived as separate columns.
Light changes the perception of identical shapes.
Even correctly assembled racks may look different if the faceted KN-006 are turned unevenly or light falls on them from different angles. Side lighting emphasizes the edges, rounded elements create soft highlights, and wide KN-007 produce horizontal shadows.
Before final fixation, it is useful to install a test rack in the intended location and look at it:
-
in daylight;
-
in the evening with main lighting;
-
from the entrance side;
-
from both separated zones;
-
from the level of a sitting and standing person.
This check does not replace the diagram, but helps clarify the orientation of faceted shapes. If there is one main viewpoint, the position of KN-006 can be linked to it. If the partition is visible from two sides, choose a single neutral rotation and repeat it throughout the row.
What to coordinate with the designer before changing the standard composition
The desire to remove several figures often arises due to the scale of the room. However, changing the composition affects not only density. It changes the position of the joint, open sections of the axis, the center of gravity of the pattern, and the distance between large accents.
Before adjustment, the designer is provided with:
-
a standard photograph KON-003;
-
the room height;
-
the number of racks;
-
distance between axes;
-
the type of finish;
-
the desired degree of saturation;
-
the elements proposed for removal;
-
the new dry layout.
After this, two full-size silhouettes are compared: the standard and the modified one. The decision is made not based on a single detail, but on the entire row. Sometimes, instead of removing figures, it is better to increase the distance between the racks. In another project, on the contrary, a dense step is maintained, but a simpler set from the KON series is chosen.
How to check the first assembled rack before repeating
The first rack becomes a reference only after inspection, not immediately after stringing the figures. It is measured, photographed, and evaluated in a vertical position.
Inspection includes:
-
final height;
-
maximum width;
-
position of large balls;
-
distance from the bottom to KN-003;
-
axis connection point;
-
direction of KN-006;
-
match with the design photo;
-
fit quality;
-
no play;
-
accessibility of the fastening assembly.
After checking on the axis, temporary marks are made or a dimensional table is created. The second rack is assembled nearby and compared by key levels. Only when both compositions match, the remaining sets are launched.
This order may seem slower than mass simultaneous assembly. In practice, it saves time: one error is detected on the first product, rather than repeated seven times.
A finished specification that can be sent to the manager
A good request should not turn into a long unstructured letter. One table and a photo of the standard are enough.
| Item | What to specify |
| Article number | KON-003 |
| Number of sets | ___ pcs. |
| Purpose | Partition / decorative rack / column |
| Size of one stand | 2800 × 170 × 34 mm or agreed change |
| Material | Beech / Oak |
| Sanding | «Prestige» |
| Preparation | For enamel / for tinting |
| Composition | Per confirmed item-by-item specification |
| Changes | None / list item numbers and quantity |
| Direction | All repeat the reference / mirror pairs |
| Top and bottom | Mark on each set |
| Joint MLD-060 | Show on diagram |
| Finishing | Color, system, gloss level |
| Packaging | Each set separately |
| Reference | Photo and diagram attached |
| Responsible person | Name and contacts |
Example order wording
Five sets of KON-003 in oak are required. All posts must repeat one approved sequence of elements and have the same direction. Please confirm the current specification of KN figures, dimensions of MLD-060 axes, material, preparation for finishing, and final size 2800 × 170 × 34 mm. Each set must be packed separately, with the post number, top and bottom marked. Before starting the order, please approve a photo or diagram of the reference layout.
If the standard composition changes, a separate list is added to the letter. You cannot limit yourself to the phrase "make it a bit less frequent": it does not explain which elements to remove and how to redistribute the intervals.
How to place an order on STAVROS without unnecessary correspondence
-
Open the product card and order identical sets of KON-003 stands in the required quantity.
-
check the dimensions of one stand
-
choose beech or oak
-
confirm the preparation for finishing
-
request the current itemized composition
-
determine if the standard pattern is used
-
prepare a reference if changed
-
mark the top, bottom, and axis connection point
-
ask for separate packaging
-
perform a dry assembly before painting
-
Repeat the reference for the entire batch.
-
Save the diagram in case of repair or expansion.
Purchasing via a card is convenient because the project starts with a compatible kit rather than scattered parts. However, the card must be supplemented with a specification when ordering multiple racks.
Checklist before payment
| Security question | Answer |
| How many vertical racks are needed? | ___ |
| Is one KON-003 counted as one rack? | Yes / no |
| Has the height of 2800 mm been checked? | Yes / no |
| Does the maximum width of 170 mm fit? | Yes / no |
| Is the material of all racks the same? | Yes / no |
| Is the composition confirmed by article numbers? | Yes / no |
| Is the standard pattern preserved? | Yes / no |
| Have the changes been made to the diagram? | Yes / no |
| Are the top and bottom marked? | Yes / no |
| Is the MLD-060 joint marked? | Yes / no |
| Is the finish approved? | Yes / no |
| Will the holes be protected during painting? | Yes / no |
| Is each set packed separately? | Yes / no |
| Is the reference photo attached? | Yes / no |
| Are spare parts provided? | Yes / no |
If there is no answer for at least one critical point, it's better to stop the order and clarify the data. It's much easier to fix the table before payment than to rebuild an already assembled row.
Three levels of control: order, workshop, and site
Even a good specification won't help if it stays only with the buyer. Information must pass through all stages without loss.
At the order stage
The manager receives the number of kits, material, preparation option, composition changes, and the reference. Here, discrepancies in the number of figures are resolved, and it is confirmed which items will be included in each rack.
The result of the stage is a written specification, not a verbal agreement.
In the workshop
Before painting or gluing, parts are distributed into kits. One rack is assembled dry, compared with the diagram, and only after verification are the rest started.
The result of the stage is a physical reference that matches the document.
At the site
The installer receives labeled packages. They check the rack number, top, bottom, and installation location. If the project includes mirrored pairs, this is indicated on the plan.
The result of the stage is a row that repeats the approved pattern, not the interpretation of the last crew.
| Stage | Main document | Main risk |
| Order | Item-by-item specification | Unconfirmed composition |
| Workshop | Reference layout | Changing the order of parts |
| Installation | Placement plan and marking | Turning or rearranging racks |
Why three racks and seven racks require different organization
For three racks, an error can still be noticed and corrected before installation. Kits can be easily laid out nearby, and all parts fit on one workbench. With seven or more verticals, the number of similar modules increases sharply. Even with careful work, the risk of mixing packages, losing a tag, or taking a part from a neighboring set increases.
For a small batch, it is enough:
-
one reference photo;
-
three separate packages;
-
marking of the top;
-
checking the composition before assembly.
For a large row, it is useful to add:
-
summary sheet;
-
colored tags;
-
item number on each figure;
-
picker's control signature;
-
separate reserve;
-
layout diagram of racks in the room;
-
receiving log.
The organization should not be more complex than the project itself. But the more repetitions, the less you can rely on memory.
Transferring a project to another team without losing the concept
Often, the order is placed by a designer, painting is done by a furniture workshop, and installation is done by a finishing company. Each team sees only its part of the work. If data is transmitted verbally, important details disappear.
The installation package must include:
-
image of the finished partition;
-
floor plan;
-
rack numbers;
-
reference photo;
-
top mark;
-
axis joint location;
-
height after trimming;
-
fastening unit;
-
coating protection requirements;
-
contact person.
Don't expect the craftsman to "understand the drawing from a catalog photo." The catalog shows a commercial sample, while a modified version may be used on site.
When a control stand is needed before ordering the entire batch
A control set is especially useful in four cases.
First — the standard height doesn't match the room. You need to figure out where to reduce the axis and how to redistribute the figures.
Second — the composition changes. Even removing one KN-005 affects the intervals along the entire length.
Third — complex finishing is used. A trial stand shows how color and gloss work on rounded and faceted surfaces.
Fourth — the partition is in a narrow passage. A real KN-004 helps assess the dimensions better than a flat visualization.
After inspection, the control sample doesn't disappear: it becomes the first stand of the row or is kept as a reference until installation is complete.
What counts as project readiness for ordering
The project is ready not when a beautiful item is chosen. It's ready when there are clear answers to the main questions.
-
The exact number of racks is known.
-
The room height has been checked.
-
The maximum width of 170 mm does not obstruct passage.
-
The material has been selected.
-
The standard or modified composition has been approved.
-
The item-by-item quantity has been confirmed.
-
Top and bottom have been marked.
-
The reference sample has been attached.
-
The finishing has been agreed upon.
-
The assembly executor has been assigned.
-
Fastening unit designed.
-
Packaging and labeling agreed upon.
If these items are closed, the order becomes predictable. Price, deadlines, and availability are checked in the card immediately before placing the order, because this data may change.
Questions and answers about KON-003
How many racks are included in one KON-003 kit?
One KON-003 is designed for assembling one vertical rack. For a partition with multiple verticals, order the corresponding number of kits.
What is the size of the assembled rack?
The confirmed dimension is 2800 × 170 × 34 mm. If the room is lower or a different height is required, the change must be linked to the layout and installation diagram.
What is included in KON-003?
The composition uses MLD-060 axles and five types of geometric shapes: KN-003, KN-004, KN-005, KN-006, and KN-007. The exact quantity of each item should be verified against the current specification.
Why does the article not specify the total number of figures?
There is a discrepancy in the card between the text summary and the sum of individual lines. Until the data is corrected, it is safer to check the composition for each item.
Can the standard composition be changed?
Yes. The card allows changing the quantity and partial exclusion of figures. The new sequence must be approved and repeated in all identical racks.
Is it necessary to order one set first?
For a complex modified pattern, a control set is useful. It allows checking the scale, fit, assembly, and finish before launching the entire batch.
What is a reference layout?
This is one rack assembled without glue and approved as a sample. All other sets repeat its order, direction, and intervals.
Is it necessary to mark the top and bottom?
Yes, if the row should look the same. Marking prevents accidental flipping of one of the racks.
Can the posts be installed mirrored?
Yes, when mirroring is provided for in the project. It requires a separate diagram, not a verbal request to "make it symmetrical."
Which material to choose — beech or oak?
Beech is convenient for covering enamel, while oak is chosen when you want to preserve a noticeable texture. It's better to order all posts in one row from the same wood species.
Can beech and oak be mixed in one partition?
Technical compatibility in terms of the hole does not make the wood species visually identical. Mixing is only acceptable as a deliberate design decision.
When to paint the parts?
The card recommends painting or tinting after full assembly and installation. The mounting holes need to be protected from the paint layer.
Why can't the 34 mm diameter hole be painted?
The coating reduces the free diameter and may make it difficult to fit the figure onto the axle. Sometimes the part needs to be reworked after painting.
How to fix the modules?
The card recommends PVA D3 wood glue. During polymerization, painter's tape can be used, and additionally, micro pins.
Where do the axes of MLD-060 connect?
A large figure can be used as a connection node. The specific connection point is marked in the reference diagram.
Can a damaged module be replaced separately?
Yes, KN and MLD-060 figures have separate cards. The replacement must match in material, preparation, and finish.
Is it necessary to buy a spare?
For a large project, having spare parts can be useful. This is especially true for transparent finishes, where matching the wood tone later is more difficult.
How to pack multiple kits?
It is better to assemble each rack in a separate package with a list of parts, number, "top" arrow, and a copy of the diagram.
Is KON-003 suitable for self-assembly?
Yes, if the performer has precision woodworking skills, space for dry layout, and a clear installation diagram. Without a reference, the risk of error is high.
Can the racks be installed between the floor and ceiling?
KON-003 is used for partitions and decorative verticals, but the specific fasteners depend on the bases and the project. A universal node with a card is not specified.
How to choose the distance between the posts?
The spacing is calculated considering the maximum width of 170 mm, visual density, passage, cleaning, and fastening. Dividing the opening width only by the figure dimension is not allowed.
Is KON-003 suitable for a narrow room?
Only after checking the scale. Large KN-004 can visually and physically weigh down a narrow passage.
Can part of KN-005 be removed?
Yes, if the change is agreed upon. You need to specify the exact quantity, new intervals, and repeat the solution for all posts.
What to do if the kits arrived without separation by posts?
First, distribute all items into complete sets and check them against the specification. Assembly from a common box should not be started.
Where can I see other models?
You can to compare the KON-001–KON-007 stand sets and choose a calmer or more compact silhouette.
Can I order only individual elements?
Yes. In the category you can buy individual geometric elements and create your own composition, but its proportions will have to be designed independently.
What to check upon receipt?
Article, material, number of packages, composition of each stand, condition of axes and figures, marking and compliance with the reference diagram.
How to replicate the partition after several years?
Save the item-by-item specification, reference photo, dimensions, finish code, and a spare part. This data will allow reproducing the pattern without guesswork.
How is KON-003 different from a ready-made solid stand?
The kit is supplied disassembled and allows changing the composition. A solid product usually does not offer such freedom, but requires fewer assembly decisions on site.
Why does the same article number not guarantee the same result?
Because the pattern depends on the order, direction, intervals, and orientation of the parts. These parameters are not defined by a single product name.
One drawing begins not at assembly, but in the order.
KON-003 already combines the compatible MLD-060 axle and five types of wooden figures with a 34 mm hole. The customer does not have to search for random balls, washers, and adapter modules. But when ordering several sets, another task arises: turning a free construction set into a repeatable system.
Before launching a batch, fix the number of posts, material, preparation for finishing, and the current composition. Assemble one composition dry, mark the top and bottom, note the axle connection point, photograph the layout, and attach it to the order. Do not guess the disputed total number of figures — request a specification by article numbers.
STAVROS allows you to start with a ready-made KON-003, if necessary, select individual KN and MLD-060, and then arrange the entire row according to one approved scheme. This approach preserves the main thing: not just identical parts in boxes, but a complete partition pattern after assembly.