Article Contents:
- Short answer: start with one pair, and repeat it only after a full-size layout
- What exactly we buy: NPU-120L and NPU-120R — two separate SKUs
- Why the side of the staircase is better suited for this task than risers
- First, clarify what the side length of 2.4 m means
- Size 150 × 59 × 10 mm: what it means for the composition
- One mirrored pair: when a local accent is enough
- Two mirrored pairs: an intermediate option that is often forgotten
- Three mirrored pairs: when decor becomes the rhythm of the entire flight
- Comparison of one, two, and three pairs on a 2.4 m side panel
- Should the overlays themselves be tilted to follow the staircase or kept relative to the room
- Option 1. The long side of the pattern follows the staircase incline
- Option 2. The pattern remains "level" relative to the room
- How to resolve without argument
- Minimalist staircase
- Classic staircase with medium richness
- Rich carved staircase
- Matching the side panel
- In the color of the wooden elements of the staircase
- Contrasting Accent
- Layout A — one pair
- Layout B — two pairs
- Layout C — three pairs
- Mistake 1. Buying three pairs just because the side panel is long
- Mistake 2. Ordering the same number of L and R, but not checking the direction of each pair
- Mistake 3. Maintaining distances between pairs, but making different internal intervals
- Mistake 4. Starting installation from the bottom without full marking
- Error 5. Not accounting for the column and landing
- Error 6. Evaluating white patterns, then making the overlays contrasting
- Error 7. Trying to fill the side panel at any cost
- Pre-painting
- Painting after installation
- Combined option
- Is it always necessary to buy NPU-120L and NPU-120R together?
- Can I install only NPU-120L without NPU-120R?
- Can I alternate the direction of pairs along the flight?
- Is it mandatory to place the pads parallel to the staircase slope?
- What exact distance should be left between NPU-120L and NPU-120R?
- Is a spare seventh pad needed when ordering three pairs?
- Can NPU-120L/R be glued directly onto painted MDF?
- Won't a 10 mm relief interfere with cleaning?
- What is better on a very long side panel — four pairs or a larger element?
- Can this same pattern be used outside the house on an external staircase?
- Should the pairs be tied to each step?
- What matters more when choosing the quantity — the length of the side panel or the decorative nature of the railing?
Short answer: start with one pair, and repeat it only after a full-size layout
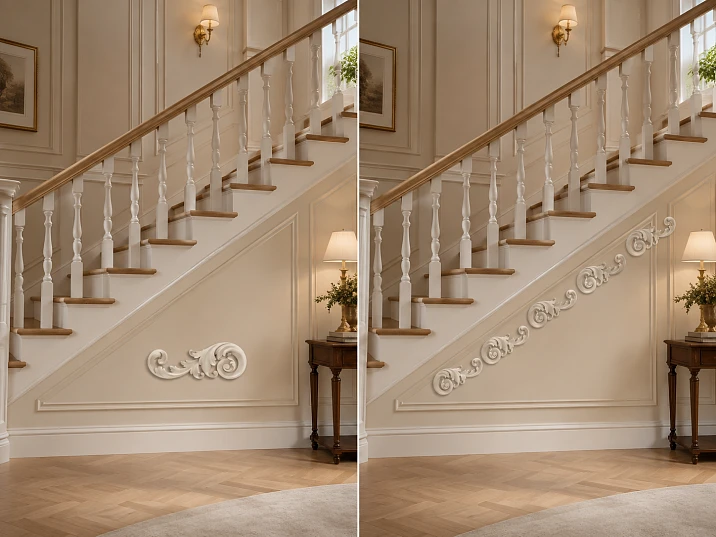
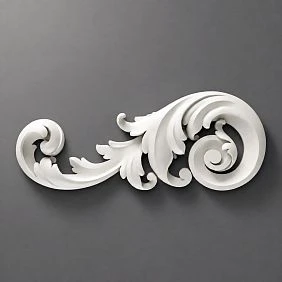
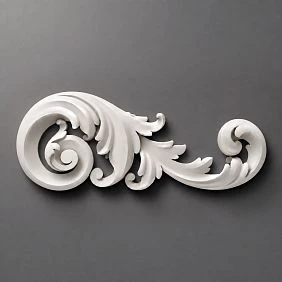
If the smooth outer side panel of a flight of stairs seems empty, NPU-120L and NPU-120R should logically be considered not as two random parts, but as a paired mirror ornament. One left and one right overlay give a compact central accent. Two pairs already form a repeat. Three pairs turn a separate ornament into a steady rhythm that starts to work across the entire length of the flight.
For the example with a decorative side panel 2.4 m long, it is reasonable not to start by ordering six parts. First, you need to make at least six paper templates sized to the product dimensions, i.e., 150 × 59 mm each, and lay out three options: one pair, two pairs, and three pairs. Only on the actual side panel does it become visible whether one center is enough or whether the small ornament really gets lost on a long plane.
At the current price of each overlay of 1,020 ₽, the budget looks like this:
| Scheme | NPU-120L | NPU-120R | Total items | Cost |
|---|---|---|---|---|
| One mirror pair | 1 | 1 | 2 | 2 040 ₽ |
| Two mirror pairs | 2 | 2 | 4 | 4 080 ₽ |
| Three mirror pairs | 3 | 3 | 6 | 6 120 ₽ |
The difference between one local accent and three repeating pairs is 4,080 ₽. But the choice shouldn't be based on this difference. The main question is what function the decor should perform: become one expressive point or set the rhythm for the entire flight.
For a staircase with active balusters, carved posts, an expressive handrail, and rich wood texture, one pair often looks more convincing: it doesn't compete with the existing architecture. On a calm, closed staircase with a large smooth side panel, one small pair might get lost, and then two or three pairs make more sense.
There's another fundamental limitation: this article specifically refers to a stationary decorative side panel, not to treads or the area of constant foot impact. The overlays have a relief of 10 mm, so their placement should be chosen where the decor doesn't interfere with movement and doesn't bear operational load.




What exactly we're buying: NPU-120L and NPU-120R — two separate SKUs
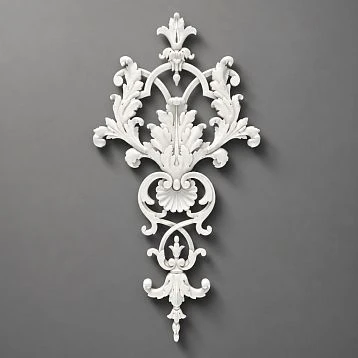
NPU-120L and NPU-120R are carved polyurethane overlays. This composition requires two separate items: left and right. They cannot be considered a single item that automatically comes as a pair.
Both product pages currently show the same size and the same price:
| Parameter | NPU-120L | NPU-120R |
| Product type | Carved overlay | Carved overlay |
| Material | Polyurethane | Polyurethane |
| Size A × B × C | 150 × 59 × 10 mm | 150 × 59 × 10 mm |
| Price per 1 pc. | 1 020 ₽ | 1 020 ₽ |
The NPU-120L page shows NPU-120R in the related products block, and the NPU-120R page shows NPU-120L. In the photos, the two elements have opposite directions of the S-shaped plant pattern, so in this article they are considered specifically as a paired mirror composition.
It is important not to confuse the concepts. "One pair" means two product units:
-
1 × NPU-120L;
-
1 × NPU-120R.
"Three pairs" is already:
-
3 × NPU-120L;
-
3 × NPU-120R.
That is, the cart will contain six items, not three.
Buy the left carved overlay NPU-120L made of polyurethane
Buy the right carved overlay NPU-120R made of polyurethane
Our factory also produces:
Why the side panel of a staircase is better suited for this task than risers
In a staircase, decorative and working surfaces must be distinguished. The tread bears the load from steps. The riser is located near the movement of the foot. Edges and protruding parts can be caught by shoes, furniture during carrying, and cleaning equipment. A smooth outer side panel is a different component: it is located on the side and can be an independent decorative plane.
That is why in this article NPU-120L/R are not offered as decor for the working step. The 10 mm relief is small, but it still protrudes above the base. On a riser, such a protrusion can fall into the zone of mechanical contact. On a stationary side panel, where a person does not step on the surface or hit it with the toe of a shoe, the conditions for a relief overlay are noticeably calmer.
However, the word "side panel" should not be misleading. If you have an open load-bearing stringer, a carriage, or another structural element, the decorative solution should not change its operation, cover inspection points, or interfere with fasteners. This topic assumes an already finished smooth cladding or decorative panel that can be styled as an interior surface.
Before purchasing, you need to make sure that the selected area:
-
stationary;
-
sufficiently flat for product installation;
-
is not part of the step that is walked on;
-
does not come into constant contact with the foot, bags, vacuum cleaner, or carried furniture;
-
does not cover technical fasteners;
-
allows for neat marking and gluing.
Such a filter is more important than the beauty of the pattern itself. Good decor on an incorrect surface turns into an operational problem.
Get Consultation
First, clarify what the side length of 2.4 m means
For the calculation example, we take a side decorative plane with a length of 2.4 m, but there is a subtlety here: on a staircase, several different "lengths" can be measured.
The first is the horizontal projection of the flight onto the floor. The second is the inclined length along the staircase line. The third is the actual length of that decorative zone of the side panel on which overlays are allowed to be placed. These values do not have to coincide.
If you are going to lay out the NPU-120L/R along the slope of the flight, for the layout you need exactly the length of the working decorative line along the side, not the horizontal size on the plan. If the ornament is to be held horizontally relative to the room, each element will be in a different coordinate system, and simply dividing 2.4 m by the number of pairs will become even less useful.
Therefore, before making templates, mark:
-
the beginning of the available decorative zone;
-
the end of the available zone;
-
the upper limit line;
-
the lower limit line;
-
posts, baseboard, fasteners, and other obstacles;
-
the actual length between these limits.
In the following examples, 2.4 m is considered the conditional working length of the decorative zone. If your 2.4 m was obtained as a horizontal projection of the flight, you need to measure the side again along the line where the ornament is actually intended to be placed.
Size 150 × 59 × 10 mm: what it means for the composition
The cards of both overlays indicate the size A × B × C 150 × 59 × 10 mm. The photos show an elongated S-shaped element, but on the staircase the overlay can be rotated, so one side cannot automatically be declared "horizontal" for any project.
For the template, it is safer to use the confirmed front projection dimension of 150 × 59 mm and a depth of 10 mm, and choose the orientation already on the actual side panel.
If in the selected layout the long side of each element runs along the local decorative line, two elements give a total of 300 mm in length before accounting for the gap between L and R. If a conditional interval G is left between them, the working length of the pair will be:
300 + G mm.
For example, with a trial gap of 40 mm, the pair module will take about 340 mm. This is not a standard or factory recommendation. It is a convenient example for paper layout, which allows comparing one, two, and three modules on a 2.4 m side panel.
Along the other axis, each element has a dimension of 59 mm, and the relief protrudes by 10 mm. Therefore, even small-area parts will produce a well-readable light-and-shadow effect, especially with side lighting.
The main conclusion from the dimensions is this: NPU-120L/R is not a large central panel decor. It is a relatively compact ornamental element. On a long side panel, its effect is determined not only by the size of a single product, but also by the quantity, distances, and the relationship to the scale of the entire staircase.
One mirror pair: when a local accent is enough
One pair is the most cautious scenario. Two parts form a single local motif, while the rest of the side panel remains calm.
This option is especially logical if the staircase itself already has strong elements: turned or carved balusters, expressive posts, a complex handrail, contrasting wood, a high baseboard, or decorative wall panels. In this situation, the side panel does not necessarily need to become another main character. One pair is enough to keep the empty surface from being completely featureless.
But on a long panel of 2.4 m, one pair may feel too intimate. If a conventional pair module takes up about 320–360 mm depending on the chosen gap, it covers only a small part of the length. This is the goal of a local accent: most of the surface is deliberately left empty.
It makes sense to place one pair not "where there is space left," but at a point perceived as the center of the decorative zone. On a sloped side panel, this center cannot be determined only as half the length by tape measure. The geometry of the staircase, posts, the start and end of the flight, and the view from the lower and upper points must be taken into account.
The advantage of one pair is a low risk of overload and a minimal budget of 2,040 ₽. The disadvantage is that on a large smooth surface, it may look like a small random insert.
Therefore, one pair is suitable not when you just want to "save money," but when the interior truly needs a single accent and a large amount of calm background.
Two mirror pairs: an intermediate option that is often forgotten
Between a single center and a triple repeat, there is a useful intermediate scenario—two mirror pairs.
Four items cost 4,080 ₽. In character, this is no longer a single medallion, but not yet a full ornamental strip. Two pairs create two centers with a noticeable interval between them.
This option can be good if the side panel naturally divides into two semantic zones. For example, one pair reads closer to the lower part of the flight, and the second closer to the upper part. The middle remains free, and the repetition connects the beginning and end of the staircase.
But two pairs require caution. If the wall is perceived as a single long plane without natural division, two identical motifs can look as if a third element is missing. On three modules, the rhythm is read immediately: beginning, middle, continuation. On two, the eye often tries to understand why the composition is split into exactly two points.
Therefore, the scheme with two pairs especially depends on the architecture of the specific staircase. It should be chosen if there is a real reason for two accents: for example, two visible fields, two light spots, two large areas between structural nodes.
If there is no such reason, the comparison "one pair or three" is often clearer.
Three mirror pairs: when decor becomes the rhythm of the entire flight
Three pairs is already a fundamentally different approach. Six elements cease to be perceived as several separate decorations and begin to form a repeating ornamental rhythm.
The cost of such a set is 6,120 ₽:
-
3 × NPU-120L;
-
3 × NPU-120R.
Three pairs are suitable for a calm, fairly long, and visually empty side panel, especially if the staircase itself is laconic. The rhythm can support the step of the treads but does not have to literally repeat each step. On the contrary, too frequent fragmentation can turn small S-shaped overlays into a decorative "ribbon" that begins to compete with the staircase architecture.
The point of three pairs is not to fill the maximum area but to create three well-readable repetitions. Air should remain between the modules. If the distances are too small, six separate details will merge into a long ornament, and the idea of a mirror pair as an independent motif will be lost.
Three pairs work especially well when the side panel has a long continuous smooth zone without doors, outlets, panels, or technical inserts. Then the repetition can be evenly distributed and linked to the overall slope of the flight.
If the surface is short, intersected by posts, or already visually saturated with wood texture and baluster shadows, a triple repetition may be excessive.
Three pairs should only be purchased after all six templates have been placed on the side panel simultaneously. One paper pair that is moved three times does not give a sense of overall density.
Comparison of one, two, and three pairs on a 2.4 m side panel
For clarity, let's take a working template where each pair conditionally occupies 340 mm along the chosen line: two elements of 150 mm plus 40 mm of internal gap. Again: 40 mm is not a mandatory installation size, but an example to see the difference between the schemes.
If the free space is distributed with equal intervals between the modules and the edges of the 2400 mm work area, we get:
| Diagram | Conditional module length | Free length | Number of free intervals | Conditional equal interval |
| 1 pair | 340 мм | 2060 мм | 2 | 1030 мм |
| 2 pairs | 680 мм | 1720 мм | 3 | ≈ 573 mm |
| 3 pairs | 1020 мм | 1380 мм | 4 | 345 мм |
This table shows not the "correct mounting distances," but the difference in character.
One pair with this layout literally becomes a separate island in the center of a large plane.
Two pairs create a very sparse double rhythm.
Three pairs already read as a series: between the modules and at the edges, intervals of about 345 mm remain, meaning air is preserved, but the repetition becomes obvious.
If you change the internal gap of the pair, the results will change. If the overlays are rotated relative to the slope, their projection along the flight will also become different. Therefore, the table is needed as a thinking model, not as a ready-made mounting scheme.
The main practical conclusion: on a 2.4-meter side panel, a triple repetition does not have to be too frequent. With proper distribution, it can remain fairly free. Danger arises when pairs start being placed closer to each other just to fill the void.
Whether to tilt the overlays themselves following the flight or keep them relative to the room
This is one of those questions where a universal answer cannot be given without a trial fit. The staircase sets a strong diagonal. The floor, ceiling, doors, and furniture are horizontals and verticals. The NPU-120L/R can be subordinated either to the line of the flight or to the geometry of the room, and the effect will be different.
Option 1. The long side of the ornament follows the slope of the staircase
This technique makes the decor part of the flight itself. The pair seems to continue the movement of the steps upward. On a long smooth side panel, this is especially natural if three pairs form a repetition.
Plus — strong connection with the staircase. Minus — with a very steep slope, the S-shaped pattern may be perceived as more dynamic than desired. In addition, the same angle of all six elements must be strictly maintained. Even a small difference between repeating pairs will be noticeable.
Option 2. The ornament remains "at level" relative to the room
Then the overlays are perceived as ordinary wall decor applied to an inclined plane. The staircase runs diagonally, while the S-shaped elements themselves maintain a horizontal or other stable orientation.
This option sometimes better connects the side panel with moldings and decor of adjacent walls. But on a long flight, there may be a feeling that the overlays do not follow the architecture of the staircase, but are simply glued on top of it.
How to resolve without arguing
Make two sets of paper templates. Rotate the first one along the line of the flight, and the second one relative to the room level. Photograph both options strictly from the same point. Do not evaluate them simultaneously during the re-sticking process: photos allow comparing compositions without the habituation effect.
For one pair, a more independent orientation is acceptable. For three pairs, a common system is especially important: all modules must follow the same angle, otherwise the rhythm will be destroyed.
Where to look for the compositional center of an inclined side panel
Finding the center of a rectangular wall is easy: half the width and half the height. The side panel of a staircase often has the shape of an elongated trapezoid, parallelogram, or complex panel, so the geometric center of the surface does not always coincide with the visually best point for decor.
It is useful to distinguish three centers.
Geometric center — the middle of the working length and height of the panel. It is convenient for the first fitting.
Optical center — the point where the decor appears balanced with the lower and upper ends of the staircase. It can shift due to a large starting post, landing, baseboard, or handrail.
Center of the visible route — the place that most often ends up in front of a person's eyes when they approach the staircase or walk past it.
For one pair, the optical center matters most. If you place two pieces strictly by mathematics, but a massive post is nearby, the entire composition can visually shift.
For three pairs, the task changes: what matters is not a single point, but a system of centers. Usually, the first and last allowable zones are determined first, then the middle pair is distributed between them. This approach gives a more stable rhythm than trying to start from the middle and then "add one by one" to the remaining spots.
In practice, it is convenient to temporarily mark the main placement line with painter's tape, note the beginning and end of the working zone, and only then lay out the modules.
The offset from the beginning and end of the flight is more important than maximum filling
A weak layout often starts the same way: a person sees an empty side and tries to use almost all available length. The first pair ends up too close to the lower post, the last one — to the landing or the end of the panel. As a result, there is formally a rhythm, but the edges of the composition look cramped.
The ornament should have a margin of wall before structural endings. This margin does not have to be equal to the internal distance between pairs. Moreover, sometimes it is useful to make the outer field larger so that the decor does not conflict with a large staircase post.
You need to check not only the distance to the physical edge of the panel, but also to visually strong objects:
-
support or decorative post;
-
end of the handrail;
-
baseboard line;
-
platforms;
-
junction with the wall;
-
doorway next to the stairs;
-
socket, switch, wall lamp;
-
piece of furniture standing at the bottom of the flight.
If the outermost pair approaches one of these objects, it ceases to read as part of its own rhythm and begins to form a random connection with it.
This is why the calculation "2400 mm divided by three" does not work. You need to first subtract the undesirable edge zones, and then distribute the remainder among the modules.
For a paper layout, it is useful to make two options: one with maximally even intervals, the second with increased margins at the ends. On a real staircase, the second option often looks calmer.
What gap should be left between NPU-120L and NPU-120R within one pair
The left and right parts should feel connected. If placed too far apart, the viewer will stop reading them as one mirrored pair. If almost closed, the two S-shaped patterns may visually merge and lose the character of each element.
There is no exact universal distance here. It depends on which sides the elements face each other, how they are rotated relative to the flight, what color they are painted, and how closely the viewer passes by.
It is more convenient not to look for the "correct 20 or 40 mm", but to make three trial templates:
-
tight pair;
-
medium interval;
-
more loose pair.
For example, for a preliminary assessment, you can try 20, 40, and 60 mm between the bounding rectangles. These numbers are not factory standards, but simply three noticeably different layouts.
What to look at:
-
whether the two elements are read as a single whole;
-
doesn't the middle turn into a random empty gap;
-
don't the curls visually collide;
-
doesn't the overall module become too long;
-
does the mirroring remain clear from a distance.
After choosing the internal interval, it is fixed for all repeating pairs. If the first pair has 30 mm, the second 45 mm, and the third 25 mm, the difference will be perceived as an error even with perfectly equal external distances.
How to maintain an even rhythm between repeating pairs
When three pairs are used, you cannot mark them "by eye from the previous one." A small error in each step accumulates, and by the top of the flight, the last module may noticeably drift.
It is better to work from the total length.
First, determine:
-
the working length of the decorative zone;
-
the length of one selected module of the pair;
-
number of modules;
-
desired fields at the beginning and end;
-
remaining space between modules.
If a module conditionally takes 340 mm, and the working length is 2400 mm, three modules take 1020 mm. 1380 mm remains. Then there are two approaches.
Uniform: divide the remainder into four equal free intervals — two outer and two inner. That gives 345 mm.
With reinforced edges: for example, give more space at the beginning and end, and make the distances between the three pairs slightly smaller. This solution may be better near large pillars.
Which option to choose is decided by the staircase architecture. The main thing is to calculate the entire system simultaneously. With a triple repeat, the positions of all six elements must be known before gluing the first one.
For marking, a paper tape or chalk line along the chosen axis is useful. On it, you can mark the centers of the modules and not depend on the complex shape of the panel edges.
When NPU-120L/R are too small for a long staircase
Compactness is not always an advantage. On a large staircase with a high flight, massive wooden elements, and a large room, overlays of 150 × 59 mm may simply get lost.
Signs of too small a scale:
-
even three pairs are barely visible from the main viewing point;
-
the ornament is only readable up close, and from the hall it turns into small shadows;
-
large balusters and pillars are visually several times heavier than the overlays;
-
the side panel has a large empty field not only in length but also in height;
-
you have to place pairs too often for the decor to start affecting the wall at all;
-
there is a desire to add a fourth, fifth, and sixth pair just to fill the emptiness.
In the latter case, it is better to stop. If you have to repeatedly multiply a small detail to achieve the desired effect, the problem may not be in the quantity, but in the scale of the product.
Then it is wiser to look at other carved polyurethane overlays and choose one larger accent or a longer composition. This often looks more expensive and calmer than a frequent scattering of small elements.
Choose other carved polyurethane overlays
When three pairs are already too many
The opposite mistake is to assume that a long side panel automatically requires multiple repetitions.
Three pairs may be redundant if:
-
the railing already consists of frequent carved balusters;
-
the starting and top posts have intricate decor;
-
the side panel is clad in expressive wood;
-
there are moldings, panels, or large paintings on the adjacent wall;
-
the intervals between the overlays have to be too small;
-
the staircase is in a small space and is viewed up close;
-
the ornament is contrastingly painted and every detail becomes very noticeable.
In such an interior, six elements can turn the side panel into a decorative strip that begins to compete with the railing. This is especially pronounced with contrasting colors: dark overlays on a light background or gold decor on a white panel appear visually larger than the same items in the base color.
A good test is to remove the middle pair from the template. If the staircase immediately "calms down" and the composition does not seem empty, then two pairs may be better than three. Then remove another one. If a single center is still convincing, there is no reason to buy six pieces.
The quantity should add structure, not just increase the surface fill.
One large overlay instead of six small ones: when it is more reasonable
Sometimes the buyer likes the very idea of carved decor on the side panel, but does not like the rhythmic repetition. Then, instead of three mirror pairs, it makes sense to consider one larger decorative element.
This is especially logical when the side panel has a large central field and the staircase is perceived frontally. One large ornament creates a clear center and does not require perfectly maintaining the repetition.
Advantages of a large single element:
-
fewer mounting points;
-
no risk of error accumulation between six pieces;
-
the composition is perceived immediately;
-
it is simpler to make one center;
-
it is easier to leave large calm fields.
But a large overlay is not universal either. It may turn out to be too heavy for a thin side panel or conflict with the panel's slope. In addition, the cost of another model may be higher.
You need to compare not only the price. A useful question is: does the side panel need rhythm or one center? If rhythm is not needed, six small parts become an unjustified way to achieve an effect that is easier to create with a single piece.
When selecting an alternative, it is important to re-check the material, dimensions, relief, and suitability of the specific surface, rather than automatically transferring recommendations for NPU-120L/R to any overlay.
How the baluster pattern affects the number of overlays
The side panel of a staircase does not exist separately from the railing. Above it is a system of balusters, posts, and a handrail, and this system already has its own rhythm.
If the balusters are placed frequently, the eye receives many repeating verticals. Adding another frequent ornamental rhythm to the side panel should be done carefully. Three pairs of NPU-120L/R can create a second independent "metronome" that does not match the baluster spacing.
It is not necessary to synchronize each pair with every second or third baluster. Such literal subordination often makes the composition mechanical. But it is useful to check whether the centers of the pairs fall into clearly conflicting positions: for example, one module exactly under a post, the second between balusters, the third under an empty gap.
With a sparse and simple railing, a triple repetition on the side panel gets more freedom. With a rich carved railing, one pair often looks more mature.
Old classic staircases are often built on hierarchy: a large post — a rhythm of balusters — a calm stringer or side plane. If overlays disrupt this hierarchy and start attracting more attention than the railing, their number should be reduced.
A simple staircase and a decorative staircase require different quantities
The same 2.4 m side panel can receive completely different decor in two interiors.
A minimalist staircase
A smooth painted side panel, a simple handrail, sparse straight balusters. Here one small module can look too lonely. Two or three pairs can add the needed rhythm and make the side surface meaningful.
A classic staircase of medium richness
There is a profiled handrail, shaped balusters, a noticeable post, but the side panel is calm. Here one pair in the center or two pairs with large intervals often wins.
A richly carved staircase
Posts and balusters are already independent decor. The side panel can serve as a pause. One pair is the maximum, and sometimes the best option is to leave it without any additional molding.
This logic shows why counting quantity only by meters is wrong. 2.4 m is geometry. The richness of the staircase is composition. The final order is determined by both variables.
Relief 10 mm: a small size that changes light and shadow and usability
The third dimension in the NPU-120L/R size is 10 mm. On screen, it seems almost insignificant, but on a smooth side panel, even a centimeter relief works well with light.
With side lighting, the curls cast shadows and look deeper. In the color of the panel, they read softly. With contrasting paint, the relief becomes much more active.
Ten millimeters should also be considered practically. If the side panel is located near a narrow passage, make sure that protruding elements will not constantly catch on bags, clothing, strollers, or cleaning equipment. In most normal side zones, 10 mm does not create a problem, but a specific staircase is better to check.
For a paper template, the depth can be modeled with small pieces of cardboard or foam material. This is especially useful if the overlays are planned low and near the traffic route.
The small relief is one of the reasons why NPU-120L/R are convenient precisely as a delicate repeat: six pieces do not create such massive plasticity as large volumetric elements. But the quantity still affects visual density more than the depth of one overlay.
Painting: in the color of the side panel, in the color of wood, or contrasting
Color can change the decision about quantity more than it seems. The same six overlays can look either almost architectural texture or an active decorative strip — only because of the finish.
In the color of the side panel
The calmest option. If the side panel is white and the overlays are painted the same white, the pattern appears mainly due to shadows. This is a good way to use two or three pairs without turning the staircase into an ornamental attraction.
This solution is especially suitable for neoclassicism, where you want to add relief but preserve the integrity of the plane.
In the color of the wooden elements of the staircase
If the side panel is painted, and the handrail, steps, or posts have a noticeable wood tone, the overlays can be made close to that shade. Then they visually connect the smooth panel with the wooden architecture.
But here the contrast is higher. Three pairs in a wood or dark color will be perceived more actively than three white pairs on a white background. Therefore, the quantity needs to be re-checked after the color mockup.
Contrast accent
Black, gold, bronze, or any clearly distinct shade sharply increases the visual weight of a small detail. In this case, one pair often does more work than three pairs in the background color.
A practical way to check is not to wait for actual painting. Paint the paper templates with an approximate color and apply them again. White paper poorly predicts the effect of contrasting finishes.
When choosing the quantity, always evaluate not only the size but also the future contrast.
How lighting changes the feel of one and three pairs
Stair flights often receive light from the side: from a window, corridor, wall sconces, or step lighting. For a 10 mm relief, this is significant.
If the light comes almost along the surface, each overlay creates a pronounced shadow. Three pairs begin to read as six independent plastic elements. With soft frontal light, the same set looks calmer.
If you plan a sconce near the side panel, check whether each pair has its own hard spot. Sometimes lighting accidentally enhances the middle and weakens the outer modules, making a uniform layout appear uneven.
It is useful to view patterns in at least two modes:
-
during the day in natural light;
-
in the evening with standard fixtures.
If the staircase is equipped with step lighting, it can provide directional light from bottom to top. Then the lower edge of the relief will become more contrasting, and even overlays matching the panel color will be clearly visible.
It is precisely lighting that explains why you cannot make a decision based only on a product photo on a gray background. On a real side panel, a small relief may turn out to be much more expressive.
What surface is needed for neat installation
NPU-120L/R are designed for decorative installation, but the quality of the result depends on the base. The smooth side panel must be not only visually flat but also suitable for adhesion.
Before marking, check:
-
whether there is any peeling paint;
-
is the surface coated with a compound that mounting adhesive adheres poorly to;
-
is there a strong texture;
-
are there hidden service covers passing under the chosen location;
-
is access to the ladder fasteners required;
-
is the plane sufficient for the entire back part of the overlay.
If the side panel is made of painted MDF, wood, or another material, the preparation scheme may differ. It is not possible to universally recommend the same sanding and the same adhesive for all coatings.
The STAVROS card provides general adhesive logic for decorative products, but the specific base still needs to be checked. A weak finish coating may peel off the panel along with a well-adhered overlay.
Particular attention should be paid to a staircase that is already fully finished and in use. A marking error here is more costly: traces of removed adhesive or damage to the enamel will be visible on a long smooth surface.
Therefore, first — templates and dry fitting, then — preparation, and only then installation.
Dry layout: how to check all options at once without adhesive
For this topic, a dry layout is the main decision-making tool. It allows you to compare quantities without purchasing all six items.
Make six identical templates measuring 150 × 59 mm. It's better to mark the direction of the pattern on them: label three as L and three as R. If possible, print photos of the items to scale or schematically draw the character of the curl. Simple rectangles will show the dimensions but won't fully convey the mirror effect.
Next, perform three layouts.
Layout A — one pair
Place L and R in the assumed central module. Leave the surrounding side empty. Look from the bottom point, from the side, and from the top platform.
Layout B — two pairs
Add a second module. Check whether there is an architectural reason for two centers or if the composition seems unfinished.
Layout C — three pairs
Place all six elements simultaneously and maintain one internal gap for each pair. Check the rhythm.
After each layout, take a photo from the same position. Then compare the three shots in sequence. This method is better than memory: with constant repositioning
In what order to glue three pairs
When all positions are checked, the question of installation arises. Here it is logical not to go strictly "from bottom to top," but to keep the ability to control the entire composition.
One convenient option is to first install the middle pair. It sets the main center of the series. Then place the bottom and top, checking distances from the already fixed middle.
Another approach is to first place the outer pairs, then the middle one between them. It is convenient if the outer points are determined by the architecture: for example, the bottom is tied to a post, the top to the beginning of the platform.
Which order is better depends on the layout. But there is a general rule: before the first glue, all six positions must be marked and checked. You cannot glue a pair and then decide where to place the remaining ones.
After applying the mounting compound, each overlay must accurately return to a predetermined position. If the parts are symmetrical in a pair, it is useful to mark the back side with painter's tape: L1/R1, L2/R2, L3/R3. This is especially convenient if the overlays are pre-painted and lie nearby.
Why you should not transfer this scheme to risers
The NPU-120L/R has an attractive small size, and after a successful side composition, there may be a desire to repeat them on each step. But this is a different surface and a different risk.
The riser is directly in the zone of foot movement. The official STAVROS material on stair finishing separately warns about protruding decor in the toe impact zone. Therefore, the scheme from this article is deliberately limited to the fixed side plane, where there is no direct load from the step.
This does not mean that any polyurethane decor on the stairs is prohibited. It only means that for each plane, you need to choose its own logic.
Side:
-
decorative;
-
viewed from the side;
-
is not a foot support;
-
allows creating a long rhythm.
Riser:
-
is located in front of the shoe toe;
-
repeats multiple times on each step;
-
has other restrictions on height and protrusion;
-
requires separate calculation of quantity and safe zone.
Therefore, you shouldn't turn one successful idea into a universal recipe for the entire staircase. If you want to additionally decorate the risers, that's a separate project.
What to do near the baseboard and the bottom line of the staircase
The closed side panel often already has a bottom profile, baseboard, or decorative finish. It creates its own line along the flight and can serve as a natural base for positioning the NPU-120L/R.
Don't automatically place the overlays at the same distance from the bottom edge of the panel if that edge has a complex shape. It's better to choose one stable reference line relative to which all pairs will look consistent.
If the baseboard runs parallel to the slope of the flight, you can use it as a visual base. If the bottom edge varies in height or transitions into a stepped profile, such alignment may produce a broken result.
It's important to leave enough space between the relief of the baseboard and the overlays. When two ornaments almost touch, they start to be perceived as one random complex profile.
If the baseboard itself is large and expressive, it's better to reduce the number of pairs. If the bottom line is simple, the rhythm of the overlays can become the main decoration of the side panel.
How to connect the NPU-120L/R to the staircase post
The starting post is one of the strongest elements of the staircase. If it's carved or massive, the first pair of overlays shouldn't compete with it.
A bad layout is when the bottom pair is placed too close to the post, and its curl visually "cuts into" the post's carving. This creates a feeling of random accumulation of decor.
It is better to consider the column as an independent large accent and leave a pause next to it. That is why a uniform mathematical distribution should sometimes be broken: the outer field at the lower part can be made larger than the interval between pairs.
If the column is very simple, on the contrary, the first pair can be slightly closer and help connect it to the long side panel.
At the top, a landing, an upper column, or a turn of the railing plays a similar role. Therefore, the outer pairs cannot be designed without these elements.
The rhythm should exist between two architectural endings, not over them.
What to consider if the staircase is visible from only one angle
Sometimes the side panel is open to the hall and is visible almost frontally. In another house, it is noticed only at an acute angle when passing by. This greatly changes the choice of quantity.
With a frontal view, three pairs read as a clear system. Any violation of intervals is noticeable, but the rhythm can effectively emphasize the length of the flight.
With an acute side angle, elements visually converge in perspective. Three pairs may seem denser than on the drawing, and one central pair may almost disappear behind the slope.
Therefore, templates should be evaluated not only by standing directly opposite the side panel. Walk the actual route: from the entrance, from the adjacent room, from the sofa, from the second landing. Sometimes it is the main viewpoint that decides the question of quantity.
If the staircase is visible only briefly and at an angle, an overly complex composition does not have time to be read. Then one or two pairs are often more effective than six details.
When the side panel has several separate smooth fields
Not every decorative side panel is a single continuous strip of 2.4 m. Sometimes it is crossed by posts, joints, decorative panels, stair turns, or structural seams. In that case, the entire length cannot be considered a single field.
If the side panel is actually divided into three separate sections, three pairs may be a natural solution: one pair in each field. In this case, the rhythm is created by the architecture itself, not by artificially dividing a long surface.
If there are two sections, two pairs have a clear reason to exist. This is the case where the intermediate option of four overlays becomes stronger than both one and three pairs.
If there is only one field, the solution is based on optical rhythm.
Before ordering, it is useful to draw a simple diagram of the side panel and mark not only the length but also all visible boundaries. The plan immediately makes it clear whether the surface is truly continuous.
You cannot conclude "2.4 m = three pairs" without analyzing the structure. The length tells how much space is available. The division of the panel tells how many decorative centers are actually justified.
If the side panel is painted in a dark color
On a dark background, white polyurethane overlays create a very strong contrast. Even one pair becomes noticeable from afar. If you leave the decor white on a graphite, blue, green, or almost black panel, three pairs will be perceived as significantly denser than on a white wall.
In this case, there are three strategies.
The first is to reduce the quantity to one pair.
The second is to keep three pairs, but paint them in the color of the side panel so that the relief works only through light and shadow.
The third is to use an intermediate tone, close to the color of the wooden steps or handrail.
For a light side panel, the situation is reversed. White overlays on a white background can be very delicate, and a triple repetition will not necessarily become excessive.
This is another argument against choosing the quantity before approving the finish. The same set of six items can change its visual weight several times just through contrast.
If the side panel is wooden and you don't want to repaint it
On natural wood, polyurethane decor needs to be especially carefully matched in color and surface character. A simple white item on an oak or beech panel will look like a deliberate contrast. If a monolithic effect is needed, a finish that imitates or supports the wood tone will be required, but the result should be tested on a sample in advance.
You cannot promise that painted polyurethane will become indistinguishable from solid wood. These are different materials. The task may be different: not to mask the difference, but to beautifully tie the colors together.
If the wooden side panel already has a pronounced texture, a frequent ornament may conflict with the grain pattern. In such a situation, one pair often looks better than three: the wood itself is the decor.
If the surface is painted with opaque enamel, the base material visually recedes into the background, and repeating the overlays becomes easier to integrate.
Before purchasing, it's useful to attach white templates and then paint them with an approximate shade. This quickly shows whether the problem is really in the quantity or only in the color.
Mistakes that most often ruin such a composition
Mistake 1. Buying three pairs just because the side is long
The reason is an attempt to link the number of details only to the footage. The consequence is extra ornament on the staircase, which is already expressive enough without it.
Check: first one pair, then add paper modules. If the third pair doesn't improve the rhythm, it's not needed.
Mistake 2. Ordering the same number of L and R, but not checking the direction of each pair
Formally, the cart is correct, but during installation, pairs can be turned differently. The consequence is one module "looks" inward, another outward, and the overall rhythm breaks.
Solution — make an L/R diagram in advance and number the positions.
Mistake 3. Maintaining distances between pairs, but making different internal intervals
The eye first reads each pair as a separate module. If the gap between L and R changes, the modules seem to be of different sizes.
Solution — first select the inner interval, then repeat it three times.
Error 4. Start installation from the bottom without full marking
Each next pair is oriented to the previous one. A small angle error accumulates.
Solution — mark all centers and contours before the first glue.
Error 5. Not accounting for the column and the platform
Equal mathematical intervals can place the edge decor too close to a large architectural element.
Solution — first determine safe edge zones, then distribute the remaining length.
Error 6. Evaluate white templates, then make the overlays contrasting
After painting, six parts look much more active.
Solution — check the approximate future color on paper beforehand.
Error 7. Trying to fill the side panel at any cost
An empty plane is not a defect in itself. Sometimes it is precisely what balances carved balusters and posts.
The solution is to compare the version without any overlays with one and three pairs.
When it is better to leave the side panel without NPU-120L/R
A commercially correct choice sometimes ends with zero in the cart.
Do not buy NPU-120L/R for this zone if:
-
the side panel already has a beautiful panel or carved trim;
-
the texture of natural wood is expressive enough by itself;
-
the space is very narrow and the side panel is constantly bumped;
-
there is no flat mounting surface;
-
the decor will cover the technical access;
-
even one pair looks like a random small detail;
-
three pairs require too frequent repetition;
-
the staircase is already overloaded with balusters, posts, a carved handrail, and wall decor;
-
the future color of the overlays creates an undesirably high contrast;
-
we want a modern minimalist staircase without additional ornaments.
In this case, refusing decor is not a lost opportunity. It is a conscious preservation of a visual pause.
If the emptiness really bothers you, but the NPU-120L/R are not suitable in scale, it is better to choose a different carved overlay rather than increase the number of an unsuitable model.
Check not only the length, but also the height of the free zone of the side panel
The overlay has two face dimensions — 150 and 59 mm. While the element lies conditionally "flat," it seems that a very low strip is needed for installation. But if you turn it to follow the staircase slope, the 150 × 59 mm rectangle takes up more vertical space.
This is important on the side panels, where the free decorative strip is bounded above by the string, the stair line, the lower part of the railing, or a panel, and below by the baseboard.
For a paper template, you don't need to calculate complex geometry: it's enough to cut out a rectangle of 150 × 59 mm and physically rotate it at the chosen angle. But understanding the principle is useful. The more the long side is rotated, the larger the vertical projection of the overall dimensions becomes.
For example, if a conditional rectangle of 150 × 59 mm is rotated approximately 30° relative to the horizontal, its full vertical dimension according to the bounding rectangle is about 126 mm. At 35° — about 134 mm, at 40° — about 142 mm. These numbers refer specifically to the external rectangular dimensions of the template, not to the actual filling with the openwork ornament.
The practical meaning is obvious: an overlay 59 mm high in its original position, when rotated along the stair flight, may require a vertical strip more than twice as large.
Therefore, before ordering, measure:
-
the minimum free height of the side panel at each point;
-
the distance to the lower profile;
-
the distance to the upper structural line;
-
changes in the panel height along its length.
If the side panel is narrow at the bottom and widens higher up, the outermost pair may not fit in height, even though the middle one fits without problems. In such a case, three identically oriented pairs should not be automatically considered compatible. Sometimes you need to reduce the quantity, shift the outermost module, or choose a different orientation.
Why the march angle cannot be transferred to overlays "by degrees from the project"
The staircase angle may be known from the drawing, but the decorative side panel after finishing does not always perfectly follow its line. The baseboard, decorative edge, panel, or facing panel may have its own geometry.
Therefore, the phrase "the staircase is 35°, so we set the overlays at 35°" oversimplifies the task.
The best reference is the real visible line that the decor must follow. This could be:
-
the lower baseboard;
-
the upper edge of the side panel;
-
handrail line;
-
the line of stair centers;
-
a specially chosen decorative axis between the upper and lower boundaries.
If two visible lines are not parallel, you need to choose the main one. You cannot try to maintain parallelism with both the baseboard and the handrail if they visually diverge.
For three pairs, it is especially useful to draw a long painter's line and align all modules relative to it. Then the eye sees the system as a whole.
One pair allows more freedom: the local accent can be oriented almost independently. But as soon as a repeat appears, any difference in angle becomes part of the rhythm and is therefore noticeable.
Paint the NPU-120L/R before or after installation
Both approaches are possible, but they carry different risks.
Pre-painting
Advantages:
-
it is convenient to work with the relief on the table;
-
there is no need to protect a large area of the side panel;
-
it is easier to achieve an even coating on six parts;
-
especially convenient with a contrasting color.
The downside is that after gluing, local touch-ups may be needed at the joint, and careless installation can damage the finished coating.
If three pairs are chosen, it is better to paint all six parts with one batch of material and in one sequence. Different gloss on repeating elements will be more noticeable than on a single overlay.
Painting after installation
The advantage is that you can visually unify the overlays and the side panel with one coating. This is especially useful if a monolithic relief in the panel color is needed.
The downside is that it's harder to carefully paint the curls without affecting neighboring areas if the background needs to remain a different color.
Combined option
The base coat is applied in advance, and after installation, local touch-ups are done. This approach is often convenient for contrasting overlays.
The choice of painting method should not determine the quantity, but it affects labor intensity. Six elements require three times as many identical operations as one pair, and any differences between parts become part of a repeating system.
Maintenance and future repainting: why a series requires more discipline
One pair is two small relief details. Three pairs are already six places where dust will collect and where, during repainting, the complex relief needs to be treated identically.
This is not a reason to give up repetition, but it's a good operational question to ask before purchasing.
If the staircase is in a high-traffic area, dust on horizontal sections of the ornament appears faster than on a smooth side panel. The more elements there are, the more time will be needed for careful cleaning.
For future repainting of the side panel, there are two options:
-
leave the overlays in place and paint the entire system together;
-
remove the decor if the mounting technology and surface condition allow it.
In practice, it is usually easier to consider overlays as part of a permanent composition in advance and design the color so that it does not require frequent changes.
If the interior is frequently updated, one pair or two pairs provide more flexibility. A triple rhythm more strongly defines the character of the entire staircase and is harder to "ignore" in a new room design.
Control fitting of actual products after receipt
Paper templates solve the issue of dimensions and quantity, but after delivery it is useful to perform another dry fitting with the actual NPU-120L and NPU-120R.
Check:
-
matching of article numbers;
-
that the quantity of L and R matches the selected scheme;
-
integrity of thin sections of the ornament;
-
uniformity of the overall dimensions;
-
absence of contamination on the back surface;
-
direction of each pair;
-
relief 10 mm relative to the passage.
If six items are ordered, lay them on the floor in the order they will go on the side panel: L1/R1, L2/R2, L3/R3. Then transfer them to the wall without glue or replace some of the templates with real parts.
This step is needed because the photo and the 150 × 59 mm rectangle do not convey the mass distribution inside the S-shaped pattern. The real overlay may visually "pull" the composition to one side more than expected.
If after trying on the real items you want to change the interval within a pair, it is better to do it now. With three pairs, the new interval should be immediately applied to all modules and the overall layout recalculated.
Practical route from measurement to order
Before placing an order in the cart, it is useful to follow one sequential route.
-
Determine that what you have in front of you is indeed a fixed decorative side panel.
-
Measure the working length along the line along which the decor can run.
-
Record the start and end of the allowed zone.
-
Mark columns, baseboard, platform, fasteners, and other constraints.
-
Make three L templates and three R templates sized 150 × 59 mm.
-
Check one pair.
-
Check two pairs.
-
Check three pairs.
-
Choose orientation: along the flight or relative to the room.
-
Select the internal interval within the pair.
-
Maintain the same interval across all repeating modules.
-
Photograph the options from the same point.
-
Evaluate the future color.
-
Check the evening light.
-
Check that the 10 mm relief is not touched during operation.
-
Only after this determine the number of L and R.
-
Check the current price in both cards.
-
Order the required number of items.
-
Before gluing, perform full marking.
-
After a dry fit, proceed to installation.
This algorithm takes more time than quickly putting six items in the cart, but almost completely eliminates the main problem of this topic — incorrect repetition scale.
Choice tree: one, two, three pairs or other decor
Is the side panel itself already expressive?
Yes → start with one pair or none at all.
No → move on.
Is the plane continuous and long?
Yes → compare one and three pairs.
No, it is divided into two or three fields → the number of pairs can be linked to real fields.
Is one pair clearly visible from the main viewpoint?
Yes → check whether three pairs become redundant.
No → add the second and third modules to the template.
Do three pairs form a rhythm with air between them?
Yes → six items can be justified.
No, they merge into a strip → reduce the number or choose larger decor.
Do two pairs look like two deliberate centers?
Yes → the intermediate option of four items works.
No → choose between one center and a triple rhythm.
Doesn't any option look convincing?
Don't buy NPU-120L/R just to fill the surface. Choose a different model or leave the side panel calm.
What to put in the cart after trying on
If one pair wins:
-
NPU-120L — 1 pc.;
-
NPU-120R — 1 pc.;
-
cost of overlays — 2,040 ₽.
If two pairs won:
-
NPU-120L — 2 pcs.;
-
NPU-120R — 2 pcs.;
-
cost of pads — 4,080 ₽.
If three pairs won:
-
NPU-120L — 3 pcs.;
-
NPU-120R — 3 pcs.;
-
cost of pads — 6,120 ₽.
Before payment, the price needs to be checked again in the product cards, because it may change. Also check the cart contents: for each mirror pair, the quantities of L and R must match. The error "three left and two right" is detected only on site, when a full third module cannot be assembled.
If after layout it turns out that 150 × 59 mm is too small, do not automatically increase the order to eight or ten pieces. Go to the pads section and compare larger items. In this case, not only the quantity changes, but also the composition principle: instead of a frequent rhythm, one large center may appear.
If not only the side panel but the entire staircase is being finished, you can view it separately. staircase components. This is a different product category: it is intended for comprehensive work with the staircase, not for replacing polyurethane NPU-120L/R.
Final recommendation for a 2.4 m side panel
For a smooth, fixed side panel about 2.4 m long, I would start not with three pairs in the cart, but with three full-size layout options.
If the staircase is already decorative, one mirrored pair of NPU-120L + NPU-120R will usually provide enough accent and maintain a calm surface. That is 2 items costing 2,040 ₽ at the current price.
If the side panel is truly large, smooth, and visually empty, and the railing is minimalist, three pairs may work better. Then six overlays create a rhythm for the entire flight and cost 6,120 ₽. Using a conditional example of a 340 mm module, three pairs can be distributed over 2.4 m with noticeable intervals, meaning the repetition does not have to become a dense strip.
Two pairs are a useful third option. They are especially good when the side panel is architecturally divided into two fields, or when a single center is too weak, and a triple rhythm already seems excessive.
The main rule here is simple: the quantity is chosen not by meters or price, but by the decorative function.
One pair is a local accent.
Two pairs are two connected centers.
Three pairs are the rhythm of the entire march.
And only after the actual side panel confirms the desired scenario does it make sense to order the corresponding quantity of NPU-120L and NPU-120R.
FAQ
Do you always need to buy NPU-120L and NPU-120R together?
For the mirrored composition from this article — yes, one left and one right piece per module. But technically each overlay is sold separately, so the quantity in the cart needs to be set manually.
Can you install only NPU-120L without NPU-120R?
You can as a single asymmetric accent if it fits the project. But that's a different composition: a mirrored pair won't be achieved.
Can you alternate the direction of pairs along the march?
Only after a visual check. Alternating creates a more complex rhythm and easily turns a calm series into a decorative "wave." For most minimalist schemes, it's simpler to repeat the same orientation for all pairs.
Is it mandatory to position the overlays parallel to the staircase slope?
No. The orientation should be chosen according to the template. In one interior, following the march works better; in another, positioning relative to the room's horizontals.
What exact distance should be left between NPU-120L and NPU-120R?
There is no universally confirmed distance. Make several template options and choose the interval at which the parts read as one pair but do not merge.
Is a spare seventh overlay needed when ordering three pairs?
There is no need to automatically add a spare without a reason. If protection against damage on site is important, the decision on a reserve is made separately, taking into account delivery times, installation technology, and working conditions.
Can NPU-120L/R be glued directly onto painted MDF?
This depends on the specific coating and mounting compound. Before work, you need to check the strength of the finish layer and the compatibility of the adhesive. The fact that the product is polyurethane does not guarantee adhesion to any enamel or film.
Will a 10 mm relief interfere with cleaning?
Usually not in a properly chosen side area, but the relief will collect more dust than a smooth panel. If the side is constantly hit by a vacuum cleaner attachment or other equipment, it is better to raise the decor higher or reduce the quantity.
What is better on a very long side — four pairs or a larger element?
If three pairs already seem small, increasing the number of small parts does not always improve the composition. Often it is more reasonable to switch to a larger overlay or another type of decor.
Can the same pattern be used outside the house on an exterior staircase?
Polyurethane products can have exterior applications, but the specific open staircase conditions, base, finish, adhesive, temperature, and moisture require separate verification. This article pertains to interior decorative side panels.
Should pairs be tied to each step?
No need. The NPU-120L/R in this topic operate at the level of the entire side panel. Literally repeating each step may make the composition too frequent.
What matters more when choosing the quantity—the length of the side panel or the decorative nature of the railing?
Both parameters. The length determines the available space, while the density of balusters, posts, and handrail determines how much additional ornament the staircase can visually handle.