


Article Contents:
- Why a simple smooth door ruins an expensive renovation
- You don't have to change the door: when decoration works
- What's important to check before decorating
- Moldings on doors: relief that changes everything
- Types of moldings for doors
- Decorative overlays on doors: accent where character is needed
- Neoclassical style door: moldings as the main tool
- Neoclassicism: three ready-made schemes for the door
- Door matching the wall color: how to preserve character when the panel 'disappears'
- Old door after renovation: what can be improved without dismantling
- Comprehensive update of an old door without dismantling
- Moldings or overlays: which to choose for a specific task
- Rosettes and Corner Elements
- Door portal: when a grand opening is needed
- How to choose the right molding size for a door
- Molding width
- Indents and frame proportions
- What else to consider when selecting molding
- Composition on the door panel: ten ready-made options
- Classic options
- Decorative options with overlays
- Mistakes when decorating a door with moldings: learning from others' miscalculations
- How to install moldings on a door: step-by-step instructions
- What You'll Need
- Work Sequence
- Where to buy moldings and decor for interior doors
- FAQ: answers to popular questions about moldings and door decor
It happens like this: the renovation is done well. The walls are smooth, painted in a beautiful color, the baseboards are matched, the furniture is placed correctly. But something is off. Something doesn't come together as a whole. And when you start looking for the reason, your gaze stops at the door. A flat white panel without a single detail, without character, without relief. It's not bad. It's just nothing.
It is this kind of door that most often spoils an expensive renovation. Not because it is broken or unattractive, but because it is unfinished. It has no visual language that speaks to the interior style.
The good news: you don't need to replace the door. Just add Door moldings — and the flat panel will gain relief, rhythm, depth, and style. This is one of the most effective and affordable interior decorating techniques that professional designers have been using for a long time, and home craftsmen are discovering more and more actively.


Why a simple smooth door ruins an expensive renovation
Interior design works on a system principle. Every element must be coordinated with the rest: in color, texture, and stylistic language. When an item without character appears in this system, it doesn't just 'not decorate' — it introduces dissonance.
An interior door is one of the largest vertical planes in a room. Its area ranges from 1.6 to 2.0 square meters. This is a huge chunk of space that either works for the interior or doesn't.
A smooth panel without details contributes zero to the room's visual system. This is especially noticeable when:
-
The interior has textured walls, stucco, wall moldings, or wooden panels;
-
Baseboards and architraves have a profile — but the door remains flat;
-
The interior style is classic, neoclassical, Provence, or Art Deco — but the door is 'from a different story';
-
You want the feeling of an 'expensive renovation' rather than standard residential housing.
This is where door decor comes in — moldings, overlays, frames, rosettes — as a tool to complete the interior without full dismantling.


The door doesn't need to be replaced: when decorating works
There is a clear criterion: if the door leaf is intact, level, not deformed, and fits the size, replacing it is impractical. A new MDF door solves this problem expensively and with dismantling. Decorative elements solve it faster, cheaper, and often more beautifully.
polyurethane create a classic frame between the wall and ceiling. The profile height varies from minimalist 50 mm to ceremonial 200 mm — the choice depends on the room's height and style. In a room with 2.7 m ceilings, a 150 mm cornice will look excessive, 'pressing' from above. And in a hall with 3.5 m ceilings, a narrow 60 mm cornice will get lost, failing to visually mark the boundary. — these are profiled wooden slats that are glued or attached to the door leaf. They create frames, imitate paneling, set a rhythm, and make the surface three-dimensional.
Decorative overlays for doors — these are individual decorative elements: rosettes, corner inserts, vertical or horizontal accents, carved details.
Together, they turn an ordinary MDF door leaf into a designer object — without replacement, without complex installation, in one day's work.
Our factory also produces:


What to check before decorating
Before attaching moldings, make sure:
-
The surface of the door leaf is smooth, without bulges or delamination;
-
The coating allows for glue or screws (film, enamel, veneer — all accept glue with proper preparation);
-
The door is not deformed diagonally — check with a straightedge;
-
Moldings and overlays will not interfere with opening and the handle.
If everything is in order, you can proceed.
Get Consultation
Door moldings: relief that changes everything
Door moldings — this is the most common and universal way to decorate a door leaf. A molding is a profiled strip with a specific cross-section: rectangular, oval, with a cove, with a quarter, with a half-column.
A molding glued to the door creates a visual effect of a three-dimensional frame — as if the door was originally made with a panel. This technique is known to everyone who has worked with neoclassical, Provence interiors, or classic finishes.
Door molding works on several tasks simultaneously:
-
Creates an imitation of a panel — panels "in a frame" that are perceived as part of the door structure;
-
Sets a vertical rhythm — two elongated frames make the door "slimmer" and taller;
-
Connects the door with wall trim — if there are moldings on the walls, the door starts speaking the same language.
-
Provides a base for painting — after painting in a single color, the moldings and the panel are perceived as a single product made of expensive material.
Types of door moldings
Choosing a profile is a matter of style. Here are the main options:
Flat rectangular profile. The most laconic — for minimalist and modern interiors. A thin strip with sharp angles gives neat geometry without ornamentation.
Profile with a fillet or chamfer. A slightly beveled or concave profile — a transitional option between minimalism and classic. Looks good in modern classic and restrained neoclassical styles.
Oval or semicircular profile. More decorative, soft. Suitable for Provence, country, neoclassical styles.
Wide profiled molding with a cornice shape. Heavy in plasticity, with several ledges. For classic, Art Deco, Baroque styles.
Molding MLD-019 — a specific item from the STAVROS catalog that is suitable for door decor: neat profile, good proportions, solid wood.
Decorative door overlays: an accent where character is needed
Door decorative inlay This is no longer a frame, but an element. It is placed at a specific point on the canvas and creates an accent: in the center, in the corner, along an axis, as vertical decor.
How is an overlay different from a molding? Molding builds geometry, an overlay creates an ornamental or sculptural accent. A rosette in the center of the top panel, corner decorative inserts, a vertical row of ornaments — all of these are functions of an overlay.
Wooden door overlays work especially well in the following scenarios:
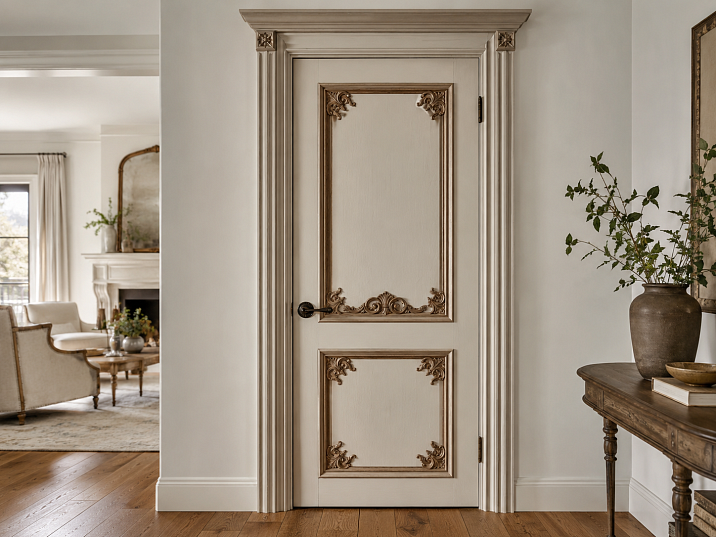
Classic dining room or living room. A door with molding frames and rosettes in the center of the top and bottom sections creates the image of a door from a good old mansion. This is unattainable at any MDF factory without a special order.
Study or library. A vertical rhythm of two or three overlays along the door axis gives it monumentality and seriousness.
Hallway with an accent wall. If the door is an element of a designer wall, the overlay on it continues the decor theme and creates a unified system.
Carved wooden overlay as an art object. If the entire canvas is simple, one carved element in the center makes it unique — without overloading.
Neoclassical style door: moldings as the main tool
Neoclassicism is one of the best-selling styles in modern residential interiors. Clean lines, calm colors, profiled frames, symmetry — these are its main techniques. And a door with moldings is one of the key elements of this language.
Neoclassical door scheme:
-
Smooth panel — base;
-
Two or three rectangular frames made of moldings for interior doors — top wide and bottom, or two symmetrical in height;
-
Between frames — flat field of the panel without decor;
-
The entire door is painted in a single color — white, light gray, milky, pastel;
-
Wooden casings of the same profile as the moldings — for unity of framing;
-
Wooden Skirting Boards with a classic profile supporting the theme.
Result: a door that cost as much as a standard MDF panel looks like it was custom-made for a specific interior.
Neoclassicism: three ready-made schemes for a door
Scheme 1: "Two Verticals." Two rectangular moldings arranged symmetrically vertically. Between them is the panel field. Top and bottom have indents from the door edge. Calm, strict, elegant.
Scheme 2: "Top and Bottom." An upper horizontal frame about 1/3 of the door height and a lower one about 2/3. This is the classic panel ratio in historical furniture and doors. It looks "expensive" even in a simple execution.
Scheme 3: "Three Sections." Upper, middle, and lower frames separated by transverse moldings. Suitable for tall doors from 2.2 m and above.
Door in wall color: how to preserve character when the panel "disappears"
The design technique — a door in wall color — is now at the peak of popularity. It creates a "hidden door" effect where the panel blends into the wall background. But this technique has a risk: the door becomes invisible — and flat.
Solution: moldings on interior doors when painted in wall color, they create relief that is visible through the play of shadows — not through contrasting color. The door "recedes" into the wall in color but remains expressive in plasticity.
This technique works especially well:
-
In a living room with vertical moldings on the walls — the door continues their rhythm;
-
In a bedroom with an accent wall, the door becomes part of it rather than breaking the composition.
-
In a hallway with wooden panels, the door "blends into" the finishing system.
An important condition: the moldings must be wide enough to cast a noticeable shadow. Thin slats of 10–15 mm get lost when painted the same color as the wall. The optimal profile width is from 20–25 mm.
Old door after renovation: what can be improved without dismantling
The renovation is finished. The wallpaper is hung (or the walls are painted). The baseboards are installed. And then it turns out that the old door—which seems to work fine—now looks strange against the new interior.
Replacing it means disturbing the frame, possibly dismantling the trim, and repainting after installation. That's a day's work and extra expenses. Is there a way to avoid it?
Yes, and more than one.
Comprehensive update of an old door without dismantling
Repainting the door leaf. If the door was light but has yellowed or cracked, it can be sanded and painted in a new color. Satin or matte enamel completely changes the perception.
Adding moldings. A smooth leaf after repainting can be complemented with molding frames—and you get a completely different door. Wooden moldings They are glued with liquid nails or PVA wood glue, and painted together with the panel.
Replacing the handle. A new handle is the cheapest and most noticeable change. A properly chosen handle (color, shape, material) instantly changes the look of the door.
Updating the architraves. If the old architraves have dried out, cracked, or don't match the new interior — Wooden casings they can be replaced without dismantling the frame. It's quick and inexpensive.
Adding decorative overlays. Interior Door Decor in the form of carved overlays or corner elements is attached on top of the panel and adds a visual accent where there was emptiness before.
Linking with the baseboard and wall decor. If the door, architraves, and Wooden Skirting Boards are the same color and the same profile language — they are perceived as a single system. This is the main principle of a finished interior.
Moldings or overlays: what to choose for a specific task
The question often arises: what exactly is needed — a molding or an overlay? These are different tools with different functions, and the choice depends on the goal.
| Task | Tool |
|---|---|
| Create a panel imitation | Molding — rectangular frames |
| Add vertical rhythm | Molding — vertical slats |
| Make a horizontal belt | Molding — horizontal strip |
| Add a decorative accent | Overlay — rosette, ornament, insert |
| Decorate the corner of the frame | Corner overlay-insert |
| Create a central focal point | Carved overlay or rosette in the center |
| Make the opening more beautiful | Trim with decorative profile |
| Make the opening grand | Door portal |
Obviously, both tools are often used together: first, the geometry is built with molding, then an overlay is added as a final accent at key points.
Rosettes and corner elements
Furniture rosettes and decorative elements — this is a separate category of decor. The rosette is placed in the corner of the molding frame — where the horizontal and vertical slats meet. It covers the joint and adds a decorative detail.
This is a technique from classic joinery: a corner insert always looks professional and shows attention to detail. A simple frame made of molding with rosettes in the corners turns into a full-fledged architectural detail.
Door portal: when a grand opening is needed
If the task is not just to update the door leaf, but to make the entire doorway a significant architectural element, you need door portal. The portal includes framing of the opening with columns, cornice, pilasters, or a decorative top.
This is relevant for:
-
Living room with high ceilings;
-
Formal hallway;
-
Dining room with a classic interior;
-
Study or library;
-
Corridor that should become a "gallery."
A portal is no longer just door decor, but interior architecture. However, this story still begins with the same molding.
How to choose the right molding size for a door
The question of proportions is key. An incorrectly chosen profile will either get "lost" on the door or visually "weigh it down."
Molding width
For a standard door 800×2000 mm:
-
Narrow moldings (10–15 mm) — for modern and minimalist interiors, provided they are painted in a contrasting color;
-
Medium (20–30 mm) — a universal option, looks good in most styles;
-
Wide (35–50 mm and more) — for classic and neoclassical styles, provided the door leaf is wide enough.
Rule of thumb: the width of the molding should not exceed 1/10 of the width of the frame it forms.
Indentations and frame proportions
The standard indentation of the molding from the edge of the door leaf is 50–80 mm. Too small an indentation (20–30 mm) creates a feeling of tightness. Too large (100 mm or more on a narrow door) disrupts the proportion of the frame.
For a door 800 mm wide:
-
Side margins: 60–70 mm;
-
Frame width inside the molding: 800 − 2×70 − 2×molding width.
For a door 2000 mm high:
-
With two frames: the top one approximately 700–800 mm high, the bottom one — 900–1000 mm;
-
With one frame: height 1600–1700 mm with margins of 100–150 mm at the top and bottom.
What else to consider when choosing a molding
-
Handle and lock: the molding should not intersect the handle or hardware area. Marking should be done considering the location of all hardware;
-
Casing width: the molding and casing should be stylistically coordinated — from the same profile 'family';
-
Painting: before installing the molding, it is important to understand whether the molding and the door leaf will be painted in a single color or contrasting. This affects the choice of profile and installation accuracy;
-
Door opening: moldings with a large protrusion (from 15 mm) may interfere with the door closing tightly in a narrow opening or when hung on hinges with a small gap.
Composition on the door leaf: ten ready-made options
Marking is the most crucial stage. It determines whether the door will look professional. Here are proven compositions.
Classic options
One large frame. Molding along the entire perimeter of the leaf with an indent of 70–100 mm from the edge. A simple and strict solution for a minimalist interior. Works with rectangular doors of any size.
Two vertical frames. The leaf is divided vertically into two equal parts, each with a frame made of molding. Suitable for wide doors from 900 mm.
Upper and lower sections. Horizontal molding divides the door into approximately 1/3 and 2/3. Each section has a frame. This is the most "correct" classic proportion.
Three vertical sections. Three frames of different heights: top narrow, middle wide, bottom medium. For tall doors from 2.2 m.
Decorative options with overlays
Frame + rosettes in the corners. A rectangular frame made of molding with on the walls, creating a complete classical composition. in each of the four corners. A professional, fully finished look.
Frame + overlay in the center. Molding frame and decorative insert in the center — a carved element, ornament, or monogram.
Accent vertical along the door axis. Several overlays along the vertical axis, without a frame. A non-standard solution for a designer interior.
Two frames + architraves in the same profile. The door leaf, architraves, and possibly baseboard in a single style key. A unified architectural system.
"Inverted" proportion. The lower frame section is smaller than the upper one — non-standard but fresh. Suitable for modern classics.
Asymmetric frame. One frame shifted to the top or bottom of the door leaf. Requires experience and a confident style solution.
Mistakes when decorating a door with moldings: learning from others' miscalculations
Molding is a tool that is easy to apply correctly. But just as easy — incorrectly. Here are typical mistakes.
Gluing moldings without preliminary marking. The most common and most noticeable mistake. By eye — it doesn't work. Pencil marking and a spirit level are mandatory.
Making a frame that is too small. A frame that occupies less than 50% of the door leaf area looks lost. The frame must be proportionate to the door.
Do not account for the handle. A molding passing directly through the handle or lock is an installation error. Marking always starts with marking the handle area.
Taking too wide a profile for a narrow door. On a 700 mm wide door, a 50 mm molding looks rough. Maintain the proportion: profile width to frame width.
Breaking symmetry. Different margins on the left and right, uneven frames are immediately noticeable. Symmetry is the main requirement for door decor.
Using decor of an incompatible style. A carved baroque molding in a minimalist Scandinavian apartment is a conflict. The style of the molding must match the style of the interior.
Not coordinating the door with the architraves and baseboard. If the architraves are profiled and the molding is flat — or vice versa — the system does not work as a whole. Wooden moldings should be chosen in a pair with the architraves.
Overloading a small door leaf with carving. A 700×2000 mm door with a large carved ornament in the center and two frames of wide moldings is too much. A small size requires delicacy.
Choosing overlays without understanding painting. If the overlay is made of dense wood with relief, and the door is painted with glossy paint, the difference in texture may become noticeable. With matte painting, this is leveled out.
Forget about Carved wooden decoration as part of a unified system. If there are carved elements on furniture or walls in the interior, the door decor should echo them in the nature of the ornament.
How to install moldings on a door: step-by-step instructions
This is a job that anyone who can work with a ruler and glue can handle. No special equipment needed — just accuracy.
What you'll need
-
Moldings of the required length with a 10–15% margin;
-
Miter box for cutting at a 45° angle (for corner joints);
-
Saw or jigsaw;
-
Spirit level and square;
-
Pencil and tape measure;
-
Liquid nails or wood construction adhesive;
-
Painter's tape for fixing while drying;
-
Wood putty (for filling joints);
-
Sandpaper P220;
-
Primer and paint.
Work sequence
-
Marking. Draw the outline of all frames with a pencil. Check symmetry horizontally and vertically. Check the indents from the edge and from the handle.
-
Cutting. Cut the moldings to size. Corner joints — at 45°, exactly according to the markings.
-
Fitting. Lay out all elements on the door without glue, check joints and proportions.
-
Fixing. Apply glue to the back side of the molding. Press against the panel, secure with masking tape until dry (24 hours).
-
Puttying joints. After drying, fill the joints with putty, sand with sandpaper.
-
Priming and painting. Prime the entire door in a single coat. Paint in 2–3 coats with intermediate drying.
With proper installation, the boundary between the molding and the panel disappears after painting — the door looks like a solid product.
Where to buy moldings and decor for interior doors
If you are looking for where buy moldings for interior doors, decorative overlays and other door decor — STAVROS offers a full range of wooden products for updating interior doors.
In the catalog:
-
Door moldings — profiled wooden slats for frames and panels;
-
Wooden moldings — full section of moldings, cornices and baseboards from solid wood;
-
Molding MLD-019 — popular model for door decor;
-
Decorative overlays for doors — wooden overlays for doors and furniture;
-
furniture rosettes — corner and central decorative elements;
-
Wooden casings — for framing doorways;
-
Wooden Skirting Boards — for a unified system with the door;
-
door portal — for formal doorway decoration;
-
Carved wooden decoration — for custom solutions;
-
Solid Wood Items — the entire catalog of wooden interior products.
STAVROS is a Russian manufacturer of solid wood products. Moldings, overlays, architraves, baseboards, rosettes, portals, carved decor — everything is produced at our own facility from select wood. STAVROS understands: a door is not just a passage from room to room. It is an architectural element that sets the tone for the space. And a properly chosen molding turns an ordinary door leaf into a designer interior detail — without replacement, without renovation, without compromises.
FAQ: answers to popular questions about moldings and door decor
Can moldings be glued to an interior door?
Yes. On a smooth, prepared surface Door moldings they are glued using assembly adhesive or liquid nails. It is important to pre-mark and secure the parts with tape until completely dry.
What is better for a door: moldings or decorative overlays?
polyurethane create a classic frame between the wall and ceiling. The profile height varies from minimalist 50 mm to ceremonial 200 mm — the choice depends on the room's height and style. In a room with 2.7 m ceilings, a 150 mm cornice will look excessive, 'pressing' from above. And in a hall with 3.5 m ceilings, a narrow 60 mm cornice will get lost, failing to visually mark the boundary. — for frames and geometry. Decorative Inserts — for ornamental accents. Together they create a complete door composition.
Can an old door be updated without replacement?
Yes. If the door leaf is in good condition, it can be repainted, have moldings added, the handle replaced, and be refreshed. Wooden casings. The result is a new door without dismantling or replacement.
Are wooden moldings suitable for a modern door?
Yes, if you choose a minimalist profile and a simple composition. In modern classic and neoclassical styles, they Wooden moldings look organic and expensive.
How to make a simple door look like a paneled one?
Assemble frames from moldings on the door leaf according to markings, paint everything in a single color. After painting, the door is visually indistinguishable from a real paneled one. Corner Outlets details will enhance the professional look.
How to connect the door to the interior through decor?
Use one profile language for door moldings, casings, and wooden baseboards. A single color and consistent profiles make the door part of a unified architectural solution.


