Article Contents:
- Wooden cornice PLT-006 100×15/16 mm: what is confirmed by the product card
- Wooden ceiling plinth and linear diffuser: what dimensions to take before purchasing
- Where to end PLT-006 near a ventilation grille
- Wooden cornice ends before the diffuser
- PLT-006 continues beyond the diffuser
- Cornice makes a decorative return to the wall
- Why you cannot cover the removable part of the linear diffuser with PLT-006
- How to check the service unit before the first cut PLT-006
- How to make an angle on a wooden ceiling plinth near a diffuser
- Inner angle before the diffuser
- Short section after the angle
- Why the actual room angle needs to be measured
- When a template is needed before cutting PLT-006
- How to join wooden ceiling plinth if ventilation divides the wall into two sections
- MDF 2600 mm
- Beech or oak 2400 mm
- Why the joint location cannot be chosen after cutting
- PLT-006 made of MDF, beech, or oak: which end is easier to finish near the diffuser
- Cornice PLT-006 made of MDF
- Wooden cornice PLT-006 made of beech
- Ceiling PLT-006 made of oak
- PLT-006 2400 or 2600 mm long: why ventilation changes the number of slats
- MDF 2600 mm
- Beech/oak 2400 mm
- Practical room calculation: does the diffuser really reduce the order or just change the leftovers
- Why the shortest section near the diffuser cannot be automatically cut from any leftover
- Wooden ceiling plinth 100 mm and a narrow wall section between the corner and ventilation
- When 380 mm makes sense
- When a short fragment is better not to install
- How to finish the straight end of PLT-006 next to a metal diffuser
- Decorative return PLT-006: how much extra length it requires
- Ceiling ventilation divides one wall into three segments: how to avoid too many joints
- When it is better to resolve the ventilation unit before purchasing all ceiling moldings
- Scenario 1. The diffuser starts 380 mm after the internal corner
- Scenario 2. The diffuser occupies almost the entire wall
- Scenario 3. The diffuser is installed in the center of the wall
- Scenario 4. The diffuser is shifted toward one corner
- Scenario 5. Two diffusers on one wall
- Scenario 6. The diffuser is located in front of a ceiling-height cabinet
- Scenario 7. The diffuser is built into a ceiling recess
- Scenario 8. The diffuser is painted to match the ceiling color, PLT-006 is natural oak
- Scenario 9. The diffuser is black, PLT-006 is white
- Scenario 10. After ventilation installation, only a 90 mm free section remains
- How to compare the cost of PLT-006 made of MDF, beech, and oak on the same cutting layout
- Example: 6 MDF versus 7 oak
- Is it necessary to use moisture-resistant MDF near a ventilation diffuser
- Painting MDF PLT-006 near a ventilation grille
- Natural beech and oak near metal ventilation
- Why PLT-006 should not interfere with air flow adjustment
- Cleaning the diffuser and dust on the wooden cornice
- If the diffuser is replaced with a different model
- What to preserve after installing PLT-006 near ventilation
- Supply, exhaust, and special ventilation systems: why the diffuser type cannot be ignored
- If this is a supply diffuser
- If this is an exhaust grille
- If the element belongs to a fire or smoke control system
- Mistake 1: Calculating the entire ceiling perimeter without a ventilation gap
- Mistake 2: Blocking the removable part of the diffuser
- Mistake 3: Assigning a universal gap of 20 or 30 mm
- Mistake 4: Buying MDF and oak using the same calculation
- Error 5. Not accounting for the difference in thickness between 16 and 15 mm
- Error 6. Considering a short leftover automatically suitable
- Error 7. Making a straight end without a trial finish
- Error 8. Placing the longitudinal joint right next to ventilation
- Error 9. Modifying PLT-006 by milling for a diffuser without a drawing
- Error 10. Not checking the adjustment elements of ventilation
- When to buy a regular wooden baseboard, and when specifically a ceiling PLT-006
- Mounting materials: why the ventilation unit is determined before the adhesive
- If the ceiling or wall is uneven: why the diffuser cannot be used as the only reference
- If the linear diffuser is not parallel to the wall
- If the diffuser is located 10–20 mm from the wall
- If the diffuser is located 80–100 mm from the wall
- If the grille passes through the internal corner of the room
- If the linear diffuser is located near a ceiling cabinet or bookshelf
- Control example: wall 5200 mm, diffuser 1200 mm centered
- Control example: diffuser starts 380 mm after the corner
- Control example: two diffusers and three wooden sections
- How to receive PLT-006 before installation near a diffuser
- How to mark strips for a ceiling map
- When a reserve PLT-006 strip is justified
- When a reserve strip is redundant
- Checklist before payment
- Can PLT-006 be used as a ceiling cornice?
- What is the size of PLT-006?
- Can PLT-006 be installed flush against a linear diffuser?
- How to determine the distance to a ventilation grille?
- Can the edge of a removable grille be overlapped by a cornice?
- How to finish the end of PLT-006?
- How to make a corner on a wooden ceiling plinth near ventilation?
- How to calculate the number of MDF planks 2600 mm?
- How to calculate oak or beech planks 2400 mm?
- Can a leftover piece be used near a diffuser?
- When is it better not to install a short section of PLT-006?
- Do I need to buy moisture-resistant MDF because of ventilation?
- What to do if the diffuser is installed crookedly?
- Should I keep a spare plank?
- When is it better to choose a different ceiling profile?
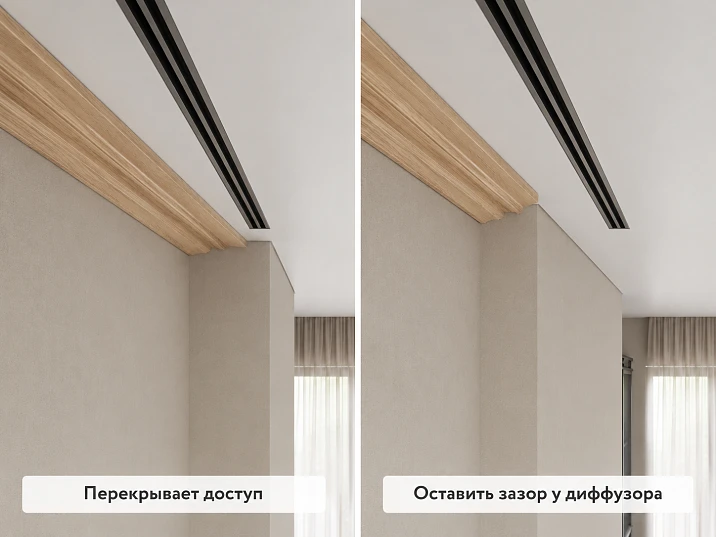
A linear ventilation diffuser is already included in the project or installed close to the ceiling perimeter, and PLT‑006 has been chosen for the room. On straight wall sections, the task is simple: the profile runs continuously. The problem appears where the decorative line approaches the removable ventilation grille. Can the cornice be continued behind it? Where should the end be made? How to keep access to the fasteners and adjustments? And how many slats to buy if the diffuser breaks the usual perimeter calculation?
The correct answer starts not with the length of PLT‑006, but with the service geometry of the specific diffuser. The ceiling profile cannot be extended onto the removable part, cover the fasteners, or reduce the working opening just for the sake of a continuous decorative line. First, check the ventilation product's datasheet, the method of removing the face part, the position of the fasteners, and the actual offset from the wall. Then choose one of three scenarios: end PLT‑006 before the diffuser, continue the profile behind it if compatibility is confirmed, or make a neat decorative return to the wall.
This also changes the purchase. Ventilation turns one long ceiling section into two or three independent segments. A 600 mm remainder after a 4400 mm wall may perfectly cover the wall section near the grille—or may turn out to be useless due to corner cuts, profile direction, or the need for a neat end. Therefore, PLT‑006 should be calculated by whole slats of 2400/2600 mm, not by the formula "perimeter ÷ length".
If the profile is still being selected, you can first Buy wooden ceiling baseboard after checking the ventilation unit. But in this article, the task is already specific: to understand how to use exactly PLT‑006 near a linear diffuser and place an order without extra slats and without losing access to ventilation.
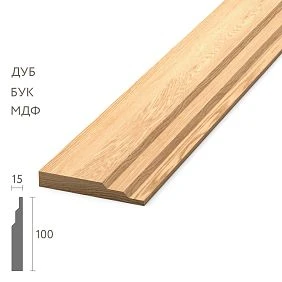
Wooden cornice PLT‑006 100×15/16 mm: what is confirmed by the card
The current card calls PLT‑006 "wooden plinth / trim / cornice". That is, ceiling use is not invented specifically for this article: it is part of the profile's official purpose. For calculations near ventilation, three parameters are important—size A=100 mm, thickness C=15/16 mm, and standard length L=2400/2600 mm.
| PLT‑006 version | Size | Price at the time of check | What matters about the diffuser |
|---|---|---|---|
| Moisture-resistant MDF | 100 × 16 × 2600 mm | 2 110 ₽ | Length 2600 mm, paintable end |
| MDF | 100 × 16 × 2600 mm | 1 660 ₽ | Same geometry 100×16 |
| Beech | 100 × 15 × 2400 mm | 3 220 ₽ | Natural visible end, length 2400 mm |
| Oak | 100 × 15 × 2400 mm | 4 780 ₽ | Texture and end are especially noticeable |
Price and stock change, so in the article they are used as data at the time of checking, and before payment they need to be verified again. Much more important is that MDF and wood versions have different lengths and thicknesses. The layout calculated for 2600 mm does not automatically transfer to 2400 mm: joint locations, leftovers, and sometimes the number of purchased planks will change.
After approving the node, you can open the card wooden cornice PLT-006 and select a specific version. Mixing MDF and oak in one line just for a convenient leftover is not recommended: they differ in thickness, material, and finish.




Wooden ceiling plinth and linear diffuser: what dimensions to take before purchasing
You need to calculate not the ceiling area or even the total perimeter. A linear diffuser creates a local installation unit where specific coordinates matter.
| Size | What to measure | What for |
|---|---|---|
| Wall length | From corner to corner | Base ceiling section |
| Diffuser start | Distance from nearest corner | Length of first PLT-006 segment |
| Diffuser end | Coordinate of second edge | Length of second segment |
| Outer grille width | By removable part | Do not block the service |
| Mounting frame | If it protrudes beyond the front grille | Understand the real boundary |
| Distance to the wall | From the edge of the diffuser to the vertical plane | Check the physical space for PLT-006 |
| Removal trajectory | Down / sideways / with snap-off | Leave service access |
| Internal corners | Actual, not just nominal 90° | Cut and reserve |
| External corners | If there are protrusions | Additional consumption |
| Visible ends | Left and right of the diffuser | Choose the ending method |
It is useful to put dimensions on the wall layout. For example: corner — 380 mm of clean section — start of diffuser — 1200 mm of diffuser — 1820 mm of clean section — second corner. Such a drawing immediately shows that the ceiling line consists of two decorative segments, not one wall 3400 mm long.
If the installer says “we’ll leave a small gap and trim on site,” ask them to first show which part this gap is measured from. A linear diffuser’s face grille, mounting frame, and inner chamber may have different sizes. For PLT‑006, the boundary that must remain free for removal and maintenance is the important one.
Our factory also produces:



Where to end PLT‑006 next to a ventilation grille
The node has three fundamentally different solutions. You need to choose between them before cutting, because each option consumes material differently and forms the visible end face.
Get Consultation
The wooden cornice ends before the diffuser
The most straightforward and maintainable option. PLT-006 runs from the corner to the calculated point and ends without extending onto the removable part. After the ventilation grille, a new segment begins.
Advantages:
- diffuser service remains independent;
- the position of each end face is clear;
- no need to modify the ventilation product;
- the cutting layout is easy to verify on the plan.
There is one drawback, but it is important: two end faces become part of the interior. On painted MDF, they are easier to blend with the main color. On oak and beech, the end grain is more noticeable, so its finish needs to be approved in advance.
PLT-006 continues beyond the diffuser
This option is only possible if the ventilation design truly leaves a free wall line, and the profile does not interfere with removing the grille, access to fasteners, adjustment elements, and cleaning.
The words "diffuser lower" or "cornice higher" are not enough. You need to physically remove the front part and check whether the trajectory remains clear with the PLT‑006 100×15/16 mm template. If during disassembly the grille needs to be first shifted toward the wall or lifted at an angle, the decorative profile may interfere even without direct overlap.
The cornice makes a decorative return to the wall
If a straight cross-cut looks too rough, a short element can return the profile pattern to the wall and form a finished end. Such a joint requires more material and precise trimming, but is especially useful for a visible oak or beech cornice.
| Scheme | Appearance | Ventilation service | Cutout | Risk |
|---|---|---|---|---|
| Finish before the grille | Two visible ends | Usually the simplest | Clear segments | Need to finish the ends nicely |
| Continue beyond the diffuser | Continuous line | Only after passport verification | It might be simpler by length | Service zone overlap |
| Make a return | Most finished end | Preserved at the correct point | Additional short parts | Cutting error and extra waste |
Service access: what ventilation should allow after PLT-006 installation
Why the removable part of the linear diffuser PLT-006 cannot be closed
The front part of the linear diffuser can be removed for cleaning, adjustment, or access to fasteners. Even if the ventilation operates stably today, the grille must remain serviceable throughout the entire service life of the system.
PLT-006 must not:
- cover the edge of the removable part;
- cover screws, latches, and spring clips;
- impede the movement of the grille during removal;
- cover the flow regulator or damper;
- deny access to the internal chamber if it is intended through the front part;
- create an adhesive or paint bridge between the cornice and the grille.
The article must not assign a universal offset of 20, 30, or 50 mm. Different diffusers have different frames and removal procedures. For one product, it is sufficient to leave the edge completely open; for another, additional space is required to tilt or slide the grille. Priority is given to the specific product's instructions and physical testing.
How to check the service unit before the first cut of PLT-006
The most useful check is done on the finished ventilation without the decorative profile.
- Take a photo of the diffuser in its installed state.
- Remove the front grille as intended by the manufacturer.
- Mark on the wall the maximum trajectory of its movement.
- Mark all screws, clips, and adjustment elements.
- Apply a cardboard or wooden template with the PLT-006 dimension.
- Repeat the grille removal.
- If movement is limited, shift the end point of the cornice.
For the template, the actual thickness of the selected version matters: 16 mm for MDF and 15 mm for beech/oak. The difference of just 1 mm rarely resolves a major conflict, but in a tight assembly it still cannot be ignored.
Corners and joints of the wooden ceiling plinth near the ventilation
How to make an angle on a wooden ceiling plinth near a diffuser
If the ventilation grille is located close to the corner of the room, the assembly becomes more complex: first you need to assemble the internal or external corner PLT‑006, and a few dozen centimeters later finish the profile at the diffuser. An error in the corner cut reduces the useful length and can "eat up" the entire allowance of the short section.
Internal corner before the diffuser
Suppose there are 380 mm left from the internal corner to the start of the removable part of the diffuser. You cannot immediately cut a workpiece 380 mm long. First, check the actual wall angle, make the corner cut, test-fit the piece, and only then mark the point of the end cut at the ventilation.
If the room angle is not exactly 90°, calculation by nominal value creates a gap. On a long ceiling cornice, such a defect can be partially distributed, but on a short 380-millimeter segment it becomes especially noticeable: the entire piece is between two rigid boundaries — the corner and the diffuser.
Short section after the corner
The shorter the segment, the more important it is to know in advance how its second end will be finished. A straight end requires one length, a decorative return requires additional material. Therefore, in the cutting map, you should write not "380 mm" but, for example, "left section 380 mm + return".
Why the actual room angle needs to be measured
Construction geometry may differ from the nominal value. Even a slight deviation affects the joint line of two profiled pieces. For visible oak or beech, it is better to first make a template on a technological offcut than to fix the joint on the finished plank.
When a template is needed before cutting PLT‑006
The template is especially useful if the section between the corner and the ventilation is shorter than 500–600 mm, the corner is complex, there is a ceiling niche nearby, or a decorative return is planned. One test cut on a scrap piece is cheaper than losing an entire plank of 2400 or 2600 mm.
How to join wooden ceiling molding when ventilation divides the wall into two sections
Here we are not talking about a corner joint, but about a segment map. A linear diffuser can divide one wall, for example, into 1800 mm on the left, 1200 mm of ventilation zone, and 1600 mm on the right. The sum of the wooden sections is 3400 mm. But it does not follow from this that "3400 mm PLT‑006" is enough: you need to understand which whole planks will produce both segments and what remnants will remain.
MDF 2600 mm
The layout might look like this:
- plank #1: 1800 mm for the left section, remainder about 800 mm;
- plank #2: 1600 mm for the right section, remainder about 1000 mm.
Mathematically, two planks are required. But if the room has other short ceiling sections of 700–900 mm, both remnants can be used further. Then the ventilation gap even helps optimize cutting.
Beech or oak 2400 mm
For the same segments:
- plank #1: 1800 mm, remainder about 600 mm;
- plank #2: 1600 mm, remainder about 800 mm.
The quantity is still the same — two planks, but the useful remainders are shorter. If the next part has a length of 950 mm, the MDF remainder of 1000 mm may fit, but the oak 800 mm — no longer. Therefore, the final specification changes not only due to the material price, but also due to the standard length.
Why the joint location cannot be chosen after cutting
On long walls, it is advisable to determine in advance where the connection will be. A joint right next to the diffuser can visually overload the node: the cornice end, the ventilation frame, and another connection will be nearby. It is better, if possible, to move the longitudinal joint to a calmer area.
Material and end node PLT‑006 near the metal grille
PLT‑006 made of MDF, beech, or oak: which end is easier to finish near the diffuser
Material changes not only the price and plank length, but also the appearance of the open end. At a linear diffuser, the end often remains fully visible, so it cannot be considered a secondary technical edge.
Cornice PLT‑006 made of MDF
MDF is convenient for covering painting. The straight end can be prepared and painted in the same system as the front part. This is especially useful if the diffuser is white, black, or painted in the ceiling color, and the cornice itself should visually blend with the wall.
At the same time, an untreated end cannot be considered finished. It absorbs the coating differently and requires its own preparation. If the end is 20–30 cm from the main passage, the texture difference will be noticeable.
Wooden cornice PLT-006 made of beech
On beech, the end grain opens up. When tinting, it may become darker than the face surface. Therefore, it is better to check the finish option on a small offcut before processing the entire batch.
Ceiling PLT-006 made of oak
Oak is especially expressive in texture. A straight end next to a metal diffuser can become a beautiful detail if it is carefully finished, or look like a random cut if the finish is not thought through. With a transparent finish, it is worth deciding in advance whether a decorative return is needed.
If natural wood is important in the project, you can compare the entire range and buy a wooden baseboard only after it has been confirmed that a specific profile fits the service unit.
Cutting 2400/2600 mm: how ventilation changes the quantity and cost
PLT-006 with a length of 2400 or 2600 mm: why ventilation changes the number of slats
A regular ceiling contour easily tempts you to calculate by perimeter. The diffuser breaks this logic because it introduces independent short segments. The correct formula looks like this:
clean ceiling sections + returns + corner allowances + technological reserve → map of individual parts → layout across whole slats.
Consider a wall 5200 mm long. A diffuser 1200 mm wide is installed in the center. 2000 mm remains on the left and right.
MDF 2600 mm
Two segments of 2000 mm require two planks. About 600 mm remains from each. Net material:
2 × 2600 = 5200 mm.
4000 mm used, remainder — about 1200 mm total.
Beech/oak 2400 mm
Also need two planks:
2 × 2400 = 4800 mm.
Same 4000 mm used, remainder — about 800 mm total.
On this specific wall, the number of planks is the same. But if there is a short section of 550 mm nearby, the MDF remainder of 600 mm can cover it, while the wood remainder of 400 mm from one plank cannot. Therefore, the decision for the entire room may differ.
Practical room calculation: does the diffuser actually reduce the order or only change remainders
Let the room have four ceiling sections after subtracting ventilation zones:
- wall A — 4300 mm;
- wall B — 3600 mm;
- wall C — two segments 1700 and 1500 mm due to the diffuser;
- wall D — 2800 mm.
Net total length of the wooden cornice:
4300 + 3600 + 1700 + 1500 + 2800 = 13,900 mm.
Simple division for MDF:
13,900 ÷ 2600 ≈ 5.35, so mathematically at least six planks.
For 2400 mm:
13,900 ÷ 2400 ≈ 5.79, also at least six.
But now we check the actual pieces. Wall A requires 2600 + 1700. Wall B — 2600 + 1000. Segments C — 1700 and 1500. Wall D — 2600 + 200. Remainders from long pieces can be redistributed. Only such a map shows whether six planks will suffice or a seventh will be needed due to an unfortunate combination of lengths.
Therefore buy PLT-006 is only worth it after such a layout, not after rounding the total footage.
Why the shortest section near the diffuser cannot be automatically cut from any leftover
The phrase "a 380 mm piece will definitely be found" seems logical, but it often doesn't work on site. There are several reasons.
- the leftover already has an angled cut and its usable length is less than the nominal one;
- the opposite side of the profile is needed for a neat return;
- the length is sufficient for a straight end, but insufficient for a return;
- the joint from a short leftover falls in too visible a place;
- an oak or beech fragment has a sharply different grain pattern;
- after final trimming, too little machining allowance remains.
Therefore, leftovers should be marked after each cut: material, actual length, condition of both ends, and intended use. Then the short section near the diffuser is assigned from a real suitable leftover, not from an abstract "pile of scraps".
Short sections, straight ends, and decorative returns
Wooden ceiling plinth 100 mm and a narrow wall section between the corner and ventilation
Let the linear diffuser start 380 mm after the inner corner. PLT-006 has dimension A=100 mm and forms a noticeable profile. A 380 mm long piece will look like an independent architectural element between the corner and ventilation.
Before purchasing, you need to answer four questions:
- Does the profile itself fit without overlapping the removable grille?
- Is a straight end or a return needed?
- Can the piece be made from the leftover after another wall?
- Doesn't the short 380-millimeter fragment look visually random?
When 380 mm makes sense
If the corner and the diffuser are clear boundaries, and the cornice continues along the adjacent wall, the short piece can look natural. Especially if the end is neatly finished.
When it's better not to install a short fragment
If after the necessary service gaps 50–100 mm of decorative profile remains, such a piece may look awkward and complicate maintenance. In this case, it is more reasonable to end PLT‑006 at the previous architectural boundary or choose a different design node.
How to finish the straight end of PLT‑006 next to a metal diffuser
The end should look like an intentional termination, not like a leftover after cutting. For MDF, an even edge preparation and uniform painting are important. For oak/beech, finish the end grain wood.
Also check the visual distance between the wooden end and the metal frame. Even if the technical gap is minimal and acceptable, the two parts may look "stuck together." Sometimes a slightly larger visual clearance makes the joint cleaner—but its size is chosen based on a mockup, not a universal number.
Decorative return PLT‑006: how much additional length it requires
The return is not a free operation. The short finishing piece is cut from the same material and requires its own cut. If the diffuser has two ends, there are also two returns.
The cutting plan must account for:
- the useful length of the main part up to the end line;
- the length of the return itself according to the actual profile;
- an allowance for two precise cuts;
- ability to get a refund from the same balance;
- finishing match.
If the return is particularly small, it is easier to lose or damage it during processing. It is useful to make a spare element before final finishing.
Ceiling ventilation divides one wall into three segments: how to avoid too many joints
Sometimes two diffusers are placed in one line, or one long element with a gap. For example:
corner → 900 mm PLT‑006 → 1000 mm diffuser → 700 mm PLT‑006 → 1000 mm diffuser → 1200 mm PLT‑006 → corner.
Here, three wooden segments are already defined by the architecture. There is no need to additionally split each of them with longitudinal joints if you can get solid pieces from suitable remnants. The short middle section of 700 mm is especially convenient to assign after cutting long walls.
Such a node should be drawn in advance: a large number of alternating metal and wooden elements may appear visually overloaded. If diffusers occupy a significant part of the ceiling line, a simpler cornice sometimes looks better.
When it is better not to install the wooden cornice PLT‑006 near a diffuser
PLT‑006 is not a mandatory element of any ceiling line. It should be abandoned in a specific section if:
- the profile overlaps the removable grille;
- for dismantling the ventilation, space is required that the cornice occupies;
- the adjustment mechanism needs to be covered;
- after the service gap, a visually meaningless offcut of 50–100 mm remains;
- the profile has to be deeply milled or modified;
- the assembly requires constant removal of the cornice for cleaning;
- the thickness of 15/16 mm conflicts with the mounting frame;
- another cornice model provides a significantly cleaner junction.
In this case, it is better to compare wooden cornices and skirting boards and choose a profile that does not require a compromise with the engineering system.
When is it better to decide on the ventilation unit before purchasing the entire ceiling molding run
If a room has multiple diffusers, the cornice passes through niches, built-in wardrobes, and complex corners, PLT‑006 cannot be purchased as a "single perimeter" before checking all gaps. First, a map of engineering obstacles is compiled, then calculated Wooden trim based on actual segments.
This allows distributing leftovers between the ceiling, doors, and other areas if the project truly uses one profile. Related article PLT-006 as baseboard, trim, and cornice details the overall kit logic; here we do not repeat it but solve specifically the ventilation unit.
Practical scenarios for PLT‑006 near a linear diffuser
Scenario 1. Diffuser starts 380 mm after the inner corner
This is a classic short section. First, assemble the corner, then try the 380-mm piece and decide how to finish it at the grille. If a straight end is chosen, the piece can come from a leftover after a long wall. If a return is needed, extra length is left. Buying a separate full plank just for 380 mm is usually not rational—unless, of course, the room map shows no suitable leftover.
Scenario 2. Diffuser occupies almost the entire wall
For example, a wall is 4200 mm, and a linear grille is 3200 mm. That leaves 500 mm on each side. PLT‑006 turns into two short pieces rather than one 4.2-meter line. For MDF, both pieces can theoretically be obtained from a single offcut longer than a meter, if the corner cuts allow it. That is, the diffuser itself can reduce the number of purchased slats more than it seems based on the overall perimeter.
Scenario 3. Diffuser installed in the center of the wall
If the sections on the left and right are equal, the two symmetrical ends are especially noticeable. Here it is important that their finish and distance to the grille look the same. On oak, it is worth selecting pieces with a similar grain pattern, otherwise one side may look visually different.
Scenario 4. Diffuser offset toward one corner
250 mm remains on the left, 1900 mm on the right. The short left piece may be so small that it is visually better to remove it altogether. The right section remains a full cornice. Such an asymmetric solution is fine if it follows the architecture rather than forcibly trying to make both ends identical.
Scenario 5. Two diffusers on one wall
The three wooden gaps should be considered as separate pieces. Often the middle section is short and is ideally made from an offcut. But if all three segments have returns, the number of cuts increases sharply, and a small reserve becomes more useful than trying to use every centimeter.
Scenario 6. Diffuser located in front of a floor-to-ceiling cabinet
If part of the PLT‑006 is still hidden by furniture, there is no point in running the cornice into an invisible area just for the sake of a formal perimeter. You can end it at the side of the cabinet and separately finish the section near the ventilation. This reduces material and the number of joints.
Scenario 7. Diffuser built into a ceiling niche
If the grille is located inside a niche, and PLT-006 runs along the outer plane of the wall, the conflict may disappear completely. But it is necessary to check whether the front part can be removed downward and whether it hits the cornice. The niche itself does not guarantee service compatibility.
Scenario 8. The diffuser is painted to match the ceiling color, PLT-006 is natural oak
The metal grille visually dissolves, and the wooden ends become the main points of interruption. Here, a decorative return or a very neat straight end is especially useful.
Scenario 9. The diffuser is black, PLT-006 is white
The contrast makes the joint graphic. Even a small inaccurate gap is immediately noticeable. It is especially important to maintain the same distance on the left and right if the composition is symmetrical.
Scenario 10. After ventilation installation, a free section of only 90 mm remains
Installing a 100-millimeter profile by scale on a part 90 mm long is usually pointless. Such an insert looks like a cut-off piece and creates another end. It is more reasonable to end the cornice at the previous boundary if the design allows it.
Material, price, and finish after approval of the cutting layout
How to compare the cost of PLT-006 made of MDF, beech, and oak on the same cutting layout
Suppose that after all ventilation gaps, the map shows the need for six full slats. At current prices, only the material will cost:
| Execution | Price of one plank | 6 planks |
|---|---|---|
| MDF | 1 660 ₽ | 9 960 ₽ |
| Moisture-resistant MDF | 2 110 ₽ | 12 660 ₽ |
| Beech | 3 220 ₽ | 19 320 ₽ |
| Oak | 4 780 ₽ | 28 680 ₽ |
This does not mean that MDF is always more advantageous: its length is 2600 mm, while beech/oak is 2400 mm. For a real project, the quantity may differ. Sometimes six MDF planks cover a room, while seven wooden ones are required. Therefore, the cost should be compared after a separate cutting map for each option.
Example: 6 MDF vs 7 oak
MDF:
6 × 1660 = 9960 ₽.
Oak:
7 × 4780 = 33 460 ₽.
The difference now consists not only of the material price but also of the standard length. If natural texture is an important part of the project, it may justify the budget. But counting oak "for the same footage" without a new cutting plan is not possible.
Do I need to use moisture-resistant MDF near a ventilation diffuser
The mere presence of ventilation does not make the area humid. Moisture-resistant MDF should be chosen based on the actual conditions of the room: high humidity, risk of condensation, operational features. A linear diffuser in an ordinary dry living room is not an automatic reason to overpay for a moisture-resistant version.
If cooled air is supplied through the system and the designer warns about possible condensation on adjacent surfaces, the material issue should be resolved together with the engineering project. The article cannot promise that moisture-resistant MDF will "solve condensation": the cause of condensation relates to the temperature and humidity regime, not to a single cornice.
Painting MDF PLT‑006 near a ventilation grille
MDF is convenient for a monochrome ceiling solution. If the diffuser is painted white or the ceiling color, PLT‑006 can be made close in tone. But the end edge and the gap between materials remain visible under side lighting.
Before installation, it is better to:
- make a finish cut;
- prepare the open end grain;
- perform a test paint;
- compare with the actual grille;
- only then send the remaining parts for finishing.
Do not paint the entire batch before the end grain assembly is approved. If after a test fit it turns out that a decorative return is needed, you will have to rework fresh cuts.
Natural beech and oak next to metal ventilation
The combination of wood and metal can be a strong interior detail. But it also makes mistakes more noticeable: the metal frame has strict geometry, while the wood end grain has a lively texture.
For natural material, it is useful to check:
- how the fibers end at the end grain;
- whether the end grain part becomes too dark after oil/stain;
- whether the tone of adjacent segments matches;
- whether a return is needed;
- how the cornice looks with ventilation backlighting or ceiling lights on.
Operation of ventilation after installing a wooden cornice
Why PLT-006 should not interfere with air flow adjustment
Some linear diffusers have internal adjusting elements. Access to them may be through a removable front panel. Even if the cornice itself does not cover the openings, it may obstruct a hand, a tool, or the removal of an internal part.
Therefore, the service check should include not only "the grille can be removed" but also "after removal, the intended maintenance can be performed." This is an important distinction. A decorative profile should not turn a simple adjustment into dismantling the ceiling finish.
Cleaning the diffuser and dust on the wooden cornice
The ceiling ventilation grille periodically requires cleaning. If PLT-006 is placed flush, dust may accumulate in the narrow seam between materials. A too-tight joint is inconvenient for cleaning, while a too-wide gap may look random.
Therefore, when creating a mockup, it is useful to check not only disassembly but also access to the material boundary with a regular cloth or brush. This is an operational detail that becomes more noticeable after a year than an ideal photo of a new interior.
If the diffuser is replaced with a different model
Engineering equipment sometimes changes before decorative trim. A new grille may be wider, narrower, or have a different frame. A too-precise PLT-006 end, tied to the current housing, may no longer fit.
For a long-term project, two solutions are useful:
- tie the cornice end to an architectural line, if possible;
- keep a large PLT-006 remnant from the same batch for future rework.
For oak and beech, the reserve is especially valuable due to the natural grain. For painted MDF, it is more important to preserve the profile and finish data.
What to keep after installing PLT-006 near ventilation
Take a photo of the assembly with the grille removed before final cornice installation. It should show the fasteners, service path, and the PLT-006 end point. Save the diffuser model name, gap dimensions, and a small profile offcut.
In a few years, this will allow a service specialist to understand how to disassemble the assembly without damaging the cornice. Without such documentation, the next technician may mistake the decorative return for a non-removable part of the wall and damage it during maintenance.
Type of ventilation system and decorative assembly constraints
Supply, exhaust, and special ventilation systems: why the diffuser type cannot be ignored
The word "linear diffuser" is often used in everyday conversation for different ceiling elements. One unit supplies air, another removes it, and a third is part of a more complex system. This is important for PLT‑006 not because wood "works differently with supply and exhaust," but because requirements for access, adjustment, and maintenance may differ.
If this is a supply diffuser
Its working geometry cannot be altered with a decorative profile. PLT‑006 must be outside the face opening and not interfere with adjustment elements. If the flow is directed along the ceiling or wall, the designer additionally checks whether the cornice creates an unwanted obstruction. Without an aerodynamic calculation, one cannot promise that the profile "has no effect" just because it does not directly block the openings.
If this is an exhaust grille
The main practical issues become free air passage and cleaning. The cornice must not cover the edge that needs access when removing the grille. Dust is especially noticeable in the narrow seam between the wooden part and the metal frame, so maintainability should be checked on a mock-up.
If the element belongs to a fire protection or smoke control system
You cannot independently change the geometry, cover the edge with a decorative profile, or move the service boundary. Such products operate as part of a special engineering system and must maintain the design accessibility and certified configuration. In this scenario, the decision on PLT‑006 is coordinated with the designer and the responsible specialist, not made based on aesthetics.
That is why it is useful to record in the specification not just "ventilation grille," but the exact model and function. This allows the finisher to understand where a decorative end is acceptable and where any changes require separate engineering approval.
Mistakes when ordering PLT‑006 near a linear diffuser
Error 1. Calculating the entire ceiling perimeter without a ventilation gap
Extra meters are purchased or joints are distributed incorrectly. First, separate clean segments are allocated.
Error 2. Covering the removable part of the diffuser
Maintenance requires dismantling the cornice. Solution — check the grille removal before marking PLT‑006.
Error 3. Assigning a universal gap of 20 or 30 mm
Different models have different trajectories. The offset is taken from the datasheet and actual verification.
Error 4. Buying MDF and oak using the same calculation
Lengths of 2600 and 2400 mm change the cutting layout and the number of planks.
Error 5. Not accounting for the thickness difference of 16 and 15 mm
In a tight joint, a step appears or the position of the end changes.
Error 6. Considering a short offcut automatically suitable
After an angled cut, it may turn out shorter or have an incorrect end face.
Error 7. Making a straight end face without a test finish
MDF absorbs paint differently, and the wood end face darkens when tinting.
Error 8. Placing the longitudinal joint right next to ventilation
The assembly becomes visually overloaded. It is better to shift the joint.
Error 9. Modifying PLT-006 by milling for a diffuser without a drawing
The profile turns into a non-standard part. It is better to change the assembly or choose another cornice.
Error 10. Not checking the ventilation adjustment elements
The grille is removable, but the damper is o
What to prepare before ordering a wooden cornice PLT-006
For the final order, not only the length is needed. Prepare:
- item number PLT-006;
- material — MDF, moisture-resistant MDF, beech or oak;
- the exact model of the linear diffuser;
- the passport or installation diagram of the ventilation;
- photos of the grille in installed and removed states;
- the length of each ceiling segment;
- internal and external corners;
- the coordinates of the start and end of each diffuser;
- a diagram of visible ends;
- the solution: straight end or return;
- cutting map 2400/2600 mm;
- selected finish;
- the size and purpose of the reserve remainder.
After such preparation, you can order wooden cornice PLT-006 without calculating "by eye".
PLT-006 in the overall molding system: where the ceiling unit ends
When to buy a regular wooden baseboard, and when specifically a ceiling one PLT-006
PLT-006 is universal according to the card, but this does not mean that one profile is automatically the best for every area. If the task relates only to the floor, you can separately to buy wooden baseboard according to floor requirements. If the task is a ceiling line near ventilation, the solution is determined specifically by the cornice unit, corners, and diffuser service.
This is how intents are divided: floor baseboard is chosen by floor and furniture, ceiling cornice — by ceiling architecture and engineering systems.
Installation, base geometry, and boundary distances
Installation materials: why the ventilation unit is determined before the adhesive
The method of fixing PLT-006 depends on the profile material, base, and chosen finish. But near the diffuser there is an additional condition: decorative installation must not connect the cornice to the removable ventilation part.
Before choosing adhesive or mechanical fixation, make sure that:
- the adhesive will not get onto the metal frame of the diffuser;
- the cornice can be locally dismantled without damaging the ventilation, if this is provided for by the project;
- the wall base is strong enough;
- the end area does not require constant technical access;
- the profile finish is compatible with the selected mounting compound.
Do not fill the technological gap between the cornice and the grille with mounting compound for the sake of an "ideal line." Such a bridge can glue together elements that should be serviced separately.
If the ceiling or wall is uneven: why the diffuser cannot be used as the only reference point
A linear ventilation grille usually has strict straight geometry. The wall and ceiling may have a slight deviation. If you guide the PLT‑006 strictly parallel to an uneven wall, the distance to the diffuser changes. If you rely only on the grille, the gap to the ceiling or wall may become uneven.
Before cutting, it is useful to check with a laser:
- ceiling line;
- cornice installation line;
- diffuser axis;
- left and right boundaries of the grille;
- actual wall angle.
If the deviation is noticeable, it needs to be distributed in the project. You cannot cut one end of PLT‑006 with a wedge just to visually "pull" the cornice toward a crookedly installed grille without checking the rest of the wall.
If the linear diffuser is not parallel to the wall
Such a defect is especially noticeable next to a straight wooden line. With a slight deviation, two elements that seem parallel at first glance begin to diverge. The longer the grille, the more the eye notices the difference.
Before installation, the source of the problem must be identified: the diffuser is installed with a deviation, the wall is not parallel, or both elements have different bases. If the ventilation can still be corrected without disrupting the system, it is better to do this before installing PLT‑006. Fitting the cornice to the erroneous geometry of an engineering element is a bad strategy.
If the diffuser is located 10–20 mm from the wall
This is a boundary node for a profile with a thickness of 15/16 mm. But a simple comparison of "20 mm is larger than 16 mm, so it fits" is not enough. The cross-sectional shape of PLT-006, the adhesive layer, the actual position of the mounting frame, and the removal trajectory of the grille must all be taken into account.
With such a small distance, a physical trial fit with a scrap piece of the selected material is mandatory. If the grille can only be removed after lateral shifting, even a few free millimeters may prove useless.
If the diffuser is located 80–100 mm from the wall
There is more free space, but another question arises: how will the gap between the wooden cornice and the ventilation look. If both elements run parallel along a long wall, the narrow ceiling strip between them becomes an independent part of the composition.
Here, it is useful to create a frontal visualization: cornice, gap, diffuser, ceiling. Sometimes a technically free zone looks visually too dense, and it is better to choose a more compact profile.
If the grille passes through an interior corner of the room
Linear systems sometimes continue along two walls. Then PLT-006 meets not only the diffuser but also its corner geometry. A standard cornice corner template cannot be used until the ventilation corner construction and the removal of each part are understood.
It is better to split the task into two independent nodes: the left section up to the ventilation and the right section after it. If the diffuser itself forms a corner accent, the wooden cornice can terminate on both sides and not pass through the corner at all.
If the linear diffuser is located near a ceiling cabinet or bookshelf
Three boundaries converge at one point: cornice, ventilation, and furniture. Do not try to extend PLT-006 behind the cabinet if the section is not visible and complicates cutting. It is better to determine what is the main architectural line: the furniture side, the grille, or the room corner.
A short fragment between the cabinet and the diffuser only makes sense if it is visible and compositionally complete. Otherwise, an extra piece creates an additional end without benefit.
Control calculations of finished schemes
Test case: wall 5200 mm, diffuser 1200 mm centered
Left and right leave 2000 mm of PLT‑006 each. For MDF, two strips of 2600 mm are needed. Remnants are about 600 mm on each side. If the room has two short sections of 550 mm each, both remnants can be used, and the ventilation gap helps optimize the purchase.
For oak/beech, two strips of 2400 mm leave 400 mm each. Sections of 550 mm are no longer covered. As a result, an additional wooden strip may be needed for the entire room, although the quantity on the wall in question is the same.
Test case: diffuser starts 380 mm after the corner
The main wall is 3900 mm after the diffuser, the short segment is 380 mm. If on another wall, after cutting MDF, a 450 mm remnant with a clean straight end remains, this remnant can cover the short section. If the remnant has an angled corner cut and the usable length is only 360 mm, it is no longer sufficient.
This shows why the map should store the actual length of each remnant, not just the initial arithmetic.
Test case: two diffusers and three wooden sections
Let the PLT‑006 segments be 900, 700, and 1200 mm. Their total length is 2800 mm. By the net sum, it seems that two meter-long remnants are enough. But all three parts must have their own finished ends, and the outer ones also need angled cuts.
If there is one whole MDF strip of 2600 mm and a suitable remnant of 400 mm, theoretically the length is exactly 3000 mm. In practice, you need to check how the cuts are distributed. Sometimes it is safer to allocate two full workpieces than to try to assemble three visible parts without reserve.
Receiving, marking, and reserving before installation
How to accept PLT-006 before installation near the diffuser
Before painting and cutting, check:
- article number and material;
- actual length;
- straightness of the strip;
- integrity of the face profile;
- ends;
- matching of wood shade within the same batch;
- compliance of quantity with the cutting map.
For a visible ceiling assembly, a slightly curved strip is especially unpleasant: next to a straight metal diffuser, the deviation is noticeably stronger. The part should be assessed before installation, not attempted to be pressed with glue to a perfect line.
How to mark strips for the ceiling map
It is convenient to assign a code to each part:
- A1 — the first part of wall A;
- A2 — the second part of wall A;
- VD-L — left segment at the ventilation diffuser;
- VD-R — right segment;
- R — reserve;
- RET — blank for return.
This prevents a situation where a long piece assigned to the main wall is accidentally cut into short fragments near the ventilation.
When the spare plank PLT-006 is justified
The reserve is especially useful if:
- there are several external corners;
- two or more diffusers;
- decorative returns are selected;
- natural oak or beech needs to be kept from the same batch;
- a long view section cannot be assembled from short remnants;
- the object is located far from the warehouse;
- the repair must be completed without a pause for reordering.
But the reserve does not necessarily equal one whole plank. If the layout already leaves a large straight remnant of 1400–1800 mm, it can cover most short repair tasks. The decision depends on the longest critical section.
When the reserve plank is excessive
If all long walls are covered in one piece, the ventilation segments are short, and several useful fragments remain from the cutting, an additional whole plank may not be needed. Buying "plus 10%" automatically is not necessary — for linear footage, the parts map is more accurate than a percentage.
Final specification PLT‑006 next to the linear diffuser
| Parameter | What to fix |
|---|---|
| Product | PLT‑006 |
| Role | Ceiling cornice |
| Material | MDF / moisture-resistant MDF / beech / oak |
| Size | 100×16×2600 or 100×15×2400 mm |
| Diffuser model | Exact name |
| Removable part | Overall dimension and dismantling trajectory |
| Ventilation start/end | Coordinates from corner |
| End face of PLT-006 | Direct / return / other design node |
| Segments | All lengths separately |
| Angles | Internal and external, actually measured |
| Cutting map | By slats 2400/2600 mm |
| Reserve | By real critical parts |
| Finishing | Approved sample of end and front part |
Checklist before payment
- Ceiling application of PLT-006 confirmed by card;
- Specific version and its length selected;
- Diffuser model known;
- Grille actually removed during fitting;
- Service fasteners remain accessible;
- No fictitious universal gap assigned;
- Short sections checked visually;
- Ends and returns coordinated;
- Each wall broken down into individual parts;
- remainders marked;
- Price and availability rechecked before payment.
FAQ about the wooden cornice PLT-006 near a linear diffuser
Can PLT-006 be used as a ceiling cornice?
Yes. The current product card directly calls the item a plinth, trim, and cornice.
What is the size of PLT-006?
MDF — 100×16×2600 mm, beech and oak — 100×15×2400 mm.
Can PLT-006 be installed flush against a linear diffuser?
Only if it does not interfere with removing the grille, fastening, adjustment, and maintenance of the specific model. There is no universal clearance.
How to determine the distance to the ventilation grille?
According to the diffuser's datasheet and a physical check of the removal path with the PLT-006 template.
Can the cornice overlap the edge of a removable grille?
No, if the overlap interferes with standard maintenance or dismantling.
How to finish the end of PLT-006?
A straight machined end or a decorative return is possible. The choice depends on visibility and material.
How to make a corner on a wooden ceiling plinth near ventilation?
First measure the actual angle, make a test cut, then determine the final length to the diffuser on site.
How to calculate the quantity of MDF slats 2600 mm?
Break the ceiling contour into separate segments and create a layout map for whole 2600 mm slats.
How to calculate oak or beech slats 2400 mm?
As a separate map: the length is 200 mm less than MDF, so joint locations and offcuts will change.
Can an offcut near the diffuser be used?
Yes, if its actual length is sufficient after all cuts and it allows making the required end or return.
When is it better not to install a short section of PLT-006?
If after the service zone there remains a visually meaningless piece that creates an extra end and does not support the overall architecture.
Do I need to buy moisture-resistant MDF because of ventilation?
No, not automatically. The material is chosen based on the actual moisture load of the room.
What to do if the diffuser is installed crookedly?
First, determine the source of the geometric deviation. Do not adjust the wooden cornice to the error without checking the entire ceiling line.
Should I keep a spare plank?
If the cutting is complex, there is natural wood, or a future diffuser replacement is likely, a reserve is useful. With large leftovers, a separate whole plank may be unnecessary.
When is it better to choose a different ceiling profile?
When PLT-006 covers the service, requires major rework, or leaves unfortunate short fragments.
Result: ventilation first defines the service boundary, and only then is the wooden ceiling cornice calculated
PLT‑006 can indeed be used as a ceiling cornice: the card confirms this role and the current versions 100×16×2600 mm for MDF and 100×15×2400 mm for beech/oak. But next to a linear diffuser, what matters more than the profile's versatility is the maintainability of the ventilation.
First, you need to remove the front grille, see the fasteners and adjustment elements, check the removal trajectory, and only then assign the end point of PLT‑006. If the continuous profile does not interfere with service, it can be extended further. If it does interfere, the cornice ends before the diffuser, and a straight end or return is designed.
After that, the ceiling contour is divided into real segments. The 2400 and 2600 mm planks are calculated separately, and the remnants are distributed across specific short sections. This calculation shows how much to buy, where to leave a reserve, and when a simpler ceiling profile will be better.
Correct sequence: diffuser model → service trajectory → actual angles → PLT‑006 end points → ends/returns → segment map → cutting 2400/2600 mm → finishing → order.