


















Article Contents:
- What CH-001 is and what the product card doesn't tell you
- Height 2350 mm: where exactly this mark is located
- How to calculate the free space between the cabinet and the cornice
- Access to the battery and removing the case are different checks
- Why the depth of the bookcase matters more than extra centimeters of height
- Template check: what it solves and what it doesn't replace
- Will the time be visible from the armchair: checking the line of sight
- Beech or oak clock: not only the wood species needs to be agreed upon
- Case finishing: complete before high installation
- Price of CH-001 and total cost of finished wall clocks
- Acceptance and mounting: what to check before drilling the wall
- First battery and further maintenance without extra climbs
- Dust, microclimate, and storage: service is not limited to AA
- Non-standard situations: what changes after a nice fitting
- When it is better to refuse CH-001 above a cabinet
- What to send to STAVROS and the installer before ordering
- Where to buy wooden wall clocks for the agreed location
- FAQ: additional questions before purchase and operation
- Can I order CH-001 as a gift and leave the finish choice to the recipient?
- Can I use a rechargeable battery instead of a regular one?
- Can I order a spare watch capsule in advance?
- How do I set the time without damaging the hands?
- Can I attach the clock with adhesive so I don't have to drill into the wall?
- Will the side panel of a bookshelf work instead of a wall?
- Can I tilt the case slightly downward for better readability?
- What should I do if I need the clock in a seasonal country house?
- Does smooth movement mean the clock is completely silent?
- Can I check the battery compartment with my phone camera and consider access verified?
- What to do if, after finishing, the case no longer assembles freely?
- Should the view of the clock from the gallery or the upper stair landing be taken into account?
- Can the clock be installed before the library is completely filled with books?
- Should the clock be moved if the previous person can no longer service it?
- Can the clock be left purely as decor without installing the power element?
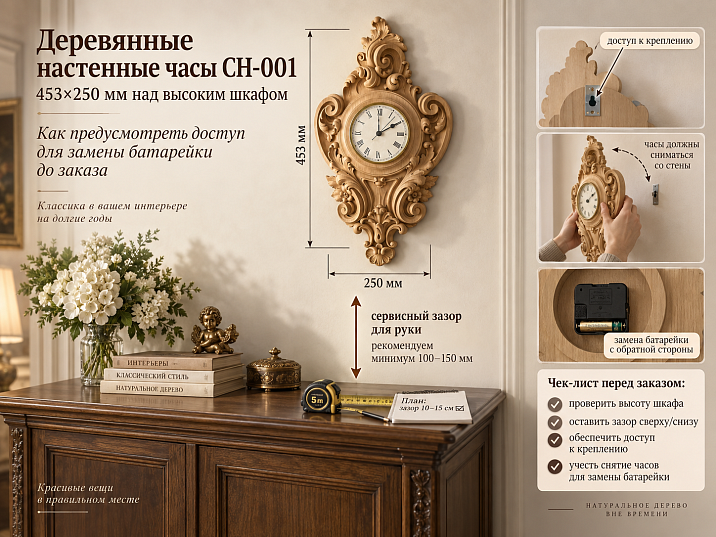
Wooden clocks above a bookcase can be ordered if two things are clear in advance: how to safely access them and how to service the mechanism without disassembling the furniture or ceiling decor. A beautiful position on a sketch is not enough. If replacing the battery is only possible by standing on the bookcase, holding the clock at arm's length, or removing an adjacent cornice, the installation location needs to be reconsidered before purchase.
Imagine a library where the bookcase is already installed. Its top is at a height of 2050 mm, and the center of the dial is desired to be at approximately 2350 mm. Between the furniture and the ceiling, there is a section of wall, and the carved Versailles CH-001 clock seems like a suitable finishing element. This is a calculated interior scenario, not a description of a completed object. 1
The model provides power from a single AA battery and a hanging rail. Therefore, the project must account not only for the installation day but also for future access to the product. At the same time, the phrase "hanging rail" does not yet explain what movement is used to remove a specific case or whether it needs to be removed entirely to replace the power source. 2
Before buy wooden wall clock CH-001, it is worth checking the location in the following sequence: dimensions, dial position, service space, access in front of the bookcase, readability, finish. Then the decision will be based on measurements rather than hope that everything will be convenient after installation.

What is CH-001 and what the card does not report
Versailles CH-001 — wall clock with a carved wooden case and an insertable clock capsule. For design purposes, it is useful to immediately divide the product into the decorative part, the mechanism, and the suspension unit: these parts perform different tasks and require different checks.
ParameterData of the modelSize A × B × C453 × 250 × 49 mmWoodBeech or oakSurface preparation"Standard" or "Prestige"Case conditionUnpaintedMechanismQuartz, smooth sweepClock capsuleBrass rim, glass lens, white dial, Roman numeralsSuspensionOne mounting bar includedPowerOne AA element, purchased separatelyDeclared warranty12 monthsCharacteristics and package contents are given according to the manufacturer's card, verified on September 5, 2026. 2
From the table, it is impossible to determine the mass of the watch, the diameter of the visible part of the dial, the suspension coordinate, the removal procedure, or the location of the battery compartment. This information should not be replaced by guesses based on the front-facing photo. It is especially dangerous to assume that the mechanism is serviced in exactly the same way as the round plastic watches already available at home.
Before ordering, request an image of the back side and an explanation of the standard battery replacement procedure. Possibly, the service operation will be related to the clock module; possibly, it will require working with the entire product. Until confirmation, neither option should be assumed as an established fact.
Separately, clarify which mounting parts to the base are supplied together with the bar. The presence of a suspension element does not mean the presence of a ready-made kit for any wall. The question "is everything there for installation?" is better replaced with a specific one: "what is included in the box, and what is selected for my base?"
For high placement, this is fundamental. On an accessible wall section, the missing clarification is sometimes discovered during fitting. Above a fixed library, the same uncertainty may require a second visit from the installer. Getting a photo and a diagram is cheaper and calmer than figuring out the clock's structure already under the ceiling.




Height 2350 mm: where exactly this mark is located
In the project, one cannot simply write "clock at a height of 2350 mm." This may mean the center of the dial, the middle of the external dimension, the top of the case, or the mounting point. For a shaped product, the listed points do not have to coincide.
On the CH-001 dimensional drawing, designation A refers to the vertical dimension, B to the width, and C to the depth. Accordingly, for wall calculations, a height of 453 mm and a width of 250 mm are used. However, the dimensional drawing does not reveal the mounting geometry of the hanging bracket. The mounting position and removal travel according to the mounting DWG are not confirmed: the file could not be opened. Therefore, only the overall dimension is calculated below, and the missing mounting dimensions must be requested from the manufacturer. 2 3
If 2350 mm is the middle of the overall rectangle, half the height will be:
453 ÷ 2 = 226.5 mm.
Then the bottom point of the housing will be at the mark:
2350 − 226.5 = 2123.5 mm,
and the top point will be at the mark:
2350 + 226.5 = 2576.5 mm.
With a cabinet height of 2050 mm, 73.5 mm will remain between its top and the bottom of the housing. This is only a geometric gap, not a confirmed allowance for hands, hanging, or removing the clock.
If at a height of 2350 mm the center of the dial is needed, the housing cannot be divided in half. Let us denote the distance from the bottom point of the housing to the center of the dial by the letter d. Then:
Bottom of housing = 2350 − d.
Top of the body = 2350 − d + 453.
The value of d is obtained from an exact drawing or by measuring the product. It should not be calculated from a small photograph with perspective distortions. Even a relatively small error becomes significant when a narrow gap remains at the top up to the cornice.
For the installer, it is useful to leave two independent records in the task: the desired dial mark and the allowable boundaries of the body. He will be able to check whether they are compatible. If not, the height, composition, or location will have to be changed, rather than imperceptibly substituting the center of the dial with the center of the entire carved shape.
When taking measurements, it is convenient to use a single base — the level of the finished floor. If the floor covering has not yet been laid, this should be explicitly noted. For example, a design addition of 15 mm to the floor will change heights relative to the finished surface, although the mutual distance between an already installed cabinet and the cornice may remain the same. An error occurs when one project participant counts from the subfloor, and another from the final one.
Also, do not confuse the distance from the ceiling with the distance to the lower boundary of the profile. In a photograph, both marks are sometimes perceived as one line. In a working record, it is better to indicate the full name of the point: "bottom of the protruding ceiling cornice," rather than just "top." If the decorative element has not yet been selected, the free zone remains preliminary.
This approach also resolves disputes during acceptance. The client evaluates the result based on the agreed point, and the contractor is not forced to guess what was meant by the phrase "slightly above the cabinet."
Our factory also produces:




How to calculate the free space between the cabinet and the cornice
For a preliminary check, two real heights are needed: the top point of the furniture and the lower boundary of the obstacle above the clock. The second boundary may not be the ceiling, but a protruding cornice, beam, lamp, or decorative molding.
Let us denote the height of the free zone as S. Then the total remainder after placing the body:
R = S − 453 mm.
This remainder is distributed between the lower and upper gaps. It is not entirely "installation allowance": part of the space is needed for the composition, part for the confirmed movement of parts, and part may be required for gripping the housing.
Below are conditional variants of one library. They show the arithmetic, not the normative installation dimensions of CH-001.
Top of cabinetLower boundary of upper obstacleFree height SRemainder R2050 mm2450 mm400 mm−53 mm2050 mm2520 mm470 mm17 mm2050 mm2620 mm570 mm117 mm2050 mm2700 mm650 mm197 mmThe first variant is immediately ruled out: the full vertical dimension is insufficient. In the second, the housing fits only statically, leaving 17 mm for both gaps. Without an installation scheme, such a variant cannot be considered suitable. The third and fourth allow the check to continue, but by themselves they prove nothing about access.
Let's return to the middle of the housing at the 2350 mm mark. With the upper obstacle at a height of 2620 mm, the clearance at the top will be:
2620 − 2576.5 = 43.5 mm.
At the bottom, 73.5 mm remains. Their sum is the same 117 mm. If the clock were simply centered between the cabinet and the cornice, there would be 58.5 mm at both top and bottom, but the middle of the housing would move to the 2335 mm mark. Consequently, the conditions "center at 2350" and "equal margins" are incompatible in this example.
Next, what is needed is not a debate about the beauty of equal gaps, but information about installation. If the confirmed service trajectory requires more upper space, it takes priority. The lower margin can be reconsidered only after verifying that the housing does not come excessively close to the furniture and remains accessible.
There is also the issue of measurement accuracy. Suppose that in a specific project, after agreeing on the design, the lower gap is set to at least 60 mm and the upper gap to at least 50 mm. These are conditional design values, not manufacturer recommendations. They will occupy 110 mm of the available 117 mm, leaving only 7 mm for discrepancies in actual dimensions and position. If the uncertainty of measurements exceeds this remainder, the solution is not yet ready for drilling.
Measure the free height across the width of the future product, not just at one convenient point. If the cornice is skewed or the top line of the cabinet is uneven, the calculation is based on the most restrictive section. A nice average value does not compensate for a local collision of the thread with an obstacle.
Get Consultation
Access to the battery and removal of the housing are separate checks.
For clocks above a cabinet, two answers are needed. First: how to replace the power element. Second: how to remove the entire product if inspection, relocation, or work with the finish is required. Even if the battery can be serviced without full disassembly, the second question remains.
It is better to formulate a request to the manufacturer specifically: how the serviceable part is extracted or opened, whether a tool is required, in which direction the part moves, where it can be held, and which surfaces cannot be used as support. If possible, ask for a short video on the specific model, rather than a verbal comparison with similar clocks.
One should not state in advance that CH-001 is necessarily lifted by a certain number of millimeters. The name of the suspension does not confirm the amount of movement. Also, one cannot promise that the capsule is removed from the front side: the open card does not provide such an instruction. 2
If the scheme involves lifting the housing, the upper gap must allow this lift, taking into account the actual position of the mounting. If movement away from the wall is required after lifting, the space in front of the product must be checked. If tilting occurs, control of the entire volume occupied by the housing during movement is needed, not just its final position.
This is why a tall cabinet and a ceiling cornice are checked together. An item may pass between them in a vertical position, but hit furniture during the intended tilt. The opposite situation also occurs: there is free space above, but a wide furniture top prevents gripping the housing in the right place.
Also coordinate a place where the clock can be safely moved after removal. Do not plan to replace the battery "on the fly" if it requires both hands, work with a small part, or support of the housing. A convenient surface below is part of the servicing process, although it is usually not shown on the interior layout.
It is useful to divide the space around the product into three areas. The first is occupied by the stationary housing. The second is required for the intended movement during removal or opening. The third is needed for the person and the tool. A free second area does not guarantee the third: the part passes by the cornice, but fingers do not fit in the right place. Conversely, a hand can touch the clock, although the housing itself does not pass along the trajectory.
For coordination, it is not necessary to create a complex three-dimensional model. A diagram on which the manufacturer or installer marks the direction of movement and the necessary spaces is sufficient. However, a dimensional rectangle without such explanations only covers the first area. This difference is especially useful when communicating with a designer: a beautiful external indentation and a working gap should not be called by the same word without clarification.
The result of the check must be reproducible: another person, having the instructions and suitable equipment, understands the sequence of actions. If everything relies on the ability of one installer to "somehow squeeze in," the project cannot be considered convenient for further maintenance.
Why the depth of a bookcase matters more than extra centimeters of height
A facade sketch shows the clock and furniture as flat shapes. In reality, a person stands in front of a protruding cabinet. Therefore, to reach the clock, one must not only climb up but also gain horizontal access.
Suppose the front plane of the furniture is 400 mm from the wall. If, for a preliminary comparison, the face plane of the cabinet is taken at 49 mm from the wall, the difference will be 351 mm. With a furniture depth of 550 mm, it will grow to 501 mm. This is a conditional comparison of planes: the actual protrusion of the clock with its mount is checked separately.
The obtained values cannot be turned into a permitted reach distance for stretching arms. They only show why two cabinets of the same height present different access challenges. Added to these obstacles are the shape of the upper cornice of the furniture, the location of the work platform, and the method of holding the item.
One must check not only the spot under one ladder leg but the entire area it occupies in its open working position. Consider the table, chair, carpet, opening door, walkway, and the ability to move items without relocating the entire library. The platform must suit the task, not be chosen on the principle of "this ladder is already at home."
One cannot compensate for poor clock placement by standing on bookshelves, a countertop, or a random combination of a stool and a stand. The HSE guidance on safe ladder use specifically warns against overreaching, the need for a stable position, and maintaining the intended support. For work with both hands, the access method is assessed with particular care. These are general safety recommendations, not the CH-001 installation manual or a Russian regulation. 4
If a person is forced to lean over the cabinet while holding a wooden frame, a sensible solution is to change the access or the clock's location. A helper below does not automatically make an awkward working position safe. The installer may need different suitable equipment; its applicability is assessed on site.
There is also a difference between installation and regular maintenance. For installation, a room is sometimes completely cleared. Repeating such a rearrangement after finishing, filling shelves, and placing a work desk will be more difficult. Therefore, the access test is conducted in the environment in which the library will actually be used.
For a built-in cabinet, a side section view is especially useful: the wall, the maximum protrusion of the furniture, the clock, the upper obstacle, and the equipment installation zone. One such drawing explains more to an installer than several beautiful frontal photographs.
Template check: what it solves and what it does not replace
Before purchasing, a lightweight mockup of the 453×250 mm footprint can be made. Its purpose is to show scale, position, and relationships with furniture. It is not a mounting template for holes, nor a confirmation of the ability to hold the real clock at height.
For a simple check, a rectangle of paper or cardboard is sufficient. If a silhouette is needed, use a dimensioned diagram with preserved proportions. After printing, always measure the final size with a ruler: automatic page scaling can alter the intended scale.
On the mockup, distinguish between the center of the footprint and the presumed center of the dial. Until the coordinate of the latter is confirmed, label it as approximate. Otherwise, the fitting will cement an error: everyone will get used to the position of the drawn circle, while the actual product may be arranged slightly differently.
First, it is convenient to examine the mockup on an accessible surface or include it in an accurate wall layout. High fitting should be entrusted to a person with suitable safe access. There is no need to arrange a risky trial climb just to check whether a risky climb might be possible in the future.
Evaluate the composition from a work chair, from the entrance, and from the main walkway. Take photos without deliberate zooming that turns a small object into a large one. A side angle is also useful: it shows the cabinet protrusion and the placement of ceiling decor.
A dry paper rectangle does not reproduce glass reflections, carving depth, or the weight of the product. Therefore, the fitting result should be stated precisely: "the footprint and position are preliminarily suitable," not "installation verified." The latter can only be claimed after specifying the suspension, base, and service operation.
If the clock is also planned within a decorative frame, this check is supplemented by selecting the size of CH-001 for the ready-made molding frame. Here, the main question is different: whether the clock can be operated above furniture that blocks access to the wall.
Printing errors can be noticeable precisely in tight spaces. For example, at 96% scale, the mockup instead of 453×250 mm will be approximately 435×240 mm. In height, about 18 mm will disappear, and in width, 10 mm. On a free wall, the difference may go unnoticed, but between furniture and a cornice, it can give a false sense of sufficient clearance. Check both sides of the finished template, not just the "100%" label in print settings.
Save a photo of the approved layout and note the heights. When the product arrives, this record will help restore the solution without re-discussing where "that perfect variant" was located.
Will the time be visible from the chair: checking the line of sight
The clock may be clearly visible to a standing person and partially hidden behind the top of a cabinet for someone seated. Therefore, assessing readability only from the entrance door is not enough. This is especially relevant for a library, where the time is often viewed from a low chair or from behind a desk.
First, check the very possibility of seeing the dial. Then, check the ability to distinguish the positions of the hands. These are different tasks. A large carved case does not necessarily mean a large working area of the clock, and the dimension 453×250 mm should not be taken as the dial size.
Furniture overlap can be preliminarily assessed geometrically. Let's take a hypothetical case: the eyes of a seated person are at a height of 1200 mm, the center of the dial is at 2350 mm, the cabinet has a height of 2050 mm and protrudes from the wall by 400 mm. All dimensions refer to a single vertical section, and the top of the furniture is considered a solid horizontal obstacle.
The protrusion of the dial itself from the wall must also be taken into account. Let's denote it as x, and the distance from the eyes to the wall as L. The height of the line of sight at the front edge of the furniture is determined as follows:
Beam height = 2350 − (2350 − 1200) × (400 − x) ÷ (L − x).
For illustrative arithmetic, let's take x = 50 mm. This is a conditional coordinate of the selected point on the dial, not a confirmed mounting dimension CH-001. In a real library, it is measured considering the suspension and the position of the clock's face; the external depth of the case does not replace this measurement.
With a distance from the eyes to the wall of 1200 mm, we get:
2350 − 1150 × (400 − 50) ÷ (1200 − 50) = 2000 mm.
The line passes 50 mm below the top plane of the cabinet. In this geometry, the center of the dial is obscured by the furniture, even though it is 300 mm above the cabinet. Raising the chin is useless if the eye position barely changes: the obstacle remains on the same line.
If you move the observation point to 3000 mm from the wall, you get:
2350 − 1150 × 350 ÷ 2950 ≈ 2214 mm.
The line passes above the furniture. But this does not yet prove the readability of the digits: the distance has increased. The calculation explains why the spot may work from the far part of the room and not work from the chair next to the cabinet.
For this same conditional cross-section, you can find the distance to the wall at which the ray to the center just touches the front top edge of the cabinet:
50 + (400 − 50) × (2350 − 1200) ÷ (2350 − 2050) ≈ 1392 mm.
This is the geometric visibility boundary of one selected point, not a recommended distance for reading the time. In this position, there is practically no margin for a different height of a seated person, a chair cushion, or a protruding furniture cornice. The lower part of the dial may remain hidden even where the center has already appeared above the furniture. For a cabinet with a side gap or a complex top, consider the actual line of sight rather than automatically applying the model of a solid barrier.
It is convenient to check two real seating positions: a normal working one and a relaxed one with a reclined back. Do not ask a person to stretch their neck for a favorable result. For a clock, the habitual gaze is important; otherwise, the function will only be available in a specially adopted posture. For the same reason, it is better for the future user to conduct the test themselves, not only the person performing the installation.
The practical check should consider not only the center but also the lower part of the dial. Check whether the furniture top, a stack of books, or a decorative vase obscures it. Items that appear later can also change the line of sight.
It is better to check reflections under normal evening lamps and daylight. A printed mock-up will show the scale but not the behavior of the glass lens. For a final assessment, use the real product in a safely organized fitting or request additional photos of the desired angle. 2
Don't try to fix poor readability with an additional lamp at any cost. Sometimes a neighboring wall section is more useful, where the dial is visible at a smaller angle and closer to the usual direction of gaze. For functional clocks, viewing convenience should be an independent purchase criterion, not a pleasant addition to beautiful carving.
Beech or oak clocks: not only the wood species needs to be coordinated
Once the location has passed the geometric check, you can choose the case finish. Here it's easy to mix four different decisions: wood species, lamella selection, sanding quality, and future finish. One does not replace another.
For a painted library, it makes sense to consider beech under an opaque coating. For furniture with pronounced natural texture, oak with a coordinated semi-transparent finish. These are design directions, not a rule prohibiting painting oak or tinting beech. In the manufacturer's description, beech is more often associated with enamel, while oak is associated with a finish that preserves the visibility of the wood grain. 2
In the STAVROS quality description, the labels "under enamel" and "under tinting" refer to the selection of wood lamellas. In the first case, strict selection of their color and grain is not assumed; in the second, it is performed, but natural differences do not disappear completely. "Standard" and "Prestige" describe surface preparation, not the presence of paint. "Prestige" provides for more detailed hand sanding. 5
The practical conclusion is simple: ordering "oak, Prestige" does not yet define the final appearance. You need to additionally clarify the available re-gluing option and specify the future finish. Otherwise, the buyer may expect a calm, uniform texture, although a blank for an opaque coating was chosen.
For an existing cabinet, the reference is a physical sample, not the shade name. Two materials labeled "walnut" may look different due to the source wood, staining technology, gloss, and lighting. Ask the finisher to compare a color swatch next to the furniture specifically in the library.
Full matching is not always necessary. The clock may be intentionally slightly lighter or darker than the cabinet if this decision is coordinated. Such controlled contrast is better than a random attempt to "hit almost the same color," especially when items stand close to each other and the difference is easily noticeable.
High placement does not cancel the surface preparation check. Evaluate the sample under the light that will fall on the clock: side light and frontal light give different impressions. At the same time, choosing more expensive sanding just because of the word "Prestige" is also not worth it. Compare what work is actually included in the subsequent finisher's estimate.
Detailed definitions of finishes are provided in the section of materials and quality of STAVROS wooden products. To order specific clocks, it is useful to transfer the selected parameters into one specification line rather than leaving them in several separate messages.
Case finishing: complete before high installation
An unpainted case gives freedom of choice, but at the same time adds a separate production stage. It needs to be planned before mounting above the cabinet, otherwise the interior will look finished only in a photo, while the clocks themselves will remain an unfinished part of the project.
Before handing over for finishing, clarify with the manufacturer the procedure for handling the clock capsule and suspension. The finisher must know which parts can be removed, which areas to protect, how to preserve mounting surfaces, and how to check the possibility of subsequent assembly. These actions cannot be derived from the general painting instructions for wooden decor.
STAVROS has recommendations for preparation, priming, and coating application. However, they are not a special instruction for disassembling CH-001. The technological sequence and drying time should be coordinated with the contractor based on the selected material system, and the permissibility of interfering with the clock mechanism should be confirmed with the product manufacturer. 6
For the project, it is useful to define the readiness criterion in advance. "The paint no longer sticks" should not be the sole basis for assembly and packaging. The contractor must confirm that the coating has reached a state in which the intended operations, contact with packaging, and installation are permissible.
After finishing, a re-check of functional areas is needed. The decorative result may be successful, but coating buildup at the joint or a painted mounting surface can hinder assembly. Such a situation should not be corrected by force, tapping, or arbitrarily enlarging the mounting location.
It is better not to plan full finishing of the clocks on the wall above the library. In this position, it is difficult to control the back side, protect adjacent surfaces, and work with mechanism parts. At the same time, an unnecessary task of access at height is created. It is much more reasonable to complete the coating at a suitable work station, assemble the product in the permitted manner, and only then install it.
When accepting the finishing, compare not only the color of the front part. Look at visible side areas, the quality of transitions, and the places by which the product will need to be held. Make sure the agreed appearance is preserved from the usual low-angle view.
The overall sequence can be discussed based on tips for finishing wooden decor, but the order should still include a separate task: to maintain the clock's functionality and standard serviceability. A beautiful finish should not turn a removable module into a non-disassemblable one.
Price of CH-001 and total cost of finished clocks on the wall
It is useful to compare options by two amounts: the price of the product and the budget for a fully completed solution. In the second case, finishing, delivery, mounting hardware for the base, and installation are taken into account. For a high location, access organization may be added, but its cost is determined for a specific site.
As of the check on September 5, 2026, the product page showed the following prices for the size 453×250×49 mm:
Material"Standard""Prestige"Beech16,600 ₽25,050 ₽Oak20,900 ₽28,890 ₽These are published prices for options, not an offer for finished painted clocks with delivery and installation. The specific configuration should be verified in the order. 2
The difference between sanding options is 8,450 ₽ for beech and 7,990 ₽ for oak. But the economic meaning of the difference becomes clear only together with the estimate for subsequent preparation. A lower price for the blank does not necessarily result in a lower final amount if the finisher requires additional work.
When comparing sanding, it is useful to obtain two comparable estimates from the finisher. They should have the same final result: one color, the same gloss, the same treatment of visible areas. If for the beech blank the additional preparation of "Standard" relative to "Prestige" is estimated above 8,450 ₽, the initial price difference alone no longer means savings. If lower, the monetary result may be the opposite. This is an arithmetic condition for comparison, not an assessment of the market value of painting work.
In addition to the amount, check accountability for the result. In one option, the contractor accepts the preparation of the case as sufficient; in another, they include refinement and its acceptance. It is important not to end up in an intermediate situation where the supplier considers the surface to match the ordered finish, while the finisher did not include the operations they needed in the agreement.
It is convenient to write down the budget like this:
Ready solution = hours + preparation and finishing + delivery + fasteners + installation + necessary access.
Each item should be counted once. If the contractor has already included surface preparation in the cost of painting, do not add it again. If the installer provides equipment as part of the work, do not automatically include a separate rental.
To compare two locations—above the cabinet and on an accessible wall section—highlight only the differing costs. The price of the hours themselves and the agreed coating may remain the same. What will change is the labor intensity of installation and future maintenance. Such a calculation helps evaluate the solution without artificially inflating the budget.
You should not set a number of battery replacements over five years and multiply it by a made-up technician rate. Without data on the mechanism and operating conditions, this would be false precision. It is enough to note whether the chosen location requires a paid visit for routine maintenance and whether the owner is ready for such an arrangement.
Before payment, check the current price in the product card again and agree on the full composition of the order. The date of verification in the article is needed to understand the calculation, but it does not fix the price of the item for the future.
Acceptance and installation: what to check before drilling the wall
When the watch is received, first compare the order with the product: article number, material, finish, completeness, and the agreed surface condition. It is more convenient to inspect at an accessible work area while packaging and documents are preserved and the case has not yet been handed over for finishing.
Take photos of the general view and any detected features. This will help discuss the issue with the supplier in a concrete manner. Do not start fixing the disputed area yourself until you find out whether it really requires refinement and what method is acceptable for doing so.
Separately verify the information about the weight and mounting. The wall attachment is chosen based on the substrate, the assembly design, and installation conditions, not on the impression that the clock "looks light." On a clad wall, it is important to distinguish between the decorative layer and the substrate in which the fastener will actually work.
The specific type and size of the fastener must be determined by a specialist based on the actual substrate, relying on the documentation of the selected fastening system. A universal recommendation for concrete, hollow masonry, and partitions cannot be given. Also, before drilling, the location of hidden utilities in the work area must be clarified.
First, the full outline of the housing and the dial mark are agreed upon on the wall. Only after that are the fastening coordinates, obtained from the product or the installation diagram, transferred. The reverse order—first drilling a hole "approximately here," then trying to adjust the composition—is especially inconvenient between a cabinet and a cornice.
Before final handover, check the intended removal or maintenance operation. This should be done with appropriate access and according to the confirmed instructions. The goal is to ensure that the installed clock can be serviced without contact with furniture and upper decor, not to repeatedly remove it for a formal demonstration.
The result can be accepted based on several observable signs, without conducting tests that the manufacturer does not provide for.
What is checkedSign of completed workPositionAgreed control points match the actual placementBase and mountingThe installer has recorded the chosen solution and confirmed the correctness of the installationAccessThe working equipment fits in the furnished roomMaintenanceThe standard operation does not require removing adjacent decorViewThe dial is visible from the agreed points without a forced postureHandover to the ownerThe instructions, handling procedure, and installer contact are clearSuch a list is convenient if the order is accepted by someone other than the person who approved the sketch. It helps to check the function, not just the absence of a visible tilt. At the same time, there is no need to add homemade strength tests by jerking, rocking, or hanging additional load: the method of checking the fastening is determined by a specialist according to their system, not by an interior article.
A useful acceptance result is a short set of information: the actual height, a photo of the position, a diagram or instructions for access, the data of the selected fastening, and the installation contractor. It can be stored together with the documents for the library.
If during the check it is found that the housing fits, but the standard operation is impossible, the installation is not yet complete. Such a defect cannot be closed with the promise "the batteries will last a long time." The position must be changed or another structurally permissible solution must be agreed upon before the equipment and tools are taken away.
The first battery and further maintenance without unnecessary climbs
Prepare the first power element before the installer arrives. In doing so, rely on the marking and instructions of the included mechanism: the size designation does not replace all requirements for the power source. Do not use a random element just because it fits in the compartment.
The general rules of the battery manufacturer require observing polarity and timely removal of a discharged element. They are useful here as well, but do not replace the access procedure for a specific clock capsule. 7
It is reasonable to check the mechanism's operation before high installation, according to the product instructions and in the intended working position. The mere fact that the hand moves at the moment of unpacking is not equivalent to checking further movement. If there is a noticeable problem, it is better to resolve it in an accessible place than to repeatedly arrange dismantling above a cabinet.
For your own operation, keep a simple record: the date of power installation, the designation of the element used, and the date of the next actual maintenance. This will allow you to rely on the experience of your specific clock. There is no basis to declare a mandatory replacement once a year in advance or to promise several years of operation: no confirmed interval for the kit in question is provided in the available data.
When maintenance is needed, first prepare access and a place for safe work with the product. Then proceed according to the mechanism's instructions and the agreed removal method. Do not try to simultaneously hold the clock, search for a battery in a drawer, and clear the table surface.
If the operation requires removing the case, combine the necessary checks: the condition of external accessible surfaces, the absence of noticeable damage, and the correctness of returning to the suspension. This is not p
The main time savings are achieved not by promising "rare maintenance," but by a prepared sequence. Everything needed is nearby, access is known, no extra rearrangements are required, and the owner understands which actions they can perform themselves and when an installer is needed.
Dust, microclimate, and storage: service is not limited to AA
In the library, regular care must also be considered. If the clock cannot be approached for inspection or permitted cleaning, the inconvenience will arise before the power element's resource runs out. Therefore, the project should provide access to the entire visible case, not just one point of the mechanism.
The cleaning method is coordinated with the finisher. You cannot automatically apply a furniture facade product to glass, metal, painted threads, and the clock mechanism at the same time. Different surfaces may require different handling.
In the general STAVROS memo, wooden products are considered interior items. The manufacturer recommends avoiding water exposure, prolonged direct sunlight, and adverse heat effects; for storage and operation, a temperature range of +10 to +25 °C is specified. These are recommendations for wooden products, not a separate climate passport for the CH-001 mechanism. 8
For a high location, check whether there is a local heat source or a direct humidifier stream nearby. The mark itself under the ceiling does not prove a problem, but a room thermometer reading near the door does not automatically describe conditions at the housing. If in doubt, evaluate the specific chosen zone.
Do not turn the decorative gap above the cabinet into storage. Stacks of books, boxes, and seasonal decorations can block the grip or removal path, even if everything was clear on installation day. It is better to designate this part of the space in advance as necessary for maintenance.
A separate scenario is the owners' prolonged absence. General Energizer recommendations advise removing batteries from devices that will not be used for an extended period. Therefore, for a seasonal home, access is needed before departure, not only after the clock stops. 7
Before renovation with dust, moving a library, or ceiling work, coordinate the removal and storage of the product in advance. Do not consider a casually thrown bag as full protection for the housing and mechanism. Packaging and storage position should be chosen so as not to stress carved protrusions and not to hinder compliance with the manufacturer's recommendations.
It is convenient to keep the rules together with recommendations for storing STAVROS wooden decor. Then, during the next maintenance, you will not have to recall the requirements from memory.
Non-standard situations: what changes after a beautiful fitting
The condition "free above the cabinet" may be true only at the moment of measurement. Before ordering, it is useful to check several situations in which the surrounding environment changes, although the clock itself remains in place.
The library will have an upper decorative cornice. If the furniture is currently installed without it, the current height cannot be used as final. The calculation includes the full future silhouette. The same applies to the ceiling profile: the phrase "we'll add a small molding later" means a change in the service space boundary.
The cabinet door or its hardware passes near the clock. The entire swing of the door must be checked, not just the closed facade. Pay special attention to protruding upper parts and items on adjacent sections. If contact is possible, the restriction must be eliminated structurally, not by asking to always open carefully.
The furniture stands in a narrow passage opposite a desk. The front wall may be spacious, but accessing the clock will require moving the desk. Here, the real effort of rearrangement should be checked: connected equipment, cables, floor covering, and the ability to move the furniture out. The chosen location will prove inconvenient if every maintenance requires dismantling the workspace.
The ceiling has a slope or a step. A single measurement above the clock's center does not describe access across the entire body. The minimum distance across the product's width and the trajectory intended by the design must be checked. The visual ceiling slope and installation necessity are considered separately.
The adjacent section of the library is planned to be expanded. Today, the clock can be accessed from the side, but after the expansion, that access will disappear. The product's position should be assessed based on the final furniture configuration. Otherwise, a temporarily convenient service method will mistakenly become permanent.
Access is only possible from the side of the end section. This sometimes leads to a proposal to shift the clock relative to the library's axis. Do not reject the option just because it breaks symmetry: first compare it with the original in terms of readability and service. But side access cannot be considered sufficient by default. The specific working position must be checked, especially if a person has to reach sideways. A compositional shift is only useful when it truly solves the problem, not when it moves it to another plane.
There is also the opposite case: the cabinet is lower, but tall collectible items stand on top of it. Formally, the furniture does not interfere, but fragile items will need to be moved before work. Therefore, access is assessed considering the actual contents, not just the cabinet body.
For each such scenario, it is useful to note what change requires re-checking. A new chair does not necessarily affect the clock; a tall item directly beneath it might. Replacing a lamp sometimes only changes lighting; installing a wide cornice changes geometry. This helps avoid considering an once-approved layout suitable for any subsequent modifications.
When it is better to refuse CH-001 above the cabinet
First, distinguish between refusing the model and refusing a specific location. If the wooden body suits the interior but the library blocks access, it is not necessary to look for other clocks. Sometimes it is enough to move the same model to a neighboring wall section.
The location above the cabinet should be rejected if routine maintenance cannot be confirmed, the case collides with obstacles, or access requires an unsafe working position. The reason may also be simpler: the time is poorly visible from the places where it is actually viewed.
The adjacent wall is checked using the same method, but without the requirement to preserve the original height. Moving it to 2350 mm simply "for the sake of an identical mark" may leave part of the previous inconveniences. Start with the viewing point and the available section of the wall, then tie the position to the furniture.
The option above a low console has a different spatial organization: there may be more freedom in front of the wall. However, low furniture by itself does not grant permission to stand on it. For a compositional comparison, material about the console area with wooden clocks, and safe access is still assessed separately.
It is reasonable to reject the model itself if a fully finished finish is needed without additional work, if the carved silhouette does not match the interior, or if the working part of the clock does not provide the required readability. More expensive wood and more thorough sanding will not fix a mismatch with the original task.
Sometimes it is better to leave the upper area without a functional item. The desire to fill every free section of the wall should not create a regular operational problem. If you want to continue the decorative theme, you can choose carved wooden decor, but for it, installation, cleaning, and operating conditions are also checked.
A good purchase does not necessarily complete the original sketch literally. It provides an item that is convenient to use in the real room after the installation work has finished and the ability to easily move everything around has disappeared.
What to send to STAVROS and the installer before ordering
One photo of the wall is not enough: it shows the composition but does not provide exact dimensions. On the other hand, a set of numbers without an image does not explain the shape of the cornice or the depth of the furniture. It is better to combine a frontal shot, a side angle, and a short dimensional note.
Send the manufacturer a request for the specific product. For example:
We plan to order Versailles CH-001 453×250×49 mm for placement above a bookcase. The top of the furniture is 2050 mm, its maximum protrusion from the wall is 400 mm, and the lower edge of the upper cornice is 2620 mm. The desired center mark of the dial is about 2350 mm. We ask to confirm the hanging position, product weight, method of replacing AA, whether the case needs to be removed, and the directions and amounts of service movements. We need a photo of the back side and instructions for handling the capsule during finishing.
The numbers in this sample refer to the calculation example in the article. In your request, replace them with actual measurements, without leaving convenient values from others.
Separately specify the chosen wood, sanding quality, and intended finish. The availability of the desired veneer option must be confirmed for the specific order. If painting is done by another workshop, determine in advance who receives technical explanations from the manufacturer and who is responsible for reassembly.
Pass the already clarified product data and information about the base to the installer. Their task is to assess the wall mounting, access, final coordinates, and serviceability in the actual room. Do not expect a manager to assign a universal dowel or confirm the safety of any existing ladder based on one photo.
In the final specification, it is useful to separate three statuses: measured, confirmed by the manufacturer, and accepted in the project. The cabinet height belongs to the first; the service method to the second; the desired dial position to the third. This separation prevents a wish from quietly turning into a product characteristic.
Before payment, a clear set of decisions should remain: what is being ordered, in what finish, who performs the finishing, where the clock will hang, and how it will be accessed. Unknown critical parameters are better resolved with a response to the request than hidden behind the phrase "we will clarify during installation."
Where to buy wooden wall clocks for the agreed location
Once geometry and access are confirmed, you can purchase the Versailles CH-001 watch in the selected finish. The order should include the agreed parameters, not just the model name: they determine the subsequent preparation and final appearance.
If the library design is not yet complete, in the section of wooden home goods you can view nearby interior items. However, additional purchases should not occupy the space reserved for watch servicing. The free area above the cabinet in this situation serves a practical function.
For the case with a height of 2350 mm, the final decision begins by clarifying which point the mark refers to. Then, the position of the case, the top gap, and access in front of the furniture are checked. Only after this should you approve the material, finish, and estimate. This sequence allows you to order wooden watches for a specific location rather than looking for a suitable place after receiving the product.
FAQ: additional questions before purchase and use
Can I order CH-001 as a gift and leave the finish choice to the recipient?
Such a scenario can be considered if the recipient knows in advance that the case will require a separate decision on the finish. Along with the gift, it is useful to provide documents and contacts of the agreed contractor. For a surprise that should be immediately hung over a finished library, uncertainty about color and installation is inconvenient. It is better to agree at least on the location, finish, and completion process of the product, without turning the gift into an unplanned renovation project.
Can I use a rechargeable battery instead of a regular battery?
Compatibility should be checked against the requirements of the installed watch movement. Specifying only the AA size is not enough to confirm any battery of the same external format. Do not change the power source based on advice for a different model, and do not rely solely on whether it fits in the compartment. If the necessary data is missing, request the permissible power specifications from the manufacturer and keep the response along with the instructions.
Can I order a spare watch movement in advance?
Availability of a compatible spare part should be confirmed with the supplier. Movements cannot be considered interchangeable just because they have a similar bezel or outer diameter: the fit, locking, and other parameters must match. It is practical to keep the designation of the complete mechanism and photos of available markings upon receipt. This will help formulate a subsequent request, but it is not a promise of indefinite availability of a specific part.
How do I set the time without damaging the hands?
Use the method specified in the instructions for the specific mechanism. Do not remove the glass yourself, turn the visible hands by force, or remove the movement without knowing its locking sequence. Include the question about setting the time in your request along with the battery replacement: it is another operation that may require access. Convenience is verified through actual actions, not by assuming that reaching the dial is sufficient.
Can I glue the clock to avoid drilling the wall?
Do not replace the standard mounting with adhesive attachment without manufacturer confirmation and assessment of the base. For a high location, not only the ability of the connection to hold the weight matters, but also the possibility of intended maintenance. Non-removable fixation may prevent disassembly or require damage to the finish. The reluctance to drill the wall is a reason to discuss another permissible method or another location, not to apply instructions for gluing a regular decorative trim.
Will the side panel of a bookcase work instead of a wall?
This is a separate mounting scenario. The material and thickness of the side panel, the cabinet construction, the permissibility of fastening, the position of adjacent doors, and the stability of the furniture need to be checked. A thin back panel cannot automatically be considered an equivalent base. The decision should be coordinated with the furniture manufacturer and a mounting specialist. Service access may become more convenient, but that advantage does not replace checking the mounting point itself.
Can the case be tilted slightly downward for readability?
Homemade shims or altered suspension positions should not be used without approval. Tilting can change how the mounting works and the distances to adjacent elements. First, check whether the issue is actually related to the viewing angle, rather than obstruction by furniture, distance, or light reflection. If the standard position does not provide the needed readability, it is safer to reconsider the placement than to modify the intended design yourself.
What to do if the clock is needed in a seasonal country house?
Assess the conditions that will be in the room during periods of absence, not just when heating is on. Recommendations for the wooden case and the mechanism's requirements should be checked separately. Also, plan access before departure for the intended preparation, including handling the battery. Lacquer should not be considered sufficient grounds for operating the product under any temperature and humidity fluctuations. 8
Does smooth movement mean the clock is completely silent?
Smooth movement is not a published measurement of sound level. The available specifications do not include an acoustic indicator that would guarantee absolute silence in a specific library. If sound is critical, clarify this with the seller and evaluate the product's operation in suitable conditions. In particular, do not substitute a promise that a high placement will automatically make the mechanism inaudible for actual testing.
Can the battery compartment be seen with a phone camera and considered proof of access?
No. A camera helps inspect an inaccessible angle but does not prove the ability to perform a service operation. The work may require a tool, a specific grip, or holding a part in place. A photo is useful to send to a specialist along with dimensions; it does not replace checking the standard procedure. For the same reason, being able to touch the case with one hand does not mean it can be safely removed and reinstalled.
What to do if the case no longer assembles freely after finishing?
Stop assembly and contact the finisher, coordinating further actions with the manufacturer. Do not force the capsule or trim the coating arbitrarily. First, understand the cause: material trapped in the joint, a change in fit, or another issue. It is especially undesirable to discover this for the first time at height above a cabinet. Assembly verification should be completed at the workbench before scheduling the final installation.
Should the view of the clock from the gallery or the upper stair landing be taken into account?
Yes, if such an angle exists in a specific room. A high-mounted object is not always viewed only from below: from the gallery, the upper and side sections may be visible. Add this point to the check of finishing and composition. However, good visibility from an adjacent level does not mean convenient access to the clock from there. It is necessary to separately assess the distance, railings, and the permissible method of servicing without leaning over them.
Can the clock be installed before the library is completely filled with books?
Installation can be planned at this stage, but access should be assessed based on the future filled room. Mark in advance the locations of large items, the work desk, and decorative content. It is especially important not to occupy the top of the cabinet with items that will later block the agreed trajectory. A photo of an empty library confirms only the temporary setting; the final operational scheme should take into account how the room will look after occupancy.
Should the clock be moved if the previous person can no longer service it?
This is a reason to reconsider the access arrangement, not to require repeating actions that have become inconvenient. A suitable service provider can be engaged, or a more accessible location can be chosen. When purchasing, it is useful to consider not only the tallest and most physically fit family member. A convenient interior solution should allow for understandable servicing when household circumstances change, without needing to find someone each time who can reach over the cabinet.
Can the clock be left purely as decor without installing the power element?
Such an intention should be honestly considered as decorative, not functional. Decide whether you are satisfied with permanently stationary time on the dial. At the same time, the need for maintenance, inspection, and secure mounting does not disappear. If the item is chosen solely for its carved silhouette, it is useful to compare it with ordinary decor without a mechanism: a high zone can receive the desired accent without expecting the clock to perform its main function.