Article Contents:
- Acceptance starts with the specific slat configuration
- A single SKU may include several profiles
- Before cutting, organize a storage area for long planks
- Check the geometry along the entire length
- What to do with a plank whose geometry is questionable
- Determine the face side and direction before marking
- For a clear finish, first match adjacent sections
- For enamel, texture matching can be simplified
- The preliminary layout distributes the material across the project
- First, secure the longest pieces to the slats
- Label the source slat and each future cut piece
- The test finish should represent your batch
- A short sample does not show how a long slat behaves
- When to finish the slat: entirely or after cutting
- The mounting surface affects the finishing route
- Include open ends in the processing map
- Check the base before starting the entire set
- Confirm the final length on the first piece
- A dry fit after cutting verifies the finished assembly
- A separate set is assembled for each product
- The specification requires both full-length strips and pre-cut segments
- Reserve and offcuts are assessed by usable length
- Where to buy a decorative solid wood strip

A long strip can easily be turned into several short parts. Restoring the original plank after an unsuccessful layout is no longer possible. If the entire delivery is first cut to the list of lengths and only then does one start selecting wood for adjacent fronts, the suitable section may turn out to be too short, and the most noticeable grain transition may land on an exposed joint.
A decorative solid wood strip undergoes preliminary preparation before final cutting: acceptance, geometry check, identification of visible sides, allocation to products, and trial finishing. After that, the cutting map is refined, the parts are produced, an accurate dry fit is performed, and the set is handed over for installation.
There are two distinct layout stages here. Full-length strips allow you to choose the adjacency of the wood and reserve the required sections. Already cut parts allow you to check angles, lengths, and fit. Preliminary allocation does not replace the final fitting, but it helps you approach it with prepared material.

Acceptance begins with a specific strip configuration
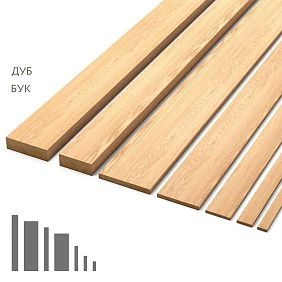
The entry “wooden moulding — ten strips” does not allow the delivery to be verified. You need the item code, species, cross-section, commercial length, and blank finish. Even visually similar elements may be intended for different parts of the project.
Before cutting, verify the delivery against the order and production specification.
| What to Check | What question does the check answer |
|---|---|
| Item code and selected size | Whether the correct model was received in the correct configuration |
| Beech or oak | Whether the material matches the project |
| Cross-section and profile | Whether the part fits the intended joints and adjacent elements |
| Nominal and actual length | Whether the planned cut pieces can be accommodated |
| Number of whole planks | Whether the delivery matches the order |
| Visible surfaces and edges | Are there any damages requiring a separate decision |
| Execution for finishing | Does the blank match the intended coating |
Until deviations are clarified, keep the labeling and packaging information. If you need to contact the supplier, a photo of the whole plank and the damaged area will be more useful than a picture of already cut remnants.




One article number may include several sections
In the product card wooden slat RK-001 for example, options 15 × 5 × 2400, 40 × 5 × 2400 and 60 × 23 × 2400 mm are presented according to the designations A × C × L. Beech and oak are specified for these options. Therefore, one article number in the work record is not enough.
Record the selected section and length in full. Then check the arrangement of dimensions against the drawing: which surface is taken as the face, where the mounting plane is located, from which edge the joint is built.
If a decorative wooden profile of a different shape is required, the same procedure applies. You can find the documentation in the section drawings and models STAVROS. The photo shows the general appearance of the product, but it cannot be used to reliably reconstruct the geometry of the joint.
Our factory also produces:

Before cutting, organize a storage place for long planks
While the batch awaits work, long-length pieces must not rest randomly on the edge of the workbench or lie under a heavy stack of other materials. Prepare a level place with supports that do not cause noticeable sagging and do not damage the face surface. Separately keep track of which slats belong to the delivery.
В STAVROS recommendations for storing wooden products it is stated that the material must be protected from water, prolonged direct sunlight and exposure to heat sources. This also applies to the waiting period between acceptance, cutting and finishing.
Wood exchanges moisture with the surrounding air; the relationship of its condition to temperature and relative humidity is described in the USDA Forest Service handbook. Therefore, the promise that it will "sit for a day and be ready" without taking conditions into account does not provide a reliable basis for work. The procedure for conditioning and monitoring the condition of the material is determined by the requirements of the product and the workshop's technology.
Get Consultation
Check the geometry along the entire length
A beautiful end and an even first twenty centimeters say nothing about the middle of a two-meter slat. You need to check both edges, the mounting side and the position of the profile along the entire working length.
Start by inspecting along the element. Then use a verified level base and a suitable measuring tool. Inspection helps find a suspicious area, while measurement helps describe it for decision-making.
Distinguish between several possible deviations: bowing along the wide side, the edge deviating sideways, and twisting, in which the cross-sections rotate relative to each other. For installation they create different difficulties. A slat may look straight from the side but not sit flush with its mounting surface.
Evaluate a thin strip taking into account its own deflection and the position of the supports. Do not press it to the table with your hand to create the appearance of a straight part. In the record, note where the deviation was found and under what conditions it was checked.
There is no universal tolerance for any wooden profile here. The result is compared against the requirements of the specific product and the agreed delivery terms.
What to do with a strip whose geometry is in doubt
First, separate it from the confirmed material. Do not send a questionable strip to general cutting with the expectation that short pieces will "straighten themselves out."
In some projects, a usable section can be used for a short part if this is permitted after inspection. But the decision is made before cutting: the required length, cross-section, installation fit, and the ability to preserve the surface are assessed. Shortening in itself is not a way to confirm quality.
Do not plan forced straightening with fasteners as a standard installation operation. If the strip holds the required position only under noticeable force, the cause and the suitability of the assembly must first be addressed.
This order preserves the options: request a decision from the supplier, change the purpose of the acceptable section, or replace the element. After mass cutting, there are fewer options.
Determine the face side and direction before marking
For a rectangular strip, the possibility of rotation sometimes seems obvious. But the project may specify a visible wide side, the position of an edge, or the direction of the grain. For a shaped profile, orientation is additionally determined by its cross-section.
Before drawing the cut lines, mark the face and mounting sides. If the position matters, add the "top" direction and the designation of the reference edge from which the length will be measured.
Check not only the convenience of marking but also the future installation. Rotating the strip for a more attractive grain pattern is acceptable as long as it preserves the required profile and mounting plane. For an asymmetric element, these conditions may limit the choice.
Place the marking so that it does not spoil the finish and does not fall into a critical glued joint. Test the marking method in advance on a suitable area or use an accompanying tag.
For a transparent finish, first select adjacent areas
It is useful to lay out the oak moulding for one frame together while it is still in the form of whole strips. Look at which areas will become the top, sides and bottom. These are exactly the ones that will be seen simultaneously after tinting.
Compare the material under the same lighting and in a comparable surface condition. A dusty strip next to a cleaned one may appear different in tone. A glare on a smooth area can also hide or enhance the pattern.
If the elements are technically accepted, distribute them by wood character: calmer, more expressive, intermediate. These are working groups for assembly. Their names must not turn into homemade quality grades.
Beech for a transparent coating is checked in the same way. Belonging to the same species does not guarantee the same appearance, and the same article number does not promise a repeat of the natural pattern.
For enamel, texture selection can be simplified
An opaque coating reduces the importance of the original shade, but it preserves the requirements for geometry, surface preparation and neatness of joints. If a smooth painted slat is required, noticeable relief transitions cannot be ignored just because the wood colour will be covered.
In the description quality of STAVROS wooden products blanks for enamel and for tinting differ. For the former, lamellas are joined without matching by colour and texture; for the latter, such matching is performed, although minor differences are allowed.
Therefore, a change of intent after purchase requires verification. If the strip was bought for opaque finishing, it cannot automatically be considered suitable for a light transparent coating. Start with a real sample before finishing the entire batch.
Preliminary layout distributes the material across the project
Before cutting, you need to understand which source strip will yield material for a specific front, frame, or panel. At the same time, whole long elements do not necessarily have to be physically laid out into a finished rectangle.
It is enough to mark the future zones on the strips and match them against the product diagram. On the workbench, you can mark the position of the sides and place the corresponding sections of wood nearby. Lengths and allowances remain in the cutting map for now.
Make a combined layout for the two cabinet doors. If they stand next to each other, a noticeable difference between the frames may matter more than small differences within each individual door.
A photograph with numbers helps you remember the distribution. It does not replace direct color comparison, but it lets you recall which part of which strip was assigned to the right side panel.
First, assign the longest parts to the strips
A long continuous section is harder to find than a short crosspiece. Therefore, preliminary distribution starts with the most demanding lengths, then short elements are placed on the remaining suitable sections.
Let us imagine a conditional task with straight crosscuts. After preparing the ends, the usable length of the strip is 2380 mm. It needs to yield two pieces of 1000 mm and one of 300 mm. Their total length is 2300 mm. If three cuts of 3 mm each are needed to separate these three parts, the remainder will be:
2380 − 1000 − 1000 − 300 − 9 = 71 mm.
A 100 mm long sample can no longer be obtained from this offcut. If such a sample is cut first and then all the working parts are to be placed, there will not be enough material. For the color sample, a pre-allocated section of another plank or a separately provided sample is needed.
The numbers in the example are conditional. For angled cuts, ornament matching and a different kerf width, a separate scheme is built. The detailed calculation is provided in the material “Decorative wooden moulding: how to calculate the linear footage and cutting map”.
Label the source plank and each future offcut
Assign internal numbers to whole elements: “Plank 01”, “Plank 02”. Each future offcut must have a link to the source and its purpose: “01-B — facade 02, top”.
The letter in such a record denotes the instance within the workshop, not the manufacturer's article number. The article number is stored separately and remains the same for parts of the same product configuration.
Before sawing, make sure that after separation the marking remains on each offcut or is transferred to its separate cell. A common tag on a long batten will not help if it remains only on the first piece.
If sanding removes the marks, transfer the designations to the accompanying sheet in advance. The marking must travel with the part through all operations, otherwise the preliminary selection will end in mixing on the next table.
The test finish must represent your batch
A sample with the same species and surface preparation as specified in the project is suitable for color selection. It is better if it shows the wood from the batch actually purchased. If the material differs noticeably, one random board may not be enough.
The manufacturer Rubio Monocoat in colour sample production guidelines indicates the need to reproduce the preparation and coating application that will be used on the product. Otherwise, the sample tests a different technology and predicts the result less accurately.
Record the compositions and the working sequence. Evaluate after the curing time specified for this system. A universal drying time for oil, stain, and lacquer does not apply here.
After the sample, reassess the preliminary adjacency of the planks. If the differences have increased, it is better to rearrange them now, while the long sections have not yet become final parts.
A short sample does not show the behavior of a long slat
In the STAVROS catalog you can order molding samples 100 mm long. They help evaluate the cross-section and appearance of a small area. The material of a specific sample must be confirmed: the section offers MDF, beech, and oak depending on availability.
Such a sample does not confirm the straightness of a whole plank and does not show the pattern across the entire side of a tall frame. To check a batch, the long elements themselves will need to be inspected.
If the profile is textured, it is advisable to see the test coating on its actual cross-section. Light and shadows in the recesses change the perception of color. A smooth board can help choose a shade, but it does not replace checking the finished profile.
When to finish the slat: entirely or after cutting
The sequence is determined by the product, the coating, the requirements for the ends, and the installation method. A test coating is needed before starting the chosen route, but the route itself may vary.
| Sequence | When it is being examined | What to check |
|---|---|---|
| Cutting, dry fitting, finishing of individual parts, assembly | Open edges must be treated in advance and joints checked | Keeping sets together, protecting assembly areas, ability to assemble after coating |
| Finishing of the long plank, cutting, edge treatment and touch-up, assembly | The technology makes it possible to obtain a coating on a long element and to cut it neatly after curing | Coating behavior at the cut, quality of touch-up, visibility of transitions |
| Cutting, dry fitting, fastening to the prepared base, overall finishing | The composition is intended to be painted as a single unit | Access to all surfaces, joint preparation, compatibility of the substrate and the adhesive bond |
In the second route, the work cannot be considered complete immediately after sawing. New end faces have appeared, and the cut may have sustained coating damage. For a clear finish, the invisibility of the repair is checked on a test piece.
For the third route, a test fragment of the joint is useful: a slat, the substrate, and a joint with the common finish. This allows you to check access to the recesses and the appearance of the boundary between the parts. A separately painted piece of profile does not confirm that the entire assembled unit can be finished with the same result.
The mounting surface affects the finishing route
Before painting, find out how the slat will be fastened and which surfaces it will be joined to. Uncoated wood, a primed panel, and a finished lacquered facade each require verification of compatibility with the chosen product.
For example, in Titebond's explanations on gluing painted surfaces it is stated that most woodworking adhesives of this brand are intended for uncoated wood. When gluing through a finish layer, the strength of the joint also depends on how firmly the layer itself adheres to the wood.
If the unit requires bare wood in the contact area, ensure it is preserved until the finish is applied. You cannot first coat all sides and then choose an arbitrary adhesive out of habit.
Select Mounting and finishing materials should be selected for the specific substrate and technology. The size of the contact area, the clamping pressure, and the holding time are checked against the chosen product and the joint design.
Open end faces are included in the finishing map
With a long product strip, the craftsman primarily sees the longitudinal surfaces. After cutting, each segment gets its own end faces, and some of them become visible on the finished furniture.
For each end, determine its purpose: an open finish, a joint, an abutment, or a glued contact. This determines the preparation and the order of coating application. Painting all end faces the same way without considering the joints is inconvenient: the finish may end up where the assembly needs a different surface.
Check the open end face on a test piece together with the face side. It may take the tint differently, so a color match along the strip does not yet confirm the appearance of its end.
If the joint is to be covered by an adjacent element, still check the actual mating. A design designation of "hidden" does not fix a gap that remains visible after assembly.
The base is checked before launching the entire set
A straight strip does not automatically correct an uneven panel. Before the final cutting, compare the actual dimensions of the base with the drawing, check its flatness and abutment points. If the front is already assembled, make sure that its geometry allows obtaining the specified frame.
For a solid wood base, the grain direction and possible changes in the wood's dimensions are taken into account. The fastening scheme for a long strip cannot be automatically transferred from another material just because the surfaces are painted the same. The acceptability of the joint is confirmed for the specific assembly.
If the base has not yet been manufactured, the control dimension in the specification must be unambiguous. Sawing the entire batch to the approximate dimension of future fronts is risky: the resulting segments may end up without an allowance for fitting. First confirm the geometry of the first product or of the template provided by the technology, then start the repeating parts.
The final length is confirmed on the first part
Before serial cutting, check the setup on the material intended for this, then try the first working part. Control the length against the accepted datum, the position of the profile, and the side of the cut.
For a corner joint, first determine which edge the length was recorded along: outer, inner, or another edge specified on the drawing. Otherwise, two operators may end up with different cut pieces while using the same number.
Do not carry the error from the first part over to the entire batch. If it does not fit, find the cause: incorrect reference, setup, cut direction, or dimension in the documentation. After correcting it, confirm the result with a repeat test fit.
A long element must have suitable support during processing. The order of clamping and work is chosen according to the equipment; the strip must not shift because of an unsupported end. Return finished cut pieces to their labeled sets immediately.
A dry fit after cutting checks the finished assembly
Now the individual parts can be used to assemble the frame or lay out the strips in their exact position on the base. For now, fastening remains temporary, without final adhesive bonding.
Check the side lengths, corner joints, mounting fit, and edge positions. For the frame, assess the consistency of the geometry as a whole, not just one successfully closed joint.
If the parts have to be noticeably bent or shifted relative to the markings, stop before installation. The error may relate to the base rather than to the strips themselves. Clamping must not hide an unresolved problem.
On paired fronts, repeat the check simultaneously. After finishing and final installation, it will be significantly harder to change the distribution of the pattern or the position of strips that are identical in length.
If the test fit was performed before coating, also check the fully finished part in tight seating areas. Determine the coating's readiness for assembly according to the instructions for the system used: a surface that can already be touched carefully is not necessarily ready for clamping, contact with packaging, or gluing.
A separate set is assembled for each product
Place the four pieces of one frame together and mark the facade number. When painting together, parts from different sets may go through the same operation, but their belonging must be preserved.
In a small production, labeled cells and a list are sufficient. On the drying rack, allocate places for specific items. If one part has been sent for rework, mark the set as incomplete.
Before assembly, recount the elements and verify the layout. It is especially easy to mix up two side panels of the same size, for which different visible sides were previously specially selected.
Keep a separate record for the control sample. If it is kept in the workshop as a finishing reference, it must not simultaneously be counted as a working piece for the customer's facade.
The specification needs both whole strips and finished pieces
The purchasing record describes the product, while the production record describes its distribution. They are linked by the article number and the internal number of the source strip.
| Field | What to record |
|---|---|
| Product | Article number and link to the card |
| Material and workmanship | Beech or oak, selected blank preparation |
| Size | Cross-section and commercial length according to the card |
| Source plank | Internal number and delivery affiliation |
| Usable section | Length after inspection and end preparation |
| Layout | Segment numbers, dimensions, allowances and measurement rule |
| Orientation | Face side, reference edge, position in the product |
| Wood combination | Adjacent part numbers and agreed layout |
| Finishing | Approved technology code and control sample |
| Purpose | Front, frame or panel number |
When changing the cutting plan, update the record before passing the material to the next craftsman. The old marking on the rail and the new table create a risk of getting a correctly cut part for someone else's section.
Reserve and offcuts are assessed by usable length
Several short offcuts do not replace one long side panel if the project does not allow a joint. Therefore, the reserve is determined after the cutting map, taking into account which elements will need to be restored in case of an error.
For visible solid wood, wood compatibility is also taken into account. A spare section of the required length may differ noticeably from the already selected pair of fronts. It is better to evaluate it next to the working set in advance.
On the retained offcut, indicate the item code, cross-section, material, usable length, coating condition, and the number of the original strip. Keep sections for finish samples separate from the confirmed installation reserve.
If an additional strip is required, repeat the supply and visual matching check. The same item code helps reproduce the product configuration but does not guarantee that the wood grain will match the previous batch.
Where to buy a decorative solid wood strip
For order decorative solid wood strip prepare a specific list: model, cross-section, beech or oak, length, and number of whole strips. Indicate whether opaque painting or a finish with visible texture is planned.
If you are going to buy wooden strips for decor in a small series, attach a list of the longest segments. It will help check whether the offered product length is suitable for the project. The possibility of obtaining all short parts from the total footage is still confirmed by your own cutting map.
If you need other wooden profiles for furniture, compare them in the section of wooden moldings and millwork. Before replacing the selected profile, recheck its joints and cutting map: a similar appearance does not make two models interchangeable.
For repeat purchases, you can review conditions for manufacturers. Availability of the required version, scope of supply, payment and delivery are confirmed for a specific order. Additional texture matching or custom processing cannot be considered automatically included.
By the time of the final cutting, each strip must have a clear purpose, and each future segment must have a designation and a verified processing sequence. Then a set with confirmed lengths, sides and finish, already test-fitted to its product, arrives for installation.