Article Contents:
- The bottom joint decides the fate of the entire pilaster
- Confirmed characteristics of BS-001
- Four versions of BS-001: size must match the scale
- BS-001 225 × 80 × 31 × 21 × 60 mm
- BS-001 225 × 100 × 31 × 21 × 80 mm
- BS-001 225 × 130 × 31 × 21 × 110 mm
- BS-001 225 × 160 × 35 × 25 × 140 mm
- The plinth is interrupted at the side faces of the base
- The base is installed above the plinth
- Stepped joining of the plinth to the side part
- Beech for opaque finishing
- Oak for expressive texture
- Buying the base before choosing the barrel
- Relying only on B
- Considering G as the pilaster width
- Not accounting for the plinth depth
- Running the plinth behind the base
- Trimming the base on site
- Installing paired parts from different floor levels
- Choosing size by photo
- Ordering the base and capital from different systems
- Mix beech and oak
- Painting elements on different dates without a sample
- Ignore floor level difference
- Mount on non-durable finish
- Finish the baseboard first
- What is BS-001?
- What sizes are available?
- Are all variants the same height?
- Which BS-001 width should I choose?
- What does parameter G mean?
- What materials is the base made from?
- Is beech suitable under enamel?
- Can oak BS-001 be tinted?
- How to join the base with the floor plinth?
- Can the plinth be run behind the base?
- Can the back part of the base be cut out for the plinth?
- What should be installed first — BS-001 or the plinth?
- Is a 1:1 template needed?
- How to choose the shaft?
- Is a capital from the same collection needed?
- Is BS-001 suitable for furniture?
- Can BS-001 be used in a door portal?
- How many bases are needed for a portal?
- Where can I see other bases?
- Where to buy BS-001?
- What should be sent to the manager before ordering?
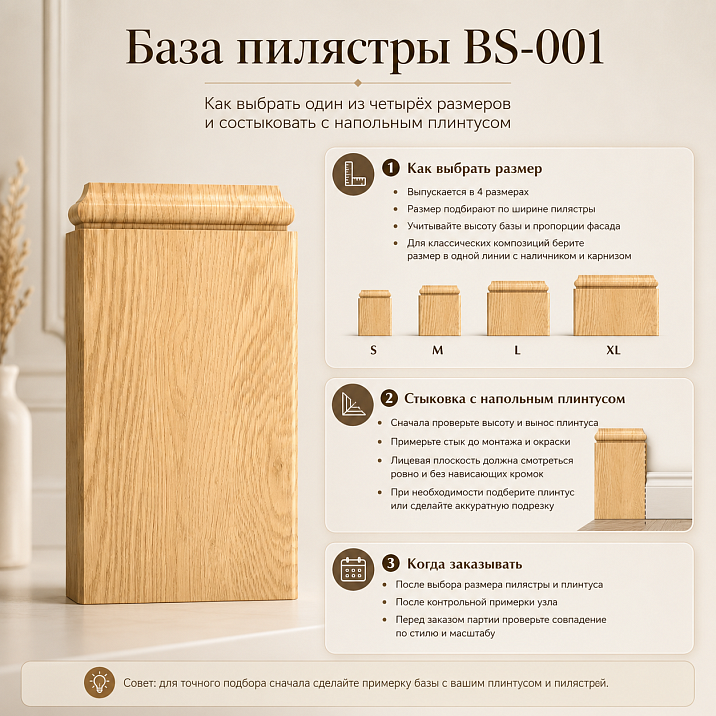
Pilaster base BS-001 in four sizes It is needed not after the pilaster has already been assembled, but at the very beginning of designing the architectural vertical. It is the lower node that determines where the floor plinth will end, how far the decor will protrude from the wall, whether the base will align with the shaft, and whether enough free space will remain around the composition. An error at the floor rarely remains local: it rises upward along with the entire pilaster and becomes noticeable at the capital level.
The buyer often starts with the beautiful upper part, chooses the shaft, mentally tries on the capital, and leaves the base "for later." On site, it turns out that the plinth has already been installed as a continuous line, its profile protrudes forward, and BS-001 must stand directly against the wall. There is a temptation to cut out the back part of the base, raise the base above the plinth, or move the entire vertical away. Each of these steps changes the original composition and can ruin an expensive set.
BS-001 has four size variants: 225 × 80 × 31 × 21 × 60 mm, 225 × 100 × 31 × 21 × 80 mm, 225 × 130 × 31 × 21 × 110 mm, and 225 × 160 × 35 × 25 × 140 mm. The height remains constant at 225 mm, while the width B increases from 80 to 160 mm. Beech and oak are available, with a "Prestige" sanding quality. Specific surface preparation, availability, and the current price of the pilaster base are checked in the product card before ordering.
The main question of this article is not reduced to the phrase "which base to buy." You need to understand which BS-001 variant corresponds to the pilaster shaft, the wall section, the furniture, and the floor plinth. After that, you choose the material, calculate the quantity, coordinate the joint with the horizontal decor, and order the base together with the other elements. This route turns a separate wooden part into a cohesive architectural system.

The lower node determines the fate of the entire pilaster
A pilaster is perceived vertically, but its design begins at the floor. The bottom point sets the central axis, the width of the decorative field, the depth of the projection, and the relationship to the baseboard. If the base is shifted even slightly relative to the shaft, the capital at the top will also end up in the wrong coordinate. If the base is placed higher than planned, the entire vertical may not fit under the ceiling cornice.
BS-001 performs a compositional function: it visually widens the bottom of the pilaster and transitions the narrow shaft into the horizontal of the floor. It is not a load-bearing structural support and should not be perceived as a structural column. Its task is to frame the lower part of the decorative vertical, connect the shaft with the surrounding plane, and create a clear finish.
The commercial value of choosing a base lies in precision. The buyer pays not only for a carved wooden element, but also for a predictable size, ready-made profiling, the ability to choose beech or oak, and to assemble a set of coordinated parts. A random blank cut on site rarely replicates factory geometry and almost always complicates the finishing of paired pilasters.




Confirmed specifications of BS-001
| Parameter | Confirmed value | What this means for the project |
|---|---|---|
| Article number | BS-001 | Allows ordering a specific model without mixing it with BS-002, BS-007, and other bases |
| Product type | Wooden base for a pilaster | Lower decorative element of a vertical composition |
| Number of sizes | 4 | A base can be selected to match different pilaster scales |
| Height A | 225 mm in all versions | The top mark of the base remains constant |
| Width B | 80, 100, 130, or 160 mm | Defines the external frontal scale of the base |
| Depth C | 31 mm for three sizes, 35 mm for the widest | Requires a side cut and checking the baseboard |
| Parameter F | 21 or 25 mm | Readable only from the technical drawing |
| Parameter G | 60, 80, 110, or 140 mm | Cannot be automatically called the barrel width without checking the dimension arrows |
| Material | Beech or oak | The material is selected together with the shaft and capital. |
| Sanding | «Prestige» | The surface is prepared at the stated level, but the finish is designed separately. |
| Preparation | The card shows the version for enamel coating. | The exact configuration is checked before placing the order. |
| Collection | "Classic" | You can search for matching vertical elements in one product selection. |
The table helps quickly compare options, but does not replace a drawing. Five numbers in the dimension line describe different points of the profile. Only B can be confidently used as the external width according to the diagram data. Values C, F, and G should be read according to the arrows of the specific part, otherwise the designer risks mistaking a decorative step for a mounting platform.
After the initial check, it is convenient to view drawing BS-001 and overlay it on the front view of the pilaster. For a serious project, this is not enough: you will also need a side section showing the wall, panel, base depth, and floor plinth.
Our factory also produces:





Four executions of BS-001: size must match the scale
The same height of 225 mm unifies the series, but the width changes the character of the base. A narrow base looks neat and suits a compact vertical. A wide one creates a more substantial lower accent and requires a sufficiently spacious wall section. You cannot assume that the largest option automatically looks more expensive. In a tight space, it will press on neighboring details and disrupt the proportion.
Get Consultation
BS-001 225 × 80 × 31 × 21 × 60 mm
This is the most compact execution of the series. The external width B is 80 mm. It can be considered for a narrow furniture pilaster, a small door portal, a thin vertical between facades, or a wall section where every centimeter matters.
Before ordering, check the distance to the casing, cabinet edge, wall panel frame, and floor plinth. The narrow base must not be wider than the available space. At the same time, you cannot choose it just because it fits: the upper junction must correspond to the shaft.
In a furniture project, a compact base helps preserve the useful width of the facade. But if the shaft is visually massive, an 80 mm base may look too weak. The decision is made on a full-size layout, not from a miniature in the catalog.
BS-001 225 × 100 × 31 × 21 × 80 mm
The 100 mm wide variant occupies a middle position. It can be checked for cabinets, libraries, wall panels, mirror compositions, and door portals of moderate scale. It already creates a noticeable lower accent but does not require as wide a wall section as the 130 and 160 mm versions.
Special attention is paid to the plinth. If its height is close to the decorative steps of the base, accidental adjacency will create a visual break. The plinth is either neatly interrupted at the base or a stepped transition is designed. Raising BS-001 to the top edge of the plinth is possible only after checking the total height of the pilaster.
BS-001 225 × 130 × 31 × 21 × 110 mm
A width of 130 mm is suitable for a more expressive architectural vertical. This size can be considered in a large cabinet, wide portal, boiserie, or wall composition with noticeable vertical divisions.
The wider the base, the more important the free margins on the sides. If there is a casing, door hinge, furniture edge, or molding frame nearby, decorative elements should not blend together. A meaningful pause or precise joint, as specified in the project, is needed between them.
The 130 mm version requires checking not only from the front but also in plan. The depth of 31 mm may protrude further than the adjacent wall panel. Then a shadow will appear on the side edge, which must either be accepted as part of the composition or eliminated by changing the base layers.
BS-001 225 × 160 × 35 × 25 × 140 mm
The widest version has an increased depth C — 35 mm and parameter F — 25 mm. It is considered for a large-scale pilaster, tall room, wide pier, monumental door portal, or composition with a developed capital.
A wide base requires architectural space. On a narrow wall, it may approach a corner, casing, or furniture so closely that it loses its independent contour. In a furniture facade, 160 mm can occupy a significant part of the panel and change the opening of the adjacent door.
This size is especially sensitive to the floor plinth. The depth of 35 mm and the developed profile cannot be thoughtlessly trimmed from the back. If the existing plinth interferes, a new joint is first designed or another base is chosen.
Comparison table of four BS-001 sizes
| BS-001 size | External width B | Depth C | Possible scale | Main check |
| 225 × 80 × 31 × 21 × 60 mm | 80 мм | 31 мм | Compact furniture or wall vertical | Is the top connection sufficient for the selected barrel |
| 225 × 100 × 31 × 21 × 80 mm | 100 мм | 31 мм | Medium cabinet, mirror, portal, panel | How the plinth fits the side edges |
| 225 × 130 × 31 × 21 × 110 mm | 130 мм | 31 мм | Large furniture and expressive wall composition | Are the margins to adjacent decor sufficient |
| 225 × 160 × 35 × 25 × 140 mm | 160 мм | 35 мм | Monumental pilaster and wide portal | Does the depth conflict with the baseboard, door, and panel |
The table does not mandate a rigid application. It shows the direction of choice. The same base can work in furniture, a portal, or a wall panel if the drawings match. The size is determined not by the room, but by the geometry of a specific vertical.
Why the base cannot be chosen only by width B
The buyer sees a clear number — 80, 100, 130, or 160 mm — and wants to compare it with the width of the stile. But the external width of the base is not automatically equal to the seating width of the upper part. The profile consists of steps, and the upper joint may be described by another parameter.
Need to check simultaneously:
-
external width of the base;
-
width of the upper platform;
-
width and depth of the stile;
-
base protrusion on the sides;
-
position of decorative steps;
-
capital width;
-
free field of the pier;
-
plinth depth;
-
wall panel thickness;
-
distance to the adjacent door or facade.
Architecturally, the base usually looks wider than the shaft, creating a stable lower part. But the amount of this expansion must be the same on the left and right. If the shaft is shifted by a few millimeters, the error is noticeable in the profile steps.
Therefore, a commercial request to "select the width of base BS-001" means not choosing a single number, but comparing two drawings. First, the shaft contour is obtained, then the base is selected, after which the capital and overall height are checked.
Size G cannot be called the shaft width without a drawing
The G values — 60, 80, 110, and 140 mm — appear to be related to the narrower part of the base. But without dimension arrows, it cannot be asserted that this is the exact width of the fit for the shaft. The parameter may refer to another step of the profile.
Misinterpretation is dangerous because it seems logical. The designer takes G as a ready-made joint, orders a shaft of the same width, and discovers a mismatch after delivery. To prevent this, in the working drawing, next to each number there should be a graphic arrow or a reference to a technical file.
If the shaft drawing is missing, the purchase of the kit is postponed. There is no need to try to compensate for the difference with grinding, pads, or a wide glue seam.
First, the architectural vertical is assembled on paper
The full kit consists of at least a base, a shaft, and a capital. In some compositions, connecting rosettes, inserts, moldings, and additional panels appear. It is useful to look in advance at what elements the architectural vertical is assembled from, and then proceed to specific item numbers.
The front drawing shows:
-
the finished floor level;
-
BS-001 with a height of 225 mm;
-
central axis;
-
barrel width;
-
joints between parts;
-
capital;
-
distance to the ceiling cornice;
-
fields up to casings and wall frames.
After that, a side section is drawn up. It is this that shows the conflict with the baseboard, which is impossible to notice in a beautiful frontal sketch.
The side section shows what the facade sketch hides
In the front view, BS-001 may look flawless: the width matches the barrel, the capital is aligned with the axis, and the fields are symmetrical. But from the side, the real layers of the wall are revealed. Plaster, wall panel, furniture facade, floor baseboard, and the base itself have different depths. If these values are not compared, the base will either hang above the plane or press against the baseboard.
The side section should include:
-
finished wall;
-
the base on which the decor will be mounted;
-
possible wall panel;
-
actual depth of BS-001;
-
skirting profile at full scale;
-
gap to the floor;
-
depth of the pilaster shaft;
-
order of finishing layers;
-
line of adhesion of glue or other fastening;
-
access for the installer.
Even if the skirting seems flat, its upper part may have a bevel or shaped profile. It is this area that falls into the side face of the base and forms a gap. Therefore, not only the maximum thickness of the skirting is measured, but also the shape of its cross-section.
Three ways to join BS-001 with floor skirting
General principles of how vertical decor meets horizontal are revealed options for joining skirting to the pilaster baseFor BS-001, these options need to be checked on a specific size, because the width and depth of the base change.
The plinth is interrupted at the side faces of the base.
This is the most understandable architectural scheme. BS-001 stands on the finished floor, and the floor plinth approaches it from the left and right. The vertical has its own base, is not artificially raised, and is not moved away from the wall.
Advantages of this solution:
-
the base retains its factory geometry;
-
no need to cut out the rear part;
-
the trunk starts at the design elevation;
-
the plinth reads as a horizontal line that approaches the architectural element;
-
paired pilasters are easier to install at the same level.
The complexity lies in the ends of the plinth. They cannot be left unfinished. Depending on the profile, a neat finish, return, decorative cap, or butt joint is required. The solution is designed before cutting the linear elements.
For the BS-001 version with a width of 80 mm, the interruption section will be compact. With a base of 160 mm, the horizontal plinth line breaks more noticeably, and the composition requires a sufficient wall section. On a long wall, two wide bases can heavily fragment the floor line — this needs to be seen in the overall elevation.
The base is installed above the baseboard
Sometimes the baseboard is already installed and they don't want to interrupt it. In that case, installation of BS-001 above the top edge is considered. This option is only acceptable after checking proportions and overall height.
Several questions need to be answered:
-
Is the baseboard perceived as the lower step of the base;
-
Does the width of the vertical composition match the wall section;
-
Does the base become too tall;
-
Is there enough space for the shaft and capital;
-
Do the depths match;
-
Is there a dark gap left behind the base;
-
How is the bottom edge finished.
The pilaster height increases by the height of the plinth. If the shaft has already been ordered to exact size, the capital may approach the cornice or extend beyond the allotted field. Therefore, raising the base "during installation" is not allowed.
Additionally, BS-001 with a height of 225 mm may lose contact with the floor after being raised. In a large composition this sometimes looks intentional, but in a compact one it seems as if the base is hanging on the wall. A full-size template helps to see the difference.
Stepped junction of the plinth to the side part
The third method is an agreed stepped transition. The plinth approaches the base not along the bottom edge and does not pass behind it, but meets a selected step of the side profile. This solution requires an accurate side drawing.
Check:
-
the height of the meeting point;
-
the depth of both profiles;
-
the junction angle;
-
the possibility of finish cutting;
-
the uniformity of the joint on the left and right;
-
the behavior of the coating at the joint;
-
the ability to repeat the solution on a paired pilaster.
A stepped transition can look elegant if the baseboard profile supports the geometry of the base. If the lines are random, the joint is perceived as a forced fit.
Why you cannot run the baseboard behind BS-001 without calculation
Attempting to simply install the base on top of a finished baseboard creates a void between the base and the wall. Externally, BS-001 protrudes forward by the thickness of the molding, the shaft also has to be moved out, and the capital no longer adjoins the original plane. A new substrate emerges that was not in the project.
Besides the visual shift, the contact area decreases. The base rests not on a flat wall, but on the baseboard profile with empty zones. Any mounting compound works differently than on a calculated plane.
If the project initially provides for a common backing behind the pilaster, it is shown in the section and made along the entire height. A random protrusion only in the lower part is unacceptable.
Why you should not cut out the back part of the base on site
When the baseboard interferes, it seems easier to make a recess in BS-001. But the factory base has a profiled shape and re-glued wood. Unauthorized trimming can:
-
reduce the mounting area;
-
expose untreated wood;
-
damage the edge of the profile;
-
disrupt the symmetry of the two bases;
-
change the position relative to the barrel;
-
ruin the part under a transparent finish;
-
cause chipping when working with a hand tool;
-
make return or replacement impossible.
The difference is especially noticeable in a paired portal: one base was trimmed deeper, the other shallower, and their front planes ended up at different levels. Such an error is visible in the light and shadow.
Geometry changes are discussed with a furniture technologist or manufacturer. Sometimes it is more correct to redo a short section of the plinth than to interfere with a complex carved element.
Full-size template BS-001: check before purchase
A 1:1 template allows you to see the node on the wall before ordering. It is made according to the drawing of the selected version, not from a photo. On thick paper or thin sheet material, the outer contour of the base, the top platform, and the central axis are marked.
Checking procedure:
-
obtain a drawing of the required size;
-
transfer the outline to full scale;
-
add the pilaster shaft;
-
mark the actual height and depth of the plinth;
-
secure the template to the wall;
-
check the front view;
-
apply the side profile;
-
assess the margins to doors, furniture, and frames;
-
repeat the layout for the paired vertical;
-
only after this to assert the quantity.
The template is especially important for the wide BS-001 160 mm. In the catalog, the difference between 130 and 160 mm seems small, but on a narrow wall segment, the extra 30 mm can bring the base closer to the casing or corner.
How to select the pilaster shaft for BS-001
The base cannot be chosen separately from the vertical element. The buyer must obtain a drawing of the shaft, determine its frontal width, depth, and the shape of the lower edge. Then these data are compared with the upper part of BS-001.
The correct sequence looks like this:
-
determine the scale of the entire vertical;
-
select the shaft;
-
check its length;
-
select the base according to the junction;
-
select the capital;
-
check the width of the top and bottom;
-
calculate the total height;
-
coordinate the material and finish;
-
order the set at the same time.
In the general catalog, you can view wooden pilasters and columns and compare available vertical elements. But a link to the category does not replace technical selection: matching the collection and material does not yet guarantee geometric alignment.
The capital must match the scale of the base
The architectural vertical is read as a system of extensions: the base forms the bottom, the shaft creates rhythm, and the capital completes the composition. If BS-001 is narrow and the capital is excessively wide, the top begins to dominate. If a 160 mm base is combined with a small capital, the bottom looks heavier than the top.
For harmony, compare:
-
external width of the base;
-
barrel width;
-
capital width;
-
the height of each element;
-
distance to ceiling;
-
adjacent cornice;
-
the scale of the doorway or furniture.
This does not mean that the top and bottom should have the same width. In classical composition, the capital may be developed, but the difference should look intentional.
To assemble a system in one style, it is useful to look at pilasters and columns from the "Classics" collection. BS-001 is included in this selection, meaning the buyer can look for adjacent elements in the common decorative language. Size compatibility is still checked against the drawings.
Base BS-001 on a furniture facade
In furniture, a floor plinth may be absent, but its place is taken by other constraints: the cabinet base, bottom panel, doors, drawers, and the body protrusion. The base should not hang over the plinth without a clear transition and should not interfere with opening.
For a furniture pilaster, check:
-
the height of the plinth;
-
facade thickness;
-
the position of the bottom drawer;
-
gap to the floor;
-
the opening of the adjacent door;
-
handles and hinges;
-
cornice projection;
-
barrel depth;
-
paint line.
The 80 mm version may suit a narrow stile between facades. The 130 and 160 mm options require a wider field and become a standalone architectural accent. On a tall cabinet, a wide base must be supported by a noticeable capital, otherwise the composition breaks off.
Built-in furniture often fits flush against a wall with a floor plinth. Then you need to decide whether the plinth ends at the cabinet, passes under the base, or meets BS-001 directly. The joint is designed together with the furniture body.
BS-001 in a door portal
Paired pilasters on either side of the door make the opening more expressive but require strict symmetry. The bases must have the same size, material, preparation, and installation height.
Before ordering, check:
-
width of the wall sections on the left and right;
-
position of the architraves;
-
thickness of extensions;
-
floor level;
-
door leaf opening;
-
hinge placement;
-
height of floor plinth;
-
capital and top finish;
-
distance to switches;
-
presence of nearby furniture.
If floor levels on the sides of the opening differ, bases cannot be installed simply "from the floor." First, a single horizontal line is determined. Sometimes local base preparation is required, but the decorative element is not used as a way to hide a construction difference without a project.
For a paired portal, it is better to buy the bases, shafts, and capitals from the same batch. This makes it easier to get a similar wood shade and identical preparation.
BS-001 in wall panel and boiserie
The wall panel creates an additional plane. The base can be installed on top of it or embedded into a prepared field. Both methods require a cut.
With surface mounting, BS-001 protrudes by its own depth plus the panel thickness. The chiaroscuro becomes more noticeable. When embedding, part of the depth goes into the structure, but the cutout must be precisely prepared and the mounting platform preserved.
They coordinate:
-
total panel thickness;
-
lower belt of boiserie;
-
molding frames;
-
baseboard;
-
joints of sheet materials;
-
wood grain direction;
-
coating color;
-
installation sequence.
Large architectural elements are better marked out before thin frames. If you install moldings and baseboards first, and then try to fit BS-001, short random segments will appear around the base.
BS-001 between cabinets or library sections
The vertical between furniture sections helps hide the technical joint and give the facade an architectural rhythm. However, the base should not block access to the cabinet fasteners or protrude into the door area.
The narrow 80 mm version saves space but requires precise alignment with the trunk. The 100 or 130 mm base can be used on a wider connecting field. The 160 mm size is only suitable when the furniture is specifically designed for a large vertical.
It is important to determine what BS-001 is attached to: the facade panel, a separate backing, or the cabinet body. A heavy wooden part cannot be mounted only on a thin decorative layer.
Base at the mirror and decorative panel
Paired pilasters on either side of the mirror create a classic frame. The scale of the reflective field is important here. Too wide bases will narrow the mirror, while too small ones will get lost next to a large capital.
Check the height of the lower edge of the mirror. If it starts above the base, an empty area may appear between them. If the mirror extends to the floor, BS-001 must have a clear connection to its frame.
In the hallway, additionally consider the floor baseboard, switches, outlets, and furniture. In the bedroom, consider nightstands and the height of the headboard. Architectural decor should organize the wall, not interfere with its use.
BS-001 in a commercial interior
In a restaurant, hotel, salon, or showroom, wooden pilasters can be repeated in a series. One incorrect bottom node is multiplied by the number of verticals, so a control sample is mandatory.
For a series, a specification sheet is prepared:
| Code | BS-001 size | Material | Baseboard | Barrel | Status |
| P-01 | As per project | Beech/oak | Interrupted/Step | Article number | Approval |
| P-02 | As per project | Beech/oak | Interrupted/Step | Article number | Approval |
| P-03 | As per project | Beech/oak | Interrupted/Step | Article number | Approval |
The first vertical is assembled and accepted as a reference. After that, the rest are repeated. This order protects against different base heights, uneven baseboard joints, and discrepancies in finishing.
Beech or oak: the material is chosen for the entire vertical
Beech for opaque finishing
Beech is rational when the base, shaft, and capital are painted with enamel in the color of the wall, panel, furniture, or portal. A smooth opaque surface makes the profile the main focus, not the wood grain.
When choosing, you need to order all parts from the same wood species and with the same preparation. If the base is beech and the shaft is oak, the difference may be less noticeable under dense enamel, but the different structure and preparation complicate the technology. Mixing materials without reason is not advisable.
Card BS-001 shows preparation for enamel. The current configuration of a specific size is checked before payment.
Oak for expressive texture
Oak is chosen when the natural grain should remain visible under a transparent or semi-transparent system. Such a finish highlights the solid wood, but requires more careful selection of adjacent elements.
Before ordering an oak base, you need to check whether suitable preparation is available for the selected size. The article should not promise a coating option that is not available in the specific card configuration.
On paired bases, the texture may naturally differ. This is not a reason to consider the wood defective, but the distribution of details across the portal sides should be done before finishing.
"Prestige" is a preparation, not a finished coating
The "Prestige" sanding quality describes the level of surface preparation. It does not mean that the base is already painted, varnished, or fully ready for installation without inspection.
Before finishing, the following is still performed:
-
acceptance;
-
trial assembly;
-
checking joints;
-
dust removal;
-
technological operations of the selected system;
-
test coating;
-
protection of installation zones.
If the base and shaft are painted separately, the color and gloss level must match. For complex tinting, it is safer to finish the entire set at once.
Finishing the base, shaft, and capital in one color
A single color unifies the parts and hides transitions between them, but does not correct geometric mismatch. A wide seam or shifted shaft will remain noticeable through light and shadow.
For the set, the following are approved:
-
color sample;
-
primer;
-
number of layers;
-
gloss level;
-
treatment of ends;
-
assembly order;
-
acceptable touch-up after installation.
If the plinth is painted in the same color, it must be decided whether it will visually be part of the base or an independent horizontal line. Different gloss levels can emphasize the joint even with the same shade.
Transparent finish requires especially clean joints
Under a transparent coating, you cannot hide trimming, putty of a random color, or wood differences. Any intervention in the back part of the base can open up layers of re-gluing and change absorption.
Therefore, it is especially important to order the oak BS-001 for transparent finishing in the correct size and not to rework it on site. The plinth and wall base are fitted around the finished geometry.
The mounting surface must be strong
Decorative plaster, loose putty, or a poorly secured panel do not become a reliable base just because the base is glued. The mounting assembly works together with the wall.
Before installation, check:
-
flatness;
-
strength of the surface layer;
-
compatibility of the coating and adhesive;
-
absence of dust;
-
humidity according to system requirements;
-
possibility of temporary fixation;
-
location of hidden wiring.
The card may show mounting adhesive among related products, but the specific composition is selected based on the base and finish. You cannot assign one adhesive for a painted wall, untreated wood, MDF, and plaster without verification.
Marking one base: the axis is more important than the edge of the wall
Walls are rarely perfectly straight, and corners are rarely strictly vertical. If you align the BS-001 with the nearest edge, the pilaster may deviate from the overall compositional axis. Therefore, marking begins not from the side boundary of the base, but from the center of the entire vertical line.
On the wall, the following are marked:
-
the overall central axis;
-
the finished floor level;
-
the upper mark of the base at 225 mm;
-
the width of the selected version;
-
the position of the shaft;
-
the upper point of the capital;
-
the boundaries of the plinth;
-
control offsets to adjacent elements.
After that, the template is applied. If the wall has a slight wave, you cannot pull the wooden part with force until it deforms. The base is prepared in advance. If the difference is significant, installation is postponed until the plane is corrected.
Installation of two BS-001 on both sides of the opening
Paired bases should be perceived as a mirror architectural system. The human eye quickly notices differences in height, field width, and relation to the baseboard. Even when the bases themselves are identical, incorrect marking creates the impression of different parts.
For a pair, one horizontal line and two central axes are used. The floor level is checked at both points. If one side is higher, you cannot simply place each base directly on the local floor and hope the capitals will align. You need to determine a design method to compensate for the difference.
Four groups of dimensions are checked:
-
distance between the inner edges of the bases;
-
distance from each base to the trim;
-
height of the top edge;
-
depth relative to the wall plane.
Before applying the mounting compound, both BS-001 are dry-fitted. The shafts and capitals should also be checked with templates. Only after overall acceptance do you proceed to fixation.
How to install BS-001 on an uneven floor
The unevenness of the floor is especially noticeable at a wide base: the long bottom edge can show a wedge-shaped gap. It cannot be filled with random sealant, especially with a transparent finish.
Possible solutions depend on the project:
-
prepare a locally level base;
-
adjust the floor level before the final finish;
-
use an agreed underlay hidden by the structure;
-
install both bases at a single mark with professional fitting;
-
change the skirting board scheme.
Self-filing of the bottom edge changes the height of 225 mm and can make the paired parts different. If fitting is necessary, it is performed by a specialist using a precise template and taking into account the final coating.
What to install first: the base or the skirting board
The most manageable sequence is to first determine and secure the large architectural verticals, then bring the skirting board to them. This way, the ends of the horizontal profile are fitted to the actual geometry of BS-001, not the other way around.
But the finishing technology of the object may require a different order. For example, walls and baseboard are painted with one system, and pilasters are installed later. Then the place for the bases is left free in advance according to the template and protected from accidental filling.
A bad scenario looks different: the baseboard is installed continuously, the finishing is completed, and then the base is applied for the first time. Any solution becomes a compromise — trimming, lifting, or
Pilaster kit specification
| Position | Article or parameter | Quantity | What to check |
| Base | BS-001 of the selected size | By the number of verticals | B, C, F, G and material |
| Barrel | As per project | By the number of verticals | Width, depth, length, and connection |
| Capital | As per project | By the number of verticals | Scale and top elevation |
| Baseboard | Selected profile | According to the wall schedule | Height, depth, and end cutting |
| Connecting elements | If necessary | According to the drawing | Geometry and style |
| Installation materials | By base | By calculation | Compatibility with the wall and finish |
| Test swatch | One approved sample | 1 | Color, gloss, and texture |
| Template | Front and side | For the typical node | Scale 1:1 |
Such a table is not needed for bureaucracy. It prevents a situation where the base is ordered from oak, the shaft from beech, and the capital has a different preparation. All parts must be linked by one schedule.
What to buy together with BS-001
A buyer rarely solves the task with a single base. Even if the shaft is already there, you need to check the capital, plinth, mounting materials, and finishing. Related items should help assemble the system, not turn into a random list.
| What to add to the purchase | Why | For which scenario | Commercial transition |
| Shaft and capital | Assemble the full vertical | Portal, wall, furniture | Select shaft and capital for BS-001 |
| Another base | Compare size and style | If BS-001 does not match the shaft | Catalog of wooden bases for pilasters |
| Collection elements | Keep the common decorative language | Classic interior | Classic decor for base BS-001 |
| Floor skirting board | Close the bottom horizontal of the wall | Any wall mounting | Check the profile and dimensions in the project |
| Mounting compound | Secure the decor to the base | Wall or furniture | Choose by material and finish |
| Finishing materials | Get a uniform color for the set | Enamel or transparent system | Approve on the sample |
| Full-size template | Check the joint before ordering | Paired and serial pilasters | Manufacture according to drawings |
The point of cross-selling here is practical: without the barrel, you cannot confirm the base width, without the plinth, the lower joint, without finishing, the material and preparation. Assembling before ordering is cheaper than fixing incompatible parts.
How not to confuse BS-001 with other bases
BS-001 has a calm profiled silhouette and four width options. Other bases may be taller, more massive, deeper, or richer in decor. The same purpose does not make them interchangeable.
When comparing, look at:
-
height;
-
external width;
-
top connection;
-
depth;
-
collection;
-
material;
-
profile shape;
-
combination with capital;
-
relation to plinth.
If BS-001 is not suitable, it is useful to compare BS-001 with other bases. Choosing an alternative only by photo is not possible: the problem of mismatch with the shaft will repeat with any model.
When it is better to look at BS-002 or BS-007
BS-002 and BS-007 belong to other bases and have their own geometry. They are considered if the project requires a larger, more developed, or stylistically different lower element. A separate material helps to understand other base options for a large pilaster.
Switching to another model is justified when:
-
The upper junction BS-001 does not match the barrel;
-
A width of 160 mm is still insufficient;
-
The capital is significantly richer in plasticity;
-
A different profile character is required;
-
The depth of BS-001 does not suit the wall system;
-
The composition belongs to a different collection.
There is no need to choose a more massive base just for the feeling of luxury. In a properly built vertical, the base supports the barrel, not argues with it.
BS-001 and a random carpentry blank
Theoretically, the base can be assembled from several profiled bars. In practice, you will need to accurately replicate four dimensional variants, obtain identical paired parts, process the ends, and ensure a clean junction with the barrel.
The finished BS-001 eliminates:
-
designing a profile from scratch;
-
selecting several linear trim pieces;
-
gluing steps together;
-
manually aligning paired bases;
-
re-manufacturing templates;
-
risk of different geometry.
The buyer still performs the design work but focuses on choosing the size, material, and installation rather than fabricating a complex base.
Purchasing BS-001 for repairing an existing pilaster
When replacing a damaged base, you cannot rely only on appearance. The old pilaster may have a non-standard shaft, different depth, and an individually trimmed base.
Before ordering, take the following measurements:
-
full height of the old base;
-
external width;
-
width of the junction with the trunk;
-
depth;
-
position of the baseboard;
-
dimensions of the damaged area;
-
material;
-
type of finish.
Then compare with drawing BS-001. If the dimensions do not match, you should not buy the closest option and modify it on site without a project. Sometimes it is easier to restore the old part or order a custom solution.
Purchasing BS-001 for new custom-made furniture
In new furniture, there is a main advantage — the body can be designed around the decor. The base size is chosen before approving the facades, and the plinth and lower panels are adjusted to its depth.
The designer must receive:
-
the selected size line;
-
a drawing;
-
material;
-
finish color;
-
position of doors and drawers;
-
plinth line;
-
general view of the shaft and capital;
-
installation base.
If the furniture is serial, first make one control facade. After approval, the dimensions are transferred to the remaining items.
Purchase of BS-001 for a finished interior
In a finished room, the restrictions are stricter. Baseboards, sockets, doors, and wall panels already exist. You need to measure the actual field and determine whether the base can be built in without damaging the finish.
Pay special attention to checking:
-
possibility to interrupt the baseboard;
-
presence of hidden wiring;
-
wall strength;
-
color match;
-
access for installation;
-
distance to furniture;
-
symmetry of paired zones.
If installing BS-001 requires deep wall restructuring, it is worth comparing the cost of the work with choosing another model or decorative scheme.
How much free space to leave around the base
There is no universal minimum clearance. It depends on the scale of the room, the width of the base, adjacent decor, and the viewing angle. But the edge of BS-001 should not accidentally touch the trim, molding, furniture, or corner.
Three types of clearance are checked:
-
installation — allows securing and finishing the part;
-
visual — allows the profile to be readable;
-
functional — preserves the opening of doors, drawers, and access to switches.
On the template, it is useful to mark not only the base itself, but also the movement zones of adjacent elements. A door handle or facade may not touch the base in the closed position, but may hit it when opening.
Light and shadow change the perception of width
The BS-001 profile creates horizontal steps. With side lighting, they produce a pronounced shadow, making the base appear deeper. Frontal soft light makes it calmer.
In a corridor with linear lights, any difference in the height of paired bases is more noticeable. In a furniture niche, a shadow can hide part of the profile. Therefore, the sample is evaluated under real lighting, not just on screen.
For oak, light also changes the tone of the texture. Two bases installed on opposite sides of a portal may look different due to the direction of light, even if they were finished together.
How to accept BS-001 after delivery
Acceptance is carried out before painting and installation. Each part is checked against the specification and drawing.
Check:
-
article BS-001;
-
size line;
-
quantity;
-
material — beech or oak;
-
sanding quality "Prestige";
-
surface preparation;
-
absence of chips;
-
profile geometry;
-
end condition;
-
matching of paired elements.
If multiple sizes are ordered, packages are marked according to installation location. Do not rely on visual differences: 80 and 100 mm versions can be confused on a large object.
Storage until installation
Bases are stored on a flat surface, protecting profiled edges. Do not place heavy materials on top or use products as temporary supports.
Parts are kept in labeled packages. Beech and oak from different projects are not mixed. If finishing is done in another workshop, transfer is carried out according to a list with quantities and codes.
Before installation, products are adapted to production conditions according to the accepted woodworking technology. Specific modes are not invented in the article — they are set by the responsible executor.
Main mistakes when choosing BS-001
Buying the base before choosing the barrel
The base looks good visually, but the top connection is not suitable. The correct step is to first get drawings of both elements.
Relying only on B
External width does not reveal the shape of the top platform and depth. You need to read the entire dimensional scheme.
Considering G as the pilaster width
A logical assumption may turn out to be wrong. The value is interpreted according to the drawing arrows.
Do not account for the depth of the baseboard
On the front view everything matches, but from the side the base hits the profile. A side section is needed.
Run the baseboard behind the base
BS-001 moves away from the wall and loses its mounting plane. The joint is designed in advance.
Trim the base on site
The profile gets damaged, requiring re-gluing and transparent finishing. First, the connection scheme is changed.
Install paired parts from different floor levels
The capitals end up at different elevations. A common horizontal line is used.
Choosing size from a photo
The image scale does not show the actual width of 80–160 mm. A 1:1 template is needed.
Ordering a base and capital from different systems
The bottom and top do not match in scale and style. The set is checked as a whole.
Mixing beech and oak
Different materials complicate finishing and disrupt unity with a transparent coating.
Painting elements on different dates without a sample
Color and gloss diverge. The entire vertical must have one approved standard.
Not accounting for floor level differences
A gap appears under one base, another stands higher. The foundation is prepared before installation.
Installing on unstable finishing
The decorative layer peels off along with the wooden element. The load-bearing surface is checked.
Finishing the baseboard first
After this, BS-001 has to be embedded into the finished horizontal. It is more correct to coordinate both elements simultaneously.
When BS-001 is particularly well suited
BS-001 should be considered if:
-
a classic wooden base with a calm profile is needed;
-
one of the four widths fits;
-
the height of 225 mm matches the vertical;
-
the trunk connects with the upper part;
-
the wall section allows placing the base;
-
the baseboard can be finished properly;
-
beech or oak of the required project are available;
-
The finish is done as a single set;
-
The mounting wall is strong enough;
-
Paired or repeating bases are needed.
A series of four sizes is especially useful: one decorative tongue can be applied in verticals of different scales within the same interior.
When it's better to choose a different base
Another option is required if:
-
The trunk does not match the junction;
-
The wall section is already 80 mm including margins;
-
A depth of 31–35 mm interferes with the door or furniture;
-
The baseboard cannot be finished correctly;
-
a more developed thread is needed;
-
the capital is noticeably more massive;
-
a radius or flexible part is required;
-
the surface is very uneven;
-
unconfirmed exterior application is assumed;
-
the base would have to be deeply undercut.
Instead of a compromise, it is better to choose a base of a different width and style.
How to buy BS-001 without reordering
-
Determine the location of the pilaster.
-
Measure the wall section and baseboard.
-
Select the barrel.
-
Obtain the barrel drawing.
-
Compare the four BS-001 versions.
-
Check B, C, F, and G according to the arrows.
-
Construct the front view.
-
Make a side section.
-
Select the baseboard junction method.
-
Check the capital.
-
choose beech or oak
-
Coordinate the finishing.
-
Calculate the quantity.
-
Execute the 1:1 template.
-
Check the current price and order terms.
After such preparation, you can buy BS-001 in beech or oak without allowance for random fitting.
Example of a request for BS-001
A base for the BS-001 pilaster is required for project ______. Selected size — 225 × ______ × ______ × ______ × ______ mm. Quantity — ______ pieces. Material — beech/oak. Preparation — according to the available card configuration. Pilaster shaft — article ______, capital — article ______. Floor plinth has a height of ______ mm and a depth of ______ mm. Selected junction method — interruption/installation above the plinth/stepped transition. Please confirm the drawing, element mating, current price, and order terms.
Such a request contains data that allows checking the set, not just selling one item.
Frequently asked questions about the BS-001 pilaster base
What is BS-001?
It is a wooden base for the lower decoration of a decorative pilaster. It is available in four sizes in beech or oak.
What sizes are available?
225 × 80 × 31 × 21 × 60 mm, 225 × 100 × 31 × 21 × 80 mm, 225 × 130 × 31 × 21 × 110 mm, and 225 × 160 × 35 × 25 × 140 mm.
Is the height the same for all variants?
Yes, parameter A is 225 mm in all four versions.
Which BS-001 width should I choose?
The one that matches the barrel according to the drawing and fits on the wall with the necessary margins. You cannot choose based on B alone.
What does parameter G mean?
Its value should be read according to the dimension arrow on the technical drawing. Without a diagram, G cannot be automatically considered the barrel width.
What materials are the base made of?
Beech and oak are confirmed.
Is beech suitable for enamel?
The card shows the configuration for enamel. The exact option for the selected size should be checked before ordering.
Can the oak BS-001 be tinted?
The possibility and surface preparation should be clarified for the specific configuration. For transparent finishes, it is especially important not to trim the base on site.
How to join the base with the floor plinth?
The plinth can be interrupted at the base, consider installing the base above it, or make a coordinated stepped transition. The choice is confirmed with a side section.
Can the plinth be run behind the base?
Only if the project provides a common substrate. Otherwise, BS-001 will pull away from the wall and lose its proper mounting plane.
Can the back part of the base be cut out for the plinth?
Unauthorized trimming is not recommended: it may damage the profile, re-gluing, and finish. Any modification should be coordinated with a specialist.
What should be installed first — BS-001 or the plinth?
It is often more convenient to first secure the architectural verticals, then bring in the plinth. But the order depends on the finishing technology of the site.
Is a 1:1 template needed?
Yes, especially for paired pilasters, wide sizes, and finished interiors. It shows the real scale and conflict with the plinth.
How to select the shaft?
Compare the shaft drawing with the upper junction of the base, check the width, depth, and overall height.
Is a capital from the same collection needed?
A unified collection helps maintain style, but geometric compatibility is still checked against drawings.
Is BS-001 suitable for furniture?
Yes, if the furniture facade and plinth are designed for its width, depth, and the opening of adjacent elements.
Can BS-001 be used in a door portal?
Yes. For a paired portal, symmetry, trim, baseboard, floor level, and door opening are checked.
How many bases are needed for a portal?
Usually two — one for each decorative vertical. The exact number is determined by the project.
Where can I see other bases?
В catalog of wooden pilaster bases.
Where to buy BS-001?
In the official card you can check the price of the pilaster base, choose the size and material.
What should I send to the manager before ordering?
Size BS-001, quantity, material, shaft and capital article numbers, joint drawing, plinth dimensions, and the selected connection method.
As-built passport BS-001 after installation completion
After acceptance, it is useful to save not only photos of the finished pilaster, but also a small passport of the joint. It records the exact size BS-001, material, surface preparation, shaft and capital article numbers, plinth connection method, the mounting compound used, and the finish code. Such a document is especially valuable for a hotel, restaurant, country house, or serial furniture where the same vertical is repeated in several rooms.
The passport helps, after several years, to restore a damaged part, repeat the color, order an additional pilaster, and understand why the plinth ends exactly at that point. Without it, a new contractor sees only the finished surface and has to re-measure the hidden joint.
| Passport section | What to save |
| Base | BS-001 and full dimension line |
| Material | Beech or oak |
| kit | Barrel articles, capitals, and connecting elements |
| Baseboard | Profile, height, depth, and finishing method |
| Installation | Wall base and applied fixing system |
| Finishing | Color code, primer, finish, and gloss level |
| Drawings | Front view, side section, and 1:1 template |
| Photos | Dry fit, marking, and final result |
An as-built passport does not complicate the project; it protects the investment. It turns a decorative vertical into a reproducible system: if one BS-001 is damaged or the design needs to be extended to an adjacent room, the client will not have to start the selection from scratch.
Conclusion: a good pilaster begins not with the capital, but with the floor
BS-001 may seem like a small part of a large vertical, but it is what connects the pilaster to the real interior. Four widths offer freedom of choice, yet each requires precise matching with the shaft, the wall section, and the floor plinth. The external width B helps assess the scale, but parameters C, F, and G must be read from the drawing. A single front sketch is not enough—the lower joint is revealed only in the side section.
The best time to choose the base is before installing the plinth, before painting the walls, and before ordering the entire vertical. Then you can calmly decide where the horizontal profile is interrupted, how the base fits against the wall, how far it protrudes, and whether it matches the capital. A full-size template turns these questions from guesses into verifiable dimensions.
Before purchasing select the width of the BS-001 base, choose beech or oak, assemble the shaft and capital in one specification and agree on the finish. Do not try to save an incompatible set by trimming on site: the correct size is always cheaper than rework.
STAVROS combines the BS-001 product card, the category of bases, pilasters and columns, the "Classic" collection, and profile materials on joining with the baseboard. This approach helps you buy not an isolated wooden part, but a complete architectural set in which the base, vertical, and top finish work as a single composition.