Article Contents:
- Short answer before ordering
- Confirmed specifications of Atlas HL-071M
- Why four parameters are more important than one number in the name
- Atlas 240 mm: total length does not equal mounting base
- Atlas 400 mm: expressive scale and mounting size 320 mm
- Atlas 560 mm: why value D cannot be "fixed by logic"
- Drawing is the main source for drilling
- How to distinguish total length from center distance
- Why common sizes 160 and 320 mm do not eliminate the need for verification
- Full-size template before purchase
- Replacing an old handle without redrilling
- New facade without holes: design before production
- Vertical installation on tall doors
- Horizontal installation on drawers and cabinets
- Paired swing doors: mirroring and collision
- Handle near molding, panel, and decorative profile
- Four finishes — four different order lines
- Natural oak: same SKU does not mean same grain pattern
- What does the "Prestige" preparation quality mean
- Drilling sheet: a document that protects facades
- One specification for the entire furniture series
- Drilling jig and paper template solve different tasks
- Control handle before launching the entire batch
- Batch acceptance before the first hole
- Fasteners and facade thickness
- Gaps and opening trajectories
- Ergonomics of a long wooden handle
- Atlas in the kitchen
- Atlas in the dressing room and on cabinets
- Atlas on the chest of drawers, nightstand, and sideboard
- New furniture and repairing existing one — different routes
- How not to confuse Atlas with a similar long handle
- Atlas and a random long handle: difference in order preparation
- What to buy and prepare together with Atlas
- How to write an order line without ambiguity
- Version control: one digit can change the entire facade
- Transferring the task between designer, cabinetmaker, and installer
- Marking handles and facades
- Photo protocol of the control installation
- Delivery and storage before installation
- Common mistakes when ordering Atlas HL-071M
- Consider A as the distance between holes
- Pass only the phrase "Atlas 400" to production
- Correct D for the 560 mm version independently
- Drill the entire series according to one internet table
- Measure old holes from edge to edge
- Do not consider the thickness and construction of the facade
- Mix coatings in one row
- Do not check collision of paired handles
- Use different axes on identical doors
- Reference two product URLs as different models
- What lengths does Atlas HL-071M have?
- What does parameter A mean?
- What does D mean?
- Is the length of Atlas 240 mm equal to the distance between holes?
- What parameters are specified for Atlas 400 mm?
- Why does the 560 mm version require separate verification?
- Can version D 560 be taken as 480 mm?
- What material is confirmed?
- What coatings are available?
- Can Atlas be placed vertically?
- Will Atlas fit a wide drawer?
- How to measure old holes?
- Can facades be drilled before receiving handles?
- Do I need a full-size template?
- Can one jig be used for 240 and 400 mm?
- How to position handles on paired doors?
- Do oak handles need to be matched by grain?
- What to write in the order?
- Where to check the current price and availability?
- What to do if the table and DWG differ?

Buy furniture handle Atlas HL-071M it is only valid after the project defines not just the overall length of the product, but also the exact coordinates of the mounting points according to the current drawing. The model has options of 240, 400 and 560 mm, but the number in the size designation refers to dimension A and should not be automatically transferred to the facade drilling map. Before ordering, you need to select the coating, check the parameters A × B × C × D, download the DWG, make a full-size template, and confirm the layout on one test piece.
The mistake here is costly not because the handle itself is complex, but because incorrect holes remain in the facade. If you tell the cabinetmaker "Atlas 240, drill every 240 mm", the holes will not match the mounting: for this version, the card specifies parameter D 160 mm. On a finished enameled door, correction may require a decorative overlay, coating repair, or complete facade replacement. When the same error repeats on a kitchen, wardrobe, or series of cabinets, the cost of rework far exceeds the time it would have taken to check the DWG.
For those planning buy wooden furniture handles for several pieces of furniture, it is useful to separate two tasks. The category helps compare shapes and coatings, while the article number for Atlas HL-071M answers a more specific question: how to read the dimension table of a specific long pull handle, prepare a drilling schedule, and not start a series of facades based on assumptions.
Below we will analyze three versions of Atlas, the role of each parameter, replacement of old hardware, vertical and horizontal installation, control of paired doors, batch acceptance, working with natural oak, and the order of data transfer between the designer, furniture manufacturer, and installer. The purpose of the article is not to replace the technical drawing, but to make it a mandatory part of the purchase.
Short answer before ordering
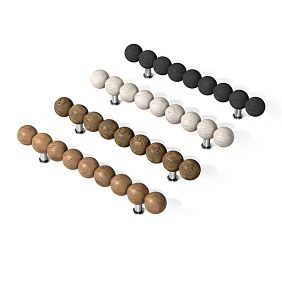
Atlas HL-071M is a long wooden pull handle made of oak. The card presents three overall lengths A: 240, 400, and 560 mm. The transverse parameter B for all three options is specified as 28 mm, parameter C as 45 mm. For versions A 240 and 400 mm, the table shows D 160 and 320 mm. For the A 560 mm version, D 240 mm is currently indicated; this combination requires separate verification against the current DWG and confirmation from STAVROS before making the template.
The working order is simple: choose the size and coating, download the drawing, determine the actual purpose D and the location of all mounting points, make a 1:1 scale template, attach it to the facade, check the opening of adjacent doors, and only then drill the test piece. After a successful fitting, the data is transferred to the specification of the entire furniture series.




Confirmed characteristics of Atlas HL-071M
| Parameter | Confirmed data | What to check before ordering |
|---|---|---|
| Model | Atlas HL-071M | Article number and selected size version |
| Type | Long wooden furniture handle-bracket | Compliance with the scale and method of opening the facade |
| Material | Oak | Pattern and shade of natural wood in the received batch |
| Option 1 | A 240 mm, B 28 mm, C 45 mm, D 160 mm | Purpose D and hole coordinates according to DWG |
| Option 2 | A 400 mm, B 28 mm, C 45 mm, D 320 mm | Purpose D and hole coordinates according to DWG |
| Option 3 | A 560 mm, B 28 mm, C 45 mm, D 240 mm per current table | Mandatory confirmation of the current drawing |
| Surface preparation | "Prestige" quality | Actual condition of the batch before installation |
| Coatings | Transparent, white, black, brown | Exact option in each order line |
| Technical materials | The card provides for working with drawing/DWG | File version and compliance with the selected modification |
| Target URL | Atlas HL-071M 240, 400 or 560 mm | Current dimensions, price, availability and configuration |
The table helps to quickly compare options, but does not serve as a drilling diagram. The letters A, B, C and D are tied to a specific drawing, so you cannot definitively interpret the fasteners only by the order of the letters or habits formed when working with other fittings.
Our factory also produces:


Why four parameters are more important than one number in the name
The buyer usually notices the largest number: 240, 400 or 560 mm. It is convenient for choosing the scale, but insufficient for production. The cabinetmaker needs hole coordinates, handle orientation, position relative to edges, and a confirmed template. The designer additionally needs to understand the product protrusion, visual width, and free space for the hand.
| Parameter | Practical meaning in the project | Typical mistake |
|---|---|---|
| A | Overall longitudinal dimension of the handle | Take it as the distance between holes |
| B | Cross-sectional size of the body | Not accounting for proximity to molding or narrow facade frame |
| C | Size of the protrusion/height of the structure according to the diagram | Not checking for collision with adjacent door or wall |
| D | Installation dimension, the exact purpose of which is confirmed by DWG | Using a number without verifying the location of mounting points |
Even when D visually resembles the center distance, the control source remains the drawing of the selected modification. It must show the axes of the holes, the number of attachment points, the position of the body, and the orientation of the dimensions. If the table and DWG differ, drilling is stopped until official clarification is received.
Get Consultation
Atlas 240 mm: total length does not equal mounting base
For the compact version, the card indicates A 240 mm and D 160 mm. The difference between the numbers is 80 mm. With conditionally symmetrical geometry, this would look like 40 mm of the body beyond the extreme axes on each side, but such a scheme cannot be approved without checking the DWG. The illustration is only for understanding: the overall dimension may be significantly larger than the installation dimension.
The 240 mm version is suitable for tasks where a long handle should be visible on the facade but not take up most of the height or width. It can be considered for cabinet doors, drawers, cabinets, and kitchen modules, but the decision depends on the size of the specific facade. On a narrow framed door, even a 28 mm cross-sectional size may conflict with the profile, panel, or decorative molding.
Before ordering, cut out a paper rectangle 240 mm long and 28 mm wide. Separately mark the mounting coordinates on it according to the current drawing. This template immediately shows whether enough margin will remain to the edges, whether the body will interfere with the relief, and whether it is comfortable to grip the handle with your hand.
Atlas 400 mm: expressive scale and mounting size 320 mm
For the medium version, A 400 mm, B 28 mm, C 45 mm, and D 320 mm are specified. It maintains the same 80 mm difference between A and D as the 240/160 version, but this similarity does not eliminate the need to check the drawing. A universal jig cannot be created based solely on an arithmetic sequence: each modification must be confirmed by its own DWG.
A length of 400 mm is clearly readable on tall doors, wide drawers, tall cabinets, and elongated fronts. It helps create a calm vertical line instead of a small local point. When installed horizontally on a drawer, the handle can become part of a common axis for several modules, but its position must be coordinated with the guides, internal partitions, and the grip method.
Check not only the center of the handle but also its ends. On paired double doors, two long items may collide when opening, especially if the fronts are at an angle or a protruding element is nearby. On a kitchen tall cabinet, clearance to the countertop, wall, adjacent refrigerator, and upper cornice is important.
Atlas 560 mm: why the D value cannot be "corrected by logic"
In the current dimension table for version A 560 mm, B 28 mm, C 45 mm, and D 240 mm are specified. Compared to the 240/160 and 400/320 variants, this entry looks atypical. It may reflect a design feature, multiple mounting points, a different axis position, or a data error. The available diagram does not allow reliably determining the reason.
The main rule: do not substitute a number that seems more logical for 240 mm. Values like 480, 320, or any others cannot be derived independently. Before ordering and drilling, it is required to check the current Atlas drawing, compare the designations, and obtain confirmation from STAVROS.
Until the data is clarified, the 560 mm version can only be evaluated using the overall template: apply a 560 mm long outline to the tall facade, check the scale and collision zones. It is not allowed to transfer mounting holes to the furniture based on a single row of the table. If the project is already in progress, in the specification opposite D, write "check against DWG and manufacturer confirmation" instead of leaving a presumed number.
The drawing is the primary source for drilling
The product card answers the question of which option can be ordered. The drawing answers the question of how exactly this option relates to the facade. These documents complement each other but are not interchangeable. In the project working folder, you should save not a screenshot of the table, but a file with the model name, size, download date, and version number, if specified.
Through the section to download the drawings of STAVROS products you can obtain a technical basis for verification. After downloading, ensure that the file specifically refers to HL-071M, not a neighboring model, and that it shows the selected configuration. If multiple sizes are collected in one DWG, the installer must explicitly mark the required layer or view.
The printout must preserve the scale. Before use, measure the control segment with a ruler: printing "fit to page" can imperceptibly reduce or enlarge the diagram. For a complex project, it is better to transfer the coordinates to your own list and attach a PDF or printout marked "control drawing".
How to distinguish overall length from center distance
The overall length is measured from one extreme end of the handle to the other. The center distance is measured from the center of one mounting point to the center of another, if the design actually uses two extreme points. The difference is fundamental: the edge of the body does not coincide with the screw axis, and for a long handle, the number or arrangement of fasteners may differ from the usual scheme.
The basic principle is detailed in the material how to measure the center distance of a furniture handleFor Atlas, it must be applied not abstractly, but together with the DWG: determine the mounting centers, verify them against D, and ensure the size refers specifically to the selected length.
You cannot measure from the left edge of the first hole to the right edge of the second. The hole diameter adds extra millimeters. When replacing old hardware, the distance is measured center-to-center; for increased accuracy, use a caliper, template, or coordinate transfer through paper.
Why common sizes of 160 and 320 mm do not eliminate the need for verification
D 160 mm for Atlas 240 and D 320 mm for Atlas 400 match common mounting values of furniture hardware. This is convenient for selection but creates false confidence. The coincidence of numbers does not prove that the holes are positioned exactly as the furniture manufacturer assumes, or that there are exactly two mounting points.
Article how the overall handle length differs from the mounting size helps clarify terminology. In the Atlas project, the general reference is used as a background, but the final layout is still based on the item-specific drawing.
This is especially important when replacing an existing handle. Even if the old holes have a base of 160 or 320 mm, you need to ensure that the Atlas body covers the previous marks, does not extend onto the frame, and has suitable fastening for the facade thickness. Matching the center distance only solves part of the problem.
Full-size template before purchase
The cheapest way to check the scale is a paper or cardboard mockup. For each length, cut out an A × B contour, mark the facade axis and the position of mounting points according to the DWG. To evaluate the C protrusion, you can attach a side strip 45 mm high to the template or use a lightweight 3D mockup.
- Print the contour at 1:1 scale.
- Check the control dimension A with a ruler.
- Transfer only the confirmed hole coordinates to the template.
- Secure it to the facade with masking tape.
- Open adjacent doors and drawers.
- Check the grip in a real pose.
- Evaluate the composition from a distance of two to three meters.
The template does not replace the material sample and does not confirm the fasteners, but it quickly reveals a scale error. A 560 mm handle may look moderate on screen, but on a real cabinet it can take up a significant portion of the height. Conversely, a 240 mm version may get lost on a wide facade.
Replacing an old handle without redrilling
When replacing existing hardware, first remove the old handle and measure the holes. The specification should include not only the center-to-center distance, but also the hole diameter, facade thickness, coating condition, distance to edges, and the size of the mark that needs to be covered by the new body.
Next, compare the data with the DWG Atlas. If the mounting base matches, apply the paper template to the old holes and check whether the wooden body covers the damage or dented areas. Matching holes do not guarantee an aesthetic result: a narrower handle may leave a visible outline from the previous hardware.
If the base does not match, the decision is made before purchase. Sometimes old holes can be professionally restored and the facade refinished, but this is a separate furniture operation. You cannot assume that a long body will automatically hide any difference. On transparent oak finishes, repairs are especially noticeable.
New facade without holes: design before production
On new furniture, it is better to approve the layout before painting or applying the finish. The designer determines the handle position, the engineer checks the internal module structure, the furniture maker creates a hole map, and the customer approves a full-size mockup. This sequence reduces the risk of drilling after expensive finishing is complete.
For each group of identical facades, one base coordinate system is assigned: from the bottom and side edges, from the geometric axis, or from the inner edge of paired doors. Mixing different methods in one series is not allowed. Otherwise, handles will be formally installed but visually "drift" by several millimeters.
Before starting a series, one test piece is made. It must be of the same material and thickness as the working facade, or represent a safe technological sample. After installation, check the fit, tightening force, absence of chips, and compliance with the template.
Vertical installation on tall doors
Vertically, Atlas works on cabinets, tall units, wardrobes, and high swing facades. The long line supports the door's proportions and can visually combine several modules into one system. However, the installation height should not be determined solely by the middle of the facade: the user's height, opening direction, position of adjacent handles, and internal shelves are important.
On a pair of doors, handles are usually tied to the inner edges and a common horizontal reference line. Check the gap between the bodies when closed and the trajectory when opening. If the doors are at an angle, a simple front mockup is insufficient — a movement test is needed.
For a tall unit next to a wall, consider the C 45 mm protrusion and clearance to the slope, trim, or side panel. The long handle must not hit the surface. An opening limiter, if needed, is designed separately and is not considered part of the product.
Horizontal installation on drawers and cabinets
The horizontal handle can be used on a wide drawer, chest of drawers, bedside table, or lower kitchen module. The position is usually associated with the center of the front, but internally you need to check the guides, mounting areas, and access to the screws. There is no universal rule for which front width requires an Atlas 400 or 560 mm.
One long handle creates a clear central axis and allows opening the drawer with one or two hands. However, convenience depends on the weight of the contents, the quality of the guides, and the depth of the grip. The article cannot assign a permissible load based on handle length: the structural performance of the entire module is confirmed by the furniture manufacturer.
For a row of drawers, uniformity is important. The same height from the top edge looks neater than random centering of each front of different heights. The decision is recorded in the specification and checked with a template across the entire vertical of the chest of drawers.
Paired hinged doors: mirroring and collision
Paired doors require two types of control. First, visual: same height, equal offset from the inner edge, mirror orientation, and matching finish. Second, kinematic: the bodies do not collide, there is enough space for fingers, and the handle does not hit the adjacent front when fully opened.
An error of a few millimeters is especially noticeable on long models. A short knob masks a small variation, while an Atlas turns it into two diverging lines. Therefore, holes cannot be marked separately on each door with a tape measure. Use a single mirror template or a jig with clear markings for left and right sides.
Before drilling, templates are secured on both doors simultaneously. Check the central gap, top and bottom ends, position relative to panels and decorative frames. Only then are the coordinates transferred to a test pair.
Handle next to molding, panel, and decorative profile
The Atlas has a cross dimension B of 28 mm and a projection C of 45 mm. On a smooth front, these parameters are straightforward, but on a framed front, they may intersect with the relief. The body should not partially rest on the frame plane and partially over the recessed panel, unless such placement is intended by the design.
A full-size outline is placed on the front together with the molding lines. Check not only the visible width but also the area of support points, access to the fastening from the inside, and the possibility of even tightening. If the handle overlaps the decorative profile, either change the position or choose a different size or shape.
On carved and active facades, a long oak handle can compete with the decor. In such a case, a calm coating and precise alignment with the vertical axis help. Random displacement makes the composition overloaded, even if installation is technically possible.
Four coatings — four different order lines
For Atlas, transparent, white, black, and brown coatings are confirmed. They change not only the color but also the role of the handle on the facade. The transparent option emphasizes the oak, white can blend the body into light furniture, black creates a graphic contrast, and brown supports a warm wood palette.
| Finish | Practical task | What to Check |
|---|---|---|
| Transparent | Preserve the visible oak grain | Variation in shade and texture between specimens |
| White | Match the handle with the light facade | Match in tone and gloss level |
| Black | Create a contrasting linear detail | Combination with other hardware and appliances |
| Brown | Support warm wood and neutral surfaces | Match with furniture sample under actual lighting |
The entry "Atlas HL-071M — 20 pieces" is insufficient. The specification must include length A, DWG parameters, finish, quantity, and distribution across facades. Even a random mix of black and brown batches will be visible on identical doors.
Natural oak: same article number does not mean same grain pattern
Atlas is made of oak, so under a transparent or semi-transparent visual finish, the natural grain will be unique. The buyer should not expect photographically identical fibers on all handles. The task of inspection is not to eliminate natural variations, but to distribute the items so that paired facades look consistent.
Before drilling, lay out the entire batch on a clean surface. Assign the closest matching pieces in tone and grain to paired doors and adjacent drawers. More distinctive pieces can be used on a separate tall cabinet or a single facade. Marking is done with removable labels that do not damage the finish.
Under a white, black or brown covering, the pattern value decreases, but the uniformity of color, ends, edges and matching gloss level are still checked. It is better to evaluate a batch under the lighting in which the furniture will be used.
What does the "Prestige" preparation quality mean
The card for Atlas indicates the "Prestige" quality. For the buyer, this means the selected level of surface preparation, but does not cancel incoming inspection and careful installation. Before installation, check the face planes, edges, coating and absence of damage after transportation.
The section describes the general principles in more detail quality of wooden products and surface preparation. In the working article, it is important to link them to a specific model: a long body shows side light well, so scratches, dirt or uneven coating may be more noticeable than on a small button.
Acceptance is carried out before drilling. An installed handle is already involved in the installation process, and it is more difficult to determine the source of damage. Each part is photographed during unpacking if the project is large or formal batch control is required.
Drilling sheet: a document that protects facades
The sheet combines the product specification and installation coordinates. It is needed not only by the cabinetmaker: the designer sees the composition, the purchaser sees the quantity and coatings, the installer sees the orientation and template, the client sees the agreed result. One line with an article number is not enough.
| Facade | Atlas size | D to DWG | Orientation | Base coordinates | Finish | Quantity |
|---|---|---|---|---|---|---|
| Pencil case No. 1 | A 560 mm | Check and confirm | Vertically | By approved template | Black | 1 |
| Box No. 2 | A 400 mm | 320 mm after DWG check | Horizontally | By common axis of the row | Black | 1 |
| Cabinet No. 3 | A 240 mm | 160 mm after DWG check | Vertically, mirrored | From inner edges | Black | 2 |
In a real project, facade dimensions, thickness, drawing number, approval date, fastening type, responsible person, and test drilling mark are added. After approval, the document is locked against accidental changes or a version history is maintained.
One specification for the entire furniture series
Kitchen, sideboard, cabinet, and nightstand can use one model, but not necessarily one length. The series looks cohesive when the shape, material, and finish are repeated, and the scale adapts to the facade. For example, Atlas 240 can be assigned to small doors, 400 to drawers and tall cabinets, and 560 to high facades after drawing verification.
The list should clearly show such a system. Different lengths cannot be mixed based on the principle of 'what is left in stock.' Each item is linked to a specific facade, and holes are drilled according to a separate template. Packages after acceptance are marked by zones: kitchen, dressing room, sideboard.
It is useful to open before purchasing catalog of STAVROS wooden furniture handles, to ensure that Atlas truly matches the entire series. But after selecting a model, you should not revert to randomly mixing forms without a design reason.
A drilling jig and a paper template serve different purposes
A paper template shows scale and composition. A drilling jig ensures hole repeatability. The former can be made at an early stage, the latter only after final confirmation of the DWG and coordinates. A tentative value of D cannot be transferred to the jig.
For a series of identical facades, the jig must have rigid stops and orientation markings. If it is used on both left and right doors, the holes must be protected from mirror errors. A practical option is separate templates or mechanical locking of the incorrect position.
Before the production run, a test is performed on a sample. Matching the first hole is not enough: the handle is fully installed, and the fit, straightness, and gaps are checked. Only after the responsible person signs off does the repeated drilling begin.
Control handle before launching the entire batch
Even with an accurate drawing, it is useful to first obtain and check one selected modification or use a product from the main batch as a control. The actual fastening points are measured and compared with the DWG and template. This is especially important for the 560 mm variant with D requiring clarification.
The control installation is performed on a test facade or technological sample. The holes, body fit, access to fastening, protrusion C, hand position, and opening of adjacent elements are evaluated. The result is photographed and attached to the report.
After confirmation, the control handle is marked and returned to the project. It must not accidentally be transferred to another object or mixed with a product of a different finish. For a large series, it is useful to store the approved template until installation and acceptance are complete.
Acceptance of the batch up to the first hole
- Check the model and size of each item.
- Separate 240, 400, and 560 mm into individual zones.
- Check the coatings and quantity.
- Match the mounting points with the current DWG.
- Inspect the oak and surface.
- Distribute paired items across the facades.
- Check for compatible fasteners without assuming their composition.
- Record the results with photos and a checklist.
Only after acceptance can you drill the test piece. If even one modification differs from the documentation, the entire related group is set aside until clarification. Adjusting the facade to an unexpected handle geometry on site is the wrong way to resolve a discrepancy.
Fasteners and facade thickness
A universal screw or fastener length cannot be assigned in the article without confirmed configuration and facade thickness. Before ordering, the door material, its thickness, presence of a frame, inner overlay, and access to the reverse side are fixed. Then the recommendations of the card and the furniture manufacturer are verified.
Too short a fastener will not provide a connection, too long may not tighten the handle or damage the structure. The hole diameter also cannot be chosen "out of habit." It must correspond to the approved installation diagram and the actual fastening.
If the facade is non-standard, for example, multi-layered or with internal reinforcement, the furniture maker must check the fit separately. The handle is part of the system, not an independent strength calculation of the entire facade.
Gaps and opening trajectories
A flat drawing shows the position on the facade but does not always reveal a collision. For this, the movement of the door or drawer is checked. The C 45 mm protrusion creates a volume that must pass by the adjacent cabinet, wall, countertop, appliances, and another handle.
In a corner kitchen, a long handle may intersect the trajectory of the adjacent facade. In a wardrobe, two hinged doors can collide at the ends. On a cabinet near a wall, the body may hit the slope. These situations are modeled using a template or a temporary volumetric mockup.
If a collision is detected, the position is changed, the opening angle is limited according to the project, or another modification is chosen. Holes cannot be moved after painting without re-approving the entire composition.
Ergonomics of a long wooden handle
Atlas allows grabbing the facade at different points along the length, which is convenient for tall doors and wide drawers. But comfort depends not only on A. The offset from the facade, edge shape, finger access, installation height, and the force required to open a specific mechanism are important.
The user should check the handle in a natural posture. On a tall cabinet, the geometry center may be inconveniently high or low. On a lower drawer, the position too close to the floor forces more bending. For accessible environments and projects with children or elderly people, the position is agreed upon separately.
You should not promise universal ergonomics for a single length. Full-size fitting and a control sample provide more information than a catalog image.
Atlas in the kitchen
In the kitchen, the model can combine tall cabinets, lower modules, and high fronts. The black finish supports appliances and graphic profiles, white supports light furniture, transparent and brown support wood surfaces. However, the combination is confirmed with samples, not color names.
In the specification, fronts for the dishwasher, refrigerator, corner modules, and wall are separately noted. Their trajectories differ from regular doors. The long handle should not interfere with opening appliances or protrude into the passage more than specified in the project.
Before production, it is useful to prepare a handle layout on furniture fronts, especially if several lengths of Atlas are used. The layout fixes axes, finishes, and size groups, rather than being limited to visualization.
Atlas in the dressing room and on cabinets
Tall cabinets give Atlas enough space but amplify the visibility of any errors. On a row of identical doors, handles should be at the same height and have equal offsets. A length of 400 or 560 mm can support a vertical rhythm, while 240 mm can work on smaller sections.
When choosing a handle for a cabinet, check the central gaps, hinge position, internal pull-out drawers, and the ability to open the door without hitting the adjacent one. If the wardrobe is narrow, protrusion C and passage width are evaluated together.
The query "wooden cabinet handles" does not mean that any long model fits any facade. Size, finish, and drilling method must be part of the project specification.
Atlas on a chest of drawers, nightstand, and sideboard
On low furniture, the horizontal Atlas becomes a noticeable line. The 240 mm version can support a single drawer, 400 mm a wide facade, but the choice is not limited to proportion. You need to check access to the mounting, grip convenience, and connection with adjacent handles.
On a chest of drawers with drawers of different heights, you can keep one length and a common axis or use a scale system. The solution is first drawn, then checked with templates. Random alternation of 240 and 400 mm makes the facade fragmented.
On a sideboard, it is important to coordinate Atlas with display frames, cornice, and legs. A long handle should not overlap the decorative center of the door. In a controversial composition, it is better to choose a calmer finish or a different size than to try to compensate for the mismatch with inaccurate installation.
New furniture and renovation of existing one are different routes
| Scenario | Main task | What is checked first |
|---|---|---|
| New furniture | Design holes before finishing | DWG, facade axes, template and test part |
| Replacing old handles | Align fasteners and cover traces | Old center distance, diameter and damage zone |
| Series expansion | Repeat existing solution | Actual model, coating, batch and archive template |
| Repair of one facade | Restore identical position | Control dimensions of adjacent doors and handle version |
On new furniture, it's easier to change the drawing than the finished facade. During repairs, the main limitation becomes existing holes and coating. Therefore, the same product requires different preparation for ordering.
How not to confuse Atlas with a similar long handle
Similar models may have close length but different width, protrusion, mounting base or material. The name "long oak handle 400 mm" is not a sufficient identifier. The order requires Atlas HL-071M, A, selected coating and parameters per specific DWG.
Do not transfer a template from another model even if D matches. The body may have a different shape, and holes may differ in quantity or position. Do not use a duplicate URL as a second independent product: the working scheme assigns the link to a page in the "Modern" collection.
If Atlas does not fit in scale, alternatives are searched in the catalog, but a new selection starts from scratch: card, drawing, template, test. The old list is not mechanically renamed to a different article.
Atlas and a random long handle: difference in order preparation
| Approach | What the project receives | Risk |
|---|---|---|
| Atlas by card and DWG | Article, three lengths, confirmed material, coatings and technical verification | Requires discipline and drawing version verification |
| Selection only by photo | Representation of appearance without coordinates | Scale and hole error |
| Purchase by overall size | Body length match | Mounting base mismatch |
| Copying old template | Fast production | Template may belong to another model or version |
A ready model does not exempt from the project but makes the project verifiable. The buyer works with specific parameters and can link each hole to a document.
What to buy and prepare with Atlas
| Position or action | Why it's needed | What to pay attention to | Link |
|---|---|---|---|
| Atlas HL-071M | Main handle in selected length and finish | A × B × C × D, DWG and quantity | Buy furniture handle Atlas HL-071M |
| Handle category with finish | Compare alternative shapes and versions | Do not mix models after template approval | buy wooden furniture handles |
| General catalog | Check adjacent hardware groups | New article requires a new drawing | catalog of STAVROS wooden furniture handles |
| DWG and printout | Prepare coordinates and scale template | File version and 1:1 print | to download the drawings of STAVROS products |
| Design layout | Link handles to the entire furniture series | Axes, orientation, coatings, and collisions | to prepare a handle layout on furniture fronts |
Fasteners, drilling tools, and consumables are selected based on the confirmed installation diagram and facade structure. Without precise data, they cannot be universally included in the list.
How to format an order line without ambiguity
Weak line: "Atlas 400, 20 pieces." It does not specify coating, DWG, facades, or mounting base. A strong line might look like: "Atlas HL-071M, A 400 mm, B 28 mm, C 45 mm,
Version control: one digit can change the entire facade
Technical files and cards may be updated. Therefore, the verification date and file name are recorded alongside the parameters. If the designer, purchaser, and production use different versions, an error occurs even if each participant works carefully.
The unified project folder must contain the approved DWG/PDF, drilling schedule, facade layout, control installation photos, and change log. After production launch, files are moved to "approved" status, and new revisions are documented separately.
Atlas 560 is particularly strictly controlled. Until D is confirmed, the template does not receive working status. Such a pause is cheaper than reworking a series.
Transfer of task between designer, cabinetmaker, and installer
The designer is responsible for composition and size selection. The furniture designer checks internal structure, facade thickness, and access to fastening. The purchaser ensures accurate article number and finish. The cabinetmaker transfers confirmed coordinates. The installer verifies actual products against the schedule before installation.
When roles are not defined, everyone assumes that D was checked by another participant. Therefore, a "checked by" column and date are added to the table. For the 560 mm variant, an explicit confirmation record is required.
The client approves not only the beautiful visualization but also the full-size layout. This protects them from a situation where a technically correctly installed handle does not match the expected scale.
Marking of handles and facades
After acceptance, each handle is assigned a facade code. For example, K-01-L and K-01-R for paired kitchen doors, G-03 for a wardrobe cabinet. The same code is applied to the packaging, schedule, and the inner side of the facade in a safe zone.
Marking is especially useful for natural oak: paired specimens by grain pattern will not be mixed up during installation. It also prevents installing Atlas 240 instead of 400 mm on a similar facade.
Labels must not damage the finish. It is better not to mark the front surface with a marker or cover it with aggressive adhesive tape. The marking method is coordinated with packaging and finishing.
Photo protocol of the control installation
Photos help convey the approved solution to the site. They capture the general view of the facade, a close-up of the handle, the internal mounting, a ruler with the control dimension, and the opening of the adjacent door. For paired facades, a frontal shot without perspective distortion is required.
The photo protocol does not replace dimensions, but quickly shows which way to orient the template and what the correct result looks like. In a series, it serves as a reference for installers.
If the size or coating changes after the control installation, old photos are marked as canceled. Multiple conflicting references cannot be stored in a shared folder without a status.
Delivery and storage before installation
Order, manufacturing, and transportation conditions may change, so before payment, check the manufacturing and delivery conditions of furniture handles. The article does not fix the price, availability, or lead time unless confirmed for a specific date.
After receiving the handles, store them in a dry, protected place, without mixing size groups and coatings. Long products should not be used as supports or left under load. Keep the packaging until incoming inspection is completed.
Before installation, the products must be in conditions agreed upon with the manufacturer and the furniture project technology. The article does not prescribe a universal acclimatization regime without official data.
Main mistakes when ordering Atlas HL-071M
Consider A as the distance between holes
This is the main mistake. A describes the overall dimension, while the mounting diagram is checked against D and DWG. For Atlas 240, the table already shows the difference of 240 and 160 mm.
Pass only the phrase "Atlas 400" to production
Without article number, coating, drawing version, and coordinates, such a record is not a technical specification. Production is forced to guess details.
Independently correct D for the 560 mm version
An atypical number cannot be replaced with a logical one. An official control source is required.
Drill the entire series according to one internet table
Before launch, actual product acceptance and test installation are needed.
Measure old holes from edge to edge
The correct size is measured between centers. Otherwise, the diameter of the holes distorts the result.
Do not account for the thickness and construction of the facade.
Fasteners and rear access depend on the furniture. A universal scheme without a facade is incomplete.
Mixing coatings in one row
Transparent, white, black, and brown finishes should be separate items.
Do not check collision of paired handles
Frontally, the composition may look correct, but when opened, long bodies intersect.
Use different axes on identical doors
Measuring each facade with a tape creates accumulated error. A single template is needed.
Refer to two product URLs as different models
For the article, the recommended "Modern" collection page is used to avoid strengthening the duplicate.
When Atlas HL-071M really fits
- A long wooden handle bracket made of oak is needed.
- The project allows one of three dimensions A: 240, 400, or 560 mm.
- The buyer is ready to check the DWG and make a template.
- The facade has enough flat space for a body width of 28 mm.
- The 45 mm protrusion does not create collisions.
- Transparent, white, black, or brown coating matches the palette.
- The long line supports the proportions of the door or drawer.
Atlas works best in a project where the shape is repeated on several facades and the lengths are distributed thoughtfully. Then the handle becomes part of the furniture architecture, not just random hardware.
When it is better to choose a different handle
- Cannot obtain or confirm the technical drawing.
- Existing holes do not match, and the facade cannot be restored.
- There is no flat surface on the frame for the body.
- The protrusion interferes with the passage or opening of adjacent elements.
- Even 240 mm is too large for the facade.
- The project requires different wood or unconfirmed coating.
- A compact point handle is needed, not a long bracket.
In this case, it is worth returning to the category and choosing a different model. The solution should not be compensated by offset drilling or partial placement on the relief.
Why drawing verification saves more than expedited purchase
DWG verification, full-size template, and one control installation take time before ordering but reduce the risk of costly operations after it. An error in the handle affects not only the hardware: it carries over to drilling, finishing, logistics, and assembly timelines. On a series of identical facades, one incorrect coordinate repeats as many times as parts are run from the template.
Therefore, the project cost should be assessed more broadly than just the price of the handle. It includes the preservation of facades, repeatability of markings, the ability to replace the product, and the absence of installation downtime. The technical pause before the 560 mm version is not an obstacle to purchase, but a normal protection against an unconfirmed D value.
An informed order for Atlas is based on a simple principle: first, the geometry is confirmed, then the required quantity is purchased, after acceptance a test part is drilled, and only then the series is launched. This sequence makes the result predictable.
How to order Atlas HL-071M from STAVROS
- Open the recommended model card.
- Select A 240, 400, or 560 mm.
- Select a transparent, white, black, or brown coating.
- Download and check the current DWG.
- For the 560 mm version, confirm the value and purpose of D.
- Make a 1:1 scale template.
- Create a list of facades and drilling.
- Calculate the quantity for specific doors and drawers.
- Clarify the current price, availability, delivery time, and terms.
- Upon receipt, accept the entire batch before drilling.
This route turns the purchase into a controlled specification. STAVROS provides a product selection point and technical materials, while the buyer links them to their furniture before irreversible operations.
Unified coordinate system for all fronts
The list becomes reliable only when all coordinates are measured from clear bases. For a vertical handle, this could be the distance from the inner side edge and the bottom edge of the door; for a horizontal one, from the side edge and the top line of the drawer. The choice of base depends on the furniture design, but once approved, it should not change within the same group of identical fronts.
The geometric center is not always the best base. On a framed front, the visual plane may differ from the overall dimension, and on paired doors, the reference to the internal gap is more important. Therefore, the drawing indicates not only the number but also the point from which it is measured. The notation "axis 80 mm from the edge" is incomplete if it does not specify which edge and to which axis.
In production, the coordinate system is depicted with arrows and symbols. This reduces the risk of mirror errors and allows the finished front to be checked independently of the specific installer. A separate template is created for each Atlas length, but the basic placement principles are preserved.
Overlay of the DWG handle onto the front drawing
For complex furniture, it is useful not to limit yourself to a paper mock-up, but to overlay the Atlas geometry onto the CAD model of the front. This reveals frames, panels, internal ties, shelves, hinges, and technical zones that are not visible in a photo. The handle model must match the selected length and the current version of the drawing.
The drawing marks the body contour, mounting points, and protrusion. Then the front view, side view, and open position are checked. If the handle is near a corner, wall, or adjacent door, the movement trajectory is constructed. This check is especially useful for Atlas 560 mm: the large dimension may intersect a neighboring object even with correct holes.
CAD verification does not resolve a disputed D value by itself. If the initial data on the card is ambiguous, the model is built only after receiving a confirmed DWG. Otherwise, digital precision masks an incorrect initial figure.
First installation unit before the series
In serial production, it is useful to designate a "first installation unit" — one fully assembled facade with a handle that undergoes extended inspection before the remaining parts are launched. This is not just a test hole in a scrap piece, but a real assembly with the same material, thickness, coating, and position.
They check hole alignment, body straightness, fit tightness, absence of chips, access to fastening, grip, and opening trajectory. The result is compared with the visualization and full-size template. If everything is confirmed, the facade becomes the reference for the series.
Any change after this stage — a new length, coating, axis offset, or different fastener — requires a repeat first installation. The previous test cannot be considered valid for the modified configuration. This procedure is especially important when handles are installed on expensive painted or veneered facades.
Repeatability control without fabricated tolerances
The article does not assign universal millimeter tolerances for furniture production: they depend on the project, equipment, material, and manufacturer's requirements. But the control principle can be defined. After the first installation, not only individual holes are checked, but also the visual line of the entire handle group.
For a row of doors, identical base distances are measured, a long control rail or laser line is applied, and the top and bottom ends of the bodies are compared. On drawers, the overall horizontality is checked. If the template gradually shifts due to stop contamination or hole wear, the error will appear before the series is completed.
Control measurements are recorded after a specified number of parts per project and after each equipment adjustment. When a deviation is detected, production is stopped, the last confirmed part is found, and the intermediate group is checked. This approach protects the series without inventing numbers that are not in the technical documentation.
What to do if one handle is damaged after installation
Replacement of one Atlas must be done according to the archive specification, not from memory. The exact article number, length A, finish, order date, and photos of the installed batch are required. For transparent execution, the natural difference in oak texture is additionally considered: the new piece may not match the pattern of the adjacent handle.
The damaged product should be removed carefully, preserving the facade and holes. Before ordering a replacement, measure the actual mounting base and compare it with the archive DWG. This is especially important if the card or drawing was updated after the initial project.
If an identical finish is not available, do not install a similar model just because the length matches. First, check the body, holes, and finish. For a paired door, it is sometimes more reasonable to replace both handles, but this decision is made based on the actual situation, not as a universal rule.
Template archive after furniture delivery
After project completion, the paper template, jig, and digital files should not be immediately destroyed. They are needed for repairs, series expansion, and manufacturing additional facades. The archive must contain the date, model, length, finish, verified D, DWG version, and photos of the reference installation.
The physical template should be labeled so it cannot be confused with an Atlas of a different length. If the jig holes wear out, do not reuse it without checking. The digital archive stores the original file and the approved production copy to prevent accidental updates from altering an already completed project.
Such an archive is especially valuable for commercial interiors and furniture series, where individual elements may need replacement after several years. It turns a one-time installation into a reproducible system.
Checking the finish under real lighting
White, black, and brown finishes are evaluated not only next to the facade sample but also under the working light of the room. Warm and cold lighting change the perception of shade and gloss level. Transparent finish additionally reveals differences in oak texture.
It is better to hold the control handle against a vertical facade rather than examining it lying on a table. Side lighting reveals relief, edges, and marks that may be invisible from the front. In the kitchen, inspection is carried out near appliances and metal parts; on a cabinet, near doors and flooring.
If the color must exactly match the furniture, the name "white" or "brown" is insufficient. The decision is approved based on a physical sample or the received product. The article does not guarantee a match with an arbitrary palette without such verification.
Final acceptance after installation
After installation, each handle and the entire composition are checked. An individual product must sit evenly, without noticeable skew or damage. For a series, common axes, equal gaps, coating matches, and distribution of oak texture are evaluated.
Doors and drawers are opened through their full working range. Collisions, grip comfort, and absence of contact with walls, appliances, and adjacent handles are checked. Inspection is performed both from the front and from the side. A long Atlas may appear straight from the front but have a noticeable body twist.
All comments are recorded before removing protective materials and final handover. If the error is related to marking, it cannot be masked by additional tightening. The cause is determined using the checklist, template, and control facade to avoid damaging other products.
FAQ: questions about Atlas HL-071M
What lengths does Atlas HL-071M have?
The card shows overall dimensions A 240, 400, and 560 mm.
What does parameter A mean?
A is used as the overall longitudinal size of the handle. It cannot be automatically considered the distance between holes.
What does D mean?
D is specified in the dimension table as a mounting parameter. The exact purpose and relationship with fastening points must be confirmed from the DWG of the specific modification.
Is the length of Atlas 240 mm equal to the distance between holes?
No. For the A 240 mm version, the card specifies D 160 mm. Drilling is performed according to the drawing.
What parameters are specified for Atlas 400 mm?
A 400 mm, B 28 mm, C 45 mm, and D 320 mm according to the current table. Before production, the data is verified against the actual DWG.
Why does the 560 mm version require separate verification?
With A 560 mm, the current table shows D 240 mm, which looks atypical compared to other options. The value cannot be corrected independently.
Can D for the 560 version be taken as 480 mm?
No. Such a number is not confirmed by input data. An official drawing or response from STAVROS is needed.
Which material is confirmed?
For Atlas HL-071M, oak is confirmed.
What finishes are available?
Clear, white, black, and brown.
Can Atlas be installed vertically?
Yes, it can be considered for tall doors, cabinets, and tall units. The exact position is checked with a template and the opening trajectory.
Will Atlas fit a wide drawer?
It may fit with horizontal installation if the front, internal structure, and grip are verified. The article does not specify a universal minimum width.
How to measure old holes?
From the center of one hole to the center of another. Additionally, the diameter, front thickness, and old handle mark are recorded.
Can fronts be drilled before receiving handles?
It is safer to first receive the batch, check the actual products, DWG, and test setup. For the 560 mm version, pre-drilling is especially risky.
Is a full-size template needed?
Yes. It shows the scale, position, and collision zones. Fastening points are applied only according to the confirmed drawing.
Can one jig be used for 240 and 400 mm?
No, unless it is specifically designed for both confirmed patterns. Each length has its own coordinates.
How to position handles on paired doors?
Mirrored, at the same height and with equal offsets from the inner edges. Before drilling, check for collision when opening.
Is it necessary to match oak handles by grain pattern?
For a clear coating, it is advisable to distribute similar pieces on paired fronts. Natural texture is never photographically identical.
What to record in the order?
Article, A, parameters according to the current DWG, oak, quality "Prestige", coating, quantity, and reference to the facade list.
Where to check the current price and availability?
In the recommended Atlas HL-071M product card, just before placing the order.
What to do if the table and DWG differ?
Stop preparing the holes and request confirmation. You cannot choose a more "logical" number on your own.
Conclusion
Atlas HL-071M is not chosen by a single number. The total length of 240, 400, or 560 mm determines the scale, but the facade is drilled according to the confirmed mounting diagram. For 240 and 400 mm, the table shows D 160 and 320 mm; the 560 mm version requires a separate check of the D 240 mm value against the current DWG.
A correct order starts with the product card, continues with a full-size template and drilling schedule, and ends with batch acceptance and a test installation. This approach preserves finished facades, ensures identical axes across the entire series, and helps you consciously choose the oak, coating, and length.
Before purchasing on STAVROS, check A × B × C × D, download the drawing, assign each handle to a specific facade, and do not pass an incomplete entry like "Atlas 400" to production. A specific specification is cheaper than correcting even one incorrectly drilled facade.