Article Contents:
- Tall PLT‑004 160×16 mm: which finishes are confirmed by the product card
- Porcelain stoneware wall down to the floor: does it need a baseboard at all
- Finishing PLT‑004 at the stone or continuing: arguments for both solutions
- When it is better to finish PLT‑004 at the boundary of the porcelain stoneware
- When PLT-004 should be continued along the stone wall
- Why 160 mm particularly strongly changes the perception of porcelain stoneware
- Porcelain stoneware starts at the inner corner
- The stone plane starts at the outer corner
- Porcelain stoneware starts in the middle of one wall
- Porcelain stoneware is located in a recessed niche
- How to finish the visible end of a tall PLT-004
- Porcelain tile protrudes relative to plaster: how the joint changes
- Why you shouldn't just trim the back of PLT-004
- If porcelain tile is recessed relative to the main wall
- Why this needs to be decided before painting the baseboard
- PLT-004 made of MDF on a stone wall: what changes in color perception
- Oak/MDF/oak veneer: when wood and stone work as contrast
- Beech/MDF/beech veneer: when a light profile fits in more easily
- Porcelain tile wall with a doorway: continuity can become stronger
- A stone wall without doors and furniture: the absence of a baseboard looks more natural
- If porcelain stoneware covers only part of the wall
- How to create a transition layout if the stone starts in the middle of the wall
- Floor covering and vertical porcelain stoneware are different issues
- Why excluding a 2.8 m stone wall can change the order more than it seems
- Calculation example: living room 5 × 4 m and a 2.8 m stone wall
- Why you cannot count only the total perimeter
- When one additional plank is needed precisely because of a complex end
- When a reserve plank is not needed
- Scenario 1. The stone wall starts at an internal corner
- Scenario 2. Porcelain stoneware starts in the middle of a long wall
- Scenario 3. Stone insert 1400 mm wide between two painted sections
- Scenario 4. A porcelain stoneware wall 3.5 m long is fully exposed
- Scenario 5. A low console stands on the stone wall
- Scenario 6. The stone wall contains a door
- Scenario 7. Porcelain stoneware matches the color of the painted wall
- Scenario 8. Contrast stone — dark graphite next to a light wall
- How to check the combination of color, texture, and height before final painting
- How to choose PLT‑004 material specifically for the paint-to-stone transition
- MDF 2600 mm
- Beech/MDF/beech veneer 2400 mm
- Oak/MDF/oak veneer 2400 mm
- High profile on a wall with large-format tiles: check porcelain stoneware joints
- If the porcelain stoneware has a pronounced relief
- If the porcelain stoneware is polished
- If the porcelain stoneware is matte concrete-style
- If porcelain stoneware imitates wood
- How to account for floor plinth at adjacent walls and thresholds
- If sockets are installed on a stone wall
- If a TV and a cabinet are installed on stone
- How to calculate plinth if the stone wall is only partially excluded
- MDF cutting map 2600 mm: example with excluded stone wall
- Cutting map 2400 mm: the same interior
- When excluding a stone wall does not reduce the number of planks
- When excluding stone saves two planks at once
- When PLT-004, on the contrary, is worth keeping despite the stone wall
- How to check the decision on visualization without a new 3D project
- Delivery conditions and long planks 2400/2600 mm
- Mistake 1. Automatically calculating the entire perimeter
- Mistake 2. Buying before approving the transition
- Mistake 3. Counting vertical porcelain stoneware as a regular painted wall
- Error 4. Calling the oak version a solid array
- Error 5. Not checking the stone protrusion
- Error 6. Leaving the 160×16 mm end without a project
- Error 7. Choosing material only by price
- Error 8. Not making a full-size template
- Error 9. Starting finishing before a dry fit
- Error 10. Transferring tile floor recommendations to a vertical wall
- Error 11. Calculating savings only in linear meters
- Error 12. Making a non-standard PLT‑004 cutout without a drawing
- Test case: stone wall 2800 mm starts at the inner corner
- Test case: stone insert 1600 mm is in the middle of the wall
- Test case: stone protrudes by 12 mm and has a dark marble pattern
- Stone wall and heated floor: does it affect the choice of PLT-004
- If the porcelain stoneware wall transitions into a stone fireplace portal
- If the stone wall is behind the dining table
- If the stone wall is in a passageway
- How to choose the end point if the stone boundary is offset from the corner by 80-150 mm
- How to calculate a short section near the stone from leftovers
- How to check two rooms with different stone walls
- Why it's better to confirm the final choice with one control wall
- What to keep after installation in case of future rework of a stone wall
- Final commercial route
- If the decision changes after purchase but before installation
- If the decision changes after painting part of the batch
- How to check the transition when the floor plinth is already installed on the adjacent wall
- What to do if the porcelain tile border is uneven
- Why you shouldn't mask a bad stone edge with a tall plinth
- Control example: the same stone wall in two different interiors
- What the buyer should be able to do after this check
- What size is PLT-004?
- Is PLT-004 available in MDF?
- Is the oak PLT-004 solid wood?
- Do I need to install a skirting board on a vertical porcelain tile wall?
- Can PLT-004 be finished at the stone edge?
- How to finish the end of a tall skirting board?
- Can PLT-004 be glued to porcelain tile?
- What to do if the porcelain tile protrudes by 10–15 mm?
- Which material should be chosen next to stone?
- Should the stone wall be counted in the total length?
- How to recalculate the number of planks?
- When is it better to choose a different baseboard?
- Where to order PLT-004?

The renovation is almost finished: one living room wall is fully tiled with large-format porcelain stoneware from floor to ceiling, the other walls are painted, and in the lower part of the room the designer chose a tall PLT-004. At this point, a question arises that is better resolved before purchasing the entire batch: should the 160-millimeter profile run continuously along the stone wall, or does the porcelain stoneware itself become the natural boundary of the wooden baseboard?
There is no universal answer. If the stone surface is intended as an independent architectural accent, and the porcelain stoneware is brought directly to the finished floor, PLT-004 is often more logical to end at the boundary of the materials. If the tall baseboard is an independent continuous band that connects doors, painted walls, and furniture, and the porcelain stoneware is neutral in pattern, extending the profile along the stone may be justified.
The main thing is not to automatically count the stone wall in the footage. First, you need to decide on the composition, check the protrusion of the porcelain stoneware relative to the painted wall, make a full-size template 160 mm high, determine the end joint, and only then build a map of planks 2400 or 2600 mm. Otherwise, you might buy an extra plank or, conversely, paint and cut PLT-004 before it becomes clear that it is visually not needed on the stone surface.
If the decision for the entire perimeter has not yet been made, it is useful to first to buy wooden baseboard only after agreeing on the transition "painted wall → porcelain stoneware". This article does not repeat the general choice of baseboard for floor tiles: here we are specifically talking about a vertical accent wall already brought to the floor.

Tall PLT-004 160×16 mm: which versions are confirmed by the card
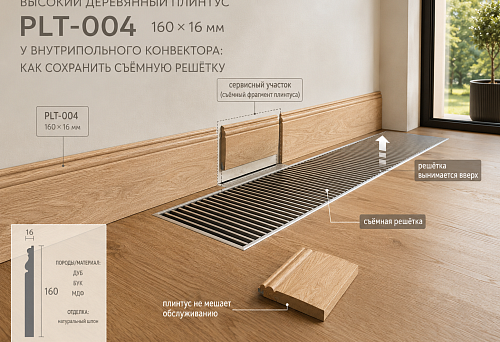
PLT-004 — high plinth / trim with size A=160 mm and C=16 mm. Three versions are confirmed in the current card.
| Execution | Size | What matters in this article |
|---|---|---|
| MDF | 160 × 16 × 2600 mm | Long strip, convenient for covering painting |
| Beech/MDF/Beech veneer | 160 × 16 × 2400 mm | Combined product, not solid beech wood |
| Oak/MDF/Oak veneer | 160 × 16 × 2400 mm | Combined product, not solid oak wood |
For a stone wall, scale is especially important. A height of 160 mm is not a thin technical strip. This profile covers a noticeable part of the lower zone of porcelain stoneware and creates an independent horizontal line. Therefore, the decision 'to install or not' cannot be made by eye after installation.
If the assembly is approved, you can buy high baseboard PLT-004 in the required version and only then calculate specific whole strips.




Porcelain stoneware wall to the floor: is a plinth needed on it at all
On a painted wall, a high plinth performs several functions: it covers the transition between floor and wall, protects the lower part of the finish from impacts and cleaning, and creates an architectural line. On a vertical porcelain stoneware wall, some of these tasks are already solved by the stone itself.
Porcelain tile does not need protection from regular wet cleaning the way paint does. Its bottom edge already forms a hard transition to the floor. Therefore, on such a wall, PLT‑004 becomes primarily a decorative element. This frees the buyer from the idea that "the baseboard must run along the entire geometric perimeter."
If a stone wall is itself conceived as a separate plane from floor to ceiling, the absence of a wooden baseboard may look not like an unfinished detail, but like a deliberate material boundary. However, if the interior is built around a continuous high belt, a break specifically on the stone may, on the contrary, disrupt the composition.
Our factory also produces:


Whether to end PLT‑004 at the stone or continue it: arguments for both decisions
Get Consultation
When it is better to end PLT‑004 at the porcelain tile boundary
Ending the baseboard at the stone usually works better when the porcelain tile is contrasting and should read from floor to ceiling as a single plane; the large-format pattern of the tiles is important; the boundary of materials coincides with an external or internal corner; the stone wall is an independent accent volume; or PLT-004 on the stone has no function other than repeating the line from the adjacent wall.
When PLT-004 should be continued along the stone wall
Continuation is justified if the high baseboard is not just protection for the paint, but a separate horizontal band for the entire room. For example, it ties together door trims, furniture, several painted walls, and a stone surface into one system.
Strong arguments in favor of continuity: the porcelain stoneware is neutral and does not require showing the pattern all the way to the floor; the profile repeats along the entire open perimeter; the door on the stone wall is already framed with elements of the same scale; the baseboard is painted the same color as the walls and works as a common architectural frame; a break in the line in the middle of a large open space looks accidental.
Why 160 mm especially strongly changes the perception of porcelain stoneware
With a low 40–60 mm profile, the impact on the stone pattern is relatively small. PLT‑004, 160 mm high, covers a significant lower band. If the porcelain stoneware imitates a large marble pattern, the lower veins may be partially hidden. If the wall is made of large-format slabs with minimal joints, the wooden horizontal becomes more noticeable than the joints themselves.
Full-size 160 mm template: the fastest way to check the composition
Cut a strip 160 mm high and 1–2 m long from cardboard or thick paper. The color can be roughly matched to the future PLT‑004. First apply the template to the painted wall, then continue it onto the porcelain stoneware. Compare the continuous line and the ending at the material boundary.
Look from the main entry point, from the sofa, in daylight and evening lighting. For a large stone wall, a small 20–30 cm sample does not give the correct sense of scale.
Where exactly to end PLT‑004 at the paint-to-porcelain transition
Porcelain stoneware starts at the inner corner
The simplest scenario. One wall ends, another begins. The baseboard can be finished at the inner corner without a separate visible end in the middle of the plane.
The stone plane starts at the outer corner
The outer edge also naturally divides materials. The end of PLT-004 can be tied to the vertical face of the stone or a special extension piece.
Porcelain tile starts in the middle of one wall
The most complex option. A straight end of a high profile can look like an unfinished break. A return, vertical molding, niche, or other architectural reason for stopping is needed.
Porcelain tile is located in a recessed niche
PLT-004 can remain on the main wall plane and not extend into the niche if the niche itself has a finished stone frame.
How to finish the visible end of a tall PLT-004
If the baseboard ends not in a corner, the 160×16 mm end is clearly visible. Possible options include a straight finished end with full trim, a profile return to the wall, abutment to a vertical molding, a joint with the end of porcelain tile or a metal profile if it is already in the project, or a custom wooden extension piece.
A ready-made factory cap cannot be considered a mandatory part of PLT-004 if it is not specified in the product card. The end joint is designed in advance.
Transition of planes: protruding, recessed, and uneven porcelain tile
Porcelain tile protrudes relative to plaster: how the joint changes
If the tile with adhesive layer protrudes forward relative to the painted wall by 10–15 mm, PLT‑004 fits the stone area not in one plane, but to a step. For a high profile this is fundamental: the 160×16 mm end may hit the protruding stone, and attempting to continue the baseboard over the porcelain tile will create a change in depth.
On the plan, three distances need to be recorded: the thickness of PLT‑004 itself, the protrusion of the porcelain tile relative to the plaster, and the position of the floor covering. If the stone protrudes by 12 mm and the baseboard has a thickness of 16 mm, one cannot automatically conclude that "the difference is only 4 mm and everything will match." The cross-section of PLT‑004 is profiled, and the stone protrusion may be uneven.
Practically, a template of planes is made first: painted wall, stone wall, floor, and PLT‑004. If the profile ends before the protrusion, one needs to decide what happens to its end. If it continues over the stone, check whether a visual step occurs.
Why you should not simply cut the back part of PLT‑004
Combined wood versions consist of several materials. Arbitrary removal of the back part may affect MDF, veneer, or the solid decorative part. Without a profile drawing, such an operation turns a standard product into a non-standard part and may worsen the geometry.
If the porcelain stoneware is recessed relative to the main wall
With a recessed stone plane, a decorative niche is created. In this case, PLT-004 can logically run only along the main painted wall and end at the outer line of the niche. Continuing inward requires additional end caps and a new depth level.
If the designer still wants to maintain a continuous belt, it is necessary to decide how the profile transitions from the main wall into the niche. A simple "fold" without an additional piece often looks random.
Can PLT-004 be glued directly onto porcelain stoneware
Technically, the answer depends on the surface of the porcelain stoneware, the adhesive composition, and the base preparation. Polished stone, matte porcelain stoneware, and textured surfaces behave differently. Not only adhesion matters, but also the possibility of future removal.
You cannot assign a universal adhesive based on a single baseboard card. After the composition is approved, you can select Mounting and finishing materials for a specific surface, but compatibility must be confirmed by the technical documentation of the composition.
Why this needs to be decided before painting the baseboard
If installation requires additional preparation of the back surface, drilling, mechanical fastening, or a special primer, it is better to know this before the finish. Reworking a painted profile directly against an expensive stone wall is inconvenient and risky.
Material and finish PLT‑004 next to stone
PLT‑004 made of MDF on a stone wall: what changes in color perception
If the MDF version of PLT‑004 is painted in the color of the other walls, on plaster it visually blends with the surface and is perceived as an architectural continuation of the wall. On porcelain stoneware, the same profile becomes a contrasting overlaid element.
Therefore, a color that works well on a painted wall may read too sharply on stone. Before purchasing the entire batch, it is useful to make a long color sample and apply it to both materials at the same time.
If MDF is planned, you can separately buy MDF skirting board after comparing other tall profiles, if PLT‑004 turns out to be too active specifically on the stone wall.
Oak/MDF/oak veneer: when wood and stone work as contrast
Warm wood texture next to cold stone can be a strong design technique. But this should be a deliberate contrast, not an automatic choice of "oak is more expensive — so it is better."
Check:
- the color of the porcelain stoneware veins;
- floor shade;
- doors and furniture;
- presence of other oak elements;
- lighting;
- continuation of the wood line on adjacent walls.
If the room already has oak doors and furniture, PLT‑004 with oak veneer can tie these elements together. If the stone is already very active, another expressive wood line may overload the composition.
Beech/MDF/beech veneer: when a light profile fits in more easily
A light beech system can be convenient in interiors with cream, beige, and warm gray stone shades. But the task of the article is not a general comparison of wood species. Beech is considered only as part of the transition between a painted wall and porcelain stoneware.
If the entire profile is covered with opaque enamel, the visual role of the wood species decreases, but the technological difference between combined products remains.
A wall of porcelain stoneware with a doorway: continuity can become stronger
If there is a door on the stone wall, especially with a casing matching the style of PLT‑004, stopping the baseboard at the stone may unexpectedly break the overall wooden frame. In such a scenario, continuing the profile over the porcelain stoneware becomes more convincing.
On the facade of the wall, three elements need to be drawn at once: a doorway, a high plinth, and a porcelain stoneware pattern. Only this way can you see which system dominates.
A stone wall without doors and furniture: the absence of a plinth looks more natural
If the accent plane is completely open, from floor to ceiling showing stone and containing no doors, cabinets, columns, or wooden elements, the absence of PLT‑004 is often perceived as a cleaner solution. The stone becomes a standalone material without a wooden horizontal strip.
If porcelain stoneware occupies only part of the wall
When a stone insert 1200–1800 mm wide is located in the middle of a painted wall, a simple break of PLT‑004 on the left and its start on the right can create two noticeable ends. In this scenario, it is useful to compare:
- a continuous plinth over the insert;
- a complete interruption across the width of the stone;
- vertical moldings along the edges of the stone insert;
- a niche or shadow gap that architecturally justifies the break.
How to create a transition mockup if the stone starts in the middle of the wall
Use two PLT-004 templates at least 800–1000 mm long. One ends before the stone, the second continues over it. Photograph from a distance of 3–4 m. If the end of the first option looks random, then the boundary lacks a vertical architectural element.
Floor covering and vertical porcelain stoneware are different matters
There is no need to transfer recommendations for a skirting board 'matching the floor tile' to this situation. Here the floor can be parquet, engineered wood, laminate, or the same porcelain stoneware — the main intent of the article still remains the vertical accent wall.
The general question of choosing a profile for floor coverings has already been covered in the material how to choose a skirting board for tiles and porcelain stonewareHere it is used only as a linked reference page to avoid repeating the existing intent.
There is a separate material wooden baseboard under tile, but it is also dedicated to another task — floor tiles and rooms like hallways or kitchens.
Should the stone wall be counted in the total footage of PLT-004
Only after deciding the composition. Correctly make two specifications.
| Option | What is included in the area | What happens to the stone wall |
|---|---|---|
| A — PLT-004 runs along the stone | Full open perimeter | Stone wall included |
| B — PLT-004 ends at the stone | Only painted and other selected walls | Length of stone wall excluded |
After that, each specification needs to be converted from meters to whole planks of 2400/2600 mm.
How the stone wall decision changes the number of whole planks
Why excluding a 2.8 m stone wall can change the order more than it seems
Suppose the accent wall is 2800 mm long. If PLT‑004 does not apply to it, the total length decreases by 2.8 m. For MDF planks of 2600 mm, this is not just "minus one plank": in a specific cutting map, the need for two planks may disappear, because one wall would require 2600 + 200 mm, and the short remainder could not be used elsewhere without an additional joint.
For wood finishes of 2400 mm, the cutting will be different. Therefore, the purchasing effect is calculated by whole planks, not by the formula "perimeter minus 2.8".
Calculation example: living room 5 × 4 m and a stone wall of 2.8 m
Geometric perimeter of the room:
5 + 5 + 4 + 4 = 18 m.
If a stone insert 2.8 m long replaces a section of one wall and PLT-004 is not needed on it:
18 − 2.8 = 15.2 m.
For MDF 2600 mm clean division:
15,200 ÷ 2600 ≈ 5.85 — at least 6 slats by footage.
For the 2400 mm version:
15,200 ÷ 2400 ≈ 6.33 — at least 7 strips.
If the baseboard also goes over the stone, the clean minimum increases. But the final quantity still depends on the cutting layout of each wall's lengths.
Why you can't count only the total perimeter
If after excluding the stone wall, the remaining walls are 4200, 3800, 3600, and short sections near doors, large leftovers from one plank can cover another segment. Simple linear footage doesn't show such optimization.
How to create two cutting maps before purchasing
It's convenient to make a table for "with baseboard on stone" and "without baseboard on stone." For each plank, record which section it covers and what leftover remains.
| Plank | Option A — over the stone | Option B — without stone |
|---|---|---|
| №1 | Long wall | Long wall |
| №2 | Continuation + part of the stone | Continuation of a regular wall |
| №3 | Stone wall / remainder | May become a reserve |
In practice, such a map quickly shows whether abandoning PLT-004 on stone reduces the order by one or two whole planks.
When one additional plank is needed precisely because of a complex end
If PLT-004 ends on stone with a complex return or custom trim, the risk of cutting error is higher. Then it is more reasonable to count the reserve as a whole plank rather than mechanical 10%.
This is especially relevant for 2400-mm combined wood finishes: an error on a long visible wall may require a full replacement of the part.
When a reserve plank is not needed
If the cutting layout leaves a large remainder of 800–1200 mm and the most complex end requires a short piece, this remainder can already serve as a reserve. But it will not replace a long strip if the main segment is damaged.
Practical scenarios for transitioning PLT-004 to porcelain stoneware
Scenario 1. The stone wall starts at an internal corner
This is the most convenient case. The painted wall ends at the corner, and beyond it begins a fully stone surface. If the template shows that the porcelain stoneware should read from the floor, PLT-004 logically ends at the corner. The end of the profile is practically invisible because the geometric boundary of the room already exists.
Commercially, this option is also simple: the length of the stone wall is completely excluded from the measurement, and on the painted wall you only need to precisely cut the last strip to the corner.
Scenario 2. Porcelain stoneware starts in the middle of a long wall
Here, stopping the 160-mm profile is more difficult. If you simply make a straight end at the stone line, it may look like an accidental termination of the baseboard. Before purchasing, it is worth checking at least three solutions: continuing along the stone; returning PLT‑004 to the wall; a vertical extension or molding along the material boundary.
If none of the termination options looks convincing, a continuous baseboard may be better even with a strong stone surface.
Scenario 3. Stone insert 1400 mm wide between two painted sections
If PLT-004 is not installed on the porcelain stoneware, two visible ends will appear—on the left and on the right. This is no longer one local node, but a pair of symmetrical terminations. They must look identical and be tied to the vertical boundaries of the insert.
With a weak frame around the porcelain stoneware, the two ends may attract more attention than the stone itself. Therefore, in such a scenario, continuing the profile over the insert more often requires serious comparison on the template.
Scenario 4. A porcelain stoneware wall 3.5 m long is fully exposed
A large stone surface without doors, furniture, or socket frames is a good candidate for having no baseboard. A 160-mm horizontal line can ruin the effect of a solid stone from floor to ceiling.
Excluding 3.5 m from the purchase already shows a noticeable economic effect: for MDF 2600 mm and a 2400 mm execution, this can reduce the need by at least one, and sometimes two, slats depending on the cutting of adjacent walls.
Scenario 5. A low console stands on the stone wall
Furniture changes the composition. If a console 1800–2200 mm wide already creates a horizontal line and partially covers the bottom of the wall, PLT-004 may be almost invisible behind it. Then the question becomes not decorative but operational: whether the profile behind the furniture is needed at all and whether its absence could be exposed during rearrangement.
Scenario 6. The stone wall contains a door
If the door has a wooden trim, a tall PLT-004 on the stone can connect the bottom of the wall to the door frame. Without a baseboard, the trim will "grow" directly from the stone surface. This can be beautiful, but requires comparing two options.
Scenario 7. The porcelain stoneware matches the color of the painted wall
If the stone is neutral, close to the wall color, and differs mainly in texture, ending the baseboard may look less justified. A continuous PLT-004 line connects the materials and makes the transition calmer.
Scenario 8. Contrasting stone — dark graphite next to a light wall
A contrasting accent wall itself is a strong boundary. Light PLT-004 extending onto the dark stone creates an additional bright horizontal stripe. If the design is not built on such graphic contrast, ending at the stone often looks cleaner.
How to check the combination of color, texture, and height before final painting
The most reliable test is a long, full-size sample. A small piece of skirting shows the material but doesn't convey the feel of a continuous 160 mm high line. Better to take a cardboard strip or an inexpensive mock-up 1.5–2 m long, paint it approximately in the chosen color, and apply it to the porcelain stoneware.
View it in three modes:
- in daylight;
- under the main evening lighting;
- under side lighting, if available.
Side light especially enhances the relief of PLT‑004 and the porcelain stoneware joints. In one lighting condition, the profile may blend with the wall; in another, it may become the main visual element.
How to choose the PLT‑004 material specifically for the "paint → stone" transition
The material is chosen not separately from the assembly, but together with the color and finishing method.
MDF 2600 mm
Convenient for covering enamel. If PLT‑004 should visually continue the painted walls and only extend onto the neutral stone, MDF provides a predictable base for a uniform color. The 2600 mm length also affects the number of joints.
Beech/MDF/beech veneer 2400 mm
Suitable if a warmer woody character is needed. But the article does not call it solid beech: the lower part is combined. With a transparent finish, you need to check the specific preparation and the actual surface of the batch.
Oak/MDF/oak veneer 2400 mm
A strong choice for an interior that already has oak doors, furniture, or flooring. But next to bright stone, the wood texture may compete for attention. A test sample is mandatory.
Pattern, texture, and additional elements of the stone wall
High profile on a wall with large-format tiles: check the grout joints of porcelain stoneware
If the horizontal tile joint runs at a height of 150–200 mm, PLT‑004 may almost coincide with it or overlap it. This can give a neat line or, conversely, an unfortunate mismatch of a few centimeters.
Before installation, apply to the facade:
- tile boundaries;
- joints;
- the top line of PLT‑004 at 160 mm;
- doors and furniture.
If the plinth covers half of an important pattern or creates a second horizontal line next to a joint, the option without it may be stronger.
If the porcelain stoneware has a pronounced relief
A relief surface complicates not only the visual solution but also installation. The back plane of PLT-004 is designed for normal adhesion. On highly textured stone, gaps may appear or special preparation may be required.
In such a case, ending the baseboard before the stone wall gains an additional technical argument. If continuation is still needed, the installation technology is agreed upon separately.
If the porcelain tile is polished
A smooth glossy surface reflects the tall wood profile more strongly. The contrast between matte enamel and polished stone can be beautiful, but it will also visually emphasize the 160-millimeter line. Additionally, the adhesive bond to a smooth substrate must be technically confirmed.
If the porcelain stoneware is matte and concrete-look
On matte gray stone, the tall painted PLT-004 can work as a crisp architectural line, especially if the color matches the doors. Here, continuity often looks more natural than on an active marble pattern.
If the porcelain stoneware imitates wood
A wood-like pattern on stone next to real veneer creates a risk of two similar but mismatched textures. In such a scenario, a painted MDF profile sometimes looks cleaner than oak veneer. But this can only be resolved with samples.
How to account for the floor plinth at adjacent walls and thresholds
If the stone wall ends at a doorway, PLT-004 on the painted wall, the casing, and the threshold must meet in a single system. Terminating the plinth at the stone can be logical, but the end should not hang a few millimeters away from the casing.
If outlets are installed on a stone wall
Continuing the tall PLT-004 may intersect the lower zone of outlet frames, especially if the electrical boxes are mounted low. Before deciding to run it over the stone, the height of the bottom edge of the frames relative to 160 mm must be checked.
If the plinth ends at the material boundary, this conflict may disappear—another practical argument for a break.
If a TV and a cabinet are installed on the stone
The TV area often has horizontal furniture that itself forms the lower composition. The plinth behind the cabinet may be invisible. You need to decide whether the line should be maintained in case of furniture rearrangement or whether the hidden section can be excluded from the measurement.
How to calculate the baseboard if the stone wall is excluded only partially
For example, a porcelain stoneware wall is 3 m long, but at the left edge there is a door portal 900 mm wide, and PLT-004 must pass under its trim. Then, not the entire stone wall is excluded from the calculation, but only the actual segment without the plinth.
That is why on the plan you need to mark not "stone wall — 3 m" but the actual start and end points of PLT‑004.
Cutting 2600 and 2400 mm after approval of material boundaries
MDF cutting map 2600 mm: example with an excluded stone wall
Let the visible sections remain 4200, 3600, 3100, and 800 mm. The total length is 11,700 mm.
One possible logic:
- 4200 = 2600 + 1600, remainder about 1000 mm;
- From the remainder of 1000, cover a section of 800 mm;
- 3600 = 2600 + 1000;
- 3100 = 2600 + 500.
So a short section can be closed without a separate plank. The final quantity depends on corner cuts and the quality of remnants.
Cutting map for 2400 mm: the same interior
For the 2400 mm execution:
- 4200 = 2400 + 1800, remainder about 600 mm;
- 3600 = 2400 + 1200, remainder about 1200 mm;
- 3100 = 2400 + 700, remainder about 1700 mm;
- 800 can be obtained from one large remainder.
The pure number of planks may turn out to be close, but the distribution of joints and reserves is different.
When excluding a stone wall does not reduce the number of planks
Sometimes after removing 2–3 m from the total length, the number of whole planks remains the same because the remnants were already sufficient. This is normal. The decision to "not install a skirting board on stone" may still be correct by design, even if material savings are zero.
When excluding stone saves two planks at once
If the stone wall is long and other areas poorly utilize remnants, omitting PLT‑004 on it may eliminate the need for one full plank for the wall itself and another for the continuation/joint. Therefore, the economics are only verified with a specific cutting layout.
When a high PLT‑004 is better not to buy at all for this room
There are situations where the problem is not a single transition to stone, but that the 160-mm profile systematically does not suit the interior. It is better to refuse PLT‑004 before ordering if:
- the porcelain stoneware wall occupies a large part of the perimeter and the skirting board on it looks alien;
- on several walls, low sockets or furniture conflict with the 160 mm height;
- there are many 'paint → stone' transitions and each requires a separate end cap;
- the plane difference of 10–20 mm creates complex stepped joints;
- The design idea of porcelain stoneware is based on a continuous surface from the floor;
- PLT-004 is visually too heavy for the room;
- The buyer is forced to come up with complex extensions just to keep a single model.
In that case, it is better to buy a wooden baseboard of a different scale and recalculate the entire room as a single system.
When PLT‑004, on the contrary, should be kept despite the stone wall
If the tall profile is already associated with door casings, furniture, classical architecture, and the overall room height, one stone wall does not necessarily have to break the entire band. Then you should not abandon PLT-004, but rather properly solve its installation on porcelain stoneware and the pattern of the lower part of the wall.
How to make a decision tree before purchasing
| Question | If "yes" | If "no" |
|---|---|---|
| Should the porcelain stoneware read from floor to ceiling as a single plane? | First, check the option without PLT-004 | Check the continuous belt |
| Does the material boundary coincide with the corner? | Ending the baseboard is simpler | A special end is needed |
| Is PLT-004 a common architectural belt? | Continuation along the stone is stronger | A gap is acceptable |
| Does porcelain tile protrude relative to the wall? | Build a 1:1 section | Check the simple abutment |
| Are there doors/furniture on the stone related to the baseboard? | Continuity may be more important | The stone plane can remain independent |
| Does the 160 mm pattern look convincing on stone? | Consider option A | Calculate option B without stone |
How to check the solution in visualization without a new 3D project
A frontal photo of the wall and simple graphic overlay are enough. Draw a strip 160 mm high in the intended color and compare two frames: with a continuous profile and without it on the stone. This test is especially useful if the porcelain stoneware has a large pattern.
What to send to the manager before ordering PLT‑004
To place an accurate order, prepare:
- article PLT‑004;
- selected finish;
- photo of the entire stone wall;
- close-up photo of the transition 'paint → porcelain stoneware';
- size of the stone protrusion or recess relative to the wall;
- length of the stone area;
- room plan;
- wall lengths;
- photo of the floor;
- color of the painted walls;
- desired finish for PLT‑004;
- preliminary layout of the planks;
- decision — run along the stone or end before it.
If the assembly is approved, you can order PLT-004 160×16 mm in the calculated quantity.
Delivery conditions and long strips 2400/2600 mm
Long profile must be delivered without damage to edges and decorative part. Before payment, it is worth checking payment and delivery terms, the packaging, and the route for bringing it into the room. This is especially important if the end assembly requires a flawless long piece without the possibility of hiding a defect.
Mistakes when buying PLT-004 for interiors with porcelain stoneware
Mistake 1. Automatically counting the entire perimeter
A stone wall may not require PLT-004 at all. As a result, extra strips are purchased.
Mistake 2. Buying before approving the transition
The profile is already painted and cut, and then it turns out that it is visually redundant on porcelain stoneware.
Mistake 3. Treating vertical porcelain stoneware as a regular painted wall
The stone already performs part of the protective and decorative functions of the lower zone.
Error 4. Calling the oak version a solid array
The current card shows a combined execution of oak/MDF/oak veneer.
Error 5. Not checking the stone protrusion
The plinth butts against the step by 10–15 mm, and the installation has to be redone.
Mistake 6. Leaving the 160×16 mm end without a project
A noticeable "cut off" end appears at the boundary of materials.
Error 7. Choosing material only by price
MDF, beech/MDF/veneer, and oak/MDF/veneer interact differently with the color and texture of the stone.
Error 8. Not making a full-size template
On a small sample, 160 mm is not perceived as a real architectural belt.
Error 9. Starting finishing before a dry fit
After changing the solution, some painted parts remain extra.
Error 10. Transfer recommendations about floor tiles to a vertical wall
This is a different intent and a different architectural node.
Error 11. Calculate savings only in linear meters
Excluding 2.8 m of stone can change the number of whole planks non-linearly.
Error 12. Making a non-standard PLT-004 selection without a drawing
The combined profile structure requires caution.
Final specification of PLT-004 for a room with a stone accent wall
| Parameter | What to fix |
|---|---|
| Product | PLT‑004 |
| Finish | MDF / beech-MDF-beech veneer / oak-MDF-oak veneer |
| Size | 160×16×2600 or 160×16×2400 mm |
| Stone wall | actual length |
| Stone position | flush / protrusion / niche |
| Baseboard solution | continue / finish |
| End cap assembly | straight / return / extension / corner |
| Installation on stone | agreed system, if needed |
| Cutting map | by whole planks |
| Reserve | by complexity of ends and corners |
| Finishing | confirmed by sample |
Control examples of ready solutions
Control example: stone wall 2800 mm starts at internal corner
The living room has a perimeter of 18 m. One wall 2800 mm long is fully tiled with porcelain stoneware and starts at an internal corner. The template shows that without PLT‑004 the stone looks more solid. Solution: the profile ends at the corner, the stone length is excluded.
The net length becomes 15.2 m. For MDF 2600 mm, the mathematical minimum is 6 slats, for 2400 mm — 7. Then a map of the actual walls is built. This scenario is one of the strongest arguments in favor of ending at the stone: the visual boundary is natural, the end is almost invisible, and the purchase is reduced.
Control example: stone insert 1600 mm is in the middle of the wall
Here, the PLT-004 gap creates two open ends. If the vertical boundaries of the porcelain stoneware are not finished, the option without a baseboard may look worse than a continuous belt. After the template, the designer decides to continue PLT-004 over the stone. In this case, all 1600 mm are included in the cutting plan.
Control example: the stone protrudes by 12 mm and has a dark marble pattern
PLT-004 is light, the painted walls are neutral. The profile at the transition butts against the step, and on the stone it creates a strong light stripe. The solution is to finish before the protrusion and design a return to the wall. A short finishing element and a reserve for p are calculated separately.
Stone wall and heated floor: does this affect the choice of PLT-004
The mere presence of a heated floor does not determine whether a baseboard is needed on porcelain stoneware. But when choosing adhesive, finishing, and joints, it is important to consider the temperature regime of the specific system. The article does not prescribe temperature gaps or special adhesives without manufacturer documentation.
The compositional solution remains the same: first understand whether PLT-004 is visually needed on the stone, then check the compatibility of the installation system with operation.
If the porcelain stoneware wall transitions into a stone fireplace portal
At the fireplace, the stone is already strong independent architecture. A tall PLT-004 can either neatly approach the portal and end, or continue along the lower stone part, if this is included in the overall system.
In this case, it is especially important not to cover the service and thermal zones of the fireplace with a decorative baseboard without equipment documentation. The article does not extend general interior advice to the technical requirements of the fireplace structure.
If the stone wall is behind the dining table
The bottom of the wall is partially covered by chairs and the table, but the plinth is still visible on the sides. If PLT-004 ends at the stone, the end may be in an area of active contact with a chair. A profile return or finishing at the corner may be more practical than an open straight cut.
If the stone wall is in a passage
On the passage wall, the lower zone more often receives random impacts. Porcelain stoneware is stable on its own, but the protruding wooden PLT-004 becomes a more vulnerable element. This is another argument to check whether it is functionally needed on the stone surface.
How to choose the ending point if the stone boundary is offset from the corner by 80–150 mm
A small painted wall segment between the corner and the stone surface creates an awkward short section. A tall PLT-004 only 80–150 mm long may look like a random insert. In this case, it is useful to compare:
- baseboard up to the stone;
- complete absence of PLT-004 on the short wall segment;
- a vertical extension piece that unifies the wall segment and the material boundary.
The decision depends on whether the wall segment is visible and how it relates to the door or corner.
How to calculate a short section near the stone from offcuts
If a 350–600 mm segment is needed in front of a stone wall, buying a separate strip for it is almost never required. Such a piece is better assigned from the remainder after a long wall.
For example, an MDF plank of 2600 mm is used on a section of 2100 mm and leaves about 500 mm. This offcut can become a ready-made extension piece in front of the porcelain stoneware. This is why the cutting map should be created after all endpoints are approved.
How to check two rooms with different stone walls
If in the living room the porcelain stoneware is contrasting and PLT‑004 is not needed on it, while in the hallway the stone is neutral and the baseboard continues, this is not necessarily inconsistent. Rooms can have different architectural logic.
But if the spaces are united by a wide opening and the same plinth visually passes from one zone to another, different solutions should be compared on a common plan. Otherwise, the line will unexpectedly break and return.
Why the final choice is better confirmed with one control wall
If doubt remains, do not start painting the entire batch of PLT-004. Take one strip or a full-size mockup, assemble the real transition at the stone, and look at it in the interior. This is cheaper than changing the decision after installing 15-20 meters of profile.
The control zone should include exactly the material boundary, because on a regular painted wall PLT-004 is already obvious.
What to keep after installation in case of future rework of the stone wall
If PLT-004 ends at porcelain stoneware, keep a small painted or tinted profile offcut. If in a few years the stone wall is dismantled or replaced with paint, this sample will help match the profile and finish to continue the line.
If a whole or large strip remains, it can be stored as a repair reserve, especially for combined oak or beech execution.
Checklist before paying for PLT-004
The order can be considered ready if:
- the PLT-004 execution is exactly selected;
- wood versions are not mistakenly considered solid timber;
- the stone is measured by length and overhang relative to the wall;
- it is decided whether PLT-004 runs over porcelain stoneware;
- the end joint is approved;
- template 160 mm made;
- Doors, furniture, and sockets are checked;
- installation on stone is technically coordinated, if needed;
- Two cutting plans are made and one is selected;
- the reserve is calculated in whole planks;
- color and finish are confirmed by sample;
- Delivery and packaging have been verified.
If the decision to "run along the stone or not" is still open, paying for the full perimeter is premature.
Final commercial route
If PLT-004 is approved and the stone wall is consciously included or excluded from the layout, the exact number of planks of a specific length is ordered. If 160 mm works too actively next to the stone, it is better to compare other profiles before purchasing.
The key is not to buy a tall baseboard for the entire perimeter out of habit. The porcelain stoneware accent wall is already a finished architectural surface and has the right to become a natural break in the wooden line.
Control table: continue PLT-004 on stone or stop before it
| Sign | Stronger for continuing | Stronger for ending at the stone |
|---|---|---|
| Porcelain stoneware | Neutral, calm | Contrasting, active pattern |
| Material boundary | In the middle of an open wall | Internal/external corner |
| Doors and architraves | Are on the stone wall and connected to PLT-004 | The stone wall is completely independent |
| Stone protrusion | Flush with the wall | Protrusion of 10–15 mm and complex transition |
| Slab pattern | Lower zone is not critical | It is important to see the pattern down to the floor |
| Installation | Adhesion and technology confirmed | Surface is textured or installation is complex |
| Layout | Continuation does not increase the number of planks | Excluding the wall reduces the order |
The table does not replace the layout, but helps to see which group of arguments is stronger in a specific project.
If the decision changes after purchase, but before installation
Suppose PLT‑004 has already been purchased for the full perimeter, but after a fitting, the designer decided not to run it over porcelain stoneware. It is not necessary to consider the extra material a loss. The planks can be redistributed to other rooms, used as a reserve, or kept for future renovation if the profile and finish there match.
The main thing is not to continue installation on stone just because the material has already been paid for. The decorative solution should remain the priority.
If the decision changes after painting part of the batch
An extra painted profile is harder to use in another room, especially if the color is different there. Therefore, a full-size template and material map should be created before the entire batch goes into finishing.
How to check the transition when the floor plinth is already installed on the adjacent wall
If part of PLT-004 is already installed, attach a temporary mock-up of the continuation onto the stone at its end. Compare the two states: the end remains at the boundary and the line continues. This shows whether the existing end is finished or requires rework.
What to do if the porcelain stoneware edge is uneven
If the vertical edge of the stone has a drop, a wide joint, or an irregular pattern, tying a neat PLT-004 end to it is risky. First, bring the border to a finished state—metal profile, neat joint, or another trim—and only then decide on the plinth.
Why you don't need to mask a bad stone edge with a tall plinth
PLT‑004 can cover the lower part of the defect, but it won't fix an uneven vertical boundary above 160 mm. If the material transition is poorly executed, it needs to be repaired as a separate joint, not hidden by covering only the bottom centimeters.
Test case: the same stone wall in two different interiors
Imagine a wall 3000 mm long made of light-gray porcelain stoneware. In the first interior — white walls, white doors, and PLT‑004 made of MDF under white enamel. Here, the plinth continuing over the stone creates a calm, unified line and doesn't conflict with the pattern. Option A looks convincing.
In the second interior, the same stone has active dark veins, nearby oak doors and furniture, and PLT‑004 is planned with an oak texture. A wooden strip of 160 mm covers an important part of the pattern and competes with the stone. The ending at the internal corner looks cleaner. Option B is stronger.
The wall size is the same, the product is the same, but the architectural solution is different. That's why the article doesn't give a universal answer like "a plinth isn't needed on porcelain stoneware" or "the plinth should always be continuous."
What the buyer should be able to do after this check
Before paying for PLT‑004, the buyer should be able to determine the actual boundary of the wooden belt, compare two full-size scenarios, measure the stone protrusion, choose the end termination, resolve the issue of installation on porcelain stoneware, and recalculate the number of whole planks.
If at least one of these decisions remains at the level of "the installer will figure it out later," the specification is not ready yet. The high profile and expensive stone wall are too noticeable to make a decision after cutting and painting.
Before the final order, it is useful to save two photos: the option with the PLT-004 template on the stone and the option without it. If a dispute later arises between the designer, the client, and the installer, the decision can be checked against what was approved before cutting. For complex transitions, this is better than the verbal comment "stop around here."
If the stone wall is excluded from the baseboard contour, the end point must be marked on the working diagram with a dimension from the corner or another permanent reference. Then the installer will not shift it by a few centimeters at their discretion, and the cutting map remains tied to the actual geometry of the room.
Before payment, it is useful to record the decision on the working diagram: specify the exact end point of PLT‑004, the length of the excluded or included stone zone, the type of end, and the plank number in the cutting plan. Then the designer, installer, and client work with the same geometry, and the decision does not change accidentally after painting and cutting.
FAQ about PLT-004 and porcelain stoneware wall
What is the size of PLT-004?
Height 160 mm, thickness 16 mm. MDF has a length of 2600 mm, combined beech and oak versions — 2400 mm.
Is there a PLT-004 made of MDF?
Yes, the current card shows MDF 160×16×2600 mm.
Is the oak PLT-004 solid wood?
No. The current card describes a combined product of oak/MDF/oak veneer.
Is it necessary to install a plinth on a vertical porcelain stoneware wall?
Not necessarily. If the stone is brought to the floor and is an independent plane, PLT-004 becomes primarily a decorative solution.
Can PLT-004 be finished at the stone boundary?
Yes, especially if the boundary coincides with a corner or another architectural division. In the middle of the wall, the end needs to be designed separately.
How to finish the end of a tall baseboard?
A straight finished end, a return to the wall, a vertical extension, or another agreed junction are possible.
Can PLT-004 be glued to porcelain stoneware?
The possibility depends on the stone surface and the chosen adhesive system. A universal compound cannot be prescribed without testing.
What to do if the porcelain stoneware protrudes by 10–15 mm?
Build a section of the transition and decide whether to finish the profile before the protrusion or design a special add-on. Do not cut the back part without a drawing.
Which material should be chosen next to the stone?
It depends on the overall palette and finish. MDF is convenient under enamel, combined wood versions — when a visible wood system is needed.
Do we need to count the stone wall in the footage?
Only if PLT‑004 actually runs along it. If the profile ends at the stone, the length is excluded.
How to recalculate the number of planks?
After determining all visible segments, they are distributed across whole planks of 2600 or 2400 mm, taking into account joints and leftovers.
When is it better to choose a different baseboard?
If 160 mm cuts the stone pattern too actively, the transitions become complex, or PLT‑004 conflicts with other elements of the room.
Where to order PLT‑004?
In the product card after approval of the material, end assembly, and cutting map.
Result: a stone wall can be a natural boundary for PLT‑004, and it is this decision that should precede the order calculation.
PLT-004 is a high profile 160×16 mm, so on a porcelain tile accent wall it works as a noticeable architectural belt, not as a neutral technical strip. If the stone should read from floor to ceiling, the baseboard is often better finished at the material boundary. If PLT-004 ties the entire room into a single system, continuing over the stone may be stronger.
Before purchasing, you need to check not only the color but also the planes: whether the stone protrudes, where its seams run, whether there are doors, furniture, and sockets, and how the open end will look. After that, two cutting maps are made—with and without the stone wall—and the number of whole planks is compared.
Correct sequence: check the PLT-004 card → make a 160 mm template → decide whether the stone is a boundary → design the end cap → check installation on porcelain stoneware, if needed → recalculate whole planks → place the order.