Article Contents:
- What exactly is the NPU-120L
- The size 150 × 59 × 10 mm cannot be automatically read as "150 mm horizontally"
- Layout 1 — overlay above the switch
- Layout 2 — overlay below the switch
- Layout 3 — overlay to the side of the switch
- Door binding
- Switch binding
- Rack wall binding
- When one NPU-120L is better than a mirrored pair
- When a L/R pair can be appropriate, although it is not the main scenario
- In the color of the wall
- In the color of the slats
- In the color of the door trim
- Contrast color
- When a decorative cover is not needed at all
- When the NPU-120L really improves the node
- When it is better to choose a smaller plate instead of the NPU-120L
- When it is better to use a molding instead of a single plate
- The surface under the plate must be solid, not just painted
- How to assess the possibility of removing the frame after installing the decor
- How to count the quantity if the same pattern repeats several times
- If identical doors have switches on different sides
- If the door casing is not yet finally installed
- If the slat panels are not yet finished
- If the wall is uneven
- What to put in the cart if the NPU-120L fits
- What to buy if the NPU-120L does not fit
- If the door handle almost touches the wall
- If the door is sliding
- If a door stop is located next to the switch
- Visual hierarchy: what should be the main element
- Measurement checklist
- Can the NPU-120L be placed diagonally above the switch?
- What to do if the cover plate only fits after removing the outer frame of the switch?
- Can the NPU-120L be placed directly above a double switch if its width is greater than the cover plate itself?
- Should the center of the NPU-120L be aligned strictly with the center of the key?
- Can the NPU-120L be placed on a door casing if there is not enough space on the wall?
- If the switch is touch-sensitive, are the requirements different?
- Can the NPU-120L be installed flush above the switch frame if access to the key is free?
- How can I check that the ornament will not catch on clothing?
- What should I do if the NPU-120L seems too small after a trial fit?
- Can I use leftover wall paint for the NPU-120L?
- Is the NPU-120R needed if the NPU-120L already fits?
- Can I first buy one NPU-120L and hold it up without mounting it?
- What should I do if a hidden cable runs near the switch and the cover is glued without drilling?
- Can the NPU-120L cover a small paint damage near the switch?
- How to understand that a clean wall is better?
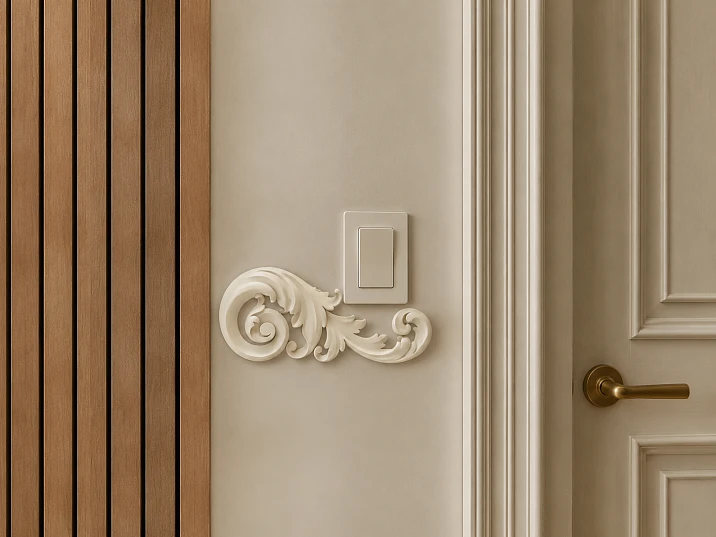
If a switch is already installed on the smooth strip between the door and the slat panels, moving the electrical wiring for the sake of one decorative NPU-120L overlay should not be taken as the initial decision. First, check whether there is a normal free zone around the existing electrical fittings where the overlay can live as standalone decor and not interfere with the use of the switch.
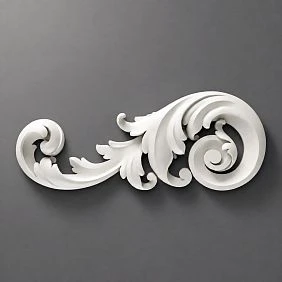
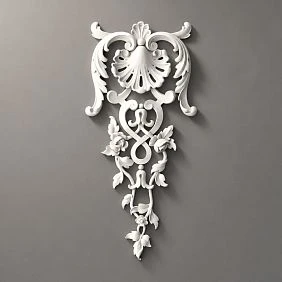
NPU-120L is a carved decorative polyurethane overlay measuring 150 × 59 × 10 mm. The current price in the STAVROS product card is 1,020 ₽ per piece. The manufacturer shows NPU-120R among related products, so the ornament has a mirrored alternative, but in this article the main question is specifically one NPU-120L on an already finished wall.
The main mistake is to take the total width of the strip, for example 520 mm, subtract the conditional width of the switch, and decide that the remaining space is "enough." For the composition, other dimensions are needed:
-
the distance from the door casing to the outer edge of the switch frame;
-
the distance from the switch frame to the edge of the slat panel;
-
the free field above the switch;
-
the free field below it;
-
the actual depth of the casing, the slat, and the overlay itself;
-
a zone that must remain accessible for use and maintenance of the switch.
Only after this can you compare three layouts: NPU-120L above, below, or to the side of the switch.
If at least one layout looks free and logical on a full-size template of 150 × 59 mm, the product can be considered for purchase. If the overlay in any position sticks to the switch frame, door trim, or edge of the slats, it is better to refuse it rather than redo the finished electrical work for the sake of decor.
Buy carved decorative overlay NPU-120L
What exactly is NPU-120L
In this task, it is important to maintain the correct product name: carved decorative overlay NPU-120L made of polyurethane. It is not a switch frame, not a molding, not an electrical decorative plate, and not a technical element for closing a mounting box.
Current specifications:
| Parameter | NPU-120L |
|---|---|
| Type | Carved decorative overlay |
| Material | Polyurethane |
| Size A × B × C | 150 × 59 × 10 mm |
| Price per 1 pc. | 1 020 ₽ |
| Related product | NPU-120R |
| The task of this article | separate decor next to an already installed switch |
The STAVROS card describes NPU-120L as a decorative element for walls, doors, and furniture. The product has no special purpose "for switches." Therefore, the correct layout is built around the existing electrical fittings, not through them.
This difference defines the entire project. The overlay must not:
-
step onto the switch frame;
-
cover the key;
-
interfere with fingers;
-
prevent removal of the decorative frame;
-
overlap the mounting hardware or service area;
-
be used as a base for the electrical mechanism.
If any of these actions must be performed for a nice picture, the scheme is not suitable.




The size 150 × 59 × 10 mm cannot be automatically read as "150 mm horizontally"
The card specifies size A × B × C = 150 × 59 × 10 mm. These are confirmed product dimensions. But the mandatory mounting orientation relative to the wall is not defined by the A × B × C notation itself.
Therefore, before calculations, two things need to be separated:
The product's overall dimension is known;
its rotation on a specific wall is chosen based on the composition.
If the overlay is positioned so that dimension A = 150 mm runs horizontally, it requires a horizontal overall field of 150 mm and 59 mm along the other face axis.
If the product is rotated, these projections swap, or at an arbitrary angle, they become larger than the bounding rectangle along both axes.
This leads to an important rule: you cannot say 'there are 155 mm between the switch and the slats, so it definitely fits.' First, you need to determine the orientation, apply the template, and check not only the outer rectangle but also the visual breathing room.
Our factory also produces:
How to measure the actual space for the NPU-120L around the switch
Why the switch cannot be considered simply a rectangle to be subtracted from the wall.
In the diagram, the switch looks like a fixed-size obstacle. In a real interior, it has several zones.
The first is the visible frame. Its outer dimension needs to be measured with a tape measure.
The second is the usage zone. The hand must freely approach the key. If the carved decor is too close, using the switch becomes inconvenient even without physically overlapping the frame.
The third is the service zone. The decorative frame and key sometimes need to be removed for maintenance or replacement. The overlay should not block this capability.
The fourth is the visual field. Even a technically acceptable small gap can look like an error: the switch frame and ornament begin to "merge" into one complex object.
Therefore, not only the width of the mechanism itself is measured. A free zone from the outer edge of the frame to the nearest decor is needed.
Why moving the electrical wiring should not be the first answer.
The switch is already installed, the finishing is complete, the door and slatted panels are in place. Moving the electrical point for a decorative overlay means interfering with the finished wall, restoring the finish, and additional work.
For NPU-120L, such a step cannot be automatically justified.
The sequence should be reversed:
-
preserve the existing electrical fittings;
-
measure the free zones;
-
check with the NPU-120L template;
-
consider another turn;
-
consider NPU-120R as a mirror alternative;
-
consider another overlay of a smaller scale;
-
if necessary, abandon the decor.
Only if the interior is initially completely remodeled and the electrical wiring is changed anyway, the position of the switch can be reconsidered together with the overall project. But this is no longer a task of "buying one NPU-120L without remodeling."
The total width of the smooth strip is 520 mm: what additional dimensions are needed.
Suppose there are 520 mm of smooth painted wall between the outer edge of the door trim and the edge of the slat panel. This figure is useful, but insufficient.
Four more horizontal dimensions need to be recorded:
-
D1 — from the trim to the left edge of the switch frame;
-
W — the actual outer width of the switch frame;
-
D2 — from the right edge of the frame to the slat panels;
-
checksum D1 + W + D2.
If the switch is not centered on the strip, D1 and D2 will be different. This asymmetry will determine whether the NPU-120L can be placed on the side.
For example, if the large free area is on the side of the slats, the overlay can be checked there. If the large area is on the door side, the decor may be associated with the casing.
But until D1 and D2 are measured, the total figure of 520 mm does not answer the purchase question.
Vertical dimensions are often more important than horizontal width.
A switch usually occupies a relatively small part of the wall height. Therefore, even on a narrow smooth strip, there may be enough space above or below, although the overlay does not fit on the side.
Before ordering, measure:
-
Htop — the distance from the top edge of the switch frame to the nearest upper limit;
-
Hbottom — the distance from the bottom edge of the frame to the baseboard, furniture, or another boundary;
-
the height of the switch frame itself;
-
the height of the door and the trim, if the overlay is planned to be connected with the door composition.
That is why the article should not turn into a single horizontal calculation. The NPU-120L has three real placement zones, and each uses a different section of the wall.
Get Consultation
Three basic layouts without moving the switch
An already finished wall has three natural directions to search. It is better to check all of them before purchasing, because the same NPU-120L can look appropriate in one position and random in another.
Layout 1 — overlay above the switch
This is the safest option for use: the decorative element does not fall into the hand's working area and can have its own separate field.
This placement works especially well if:
-
there is enough free height above the switch;
-
the door is below the ceiling and the upper zone of the wall section remains empty;
-
the ornament can be connected with the upper part of the trim;
-
The edge of the slat panels does not create another large accent nearby.
The main risk is that the overlay may end up "hanging" without connection to a switch, door, or slat wall. Therefore, its position should be set not by random height, but by architectural alignment.
Three alignments can be checked:
-
to the vertical axis of the switch;
-
to the top line of the door casing;
-
to the edge of the slat composition.
If one of them creates a clear structure, the upper placement looks convincing.
Scheme 2 — overlay below the switch
The lower zone may be freer, especially if the switch is located high and there is no furniture nearby.
But here the operational risk is higher:
-
decor closer to hands;
-
it is easier to hit it with a bag, clothing, or cleaning equipment;
-
the baseboard may limit the composition;
-
the lower overlay may look too low relative to the door.
Therefore, this option should only be checked after assessing the actual movement of people.
If the lower zone remains clean, the NPU-120L can work as a small decorative counterweight to the switch. But if a baseboard, door trim, and the edge of the slats are already nearby, additional ornament often makes the assembly too busy.
Scheme 3 — overlay on the side of the switch
This is the most obvious option for the strip between the door and the slats, but it is the one that most depends on the precise measurement of D1 or D2.
On the side, you need to simultaneously leave:
-
space for the overlay itself;
-
free space up to the switch frame;
-
air up to the trim or battens;
-
ability to remove the switch frame;
-
normal finger access.
If a large free area is on one side, the NPU-120L can become a directional accent. But if it almost touches both the switch and the adjacent boundary, the composition will look cramped.
How to make a full-size 1:1 template.
For the first check, you don't need the actual product.
Cut out a 150 × 59 mm rectangle from thick paper or cardboard. It shows the outer dimensions, but not the pattern. Therefore, it's better to additionally print a photo of the NPU-120L to scale, or at least schematically transfer the main swirls.
Separately make a second layer about 10 mm thick, for example from several layers of cardboard or foam board. It doesn't imitate the exact relief, but shows the product's protrusion from the wall.
The template should be checked in several positions:
-
A = 150 mm horizontally;
-
A = 150 mm vertically;
-
if necessary — intermediate turn;
-
mirror through the NPU-120R printout, if the ornament direction matters.
Take photos of each option from the same point. Only this way can you compare them fairly.
Why a 150 × 59 mm rectangle does not replace the ornament image.
NPU-120L has an openwork S-shaped composition. The outer rectangle shows whether the product fits physically, but does not show where the visual mass is concentrated.
Two products of the same dimensions can feel completely different:
-
one evenly fills the entire rectangle;
-
the other has a lot of empty space;
-
the third one visually stretches to one side.
For a switch, this is critical. Even if the outer dimension has the same offset on the left and right, the curl can visually "stretch" toward the frame and create a feeling of tightness.
Therefore, the final fitting should take into account the actual pattern of the NPU-120L, not just the cardboard outline.
How to determine the free space around the switch frame.
In the general STAVROS material about molding near switches, there is a recommendation to leave free space between the electrical fittings and the decor. On different sections of that page, similar but not completely identical ranges are given. Therefore, in this product task, it is more reasonable not to turn one number into a strict standard.
Practical verification is more reliable:
-
measure the outer size of the switch frame;
-
apply masking tape along its perimeter at the proposed boundary of the free space;
-
try pressing the key with a normal hand movement;
-
check whether the decorative frame can be removed without contact with the template;
-
check if there is visual air.
If the overlay does not formally touch the switch, but the hand constantly rests against the relief, there is little free space.
If the frame can only be removed after dismantling the NPU-120L, the layout is also unsuccessful.
Service access is more important than symmetry.
In a beautiful sketch, you want to place the NPU-120L perfectly symmetrically relative to the switch. But if for this symmetry the decor comes too close to its frame, priority should be given to operation.
The switch is a functional point that can be changed, repaired, or removed when repainting the wall.
NPU-120L is a decorative element.
Therefore, the hierarchy is simple:
service access → ease of use → finish safety → compositional symmetry.
If symmetry is disrupted by a few centimeters, but the wall becomes more convenient, this is a normal solution.
Why NPU-120L should not be trimmed to fit a switch frame.
The idea of cutting a section out of the carved overlay for the switch seems like a way to use the product on a narrow strip. For this theme, it is a weak solution.
Causes:
-
The factory ornament is altered;
-
The integrity of thin carved sections is compromised;
-
The result becomes dependent on the shape of the specific frame;
-
The switch starts to look built into the decor, although the product is not intended for this;
-
Replacing the electrical fittings with a model of a different size becomes more difficult.
If a whole NPU-120L does not fit nearby, it is better to choose a different layout or a different decor.
Why NPU-120L cannot be glued on top of a switch frame.
This is no longer a question of aesthetics.
The switch frame is part of the electrical fittings and must remain accessible. A decorative element glued on top of it:
-
hinders dismantling;
-
connects two different systems;
-
may cover gaps and fasteners;
-
complicates maintenance;
-
creates the appearance of a non-standard homemade assembly.
The NPU-120L should be attached to a separately prepared wall surface, not to the decorative switch frame.
If the switch frame is multi-gang.
A single switch may not be a single key, but a horizontal or vertical block of several mechanisms. Then the free zone changes radically.
You cannot use the standard size of another frame.
Measure the actual external dimensions of the entire block.
For a multi-gang frame, the "above" or "below" layout is especially useful, because the side area may be too narrow.
If the block is vertical, the NPU-120L in a horizontal orientation can create a separate composition on top. If the block is horizontal, it is sometimes better to orient the plate along the vertical of the wall section.
But any solution is first checked with a template.
If the switch is located almost at the door trim.
This is a typical situation: the electrical box is near the door, and the slat panels start further away.
Then the free zone D1 on the door side is small, while D2 on the slat side is noticeably larger.
In this case, do not try to center the NPU-120L on the entire 520 mm strip. The compositional center is already the door + switch combination.
The plate should be checked:
-
from the slat side;
-
above the switch;
-
as a separate accent in the free part of the strip.
If you force it between the trim and the frame, the joint will be tight.
If the switch is located almost at the slat panels.
The reverse situation changes the direction.
D2 is small, D1 is large. Then it is more logical to check the NPU-120L from the door side or above/below.
At the same time, you need to see whether the carved ornament starts competing with the trim. If the door already has a classic profile or a decorative capital, another S-shaped overlay nearby may be redundant.
In a modern door with a simple flat trim, a single carved accent can work more interestingly.
What to tie the NPU-120L to: the door, the switch, or the edge of the slats
On the narrow strip of the wall, three strong lines are simultaneously present:
-
vertical of the door casing;
-
switch rectangle;
-
vertical rhythm of slat panels.
If you try to align the plate to all three at once, you get a compromise without clear logic. Therefore, before fitting, you need to determine the main object.
Alignment to the door
Suitable if the door visually dominates: large casing, high portal, classic paneling, contrasting color.
The NPU-120L is then perceived as a continuation of the door composition. It can be aligned to a specific line of the casing or placed in the zone between the switch and the top of the door.
Advantage — the decor gets architectural context.
Disadvantage — it may seem like a randomly detached fragment of the door portal if the door itself has no similar details.
Alignment to the switch
Suitable if the wall strip is very narrow and the electrical fittings are actually the center of the free zone.
The plate can be placed above or below along the same vertical axis as the frame.
In this case, the NPU-120L does not frame the switch but creates a separate decorative accent on the same axis.
This option requires particularly good open space so that the viewer does not perceive the two objects as one homemade frame.
Alignment with the slat wall
Suitable when the panels are the main accent of the interior.
The plate can be shifted toward the edge of the smooth zone so that it visually completes the transition to the slats.
Here it is important to leave air between the NPU-120L relief and the last slat. Otherwise, the floral ornament clashes with the regular geometry of the panels.
How to use the 520 mm strip without false symmetry.
Let the total smooth strip from the trim to the edge of the panels be 520 mm.
The mistake is to place the switch and NPU-120L on the conditional central axis of the wall section, without considering the actual position of the electrical wiring.
It is more correct to consider 520 mm as the sum of three zones:
D1 + Wswitch + D2 = 520 mm
Where:
-
D1 — free zone from the trim to the frame;
-
Wswitch — external dimension of the frame along the selected axis;
-
D2 — free zone from the frame to the slats.
This formula gives not the number of millimeters for decoration, but a map of obstacles.
Next, the following are checked separately:
-
whether the dimension 150 × 59 mm can be placed in D1;
-
whether it can be placed in D2;
-
can you go above or below the switch;
-
how much the rotation of the NPU-120L changes the required field.
If D1 and D2 are both small, the horizontal side layout is out, but the top one can still be excellent.
Why can't you just subtract 150 mm from 520 mm.
Formula:
520 − 150 = 370 mm
is mathematically correct, but practically almost useless.
It does not account for:
-
the width of the switch;
-
its offset;
-
door trim;
-
the gap to the rail;
-
service access;
-
Ornament rotation.
As a result, the number 370 mm creates a false impression of a large margin.
For a real check, local free intervals are needed, not the remainder of the total width.
This is a good example of why in an interior design task, arithmetic should follow geometry, not replace it.
What does a depth of 10 mm next to the switch mean.
The third dimension of the NPU-120L is 10 mm. In a flat photo, this depth is almost imperceptible.
In reality, it affects:
-
the side view;
-
shadow;
-
tactile access to the switch;
-
interaction with the protruding door trim;
-
proximity to volumetric slats.
If the plate is positioned too close to the switch, the hand feels it more strongly than it appears on the frontal template.
If the switch has a noticeably protruding frame, two depths begin to compete.
Therefore, it is useful to add a 10-millimeter pad to the paper template and check the actual hand movement.
Slat panels create their own depth: you need to look from the side.
The plate may look great from the front, but turn out to be too close to the last slat from a side angle.
Slats create regular protrusions. NPU-120L is an irregular carved relief.
If there is little smooth wall between them, the two reliefs merge into one complex edge.
Check the composition:
-
straight on;
-
from the door side;
-
from the side of the slat wall;
-
from the usual walking path.
If the node is in an entryway or hallway, a diagonal angle is often more important than a perfect frontal view.
Light from a door, window, or wall lamp can change the choice of position.
A 10 mm relief creates a shadow. If light falls from the side, the overlay becomes more noticeable.
This is especially important in three cases.
Light comes from the side of the slats.
The ornament gets a shadow on a smooth wall and can compete more strongly with the panels.
Light comes from the side of the door.
The trim and NPU-120L begin to cast relief shadows simultaneously. If the trim is already complex, the composition may become overloaded.
Light from above.
Top placement of the overlay often looks more expressive than side placement, because the shadow separates it from the switch.
Therefore, the template should be viewed under real daytime and evening lighting.
When the top layout is better than the side one.
The top position usually wins if:
-
D1 and D2 are small;
-
there is a wide free field above the switch;
-
the door is tall and sets a vertical line;
-
the overlay does not fall on the line of the upper trim;
-
there is no wall lamp nearby.
It is also more convenient for switch maintenance: the decorative element is outside the main hand movement.
But the top layout must have its own height logic. You cannot simply raise the NPU-120L as high as it turned out after measurements.
Better to tie it to the door, a common row of decor, or the switch axis.
When the lower scheme makes sense.
The lower placement works less often, but can be successful if:
-
the switch is mounted high;
-
there is no furniture below;
-
the baseboard is calm;
-
the passage is wide;
-
the plate does not fall into the zone of bags and clothing.
The lower decor is especially good to check in the hallway, because there the operational contacts are higher.
If the template is constantly brushed against during normal movement, it is better to abandon this scheme.
When the side layout is truly stronger.
On the side, the NPU-120L can beautifully fill a long asymmetric free zone.
For example, a switch is pressed against a door, and a large smooth part remains before the slatted panel. Then one S-shaped ornament works as a transition between the functional point and the decorative wall.
The advantage is that the overlay does not look like part of the switch.
But it must have enough of its own breathing room. If the free zone is only slightly larger than the outer dimensions of the NPU-120L, the composition will feel cramped.
Do not place the overlay exactly in the middle of the empty space just because it is the "center."
The center of a geometric gap does not always coincide with the compositional center.
If there is a heavy door portal on the left and light slats on the right, the visual balance shifts.
If the switch itself is contrasting, it adds mass.
If the NPU-120L is painted in the wall color, it is lighter. If it is contrasting, it is heavier.
Therefore, the center is chosen on the mockup, not just with a tape measure.
NPU-120L and NPU-120R: when the mirrored version really changes the composition
NPU-120R is listed in the NPU-120L card as a related product. For this article, this does not mean that the buyer necessarily needs a pair. The mirrored version is useful as a tool for choosing a direction.
If NPU-120L visually "looks" with its curl toward the switch and creates the feeling that the ornament is pressing against the frame, the mirrored NPU-120R can turn the movement of the pattern toward the slats or the door.
This is especially important for side placement.
Before ordering, it is worth comparing two paper silhouettes:
-
NPU-120L;
-
a mirror reflection as the NPU-120R model.
If one option noticeably better organizes the free space, the choice of the article becomes deliberate.
When one NPU-120L is better than a mirrored pair
On the strip between the door and the slats, two elements can quickly overload the composition.
One NPU-120L is preferable if:
-
the switch is already the second object;
-
the smooth zone is narrow;
-
the door has a pronounced casing;
-
the slat wall is active;
-
only a small accent is needed;
-
a pair forces framing the switch.
In such a situation, singularity is not a drawback, but a way to preserve hierarchy.
When a L/R pair may be appropriate, although this is not the main scenario
The paired option can be tested if the switch is strictly on a clear axis, and a large field remains above or below.
For example, L and R can be positioned on either side of the central axis above the switch, without approaching the frame.
But such a move turns a simple product task into a new composition. You need to recalculate the overall dimensions of the pair, the internal gap, and the connection with the door.
If the buyer initially wants one NPU-120L without moving the electrical wiring, there is no need to expand the order to a pair just for the sake of symmetry.
How the color of the plate changes the required free space
The physical size remains 150 × 59 × 10 mm. The visual size changes.
Matching the wall color
The calmest scheme. The ornament is read through relief and shadow. The plate can be placed closer to other objects without a strong contrast feeling, although service gaps must still be maintained.
In the color of the slats
NPU-120L becomes a connecting element with the accent wall. If the slats are dark, the plate on a light strip is perceived as larger.
In the color of the door trim
This way, the decor is connected to the door. Especially logical with a classic portal, but it can look like a separate fragment of door decor without continuation.
Contrast color
The most demanding option. Even a small plate becomes a separate graphic object. In a tight area near the switch, such an approach often overloads the wall.
Before purchasing, it is useful to paint the paper template approximately in the future color.
A white overlay on a white wall and a dark switch.
If the switch frame is black or graphite, and the NPU-120L and the wall are light, the electrical fittings will remain the main contrasting object.
In this case, the overlay can work as a soft background, but you need to ensure that its ornament does not try to visually "frame" the switch.
A good scheme is when a separate wall zone is readable between them.
A bad one is when the curl almost touches the black frame and the eye perceives them as one decorative block.
A dark overlay and a light switch.
Here the roles change. The NPU-120L becomes a strong spot.
Even with sufficient physical distance, the dark ornament can visually press on the light frame.
This is another argument not to assign a universal minimum gap only in millimeters. Color and light change the perception of space.
If the door already has carved decor.
NPU-120L next to a classic architrave can support the style well, but it is important not to duplicate the motif too literally.
Check:
-
the scale of the carving on the door;
-
the direction of the curls;
-
color;
-
distance;
-
the number of decorative elements.
If the architrave is already ornate, one additional S-shaped element on a narrow strip may be excessive.
If the door is simple and has only one small carved motif, NPU-120L can connect the door with the rest of the interior.
If the door is modern and flat.
The contrast of a classic carved overlay with a minimalist door can be intentional, but this needs to be seen in a mockup.
If there are also modern slatted panels nearby, NPU-120L will be the only classic detail in the assembly.
Such an accent can look designer-like only when supported by other items: handles, lamps, furniture, moldings.
Without support, a clean smooth strip often looks more convincing.
If the slat panels are wooden and the wall is painted.
A natural or wood-imitation texture is already an active decorative layer.
In this case, NPU-120L is better checked in the wall color rather than trying to automatically replicate the wood.
Attempting to make a polyurethane ornament "under wood" can create another material next to the real wood texture.
If the interior is built on painted decor and wood, a calm monochrome NPU-120L usually fits in more easily.
If the slat panels are painted in the same color as the wall.
The contrast of materials is built only on relief. Then NPU-120L can become a second type of relief on the same color plane.
This option often looks more cohesive, but the relief richness is still important.
If the slats are deep and frequent, a carved overlay nearby may be redundant.
If the slats are sparse and calm, a single small S-shaped element can provide an interesting transition.
A switch cannot be turned into a "center of ornament" if the shape is not designed for that.
There is a temptation to place the NPU-120L so that the curl seems to embrace the switch.
But the product is not a special frame for electrical fittings. Therefore, such a technique should be evaluated especially critically.
If the viewer perceives the ornament and the switch frame as one object, questions arise:
-
why is the decor only on one side;
-
why does it not repeat;
-
why is the switch shape not coordinated with the ornament;
-
can the frame be removed;
-
Isn't it too cramped to use the key?
More often, a scheme where the switch and NPU-120L are two separate objects in one composition looks stronger.
When to buy NPU-120L, and when to choose another solution
When a decorative overlay is not needed at all
After the template, it may turn out that the smooth strip already has sufficient structure:
trim → switch → clean wall → slatted panels.
This is not necessarily a void that needs to be filled.
NPU-120L should be avoided if:
-
the switch looks neat even without decoration;
-
the free areas around it are small;
-
rails already create a strong accent;
-
decorative door casing;
-
the overlay does not get its own axis;
-
any rotation looks random;
-
for its sake, the service field has to be reduced;
-
one wants to install it only because there is "space left" on the wall.
A commercially correct article should lead to such a result as well. If the product does not improve the assembly, it is better not to spend 1,020 ₽.
When NPU-120L really improves the assembly
The purchase is justified if, after a full-size fitting, the overlay solves a specific compositional task.
For example:
-
connects a simple door with the classic decor of the room;
-
finishes the smooth zone before the slat wall;
-
fills an overly long empty field without a molding frame;
-
creates a directional accent near, but not right next to, the switch;
-
supports other S-shaped decor in the room.
A good NPU-120L does not look like an attempt to hide an engineering point. It makes the wall more expressive, and the switch remains an ordinary functional element.
When it is better to choose a smaller plate instead of the NPU-120L
If the idea of a carved accent fits, but the specific size of 150 × 59 mm does not fit with normal free space, there is no need to reduce the gap to the switch.
It is more rational to switch to the category and choose another decorative element.
Buy decorative polyurethane overlays
When selecting a smaller item, the full cycle is performed again:
-
size verification;
-
template;
-
orientation;
-
service access;
-
connection with the door and slats.
A smaller detail is not automatically better: too fine an ornament can get lost next to a large casing or an active slat wall.
When it is better to use a molding instead of a single overlay
If on a smooth strip you want not a point ornament but an architectural division, a single NPU-120L may be the wrong type of product.
A thin vertical molding can:
-
emphasize the border;
-
go around the switch along a different trajectory;
-
create a frame system;
-
connect the door with the overall molding of the room.
But this is already a different task. Molding should not be added just because NPU-120L did not fit.
First, you need to understand whether the wall needs an accent or linear architecture.
Installation near the switch: base, service, and depth
The surface under the overlay must be strong, not just painted
A finished painted wall seems like an ideal base, but the condition of the layers matters.
If the paint adheres poorly, the decorative element will stick to the weak top layer. Under load from its own weight or subsequent use, it may not be the adhesive that separates, but the paint along with the putty.
Before installation, check:
-
whether there is any peeling;
-
whether there is chalk dust;
-
whether the putty has cracked;
-
whether there is greasy dirt near the switch;
-
even
How to assess the possibility of removing the frame after installing the decor
Different series of switches have frames that are removed differently. Therefore, a single universal removal path cannot be given.
Practical approach:
-
find the instructions for a specific series;
-
understand whether the frame is removed forward, with snap-on, by pre-removing the key, or otherwise;
-
determine whether space is required around the outer contour;
-
transfer this contour to the wall;
-
only outside its boundaries place the decorative template.
If the instructions are unknown, it is better to leave a larger visual margin than to design the decor flush.
The depth of the door trim also affects the perception of the NPU-120L.
On a narrow wall section, the door trim may protrude from the wall by a significant amount.
The NPU-120L has a relief of 10 mm. If the trim is much deeper, the overlay visually submits to the door. If the depths are similar, the two elements begin to compete as equivalent reliefs.
Look at the assembly from the side:
-
the casing;
-
smooth wall;
-
NPU-120L;
-
switch frame;
-
last slat.
The frontal photo does not show this sequence of depths.
What to do if the edge of the slat panel protrudes far forward.
If the slats are deep, the NPU-120L may visually "sink" on a smooth wall. This is not necessarily bad: a calm ornament can be a secondary accent.
But if the idea was to make the overlay the completion of the slat zone, too large a difference in depths will weaken the connection.
In this case, it is useful to compare:
-
NPU-120L closer to the slats;
-
NPU-120L closer to the door;
-
option without overlay.
Sometimes the absence of decor creates a cleaner transition.
The same node on several doors: first one prototype
In a corridor or hotel interior, there may be several identical doors, each with a slat insert and a switch nearby.
This is a commercially important case: the buyer can immediately order 4, 6, or 8 overlays.
It is not worth doing this before a full-scale check of the first node.
First:
-
choose one typical wall;
-
make an NPU-120L template;
-
agree on the orientation;
-
check the switch;
-
approve the color;
-
only then transfer the scheme to the remaining doors.
One erroneous template, multiplied eight times, becomes an expensive systemic error.
How to count the quantity if the same scheme repeats several times
For one node, 1 NPU-120L is purchased. At the current price, this is 1,020 ₽.
If there are several identical nodes, the budget looks like this:
Number of typical nodes NPU-120L Cost of overlays 1 1 pc. 1 020 ₽ 2 2 pcs. 2 040 ₽ 4 4 pcs. 4 080 ₽ 6 6 pcs. 6 120 ₽ 8 8 pcs. 8 160 ₽ This table only makes sense after one prototype is approved.
If the doors have different switches, different widths of the jambs, or different positions of the slat panels, the same quantity does not mean the same installation scheme.
Before a large order, it is better to divide the walls into types:
-
type A — the switch is closer to the door;
-
type B — switch closer to the rails;
-
type B — large upper zone;
-
type G — the overlay does not fit.
Only after this, sum up the products.
Why the price of 1,020 ₽ should not push you to buy it "just in case."
For relatively large trim, one overlay costs moderately, so it's easy to add a few extra pieces to the cart.
But unnecessary decor creates two problems:
-
financial;
-
compositional.
If the NPU-120L does not fit a specific wall, having already purchased the item psychologically forces you to find a place for it.
The correct order is the reverse: first prove that the overlay is needed, then buy it.
For a series of eight doors, the mistake already costs 8,160 ₽ just in the price of the overlays themselves.
If identical doors have switches on different sides
In the hallway, doors may be mirrored: one has the switch on the right, the other on the left.
This is a direct reason to compare NPU-120L and NPU-120R.
You cannot automatically place NPU-120L on all doors in the same turn. On mirrored units, the ornament direction may look asymmetrical.
For a typical series, it makes sense to create two templates:
-
L scheme;
-
R scheme.
After that, decide:
-
use only L in all cases;
-
mirror alternate L/R;
-
abandon directional decor in favor of another model.
This already affects the basket: instead of 8 × NPU-120L, for example, 4 L + 4 R may be needed. The specific quantity is determined by the door plan.
If the doors are the same, but the slatted walls are of different widths.
The width of the slatted panel does not change the size of the NPU-120L, but it changes the visual balance.
On a wide dark slatted wall, one small ornament can get lost.
On a narrow insert, on the contrary, it can become too active.
Therefore, a typical node cannot be transferred only by the size of the smooth strip. The adjacent visual volume must be taken into account.
If the switches are from different series.
Even within a single apartment, frames can differ:
-
in width;
-
by height;
-
by thickness;
-
by color;
-
by the number of posts.
A layout that works well next to a compact single frame may not suit a large block.
Therefore, each type of electrical fittings needs its own template test.
If there is a socket next to the switch.
Two electrical installation devices sharply reduce the free space.
There is no need to consider them separately. For the composition, they are a single functional block.
Measure the overall outer contour and the free zones around it.
Most often in this case, the side layout NPU-120L becomes weaker, while the top one becomes more promising.
If a decorative element has to be placed between an outlet and a switch, it's almost certainly too cramped a solution.
If there's a thermostat, intercom, or sensor nearby.
Such devices cannot be ignored just because the article's topic is called "switch."
On a narrow wall section, every object affects the composition.
An intercom or thermostat may be visually larger than the NPU-120L. Then the cover plate becomes a third or fourth element.
Before purchasing, outline all devices on the wall with painter's tape, and only then look for free space.
If in the future the switch might be replaced with a larger one.
Today there's a compact frame nearby, but in a few years there may appear:
-
a smart switch;
-
a two-gang block;
-
thermostat;
-
touch panel.
If the NPU-120L is placed flush against the current frame, future replacement will become more difficult.
This is another argument in favor of a proper free field, rather than mounting "flush to the current size."
When it is too early to measure the wall for the overlay
If the door casing is not yet finally installed
You cannot measure the wall section by the opening without the casing.
The casing reduces the clean smooth strip and adds its own relief.
Therefore, the correct sequence is:
-
install or precisely select the casing;
-
know its outer edge;
-
measure the position of the switch;
-
determine the edge of the slat panels;
-
only then try on the NPU-120L.
If you order the trim earlier, 150 × 59 mm may suddenly turn out to be too large for the finished wall.
If the slat panels are not yet finished
A similar error occurs on the panel side.
Until the last slat or end piece is installed, the actual boundary is unknown.
After finishing, it may shift by a few centimeters.
First, finish the slat system, then measure the free strip.
That is why this topic relates to the finished wall after renovation: all main boundaries should already be real.
If the wall is uneven
The carved overlay has a back surface that must fit against the base.
If there is a local wave of putty near the door or panels, the NPU-120L may rock or leave a dark gap.
Before installation, apply a flat template or ruler.
If the unevenness is noticeable, the base is addressed first. Adhesive should not be used as a universal way to compensate for serious wall geometry.
Mistakes that most often lead to incorrect purchases
Mistake 1. Measuring only the 520 mm of the wall section.
Why it happens: this is the most obvious number.
Consequence: the position of the switch is not taken into account.
How to check: measure D1, W, and D2 separately.
How to avoid: draw a map of the wall, not just one dimension.
Error 2. Considering A = 150 mm as the mandatory horizontal width.
Why it occurs: the dimension is read as a ready-made orientation.
Consequence: a successful rotation is rejected, or, conversely, an unsuitable layout is considered accurate.
How to avoid: make a template and check several orientations.
Error 3. Gluing the overlay almost to the switch frame.
Why it occurs: there is a desire to "assemble" elements into one composition.
Consequence: inconvenience, poor service access, and visual crowding.
How to avoid: check the operation by hand and the possibility of maintenance.
Error 4. Using NPU-120L as a switch frame.
Why it occurs: the S-shaped form seems suitable for framing.
Consequence: the product is used not according to its decorative logic, and the electrical fittings turn out to be linked to a random shape.
How to avoid: keep the two objects compositionally separate.
Mistake 5. Ordering eight pieces at once.
Why it occurs: all doors seem identical.
Consequence: the actual walls differ.
How to avoid: first one standard layout, then the schedule.
Mistake 6. Ignoring the NPU-120R.
Why it occurs: the theme is chosen for a specific L-article.
Consequence: the ornament direction may be worse for the mirrored unit.
How to avoid: compare the mirrored silhouette before ordering.
Error 7. Trim the decor around the switch.
Why it occurs: there is physically not enough space.
Consequence: the pattern is disrupted and maintenance becomes more difficult.
How to avoid: change the layout or model, not the switch or the integrity of the overlay.
Practical algorithm: from the finished wall to the purchase decision
For this topic, what is most useful is not a long list of tips, but a clear sequence.
Step 1. Fix the boundaries of the strip.
Measure the distance from the outer edge of the door trim to the actual edge of the slat panel.
If you get 520 mm, write down exactly this final value.
Step 2. Measure the outer frame of the switch.
Do not use dimensions from the catalog of another series.
You need the actual width and height of the visible block.
Step 3. Measure D1 and D2.
D1 — from the trim to the frame.
D2 — from the frame to the slats.
Check whether D1 + W + D2 matches the total width.
Step 4. Take vertical measurements.
Measure the free space at the top and bottom.
Step 5. Make the NPU-120L 1:1.
Overall template 150 × 59 mm plus approximate depth of 10 mm.
Step 6. Check the three layouts.
Above, below, to the side.
Do not choose a position until you have seen all three.
Step 7. Check the orientation.
Do not consider 150 mm as a mandatory horizontal. Rotate the template.
Step 8. Check the NPU-120R.
Although the article focuses on L, the mirrored version may better guide the pattern.
Step 9. Check the hand.
Press the switch with a normal motion several times.
Step 10. Check the service.
Make sure the decor does not block the outer frame and its possible dismantling.
Step 11. Look from the main angles.
From the door, from the room, along the slats.
Step 12. Paint the paper template.
At least approximately in the future color.
Step 13. Compare the option without decor.
This is mandatory control.
Step 14. Only now choose the product.
If NPU-120L won the comparison — buy it.
If the mirror scheme is better — NPU-120R.
If both are too large — other decor.
If a plain wall is better — nothing.
Decision table.
Situation NPU-120L NPU-120R Another decor Without overlay Large area to the right of the switch Check check mirrored if 150 × 59 is large Possible Large area on the left Check especially compare if cramped Possible Little space on the side, a lot on top check from above compare at a different scale Possible Multi-gang block more often top/bottom compare often reasonable Yes Switch almost at the trim from the slats side compare Possible Possible Switch almost at the slats from the door side compare Possible Possible The rails and trim are very active Caution Caution rarely needed Often better One NPU looks random No Check Yes Yes Need to trim the overlay No No choose the appropriate size Yes Need to overlap the switch frame No No No Yes The table does not assign a product by a single parameter. It helps determine the next test.
What to buy after trying on
What to put in the cart if the NPU-120L fits
For one node:
-
NPU-120L — 1 pc.;
-
current price — 1,020 ₽.
No need to automatically add NPU-120R.
No need to buy a second NPU-120L "for symmetry" if it is not specified in the template.
The mounting compound is selected separately based on the base and current recommendations. The STAVROS card shows adhesive among related products, but the quantity and specific consumption depend on the installation method, so the article cannot invent a universal consumption rate.
After checking the dimensions, you can order the NPU-120L polyurethane overlay.
What to buy if NPU-120L doesn't fit
There are four reasonable options.
Choose NPU-120R.
If the issue is only with the ornament direction.
Choose a different overlay.
If the 150 × 59 mm size is too large or the pattern is too busy.
Choose a different type of decor.
If the wall needs not an ornamental accent, but a line, frame, or other architectural element.
Buy nothing.
If the switch, trim, and slats already create a complete composition.
This is not a failure of the commercial article, but protection against an incorrect order.
How to prepare the wall itself after the scheme is approved
Marking should appear before the glue.
Mark on the wall:
-
edge of NPU-120L;
-
its compositional axis;
-
outer contour of the switch;
-
zone that must not be covered;
-
border of the trim;
-
edge of the slat panel.
Apply the actual product dry.
Check that the template and the real overlay give the same impression. The actual relief may have a different visual mass.
Only after an on-site check do you proceed to preparing the base and installation.
Why you cannot rely only on the painter's tape sticker around the switch.
The tape shows the boundaries well, but not the volume.
The NPU-120L protrudes by 10 mm.
If there is also a voluminous switch frame nearby, the actual side profile may be denser than in the flat diagram.
Therefore, the last two checks are a real element or a volumetric mock-up.
The mounting seam should not turn the overlay into part of the electrical fittings.
After gluing around the NPU-120L, careful finishing of the junction with the wall may be required.
This finishing should remain independent of the switch frame.
Sealant or paint should not be applied in such a way that the decorative element visually and physically "sticks" to the electrical fittings.
An independently painted wall surface should be maintained between them.
If the wall is to be repainted later.
The free space around the switch becomes even more important.
When repainting, you need to be able to:
-
protect the frame;
-
paint the wall around it;
-
treat the NPU-120L relief;
-
avoid creating a narrow impassable gap between two objects.
A layout that barely fits today will be inconvenient during the next renovation.
If the switch is replaced after installing the NPU-120L.
The new series may have a different external size.
If a proper margin is left around the old frame, replacement is easier.
If the decor is installed almost flush, the new switch may not fit.
Therefore, a small compositional gap is also a reserve for the future.
If the door opens toward this smooth strip
Before purchasing, you need to check not only the electrical wiring, but also the door's trajectory.
If the door leaf opens toward the wall, the following may move nearby:
-
the wallpaper itself;
-
handle;
-
limiter;
-
decorative handle cover.
The NPU-120L protrudes 10 mm from the wall. By itself, this protrusion is small, but in a narrow gap between an open door and the wall, even such relief can become a point of contact.
Check:
-
fully open the door;
-
check the minimum distance to the wall;
-
check the handle separately;
-
Attach the full-size NPU-120L template;
-
Make sure the door and its handle do not touch it.
If a door stop is already installed in this area, take the actual opening angle into account.
This is especially important for the bottom and side layouts. The cover above the switch is usually outside the handle's path, but still requires checking.
If the door handle almost touches the wall
In this case, the free smooth strip is not fully available for decoration.
Even if the door does not hit the switch, the handle may land exactly where you wanted to place the NPU-120L.
There is no need to move the decorative cover a few centimeters at the last moment. It is better to include the handle's path in the wall plan as a separate obstacle from the start.
Mark the opening arc on the paper diagram.
If the door is sliding
A sliding door has a different set of constraints.
If the panel moves along the wall or goes into a pocket, you need to check:
-
whether the NPU-120L falls into the trajectory;
-
whether the relief interferes with the trim;
-
whether there is a service zone for the mechanism;
-
whether the door handle moves near the decor.
For a door that goes into the wall, the outer smooth strip can be more free. But the engineering part of the sliding system still takes priority over the decorative overlay.
If a door stop is located near the switch
A wall stop or magnetic catch is also a functional point.
The NPU-120L must not:
-
interfere with its work;
-
covers the fastening;
-
be in the door handle strike zone;
-
create a complex composition of three small objects.
If the stop is positioned low, the upper overlay scheme usually gains an additional advantage.
How to compare NPU-120L with a bare wall without subjective "getting used to it"
During prolonged fitting, the eye begins to accept any option.
A useful method:
-
photograph the wall without decor;
-
attach the NPU-120L template;
-
photograph from the same spot;
-
remove the template;
-
compare photos later.
Look not only at the overlay itself.
Evaluate:
-
where the eye falls first;
-
whether the switch remains a functional point;
-
whether the strip has become visually narrower;
-
whether the door and the slats compete;
-
whether a new meaning has appeared or only a new detail.
If the NPU-120L option seems "more filled" but not more cohesive, a plain wall is better.
Why a photo from a distance is more useful than a close-up.
A close-up almost always makes carved ornament attractive: details, curves, and relief are visible.
But a person perceives the pier together with the door and the slat wall.
Therefore, the main shot should be taken from a normal entry point into the room or corridor.
If the NPU-120L disappears in the overall photo, it may be too small for this role.
If it becomes the main subject, it may be too contrasting.
An intermediate effect is needed: the decor is noticeable but does not disrupt the hierarchy.
Visual hierarchy: what should be the main focus
Different priorities are possible for such a node.
The main door.
Then the NPU-120L supports the trim, and the slats remain in the background.
The main slat wall.
Then the overlay should be secondary and not distract from the rhythm of the panels.
Main decorative pier.
Rare but possible scenario: a narrow smooth zone with a switch is specially designed as an independent vertical.
Main switch.
This happens if designer electrical fittings are used, which themselves are an accent. Then the carved overlay should be especially calm or not needed at all.
Before purchasing, it is useful to formulate in one sentence: what should a person notice first?
If the switch is designer and expensive.
A bronze, glass, brass, or unusual frame itself can be a decorative object.
In such a case, the NPU-120L nearby can reduce the effect rather than enhance it.
Especially if the styles differ.
For example, a minimalist glass panel and a classic acanthus require a very confident overall interior.
If the switch already looks complete, a clean strip of wall can be the best frame for it.
If the switch is white and almost blends into the wall.
Then the engineering point is visually weaker.
The NPU-120L can become the main accent of the strip without entering into a harsh conflict with the electrical fittings.
But that is not a reason to place it closer. The service area remains just as important.
If the switch has a backlight.
In the dark, a small light indicator changes the perception of the wall.
If the NPU-120L is placed too close, its relief can catch local light or create an unexpected shadow.
At night, such an effect sometimes looks more interesting, and sometimes turns the decor into a random silhouette.
Check the template in the evening.
If there is LED backlighting along the slats.
The light line makes the edge of the slat wall even stronger.
In this case, the NPU-120L on the side may get intense side shadow.
If the relief becomes too contrasty, try:
-
increase the distance to the backlight;
-
choose the top position;
-
paint the overlay to match the wall color;
-
abandon the decor.
Backlighting is a separate variable that can change the solution without changing dimensions.
If a vertical molding runs nearby.
Another line on a smooth strip changes the task.
If the vertical molding already frames the edge of the slats, the NPU-120L can be logically attached to it.
But if the molding runs near the switch, a separate overlay can create an excessive number of decorative elements.
Then it's worth deciding: do you need linear decor or point decor.
If there are already molding frames on the wall.
This is a strong argument in favor of the NPU-120L if its pattern and scale support the existing decor.
A single overlay on a wall section can act as a link between framed classicism and a modern slat wall.
In this case, it is useful to make an informational transition to the general STAVROS material about stucco decor near sockets and switches: it reveals a broader logic of engineering points on a decorative wall.
How to plan stucco decor on a wall with sockets and switches
If the slat panel itself surrounds the switch.
This is a different intent.
When the switch is built directly into the slat finish, the task involves cutting, installing the panel, and styling the electrical hardware itself.
In our situation, the switch is on a smooth strip, and the NPU-120L is being considered next to it.
These two nodes should not be mixed. If the electrical hardware is located in the slats, first solve the correct styling of the panel system.
Decision tree before ordering
Is the switch already installed and are there no plans to move it?
Yes → keep its position as a hard constraint.
Is the smooth strip fully finished: the trim is installed, the edge of the slats is defined?
No → first finish the clean boundaries.
Yes → continue.
Is there at least one free zone where a full-size NPU-120L template fits without overlapping the frame and without crowding?
No → do not buy NPU-120L for this node.
Yes → continue.
Can the switch be freely used and the frame serviced?
No → change the decor position or abandon it.
Yes → continue.
Is the NPU-120L ornament oriented correctly?
No → compare NPU-120R.
Yes → continue.
Does the overlay option look better than a plain wall in the overall photo?
No → leave the wall without decor.
Yes → continue.
Do the color and side lighting make the element too active?
No → change the color/position and check again.
Yes → you can place the order.
This algorithm allows you to reach a purchase not because the item physically "fits," but because it truly suits the wall.
Measurement control table
It's convenient to fill out one sheet before ordering.
Parameter Actual value Why it's needed Total clean width of the strip … mm overall context From trim to frame D1 … mm Side view from the door side Outer frame width W … mm Actual obstacle From frame to slats D2 … mm Side view from the panel side Free field at the top … mm Top view Free field at the bottom … mm Bottom view Switch frame height … mm Vertical layout Trim protrusion … mm Side view Slat panel protrusion … mm Side view NPU-120L depth 10 мм volumetric layout NPU-120L dimensions 150 × 59 mm Template Only the last two lines are taken from the product card. The rest are measured on site.
Final recommendation for a strip around 520 mm
If about 520 mm remains between the door trim and the edge of the slat panels, this width alone does not prove that the NPU-120L fits.
First, divide it into real zones relative to the switch.
If one side zone is free and allows placing a 150 × 59 mm template with normal visual and service clearance, the NPU-120L can be installed on the side.
If the side zones are tight, but there is a free surface above the switch, the top layout is often more rational.
If the overlay looks cramped both from above and from the side, do not move the electrical wiring for the sake of one decorative element. Either compare the mirrored NPU-120R, or choose a different size, or leave the smooth strip clean.
For one confirmed node, 1 NPU-120L is required, costing 1,020 ₽ according to the current product card.
For repeated doors, one full-scale prototype is approved first, and then the quantity is calculated. This protects against a situation where the same item is purchased for 4–8 walls that actually differ in switch positions.
Main principle:
The electrical wiring remains functional and accessible; the decorative overlay adapts to the existing wall, not the other way around.
FAQ
Can the NPU-120L be placed diagonally above the switch?
You can check this orientation with a template, but a diagonal rotation increases the overall bounding rectangle along both axes and makes the ornament's directionality stronger. On a narrow strip, a diagonal often requires more free space than a horizontal or vertical position.
What to do if the overlay only fits after removing the switch's outer frame?
This option is not suitable. The decorative frame is part of the finished electrical hardware and must remain in place during normal operation. The dimensions of the free zone are calculated with the frame installed.
Can the NPU-120L be placed directly above a double switch if its width is greater than the cover plate itself?
Yes, if compositionally it looks logical and sufficient vertical distance remains. The cover plate does not have to be wider than the switch. But their axes and relative scale need to be checked on a full mockup.
Is it necessary to align the center of the NPU-120L strictly with the center of the key?
No. If the decor is related to the door or the edge of the slats, another axis may be stronger. Rigid centering is only needed when the switch itself is chosen as the compositional reference point.
Can the NPU-120L be placed on a door casing if there is not enough space on the wall?
The card allows decorative use on doors, but moving the cover plate from the wall to the casing creates a different assembly. The width of the casing, its profile, and the mounting method need to be checked separately. This cannot be considered an automatic replacement for the scheme next to the switch.
If the switch is touch-sensitive, are the requirements different?
A touch panel may require free access with the whole hand and have a different external geometry. Measure the actual unit and check the usual control gesture. Do not transfer dimensions and clearances from a key switch.
Can the NPU-120L be installed flush above the switch frame if access to the key is free?
It is not worth evaluating only access to the key. The ability to service the frame and the visual field must be preserved. Flush together, two objects begin to look like one homemade assembly.
How to check that the ornament won't catch on clothing?
Make a three-dimensional template about 10 mm thick and walk past the wall several times along your usual route. This is especially useful for the lower pattern in a narrow hallway.
What to do if NPU-120L seems too small after trying it on?
Do not increase the quantity automatically. Two small overlays can make the node even more complex. First compare one larger decorative element or a completely different type of composition.
Can I use leftover wall paint for NPU-120L?
If the selected coating is compatible with the prepared polyurethane product and the finishing technology is followed, a uniform color helps integrate the decor. The specific primer and paint system should be checked against the coating manufacturer's materials and STAVROS recommendations.
Is NPU-120R needed if NPU-120L already fits?
No. R is not needed as a mandatory half of a pair, but as a mirror alternative or part of another project. If one L looks complete, adding R for the sake of a set is not required.
Can I first buy one NPU-120L and attach it without installation?
Yes. For a single inexpensive prototype, this is a reasonable way to check the actual pattern and volume if a paper template is not enough. But for a series of several nodes, one standard variant is still approved first.
What to do if a hidden cable runs near the switch and the overlay is glued without drilling?
If the installation is truly adhesive and does not require mechanical fasteners, the risk of interfering with hidden wiring is lower. But you must not drill or insert fasteners into an unknown route. If in doubt, a specialist should check the location of the utilities.
Can the NPU-120L cover a small paint damage near the switch?
Physically, the decor can cover the area, but it should not be chosen as a patch. First, you need to understand the cause of the damage and prepare a solid base. After that, the overlay is installed only if it is needed compositionally.
How to understand that a clean wall is better?
Remove the template for a day and look at the unit again. If the door, switch, and slatted panels already provide a clear rhythm, and without the NPU-120L nothing seems unfinished, additional decor is not needed.
-