Article Contents:
- Slat panel PAN-007 1010×8×2670 mm: which SKU is needed for a tall wall with a built-in safe
- PAN-007 made of MDF 1010×8×2670 mm
- Primed MDF panel PAN-007 1010×8×2670 mm
- Oak and beech PAN-007 1010×8×2400 mm
- Why short PAN-007 950 mm panels are not a direct replacement for a long panel
- Why you cannot simply write "PAN-007 made of wood 2670" in an order
- What changes visually
- What changes geometrically
- Why can't you immediately set a "service gap of 10 mm"
- Hinge side
- Maximum opening angle
- Handle protrusion
- Keyboard and display
- Emergency key
- Battery compartment
- Service screws and disassembly
- Step 1. Fix the safe's dimensions
- Step 2. Mark the hinge axis
- Step 3. Open the door gradually
- Step 4. Mark the closest point of the door to the wall
- Step 5. Check the handle and keypad by hand
- Step 6. Check the service covers
- Step 7. After that, build the decorative contour
- Why the sample, not an 8 mm plywood strip
- Check at the loop side
- Check near the handle
- Check near the keyboard
- Check from bottom and top
- Why one OPAN position is not enough
- Important limitation
- Slat panel PAN-007 fits almost flush with the safe frame
- Why "almost flush" does not mean "without a gap"
- A smooth rectangular field remains around the built-in safe
- How to choose the field size
- The safe door is faced with the same slat pattern
- Why the article does not provide instructions on "how to hide a safe"
- The main acceptance criterion
- Three PAN-007 panels across the width
- Where exactly the missing 20 mm remain
- Can the piece from the safe cutout cover these 20 mm
- When three PAN-007 may still be sufficient
- When the fourth one becomes logical
- What a square meter cannot do
- That is why PAN-007 is counted by the parts map
- Why safe coordinates are mandatory
- Why you cannot cut four independent pieces without marking
- Advantage of this position
- Minus
- What to Check
- When the joint at the safe can be strong
- When weak
- Step 1. Choose an architectural start
- Step 2. Lay out 1010 mm modules
- Step 3. Check the wall edges
- Step 4. Only now place the safe
- Step 5. Determine which slats "disappear" inside the technical zone
- Why this method is stronger than laying out "from the safe"
- Exception
- MDF PAN-007 matching the wall color
- Primed MDF
- Oak PAN-007
- Beech PAN-007
- Why "wood is prettier" is not enough for choosing
- When buying wooden slat panels is still logical
- How to test OPAN-007 near the keypad
- Why a paper template is worse
- What counts as a bad result
- Full test
- Why the first centimeter of opening is especially important
- What matters more
- The plinth is interrupted in the rack zone
- PAN-007 and the plinth share one color system
- What changes
- Why this matters for the template
- MDF 2670 mm
- Beech/oak 2400 mm
- Why the safe amplifies the minus of the horizontal joint
- Plus
- Minus
- Conclusion
- What the example shows
- The safe is already finally installed
- Narrow frame
- Hinges are close to the wall
- Large handle
- Keyboard is close to the edge
- Battery cover slides off to the side
- Designer suggests a minimal frame
- Why specify coordinates
- Why specify hinges
- Why specify baseboard
- Why write "preliminary quantity"
- The safe is still being adjusted
- The maximum opening angle is unknown
- The emergency key has not been checked
- The battery cover has not been tested
- OPAN-007 is not attached at the minimum gap
- The baseboard has not been selected
- No full wall layout
- The safe area has already been deducted from the order
- The door is to be clad without coordination with the safe manufacturer
- Finish not defined
- The safe is close to the wall corner
- The safe is near the door trim
- The safe door opens toward the corner
- The door opens toward the furniture
- The keypad protrudes beyond the door plane
- The keyboard, on the contrary, is deeply recessed
- The handle is long and rotates 90°
- The emergency key is located under the removable emblem
- The battery compartment is inside the door
- The safe has external power or a cable
- What a designer should do
- Why the maximum side cannot be reduced
- But if the smooth zone goes from floor to ceiling
- Why this is already a different article within one task
- If the field is 60 mm
- If the field is 100 mm
- Error 1. Subtract 0.20 m² of the safe and reduce the number of panels
- Error 2. Consider three PAN-007 sufficient for a 3050 mm wall
- Error 3. Make a 20-millimeter strip from random scraps
- Error 4. Start the rhythm from the edge of the safe
- Error 5. Check the door only in the closed position
- Error 6. Open the door only at 45°
- Error 7. Leave universal "10 mm"
- Error 8. Not checking fingers on the keyboard
- Error 9. Forget the emergency key
- Error 10. Close the battery cover with the edge of PAN-007
- Error 11. Clad the door without coordination with the safe manufacturer
- Error 12. Move the panel flush to the hinge for a nice look
- Error 13. Use OPAN-007 only as a color sample
- Error 14. Check OPAN only at the handle
- Error 15. Confuse MDF 2670 and wood 2400
- Error 16. Buy short 950 mm as a direct replacement for the long panel
- Error 17. Do not take the baseboard into account
- Error 18. Consider the fourth panel entirely as waste
- Error 19. Automatically considering a large leftover as useful
- Error 20. Order PAN before the final safe adjustment
- Error 21. Do not check the future safe replacement
- Error 22. Paint the entire PAN-007 before the test fitting
- Why you cannot mix two functions
- Labeling
- When a fragment is not a repair
- When it is better to leave PAN-007
- When it is more reasonable to reconsider the model
- What size does the long MDF PAN-007 have?
- What is the thickness of PAN-007?
- Is there a PAN-007 with a length of 2670 mm?
- What is the length of the beech and oak PAN-007?
- Can I buy PAN-007 made of MDF for a tall wall?
- Can PAN-007 be installed around a built-in safe?
- Is it necessary to leave a service gap around the door?
- How to determine the service gap?
- Can the door of the PAN-007 safe itself be lined?
- How to check the hinge side?
- What is OPAN-007 for?
- What size is OPAN-007?
- How much does OPAN-007 cost?
- Does a built-in safe reduce the number of PAN-007?
- Why can't you simply subtract the safe's area?
- How many PAN-007 are needed for a 3050 mm wall?
- Does this mean four are always needed?
- Can the material from the safe cutout be used for the missing 20 mm?
- Can I use the remnants above and below the safe?
- What to choose — regular MDF or primed?
- What to choose — MDF, beech, or oak?
- Can I use the wooden PAN-007 on a wall 2500 mm high?
- How to join PAN-007 with a wooden baseboard?
- Where to buy wooden baseboard?
- Where to buy slat wall panels?
- Where to order PAN-007 1010×8×2670 mm?
- How to check the current price?
- What to do if the safe is later replaced with a larger one?
- What to do if the safe almost touches the corner?
- Where is it better to place the PAN-007 joints relative to the safe?
- Can I start the layout from the edge of the door?
- Is a fourth panel needed as a reserve?
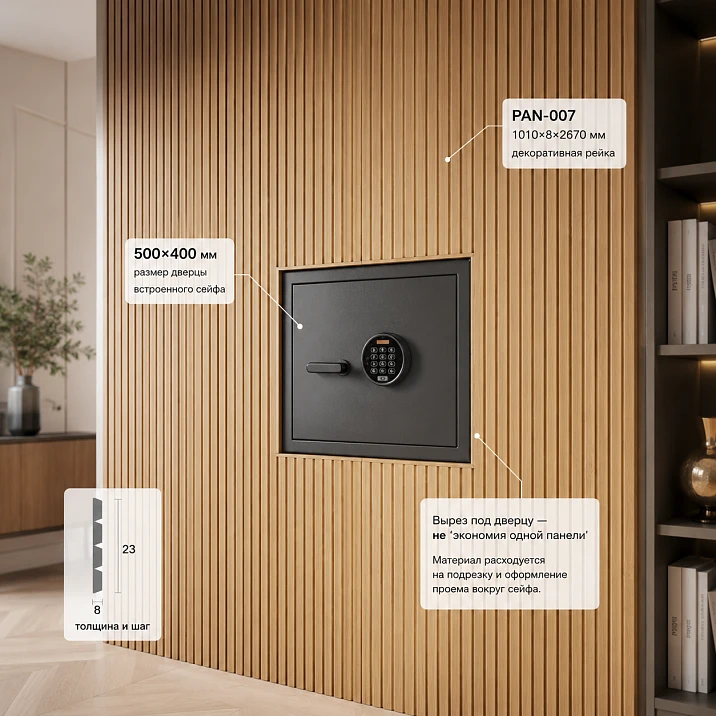
The hole for the safe reduces the cladding area, but it does not have to reduce the number of initial PAN-007 panels.
This is the main calculation paradox of the entire wall.
Let's imagine an office or dressing room where renovation is almost complete. A built-in safe measuring about 500×400 mm is already mounted flush with the painted wall. The door opens outward, with the handle, keypad, emergency key, and battery compartment in their standard positions. The safe cannot be moved. After its installation, the designer decided to add PAN-007 slat paneling.
The panel changes not only the appearance. MDF PAN-007 1010×8×2670 mm creates a new decorative plane with a depth of 8 mm plus the actual mounting layer. What was previously flush with the wall becomes deeper than the new relief after cladding. If you simply cut out a 500×400 mm rectangle and consider the task solved, the door may open worse, fingers may hit the adjacent profile, and access to the battery cover or emergency key may become inconvenient.
At the same time, false material savings appear.
For a wall width of 3050 mm, three PAN-007 panels give:
1010 × 3 = 3030 mm.
Missing:
3050 − 3030 = 20 mm.
The safe occupies 500×400 mm, but this cutout does not create the missing 20 mm at all horizontal levels of the wall. Above and below the safe, the wall still has a full width of 3050 mm. If the slat paneling runs from one edge of the wall to the other, three initial modules do not automatically become sufficient just because there is an opening in the middle.
Therefore, the correct order here is the reverse of the usual one:
-
first, check the safe's mechanics in the new plane;
-
then, define the service contour around the door;
-
build the entire vertical rhythm of PAN-007 as if the safe were not there;
-
overlay a technical zone rectangle onto this layout;
-
create a map of actual parts above, below, left, and right of the safe;
-
only after this decide whether the three original PAN-007 panels are enough or a fourth is required.
If the safe is positioned so that part of the wall can be deliberately left smooth, three panels may prove sufficient. If PAN-007 must cover the entire 3050 mm wall from edge to edge across its full height, the arithmetic of 3030 mm already shows a limitation regardless of the cutout area.
As of the check, the PAN-007 card confirms for the long wall:
| PAN-007 | Size | Price at the time of check | Status |
|---|---|---|---|
| MDF "Prestige" | 1010×8×2670 mm | 20 180 ₽ | available in St. Petersburg — 8 pcs. |
| Primed MDF | 1010×8×2670 mm | 37 470 ₽ | Custom Order |
| Beech | 1010×8×2400 mm | 27 390 ₽ | available in St. Petersburg — 2 pcs. |
| Oak | 1010×8×2400 mm | 43 790 ₽ | available in St. Petersburg — 1 pc. |
For the scenario of this article, the main SKU is MDF PAN-007 1010×8×2670 mm. It covers the tall wall with a single length where the visible vertical field does not exceed 2670 mm. Wooden versions are shorter — 2400 mm — and for a wall height of about 2500–2600 mm create a separate horizontal joint.
If the safe's mechanics and the wall map have already been verified, you can buy wall slat panels in the calculated quantity and then buy PAN-007 1010×8×2670 mm as a specific module of the project.
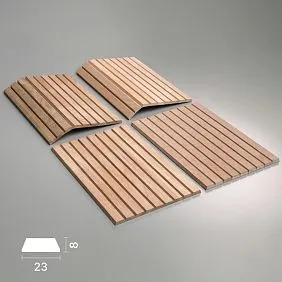
Slat panel PAN-007 1010×8×2670 mm: which SKU is needed for a tall wall with a built-in safe
PAN-007 is not produced in a single universal size. The card contains short, long, MDF, and wooden versions simultaneously. For a wall with a safe, their parameters cannot be mixed.




PAN-007 made of MDF 1010×8×2670 mm
This is the main SKU of the article.
The manufacturer confirms:
-
width A=1010 mm;
-
depth C=8 mm;
-
length L=2670 mm;
-
flexible fabric base;
-
large trapezoidal elements;
-
application in interior and furniture finishing;
-
possibility of painting MDF;
-
installation on contact adhesive with possible additional mechanical fastening.
For a wall height of 2600 mm, one length of 2670 mm provides a nominal allowance:
2670 − 2600 = 70 mm.
If there is a baseboard 100 mm high below and PAN-007 starts above it, the visible field may become about 2500 mm:
2600 − 100 = 2500 mm.
Then the allowance of one long MDF panel:
2670 − 2500 = 170 mm.
This is already a convenient range for final vertical cutting, but only after actual measurement of the wall and ceiling assembly.
Our factory also produces:

Primed MDF panel PAN-007 1010×8×2670 mm
The geometry is the same:
1010×8×2670 mm.
Current price is 37,470 ₽ versus 20,180 ₽ for regular MDF.
Difference on one module:
17 290 ₽.
On four:
69 160 ₽.
The primed version makes sense not because it is "better," but when its preparation actually reduces the painting cycle of a specific project. The manufacturer recommends priming MDF before painting. If the workshop itself performs the full cycle of insulating primer and sanding, regular MDF may be more economically viable.
Get Consultation
Oak and beech PAN-007 1010×8×2400 mm
Long natural versions are 270 mm shorter than MDF 2670.
For a visible field of 2500 mm:
2500 − 2400 = 100 mm.
One wooden PAN-007 does not cover the entire height as a single piece.
A horizontal extension appears, a separate top/bottom strip, or the need to change the facing boundary.
For a wall with an already built-in safe, this is especially important: the technical rectangle of the safe already breaks the vertical rhythm. Adding another random horizontal joint just for the sake of material needs to be done deliberately.
Why short PAN-007 950 mm are not a direct replacement for a long panel
The short PAN-007 is convenient for local inserts and furniture. For a solid wall of 2500–2600 mm, it will require several horizontal rows.
This changes:
-
the number of joints;
-
map of parts around the safe;
-
rhythm;
-
labor;
-
possible waste.
Therefore, one cannot say:
"Let's take three short ones instead of one long one — the area is the same."
The area may be similar, but the wall architecture is different.
Why you can't just write "PAN-007 made of wood 2670" in the order
The current card does not confirm such a combination.
Correct:
-
MDF PAN-007 — 2670 mm;
-
beech/oak PAN-007 — 2400 mm.
This difference can change the choice of material even before calculating the opening for the safe.
Built-in safe and PAN-007 with a depth of 8 mm: why the old wall plane ceases to be the finish surface
Before finishing, the safe is installed approximately flush with the current wall.
Conventionally:
the plane of the door/frame ≈ the plane of the wall.
After installing PAN-007:
new decorative plane = old wall + 8 mm PAN-007 + actual mounting layer.
The mounting layer cannot be universally assigned in millimeters: it depends on the base, adhesive system, wall flatness, and fixing method.
Consequently, the door, frame, keypad, and handle end up deeper than the new slatted relief.
This does not yet mean that the safe must necessarily be physically moved forward. First, you need to check the mechanics and convenience.
What changes visually
Previously, the door lay in the same plane as the wall.
After PAN-007, a frame of trapezoidal relief 8 mm high plus installation appears around it.
The safe starts to look like a niche.
Sometimes this looks neat and even helps visually calm the metal door. Sometimes the handle and keypad end up too deep.
What changes geometrically
The hinge side is especially sensitive.
When opening, the door may:
-
rotate close to the wall;
-
protrude with the handle;
-
have a lock body;
-
require access to screws or cover.
If the edge of PAN-007 is too close, the closed position looks normal, but touching occurs when opening.
Why can't a "service gap of 10 mm" be assigned immediately
Different safes differ in:
-
hinges;
-
door thickness;
-
rotation axis;
-
the protrusion of the frame;
-
handle;
-
keypad;
-
service covers.
The correct gap is determined by the specific trajectory of a specific door, not by a universal number.
Rack panel PAN-007 around the built-in safe: first check the opening mechanics
Before cutting the wall, you need to create not a decorative sketch, but a map of the safe's movement.
The built-in safe has at least seven functional zones that may conflict with the new finish:
-
hinge side;
-
free edge of the door;
-
handle;
-
keypad or control panel;
-
keyhole/emergency key;
-
battery compartment;
-
service screws, covers, or removable elements.
If at least one of them becomes inconvenient after the appearance of PAN-007, a beautiful cutout does not solve the problem.
Hinge side
The first question is where the hinges are located and how exactly the door rotates.
There are different designs:
-
the hinge axis is offset forward;
-
the axis is partially recessed;
-
when opening, the door first moves slightly out of the opening;
-
the edge of the door describes an arc close to the wall.
It is impossible to determine a safe clearance contour from a photo of a closed safe.
Maximum opening angle
If the safe is usually opened at 90°, but during service the door needs to swing 120–180°, you should check the maximum actually required angle, not a convenient demonstration one.
Why this matters: the edge of the PAN-007 may not interfere at 45°, but may start contacting further.
Handle protrusion
The handle can have static and dynamic dimensions.
When closed, it occupies one zone. When turned or pulled, it occupies another.
If a PAN-007 relief is nearby, the entire cycle must be checked:
closed → code entry → turn/unlock → first centimeter of opening → 45° → full opening.
Keyboard and display
The new wall plane can create a deep niche around the control panel.
The problem may not be mechanical, but user-related:
-
the finger hits the adjacent rail;
-
the edge of PAN-007 overlaps part of the housing;
-
the display is less visible at an angle;
-
It is inconvenient to press the side button;
-
It is difficult to open the battery compartment cover.
Emergency key
In many models, access to the mechanical key is located under the cover or a separate decorative plug.
If the PAN-007 is too close, the cover may stop coming off normally.
This is a particularly unpleasant defect: normal electronic opening works, but emergency access is found to be blocked only when the battery is discharged.
Battery compartment
It should be checked in the position in which the batteries are actually replaced.
Sometimes the cover slides not forward, but to the side.
Then the service contour should take into account the direction of the cover movement.
Service screws and disassembly
Even if the safe itself is not planned to be removed, its electronic panel, handle, or door may require maintenance.
PAN-007 should not turn repair into dismantling the entire wall.
How to remove the safe's opening map without complex tools
Before ordering panels, a simple check can be performed.
Step 1. Record the safe's dimensions
For example:
500×400 mm — the size of the front area according to the original scenario.
But it needs to be clarified:
-
this is the door;
-
frame;
-
the outer casing;
-
Mounting hole?
The PAN-007 cutting layout includes the actual visible/service boundary, not just the safe size name.
Step 2. Mark the hinge axis
On masking tape or a drawing.
Step 3. Open the door gradually
Take a photo:
-
0°;
-
15–20°;
-
45°;
-
90°;
-
maximum working angle.
Step 4. Mark the closest point of the door to the wall
This is what determines the danger zone.
Step 5. Check the handle and keypad by hand
Not only with eyes.
Step 6. Check the service covers
Remove/open them the way it is done in operation.
Step 7. After that, build the decorative contour
The order is fundamental: first function, then the frame from PAN-007.
OPAN-007 184×8×310 mm: how to check the handle, hinges, and keyboard of a safe before buying PAN-007
For this scenario, OPAN-007 is one of the most useful samples in the entire series.
Current card shows the size:
184×8×310 mm.
At the time of checking:
| OPAN-007 | Price | Availability |
|---|---|---|
| MDF | 550 ₽ | in stock in St. Petersburg — 6 pcs. |
| Beech | 960 ₽ | in stock SPb — 7 pcs. |
| Oak | 1 600 ₽ | in stock SPb — 26 pcs. |
You can buy OPAN-007 sample before the main batch.
Why exactly a sample, and not a plywood strip 8 mm
Plywood will only show the thickness.
OPAN-007 shows:
-
real trapezoidal relief;
-
real valleys and protrusions;
-
tactile finger contact;
-
profile width;
-
the behavior of light;
-
the actual new plane next to the keyboard.
Check at the loop side
The sample is temporarily placed against the wall exactly where PAN-007 will approach the safe frame.
After that, the door is opened along the entire working trajectory.
You need to see:
-
whether the door touches;
-
whether the handle touches;
-
whether a finger gets pinched;
-
whether access to the fasteners remains;
-
whether the door has to be moved away from the relief by hand.
Check near the handle
OPAN-007 is placed next to the grip zone.
The user opens the safe the way they usually do.
If the wrist or knuckles regularly hit the trapezoidal rail, the service field is too small.
Check near the keyboard
You actually need to enter the code.
Do not simulate a single-finger touch.
Check:
-
all digits;
-
confirm button;
-
screen;
-
side elements;
-
opening the protective cover, if there is one.
Check from below and above
Especially important if the panel frame forms a narrow niche.
The brush can come in from the top, the battery cover can be removed downward, and the emergency key can be inserted at an angle.
Why one OPAN position is not enough
Different sides of the safe perform different functions.
Therefore, the same sample is transferred sequentially:
-
to the hinges;
-
to the handle;
-
to the keypad;
-
up;
-
downward.
Checking the thickness of PAN-007 with the OPAN-007 sample: why 8 mm on the drawing and 8 mm in hand are perceived differently
The figure of 8 mm seems small.
Next to the flat door of the safe, the trapezoidal relief creates a noticeable edge.
Especially with side lighting.
After trying it on, you can understand:
-
the safe looks neatly recessed;
-
or it is too deeply "sunken";
-
whether a smooth service area is needed;
-
whether the relief can approach almost flush.
Important limitation
OPAN shows the thickness of the panel itself.
It does not automatically model the entire mounting layer.
If the actual adhesive/base adds additional protrusion, it must be accounted for separately.
PAN-007 and a 500×400 mm safe: three options for designing the technical zone
After the mechanical test, three main architectural scenarios remain.
The PAN-007 slat panel fits almost flush against the safe frame.
This is the most cohesive visual option.
PAN-007 forms a continuous wall, and the safe looks built into the relief.
Suitable if:
-
the door opens freely;
-
the handle does not catch;
-
the keypad is convenient to use;
-
service covers are accessible;
-
the safe frame has a neat edge;
-
future panel removal is not needed for maintenance.
Plus — minimum of smooth inserts.
Minus — high sensitivity to cut precision.
Why "almost flush" doesn't mean "without a gap"
The service contour is determined by actual movement.
If 4, 7, 13, or any other number of millimeters is required, it should come from real testing, not from the usual "let's leave a ten."
A smooth rectangular field remains around the built-in safe.
This is the most maintainable scenario.
PAN-007 ends around a predefined rectangle, inside which remain:
-
door;
-
frame;
-
keypad;
-
handle;
-
service areas.
Advantages:
-
easier opening;
-
easier access to batteries;
-
it's easier to replace the safe with a slightly different model;
-
fewer complex shaped cutouts;
-
safer for the hinge zone.
Downside — the safe becomes a more clearly defined rectangle.
How to choose the field size
Not by a symmetrical frame of "20 mm" on each side.
The field can be asymmetric:
-
larger on the hinge side;
-
larger near the handle;
-
smaller at the top;
-
more at the bottom under the battery cover.
If the service requires asymmetry, the decorative frame must follow the function.
The safe door is faced with the same slat pattern.
Visually, this is the most "concealing" scenario, but it cannot be recommended automatically.
Before such a decision, permission/recommendations from the safe manufacturer must be obtained and checked:
-
allowable additional weight on the door;
-
hinge lifespan;
-
operation of the lock;
-
handle operation;
-
ventilation/electronics;
-
access to batteries;
-
emergency key;
-
possibility of service dismantling;
-
preservation of warranty conditions.
Why the article does not provide instructions on "how to hide a safe"
The main task is safe operation of built-in equipment.
Decorative facing of the door is permissible only as an agreed part of a specific design, not as a universal designer trick.
Why a safe cannot be turned into an "invisible hatch" just for the sake of a beautiful PAN-007
The safe has a function that the finish must not impair: to open quickly, predictably, and normally.
If for the sake of a continuous PAN-007 rhythm one has to:
-
search for the button by touch;
-
insert fingers into the narrow niche;
-
press the door against the relief;
-
remove the decorative rail to replace the battery;
-
hold the panel with your hand when opening,
design lost to function.
Main acceptance criterion
A user who knows how to use the safe should open it after finishing without any new special actions.
If a new "ritual" appears, the service loop is insufficient.
PAN-007 with a width of 1010 mm: how many slat panels to buy for a wall of 3050 mm with a cutout for the safe
Now we can move on to the quantity.
Let's take a working example from the plan:
-
wall width — 3050 mm;
-
wall height — 2600 mm;
-
safe — about 500×400 mm;
-
main PAN-007 — 1010×8×2670 mm MDF;
-
Slat cladding is intended across the entire visible wall, except for the safe's service area.
Three PAN-007 panels across the width
1010 × 3 = 3030 mm.
Deficit:
3050 − 3030 = 20 mm.
If the wall were solid, the answer would be obvious: three is not enough.
The safe makes the buyer doubt: after all, there is a large rectangle in the wall without PAN-007, so the material 'in square meters' seems to be sufficient.
But modules are not purchased in arbitrary-shaped square meters.
Where exactly the remaining 20 mm are missing
Consider the horizontal line above the safe.
There is no hole at this level.
Need to cover all 3050 mm of the wall.
The three initial modules provide only 3030 mm.
The same happens below the safe if the lower zone is also solid.
Consequently, the rectangular cutout of 500×400 mm itself does not eliminate the 20 mm deficit in the upper and lower sections.
Can a piece from the safe cutout cover these 20 mm?
Theoretically, narrow fragments can be obtained from the cut material.
Practically, this creates a new system of joints:
-
a small 20-millimeter strip;
-
horizontal joints;
-
disruption of the continuous vertical rhythm;
-
complex edge near the safe;
-
increased risk of a visual "patch".
Such cutting cannot be considered normal savings of one panel without a separate project.
When three PAN-007 may still be sufficient
If the wall architecture allows:
-
a smooth vertical strip of at least 20 mm at the edge;
-
a wider smooth field near the safe that reaches the floor/ceiling;
-
reducing the slat zone to 3030 mm or less;
-
another conscious modular start.
Then three panels can cover the slatted part, because it is no longer equal to the entire wall of 3050 mm.
When the fourth becomes logical
If PAN-007 must run in a continuous rhythm from the left edge to the right across the full height above and below the safe, a source of additional width is needed.
Four panels give:
1010 × 4 = 4040 mm.
Nominal excess relative to the wall:
4040 − 3050 = 990 mm.
That's a lot.
But 990 mm is not necessarily waste. From the fourth module you can get:
-
an edge full-height strip;
-
fragments above/below the safe;
-
service reserve;
-
material for the adjacent section of the project.
The main thing is to determine this in advance.
Why a 500×400 mm safe opening does not mean saving one PAN-007
Let's calculate the area to see where the trap arises.
Wall:
3.05 × 2.60 = 7.93 m².
Safe:
0.50 × 0.40 = 0.20 m².
Cladding area excluding the service field:
7.93 − 0.20 = 7.73 m².
Area of one original MDF module PAN-007:
1.01 × 2.67 ≈ 2.6967 m².
Three modules:
≈8.09 m².
By area it seems:
8.09 m² > 7.73 m², so three are enough.
But by width:
3030 mm < 3050 mm.
Both calculations are correct.
The problem is that area does not account for shape and continuity of parts.
What a square meter cannot do
It does not show:
-
where the material should be;
-
does the same rail continue above and below the safe;
-
do the joints match;
-
is the strip of the required height obtained;
-
can the cut fragment be used without new visible seams.
That is why PAN-007 is calculated using the parts map
The area is used as a consumption control.
The cutting map is the basis for the order.
Buy slat panels by area or by the parts map around the safe
For such a project Buy slatted panels only after a detailed list.
Example table:
| Detail | Actual size | Source | Note |
|---|---|---|---|
| Left vertical zone | × mm | PAN №1 | Solid |
| Central zone above the safe | × mm | PAN №2 | continuation of the rhythm |
| Central zone below the safe | × mm | PAN №2/3 | check the joint |
| Right vertical zone | × mm | PAN №3/4 | Solid |
| Field near the hinges | ___ | smooth/PAN | by mechanics |
| Field near the handle | ___ | smooth/PAN | Along the grip |
| Top of the safe | × | Remainder | if the rhythm matches |
| Bottom of the safe | × | Remainder | if the rhythm matches |
| Repair reserve | ___ | Remainder | mark |
Why safe coordinates are mandatory
Size 500×400 mm is insufficient.
Need to know:
-
distance from the left edge of the wall;
-
distance from the floor;
-
position relative to the vertical boundaries of the original modules.
The same safe can:
-
entirely inside PAN #2;
-
cross joint #1/#2;
-
cross joint #2/#3.
The amount of material may match, but the complexity of cutting can vary greatly.
Working example: the safe entirely falls inside the second module
Suppose, after building the rhythm, a safe 500×400 mm is inside the zone that in the original layout belongs to PAN #2.
Then a rectangle is cut out of #2.
What remains:
-
a continuous strip to the left of the safe inside the same module;
-
a strip to the right;
-
the top;
-
bottom.
Why you can't cut out four independent pieces without marking
If the top and bottom are shifted even by one step of the trapezoidal profile, the vertical lines will no longer align.
Therefore, PAN №2 is first marked as a single panel, then the position of the safe is applied to it.
Advantage of this position
The safe does not cross the factory joint of the two original modules.
Minus
A large cutout can divide the panel into several parts that are weak to handle, which need to be properly marked and installed.
Working example: the safe crosses the joint of two PAN-007
This is more difficult.
Imagine, a vertical joint passes through the technical field of the safe.
Visually it seems convenient:
"the joint is still hidden by the door".
But above and below the safe, the line becomes visible again.
What to check
-
does the joint align with the architectural axis;
-
does a very narrow strip appear near the frame;
-
is it possible to maintain the same rhythm above and below;
-
does the loop side end up directly on the border of two panels.
When the joint at the safe can be strong
If the smooth service field deliberately extends vertically from floor to ceiling. Then the slat wall is truly divided into two independent zones.
When weak
If the smooth field is only around the door, and above and below it PAN-007 should again look like a single wall.
PAN-007 around the safe: how to maintain a continuous vertical rhythm
The best method starts with a paradoxical action: on the first sketch, the safe is temporarily ignored.
The entire PAN-007 wall is built as a solid one.
Step 1. Choose an architectural starting point
For example:
-
from the left finished corner;
-
from the wall axis;
-
from the adjacent cabinet;
-
from the doorway.
Not from the safe door.
Step 2. Lay out 1010 mm modules
Mark potential joints.
Step 3. Check the edges of the wall
Doesn't it turn out that there's a random 20-millimeter zone on the right.
Step 4. Only now apply the safe
A rectangle of 500×400 plus the actual service contour is applied to the finished rhythm.
Step 5. Determine which slats "disappear" inside the technical zone
And which ones should visually continue above and below.
Why this method is stronger than the "from the safe" layout
The safe is a technical object.
If you make it the initial axis of the entire wall:
-
the left edge may get a narrow trim;
-
right — the other one;
-
the center of the room will shift;
-
the technical door will become the main compositional element.
The wall architecture should live independently, and the safe should be neatly built into it.
Why the first PAN-007 slat should not accidentally start from the edge of the safe door
This is a particularly common mistake when the installer sees an already installed rectangle and starts laying material from it.
The logic seems convenient:
"From the safe to the right are whole panels, then from the safe to the left."
Result:
-
two independent rhythms;
-
the slats above the safe do not align;
-
the edge at the corner becomes random;
-
the joint appears in an unexpected place.
Exception
If the smooth technical field around the safe intentionally runs from floor to ceiling, it really divides the wall into two separate slat compositions.
Then both sides can be calculated independently.
But that is a different design, not savings on the cutout.
MDF PAN-007 or wooden slat panel: which version to order for an office with a built-in safe
After mechanics and cutting, the choice of material remains.
MDF PAN-007 matching the wall color
If they want to visually calm the safe, paintable MDF is the most straightforward scenario.
Advantages:
-
length 2670 mm covers a tall wall with one piece;
-
you can choose a color close to the wall;
-
the trapezoidal relief remains, but the safe metal contrasts less;
-
the current price is lower than long wooden options.
If the task is — buy MDF slat panels specifically for a solid interior wall finish, PAN-007 2670 mm matches this intent better than short modules.
Primed MDF
stronger where the painting process is already standardized for a primed base.
but on four modules, the difference from regular MDF is significant.
Regular MDF:
4 × 20 180 = 80 720 ₽.
Primed:
4 × 37 470 = 149 880 ₽.
The difference:
69 160 ₽.
this amount makes sense to pay only when surface preparation really saves a comparable portion of labor/time or is required by the accepted technology.
Oak PAN-007
Oak is chosen when the slat wall should become a standalone natural accent.
Current long oak version:
1010×8×2400 mm — 43,790 ₽.
For a visible height of 2500 mm, one length is short by 100 mm.
That is, an oak wall immediately requires a separate horizontal solution.
This could be:
-
top smooth strip;
-
the bottom plinth;
-
decorative belt;
-
horizontal joint.
But such a joint cannot be added just to preserve oak without assessing the composition.
Beech PAN-007
Beech 1010×8×2400 mm — 27,390 ₽ at the time of checking.
It is cheaper than oak, and the texture is calmer.
Suitable if a natural material is needed and the project allows a horizontal joint in height.
Why "the tree is more beautiful" is not enough for choosing
The safe already has a rectangular technical zone.
If you add:
-
vertical joints;
-
horizontal joint 2400/100 mm;
-
the safe frame,
the wall may become too fragmented.
MDF 2670 sometimes gives cleaner architecture precisely because of the length, even if natural wood itself is more attractive.
When buy wooden slat panels it is still logical
if:
-
the wall/plinth height allows using 2400 without random additional pieces;
-
Natural texture is a core part of the design;
-
The safe remains in a separate smooth field;
-
A horizontal line is embedded into the composition.
PAN-007 and the safe keypad: will there be enough room for fingers after the 8-mm relief appears
The keypad is one of the most "human" tests in the article.
On the plan, you can leave a nice 8–12 mm frame.
In use, it will turn out that the finger presses the side digits at an angle and catches the adjacent trapezoidal profile.
How to test OPAN-007 near the keypad
-
Temporarily secure OPAN where the nearest edge of PAN-007 will be.
-
Enter the real code completely.
-
Repeat with the other hand.
-
Check the keys at the edges.
-
View the display standing and sitting/from the side, if that's how the safe is used.
-
Check the confirmation buttons.
-
Open the protective cover, if there is one.
Why a paper template is worse
It doesn't show the 8 mm depth and sloped/trapezoidal edges.
What counts as a poor result
-
fingers regularly touch the rail;
-
the edge of the panel covers part of the markings;
-
need to press sideways;
-
screen is visible worse;
-
keyboard becomes too deep.
Then the service field is enlarged.
Safe handle and rack panel PAN-007: check not only the closed position
The handle can rotate, pull away, or move along an arc.
In static state, the distance to the panel is one.
When moving, it is different.
Full test
closed → code → unlock → turn handle → first 10–20 mm of opening → 45° → 90° → maximum angle.
At each stage, the following is checked:
-
distance to PAN;
-
distance to the hand;
-
contact with clothing/brush;
-
the ability to quickly return the door back.
Why the first centimeter of opening is especially important
For some doors, it is the beginning of movement that passes closest to the frame.
If you only check 90°, you might miss contact.
Hinge side of PAN-007: why the service gap there may be wider than at the handle
Decorative symmetry suggests equal gaps.
The mechanism may require asymmetry.
If the loop describes an arc close to the wall, more free space is needed on the left.
On the handle side — less.
This is normal.
What matters more
The safe must open without contact.
Don't sacrifice this for a symmetrical frame.
What to do if the designer requires a symmetrical smooth field
There are three options:
-
increase both sides to the size needed by the hinges;
-
leave the asymmetry and accept it as technical;
-
change the overall architecture of the field, for example, make a wider vertical service strip.
You cannot reduce the loop side just for the sake of identical millimeters.
Is it possible to face the door of the PAN-007 safe itself?
Only after coordination with the manufacturer/specialist for the specific safe.
Causes:
-
mass is added;
-
the door thickness changes;
-
mounting points are covered;
-
may change
The plinth is interrupted in the slat zone
This can be done if the PAN-007 should be perceived as a separate vertical plane from the floor.
But then the wall with the safe gets another material boundary.
Need to check if too many lines are being created:
-
edge of the baseboard;
-
PAN edge;
-
safe frame;
-
panel joints.
PAN-007 and the plinth have one color system
For painted MDF this can look seamless.
But the same color does not eliminate the difference in depths and profiles.
Buy wooden plinth: when the link is truly related to the task
If the bottom of the wall is not yet decided, you can to buy wooden baseboard in the current section of modern profiles.
PLT-005, PLT-006, and PLT-007 are presented there.
This link is useful precisely because the baseboard height changes the clear height of PAN-007.
The baseboard section should not replace the calculation.
Wooden baseboard and PAN-007: why the bottom line changes the parts map around the safe
Let's imagine a wall of 2600 mm.
The baseboard is 100 mm.
PAN starts at the 100 mm mark.
The safe, for example, is located above the baseboard.
Now the vertical parts around the safe are calculated not from the floor, but from the top line of the baseboard.
What changes
-
the lower fragment under the safe becomes shorter;
-
the total PAN length decreases;
-
the lower service contour may intersect with the baseboard;
-
the cutout for the safe cannot be transferred from the 'from floor' drawing without adjustment.
Why this is important for the template
If the safe's coordinate is given from the finished floor, and the panel starts above the baseboard, the installer must convert the dimensions into a single coordinate system.
Wooden trim for interiors: when the lower assembly becomes a separate system
If, in addition to the baseboard, moldings, casings, or other profiles are used on the wall, it is useful to view them as one architectural system.
If necessary, you can open Wooden interior moldings.
But in article PAN-007, this section remains secondary: the main task is the safe and the slat wall.
PAN-007 2670 mm or wooden PAN-007 2400 mm: what changes with a high wall
This is one of the key material choices.
Suppose that after the plinth, the visible field is 2500 mm.
MDF 2670 mm
One length is enough.
Remainder:
170 mm.
You can get a vertical part without a horizontal joint.
Beech/oak 2400 mm
Missing:
100 mm.
You need to decide:
-
horizontal extension;
-
smooth strip;
-
another plinth;
-
another top assembly;
-
reduction of slat height.
Why the safe amplifies the disadvantage of the horizontal joint
The safe already creates a rectangular opening.
A horizontal seam above or below it adds another strong line.
Sometimes this can be used architecturally, for example, aligning it with the top of the safe.
But a random 100-millimeter extension looks weaker.
If the top of the safe coincides with the 2400 mm line
This is an interesting edge case.
Suppose the slat zone starts above the baseboard, and the top of the safe is approximately at the line where the long wooden PAN ends.
One can try to connect the horizontal joint with the technical zone.
Plus
The seam gets a reason.
Minus
If the safe is later replaced, the line will remain.
Conclusion
Do not build the entire wall around the current safe without a lifecycle assessment.
If the ceiling gap reduces the visible height to 2380 mm
Then the wooden PAN-007 2400 mm is already sufficient with a single length.
Remainder:
20 mm.
In this case, natural wood becomes much stronger as an alternative.
What the example shows
Material selection cannot be made before the vertical wall map.
When OPAN-007 is truly mandatory specifically in this scenario
The sample is especially useful if multiple conditions are present simultaneously.
The safe is already permanently installed
Redoing it is expensive.
The frame is narrow
Even 8 mm of relief noticeably affect access.
Hinges are close to the wall
Risk of contact is higher.
Handle is large
Movement trajectory may cross the new plane.
Keyboard is close to the edge
Little room for fingers.
Battery cover slides off to the side
Service contour becomes asymmetric.
Designer suggests a minimal frame
The physical test is more important than the drawing.
When OPAN-007 does not need to be purchased separately
If the workshop already has a physical sample of PAN-007 of the required material and relief.
Or if there is a full-size leftover of the same panel from another area on the site.
What matters is not the name OPAN itself, but the presence of a real 8-mm relief for testing.
What to send to STAVROS manager before ordering PAN-007
A good specification should be clear to both the supplier and the installer.
Example:
PAN-007 / MDF / 1010×8×2670 mm / wall 3050×2600 mm / built-in safe 500×400 mm / safe coordinate X=___ Y=___ / hinges left or right / service field ___ / OPAN-007 checked yes/no / baseboard ___ / slat rhythm built from ___ / preliminary quantity ___ / finish ___.Why specify coordinates
The size of the safe does not show where it intersects modular joints.
Why specify hinges
The service field may be asymmetric.
Why specify a plinth
It changes the vertical size.
Why write "preliminary quantity"
Until the final parts map, the number 3 or 4 is not final.
How to place an order if three PAN-007 are enough after cutting
For example:
PAN-007 / MDF / 1010×8×2670 / 3 pcs. / slat zone 3010 mm + smooth vertical strip 40 mm / safe 500×400 / OPAN checked / parts map approved.Then three panels have a clear justification.
How to place an order for four PAN-007
PAN-007 / MDF / 1010×8×2670 / 4 pcs. / continuous slat wall 3050 mm / safe 500×400 / parts map / the fourth module is used for the extreme vertical zone + remainder as repair reserve.This is better than:
Let's take four just in case.
When PAN-007 around the safe is NOT yet needed to buy
The safe is still being adjusted
The door position may change.
The maximum opening angle is unknown
The service loop is not defined.
The emergency key has not been checked
Normal electronic opening does not reveal the entire scenario.
The battery cover has not been tested
The decor may block maintenance.
OPAN-007 is not attached at minimum clearance
8 mm currently exist only on the drawing.
Baseboard is not selected
Part height is not defined.
There is no full wall layout
It is impossible to honestly count 3 or 4 modules.
The safe area has already been subtracted from the order
This is a sign of incorrect calculation.
The door is to be faced without coordination with the safe manufacturer
Mass and service may change.
Finish not defined
Especially for oak/beech or painted MDF.
When PAN-007 can already be ordered.
-
Safe finally installed.
-
Door adjusted.
-
Hinge side known.
-
Maximum angle checked.
-
Handle checked throughout the cycle.
-
Keypad checked.
-
Emergency key checked.
-
Battery cover checked.
-
OPAN-007 is applied to critical zones.
-
The service loop is approved.
-
The rhythm of the entire wall is established.
-
The safe coordinates are marked on the modular grid.
-
The baseboard and top node are resolved.
-
MDF/beech/oak is selected.
-
The parts map is calculated.
-
It is determined whether there are three or four initial modules.
-
Price and availability are checked.
-
The finish has been approved.
Edge cases around the built-in safe: when the base plan stops working
A typical case is when the safe is located approximately in the middle of the wall, hinges and handle do not extend beyond its frame, and the service contour is small. A real object may be more complex.
The safe is located close to the corner of the wall
Suppose there is only 120 mm from the right frame of the safe to the corner.
If PAN-007 must continue in this narrow wall section, two questions arise at once:
-
Is a separate narrow slat fragment needed;
-
Would it be better to make a smooth vertical service strip from the safe to the corner.
A narrow strip of PAN-007 may look like a technical extension piece.
The safe is located next to the door trim
Two rectangular boundaries — the safe frame and the trim — begin to compete.
If 50–80 mm of wall remains between them, the relief insert may be too narrow.
Better to check the option:
trim → smooth field → safe → PAN-007
instead of trying to fill everything with a rack profile.
The safe door opens towards the corner
Even if the service gap at the hinges is sufficient, the edge of the open door may hit the adjacent wall.
PAN-007 should not mask the original problem.
First, check the full opening angle without the panel.
The door opens towards the furniture
After installing the cabinet or table, the actual opening angle may decrease.
Then the designer contour around PAN-007 needs to be checked together with the furniture.
The keyboard protrudes beyond the plane of the door.
When closed, it can almost align with the future PAN-007.
Then visually the safe does not appear deeply recessed.
But fingers still need side access.
The keyboard, on the contrary, is deeply recessed.
PAN-007 reinforces the niche.
The smooth field becomes stronger.
The handle is long and rotates 90°.
Its trajectory can cross the side relief even with a large static gap.
The emergency key is located under the removable emblem.
You need to check the emblem removal by hand, not just inserting the key.
The battery compartment is inside the door.
Then the external service loop can be smaller.
But the door must open enough so that the batteries can be changed conveniently.
The safe has external power or a cable.
PAN-007 should not cover the cable entry or turn it into a non-removable assembly.
Rack panel PAN-007 and the safe door: why the service loop may not be rectangular
For production, a rectangle is simpler.
For mechanics, the ideal loop may be asymmetric.
For example:
-
25 mm at the hinge;
-
12 mm at the handle;
-
8 mm at the top;
-
30 mm at the bottom due to the battery cover.
The article does not propose these exact numbers — they illustrate the principle.
What a designer should do
There are two options.
Functional contour.
Repeat the real mechanics, even if the frame is asymmetrical.Architectural contour.
Take the maximum required value and increase the other sides to one beautiful frame.The second option is often visually calmer.
Why the maximum side cannot be reduced
The largest side came from a real function.
If you make it smaller for symmetry, the problem returns.
When a smooth field around the safe can reduce the number PAN-007
Imagine a wall of 3050 mm.
If the smooth field around the safe remains only a local rectangle, the width of the continuous PAN above/below it is still 3050 mm.
The quantity across the width does not decrease.
But if the smooth zone goes from floor to ceiling
Suppose a vertical strip 350 mm wide is completely excluded from PAN.
The rack part:
3050 − 350 = 2700 mm.
Three PAN-007 give 3030 mm.
Stock:
330 mm.
In such a project, three modules confidently cover the rack width.
Why this is already a different article within one task
The technical field becomes an independent architectural element.
The safe does not "save the panel" with its cutout.
The quantity decreases because the entire vertical wall zone is no longer clad with PAN-007.
This is an important distinction.
If the smooth vertical zone is only 40 mm
Slat width:
3050 − 40 = 3010 mm.
Three PANs give 3030.
Nominal margin:
20 mm.
This is a working arithmetic scheme, but it's very borderline.
Need to check:
-
factory edges;
-
actual wall width;
-
trimming;
-
rhythm.
If the field is 60 mm
Slat width:
2990 mm.
Stock:
40 mm.
Already calmer.
If the field is 100 mm
Slat width:
2950 mm.
Stock:
80 mm.
But the 100-millimeter strip must have a design reason.
Errors when ordering PAN-007 around the built-in safe
Error 1. Subtract 0.20 m² of the safe and reduce the number of panels
Why it occurs: finishing is calculated by area.
Consequence: above or below the safe, the width is insufficient.
How to prevent: calculate the parts map and the modular width of 1010 mm.
Error 2. Considering three PAN-007 panels sufficient for a 3050 mm wall
Three provide only 3030 mm.
If there is no smooth strip, a deficit of 20 mm remains.
Error 3. Making a 20-millimeter strip from random offcuts
The result is a patch with additional joints.
Error 4. Starting the rhythm from the edge of the safe
The wall conforms to the technical object, and the edge at the corner turns out to be random.
Error 5. Check the door only in the closed state
Contact appears when turning the handle or opening.
Error 6. Open the door only at 45°
Service may require a larger angle.
Error 7. Leave universal "10 mm"
The actual hinge may require more or less.
Error 8. Not checking fingers on the keyboard
The code is inconvenient to enter after the relief appears.
Error 9. Forgetting the emergency key
The problem is detected at the most inconvenient moment — when the battery is low.
Error 10. Close the battery cover with the edge of PAN-007
Normal opening works, maintenance does not.
Error 11. Trim the door without coordination with the safe manufacturer
The mass and service scheme change.
Error 12. Move the panel close to the hinge for a nice look
The door starts rubbing against the relief.
Error 13. Use OPAN-007 only as a color sample
The main benefit here is the physical test of the 8-mm profile next to the mechanics.
Error 14. Check OPAN only at the handle
The loop side remains unconfirmed.
Error 15. Confusing MDF 2670 with wood 2400
The wooden length is not enough for a 2500 mm field.
Error 16. Buying short 950 mm as a direct replacement for a long panel
Additional horizontal joints appear.
Error 17. Not accounting for the baseboard
Vertical coordinates of all parts change.
Error 18. Considering the fourth panel entirely as waste
It can yield an edge strip and useful repair reserve.
Error 19. Automatically considering a large remainder as useful
Without a specific purpose, it is frozen material.
Error 20. Order PAN before final safe adjustment
After changing the door, the service loop becomes different.
Error 21. Not checking the future safe replacement
Too precise a cut ties the wall to one cabinet.
Error 22. Paint the entire PAN-007 before the test fitting
A mechanical error is discovered after expensive finishing.
When the fourth PAN-007 should be purchased as a repair reserve separately from the wall calculation
Suppose the parts map shows that three panels are enough thanks to a smooth vertical zone.
The question of the fourth can be asked separately:
is a full spare module needed for future repairs?
For the cabinet, this depends on:
-
the cost of the finish;
-
the availability of future reordering;
-
the risk of wall damage;
-
the possibility of local replacement;
-
the service life of the interior.
Why you cannot mix two functions
If the fourth panel is purchased "as a reserve," and the installer used it for cuts, after the repair there is no reserve left.
In the specification, you need to write:
3 working + 1 reserveor
4 workers per map.How to store the PAN-007 remainder after cutting out for the safe
A large fragment from the 500×400 mm zone can be valuable.
It can be saved as:
-
finish sample;
-
test element;
-
local repair stock.
Marking
PAN-007 / MDF / safe project / color ___ / date ___.When the fragment is not a repair
If its geometry and rhythm do not allow replacing the actually damaged part of the wall.
Do not store any offcut 'just in case'.
Buy wall slat panels specifically for the safe or choose a different model
PAN-007 is worth keeping in the project if its large trapezoidal relief is already approved and OPAN-007 has passed mechanical inspection near the door. But if the service contour has to be increased so much that a large smooth area appears around the safe, it is useful to compare the profile itself again with other models in the category and decide whether a calmer rhythm would be easier to integrate.
Go to category buy wall slatted panels makes sense not for finding something "cheaper", but when one of three conflicts is detected:
-
the trapezoidal profile comes too close to the keyboard;
-
the large depth visually makes the safe excessively recessed;
-
the required service contour breaks the rhythm of PAN-007 specifically.
If the problem is only in quantity — for example, three modules give 3030 mm instead of 3050 mm — changing the model by itself does not solve the task. You need to compare the width of the new module and rebuild the entire parts map. You cannot take a different panel and keep the old calculation based on 1010 mm.
When it is better to keep PAN-007
-
the safe's mechanics work;
-
the service field looks neat;
-
The profile needs to be specifically large and trapezoidal;
-
The MDF length of 2670 mm is convenient for height;
-
The cutting of 3/4 modules is already confirmed.
When it is more reasonable to reconsider the model
-
the safe turns into too deep a niche;
-
the handle base constantly conflicts with the relief;
-
you have to make several narrow technical strips;
-
another profile better aligns with the door, baseboard, and furniture.
Thus, the comparison remains within the same user intent: not "which panel is generally better," but which slat system allows maintaining the normal operation of the already installed safe.
Checklist before payment PAN-007
Parameter Value Wall × mm Safe × mm Safe X coordinate ___ Safe Y coordinate ___ Hinges left / right Maximum opening angle ___° Handle checked in motion Yes/No Keyboard checked Yes/No Emergency key available Yes/No Battery compartment accessible Yes/No OPAN-007 Checked / not checked Service field ___ PAN-007 MDF 1010×8×2670 / other Baseboard ___ Rack wall width ___ mm Source modules 3 / 4 / other Parts map is ready Yes/No Repair reserve ___ Finish ___ If at least one of the lines about the safe's mechanics remains empty, the number of panels is not yet final.
Final algorithm: how to order PAN-007 around a built-in safe
-
Record the actual size of the safe's front area.
-
Clarify what exactly 500×400 mm means: the door, the frame, or the external dimension.
-
Measure the safe's coordinates on the wall.
-
Determine the hinge side.
-
Check the maximum opening angle.
-
Check the handle trajectory.
-
Check the keyboard with real code input.
-
Check the emergency key.
-
Check the battery cover.
-
Check all service elements.
-
Temporarily attach OPAN-007 to the hinge side.
-
Repeat the test at the handle, top and bottom.
-
Fix the minimal functional contour.
-
Decide whether it will be functional or architecturally aligned.
-
Build the rhythm of the entire wall without the safe.
-
Apply a technical rectangle to the finished grid.
-
Measure the actual slat width.
-
Check if there is a smooth vertical zone.
-
Calculate 3×1010=3030 mm.
-
Compare with the actual width of the slat section.
-
Do not automatically subtract the safe area from the quantity.
-
Create a map of parts above, below, left, and right.
-
Select MDF 2670 or wood 2400.
-
Align the bottom joint with the baseboard.
-
Recalculate the vertical height.
-
Determine whether a fourth panel is needed as a working one.
-
Separately decide whether a repair reserve is needed.
-
Check current price and availability.
-
Lock in the finish.
-
Provide the supplier with one complete specification.
FAQ
What is the size of the long MDF PAN-007?
The current card shows 1010×8×2670 mm.
What is the thickness of PAN-007?
8 mm by parameter C.
The actual new wall plane will be larger by the real installation layer.
Is there a PAN-007 with a length of 2670 mm?
Yes, for MDF.
What is the length of the beech and oak PAN-007?
2400 mm for long wooden variants according to the current card.
Can I buy PAN-007 made of MDF for a high wall?
Yes. Specifically, 1010×8×2670 mm is the main SKU of this article.
Can PAN-007 be installed around a built-in safe?
Such finishing can be designed if the door, hinges, handle, keyboard, and service maintain normal operation.
Is it necessary to leave a service gap around the door?
Yes, if required by the actual mechanics. But there is no universal value like 10 mm.
How to determine the service gap?
Physically run a full opening cycle with OPAN-007 nearby and check all service operations.
Can the safe door itself of PAN-007 be clad?
Only after coordination with the manufacturer or a specialist for the specific safe. You cannot automatically add mass and close service zones.
How to check the hinge side?
Attach OPAN-007 to the hinge and open the door from the closed position to the maximum working angle.
What is OPAN-007 for?
To check the real depth of 8 mm, trapezoidal relief, hand grip, keyboard, and hinge trajectory before the main purchase.
What is the size of OPAN-007?
184×8×310 mm.
How much does OPAN-007 cost?
At the time of checking: MDF 550 ₽, beech 960 ₽, oak 1,600 ₽.
Does the built-in safe reduce the number of PAN-007?
Not necessarily.
It reduces the area to be faced, but does not guarantee a reduction in the number of initial modules.
Why can't you simply subtract the safe area?
Because above and below the safe, the wall can remain full width, and the modular panel must provide real continuous pieces.
How many PAN-007 are needed for a 3050 mm wall?
With continuous slat cladding, three panels give only 3030 mm, meaning 20 mm is missing.
The final quantity is determined by the parts map.
Does this mean four are always needed?
No. If part of the wall is deliberately left smooth and the slat width is reduced to 3030 mm or less, three may be enough.
Can material from the cutout for the safe be used for the missing 20 mm?
Technically, fragments exist, but a narrow assembled strip creates additional joints and may break the rhythm. This should not be considered automatic savings.
Can remnants above and below the safe be used?
Yes, if their size, orientation, and rhythm fit the specific piece.
What to choose — regular MDF or primed?
Compare the actual painting cycle. The primed option is significantly more expensive, so its advantage must be confirmed by savings in preparation.
What to choose — MDF, beech, or oak?
MDF 2670 mm is more convenient for a tall solid wall and painting. Beech/oak provide a natural texture, but the long 2400 mm format may require a horizontal joint.
Can the wooden PAN-007 be used on a wall 2500 mm high?
One wooden length of 2400 mm does not cover 2500 mm. A separate top/bottom joint is needed or a change in visible height.
How to join PAN-007 with a wooden baseboard?
First decide whether the panel starts above the baseboard, goes to the floor, or the baseboard is interrupted. The baseboard height changes the vertical layout.
Where to buy a wooden skirting board?
In the section of modern wooden baseboards STAVROS.
Where to buy slat panels for walls?
In the STAVROS flexible slat panels category.
Where to order PAN-007 1010×8×2670 mm?
In the exact PAN-007 card after mechanical verification of the safe and calculation of quantity.
How to check the current price?
Open the card immediately before payment: price and availability are updated.
What to do if the safe is later replaced with a larger one?
A smooth service field gives more freedom. A precise shaped cutout around the old safe ties the wall more strongly to one model.
What to do if the safe almost touches the corner?
Compare a narrow slatted fragment with a vertical smooth service field. Do not force PAN-007 to work in an inconvenient strip just for the sake of a continuous pattern.
Where is it best to place the PAN-007 joints relative to the safe?
First, based on the architecture of the entire wall. The safe should not automatically become the zero point of the rhythm.
Can the layout be started from the edge of the door?
Only if the technical field intentionally divides the wall into independent zones. In a standard scheme, it is better to first build the overall rhythm of the wall.
Is a fourth panel needed as a reserve?
This is a separate decision. A reserve is needed only if it has a real operational function.
Conclusion
The built-in safe 500×400 mm does reduce the area that needs to be covered by PAN-007. But area and the number of source panels are not the same thing.
For a wall 3050 mm wide, three PAN-007 1010×8×2670 mm panels give:
1010 × 3 = 3030 mm.
20 mm is missing.
If PAN-007 must run in a continuous rhythm from one edge of the wall to the other above and below the safe, the rectangular cutout 500×400 mm does not eliminate this deficit. At these horizontal levels there is no opening, and the wall still requires 3050 mm of original width.
Therefore, the cutout cannot automatically be considered a "saving of one panel."
First, you need to check the safe itself. After the 8-millimeter relief plus the mounting layer appears, the door ends up deeper than the new surface. The most sensitive area is the hinges, but the entire cycle needs to be checked: the keypad, the handle, the start of the door's movement, 45°, 90°, the maximum angle, the emergency key, and the battery compartment.
OPAN-007 184×8×310 mm is especially useful here. It is applied to the actual wall next to the hinges and handle, and then the safe is used in normal mode. This test shows not only the thickness, but also the real trapezoidal profile near the fingers and the moving door.
After the mechanics, the architectural contour is chosen. PAN-007 can fit almost flush, a smooth service field can be left around the safe, and cladding of the door itself should only be considered after coordination with the safe manufacturer and checking the mass, hinges, electronics, and service.
Next, the rhythm of the entire wall is built as if the safe did not exist. And only then is the technical zone overlaid on the grid. This allows preserving the vertical continuation of the slats above and below and not subordinating the entire composition to the random position of the safe.
MDF PAN-007 1010×8×2670 mm is especially convenient for a tall wall: at a height of 2600 mm, it covers the field with one length. Beech and oak come in 2400 mm, so on a visible field of about 2500 mm, they will require a separate 100-millimeter horizontal solution.
At the time of inspection, a regular MDF PAN-007 2670 mm costs 20,180 ₽. Three — 60,540 ₽, four — 80,720 ₽. The difference of 20,180 ₽ is too large to take the fourth one "just in case," and too small relative to the cost of rework to save money at the expense of a bad wall. Only the parts map provides the solution.
If the project allows a smooth vertical strip and the slat width becomes 3030 mm or less, three modules may be enough. If PAN-007 must cover all 3050 mm across the full solid height, a source of additional width is needed — usually a fourth module.
Correct sequence:
safe mechanics → OPAN-007 → service loop → architectural rhythm of the wall → parts map → baseboard and height → material → quantity → price → order.
After such a check, you can order a slat panel PAN-007 in a quantity that is actually confirmed by cutting, not by a reduced wall area.
-