Article Contents:
- What exactly is KPU-123 and why all three dimensions matter here
- The joint line and the plane difference are two different problems
- How to measure the actual difference before ordering KPU-123
- Why 100 mm width does not guarantee that the step will disappear
- Three geometric scenarios: when KPU-123 looks logical, borderline, and wrong
- Where the axis of the 100-mm strip should pass relative to the joint
- Slat relief: why "covering the panels" does not always mean getting support
- Porcelain stoneware also sets limitations: seams, bevel, texture, and the edge of the tile field
- KPU-123 does not replace sealing and moisture protection of the joint
- How to make a full-size template of KPU-123 before purchasing for 11,770 ₽
- How to calculate the number of two-meter KPU-123 without pointless excess
- Where is the best place to make the joint of two planks on a long border
- When a 100-millimeter KPU-123 is visually too wide for the joint
- When wide trim is better than a narrow molding
- Vertical and horizontal joints require different compositional checks
- How to choose the color of KPU-123 between slats and porcelain stoneware
- What to do if the joint falls near a switch, socket, or furniture
- The mounting base is more important than the width of the decorative strip
- When it's better to leave the joint without KPU-123
- When it's worth buying exactly KPU-123
- Practical algorithm for checking the joint before ordering
- Mistakes that cause KPU-123 to be bought for the wrong task
- Mistake: comparing the drop Δ with the 4 mm thickness of the product
- Mistake: choosing a profile only by the width of the gap
- Mistake: gluing a wide strip directly over a deep slatted relief without checking
- Mistake: considering a decorative profile as sealing
- Mistake: taking an extra strip without cutting
- Can KPU-123 be used if the porcelain stoneware is already fully laid?
- Do I need to place KPU-123 exactly halfway on the porcelain stoneware and panels?
- Can the remaining KPU-123 be used on another joint?
- What to check if the edge of the porcelain stoneware has a relief?
- Can KPU-123 be run through an internal corner?
- Is it worth installing KPU-123 if the panels and tiles are already flush without a visible seam?
- Can I first glue KPU-123 and then deal with sealing?
- Do I need to buy KPU-123 if the joint runs behind a tall cabinet?
- Can KPU-123 be replaced with a wooden strip?
- What matters more before ordering: joint width or surface height difference?
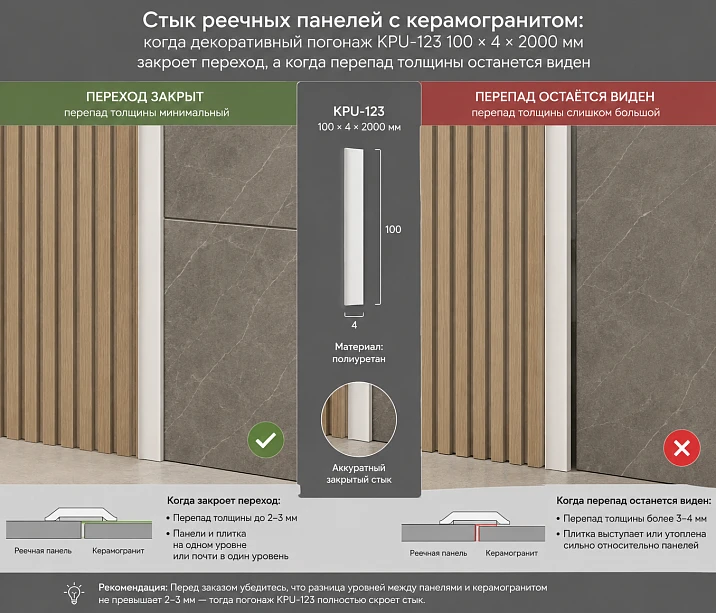
Slat cladding ends, porcelain stoneware begins nearby, and a vertical or horizontal transition line remains between them. On a drawing, such a joint looks simple: draw a decorative strip along the boundary and get a neat finish. On a finished wall, it is more complicated. The porcelain stoneware with its adhesive layer may be closer to the front plane, the slat system may be farther from the base, or vice versa. Then you see not one line that can be covered, but two surfaces at different levels.
In this situation Buy decorative molding KPU-123 made of polyurethane makes sense not because its 100 mm width is "large enough," but only after checking the joint geometry. KPU-123 has confirmed dimensions A 100 × C 4 × L 2000 mm, material is polyurethane, the current price of one two-meter strip is 11,770 ₽. But these dimensions describe the decorative trim itself. They do not mean that the product is designed to compensate for a finish height difference of 4 mm, 6 mm, or any other value.
The main rule before ordering is simple: first determine whether the porcelain stoneware and the area where KPU-123 will rest are in the same working plane; then decide what exactly the trim should do — cover the transition line or mask a geometric step. The first task can be solved by a decorative strip. The second cannot be considered solved just by the 100 mm width.
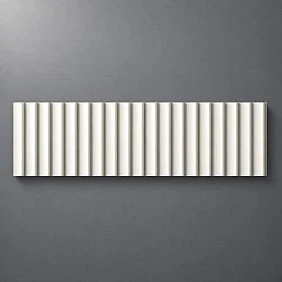
What exactly is KPU-123 and why all three dimensions matter here
KPU-123 is a polyurethane trim. For the item in question, the manufacturer specifies A = 100 mm, C = 4 mm, L = 2000 mm. In everyday descriptions, it is convenient to say "100 × 4 × 2000 mm," but when designing the joint, it is better not to turn this notation into a set of guesses.
Dimension A of 100 mm describes the wide side of the decorative strip. It determines how much of the wall the trim will visually occupy across the transition line. This is a lot for a purely technical layout: KPU-123 is perceived not as a barely noticeable gap cover, but as an independent decorative strip.
Dimension C of 4 mm refers to the thickness of the product itself. This is not a "permitted step" between porcelain tile and panels. If one finish protrudes relative to another, the back side of the decorative trim must still receive a clear, stable support scheme. The manufacturer does not claim that KPU-123 can simply be thrown over an arbitrary height difference to obtain a correct installation joint.
L = 2000 mm is the length of one strip. This parameter is already needed for the cart. A boundary 2 m high can be covered by one whole strip if the geometry and installation method allow. With a greater length, joints of individual elements appear, cutting, and the need to coordinate the pattern and the connection point.
In the article, KPU-123 makes sense to call a decorative polyurethane trim or decorative molding KPU-123. This is more accurate than "corner" or "overlay": the profile does not become a corner element just because it is placed at the boundary of two materials.
If after a trial fit it turns out that KPU-123 is too wide or does not fit the geometry, the logical next step is not to try to make it work at any cost, but to Buy polyurethane trim choose another profile or switch to a molding with a different cross-section shape.




The joint line and the plane height difference are two different problems
Most often, a mistaken purchase starts with a single photo. The image shows an ugly boundary between slats and porcelain tile, so it seems that any decorative strip wider than the gap itself will automatically fix the situation. But the joint has at least two independent characteristics.
The first is a line. This could be a small technological gap, an uneven edge of the tile field, the end of the substrate, a change in color or texture. If both face surfaces are practically in the same plane, the trim can indeed work as a decorative cover for this line: it creates a new, deliberate boundary, behind which the original seam is no longer visible.
The second is a step. It appears when the face surface of the porcelain tile is closer to the room, and the slats or their base are recessed, or vice versa. Then the eye sees not only the seam, but also the side edge of the more protruding material. It is this shadow line that often remains noticeable even after installing a wide decorative strip.
Therefore, the question "will KPU-123 cover the joint?" is too general. Before purchasing, it is useful to break it down into four:
-
Will a 100-millimeter strip cover the transition line itself?
-
Is there sufficient support surface under the trim?
-
Will the side edge of the protruding finish remain visible?
-
Will the finished transition look like an intended decorative composition, rather than an attempt to hide a construction error?
Only the first question is directly related to the large width of KPU-123. The rest require inspection and measurement of the finished assembly.
It is especially important not to confuse the decorative function with leveling. KPU-123 does not replace the base, backing, designed transition profile, or adjustment of the thickness of finish layers. If builders have not yet finished the wall, it is cheaper and neater to align the planes in advance than to later buy an expensive wide decor solely to mask a noticeable step.
Our factory also produces:
How to measure the actual difference before ordering KPU-123
For an initial check, no complex tool is needed. You need a long rigid batten, a straightedge, or a level that spans both zones. It is placed across the boundary so that it simultaneously shows the position of both face surfaces.
Let's denote the difference as Δ. This is the distance between the conditional common plane and the more recessed surface. The number itself does not need to be compared with the thickness of KPU-123 using the principle "Δ is less than 4 mm — so it fits." Such a rule has no confirmation. The Δ value is needed to understand the geometry and design the support.
If the straightedge confidently touches both finishes without rocking or a noticeable gap, the task is close to decorative: the trim can cover the transition line. If the straightedge lies on one side while a clear gap forms over the other, there is a step. Then you need to understand where exactly the back surface of KPU-123 will land.
It is useful to take measurements at least at three points along the length of the joint: at the top, middle, and bottom for a vertical boundary, or on the left, center, and right for a horizontal one. The reason is not a desire to collect more numbers, but that the wall, tile adhesive, or slat backing may have a local deviation. A single measurement in the center does not prove that the same geometry is maintained across the entire two-meter strip.
Flatness is checked separately along the installation line. KPU-123, 2000 mm long, will visually emphasize curvature if the base has a "wave." A wide decorative strip does not automatically mask poor geometry: a straight long edge, on the contrary, can make the deviation more noticeable.
After measurements, it is useful to record not only Δ but also the answer to the question: which surface will the majority of the back side of KPU-123 actually be glued to? If the answer is not obvious, the joint is not yet ready for ordering the decorative piece.
Get Consultation
Why 100 mm of width does not guarantee that the step will disappear
Width and the ability to compensate for a difference are different properties. Imagine two surfaces: porcelain stoneware on the left, a slat field on the right. There is a transition between them. Even if a 100-mm trim covers 50 mm of each material, its back plane does not cease to be a plane just because of its large width.
If one half of KPU-123 adheres to the protruding porcelain stoneware while the second half ends up over a deeper zone, the second part lacks proper contact with the base. Depending on the actual shape of the back side, surface quality, and installation method, this can lead to a visible gap, shadow, or the need to specially design a backing. It cannot be stated in advance that the adhesive layer should "make up" this difference: the allowable adhesive thickness, the behavior of the specific compound, and the type of base require separate verification.
There is also the opposite scenario. The trim can be fully shifted to one side of the boundary so that it has a stable base and only approaches the adjacent material with its edge. Then the transition line may look neat, but the side edge of the more protruding finish will remain visible. This is no longer a hidden joint but a deliberately emphasized transition.
Therefore, before purchasing, you need to formulate a visual goal. If the goal is to create a decorative strip near the joint, KPU-123 may be appropriate even without fully overlapping the two surfaces. If the goal is to make it look as if there is no difference in height at all, a width of 100 mm alone is not enough for such a promise.
This difference is especially visible under side lighting. During the day, frontal light can "eat up" a small shadow, while in the evening, a wall sconce or backlighting along the wall will emphasize the edge. Therefore, the fitting should be evaluated under the lighting that will actually be used in the room.
Three geometric scenarios: when KPU-123 looks logical, borderline, and wrong
Instead of a dozen conditional millimeters, it is more useful to consider three fundamentally different situations.
| Scenario | What happens in the joint | The role of KPU-123 | Decision before purchase |
|---|---|---|---|
| The planes almost coincide | The trim gets a clear base, the main problem is the transition line itself | Decorative overlap and compositional accent | Do a full-size fitting and calculate the length |
| There is a step, but a correct reference plane can be created | KPU-123 itself does not fix the geometry, but the joint can be prepared separately | The final decorative part of an already prepared transition | First solve the base, then order the decor |
| There is a pronounced difference in height and no proper support | One part of the strip will fit, the other will hang or leave a visible shadow | Inappropriate masking method | Consider a different transition profile or reassembly of the joint |
In the first scenario, KPU-123 is in its natural role: the decorative element works on a prepared surface. Here the task is about scale, pattern, color, and length.
In the second scenario, the product may also turn out to be correct, but only as the final layer of the solution, not as a means of creating a plane. For example, the construction part of the node pre-forms a suitable platform, after which the trim becomes a visible decorative strip. The exact method of creating the platform depends on the wall materials, panel construction, and project requirements; a universal scheme cannot be assigned without this data.
The third scenario is the one where the article should stop the purchase. If the base does not allow proper placement of KPU-123, the desire to hide everything with a wide strip does not make the node technically correct. In such a case, it is more useful Buy polyurethane wall moldings of a different cross-section or to select a special transition profile designed specifically for the geometry of two levels.
Where should the axis of the 100-millimeter strip pass relative to the joint
The most obvious solution is to place the joint exactly in the center of KPU-123. But this is not a mandatory rule. Centering depends on what the decorative trim is supposed to do and where the working base is located.
If both surfaces lie in the same plane and are equally suitable for installation, a symmetrical overlap can be compositionally clean: roughly half the width falls on the panel side, half on the porcelain stoneware. But even here, the pattern is assessed first. A wide trim may extend too deeply onto the tile or "eat up" the edge of the slat field.
If one side of the joint is noticeably better suited as a base, it is more reasonable to shift KPU-123 toward that side. Then the center of the decorative strip no longer coincides with the original line. Visually, this is not necessarily a mistake: sometimes it is more correct to make a pronounced strip on one surface than to symmetrically position a product, half of which has no proper contact with the wall.
There is also a third option—leave the actual joint open as a thin technical line, and place KPU-123 nearby as a decorative frieze. This solution does not mask the geometry and is therefore more honest in a situation where two materials are deliberately separated by levels. It requires good quality of the joint itself, because the trim no longer hides it.
A full-size paper template 100 mm wide helps to see these differences in a few minutes. It is worth making not one, but three template positions: symmetrically over the joint, shifted toward the slat part, and shifted toward the porcelain stoneware. In a photo from a distance of 2–3 meters, it will be visible which option looks like an architectural solution and which looks like a random patch.
Slat relief: why "covering the panels" does not always mean getting support
When discussing the joint, it's easy to say: "KPU-123 will overlap the slat panels by 40–50 mm." But slat cladding by definition can have a pronounced relief. The face zone consists of protruding slats and recesses between them, not a continuous smooth surface.
This is fundamentally important for wide decorative moldings. If its back part crosses alternating protrusions and gaps, the actual contact area may differ from what appears in a facade photo. Therefore, before ordering, you need to look not only at the panel width, but also at its profile, slat pitch, presence of a backing, and the design of the end edge.
A good joint usually has a predefined smooth mounting strip, end cap, or another surface on which the decorative finish rests. If such a strip is absent, the KPU-123 itself should not automatically become a bridge across deep gaps in the slat relief.
That's why the wide model is primarily interesting where its decorative scale is needed deliberately: the wall requires a noticeable dividing strip, and the joint design already allows that strip to be installed properly. If the task is purely technical—covering a few millimeters of the relief edge—100 mm may turn out to be visually excessive.
When designing a new slat wall, this issue is best resolved before panel installation. Then the edge of the field can be prepared for the chosen decorative profile. If the panels are already installed, first inspect the edge, then select the product—not the other way around.
For the slat section itself, if the project is still being assembled, it makes sense to separately buy slat panels for walls for interior finishing and immediately coordinate the end elements, system thickness, and the future transition line with the tile field.
Porcelain tile also imposes constraints: joints, bevels, texture, and the edge of the tile field
Porcelain tile seems like a perfectly flat monolithic surface until a decorative strip comes close to its edge. In a real joint, several details need to be checked.
The first is the tile joint. If KPU-123 overlaps part of the joint, the back surface gets an uneven base: smooth tile alternates with the recess of the grout. By itself, this doesn't mean installation is impossible, but the installation location must be seen in person, not assuming the tile plane is absolutely uniform.
The second is a chamfer or edge relief. Some surfaces have a pronounced texture. A 100 mm wide trim covers a fairly large area, so local unevenness can affect adhesion. With strong relief, it is worth doing a trial fitting with a rigid template or profile sample.
The third is the quality of the edge of the tile field itself. If the edge is unevenly cut, the decorative strip can visually hide it, but first you need to understand whether the defect extends beyond the 100-millimeter zone and whether it interferes with proper seating.
The fourth is the external corner. The article is devoted to the joint of two finishes on a wall, not the transition around a corner. If porcelain stoneware and panels meet at a plane break, KPU-123 has a different geometric task. A flat decorative trim cannot automatically be considered a corner profile.
The fifth is the surface condition. Tiles can be glossy, matte, textured, or with protective coatings. The specific mounting adhesive is selected based on compatibility with polyurethane and the actual substrate. You cannot transfer a recommendation for a plastered wall to porcelain stoneware without checking the composition's instructions.
KPU-123 does not replace sealing and moisture protection of the joint
Porcelain stoneware often appears in kitchens, hallways, bathrooms, and restrooms, so it is especially important to separate decorative and technical functions. Polyurethane trim can frame the boundary, but the presence of a beautiful strip does not prove the tightness of the entire assembly.
If slat panels are made of a material sensitive to moisture, their end requires a solution provided by the panel system design and room conditions. If splashes or regular wetting are possible in the area, moisture protection, sealing, and the suitability of selected materials are designed separately. You cannot assume that KPU-123 automatically replaces sealant, an expansion joint, or a special moisture-resistant transition profile.
This is especially important because a wide decor can hide the technical line from view. The assembly may look complete, but hidden moisture or an unprotected end will not disappear from that. In a dry living room, such a risk may be insignificant, but near a sink or plumbing area, the requirements are different.
Therefore, the sequence should be as follows: first determine how the assembly works technically, then how it is finished. If a decorative trim is needed, KPU-123 is installed as the visible part of the prepared solution.
A broader context on transitions between different finishes is covered in the STAVROS material Polyurethane moldings for finishing joints: how to cover the border of wallpaper, paint, panels, and tiles. For our task, the difference is fundamental: here we are not considering the class of moldings as a whole, but a specific KPU-123 and checking the difference in face planes before purchasing it.
How to make a full-size template of KPU-123 before purchasing for 11,770 ₽
For a decorative piece 100 mm wide, a paper template is especially useful. A narrow strip on a screen and a ten-centimeter-wide band on a real wall are perceived completely differently.
You need a strip of paper or thin cardboard 100 mm wide. To evaluate one section, you don't have to immediately make two meters, but it's useful to get at least 1–1.5 m of continuous strip. If the border is high and located on an open wall, it's better to assemble the template as close to the real length as possible: a short sample doesn't show how strong the vertical line will be.
The template is fixed with painter's tape in the intended position. Three viewing distances are checked: up close, from the usual entry point to the room, and from the main area where a person will see the wall most often. Then the composition is photographed without wide-angle distortion.
On the template, it's useful to mark the original joint line. This shows how much the molding overlaps each material. If it visually takes away too much of the porcelain tile field or makes the edge of the slats heavy, the problem will be detected before ordering.
A separate test is evening lighting. Paper doesn't replicate the relief of KPU-123, but it allows you to assess the scale of the strip. To check future shadows, you need a real sample or a profile visualization. If there's a wall sconce, linear lighting, or directional light nearby, it must be turned on.
After such a fitting, the buyer can come to one of three conclusions: the 100 mm width is needed and justified; a narrower profile is needed; the decorative strip in this place is unnecessary altogether. The third conclusion is not a failure—it saves 11,770 ₽ on each unnecessary plank.
How to calculate the number of two-meter KPU-123 without a pointless reserve
After geometric verification, the simple part comes — calculating the length. One KPU-123 plank has a length of 2000 mm. If the joint is shorter than or equal to two meters and the pattern allows the required trimming, one plank is basically sufficient. If the length is longer, at least one joint of elements appears.
Basic formula:
Number of planks = rounding up (length of the line being finished / 2000 mm).
For example, for a vertical transition with a height of 2700 mm, mathematically two planks are needed. At the current product price, the cost of two KPU-123 units will be:
2 × 11 770 = 23 540 ₽.
But this does not yet mean that any remainder can be considered useful. After trimming one plank, a part will remain, and its suitability depends on the pattern, the direction of the ornament, the location of the next section, and the requirements for joining.
For multiple borders, it is advantageous to first create a cutting map. Suppose there are two transitions of 1800 mm in the room. Two whole planks are logically used one per section — there will be no decorative joint inside the line. Trying to "save" and assemble one transition from offcuts can worsen the appearance, even if the footage mathematically adds up.
If the project contains multiple sections, you cannot automatically add a universal 10–15% margin without understanding the pattern and cutting. For expensive linear products, it is wiser to first list the actual lengths, locations of visible joints, and remainders. The margin is determined by the specific cutting scheme and the risk of damage, not by a template number.
After checking the node and cutting, you can order KPU-123 100 × 4 × 2000 mm already with a clear quantity, not "two planks just in case."
Where is it better to make the joint of two planks on a long border
If the transition line is longer than 2000 mm, the question of quantity quickly turns into a question of connection quality. For two-meter linear products, a joint will physically appear, and its location is better chosen before cutting.
On a vertical boundary 2.7–3 m high, the most noticeable option is to place a short joint exactly where a person most often looks. Usually, the central zone of the wall is closer to eye level and furniture, so a random joint in the middle can attract more attention than a joint shifted to a less active part of the composition. But there is no universal "always join at the top" rule either: if the top of the wall is lit by contour lighting or a cornice runs nearby, the joint there can become more visible.
The KPU-123 pattern must be taken into account. The decorative design should continue logically. Therefore, before cutting, it is not enough to simply divide the length by two meters. First, look at the repeat and choose a place where the joint does not break the motif. If the manufacturer provides a drawing or 3D model, these are more useful than guessing from a small photo.
For a horizontal transition, the situation is different. Here, a long line is often perceived as a whole, especially on a wall without furniture. Joints of individual slats should be distributed so that they do not fall into the semantic center of the composition—for example, directly above the center of a cabinet, mirror, or TV. If the wall already has vertical axes of furniture, sometimes the joint can be subordinated to one of them.
The quality of the joint between two KPU-123 pieces depends not only on the cut. The base under both slats must remain in the same plane. If one element runs over porcelain tile and the adjacent one falls onto an area with a different base, the joint will get two problems at once: a seam between the slats and a change in support. Such a node is better not to create without necessity.
For long lines, it is reasonable to first lay out the segments on a diagram with real dimensions. This simple operation often shows that a more expensive option with an additional whole slat gives a cleaner composition than maximizing savings on every centimeter.
When the 100-mm KPU-123 is visually too wide for the joint
A technically suitable profile may turn out to be compositionally wrong. A width of 100 mm is a noticeable strip. On a large wall, it can gather the transition and make it a deliberate architectural element. On a small fragment of porcelain tile, the same KPU-123 can look heavier than the materials it separates.
Width should be assessed not only relative to the gap. Much more important are four scales: the width of the slat field, the width of the tile field, the height of the room, and the dimensions of nearby furniture. If the porcelain tile occupies a narrow insert of 300–400 mm, a decorative strip of 100 mm takes away a significant part of its visual width. If there is a slat wall several meters wide nearby, the same 100 mm can look quite calm.
There is also the rhythm of the slats. A narrow, frequent rhythm is usually perceived as lighter than a wide molded strip. KPU-123 in such a neighborhood becomes a strong boundary, not an inconspicuous finish. This might be exactly what is needed for an art deco interior or a pronounced decorative composition. In a minimalist room, the same saturation can compete with the panels.
Therefore, the question "does 100 mm fit" is not equal to the question "is 100 mm suitable." A paper template should be evaluated together with furniture, door trims, baseboards, ceiling cornices, and other profiles. If KPU-123 unexpectedly becomes the most massive line on the wall, this is a reason to compare it with a narrower solution.
In that case, moving to the section Buy polyurethane wall moldings — is not a "downgrade" of the decision, but a proper alternative. A narrower profile may better match the scale of the joint, especially when the task is a neat finish rather than creating a decorative frieze.
When a wide molding is better than a narrow trim
There is also the opposite situation: a thin trim technically covers the line, but visually looks accidental. This happens on a large wall where slat panels and large-format porcelain stoneware themselves have a strong scale.
The wide KPU-123 can work as a third material between them. Instead of trying to "make the joint invisible," it honestly creates a decorative pause. The slat rhythm ends, then comes a molded strip, after which the stone surface begins. The transition becomes readable and intentional.
This technique is especially useful when textures differ greatly. A warm wood or painted slat surface next to a cold stone pattern sometimes requires an intermediate line that ties the composition together. KPU-123 can be painted in the color of one of the materials or in a third shade that supports other interior elements.
But a wide strip is justified only with good geometry. The more noticeable the profile, the more attention it draws to itself and its edges. An uneven gap, a crooked cut of porcelain stoneware, different distances to adjacent furniture, or a poor joint of two planks on a wide KPU-123 will be more visible than on a thin neutral profile.
Therefore, "wide = better hides mistakes" is bad logic. On a prepared joint, a wide molding gives a strong architectural line. On an unprepared one, it can highlight exactly what was meant to be hidden.
If the project is initially built around decorative molding, it is useful to look at the entire catalog and You can buy ready-made stucco matching the Baroque style. Calculate the quantity: linear meters of cornices and moldings, number of rosettes, pilasters, consoles, corner elements. Add a ten to fifteen percent allowance for trimming. as a coordinated system: moldings, trims, cornices, and other elements should support each other in scale, rather than appearing on the wall as random separate strips.
Vertical and horizontal joints require different compositional checks.
The same KPU-123 is perceived differently on vertical and horizontal edges. This does not change the dimensions of the product, but it changes the role of the strip in the interior.
A vertical KPU-123 visually divides the wall into two fields. It can emphasize the height of the room, align with a door casing, the side line of a cabinet, or the vertical of a mirror. In this arrangement, it is especially noticeable if the trim is not level or if the distance from it to adjacent vertical objects changes with height.
A horizontal KPU-123 acts as a belt. It can stop the vertical rhythm of slats, separate the lower panel zone from porcelain stoneware, or form a line at furniture level. Here, the relationship with the baseboard, countertop, windowsill, and other horizontals is more important.
The geometry of the transition is also read differently. On a vertical joint, side light from a window can cast a long shadow along the entire strip. On a horizontal joint, the shadow often depends more on upper or lower light. Therefore, checking under working lighting is needed in both cases, but the result may differ.
With a horizontal line, another practical question arises: whether a wide trim might become a surface where dust is visually noticeable. This is not a reason to abandon KPU-123, but the relief and position of the profile should be evaluated as part of maintenance, especially in hallways and kitchens.
The main thing is not to change the orientation of the product arbitrarily just because 2000 mm is the length. The ornament and direction of the decorative pattern should be checked against the card, drawing, and images. If a specific composition involves rotation or trimming, it is better to verify whether the pattern is preserved in the chosen direction.
How to choose the color of KPU-123 between slats and porcelain stoneware
Color can either reduce the visual width of the 100-millimeter strip or make it the main accent. Therefore, the purchase decision is best made together with the painting plan.
In the color of the slat panels. In this case, KPU-123 is perceived as the completion of the slat zone. It seems to gather its edge and separate it from the stone surface. This option is logical if the panels are the main decorative material, and porcelain stoneware serves as an adjacent functional background.
To match the color of the porcelain tile. The trim visually blends into the tile field. This can make the border calmer, especially if the stone is monochromatic or has a subtle pattern. However, achieving an exact match of the complex texture of porcelain tile with paint is usually impossible, so this refers to a complementary shade rather than an imitation of the material.
To match the color of the wall, baseboard, or door trim. Then KPU-123 becomes part of the overall system of architectural lines. This approach often best explains why a wide decorative strip appeared at the junction at all: it repeats the existing language of the interior.
Contrasting color. A black, dark, or metallic-looking shade turns the transition into a graphic line. Here, flawless alignment is especially important: contrast highlights every imperfection.
Before final painting, it is better to make color swatches next to the actual tile and panels. A smartphone screen poorly conveys the temperature and sheen of materials. Matte paint, semi-matte surface, and glossy porcelain tile of the same nominal shade will still be perceived differently.
If KPU-123 is painted after installation, you need to decide in advance how the adjacent surface will be protected and which compounds are compatible with the product and the substrate. The article should not prescribe a universal paint without considering the manufacturer's recommendations for the specific finishing system.
What to do if the joint falls near a switch, outlet, or furniture
A wide 100 mm strip rarely exists in a vacuum. On a real wall, there may be an outlet, switch, wall sconce, cabinet end, countertop, or mirror nearby. It is these objects that can make a formally suitable KPU-123 impractical.
If an electrical point falls within the intended strip, you cannot simply "go around it" with trim without a project. Cutting around the outlet frame can disrupt the pattern, and moving the electrical point is already a separate construction task. Often it is more correct to shift the axis of the decorative strip or choose a narrower profile.
Near furniture, clearance for opening doors and drawers is important. Trim with a thickness of C 4 mm is relatively thin by itself, but the relief, paint, and actual position relative to the facades must be checked on site. You cannot draw conclusions based only on the number 4 mm.
For a mirror or glass panel, visual precision of the joint is important. If the mirror is already installed, KPU-123 should not create a random short leftover strip between itself and the mirror edge. It is better to subordinate the transition to one of the existing axes.
If a countertop or console runs nearby, the horizontal KPU-123 should not be automatically placed exactly at its level. Sometimes matching lines looks neat, and sometimes it creates the impression that the decorative strip is a continuation of the furniture, even though it actually runs along a different wall. Checking with a template resolves this faster than abstract rules.
All of this comes back to one principle: KPU-123 is chosen not by the joint in isolation, but by the entire wall fragment.
The mounting base matters more than the width of the decorative strip
When a buyer sees 100 mm of width, there is a temptation to think that "there will be enough room for glue." But surface area and quality of support are not the same thing.
For reliable mounting, there must be a surface that the instructions of the chosen adhesive compound and the decorative product itself allow. If part of the trim falls on smooth porcelain tile, another part on a painted substrate, and a third part over the void of a slatted relief, in fact we are talking about several bases at once.
Each base may have its own preparation. Dust, grease, residues of construction compounds, weak paint, or protective impregnation can impair adhesion. This cannot be compensated for with a larger amount of glue without checking the instructions.
It is especially dangerous to perceive glue as a material for leveling out differences. The mounting compound must be used within the limits stated by its manufacturer. If the joint requires creating a noticeable backing or leveling layer, that is already a separate structural operation.
Therefore, before ordering KPU-123, it is useful to conduct a "back plane test": apply a rigid strip 100 mm wide where the trim will be, and see where it actually touches the base. If the contact is clear and stable along the entire length, the task becomes predictable. If the template rocks, sinks into the relief, or rests only on one edge, the wide decorative piece does not yet solve the problem.
This test is especially valuable on an already finished renovation: it shows the limitation before purchasing an expensive product and before applying glue to the finish.
When it is better to leave the joint without KPU-123
A commercial article must allow the answer "don't buy." For KPU-123, there are several such situations.
First, the planes are deliberately separated. For example, a slat system protrudes relative to porcelain tile, and this volume is part of the design. Then trying to hide the step with a flat wide strip can make the joint heavier. A neat open edge or a specialized profile looks more honest.
Second, there is no proper support. If the trim actually has to hang over a relief or cross a significant difference in height, a structural solution is needed first. Buying KPU-123 before that is premature.
Third, 100 mm is too much in scale. A small bathroom, a narrow partition, or a tight area near a door casing may not handle a wide decorative strip.
Fourth, the joint is in an area where the main task is technical, not decorative. For example, an expansion, waterproof, or impact-resistant transition is required. Then the profile is chosen primarily by its technical function.
Fifth, the existing edge is done well enough. If the porcelain tile and slat panel are already joined with a neat thin line, an additional decorative strip can only overload the wall.
Sixth, KPU-123 conflicts with
When it makes sense to buy exactly KPU-123
After all the limitations, the criteria for a suitable scenario become quite clear.
KPU-123 should be considered if the transition should be a noticeable decorative line, not a nearly invisible technical seam. The 100 mm width then works for the task rather than against it.
The second prerequisite is prepared geometry. The planes are either close and provide a clear base, or the construction joint is specially prepared for a wide decorative strip. The buyer does not expect that the 4-millimeter thickness of the product will automatically fix a step.
The third is the scale of the wall. There is enough space nearby so that KPU-123 does not pinch the porcelain stoneware, does not cut off the rhythm of the slats, and does not conflict with the furniture.
The fourth is clear length and cutting. It is known how many two-meter planks are needed, where the joints will be, and what to do with the leftovers.
The fifth is installation compatibility. The base is prepared, a suitable adhesive is selected, and in wet or complex areas, technical sealing is resolved independently of the decorative profile.
The sixth is a coordinated color. The trim supports panels, tiles, or other architectural elements, rather than becoming a random third line.
If these conditions are met, the purchase for 11,770 ₽ has a clear reason: KPU-123 does not "save the joint" but completes an already well-thought-out transition.
Practical algorithm for checking the joint before ordering
To avoid returning to the same doubts during the renovation, it is convenient to go through the sequence once.
-
Measure the length of the boundary. Write down not "approximately 2.5 m," but the actual length of each individual section.
-
Check both face planes with a straightedge. Record whether there is a difference Δ and whether it changes along the length.
-
Inspect the edge of the slat system. Is there a continuous strip for support or only protruding slats with gaps.
-
Inspect the edge of the porcelain stoneware. Seams, relief, chamfer, uneven cutting, and position relative to the future profile.
-
Make a 100 mm template. Try it symmetrically on the joint and with an offset to both sides.
-
Check adjacent objects. Outlets, sconces, furniture, mirror, door casing, baseboard.
-
Evaluate the wall under working lighting. Especially side shadows.
-
Determine the technical function of the joint. Is moisture protection, expansion gap, edge protection, or only decor needed.
-
Choose the type of solution. KPU-123, other linear molding, molding, specialized transition profile, or an open neat joint.
-
Calculate strips by length of 2000 mm. Then make a diagram of joints and cutting.
-
Check the cost. Quantity × 11,770 ₽ — base price of the strips themselves without adhesive, preparation, and finishing.
-
Only after that place the order.
This order is more useful than starting with the question "which beautiful profile to choose." It first answers whether a decorative profile can work in a specific geometry, and only then compares design.
For a more general understanding of joining panels with other materials, you can refer to the STAVROS article. "How to join slat panels and use moldings for polyurethane walls: joints that look professional". In our case, the task is narrower: to make a decision specifically on KPU-123, taking into account its width, thickness, and length.
Mistakes that cause KPU-123 to be purchased for the wrong task
Mistake: comparing the difference Δ with the 4 mm thickness of the product
Why it happens: the 4 mm figure visually seems like a ready-made technical tolerance.
Consequence: the buyer assumes that if the step is "up to 4 mm," the profile will compensate for it.
How to check: go back to the product card — 4 mm describes the size C of the KPU-123 itself. The allowable difference between two finishes is not stated by the manufacturer in this data.
How to avoid: design the support plane independently of the thickness of the decorative molding.
Mistake: choosing a profile only by the width of the gap
Why it occurs: the joint is perceived as a two-dimensional line.
Consequence: after installation, a shadow from the side edge remains, or part of the profile lacks proper support.
How to check: apply a straightedge across the two finishes and a rigid template 100 mm wide.
How to avoid: check not only the line but also the third dimension — the level of the face planes.
Mistake: gluing a wide strip directly over a deep slatted relief without checking
Why it occurs: it seems that the adhesive will reach all areas.
Consequence: uneven adhesion, visible gap, unpredictable installation.
How to check: inspect the actual contact points on the back side.
How to avoid: first create a suitable base or choose a profile that matches the edge construction.
Mistake: considering the decorative profile as sealing
Why it occurs: after installation, the technical seam disappears from view.
Consequence: the attractive appearance creates a false sense of a completed waterproofing joint.
How to check: separately answer which element addresses waterproofing and edge protection.
How to avoid: separate the decorative and technical functions.
Mistake: taking an extra plank without cutting it to size
Why it occurs: the habit of adding a universal allowance.
Consequence: at a price of 11,770 RUB, the leftover may turn out to be expensive and unnecessary.
How to check: draw all sections and lay them out on two-meter blanks.
How to avoid: calculate specific cuts and joint locations before ordering.
Solution table: KPU-123, another molding, or reworking the joint
| Condition | KPU-123 | Narrower molding | Special profile / joint preparation |
| Planes align, need a noticeable decorative strip | Yes, after the template | Possible if 100 mm is too much | Usually not required |
| Planes align, need a nearly invisible line | Rather redundant | More often more logical | A thin technical profile is possible |
| There is a difference, but a solid support can be created under KPU-123 | Possible after preparation | Depends on the cross-section | Preparation is mandatory |
| There is a pronounced step without support | Do not buy as 'camouflage' | Does not solve the problem automatically | Priority path |
| Wet zone requires sealing | Only as decor after technical solution | Same | First, the moisture protection unit |
| Joint on the external corner | Do not consider KPU-123 as a corner element | A profile of suitable cross-section is needed | A corner profile is often needed |
| Narrow wall section, lots of adjacent decor | May be too wide | Usually better | Depending on the situation |
This table is useful precisely because it does not make KPU-123 a universal answer. Its strength is decorative width and expressive line. Where the main problem is a structural difference, another type of solution is needed first.
How much a solution with KPU-123 really costs
The price of one strip at the time of check is 11,770 ₽. Therefore, even a simple border quickly becomes a noticeable part of the budget.
| Length of the line being finished | Minimum of whole planks of 2000 mm | Cost of KPU-123 |
| up to 2000 mm | 1 | 11 770 ₽ |
| more than 2000 up to 4000 mm | 2 | 23 540 ₽ |
| more than 4000 up to 6000 mm | 3 | 35 310 ₽ |
This is only arithmetic of the number of whole planks. It does not account for the suitability of offcuts, pattern repeat, joint locations, installation compound, substrate preparation, painting, and labor.
For the 2050 mm boundary, the issue is especially illustrative. The math already requires two planks, although only 50 mm is missing. This is exactly where it is worth comparing the cost of the decorative solution with an alternative. Perhaps it is compositionally more reasonable to change the start or end of the line, choose a different profile, or use a solution that is available in a suitable length. Buying a second KPU-123 for a very short filler piece is justified only if this particular pattern is essential to the project.
For the 3900 mm boundary, two planks seem more rational, but it is still important to choose the location of the single joint. For multiple walls, offcuts can be redistributed between sections, so the overall cutting layout often reduces the actual quantity.
Cost is another argument to measure surfaces first. An error in choosing one plank costs 11,770 ₽, two — 23,540 ₽. A full-size paper template and rule verification cost incomparably less.
Final choice before purchase
KPU-123 is suitable for the joint of slat panels with porcelain stoneware when the buyer deliberately wants a wide decorative strip, rather than hoping to fix unknown geometry with it.
Size 100 × 4 × 2000 mm gives three different initial data. 100 mm is responsible for the visual width. 4 mm is the thickness of the product itself. 2000 mm is the length of one plank for calculation. None of these parameters by itself sets the allowable difference between finishes.
If the rule shows that the surfaces practically work in one plane, the edge of the slat system provides normal support, the 100-millimeter template looks proportionate, and the technical requirements of the joint are solved separately, KPU-123 can be considered a strong decorative finish.
If a noticeable step remains, part of the molding must "hang" over the recessed surface, the wet area is not sealed, or 100 mm overloads the composition, buying KPU-123 just hoping "everything will hide" is not worth it. First, you need to fix or redesign the transition, and then choose the final decor.
When the solution is confirmed by geometry and template, in the card you can Buy decorative molding KPU-123 made of polyurethane. If the joint is still being designed together with the panel field, it makes sense to simultaneously Buy slatted panels for wall finishing and bring the thicknesses of the entire system together in advance, so that the decorative molding completes a good joint rather than masking a bad one.
FAQ: additional questions about KPU-123 at the joint of panels and porcelain stoneware
Can KPU-123 be used if the porcelain stoneware is already fully laid?
Yes, the fact that the tile field is ready does not exclude decorative molding. But it limits the ability to adjust the geometry. You need to check the level of the face plane, the condition of the tile edge, the suitability of the surface for the chosen mounting compound, and the position of the slat zone. If the finished difference is inconvenient, one decorative strip does not fix it automatically.
Do I need to place KPU-123 exactly halfway on the porcelain stoneware and panels?
No. Symmetrical positioning is just one compositional option. The actual axis should account for the supporting surface, pattern, and visual objective. Sometimes it's more logical to shift the profile to one side, leaving the joint itself as a separate technical line.
Can I use the remaining KPU-123 on another joint?
Yes, if the length, ornament direction, and edge quality are suitable for the second section. The remainder cannot be considered useful automatically: a short fragment with an inconvenient pattern may not provide a neat connection.
What should be checked if the porcelain tile edge has a relief?
You need to assess the actual contact of the back side of the future profile with the surface. A paper template will show the scale but not the fit. For a relief base, a rigid sample or physical fitting of the profile and checking the installation compound instructions is more useful.
Can KPU-123 be run through an internal corner?
Such a transition requires separate layout, cutting, and pattern verification. A straight two-meter strip does not automatically become a corner element. If the joint changes plane, design the connection as a corner, not as a continuation of a straight wall.
Should KPU-123 be installed if the panels and tiles are already flush without a visible seam?
Not necessarily. If the technical and visual joint is already neat, a wide decorative strip is only needed as a deliberate design choice. There's no need to add it just because "joints are usually covered."
Can I first glue KPU-123 and then address the sealing issue?
In a potentially damp area, this order is risky. First, you need to understand how the technical protection of the joint and ends is arranged, so that the decorative element does not block access to an unfinished node. The specific sequence depends on the materials used and the sealing system.
Do I need to buy KPU-123 if the joint runs behind a tall cabinet?
If the boundary is completely hidden by furniture and does not require separate protection, decorative trim on an invisible section may be unnecessary. But the technical finishing of the panel edges must still match the construction. Decoration and protection are different tasks.
Can KPU-123 be replaced with a wooden plank?
A wooden profile can be considered as an alternative if it matches the style, operating conditions, and joint construction. This is a different product with different requirements for humidity, finishing, and installation. You need to compare not only the appearance but also the working conditions.
What is more important before ordering: the joint width or the surface height difference?
Both parameters are needed, but for the risk of incorrect purchase, the height difference is often more important. A line several millimeters wide can be easily visually covered by a 100-mm strip, but different heights of two surfaces can leave a visible step and disrupt the support of the trim.
ALT for illustrations
-
Joint of slatted panels with porcelain stoneware and decorative trim KPU-123, 100 mm wide
-
Checking the height difference of slatted panels and porcelain stoneware planes with a long straightedge before installing KPU-123
-
Paper template KPU-123 100 mm on a vertical transition between a slat wall and porcelain stoneware
-
Diagram of the joint in one plane and with a step before installing decorative trim
-
Two KPU-123 strips of 2000 mm each on a long vertical joint of finishing materials
-
Comparison of wide KPU-123 and narrow molding at the boundary of slat panels with tiles
Sources
New renovation and already finished wall: the order of actions differs
The same KPU-123 can be a reasonable choice at the design stage and a poor repair attempt after finishing is complete. The difference is not in the product itself, but in the freedom that remains for the craftsman.
If porcelain stoneware and slat panels are not yet installed, you can first assemble the thicknesses of the entire system on the drawing: the base, adhesive under the tile, the porcelain stoneware itself, the substrate or frame of the slat area, the face height of the slats, and the future decorative profile. Already at this stage, it is visible whether the two finishes will be close in the face plane. If not, the transition can be designed in advance: form a mounting strip, change the substrate thickness, select a different profile, or deliberately leave a step as part of the architecture.
In such a situation, KPU-123 is chosen not as a "rescue element," but as a pre-planned detail. Under it, you can leave a solid base of the required width, align the vertical axis, check the cutting layout, and route electrical points out of the decorative strip area. This is the most predictable scenario.
If both finishes are already complete, there is significantly less freedom. You cannot change the tile adhesive layer or the position of the slat substrate without consequences. Then, first, the existing geometry is fixed, and only after that is it decided whether KPU-123 can work as an overlay decor. If not, it is better to refuse the specific product than to try to rebuild the finished assembly around an already purchased strip.
There is an intermediate case: the porcelain stoneware is ready, and the slat panels are only being selected. Here, it is especially advantageous to agree in advance on the thickness of the future panel system with the tile field. If the slat area is being equipped now, you can buy slat panels for walls for interior finishing already with an understanding of how the edge will be finished. Then KPU-123 becomes part of the overall solution, not an independent purchase.
For the client, this difference has direct monetary meaning. At the project stage, adjusting the geometry may allow the use of one or two strips without additional decorative compromises. On a finished wall, the error is discovered after the expensive product has already been delivered and cut. Therefore, the rule "first the assembly, then the decor" is especially important for KPU-123, costing 11,770 ₽ per two-meter strip.
A short decision tree before adding KPU-123 to the cart
The entire material can be reduced to six questions.
1. Is a wide decorative strip of 100 mm needed?
If not, compare narrower moldings and trim. If yes, proceed further.
2. Are the face surfaces in compatible geometry?
If the rule shows a pronounced step, first design a base or another transition profile. If the planes are close, continue.
3. Is there a continuous suitable surface for installation?
If KPU-123 must lie over deep gaps between slats or rest only on the edge of the tile, the joint is not ready yet. If the support is clear, continue.
4. Is the technical function of the joint solved separately?
In a wet area, near a sensitive end, or when an expansion joint is needed, solve this task first. Decorative trim does not replace it.
5. Are the length and cutting plan clear?
Calculate two-meter planks, choose connection points, and assess leftovers. If one extra plank is needed for a short piece, compare alternatives by cost and appearance.
6. Does the full-size template look convincing?
If 100 mm overloads the wall, do not buy KPU-123 just because it technically fits. If the scale, color, and axis work — then the order is justified.
Such a decision tree leaves KPU-123 exactly in the role for which it is best suited: visible decorative molding on a prepared transition between two materials.