Article Contents:
- Wooden ceiling plinth PLT-001 120×15 mm: what exactly the customer is ordering
- Beech plinth PLT-001 120×15×2000 mm
- Wooden beech plinth PLT-001, 2400 mm long
- Oak ceiling plinth PLT-001 2000 and 2400 mm
- PLT-001 for enamel and for tinting: why the finish is determined before ordering
- PLT-001 — rigid wooden molding
- What happens if you press a straight profile against a wave in the wall
- What happens if you maintain a straight architectural line of PLT-001
- Why you can't promise that sealant will fix any geometry
- Wall flatness with a long straightedge
- Ceiling flatness
- Maximum local dips
- Maximum protrusions
- Room corners
- Side light from the window and track lighting
- Visible front walls and less noticeable areas
- Scenario 1. The joint is almost even
- Scenario 2. There are one or two local bumps
- Scenario 3. The wave runs along most of the wall
- Why a 120 mm paper strip does not replace the profile cross-section
- How to use the PLT-001 drawing
- How to make a rigid profile template
- How to check the joint under side light
- Which areas of the room to test first
- Why covering paint does not fix the substrate
- How a single color of the ceiling and PLT-001 affects the perception of the gap
- When the finishing seam becomes visible under side lighting
- Oak PLT-001 for tinting
- Texture and architectural line
- Why a noticeable gap next to natural wood becomes a separate interior detail
- When to fix the substrate first and then order oak
- Price of batch PLT-001
- Cost of local base repair
- Cost of repainting the strip
- Risk of ruining an already painted wall
- Cost of rework after installing expensive wooden profile
- Main feature wall
- Wall opposite the window
- Area with directed light
- Zone above tall furniture
- Short sections between corners
- Mounting base
- Cosmetic surface
- Hidden color defect
- Protrusion
- Loose area
- Active crack
- Finishing cosmetic seam
- Local depression
- Longitudinal wall wave
- Why sealant should not replace geometry leveling
- Example of a map after base correction
- Light along the wall
- Light across the profile
- Shadow from PLT-001 relief
- Why a small geometric error almost disappears frontally and sharply appears from the side
- Mistake 1. Measure only the width of the largest gap
- Mistake 2. Check only the wall, not the ceiling
- Mistake 3. Buy the entire oak before a test fitting
- Mistake 4. Pull the profile to every bump
- Mistake 5. Consider sealant a universal compensator
- Mistake 6. Not accounting for side light
- Mistake 7. Order 2000 mm for a segment almost 2000 mm without allowance for processing
- Mistake 8. Use discounted warehouse stock as a reason to change the project
- Mistake 9. Fix the entire wall because of one local protrusion
- Error 10. Do not re-check the base after repair
- The cause of unevenness is unknown
- There is loose plaster
- There are active cracks
- Wet processes are still ongoing
- The ceiling line will still be adjusted
- The corner is not finished
- The finish is not approved
- It's impossible to do a fitting check
- 1. The base is stable
- 2. Local protrusions are eliminated
- 3. The line is checked with a long straightedge
- 4. The working position of PLT-001 is checked with a template or sample
- 5. Material is selected
- 6. Finish is selected
- 7. Individual segments are measured
- 8. A map of 2000/2400 mm is built
- 9. The current product card is checked
- 10. Quantity determined
- First inspection
- What happens if you buy immediately
- Correct Sequence
- Preliminary map for 2400/2000
- What the example shows
- Beech for enamel
- Oak for tinting
- Oak under enamel
- Local correction up to the baseboard
- Rework after baseboard
- Step 1. Check the product card
- Step 2. Turn on the real room light
- Step 3. Check the wall and ceiling with a straightedge
- Step 4. Separate defects
- Step 5. Make a cross-section template
- Step 6. Try it on the worst wall
- Step 7. Fix only necessary areas
- Step 8. Repeat the check
- Step 9. Approve beech or oak and finish system
- Step 10. Remove finish segments
- Step 11. Build map 2000/2400
- Step 12. Calculate risk reserve
- Step 13. Check price and availability again
- Step 14. Place order
- Why the decision is made based on the working position of the profile, not on the wall separately
- Why you cannot make a decision based only on a photo of the gap
- First, the same line is checked with the same rule
- Then the PLT-001 template is returned
- Then constant lighting is turned on
- Only after acceptance are the boundary parts measured
- Control checklist after repair
- When a template is sufficient
- When a real plank is useful
- How not to ruin a trial plank
- When a trial purchase is not needed
- Can a wooden PLT-001 be installed on an uneven wall?
- Do I need to perfectly level the wall before installing a ceiling plinth?
- Can PLT-001 hide an uneven joint between the wall and ceiling?
- Can a gap be compensated with acrylic sealant?
- How to check the wall before buying PLT-001?
- What size does the wooden ceiling plinth PLT-001 have?
- What lengths of PLT-001 can be purchased?
- What to choose — beech or oak?
- Can PLT-001 be ordered for enamel?
- Is oak PLT-001 suitable for tinting?
- When should the wall be fixed first, and then the plinth purchased?
- How do I calculate the quantity of PLT-001 after leveling?
- Where to buy a wooden ceiling plinth?
- How to check the current price of PLT-001?
- Can I order one PLT-001 strip for testing?
- Why does side lighting show gaps more strongly?
- Do I need to buy the baseboard first to understand the geometry?
- What is more dangerous — a dip or a bump?
- Can PLT-001 be attached to a wavy wall with fasteners?
- Do I need to fix an unpainted strip if PLT-001 will completely cover it?
- What to do if the wall size changed after leveling?
- Can I mix planks of 2000 and 2400 mm in one order?
- Should I only take 2400 mm to have fewer joints?
- What is more important before ordering: the total perimeter length or the wall geometry?
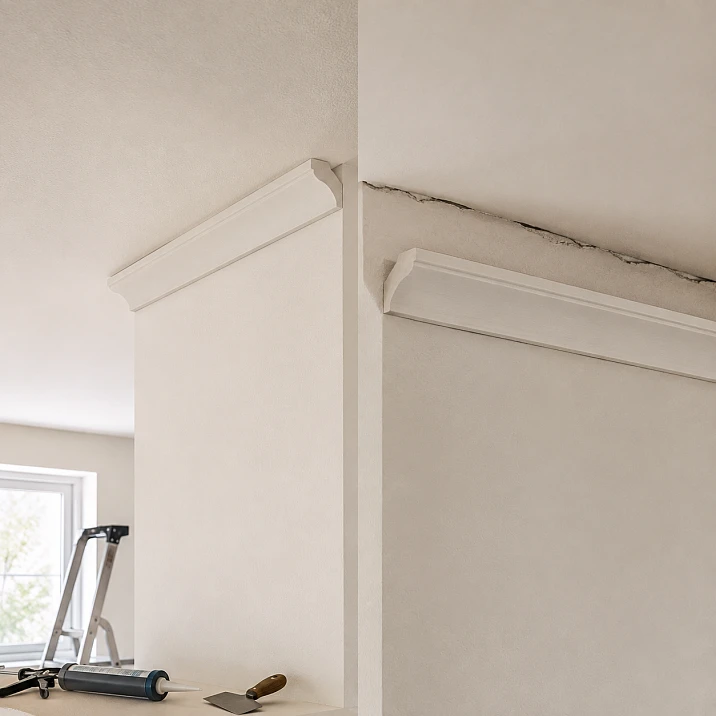
The room is almost ready. The ceiling is painted, the walls have a finish coating, door trims are installed or ordered, and furniture is chosen. A specific profile has already been found for the upper contour — a wooden ceiling plinth PLT-001 120×15 mm. Before payment, the craftsman applies a long straightedge to the wall-ceiling junction line and discovers what was barely visible from a distance: the section runs in a wave, in places the base deviates from a straight line, somewhere there is a local bump, somewhere a small depression.
At this point, the question ceases to be decorative. The buyer is already ready to purchase a wooden ceiling plinth, but must decide whether to place a full order now or first bring back the finishers and fix the base. For a rigid wooden profile, this is fundamental. It does not work like a soft tape that can seamlessly follow any surface deviation. If you try to press straight molding against a wavy wall, you can get a wandering line on the profile itself. If you keep it straight, gaps may appear in certain areas between the product and the base. And if you expect that sealant will hide everything later, there is a risk of turning a neat architectural joint into a wide repair strip.
Therefore, the correct answer is this: PLT-001 makes sense to purchase in full volume only after the actual geometry of the junction has been checked and it is clear how the profile will sit on the most problematic areas. If the unevenness is local and can be fixed without redoing the entire room, it is wiser to address that area first. If the wave runs along most of the wall, first determine the method for correcting the base, and only then finalize the quantity, lengths of 2000/2400 mm, and the final cutting plan.
It is impossible to give a universal tolerance like "up to 5 mm can be left unfixed" or "8 mm must be puttied." The PLT-001 card does not establish such a tolerance, and the visual result depends not only on the magnitude of the deviation. The same unevenness can almost disappear in the shadow above a cabinet and sharply appear on a prominent wall under side light from a window or track lighting. Therefore, what is checked is not an abstract number, but a specific joint: the plane of the wall, the plane of the ceiling, the position of the profile, the visibility of the gap, and the direction of light.
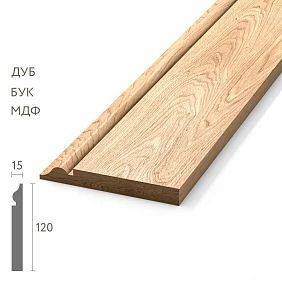
The PLT-001 itself is already defined quite precisely. It is a wooden ceiling plinth with a cross-section of 120×15 mm, offered in beech and oak, in lengths of 2000 and 2400 mm, with a "Prestige" finish, prepared for enamel and for tinting. For missing items, the manufacturer indicates an average production time of 5–10 days for custom orders. This allows building not a general material "about ceiling plinths," but a practical purchasing scheme for a specific article.
If after a control check the line is suitable for installation, you can buy the wooden ceiling plinth PLT-001 in the calculated lengths. If the check shows a systematic wave of the base, it is better not to use the purchase of the full perimeter as a way to force the installer to "somehow fit" the finished trim.
Wooden ceiling plinth PLT-001 120×15 mm: what exactly the buyer orders
Before discussing uneven walls, it is necessary to establish the product's characteristics, because the decision depends on the actual geometry and material of PLT-001, not on a conditional "any ceiling plinth."
According to the current product card, the item has a cross-section of 120×15 mm. Beech and oak are available, in lengths of 2000 and 2400 mm. The finish quality is "Prestige." Depending on the variant, the blank may be prepared for enamel or for tinting. For items not in stock, an average production time of 5–10 days is indicated. Delivery is possible across Russia.
At the time of the check, the card showed four main combinations by material and length:
| Material | Section | Length | What is important for the current scenario |
|---|---|---|---|
| Beech | 120×15 mm | 2000 мм | Can be used on short sections; often logical under a covering finish |
| Beech | 120×15 mm | 2400 мм | Reduces the number of direct joints on long walls |
| Oak | 120×15 mm | 2000 мм | Suitable for short pieces when visible wood grain is needed |
| Oak | 120×15 mm | 2400 мм | Preferred for long visible sections if they fit into a single plank |
Warehouse prices may include a discount that applies specifically to current stock. Therefore, today's price cannot be treated as a permanent reference in the article. Before payment, check the current product card and the actual quantity of the specific variant.




Beech skirting board PLT-001 120×15×2000 mm
A two-meter beech plank is useful where the finished section is significantly shorter than 2000 mm and using a 2400 mm blank would create a pointless long offcut. However, choosing it solely because of its shorter length is also incorrect.
Let's imagine a section of 1930 mm. Theoretically, it fits within 2000 mm, leaving 70 mm. However, before the final cut, you need to account for the actual angle, refreshing the end, and possible adjustments after a trial fit. You cannot assume these 70 mm are a guaranteed working allowance in advance. If the point is critical, first determine the actual piece and the cutting method, then choose the format.
Beech is especially appropriate if PLT-001 will be painted with an opaque enamel. But enamel changes the surface color, not the geometry of the base. A wavy wall under a white profile does not automatically disappear. On the contrary, if the ceiling and skirting board are painted the same color, a noticeable dark gap between them may appear even more pronounced.
Our factory also produces:




Beech wood skirting board PLT-001, 2400 mm long
The 2400 mm format is primarily needed for long sections. If the wall has a finished length of 2250–2350 mm and, after checking the angles, the piece confidently fits within 2400 mm, a single long plank helps avoid a direct joint.
But it is precisely on the long wall that the wave of the base is especially noticeable. A solid piece works as a long architectural line. If you try to repeat the wall with this piece, the deflection will become noticeable along the edge of the profile. If the piece is kept straight, the unevenness will show in the gap.
Therefore, a long 2400-millimeter plank not only reduces the number of joints. It simultaneously becomes a good indicator of the quality of the prepared base.
Get Consultation
Oak ceiling plinth PLT-001 2000 and 2400 mm
Oak has the same cross-section geometry and the same two standard lengths, but the visual task is often different. Oak is chosen when the wood texture should remain part of the interior: for example, to support doors, furniture, wall panels, or other wooden elements.
In such a situation, a wide strip of sealant next to the natural texture usually looks especially alien. The profile itself attracts attention, so the junction should be perceived as a well-thought-out line.
For oak, the question of "base first or purchase first" becomes even stricter. If the finish involves tinting and visible wood, rework after the final finishing of the profile is organizationally more complicated: the product has to be dismantled, re-fitted, or the coating locally restored.
PLT-001 for enamel and for tinting: why the finish is determined before ordering
On the page about materials and quality, STAVROS separates blanks "for enamel" and "for tinting." For opaque finishes, a more pronounced difference in lamellas by color and texture is allowed, since the surface should be covered with a dense coating. For semi-transparent finishes, the selection is stricter, although natural wood may still have tonal differences.
This means that the phrase "we take oak, then decide whether to paint or tint it" is weak. The finish affects the blank category, the visual perception of joints, and the requirements for the junction.
Before ordering, it is useful to fix the chain:
Then the purchase becomes a technical specification, not a set of long planks that the installer must adapt to an already finished renovation.
Then the purchase becomes a technical specification, not a set of long planks that the installer must adapt to an already finished renovation.
Wooden ceiling plinth and wavy base: why the profile does not replace leveling
The central mistake of this scenario is perceiving PLT-001 as a means of correcting the line of the wall and ceiling.
The ceiling plinth does indeed cover the corner joint itself and creates a decorative border. But it does not turn an unstable, wavy, or convex surface into a flat construction plane.
PLT-001 — rigid wooden molding
A long wooden plank tends to maintain its own shape. To a small extent, the product and the installation system can adapt to the actual surface, but the profile cannot be considered a flexible compensator.
This is especially visible on a wall four to five meters long. If the base deviates in a smooth wave, trying to replicate it with the plinth changes the entire visual line. Entering the room, a person may not notice the wall itself, but will see that the edge of the cornice “floats” relative to the ceiling.
If the installer holds PLT-001 straight, gaps appear between the product and the recesses of the base. A small finishing seam and a systemic geometric problem are not the same thing.
What happens if you press a straight profile against a wall wave
Let's imagine a smooth convexity in the center of the wall. If you press a long plank against it, its ends may tend to pull away from the surface, or the line itself will be forced to follow the curve.
On a short section, this is sometimes almost imperceptible. On a long formal wall, the result reads more strongly, especially if a shadow runs along the profile.
Another case is several local bumps. Then the skirting board touches the base at individual points, and gaps form between them. Trying to forcefully pull the plank with fasteners does not solve the root cause. Instead of a level joint, you can get a stressed part and a visually uneven line.
Therefore, a protrusion in the base is usually more dangerous than a small depression: a depression can be assessed as a local seam and decided whether cosmetic finishing is acceptable; a protrusion physically pushes the profile out of the design plane.
What will happen if you maintain the straight architectural line PLT-001
The second approach is not to force the profile to follow the wall, but to maintain a straight line.
This is often more correct from an architectural standpoint. Then it immediately becomes visible where the base deviates from it.
If the gap is small and local, after a control fitting you can determine the method of final finishing. If the gap is long, noticeable, and varies in width, this is already a signal: the problem is in the base, not in the baseboard.
Such a test is especially useful before purchasing the entire batch. One rigid template or a test plank shows the real behavior of the joint better than a photo of the wall.
Why you can't promise that sealant will fix any geometry
Acrylic or another compatible finishing material can participate in forming a thin final seam. But it should not be used as a universal construction putty to mask the long logic of an uneven wall.
The wider and longer the filled seam, the more problems:
-
it becomes an independent visible strip;
-
it may differ in texture from the painted wall and wood;
-
it reacts more strongly to side light;
-
it requires careful painting;
-
it does not eliminate protrusions;
-
does not fix the wandering line of the profile itself.
Therefore, the question is phrased not as "can the gap be filled," but as "after a test fitting, does a normal finish seam remain, or does the base still require correction?"
What to measure before buying the wooden ceiling plinth PLT-001
A finished painted room has an unpleasant feature: the defect can no longer be assessed on the rough surface. You need to work in a way that does not destroy anything extra.
The first stage is diagnostic. No extensive openings or re-plastering of the room are required until the picture is understood.
Wall plane with a long straightedge
The straightedge is applied in the area where the PLT-001 will actually be located.
Several positions are checked on each wall:
-
closer to one corner;
-
in the center;
-
closer to the second corner;
-
on a visually suspicious area;
-
near the door portal;
-
above tall furniture, if the line passes nearby.
Need to see the nature of the deviation.
Local bump — a separate point that pushes the rule out.
Local dip — a small area where a gap appears between the rule and the wall.
Smooth wave — the deviation changes over a significant length.
These three situations cannot be resolved in the same way.
Ceiling plane
The problem may not only be in the wall.
If the ceiling has its own wave, the profile falls between two non-coinciding planes. Then you need to decide which line is visually the main one.
With a painted ceiling, a long beam of light along the plane or laser marking is especially useful. It shows whether an illusion arises that a wall defect is actually related to the ceiling.
Maximum local dips
It is necessary not just to find the largest gap, but to record its position.
Example of a statement:
| Section | Wall | Ceiling | Nature of the defect | Visibility | Decision before ordering |
|---|---|---|---|---|---|
| A | local deviation | evenly | depression | High | control with a template |
| B | Smooth wave | evenly | long gap | High | adjust the base |
| C | evenly | slight deviation | Ceiling | Medium | check the working position |
| D | evenly | evenly | no defect | High | the part can be considered |
It is not necessary to immediately turn the table into a millimeter passport if the measurements are still rough. The main thing is to separate a local defect from a systemic one.
maximum protrusions
The protrusion should be found first, because it is what sets the position of the long rigid part.
If the profile rests against a bump, the entire adjacent part may move away from the wall.
Therefore, local correction of one protrusion can improve the fit for meters around it.
This is one of the scenarios where there is no need to "redo the entire room." Sometimes it is enough to bring the craftsman back to a specific point, carefully eliminate the cause, and restore the finish.
Room corners
If the corner itself is not finished, the baseboard may fit well on a straight section and conflict in the last 100–200 mm near the wall junction.
Therefore, checking only the middle of the wall is insufficient.
Before ordering, the following are recorded:
-
actual internal corners;
-
external corners, if any;
-
portals;
-
short returns;
-
areas where one wall ends before another.
Side light from the window and track lighting
Light is part of diagnostics.
Frontal diffused light smooths out irregularities. A beam along the wall emphasizes them.
Therefore, the problem line is examined in at least two modes: under natural daylight and under the artificial lighting that will actually be used in the evening.
If a track light is directed almost parallel to the wall, even a small changing gap can produce an expressive shadow.
Visible front walls and less noticeable areas
Geometry requirements do not have to be the same around the entire perimeter.
The wall opposite the entrance, the area near the window, and a long free plane usually require maximum precision.
The zone above a tall cabinet or in a deep niche can be significantly less sensitive.
This does not mean that hidden areas can be done poorly. It just helps to understand the visual priority when deciding on local correction.
Buy PLT-001 now or first return the painters: three real scenarios
The buyer needs not a diagnosis of "the wall is crooked," but a solution.
After checking, the rule usually leads to one of three scenarios.
Scenario 1. The joint is almost flush
The rule does not show a systematic wave. There are small local deviations that do not change the working position of the profile. The rigid template PLT-001 sits stably, and under side light the line looks calm.
In this case, there is no point in opening up the finished wall out of fear of any micro-irregularity.
Correct sequence:
-
check several characteristic areas;
-
approve the working position of the profile;
-
take final lengths;
-
create a 2000/2400 mm map;
-
choose beech or oak and type of finish;
-
place the order.
Here Buy wooden ceiling baseboard can be done after a technical check, not based on a single interior photo.
Scenario 2. There are one or two local bumps
This is a good case for local repair.
Let the straightedge stand calmly overall on a wall 4.6 m long, but on a section of about 300–400 mm a pronounced protrusion pushes it away. If this particular bump causes the entire profile to move away from the wall, it is more reasonable to fix the point first.
Sequence:
-
mark the boundaries of the problem area;
-
determine the cause;
-
fix only the necessary area;
-
restore primer and paint;
-
reapply the rule;
-
check the PLT-001 template;
-
only then fix the length of the part.
Buying a full oak set before such an operation makes little sense. The wall size may change only slightly, but the working geometry of the joint will change fundamentally.
Scenario 3. The wave runs along most of the wall
This is a case where the profile should not be used to fix the problem.
For example, over three meters, the wall gradually deviates from a straight line and returns back. If PLT-001 is kept straight, the gap will widen and narrow. If the wall is replicated, the baseboard line will become wavy.
Before ordering the entire perimeter, it is necessary to determine which correction method is acceptable for the finished renovation.
Sometimes it is enough to level the top strip of the wall that will be directly under the profile. Sometimes the issue is related to the ceiling. Sometimes the renovation is too destructive, and the designer deliberately chooses a different way to finish the junction.
But buying expensive linear molding in advance and presenting the installer with a fait accompli is the worst approach.
How to check the wooden baseboard PLT-001 before ordering the entire perimeter
The rule shows the base, but it does not show the actual cross-section of the product.
Therefore, the second level of checking is a physical model of PLT-001 itself.
Why a 120 mm paper strip does not replace the profile cross-section
A height of 120 mm indicates the overall size, but the actual profile has a shape.
A simple strip of cardboard 120 mm high helps assess the scale, but does not show:
-
the actual points of contact with the wall;
-
the overhang relative to the ceiling;
-
relief;
-
shadow;
-
the behavior of the joint;
-
the real visual edge.
To decide on an uneven base, a rigid template as close to the cross-section as possible is needed.
How to use drawing PLT-001
If a product drawing is available, a cross-sectional template can be made from it.
It helps determine the working position of the profile in the corner.
Then this template is applied at several points in the room.
If on one wall it consistently holds one position, but on another you have to noticeably rotate it or different gaps appear, this is a useful signal before purchase.
How to make a rigid profile template
For an initial check, it is not necessary to buy the entire order.
You can make a mock-up from rigid sheet material according to the dimensions and working shape, or use a real short sample if available.
A length of not just a few centimeters, but sufficient to assess contact on a specific area, is especially useful. A cross-section template shows the fit, while a longer straight sample shows the wave.
How to check the junction under side light
The template is placed in the intended position and illuminated along the line.
You can use existing track lighting, a portable light source, or daylight from a window.
They look not only at the width of the gap, but also at its change.
A uniform thin seam is usually visually calmer than a gap that gradually widens and then abruptly disappears.
Which areas of the room to test first
The worst area is checked first.
This could be:
-
long wall opposite the window;
-
place with the largest gap under the straightedge;
-
local bump zone;
-
internal corner;
-
area under directed light.
If PLT-001 works there, other places are often simpler.
If the solution looks bad on the worst section, there is no point in starting with optimistic areas and ordering the entire perimeter based on them.
Wooden ceiling plinth made of beech: what to check before buying for enamel painting
Beech is often chosen for opaque painting. This solution has clear interior logic: the profile becomes a continuation of the white or colored ceiling contour, and the natural texture should not dominate.
But an opaque finish does not eliminate the requirements for geometry.
Why opaque painting does not fix the base
Enamel hides the color and part of the natural wood texture. It does not change the shape of the wall.
If a long, changing gap remains between PLT-001 and the base, it does not disappear after painting.
Moreover, a light, uniform surface often makes the dark line of the gap more contrasting.
Therefore, the phrase "it will be white anyway, we'll cover it up" should only appear after a physical fitting, not instead of it.
How a single color of the ceiling and PLT-001 affects the perception of the gap
When the ceiling and profile are painted in one color, the viewer perceives them as a single architectural system.
With a neat junction, this is a strong effect.
In a bad case, the defect also becomes part of the system. The gap reads as a break in the overall white line.
If the wall color differs, the gap can create a dark shadow between two clean planes.
When the finish seam becomes visible under side light
Side lighting pulls a shadow along the wall.
Even a normally executed small seam can show more strongly than under frontal lighting. This does not mean that any such manifestation requires rework. The result should be assessed as a whole.
But if the seam alternately widens and narrows, the light emphasizes precisely the change in geometry.
Therefore, when choosing beech for enamel, control is carried out before the final painting of the profile.
If you need to look at the manufacturer's recommendations for preparation, useful tips for finishing and installing wooden plinth.
Oak ceiling baseboard PLT-001: why natural finish cannot be turned into a way to hide unevenness
Oak is often chosen specifically for its texture. In this case, the profile does not dissolve into the ceiling but becomes an independent line.
The erroneous logic sounds like this: "Natural wood is active, and against its background a slight unevenness will not be noticeable."
In practice, everything can be the opposite.
Oak PLT-001 for tinting
For a translucent finish, an appropriate workpiece is needed.
The manufacturer directly states that the "for tinting" category involves matching lamellas by color and texture, but natural tonal differences are still possible.
After tinting, the relief and wood structure become part of the composition.
Texture and architectural line
The more expressive the material, the more attentively the eye follows it.
If an oak strip runs under the ceiling for five meters, a person perceives it as a single horizontal element.
A wave along the bottom edge or a noticeable sealant line disrupts exactly that integrity.
Why a noticeable gap next to natural wood becomes a separate interior detail
The gap next to a white wall and oak has contrast across several characteristics at once:
-
color;
-
depth;
-
shadow;
-
texture.
If filled with a material of a different character, a third surface may appear between the wall and the wood.
Therefore, with oak PLT-001, it is especially useful to resolve the geometry of the base before the final finishing of the profile.
When to fix the base first and then order the oak
It is better to postpone the purchase if:
-
the wave runs along the main feature wall;
-
there is a protrusion that physically pushes the profile out;
-
it is unclear which line should be considered the design line;
-
a wide joint filling will be required;
-
the base is loose or cracking;
-
Additional ceiling leveling is planned;
-
the oak finish category has not been chosen yet.
Detailed differences between blanks can be checked in the section materials and quality of wooden moldings.
Buy a wooden ceiling plinth or plaster first: we calculate not only the cost of the profile
A commercial solution cannot be reduced to the question of "how much does one plank cost".
You need to compare the cost of two scenarios:
Scenario A: fix the base before installation;
Scenario B: buy and install the profile, then try to fix the resulting joint.
Price of batch PLT-001
At the time of checking, the card showed the following warehouse prices and statuses:
| Execution | Size | Price at the time of check | Status |
|---|---|---|---|
| Beech | 120×15×2000 mm | 2,984 ₽ with warehouse discount | St. Petersburg — 4 pcs. |
| Oak | 120×15×2000 mm | 4,424 ₽ with warehouse discount | on order; base price is higher |
| Beech | 120×15×2400 mm | 3,560 ₽ with warehouse discount | SPb — 30 pcs. |
| Oak | 120×15×2400 mm | 5,192 ₽ at warehouse discount | SPb — 105 pcs. |
The discount applies to warehouse stock, so these values cannot be considered permanent.
Suppose a room conditionally requires 8 long oak planks. At today's discounted price, this is already a significant product cost. If after installation it turns out that two pieces need to be removed, trimmed, and refinished, the "savings" on local wall preparation may prove false.
Cost of local base correction
An article cannot assign the cost of a painter's work without a specific object.
But you can correctly compare the scope of work.
Local correction before installation typically includes:
-
protection of finished finish;
-
elimination of a specific protrusion or depression;
-
restoration of the primer;
-
local painting;
-
control with a straightedge.
After installation, the following are added:
-
dismantling or partial release of the profile;
-
risk of damaging the wood;
-
risk of damaging the painted wall;
-
re-fitting;
-
restoration of PLT-001 finish;
-
re-sealing.
Therefore, you should compare not "putty costs money" and "the plinth is already bought," but the entire cycle.
Cost of repainting the stripe
If the renovation is already complete, local correction of the wall may require repainting the top strip.
Sometimes it looks scarier than it actually is. If the color and material are preserved, neat local work can be much simpler than redoing after installing expensive molding.
But the decision should be made by the craftsman on site: some coatings tolerate invisible local repair worse than others.
Risk of ruining an already painted wall
This risk is real and works in favor of careful diagnostics.
There is no need to automatically start sanding the entire junction just because the rule showed a gap.
First, determine:
-
what exactly is blocking the profile;
-
where the working line runs;
-
how visible the defect is;
-
whether only one section can be fixed.
The more accurate the diagnosis, the smaller the intervention area.
The cost of rework after installing an expensive wooden profile
The most expensive scenario is when the problem is discovered only after final finishing and installation.
It is especially unpleasant if the profile is oak, tinted, and the joints are already aligned.
Then the rework affects several finished systems at once.
Therefore, before buying a wooden ceiling plinth for the entire perimeter, one hour of proper base inspection is often more useful than arguing over a few percent discount.
Price of wooden plinth PLT-001: when wall condition affects the actual budget
The price of the product is only one budget line.
The condition of the base determines which additional operations become mandatory.
| Expense item | Even base | Local correction | Strong wave |
|---|---|---|---|
| PLT-001 | purchased by card | purchased after verification | full order after base resolution |
| Wall preparation | Minimal | Local | can be significant |
| Repeated painting | usually not needed | locally possible | depends on the volume of correction |
| finishing seam | normal technological | After renovation | should not replace alignment |
| risk of rework | Low | Medium | high without prior preparation |
| cutting 2000/2400 | can be fixed | after local correction | Too early to fix |
This table shows why cheaper doesn't always mean "don't fix anything."
If the base is already good, no additional work is needed.
If one bump ruins the entire line, its local correction may be the most cost-effective operation of the project.
If the wave is systemic, an architectural decision must be made first. Perhaps the wooden PLT-001 is still suitable, but the method of wall preparation will become part of the budget.
Buy wooden ceiling moldings: why you need to determine work areas first
When a person plans to buy wooden ceiling moldings, it's useful to divide the room not only by lengths but also by visual priority.
Each area has different requirements for the base.
Main front wall
This is the wall visible immediately upon entry.
On it, the following are usually undesirable:
-
wandering bottom line;
-
wide joints;
-
frequent joints;
-
obvious repetition of the wall's wave.
If it is uneven, correction makes the most sense.
Wall opposite the window
It receives strong natural light.
Depending on the room's orientation, light may travel along the surface and reveal the slightest shadow variations.
It should be checked at the actual time of day, not only in the evening under general lighting.
Area with directional light
A track light, sconce, or hidden backlight can radically change the perception of a joint.
If light runs along the profile, a small gap becomes a long shadow.
If directed across, the same area may be almost invisible.
Therefore, the lighting scenario should be included before deciding whether to keep or fix it.
Zone above tall furniture
If a small strip of wall remains between the top of the cabinet and PLT-001, the two horizontal lines begin to be compared.
Even a slight deviation of the plinth can be noticeable against a perfectly straight furniture body.
If the cabinet completely covers the viewing area, the priority is different.
Short sections between corners
On a short wall, a long smooth wave does not have time to develop visually as much as on five meters.
But here, errors in corners and profile seating are more noticeable.
Therefore, for short pieces it is more important to check the two ends, and for long ones — the entire line.
Do I need to fix the base behind the entire wooden plinth PLT-001
Not every surface that will be hidden by the profile needs to look like a finished painted wall.
But the hidden area must be technically suitable for installation.
Mounting base
It must be stable.
If the plaster is loose and crumbling, the decorative profile should not be used as a cover for the problem.
First, the unstable layer is removed.
Cosmetic surface
If old paint remains behind PLT-001, a slight color difference or trace of previous finish that is fully covered and does not interfere with installation, it is not necessary to bring the hidden strip to a decorative ideal.
This is a different type of defect.
Hidden color defect
Color does not affect geometry.
If the spot is fully covered by the profile, it is assessed by adhesion and base stability, not by appearance.
Protrusion
The protrusion directly affects the position of PLT-001.
It needs to be checked and corrected if necessary.
Loose area
Loose base is a reason to stop installation.
You cannot rely on the baseboard to hold a crumbling surface.
Active crack
If the crack continues to move, you first need to understand its cause.
Covering it with a wooden profile and hoping it has disappeared is wrong.
Can the gap between the wooden PLT-001 and the wall be compensated with acrylic?
Short answer: finishing the seam and leveling the wall are different operations.
Final cosmetic seam
After proper installation, a small seam can be used for a neat finish of the joint.
It should be perceived as technical refinement, not as an independent strip.
Local depression
If the depression is truly small and does not change the profile position, after fitting the craftsman may decide that it is acceptable to finish it with the final material.
But the decision is made on site.
The article does not establish a universal width.
Longitudinal wall wave
If the gap runs for meters and varies in width, filling it as a regular joint usually means masking the problem rather than solving it.
Under side lighting, such a line can become very noticeable.
Why sealant should not replace geometry alignment
Sealant has a different function.
It can close a technological micro-gap between two surfaces.
He should not set a new architectural plane where the wall systematically deviates from the straight line.
Therefore, there is only one key question:
after a dry fit, PLT-001 looks like a straight line with normal
Example of a map after base correction
Suppose after the final measurement, the following segments are obtained:
| Segment | Finished length | Visibility | Preferred blank |
|---|---|---|---|
| A | 2320 мм | High | 2400 мм |
| B | 1880 мм | High | 2000 мм |
| C | 1150 мм | Medium | combine with a short remainder |
| D | 2140 мм | High | 2400 мм |
| E | 820 мм | Low | merge with C |
C + E = 1970 mm.
If the angles and orientation allow both parts to be obtained from one two-meter strip, this map uses:
-
2 × 2400;
-
2 × 2000.
But this decision only appears after the final geometry.
Wooden baseboard and side light: why the sample should be viewed in the evening and during the day
One of the most underestimated factors is the direction of light.
A wall can look perfect under general diffused lighting and show all imperfections after turning on a single track.
Light along the wall
This is the strictest mode.
Every protrusion creates a shadow.
Each recess changes the width of the light band.
If PLT-001 runs along the wave, its relief begins to produce an uneven pattern.
Light across the profile
Cross light shows the relief of the plinth more strongly and pulls out longitudinal defects less.
Therefore, the same joint can be perceived completely differently.
Shadow from the relief of PLT-001
The profile itself forms the shadow.
This is normal and is part of the architectural effect.
The problem begins when a second shadow appears on top of the standard one—from the changing gap between the base and the product.
This is the easiest one to see during a test fitting.
Why a small geometric error almost disappears from the front and sharply appears from the side
With frontal light, shadows are short.
With side light, any difference pulls a shadow along the surface.
Therefore, it is not possible to assess a node based only on a photo taken with flash or bright general lighting.
If an apartment has several lighting modes, at least the main daytime and main evening modes are checked.
Mistakes before buying PLT-001 for already painted walls
Mistake 1. Measuring only the width of the largest gap
Why it occurs: the desire to get one number and compare it with a conditional tolerance.
Consequence: the nature of the defect is lost. A short local depression and a three-meter wave with the same maximum gap require different solutions.
How to prevent: record the length, nature, and visibility of the area, not just the maximum gap.
Mistake 2. Checking only the wall without checking the ceiling
Why it occurs: the gap is visually located near the wall.
Consequence: the wrong surface is corrected.
How to prevent: check both surfaces and the working position of the profile.
Error 3. Buy all the oak before a test fitting
Why it happens: the product is selected, and you want to lock in the price and availability.
Consequence: after delivery, it turns out the base requires repair, and the cutting has to be recalculated.
How to prevent: first the rule and template, then the final cart.
Error 4. Pull the profile to every bump
Why it happens: it seems that a tight fit is more important than a straight line.
Consequence: the architectural edge becomes wavy.
How to prevent: determine the design line in advance and adjust the base where it interferes with it.
Mistake 5. Treating sealant as a universal compensator
Why it occurs: a small finishing seam is indeed often used.
Consequence: the narrow finishing becomes a wide strip.
How to prevent: separate cosmetic finishing from geometric correction.
Mistake 6. Not accounting for side lighting
Why it occurs: during installation, only general construction lighting is used.
Consequence: after occupancy, the track or window shows the defect more strongly.
How to prevent: test in real lighting scenarios.
Error 7. Ordering 2000 mm for a segment of almost 2000 mm without allowance for processing
Why it occurs: the finished length is compared directly with the nominal length of the plank.
Consequence: after the first cut, the part becomes too short.
How to prevent: take into account the actual end pattern and trial fitting.
Error 8. Using a discounted warehouse stock as a reason to change the project
Why it occurs: a specific length is currently more advantageous.
Consequence: cutting and the number of joints adapt to the promotion, not to the interior.
How to prevent: first a parts map, then price comparison.
Error 9. Fixing the entire wall because of one local protrusion
Why it occurs: the term "uneven wall" sounds like a systemic problem.
Consequence: unnecessary rework of already completed renovation.
How to prevent: localize the defect with a rule.
Error 10. Not re-checking the base after renovation
Why it occurs: it is considered that the task is already closed.
Consequence: after painting, a new bump or transition remains.
How to prevent: repeat the rule and template before ordering.
When it is better not to buy PLT-001 yet
Honest commercial material should include situations where the purchase should be postponed.
The cause of the unevenness is unknown
If the wall clearly changes plane, but it is unclear why, diagnostics are needed first.
Especially if there are cracks or peeling nearby.
There is loose plaster
Decorative profile should not cover an unstable base.
There are active cracks
If the crack continues to develop, the cause is addressed first.
Wet processes are ongoing
Finished wooden trim should not be brought into a room where humidity is still actively changing and intensive finishing is ongoing.
The ceiling line will still be adjusted
If a stretch ceiling section, additional painting, leveling, or another element is planned, the working geometry is not final yet.
The corner is not finished
Parts of 2000/2400 mm cannot be confidently calculated if the actual junction point will still change.
The finish is not approved
Beech/oak and "under enamel/under tinting" must be determined before the final purchase.
It is impossible to do a fitting check
If the room is closed, there is no access, or the baseboard is selected only by render, it is better to first get a physical check.
When the wooden ceiling baseboard PLT-001 can already be ordered
A specific control point is needed.
An order can be considered technically prepared if the following conditions are met.
1. The base is stable
There are no loose areas or active defects.
2. Local protrusions are eliminated
The profile is no longer pushed out of its design position by individual points.
3. The line is checked with a long straightedge
It is clear where the remaining deviations are located.
4. Working position of PLT-001 checked with template or sample
It is known how the actual cross-section fits into the corner.
5. Material selected
Beech or oak.
6. Finish selected
For enamel or tinting in accordance with the project.
7. Individual segments measured
Not just the overall perimeter.
8. Map of 2000/2400 mm built
Each plank has a purpose.
9. The current product card has been verified
Price, availability, and delivery time were confirmed immediately before payment.
10. The quantity has been determined
Not "approximately 20 meters," but a specific number of planks of each format.
How to build a base inspection map before ordering
For a large room, it is useful to create a simple A–H map.
It connects finishers, the installer, and the buyer.
Example:
| Section | Wall length | Base | Light | Visibility | Status |
|---|---|---|---|---|---|
| A | 4650 мм | Smooth wave | side | High | fix |
| B | 3220 мм | evenly | scattered | High | done |
| C | 980 мм | local depression | Weak | Low | Template |
| D | 2380 мм | evenly | side | High | done |
| E | 1450 мм | local bump | frontal | Medium | Local correction |
After repairing section A, the status changes to "recheck".
Only after this, its finished length is transferred to the cutting map.
This way, two different tasks are not mixed:
the base map answers whether the profile can be installed;
the cutting map answers how many and which strips need to be purchased.
Example object: a long living room after final painting
Consider a conditional room of 5.1 × 3.8 m with a doorway and a built-in wardrobe.
The ceiling and walls are already painted.
PLT-001 is planned along three open walls and part of the fourth.
First inspection
Wall A, about 5.1 m long, visually appears straight.
The rule shows a smooth wave in the middle third.
Wall B 3.8 m — stable.
Wall C, 5.1 m, has one local bump near the corner.
Wall D is partially covered by a cabinet.
What happens if you buy right away
Based on the rough perimeter, the customer estimates about 15 m of baseboard and plans to buy several 2400 mm planks.
But after installing the first piece on wall A, it becomes clear that the shadow changes along the window.
The installer either repeats the wave or gets a wide seam area.
On wall C, a local bump prevents the corner piece from sitting flush.
That is, the problem arises not because of PLT-001 or its length. The order was simply made before the technical check.
Correct sequence
Wall A: the master determines the correction zone for the top strip.
Wall C: a local protrusion is eliminated.
After restoring the paint, the rule is applied again.
Then the finishing segments are removed:
-
A — 5080 mm;
-
B — 3760 mm;
-
C — 5040 mm;
-
D open section — 1680 mm.
Total open length:
5080 + 3760 + 5040 + 1680 = 15,560 mm.
But this is still not the number of planks.
Preliminary map for 2400/2000
A 5080 mm requires at least three pieces if a longer non-standard format cannot be used: for example, 2400 + 2400 + 280.
B 3760: 2400 + 1360.
C 5040: 2400 + 2400 + 240.
D 1680: conveniently obtained from 2000.
Now the short extensions can be attempted to be combined.
280 + 1360 + 240 = 1880 mm.
Theoretically, they fit into one 2000 mm plank.
This results in a rational preliminary scheme:
-
A — 2×2400 + extension 280;
-
B — 1×2400 + additional piece 1360;
-
C — 2×2400 + extension 240;
-
D — 1680 out of 2000;
-
three short additions — from another 2000.
Total: five strips of 2400 and two strips of 2000.
But the final layout must also account for real angles and end allowances. Therefore, these numbers are an example of logic, not a ready-made order for any room.
What the example shows
If the base had not been corrected, the lengths could have remained similar, but the position of the joints and the appearance would have been worse.
Base preparation is needed not for "saving millimeters," but so that the calculated layout turns into a straight architectural line.
How the condition of the base affects the choice of beech or oak
The wall defect itself does not determine the material.
But the material changes the consequences of the error.
Beech for enamel
Advantages of the scenario:
-
covering surface;
-
it is easier to locally restore a uniform color after fitting;
-
the profile can visually blend with the ceiling.
Risk:
-
a white uniform finish highlights the dark changing gap.
Oak for tinting
Advantages:
-
expressive natural line;
-
support for other wooden elements.
Risks:
-
a noticeable seam conflicts more strongly with the texture;
-
after dismantling, it is harder to perfectly restore the finish;
-
you need to check the blank category in advance.
Oak under enamel
This option is also possible depending on the project and available execution, but the point of buying oak should be evaluated separately.
If the texture is completely covered, it is important to understand why this particular material was chosen.
The article should not automatically declare a more expensive wood species as "better."
What to do if fixing the wall damages the finished paint
This is a common objection: "The wall is already painted, I'd better cover everything with a baseboard."
Sometimes it is reasonable, but not always.
You need to compare two intervention zones.
Local correction up to the baseboard
The craftsman can work only in the upper strip, a significant part of which will then be covered by the product.
If the paint change falls under PLT-001, the requirements for the invisible part differ from those for the exposed wall.
But the open bottom edge of the repair must be restored neatly.
Rework after the baseboard
If the profile is already installed, access to the base is worse.
The wood needs to be protected or dismantled.
The risk of damage increases.
Therefore, fear of local painting should not automatically block preparation.
Need to get a painter's assessment: how to restore the specific coating and where the repair boundary will be.
Can I order one PLT-001 plank for testing?
The manufacturer's card indicates the possibility of delivery from one piece, but the actual availability of the specific material, length, and category needs to be confirmed.
Buying one plank may be reasonable if:
-
the object is expensive;
-
the profile has not been physically tried on yet;
-
the basis raises doubts;
-
the material and finish need to be agreed upon;
-
the risk of a wrong large order is higher than the cost of a test item.
But the test strip should not automatically be turned into a consumable.
If after checking it meets the quality and cutting plan, it can be included in the main order or kept as a reserve.
For a complex oak interior, one trial item is sometimes more useful than dozens of photos.
How to order wooden ceiling plinth PLT-001: ready specification
After preparing the base, the manager does not need a story about the entire renovation history.
He needs an exact request.
Example structure:
PLT-001 / 120×15 mm / beech or oak / 2000 and 2400 mm / preparation for enamel or tinting / quantity / room / finishing method / delivery.
Extended version:
| Field | Value |
|---|---|
| Article number | PLT-001 |
| Purpose | Ceiling skirting board |
| Cross-section | 120×15 mm |
| Material | Beech / Oak |
| Preparation | For enamel / for tinting |
| Quality | Prestige |
| 2000 мм | ___ pcs. |
| 2400 мм | ___ pcs. |
| Room | ___ |
| Segment map | A–___ |
| Finish | ___ |
| Critical walls | ___ |
| Reserve | ___ |
| Delivery | ___ |
After that, you can order PLT-001 120×15 mm already based on a specific map.
Before sending the request, it is useful to check delivery conditions for wooden baseboards, especially if ordering long 2400-mm products to another region.
Where to buy wooden ceiling plinth after checking the joint
If PLT-001 has already been physically checked and the profile fits, the logical path is the specific product card.
If after the mockup it turned out that the 120×15 mm section does not fit in scale or conflicts with the node, it is better to return to the category and Buy wooden ceiling baseboard of a different profile.
If you need to compare not only ceiling plinths, but also moldings, cornices and other items, you can open wood trim items.
A good commercial article should not hold the buyer on PLT-001 at any cost. If the physical mockup shows that the profile does not fit, switching models before payment is better than proving the opposite through installation.
Final algorithm before paying for PLT-001
Step 1. Check the product card
Record:
-
PLT-001;
-
120×15 mm;
-
beech/oak;
-
2000/2400 mm;
-
quality;
-
preparation;
-
current price;
-
availability.
Step 2. Turn on the real room light
Do not evaluate the joint only with a construction lamp.
Step 3. Check the wall and ceiling with a straightedge
Mark protrusions, depressions, and smooth waves.
Step 4. Separate defects
Cosmetic and geometric are not the same thing.
Step 5. Make a cross-section template
Check the actual working position of PLT-001.
Step 6. Try it on the worst wall
If it works there, move on to the rest.
Step 7. Fix only necessary areas
Do not redo the room without a reason.
Step 8. Repeat the check
After repair, apply the rule and template again.
Step 9. Approve beech or oak and the finish system
Do not postpone this choice until after purchase.
Step 10. Remove the finishing segments
Each wall is divided into real parts.
Step 11. Build a 2000/2400 map
First long view parts, then short ones and leftovers.
Step 12. Calculate the reserve for risks
Do not use automatic 10% without checking.
Step 13. Check the price and availability again
Warehouse discounts and quantity change.
Step 14. Place order
Pass a proper specification to the manager.
Decision matrix: what to do with different defects before purchasing PLT-001
To avoid turning wall assessment into a subjective dispute between the customer, painter, and installer, it is useful to consolidate observations into a simple matrix. It does not set regulatory tolerances in millimeters—the PLT-001 card does not specify them. The matrix answers a different question: what next step is needed for a specific type of defect.
| What was found | How the PLT-001 template behaves | Visual situation | Next action |
|---|---|---|---|
| The base is generally level, with a small local depression | the profile maintains a straight line | The seam is short and almost uniform | Assess the final finishing, then count the order |
| One pronounced protrusion | The profile wobbles or pulls away nearby | The line is broken over a noticeable section | Locally fix the protrusion and check again |
| Smooth wave on a long wall | The profile either follows the wave or forms a long varying gap | High visibility | First, solve the geometry of the base |
| Defect only in the hidden color band | profile position is stable | after installation, the section is not visible | do not redo cosmetics without a technical reason |
| loose plaster | no reliable support | appearance is secondary for now | stabilize the base before ordering/installation |
| active crack | fitting result is unreliable over time | risk of reopening | establish the cause and only then design the node |
| Slight unevenness on a hidden area | the profile stands stably | low visibility | compare the cost of repair with the real visual benefit |
| The same unevenness on the front wall under side lighting | the profile stands, but the shadow changes | the defect is clearly readable | do a full-size control fitting and make a decision based on the actual appearance |
The matrix is useful because it removes the dangerous logic of "we fill any gap" and the opposite extreme "any gap means redoing the wall." In one case, the defect really relates to final finishing, in another, it changes the working plane of a long wooden part.
Why the decision is made based on the working position of the profile, and not on the wall separately
The wall may have a slight deviation that does not affect the final look of PLT-001. Conversely, the base may visually seem good, but a specific relief profile in the corner takes a position where the shadow becomes noticeable.
Therefore, the sequence is important:
-
the rule shows the geometry of the base;
-
the template shows the profile fit;
-
the light shows the visual result;
-
the cutting map shows the commercial consequence of the decision.
None of the four stages individually provides the full picture.
Why you cannot make a decision based only on a photo of the gap
A close-up photo often exaggerates the defect. The phone is positioned a few centimeters from the wall, the camera automatically enhances contrast, and a person in the interior looks from a different distance and at a different angle.
The reverse problem also occurs: a wide-angle photo of a room smooths out the wave, which becomes obvious when moving along the wall.
Therefore, a photo is a document, but not the only criterion. It is better to supplement it with a short video along the line and a photo with the working lighting turned on.
How to accept a corrected base before ordering PLT-001 120×15 mm
After local correction, the wall cannot be considered finished just because the painter has completed the work and restored the color. A re-acceptance is needed specifically under the future wooden profile.
First, check the same line with the same rule
If the initial diagnosis was carried out with a long rule, after the repair it is used again in the same places. This allows comparing the condition before and after, rather than relying on memory.
Pay special attention to the boundaries of the local correction. Poorly executed repair can remove the central bump but create two new transition zones at the edges of the putty.
Then return the PLT-001 template
The template should occupy a working position without the need to constantly change the tilt angle. On a long wall, it is useful to go through several control points and make sure that the bottom line remains visually predictable.
If after the repair the profile still has to be "caught" in different positions, the base is not yet resolved.
Then constant lighting is turned on
Before the final order, you need to look at the wall again under the room's main light. If track lights are already installed, turn them on. If the lighting is not yet installed, it is useful to at least check the direction of the future light according to the project.
This is especially important for painted beech PLT-001. The white line may look even in diffused daylight and show a change in shadow in the evening.
Only after acceptance are the boundary parts measured
Segments whose length is close to 2000 or 2400 mm are measured last. A slight correction of the angle or the top strip can change the final cut point.
If a segment after repair turns out, for example, near the boundary of a standard length, you cannot automatically choose the minimum suitable format. You need to leave a real technological allowance for the specific end and check the entire map.
Control checklist after repair
| Section | What was | What has been fixed | Rule | Template PLT-001 | Light | Status |
|---|---|---|---|---|---|---|
| A | Smooth wave | top wall strip | line is stable | position is stable | shadow is even | done |
| B | local bump | protrusion removed, paint restored | no wobbling | profile sits | defect is not visible | done |
| C | local depression | without repair | small finishing seam | straight profile | low visibility | accept per sample |
Such a report is especially useful when finishing and installation are done by different contractors. The installer gets not a phrase like "the wall seems leveled," but a clear inspection result.
Full order or one trial plank: how not to overpay for testing
A buyer who discovers a wave after painting often finds themselves between two inconvenient options. The first is to buy the entire perimeter at once and risk a large sum. The second is to order nothing until the wall becomes abstractly "perfect."
There is an intermediate option: use a drawing and template, and for an expensive or disputed object, confirm the possibility of purchasing a single plank of a specific finish.
When a template is enough
A template is usually sufficient if the question is only about the cross-section geometry and the base. It allows understanding the fit, scale, and approximate shadow line without purchasing inventory.
When a real plank is useful
A real product is more useful if simultaneously checked:
-
straightness of a long part on a specific wall;
-
visual scale of 120 mm;
-
natural oak texture;
-
intended tinting;
-
real relief under side light;
-
joint with already installed elements.
In this case, one plank serves as a reference sample and can later be included in the cutting map.
How not to ruin a test plank
Do not immediately make a final cut for the first problematic corner. First, the product is used for a dry fit. If a finish test is needed, it is better to determine in advance whether it can be done on a small area that will later go into the technological offcut, or obtain a separate sample.
If a 2400-mm oak plank is to become a 2320-mm part, you cannot give its long working section over to random experiments.
When a trial purchase is not needed
If the designer and installer already have a physical sample of PLT-001, the wall geometry has been checked, and the profile has been used on a project in the adjacent room, an additional test plank may not provide new information.
The purpose of the check is to remove uncertainty, not to create a mandatory additional step for every order.
FAQ
Can a wooden PLT-001 be installed on an uneven wall?
It depends on the nature of the unevenness. A small local defect may be acceptable after a trial fitting and final finishing. A systematic wave that causes the profile to bend or creates a long, changing gap usually requires addressing the base before installation.
Do you need to perfectly level the wall before installing a ceiling plinth?
It is not necessary to bring a hidden surface to a decorative ideal just for the sake of installation itself. But the working area must allow the profile to take its design position without noticeable rocking, waving, or an abnormal seam.
Can PLT-001 hide an uneven wall-ceiling junction?
It covers the corner itself, but does not guarantee compensation for any geometry. You cannot consider 120×15 mm as a tolerance for unevenness.
Can a gap be compensated with acrylic sealant?
Acrylic can be used as a final touch-up for a compatible narrow joint. It should not replace the leveling of a long wall wave.
How to check the wall before purchasing PLT-001?
Use a long straightedge, check the ceiling, mark protrusions and depressions, then try a rigid profile template on the most problematic areas and observe the result under side lighting.
What is the size of the wooden ceiling plinth PLT-001?
The cross-section is 120×15 mm.
What lengths of PLT-001 can be purchased?
The product card offers 2000 and 2400 mm for beech and oak.
What to choose — beech or oak?
The choice depends on the finish and the interior task. Beech is often convenient for covering finishes, oak is used when an expressive wood texture is needed. However, the material does not solve the problem of an uneven base.
Can PLT-001 be ordered for enamel painting?
The card provides for preparation for enamel for the corresponding options. The actual configuration must be confirmed when ordering.
Is oak PLT-001 suitable for tinting?
The website has a category of blanks for tinting. For a specific oak item, you need to select and confirm the corresponding version.
When should you first fix the wall and then buy the baseboard?
When there is a protrusion pushing out the profile, a long wave, an unstable base, an active crack, or a gap that cannot be considered ordinary finishing.
How to calculate the quantity of PLT-001 after leveling?
First measure the individual finished segments, then distribute them across planks of 2000 and 2400 mm, taking into account joints, corners, and useful leftovers.
Where to buy a wooden ceiling baseboard?
If PLT-001 is selected — in the card of this article. If the profile is still being compared — in the category of wooden cornices and baseboards.
How to check the current price of PLT-001?
Directly in the product card before ordering. Discount values may apply only to current stock levels.
Can I order one PLT-001 plank for testing?
The manufacturer specifies delivery from one piece, but the availability of the required material, length, and category should be confirmed before ordering.
Why does side lighting show gaps more strongly?
Because a beam along the wall forms a longer shadow from a difference or gap. Frontal light makes the same defect less contrasting.
Do I need to buy the baseboard first to understand the geometry?
You don't have to buy the entire volume. For testing, you can use a drawing, a rigid cross-section template, a sample, or one trial plank.
What is more dangerous—a dip or a bump?
For a long rigid profile, a local protrusion is often more critical because it physically pushes the product out of the plane. A dip may manifest as a seam, which is assessed separately.
Can PLT-001 be pulled to a wavy wall with fasteners?
Forceful pulling should not replace base preparation. It can make the profile follow a wave and ruin the architectural line.
Do I need to fix an unpainted strip if PLT-001 will completely cover it?
If the defect is only cosmetic, the surface is stable and does not interfere with installation, perfect decorative painting of the hidden area is not required. Geometry and strength of the base still need to be checked.
What to do if the wall size changed after leveling?
Re-measure the final size and update the cutting map. Do not use the old list automatically.
Can I mix planks of 2000 and 2400 mm in one order?
Yes, if the mixed map gives less waste or better joint placement. For each part, the source blank is assigned in advance.
Should I take only 2400 mm to have fewer joints?
Not always. On long walls it is convenient, but on short sections 2000 mm may be more economical. The part map decides.
What is more important before ordering: total perimeter length or wall geometry?
Geometry and map of individual segments. The total footage is needed as a control, but by itself it does not show how many planks to buy and how they will fit.
Conclusion
If the walls and ceiling are already painted, and the rule showed a wavy junction, you don't have to choose between two extremes: either redo the entire room, or immediately buy PLT-001 and hope for sealant.
The correct sequence is significantly more accurate.
First, the nature of the defect is determined. A local bump, a small depression, and a systemic wave are different situations. Then not only the wall but also the ceiling is checked. After that, the actual cross-section of PLT-001 120×15 mm is tried on with a rigid template or sample at the most critical points, and they look under the lighting that will work in the interior.
If the profile takes a stable position, the line remains straight, and the remaining seam is normal finishing touch, you can proceed to purchase. If the long piece is forced to follow the wave or a noticeable changing gap forms between it and the wall, it is more rational to fix the base first.
Only after this check do they choose beech or oak, a version for enamel or for tinting, take final segments, and build a map from planks of 2000 and 2400 mm.
Thus, the buyer gets not just a beautiful wooden baseboard, but a manageable result: a clear line, a calculated quantity, meaningful finishing, and minimal risk of redoing an already finished interior.
After a control fitting and final cutting, you can place an order buy the wooden ceiling plinth PLT-001 in the required material and lengths, rather than ordering the full perimeter blindly.