Article Contents:
- One digit changes the entire calculation: the working length of MLDPU-002 is 2600 mm
- 2400, 2600, 2750, and 3000 mm: four lines — four different scenarios
- Why a 2750 mm line is sometimes more complex than a 3000 mm line
- First, find the 'quiet' edge
- The center of the wall is not always the best place
- The joint cannot be moved closer to the corner just for masking purposes
- The main enemy is not the seam line, but the step
- The total footage by itself is also insufficient
- First the minimal map, then the allowance
- The remaining 2200 mm can be used on the vertical
- Mistake 1. Ordering one plank after seeing only the number '3 m wall'
- Mistake 2. Ordering two planks and throwing away the 2200 mm remainder
- Mistake 3. Counting each frame separately
- Mistake 4. Dividing the total length by 2600 and rounding immediately
- Mistake 5. Adding 15% to each side
- Mistake 6. Placing the joint in the center just for symmetry
- Mistake 7. Making the extension piece too short at the corner
- Mistake 8. Cutting all planks in half in advance
- Mistake 9. Saving length at the cost of extra joints
- Error 10. Not accounting for the cutting width
- Error 11. Not checking the ends before gluing
- Error 12. Fixing a step with a thick layer of sealant
- Error 13. Buying MLDPU-002U without a drawing
- Error 14. Mixing MLDPU-002 and a similar item in one list
- Error 15. Choosing glue only based on the recommendation "for moldings"
- Error 16. Not checking the side light
- Error 17. Ordering a formal reserve without a map
- Error 18. Not keeping useful leftovers
- Will one MLDPU-002 plank be enough for a 3 m wall?
- How much exactly is missing to reach 3 m?
- Does this mean the second plank will almost entirely go to waste?
- Where is the best place to make the joint on the 3 m line?
- Do I need to place the joint exactly in the center?
- Can the seam be made completely invisible?
- What is more important for an invisible seam — putty or precise cutting?
- Is a separate compound needed for the joint?
- How many slats are needed for a 2750 mm line?
- How many slats for a 4000 mm line?
- And for 5200 mm?
- Can two 3 m lines be made from three slats?
- Why can't you just divide the total length by 2600?
- How much extra should be allowed?
- For one 3 m line, do I need to buy a third slat for 15%?
- How to calculate a rectangular frame?
- What does "frame 1200 × 800 mm" mean when calculating the cut?
- Can I use the remainder with an angular cut?
- Do I need to buy MLDPU-002U together with MLDPU-002?
- What is the size of MLDPU-002U?
- Can MLDPU-002U be considered a regular corner for any frame?
- What should I do with the 200 mm remainder after the 2400 mm line?
- How to store a long remainder?
- Do I need to label the offcuts?
- When to paint the joint?
- How to check the seam before final painting?
- What to do if the joint is still noticeable?
- Can the connection be placed behind a cabinet?
- How to understand that the cutting map is good?
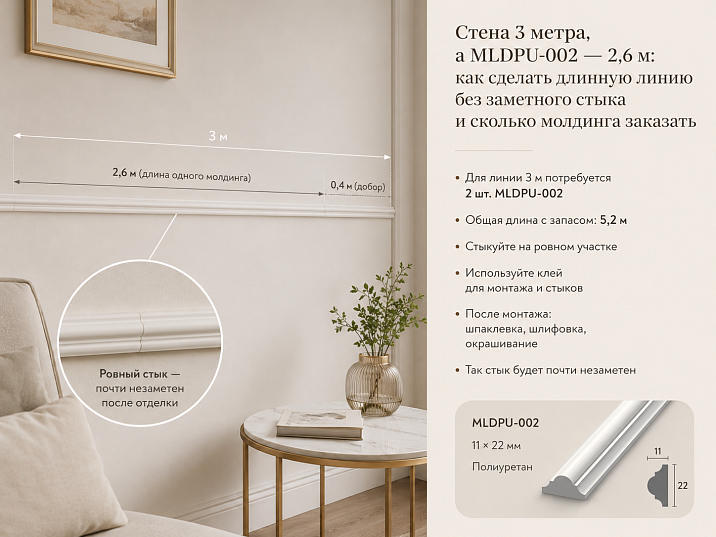
On the drawing, everything looks simple: one straight decorative line runs along the wall from edge to edge. On site, arithmetic comes into play. The chosen molding MLDPU-002 measures 22 × 11 × 2600 mm, and the wall length is 2750, 3000, or 3200 mm. One plank is no longer enough. The buyer has to solve several questions at once: whether to buy two, where to join them, which piece to leave as an additional one, whether the remainder of the second plank can be used on an adjacent frame, and how not to order extra material just because the line is 400 mm longer than the standard plank.
For a 3000 mm wall, the answer on quantity starts with a simple number: one plank 2600 mm long is physically insufficient, so for this one continuous line, at least two whole MLDPU-002 planks are needed. But this does not mean that the second plank is "fully consumed" for a 400 mm additional piece. After preliminary cutting of 2600 + 400 mm from the second plank, theoretically up to 2200 mm of material remains before accounting for finish trims, cut width, and possible end defects. This remainder can become a side of another frame, part of an adjacent line, or several short elements.
That is why buying molding using the formula "each three-meter line = two planks" is only convenient for a rough estimate. For a real order, a cutting map of the entire room is needed. The more frames and lines, the more important it is to calculate them together: a long remainder from one section can cover another and significantly change the final quantity.
MLDPU-002 is a polyurethane molding with a width of 22 mm, a thickness of 11 mm, and a length of 2600 mm. If the profile is already selected and the dimensions fit the composition, you can buy molding MLDPU-002 after all segments, joints, and useful remnants are collected on one sheet. This order protects both against a shortage of one plank at the end of installation and against a box of expensive offcuts that found no place.

One digit changes the entire calculation: the working length of MLDPU-002 is 2600 mm
For this topic, what matters is not a general story about molding, but one specific size — 2600 mm.
| Parameter | MLDPU-002 | What this changes in the calculation |
|---|---|---|
| Profile Width | 22 мм | Determines the scale of the line and frame |
| Profile thickness | 11 мм | Forms the relief and shadow on the wall |
| Length of one plank | 2600 мм | Any continuous section longer than this requires joining at least two blanks |
| Material | Polyurethane | Installation and joint treatment must be selected for the polyurethane profile and the base |
| Article number | MLDPU-002 | The specification records the full article number, not just the word "molding" |
The length of 2600 mm itself is neither good nor bad. It simply sets the purchase module. As long as all sides of the frames are shorter than 2600 mm, the task mainly comes down to rational cutting. As soon as at least one side is 2700–3000 mm, a longitudinal joint on a straight line appears.
That's what needs to be designed before purchasing.




2400, 2600, 2750, and 3000 mm: four lines — four different scenarios
Let's put the most obvious cases side by side.
| Finished line | Minimum number of whole planks for this line separately | Theoretical remainder after simple cutting* | What happens |
| 2400 мм | 1 | up to 200 mm | No joint on a straight line needed |
| 2600 мм | 1 | 0 мм | One plank covers the length without an extension |
| 2750 мм | 2 | up to 2450 mm | An additional 150 mm section is needed or a different layout for distributing the two strips |
| 3000 мм | 2 | up to 2200 mm | Can be assembled as 2600 + 400 mm or shift the joint with a different layout |
| 3200 мм | 2 | up to 2000 mm | The total length of the two strips is sufficient with a large useful remainder |
| 4000 мм | 2 | up to 1200 mm | Two strips cover the line, the connection point is chosen in advance |
| 5000 мм | 2 | up to 200 mm | A rational layout can be 2600 + 2400 mm |
| 5200 мм | 2 | 0 мм | Two full strips give the exact total length |
| 5300 мм | 3 | Up to 2500 mm | A third plank appears, but a large part of it may go to other sections. |
*The remainder is indicated only as the arithmetic difference between the total length of whole planks and the finished line. The actual useful remainder is reduced by final trimming, cut width, end adjustment, and the joint pattern.
This caveat is fundamental. Not every millimeter of the theoretical remainder can be considered guaranteed usable.
Our factory also produces:



Why a 2750 mm line is sometimes more complex than a 3000 mm line
Paradoxically, a 150 mm add-on may require more attention than a 400 mm add-on.
If you leave an almost whole plank of 2600 mm and add short 150 mm pieces, the joint will be very close to the edge. This may be advantageous in terms of remainders: from the second plank, a large part remains—about 2450 mm before finishing losses. But the short fragment needs to be carefully installed and aligned with the profile.
If there is a frame with a side of 2400 mm nearby, such a remainder is especially valuable. Then the scheme "2600 + short add-on" can be rational.
If there are no adjacent elements, the joint location can be shifted and the length distributed between two larger segments. The decision depends not on a single line, but on where the remainders will go.
Get Consultation
On a 3 m wall, the second plank is not "extra," but a source of 2.2 m of material
This is the main commercial meaning of the topic.
A wall of 3000 mm requires at least two MLDPU-002 strips. Total purchase length:
2600 × 2 = 5200 mm.
Net line length:
3000 mm.
Theoretical remainder:
5200 − 3000 = 2200 mm.
If you look only at one wall, it seems that almost half of the second strip is unnecessary. If you look at the room as a whole, 2200 mm is already a normal side of a decorative frame, a horizontal band on an adjacent pier, or a set of short sides.
Therefore, the task is not “how not to buy a second strip.” Without it, three meters cannot be assembled. The task is how to turn the remainder of the second strip into a useful part of the project.
Where to place the joint on a three-meter line
The most obvious option is to keep one strip as long as possible and add the missing 400 mm.
Then the joint can be placed 400 mm from one edge of the wall: simply install a short extension on the less visible side, and run the main 2600 mm plank across most of the visual field.
This is not a universal rule. But such logic is often better than a random central joint.
First, find the "quiet" edge
Look at what is on either side of the line:
-
curtain;
-
tall cabinet;
-
door trim;
-
room corner;
-
radiator;
-
console;
-
decorative panel;
-
edge of the mirror;
-
free open plane.
If one side is noticeably less active to the eye, the extension can be considered right there.
The joint should not physically hide behind furniture if the furniture can be moved. It's about visual hierarchy: the main long plank runs through the most visible part of the wall, the short segment stays closer to the periphery of the composition.
The center of the wall is not always the best place
A central joint is easy to mark out: two equal segments of 1500 mm each. But the eye often automatically lands exactly on the center of the decorative line.
If the connection is made flawlessly, there is no problem. If even a minimal shadow or plane difference remains, the central position emphasizes it.
Therefore, symmetry of the cut should not be an end in itself.
The joint should not be brought close to the corner just for the sake of masking
The other extreme is making the extension so short that the connection almost touches the corner or the edge of the frame.
Technically, this is possible but not always convenient. A very short fragment is harder to position, and near the corner there is already its own trimming and joining zone.
You need to leave space where the craftsman can properly process both joints.
There is no exact universal distance. It is determined by the profile, tool, and project geometry.
"Without a noticeable seam" is not a promise, but the result of several precise operations.
The mere fact that two segments belong to the same article does not make the seam invisible.
Visibility is affected by:
-
straightness of the base;
-
precision of the ends;
-
alignment of the profile in height;
-
absence of a step between the planks;
-
selected composition for joining and sealing;
-
quality of sanding and priming, if provided by the system;
-
finish painting;
-
direction of side light.
Therefore, it is more accurate to say: the joint can be made as inconspicuous as possible if you choose its location in advance and carefully assemble the assembly.
The main enemy is not the seam line, but the step
Even a well-sealed joint remains visible if one plank protrudes a fraction of a millimeter relative to another.
Side light immediately casts a shadow.
Therefore, when joining MLDPU-002, it is necessary to control not only the gap between the ends, but also the overall face plane of the profile.
If the base has a wave, a long line will show it especially clearly.
First align the route, then glue the molding.
A three-meter line amplifies wall errors.
Before installation, mark up and dry-fit the pieces without glue.
Check:
-
whether the line goes upward;
-
whether the base has any bulges;
-
whether the ends align;
-
whether a step appears;
-
where the joint will be relative to the light.
On a short frame, a small error can get lost in the corners. On a straight line 3 m long, it stretches across the entire wall section.
Light determines how visible the joint will be.
Imagine a white wall and a white MLDPU-002.
During the day, the window is on the right. Light comes almost along the profile.
Any step at the joint creates a vertical or diagonal shadow.
In the evening, frontal light smooths the surface, and the same seam almost disappears.
Therefore, it is useful to check the joint under the actual lighting of the room.
If wall lighting is planned, the lighting scenario should be known before cutting.
Do not confuse the longitudinal joint with the frame corner.
These two nodes have different purposes.
At the corner, the direction of the line changes. For a rectangular frame, the sides meet at an angle.
On a long straight MLDPU-002 simply continues in the same direction. Here the key task is to preserve the profile and one face plane.
Therefore, an article about a 3 m wall should not turn into a guide on corners.
Cutting map: one sheet saves more material than a "margin by eye"
For a room with multiple frames, keep a table of segments.
For example:
| Section | Finish length | Number of identical segments | Priority |
| Horizontal line above the console | 3000 мм | 1 | Main visible section |
| Frame A verticals | 1200 мм | 2 | Middle segments |
| Frame A horizontals | 800 мм | 2 | Short segments |
| Frame B | 1000 мм | 4 | Repeating parts |
Next, lay out the segments on 2600 mm planks, like parts on a sheet of material.
Do not start cutting the first plank until all sides are clear.
Three identical frames: why counting each one separately is unprofitable
Let's take a frame of a conventional size of 1200 × 800 mm.
For one frame, four sides are needed:
1200 + 1200 + 800 + 800 = 4000 mm.
If you count one frame separately, the minimum is two planks of 2600 mm.
For three frames, “two planks for each” will result in six planks.
But the cutting layout shows otherwise.
For three frames:
-
six pieces of 1200 mm;
-
six pieces of 800 mm.
It is convenient to arrange the six 1200-mm pieces in pairs:
1200 + 1200 = 2400 mm.
This uses three planks.
Six parts of 800 mm each can be laid out three at a time:
800 + 800 + 800 = 2400 mm.
Two more planks are used for them.
That makes five planks instead of six before accounting for additional technological allowance.
This is the reason to consider the series as a whole.
The total length by itself is also insufficient.
Three frames of 4000 mm each give 12,000 mm.
12 000 / 2600 = 4,62.
The mathematical minimum is 5 planks.
In this example, it is indeed achievable because the lengths of the segments add up well.
But that is not always the case. If the segments are inconvenient to combine, simply dividing the total length by 2600 will give an overly optimistic result.
Therefore, after the formula, a layout check is always needed.
The preliminary quantity formula and its limitation.
For a rough estimate:
N = round up (Ltotal / 2600),
where Ltotal is the sum of all finished segments in millimeters.
But this is only a lower bound.
After that, you need to check:
-
whether specific segments fit into individual strips;
-
how much material is taken up by trims;
-
which sides have angular cuts;
-
Is a reserve needed?
-
Can leftovers be used?
-
Are there long sections over 2600 mm that will necessarily have a joint?
That is why professional purchasing is not just about length.
Example: frame 1500 × 1000 mm.
Perimeter:
2 × (1500 + 1000) = 5000 mm.
Two strips give:
5200 mm.
At first glance, the margin is only 200 mm.
And here the cutting can indeed be compact:
-
first plank: 1500 + 1000 = 2500 mm;
-
second: 1500 + 1000 = 2500 mm.
100 mm of arithmetic remainder per plank before finishing operations.
This is an example project where "two planks" almost completely turn into a frame.
Example: frame 1800 × 1200 mm.
Perimeter:
2 × (1800 + 1200) = 6000 mm.
Two planks give only 5200 mm.
So, at least three.
But another thing is important: the 1800 mm segment and the 1200 mm segment together give 3000 mm — they do not fit into one 2600 mm plank.
A rational scheme could be as follows:
-
bar 1 → 1800 mm;
-
bar 2 → 1800 mm;
-
bar 3 → 1200 + 1200 = 2400 mm.
Theoretically, 800 + 800 + 200 = 1800 mm remains.
These leftovers are worth trying to use in other frames.
Example: a 3000 mm line plus a 1000 × 600 mm frame.
This is already a real project, not a separate task.
The line requires:
3000 mm.
Frame:
2 × (1000 + 600) = 3200 mm.
Total:
6200 mm of finished length.
Three MLDPU-002 strips give:
7800 mm.
It can be done like this:
-
strip 1 → main part of the long line 2600 mm;
-
strip 2 → line extension 400 mm + 1000 + 600 + 600 = 2600 mm;
-
strip 3 → remaining side of the frame 1000 mm.
This is just one option. Its value is different: the 2200 mm remainder of the second strip does not disappear but almost entirely turns into frame sides.
If the line and the frame were calculated independently, the buyer could order more.
For a 3-meter line, the place for the additional piece can be chosen together with the stock map.
Suppose the second plank, after a 400-millimeter additional piece, is to be given parts of 1000, 600, and 600 mm.
Then its cutting becomes almost waste-free.
But if the neighboring frame requires 2200 mm entirely, it's even simpler: after 400 mm, a large continuous section remains.
Thus, the joint location on the wall and material savings turn out to be connected.
Do not cut all long planks into "convenient" halves in advance.
Sometimes a craftsman cuts 2600 mm in half because it's easier to work with short elements.
This is dangerous for the cutting map.
After such an action, you lose the only opportunity to get segments of 1500, 1800, 2200, 2400, or 2600 mm without a joint.
First, distribute all long sides. Short ones get material from the remaining parts.
The most valuable remainder is a long one.
A 1800–2200 mm offcut can cover an entire side of a large frame.
Ten offcuts of 150–200 mm have the same total length, but much lower project value.
Therefore, during optimization, not only the waste percentage matters, but also the structure of the remainders.
Try to preserve large continuous pieces.
Where to record remainders after each cut.
Create a separate column:
| Plank | First cut | Second cut | Remainder | Where reserved |
| №1 | 2600 | — | 0 | Line 3 m, base |
| №2 | 400 | 1000 | 1200* | Frame B |
| №3 | 1800 | — | 800 | Short side of frame B |
*Example is conditional: actual remainder depends on all cuts and finishing.
Such a log is especially useful if installation takes several days. Otherwise, a good remainder can easily turn into a random short offcut.
15–20% reserve from the card: how to use the recommendation wisely
In the description of MLDPU-002 for frame mounting, a reserve for trimming is provided. The card contains a recommendation of about 15–20%, and in a separate calculation block, a guideline of 15%.
This figure cannot be turned into a mechanical rule for every project.
For one straight line of 3000 mm, the situation is clear: two planks already give a large absolute remainder. Buying a third one just for the formal 15% may be pointless if there are no other frames or special risks.
For a complex system of many frames, corners, and repeating elements, the reserve becomes significantly more relevant.
First, the minimum map, then the reserve.
Correct sequence:
-
collect all finishing segments;
-
lay them out by 2600 mm;
-
determine the mathematical minimum of planks;
-
estimate trims and the number of joints;
-
apply a reasonable reserve to the specific project;
-
round up to whole planks.
Thus, the reserve recommendation works for the real object, not against it.
Why you cannot add 15% to each side separately.
Suppose the frame has four sides.
If you artificially increase each side by 15%, you get not a cutting map, but a set of conditional lengths that do not exist in the finished structure.
The allowance is needed at the purchasing level, not for changing frame dimensions.
The finished size of the side remains as specified in the project.
Polyurethane moldings: the project price depends not only on the price of one strip
The query "polyurethane moldings price" seems product-oriented, but for a large layout, the price of one piece is only half the answer.
Two projects with the same total footage may require a different number of whole strips due to different segment lengths.
For example:
-
many segments of 800 mm pack into strips very tightly;
-
several sides of 1800 mm leave large leftovers that still need to be used somewhere;
-
a line of 3000 mm requires a joint and at least two strips even with a slight excess over 2600 mm.
Therefore, it is correct to compare costs after cutting.
If the task is not yet linked to a single profile, you can view Moldings made of polyurethane and compare profile sizes, but for the selected MLDPU-002, the working length of 2600 mm remains the starting point for calculation.
Line 2.7 m: don't rush to make a 100 mm extension.
For 2700 mm, only 100 mm is missing.
Mathematically, you can use 2600 + 100.
But a short extension is very sensitive to installation accuracy and leaves almost no room for adjustment.
If the line is visually important, consider a different cutting layout for two planks so that the joint falls in a more convenient area, and the remnants match other parts of the project.
There is no single correct ratio of lengths here.
The task is to get a neat line and useful remnants.
Line 2.8 m: 200 mm extension or redistribution.
At 2800 mm, two planks provide a large total reserve.
You can use the full 2600 and 200 mm.
You can shift the joint.
The choice depends on what needs to be cut from the remaining material next.
If there is a side of 2300–2400 mm nearby, it is advantageous to keep the second piece as long as possible.
If the project consists of only one line, installation convenience can be prioritized over optimizing leftovers.
Line 3.2 m: the joint can be moved out of the center without a small fragment.
For 3200 mm, 600 mm is missing.
The 2600 + 600 scheme already provides an add-on that is easier to work with than 100–150 mm.
The theoretical remainder of the second plank is 2000 mm.
This is a very useful length for the frame.
Therefore, in projects with multiple elements, 3200 mm is sometimes even more convenient than 2750 mm.
4 m line: two slats, but centering the joint is not necessary.
Total material 5200 mm.
Finish line 4000 mm.
Remainder — up to 1200 mm.
You can combine 2600 + 1400 and get a 1200 mm remainder.
You can do 2000 + 2000 and get two remainders of 600 mm each.
Which option is more advantageous is decided by the neighboring geometry.
If you need one 1200 mm segment, the first scheme is obviously more useful.
Line 5 m almost completely uses two planks.
2600 + 2400 = 5000 mm.
After this layout, about 200 mm remains before finish losses.
This is an example where two planks really go almost entirely into one line.
The joint can be placed at 2400 or 2600 mm from the edge, that is, close to the center of the long section. Here, flatness and light are especially important.
If the line passes through several walls.
Suppose the molding runs as a horizontal belt around the room.
Wall A — 3000 mm.
Wall B — 2400 mm.
Wall C — 1800 mm.
They cannot be considered as one 7200 mm line if there are separate cuts at the corners.
But buying an independent set for each wall is not always cost-effective either.
Make a list of actual segments and distribute the leftovers.
From the second plank of wall A, 2200 mm may remain — almost ready material for wall B, which is 1800 mm long.
This way, the total purchase is reduced.
The MLDPU-002 corner is a separate node; do not hide a longitudinal joint there.
If a long line approaches a room corner, it seems tempting to combine two events: finish the plank here and turn the profile here.
But these are different connections.
The more operations are concentrated at one point, the harder it is to control the geometry.
First, determine the finished length up to the corner.
Then decide whether a longitudinal joint is needed on this side at all.
MLDPU-002U: consider only if it is actually present in the project
The assortment includes a related decorative element MLDPU-002U measuring 172 × 172 × 13 mm made of polyurethane.
It can be considered as an additional decorative component of the frame composition, but it cannot automatically be considered a replacement for the regular corner joint MLDPU-002 without checking the pattern and drawing.
If the project is indeed built with such an element, you can buy the corner element MLDPU-002U after checking how its geometry connects with the selected frame.
The main article still remains about the straight MLDPU-002 with a length of 2600 mm.
The corner decorative element changes the lengths of the straight sides.
If MLDPU-002U occupies part of the frame corner, the straight molding no longer runs from vertex to vertex as in a simple frame with miter joints.
Therefore, you cannot first order the straight sides according to the old dimensions and then add corner inserts.
First, the entire frame is drawn with the actual dimensions of the decorative components.
Only after this is the cutting map created.
Rectangular frame: outer and inner dimensions — different calculations
The customer says: "We need a frame 1200 × 800 mm."
But what does 1200 mean?
The dimension along the outer edge of the profile?
Along the inner light field?
Along the centerline of the molding?
For a profile 22 mm wide, the difference already matters.
Therefore, before cutting, fix relative to which line the design size is specified.
Without this, even four perfectly cut sides can result in a frame of the wrong dimensions.
Why a simple perimeter is not enough for corner cuts.
The formula 2 × (W + H) is useful for preliminary measurements.
But the actual length of the workpiece when cutting at an angle depends on which edge or axis you hold the dimension to.
Therefore, the final cut-list should be made by a craftsman based on a specific drawing.
The article does not replace this drawing.
How to make the joint less noticeable: first, the profile must match
Place two MLDPU-002 offcuts end to end before applying glue.
Look from the top and from the side.
Run your finger over the relief.
If one end is collapsed, a V-shaped gap appears.
If one part is higher, a step appears.
If the profile is shifted sideways, the ornamental line breaks.
All these defects are better fixed before mounting on the wall.
The cut should be clean, not "compensated with putty."
The filling material helps to finish a small technological seam.
It should not fix a crooked or ragged cut.
The more accurately the ends are prepared, the less material will be needed for finishing, and the smoother the light-and-shadow will be after painting.
The joint and mounting compounds solve different tasks.
Mounting adhesive holds the molding on the base.
The compound for the joint works in connecting two sections and finishing the seam.
The specific system depends on the chosen materials and the manufacturer's instructions.
Before working, it is useful to study the material molded decoration adhesive and divide the tasks in advance into "glue to the wall" and "neatly finish the joint."
Do not choose an adhesive just because it says "polyurethane."
The second surface is the wall.
It can be:
-
plastered;
-
painted;
-
primed;
-
faced with another material.
Compatibility of the composition is determined by the entire pair of materials and the condition of the substrate.
It is especially important to check old paint: the strength of the bond will not be higher than the strength of the layer that is peeling off the wall.
Painting in one color helps to unify a long line.
When MLDPU-002 and the wall are painted in one color, the profile is perceived as part of the surface architecture.
A well-prepared joint becomes significantly calmer visually after finishing.
But paint does not fix a step, an incorrect profile, or a wide gap.
Therefore, finishing is the final stage, not a way to hide poor geometry.
Contrast painting requires an even more precise joint.
If the molding noticeably differs from the wall in color, the eye fixes on its line more strongly.
Any break or seam becomes part of the graphic.
In such a composition, the place of the longitudinal joint should be chosen especially deliberately.
Side light and shadow from the 11 mm profile.
The thickness of MLDPU-002 is 11 mm.
This is a real relief that casts a shadow.
If light runs along the molding, a slight mismatch between the two parts may appear more noticeable.
Therefore, do a control check not only from the front.
A three-meter horizontal line above the sofa
Such an area is usually in the center of attention.
It's better not to place the seam directly above the center of the sofa just for mathematical symmetry.
If one edge goes toward a curtain or a tall piece of furniture, a short filler piece can be considered there.
But the solution is checked against the entire wall.
The remaining 2200 mm can be used on the vertical.
After the 2600 + 400 mm layout, about 2200 mm remains.
If a vertical frame 2100 mm high is planned nearby, the remainder fits almost perfectly.
This is a good example where a long line itself "finances" the adjacent side with material.
A three-meter line above the headboard.
In the bedroom, the eye is often focused on the central axis of the bed.
A central seam is undesirable precisely for compositional reasons.
Place the main continuous segment so that the central zone falls on one plank.
Move the extension piece to the less active side.
Wall section 2750 mm between doors.
Both boundaries are visible, so hiding the extension piece near one edge is more difficult.
Here it is useful to compare two schemes:
-
2600 + 150;
-
two larger segments with an offset joint.
Choose the one where the joint location conflicts less with trims and furniture, and the leftovers are more useful for the project.
Long vertical line 3000 mm.
If the ceiling is high and MLDPU-002 goes vertically, the principle is the same: two planks.
But the joint is at height, so the viewing point needs to be taken into account.
A connection at eye level is perceived more actively.
It can be moved higher or lower if the cutting layout and installation allow.
There is no universal height for an "invisible seam."
A frame 3000 mm high: two verticals already create two longitudinal joints
If a rectangular frame is 3 m high, each vertical side is longer than 2600 mm.
This means that on just the two verticals, there will already be at least two connections.
Plus the horizontals.
Here it is especially important not to count each side separately, but to distribute the remnants of two additional strips between the top and bottom parts of the frame.
Large frame 3000 × 1800 mm: we count segments, not just the perimeter
Perimeter:
2 × (3000 + 1800) = 9600 mm.
Mathematically, 9600 / 2600 = 3.69, meaning at least four strips by total length.
But two sides of 3000 mm each require splitting.
Four strips give 10,400 mm, with only 800 mm of length margin.
Need to check the actual packaging of segments.
For example, two long sides can be assembled as 2600 + 400. This uses two full strips and two 400 mm pieces from others.
The remaining 2200 mm parts of these strips can be used in the 1800 mm horizontals.
A cutting map becomes mandatory.
A series of frames on one wall: a consistent rhythm simplifies optimization.
When frames repeat, segment lengths repeat as well.
This allows grouping identical parts:
-
all verticals;
-
all top horizontals;
-
all short extensions.
So 2600 mm strips are used more densely.
Different frames are more complex, but leftovers work better.
Paradox: in a composition with frames of different sizes, it's easier to find use for leftovers.
After 1800 mm, about 800 remains.
After 1500, about 1100.
After 1000, about 1600.
These segments may coincide with the short sides of neighboring elements.
The main thing is not to cut them without a list.
Wall decor made of polyurethane and MLDPU-002: when a line becomes part of a large composition
If in addition to frames, overlays, rosettes, or other elements are used, they need to be planned before calculating the straight molding.
Part of the wall may no longer require a continuous line.
In another place, on the contrary, additional contours will appear.
View Polyurethane wall decor useful at the stage of the general sketch, not after MLDPU-002 has already been cut.
Decorative polyurethane elements can change the geometry of the frame
If an ornamental insert occupies a corner or the center of a side, the straight segments become shorter.
In the section decorative polyurethane elements additional parts can be selected, but their dimensions must be included in the drawing before purchase.
You cannot first order molding for the full perimeter and then simply "insert decor".
When to choose specifically MLDPU-002, and not another molding
This article assumes that the 22 × 11 mm profile is already appealing and suits the interior.
But if the main issue is not the 2600 mm length, but a profile that is too large or too small, you need to take a step back.
In the category Buy polyurethane wall moldings you can compare other sizes and patterns.
You should not choose a different item number just for the length if its profile fits the project worse. But you also don't need to tie the entire interior to MLDPU-002 just because it's already in the cart.
How not to confuse MLDPU-002 with MLD-002-MG and neighboring item numbers
The catalog has items with similar numbers.
MLDPU-002 is a polyurethane molding 22 × 11 × 2600 mm.
A similar neighboring name may refer to a different material or profile.
Be sure to record in the specification:
-
full article number;
-
material;
-
width;
-
thickness;
-
length.
The phrase "molding 002" for an order is too vague.
MLDPU-002U is also not MLDPU-002.
The letter U changes the product.
MLDPU-002U has its own size of 172 × 172 × 13 mm and a separate card.
Therefore, in the specification, the name cannot be shortened to "002U/002 as applicable."
The straight profile and the decorative corner element are counted separately.
What to order together with MLDPU-002
The commercial basket depends on the project, not on the desire to add more items.
| What to add | Purpose | When really needed | What to check |
| MLDPU-002 | Straight lines and frames | Always within the scope of this article | Number of whole strips per cutting map |
| Mounting compound | Attachment to the base | For installation | Compatibility with wall and polyurethane |
| Compound for joints/finish | Finishing of connections | If the installation system provides for it | Compatibility with subsequent painting |
| MLDPU-002U | Decorative corner unit | Only if it is on the sketch | Size 172 × 172 × 13 mm and actual mating |
| Different decor for moldings | More complex composition | As per project | Dimensions and position before cutting |
| Paint/finish | Unified look of wall and profile | If provided by the trim | Compatibility with all system layers |
A separate "spare molding" line should not appear automatically. Spare is a result of risk calculation and cutting scheme.
What you don't need to buy in advance.
Do not order:
-
random corner decor "just in case";
-
a third plank for one 3 m line just for a formal percentage;
-
glue without checking the base;
-
additional molding before approving frame dimensions;
-
decor that is not yet applied to the sketch.
First geometry, then the basket.
How many MLDPU-002 to order for one 3 m wall
If the task is one straight line 3000 mm and nothing else, the mathematical minimum is 2 slats.
One gives 2600 mm.
The remaining section is needed from the second.
The third will be needed
How many to order for three 3 m lines
Finish length:
9000 mm.
Four slats give:
10,400 mm.
By total length, four are sufficient.
But the segments need to be arranged so that each of the three lines has the required sum.
One option:
-
line 1: 2600 + 400;
-
line 2: 2200 + 800;
-
line 3: 1800 + 1200.
The planks can be laid out as follows:
-
№1: 2600;
-
№2: 400 + 2200 = 2600;
-
№3: 800 + 1800 = 2600;
-
No. 4: 1200, remainder about 1400.
Four planks cover the task by net length. Next, the issue of allowance and acceptability of chosen joint locations is resolved.
Such optimization should not degrade the visual result.
You cannot save one strip at the cost of three central seams in the most visible places.
The cutting layout has two criteria:
-
minimum reasonable waste;
-
good seam locations.
If they conflict, the visually important line takes priority.
Priority and secondary areas.
Label the lines with letters:
A — central wall, always in view.
B — side partition.
C — frame behind the furniture.
Give the best long whole pieces to sections A.
Extensions and joints are easier to distribute to B and C.
This doesn't mean hiding defects. It means using whole lengths wisely.
When the remainder cannot be considered useful.
A cut-off may be long but unsuitable for the next task if:
-
the end already has an unsuitable angled cut;
-
there is damage;
-
the length is insufficient considering finishing;
-
the profile is deformed;
-
the new side requires two clean ends, and the remainder gives only one;
-
the pattern or orientation of the element does not match the node.
Therefore, in the map, write not just "remainder 800", but its actual condition.
A 45° trim eats not a "percentage", but specific geometry.
For frames, each corner requires a precise cut.
The most honest way is not to try to calculate the abstract millimeter consumption of corners from an article, but to give the craftsman the finished dimensions and build a cutting map based on the actual measurement line.
A reserve of 15–20% from the product recommendation helps account for such losses, but does not replace a drawing.
The saw also has a cutting width.
Several consecutive cuts turn part of the material into sawdust.
On one plank, this is a little.
On dozens of frames, the total loss already exists.
Therefore, optimizing to zero is dangerous.
If the calculation shows that five planks cover the project with a remainder of 10–20 mm, in practice this is too tight a scheme and requires additional checking of the tool and finishing allowances.
First, a test cut on a small section.
If the craftsman has not worked with this particular profile before, it is useful to start with a short non-priority segment or a technical offcut.
You need to understand:
-
how the profile is cut;
-
how clean the end face is;
-
how accurately the pattern matches;
-
how much material the tool actually loses;
-
how the connection behaves after processing.
After this, the map can be refined.
It is better to install a long line with pre-assembled markings.
Do not start with the first plank, hoping to "reach the end and see there."
Mark:
-
the beginning;
-
the end;
-
the joint location;
-
the position of the first plank;
-
the length of the extension piece.
Then the error of the first 2–3 mm will not accumulate toward the edge.
The marking of the joint location must reach the wall.
If the connection is chosen at a distance of 400 mm from the right edge, mark it.
Do not transfer the dimension "approximately by the remainder."
This way both parts are prepared for the actual point.
Dry assembly before gluing is especially useful for 3 m.
Lay out the 2600-millimeter base and the extension piece on the floor, or place them against the wall without final fixation.
Check:
-
total length;
-
profile match;
-
seam position;
-
end of line;
-
absence of unexpected gap.
After gluing, correcting the layout is much more difficult.
Why 2600 mm is convenient to use as a base long segment.
The fewer joints on a straight line, the fewer areas where the profile needs to be aligned.
Therefore, for a 3000 mm line, a base scheme with one long segment is rational.
But this rule gives way to the scrap map and composition: if a different layout gives a better seam and better material usage, it can be chosen.
Do not make three segments where two are sufficient.
A 3000 mm line can be assembled from three meter-long pieces.
Physically — yes.
Practically, this is two extra joints.
If there is no special reason, splitting a solid profile is unprofitable both visually and in terms of labor costs.
A frame composition with many short sides is a different matter.
Here, the joints are already defined by the corners.
Remnants of 600, 800, 1000 mm have real value.
It is precisely such frames that best "eat up" the remnants from long three-meter lines.
Polyurethane wall moldings: first, design the entire wall
When several lines are planned, it is useful to first look at the entire section polyurethane wall moldings and finally confirm that MLDPU-002 is used everywhere.
If a different profile is used on the adjacent frame, the MLDPU-002 remnant can no longer be transferred there.
That is, uniformity of the article number directly affects cutting efficiency.
Mixing different moldings increases waste.
Two profiles of the same length cannot be considered interchangeable.
If on the wall:
-
MLDPU-002 for large frames;
-
another molding for internal lines,
remainders are calculated separately for each article number.
The total footage of "all stucco" does not help.
Buy stucco: first specification, then quantity
Broad query Buy moldings leads to a large group of products.
But for a specific three-meter wall, a narrow specification is more useful:
MLDPU-002 — 22 × 11 × 2600 mm — ___ pcs.
Then accompanying elements are added.
This way, the order does not mix different tasks.
Buy polyurethane molding: when you need more than just one molding
If the project has expanded to ceiling decor, frames, rosettes, and other elements, you can Buy polyurethane molding as a system, but each item still gets its own quantity card.
You cannot apply the MLDPU-002 stock to all decor in one line.
It makes sense to buy decorative molding after determining the free fields inside the frames
If an overlay is planned inside MLDPU-002, first build the frame, then the inner field.
Only after this can you Buy Molded Decoration of the appropriate size.
Otherwise, the overlay may not fit, and changing the frame will again change the length of the molding.
Buy polyurethane decor: do not mix budget with cutting
In the section buy polyurethane decor can be supplemented with corner and ornamental elements.
But saving MLDPU-002 at the expense of random decor is illogical.
First design, then cutting.
Polyurethane moldings in St. Petersburg: the region does not change the 2600 mm formula
A buyer may search for polyurethane moldings in St. Petersburg or another city, but the order geometry remains the same.
The main MLDPU-002 plank has a length of 2600 mm.
A 3000 mm line in any region requires a connection.
Logistics and purchase conditions change, which are checked separately in the current card; the cutting formula does not change.
Storing long remnants is part of the savings.
Keeping 2200 mm makes sense only when that segment remains straight and undamaged until the next stage.
Long elements are best stored on a flat horizontal support.
Do not place a useful remnant where it will be stepped on or pressed down by materials.
Label the remnants immediately.
On the masking tape, write:
MLDPU-002 — 2185 mm — clean edge on the left.
In a week, this will eliminate repeated measurements.
If there are several article numbers, the label is especially important.
When the remainder is worth keeping after installation is complete.
Minor repairs or damage in the future may require a fragment of the same profile.
But storing any short offcut is pointless.
Keep only a piece that can actually be used.
Mistakes that cause buying too much or too little for a 3 m wall
Mistake 1. Ordering one plank after seeing only the figure "3 m wall"
MLDPU-002 has a length of 2600 mm. One plank is physically insufficient.
Mistake 2. Ordering two planks and throwing away the 2200 mm remainder
For one line a second plank is needed, but the remaining length can cover the adjacent frame.
Mistake 3. Counting each frame separately
A series of identical frames often fits into fewer planks with a common cut.
Mistake 4. Dividing the total length by 2600 and rounding immediately
This gives only a lower bound. Segments may not fit into planks rationally.
Mistake 5. Adding 15% to each side
The allowance relates to purchasing and losses, not changing final dimensions.
Mistake 6. Placing a joint in the center just for symmetry
The center can be the most visible spot on the wall.
Mistake 7. Making too short an extension near the corner
A short fragment can be inconvenient during installation and creates two complex zones nearby.
Mistake 8. Cutting all planks in half in advance
This eliminates long whole pieces needed for sides of 1800–2400 mm.
Mistake 9. Saving footage at the cost of extra joints
Two planks are better than three segments on one visible line, unless the project requires otherwise.
Mistake 10. Not accounting for the width of the cut
A "zero-gap" layout may not align after several cuts.
Mistake 11. Not checking the ends before gluing
A slanted end will not become straight after final putty.
Mistake 12. Fixing a step with a thick layer of sealant
The main plane must be assembled mechanically accurately.
Error 13. Buying MLDPU-002U without a drawing
The corner element changes the frame geometry and straight lengths.
Error 14. Mixing MLDPU-002 and a similar article in one list
Material and profile may differ.
Error 15. Choosing glue only based on the recommendation "for moldings"
You need to consider the wall base and finish.
Error 16. Not checking side light
A small step at the joint becomes noticeable due to shadow.
Error 17. Ordering a formal reserve without a map
Sometimes an additional strip is needed, sometimes existing remnants provide a larger reserve.
Error 18. Not saving useful remnants
A good piece turns into waste only due to poor storage or lack of labeling.
When MLDPU-002 is especially convenient for a long wall
The profile suits the project if:
-
width 22 mm matches the scale of the composition;
-
thickness 11 mm provides the desired relief;
-
length 2600 mm is taken into account in advance;
-
the connection point can be chosen deliberately;
-
remnants fit into other frames;
-
The entire system is calculated with a single article number.
In such a project, the standard length ceases to be a limitation and becomes a cutting module.
When it's better to consider a different profile
Another molding is worth comparing if:
-
22 mm is too wide or too narrow;
-
11 mm gives a different relief;
-
The design requires a different pattern;
-
The project is initially calculated for a different length, and replacing the profile does not disrupt the style;
-
Too many straight sides slightly longer than 2600 mm create inefficient cutting;
-
The selected decorative elements do not interface well with MLDPU-002.
The solution must account for both appearance and installation economy.
But it's not necessary to replace MLDPU-002 just because of one 3 m wall.
Two slats easily cover three meters.
The main question is where to use the 2200 mm remainder.
If the room has at least one frame or vertical around two meters, the problem almost disappears.
Practical purchasing route for an apartment
Let's imagine:
-
one line of 3000 mm;
-
two frames 1200 × 800 mm;
-
one frame 1500 × 1000 mm.
First, we write out the segments:
-
3000 — 1 line;
-
1200 — 4 pcs.;
-
800 — 4 pcs.;
-
1500 — 2 pcs.;
-
1000 — 2 pcs.
Now we divide the long line, for example, into 2600 + 400.
Then we lay out the remaining parts into planks of 2600.
This way you can see the actual quantity and only then add a reasonable reserve.
This is much more accurate than summing perimeters and automatically multiplying by a coefficient.
For the designer: pass not meters, but a list of segments.
The phrase "MLDPU-002 — 18 linear meters" is insufficient for procurement.
Better to pass:
| Article number | Finished part | Quantity | Comment |
| MLDPU-002 | 2600 мм | 1 | Line base 3 m |
| MLDPU-002 | 400 мм | 1 | Extension on the right |
| MLDPU-002 | 1200 мм | 4 | Frame verticals/horizontals |
| MLDPU-002 | 800 мм | 4 | Frames |
| MLDPU-002 | 1500 мм | 2 | Large frame |
| MLDPU-002 | 1000 мм | 2 | Large frame |
After that, the craftsman builds a cutting map using whole planks.
For DIY repairs: colored stickers instead of a complex program.
It is not necessary to use professional software.
Take paper strips at a scale of 1:10.
A 2600 mm plank turns into a 260 mm strip.
A 1200 mm segment becomes 120 mm.
Lay them out physically.
This way, you can immediately see which pieces fit together.
For a commercial project: leftovers are calculated across the entire floor.
If identical frames are repeated in 20 rooms or offices, the purchase cannot be calculated based on one room and then multiplied.
A large series provides more opportunities for optimization.
The remainder from room No. 1 can become a part of room No. 2.
It is on a series that the cutting map brings maximum benefit.
In what order to open STAVROS pages before ordering
First, the MLDPU-002 card: we confirm 22 × 11 × 2600 mm.
Then the molding category: only if a comparison of alternatives is needed.
Next, decorative elements — if they are actually included in the sketch.
After that, material on adhesive and mounting system.
Thus, the catalog route follows the project logic rather than turning into random product browsing.
Three product transitions to MLDPU-002 are needed at different decision points.
At the beginning, the customer confirms the profile itself.
In the middle — after the calculation, they understand the quantity.
At the end — they come with a ready-made specification.
Therefore, after the cutting map, you can already order MLDPU-002 with a length of 2600 mm not "approximately for the room," but with a specific number of whole planks.
The joint and the remainder must be approved simultaneously.
You cannot first decide "the seam will be on the right," and then find out that the remaining piece is inconvenient for the other frames.
Conversely, you cannot place the seam in the center just because the cutting fits nicely that way.
The optimal solution balances both tasks.
Control question before each cut.
Before turning on the saw, the master must know:
which next part will be cut from the remainder?
If there is no answer, it is better to check the cut again against the list.
FAQ: MLDPU-002 2600 mm on the wall is longer than one plank
Will one MLDPU-002 plank be enough for a 3 m wall?
No. The length of one plank is 2600 mm, so for a continuous line of 3000 mm at least two planks are needed.
How exactly much is missing to reach 3 m?
400 mm.
Does this mean that the second plank will be almost entirely wasted?
No. After using 400 mm, theoretically up to 2200 mm remains before accounting for trims and cut width. This segment can be used in other parts of the project.
Where is the best place to make the joint on the 3 m line?
There is no universal place. Usually, it is useful to leave the longest continuous section in the main field of view, and move the connection closer to a less active part of the composition, if it is convenient for installation and cutting.
Is it necessary to place the joint exactly in the center?
No. Symmetry of the connection is not required.
Can the seam be made completely invisible?
Full invisibility cannot be guaranteed. Precise cutting, profile alignment, proper joint treatment, and a uniform finish make the seam as inconspicuous as possible.
What is more important for an inconspicuous seam — putty or precise cutting?
First, precise geometry. The filling material should not compensate for a large step or slanted ends.
Is a separate compound needed for the joint?
This depends on the mounting system. Mounting adhesive and joint treatment perform different functions, so it's better to choose specific materials in advance based on recommendations for polyurethane and the substrate.
How many planks are needed for a 2750 mm line?
At least two. 150 mm is missing, and the remainder of the second plank can be used in other areas.
How many planks for a 4000 mm line?
At least two, because the total length of two planks is 5200 mm.
And for 5200 mm?
Exactly two planks give 5200 mm at nominal length. But for a project requiring finish cuts or additional reserve, the calculation needs to be checked separately.
Can two 3 m lines be made from three planks?
By pure footage and rational cutting, yes, it's possible: three planks give 7800 mm with a requirement of 6000 mm. Joints, cuts, and reserve need to be checked separately.
Why can't you just divide the total footage by 2600?
Because specific segments must physically fit into each plank. Incompatible lengths may require an additional piece even if the total footage is sufficient.
How much allowance should be set aside?
The MLDPU-002 card for frame work recommends an allowance for trimming, approximately 15–20%. But it should be applied after the cutting map, not mechanically to each side.
For a single 3 m line, do we need to buy a third plank for 15%?
Not automatically. Two planks already provide 5200 mm of material with a net requirement of 3000 mm. A third is needed only for a specific project reason.
How to calculate a rectangular frame?
For a preliminary estimate, use P = 2 × (width + height). Then convert the perimeter into four real sides and distribute them across planks.
What does "frame 1200 × 800 mm" mean when calculating the cut?
It needs to be clarified whether the size is specified by the outer, inner, or another reference line. For a profile with a width of 22 mm, this affects the final dimensions of the parts.
Can a leftover piece with an angled cut be used?
Sometimes yes, but its useful length and orientation depend on the next part. In the map, the remainder must be recorded with the end condition specified.
Do I need to buy MLDPU-002U together with MLDPU-002?
No. The corner decorative element is only needed when it is present in the project and its connection is verified against the drawing.
What is the size of MLDPU-002U?
172 × 172 × 13 mm.
Can MLDPU-002U be considered a regular corner for any frame?
No. It is a separate decorative item. Its application and connection with the straight profile must be checked against the specific composition.
What to do with the 200 mm remainder after the 2400 mm line?
Keep it if there is a suitable short part in the project or a control sample is needed. If there is no use, do not build a new composition just to use the remainder.
How to store a long remainder?
On a flat horizontal surface, protected from deformation and mechanical damage.
Do I need to label the offcuts?
Yes, especially if multiple SKUs are used. Labeling with the model and length saves time and reduces the risk of mixing up profiles.
When should the joint be painted?
After the connection is assembled and processed according to the chosen installation system. Painting is the finishing step, not a way to fix a poor cut.
How to check the seam before final painting?
Inspect it from the front and under side lighting, run your finger along the profile, and make sure there is no step.
What to do if the joint is still noticeable?
First, determine the cause: gap, step, incorrect end cut, uneven wall, or finish. Do not add material blindly over the defect.
Can the joint be placed behind a cabinet?
Only if it matches the project and the cabinet is truly stationary. Don't build the entire layout around furniture that might be moved later.
How to tell if a cutting map is good?
In it, long whole pieces are given to the main visible lines, the remnants have a purpose, the number of joints is not increased for the sake of saving, and the allowance is explained by specific risks.
Order checklist: MLDPU-002 for a 3 m wall and adjacent frames
Check ten points before paying.
1. Profile.
The article number is exactly MLDPU-002.
2. Size.
22 × 11 × 2600 mm.
3. All lines.
Not only three meters of the main wall were measured, but also adjacent frames.
4. Segment map.
Each side is recorded separately.
5. Joint location.
On the 3-meter line it is specified, not chosen after the first cut.
6. Remainder.
For the long remainder of the second plank, a use was found or a reserve was consciously accepted.
7. Reserve.
It is calculated after cutting and corresponds to the complexity of the project.
8. Corner elements.
MLDPU-002U is added only if present on the drawing.
9. Installation materials.
Compatibility with polyurethane and the substrate has been verified.
10. Finish.
It is clear how the longitudinal joint will be processed and painted.
If all items are closed, you can buy the polyurethane molding MLDPU-002 already according to the exact specification.
A long line starts not with a joint, but with the correct quantity
There is no mystery on a 3 m wall: 2600 mm of one plank is not enough, so at least two are needed.
But it is precisely after this simple answer that the useful part of the calculation begins.
The second bar is not 400 mm of extension and "extra" 2200 mm. It is 400 mm for continuing the main line plus the potential side of an adjacent frame, a vertical, a horizontal belt, or a reserve. If there are several such elements in the room, the remnants should be distributed across the entire project.
The joint location is also not chosen separately from the cutting layout. The main visual zone should preferably be left as intact as possible, and the seam should be placed where it conflicts less with the composition and light. At the same time, you cannot make an inconveniently short extension just to "hide" the seam. A good project balances three things: appearance, ease of installation, and material usage.
The size of MLDPU-002 — 22 × 11 × 2600 mm — must be fully recorded in the specification. For frames, the finished sides and a control dimension line are additionally recorded. For a series of frames, all segments are calculated together. The allowance is added after the layout, not instead of it.
It is this approach that makes purchasing polyurethane molding predictable. You know in advance why you are taking two, five, or ten strips, where each joint will appear, and where the large remnant will go.
STAVROS company provides the opportunity to assemble not a random set of individual profiles, but a connected system: straight MLDPU-002, decorative elements for moldings, corner MLDPU-002U, other types of stucco decoration, and information on installation materials. But the accuracy of the order starts with the buyer — with the wall dimensions and the cutting map.
For a 3000 mm wall, proceed sequentially: fix the line → determine the joint location → plan two strips → allocate the 2200 mm remnant → add adjacent frames → check the allowance → only then place the order.
Then the 2600 mm length ceases to be a problem. It becomes a clear module from which you can assemble both a three-meter line and a large frame composition without excess molding and without random joints in the most visible places.