Article Contents:
- Wooden slat RK-001: which cross-sections are actually confirmed
- Why an inspection hatch cannot be finished like a regular section of a slat wall
- Wooden slat or ready-made slat panel: where the advantage of RK-001 lies
- Which RK-001 cross-section to consider around a 600×600 mm hatch
- RK-001 15×5 mm
- RK-001 24×5 mm
- RK-001 40×5 mm
- RK-001 70×7 mm
- RK-001 90×10 mm
- RK-001 60×23 mm
- RK-001 80×23 mm
- Swing lid
- Push-to-open hatch
- Removable lid
- The rail remains on the wall
- RK‑001 is attached to the lid
- What to do if the edge of the hatch falls directly under an existing rail
- Oak RK-001 or beech under enamel
- How much does a frame around a 600×600 mm hatch cost in different sections
- How to make a full-size mock-up of the frame before purchasing
- What to do if after installation the frame catches the lid only in one corner
- Final procurement specification of RK-001 for one hatch
- Inspection acceptance after installing the frame around the hatch
- Short conclusion
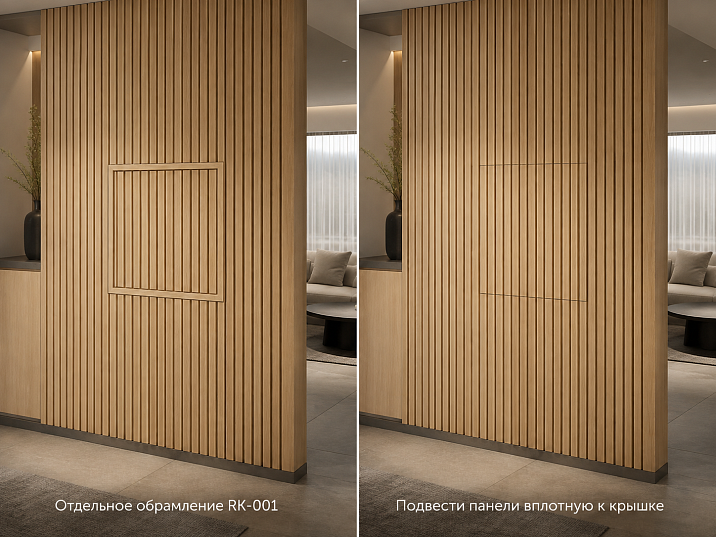
The inspection hatch is already installed. The 600×600 mm lid must open for access to utilities, and slat wall finishing is planned around it. At this stage, the buyer has two options: bring finished slat panels or individual verticals almost to the edge of the lid, or make a separate wooden contour from RK-001 that will separate the technical zone from the main plane.
The main question of the article is not which slat is "prettier." You need to understand when a separate RK-001 really improves the service unit, which cross-section does not interfere with opening, where to leave a technological gap, and how many whole slats 2400 mm long to order.
The direct answer is this: a separate frame made of RK-001 is justified if the hatch needs its own neat contour, the finished panel is poorly trimmed to four edges, or the main slat rhythm is inconvenient to bring close to the lid. But the decorative frame should not block opening, the latch, hinges, lid removal, or access to utilities. Therefore, first check the hatch mechanics and only then choose the cross-section and number of slats.
For an already installed hatch, the correct procedure looks like this:
-
measure the lid and the finished opening;
-
determine the opening method — hinged, removable, push-to-open, on hidden hinges;
-
fix the axis and direction of movement;
-
check whether the cover protrudes when opening;
-
measure the surrounding slat trim and pitch;
-
decide whether the RK-001 slat remains on the wall or becomes part of the cover itself;
-
select a cross-section that does not interfere with the trajectory;
-
build a full-scale mockup;
-
calculate the four sides of the frame using the actual long points;
-
only then order one or more 2400-mm slats.
If the main task is a large wall surface, it is logical to first Buy slatted panels for wall finishing and form a general background. If an individual infill around a technical hatch is needed, buy a wooden slat RK-001 is after checking the specific cross-section and parts map.

Wooden batten RK-001: which cross-sections are actually confirmed
The current card shows seven cross-sections, all 2400 mm long, made of beech and oak.
| Cross-section A×C, mm | Length | Beech, price at the time of check | Oak, price at the time of check |
|---|---|---|---|
| 15×5 | 2400 мм | 490 RUB | 680 RUB |
| 24×5 | 2400 мм | 840 RUB | 1,150 RUB |
| 40×5 | 2400 мм | 1,130 RUB | 1,620 RUB |
| 70×7 | 2400 мм | 2,310 RUB | 3,290 RUB |
| 90×10 | 2400 мм | 3,350 RUB | 4,850 RUB |
| 60×23 | 2400 мм | 4,420 RUB | 6,680 RUB |
| 80×23 | 2400 мм | 5,720 RUB | 8,600 RUB |
Prices and availability are subject to change; they need to be rechecked before payment.
The card also confirms the quality of the 'Prestige' sanding. For the shown beech version, the 'Under enamel' preparation is indicated, and in current STAVROS materials, oak RK-001 is used as a variant for tinting/preserving the natural texture.
Why the length of 2400 mm is a key parameter specifically for the hatch frame
At first glance, a 600×600 mm frame has a perimeter:
4 × 600 = 2400 mm.
From this, it is easy to conclude:
one RK-001 with a length of 2400 mm = one frame.
This is too rough arithmetic.
A real frame requires:
-
cutting the factory ends;
-
corner cuts;
-
definitions, 600 mm — external or internal dimension;
-
technological allowance;
-
possible fitting of one side.
If four parts really need long points of 600 mm each, the net sum already equals the entire factory length without a single millimeter for adjustment and cutting.
This means one 2400 mm slat may be mathematically sufficient, but practically too tight a blank.
Beech and oak are not identical commercial scenarios
Beech is especially logical if the frame must:
-
be painted in the wall color;
-
blend into the overall slat composition;
-
receive an opaque enamel.
Oak — if you need to preserve:
-
natural texture;
-
visible wooden end grain;
-
contrast with the painted wall.
But the choice of material comes after the hatch mechanics. An expensive oak frame that catches the lid remains a bad solution.




Why an access hatch cannot be finished like a regular section of a slat wall
An access hatch is not a decorative insert. Its main function is to periodically open and provide access to utilities.
The decorative system around it must comply with the service function.
What the hatch must preserve after finishing
-
full working opening angle;
-
access to the latch or push-to-open mechanism;
-
access to hinges, if they are serviceable;
-
ability to remove the cover, if the design is removable;
-
free passage of hand and tool;
-
possibility to repair pipes, filters, meters, or electricals.
Why "fitting panels flush" can be a problem
If a panel or slat ends almost at the edge of the cover, it may:
-
catch when opening;
-
hide the service seam;
-
interfere with pressing;
-
block access to the removable element.
Why "making a frame" is not always the solution either
Too thick RK‑001 can itself become an obstacle.
For example, 80×23 mm creates a depth of 23 mm. If the lid describes an arc close to the wall when opening, such a frame can physically interfere with the movement.
Therefore, the choice of cross-section starts not with design, but with the lid's trajectory.
Our factory also produces:




Wooden batten or ready-made slat panel: where the advantage of RK-001 lies
A ready-made panel is strong on a large surface.
It provides:
-
a repeatable factory rhythm;
-
quick installation;
-
a unified backing;
-
predictable pattern.
But around the hatch, these advantages can turn into inconvenience.
What the separate RK‑001 provides
You can set independently:
-
frame width;
-
thickness;
-
indent from the cover;
-
length of each side;
-
material;
-
Color.
Why this is convenient in the service area
The inspection hatch already exists as a separate object.
RK‑001 allows you to create a separate architectural boundary around it without forcing the main panel to precisely follow the four edges of the cover.
When a finished panel is still better
if:
-
The hatch cover is designed to be faced with the same panel;
-
The overall slat rhythm continues seamlessly;
-
The hatch manufacturer allows additional thickness;
-
The service joint remains accessible;
-
The cover opens without collisions.
Then a separate frame may be unnecessary.
Two products — two functions
Main wall:
buy slat panels for interior wall finishing.
Individual boundary of the technical zone:
RK‑001.
These are not competing solutions, but different levels of the same wall.
Get Consultation
Which RK-001 section should be considered around the 600×600 mm hatch?
For the 600×600 mm cover, seven sections give a completely different scale.
RK-001 15×5 mm
A very thin line.
Suitable if:
-
the hatch should be almost invisible;
-
the surrounding layout is also thin;
-
the cover is at eye level;
-
Need a minimal protrusion.
Plus — depth is only 5 mm.
Minus — on a large wall, such a frame may almost disappear.
RK-001 24×5 mm
A more readable, but still light frame.
For a 600 mm hatch, the ratio of rail width to side:
24 / 600 = 4%.
This is already a noticeable, but not massive border.
RK-001 40×5 mm
The front line is significantly wider.
Ratio:
40 / 600 ≈ 6,7%.
On a 600×600 cover, such a frame becomes an independent architectural detail.
RK-001 70×7 mm
The width occupies:
70 / 600 ≈ 11.7% of the side.
On a small cover, it may look heavy.
RK-001 90×10 mm
90 / 600 = 15%.
This is already a very wide contour.
It can be appropriate if the entire wall is built on large massive stripes, but for a regular technical hatch it is easy to overload the composition.
RK-001 60×23 mm
The width is moderate, but the depth is 23 mm.
The main risk is not the visual width, but the volume.
Such a rail should not be chosen without checking the movement of the cover.
RK-001 80×23 mm
The most massive volumetric option in the lineup.
For a flat inspection hatch 600×600 mm, a separate justification is often required.
Practical conclusion
For most thin slat walls, it is reasonable to first create a mock-up:
-
15×5;
-
24×5;
-
40×5.
Large sizes 70×7, 90×10, 60×23, and 80×23 are considered if the surrounding architecture is already large-scale.
But this is not a universal rule. The exact choice is determined by the actual scale of the wall.
First, check not the aesthetic width of the slat, but the opening trajectory of the cover
An inspection hatch can open in several ways:
-
swing open on a hinge;
-
tilt open;
-
be removed entirely;
-
open by pressing;
-
have a hidden hinge;
-
be secured by magnets or latches.
For each scenario, the critical zone is different.
Swing-up lid
The edge of the lid moves along an arc.
If RK-001 is too close to the outer edge, at the first degrees of opening it may:
-
catch on the frame;
-
touch the adjacent panel;
-
rest against the protruding relief.
Push hatch
Need to maintain free inward travel.
If the decorative frame is too close to the lid, the user will not be able to press it in to the required depth.
Removable cover
It can be removed:
-
toward yourself;
-
up;
-
with a tilt.
The frame must not reduce the free path.
Hatch on a concealed hinge
The lid may first shift and then rotate.
This kinematics is especially sensitive to protruding decor.
Why can't a universal gap be assigned
It is impossible to honestly write:
"leave 3 mm"
or
"5 mm is enough."
The minimum service gap depends on:
-
hatch design;
-
hinges;
-
latch;
-
finishing thicknesses;
-
installation quality.
Proper verification is a physical mockup and several opening cycles.
What to measure before ordering the wooden lath RK-001
Before purchasing, a full measurement of the technical zone is needed.
1. Finished size of the cover
Not the construction opening, but the visible cover after installation.
2. Opening size
It may differ from the cover.
3. Opening method
Record specifically:
-
swing;
-
removable;
-
push;
-
other.
4. Hinge axis
If the hatch is hinged, it is important to know where the axis of rotation is located.
5. Maximum opening angle
Not promotional, but factual.
6. Cover protrusion during movement
It is necessary to see whether it extends beyond the plane of the wall.
7. Thickness of the surrounding slat system
If the main panel protrudes by 11, 20, or 40 mm, the separate RK-001 must be coordinated with this volume.
8. Distance to the nearest main slat
A too-small gap may create an accidental double rhythm.
9. Location of the lock or push zone
It must not be covered.
10. Outer size of the future frame
It is important to decide whether the frame goes:
-
along the edge of the lid;
-
with an offset;
-
along the edge of the opening.
11. Inner frame size
It determines the actual service seam.
12. Hatch visibility
From which point it is most often visible.
Control table
| Parameter | Value |
| Cover | 600×600 mm |
| Opening | ___ × ___ mm |
| Opening type | ___ |
| Hinge axis | ___ |
| Service joint | ___ mm |
| Section RK-001 | ___ |
| Outer frame size | ___ |
| Internal frame size | ___ |
| Distance to adjacent rail | ___ |
Without this table, buying RK-001 is premature.
Making RK-001 on the wall or on the hatch cover itself
These are two fundamentally different solutions.
The rail remains on the wall
The cover remains an independent plane.
Advantages:
-
the mass of the hatch does not increase;
-
its thickness does not change;
-
the frame does not participate in movement;
-
it is easier to preserve the service seam.
Cons:
-
the hatch remains visually readable.
RK-001 is attached to the cover
This way you can continue the rhythm of the wall.
But new risks appear:
-
the mass increases;
-
the center of gravity shifts;
-
the thickness increases;
-
the loop receives additional load;
-
the push mechanism may work differently;
-
the rail may cover the latch.
Why can't you just "glue rails to the lid"
The RK‑001 card does not promise compatibility with any inspection hatch cover.
You need to get confirmation from the hatch manufacturer or installer.
When a batten on the cover can be justified
If the hatch:
-
is designed for cladding;
-
has sufficient load capacity;
-
preserves the service joint;
-
opens after a trial installation without contact.
When a frame on the wall is better
If technical access is more important than maximum concealment.
For most service points, this is a more predictable solution.
Can an inspection hatch be made almost invisible in a slat wall
It is not always possible to completely "erase" the hatch visually.
Even with a matching rhythm, the following remain:
-
seams;
-
the lid border;
-
the opening point;
-
a change in the pattern.
The right goal
Not to pretend the hatch does not exist, but to:
integrate the technical cover into the wall without losing access.
Two approaches
1. Camouflage.
The rhythm continues over the lid.
2. Honest framing.
RK-001 creates an independent contour.
The second option is often easier to operate.
When the frame looks better than an "invisible" hatch
if:
-
the lid is not aligned with the rhythm;
-
its seams are still visible;
-
the hatch is needed for regular access;
-
the finish is expensive and you don't want to risk the mechanism.
Then a neat wooden border looks more deliberate than an attempt to hide a technical detail at any cost.
How to maintain the slat rhythm around the hatch
Before the first cut, the entire wall needs to be laid out.
Don't start from the hatch.
Step 1. Determine the base axis of the wall
For example:
-
center of the TV;
-
center of the furniture;
-
edge of the wall;
-
specified spacing.
Step 2. Lay out the main verticals
First, without taking the hatch into account.
Step 3. Overlay the 600×600 outline
Now you can see which slats fall on the cover.
Step 4. Decide what to do with intersecting verticals
Options:
-
interrupt;
-
move;
-
continue on the cover;
-
replace with a separate frame.
Step 5. Check symmetry
No random narrow fields should appear to the left and right of the hatch.
Step 6. Only then design RK-001
The frame should support the overall rhythm of the wall, not exist independently.
What to do if the edge of the hatch falls directly under an existing rail
This is a common conflict.
Option 1. Shift the overall rhythm
Works if the wall finish is not yet installed.
Even a shift of 10–20 mm can eliminate direct alignment.
But the number is chosen based on the project, not as a universal value.
Option 2. Interrupt the specific rail
It ends at the service joint and continues after the hatch.
Option 3. Create frame RK-001
The hatch becomes a separate insert, and the main vertical stops at the frame.
Why you don't need to file down the hatch
The technical structure is already installed.
The decor adapts to it, not the other way around.
Oak RK-001 or beech under enamel
For the hatch, the material is chosen based on the overall wall.
Beech under enamel
Suitable if the frame must:
-
match the wall;
-
to be white;
-
to be colored;
-
visually dissolve.
Oak
Suitable if:
-
main wall made of natural wood;
-
a pronounced contour is needed;
-
the frame must remain visible.
Material price and service unit
If the frame requires two slats, the difference becomes noticeable.
For example, for 24×5:
Beech:
2 × 840 = 1680 rub.
Oak:
2 × 1150 = 2300 RUB
But price is secondary to mechanics.
Why one RK‑001 with a length of 2400 mm cannot simply be considered as "four sides of 600 each"
This is the key calculation of the article.
Mathematically:
4 × 600 = 2400 mm.
But such a calculation assumes:
-
zero kerf;
-
zero end trimming;
-
no errors;
-
external dimension exactly 600;
-
no corner allowance.
If 600×600 is the outer size of the frame
Theoretically, four long points of 600 mm already exhaust the entire factory length.
There is no real reserve.
If 600×600 is the inner light
For RK‑001 with a width of 24 mm, the outer side will be:
600 + 2×24 = 648 mm.
Four sides:
4 × 648 = 2592 mm.
One plank of 2400 mm is already physically insufficient.
For 40 mm:
External size:
680 mm.
Perimeter:
2720 mm.
For 15 mm:
630 mm × 4 = 2520 mm.
That is, even a thin 15×5 already requires more than 2400 mm, if 600×600 is the internal size.
Why the dimension system is critical
Need to record:
-
“600×600 — cover”;
-
“external frame ×”;
-
“internal light ×”.
Without this, the same phrase means different orders.
How to calculate the quantity of RK‑001 for one hatch and several hatches
After determining the actual external size of the frame, you can count the parts.
For one hatch, four sides are needed:
-
the top;
-
bottom;
-
left;
-
right.
But you need to buy them not as "four pieces," but as a cut from 2400‑mm planks.
Example 1. External frame 600×600 mm
If exactly four pieces of 600 mm are needed at the long points, the net sum is:
2400 mm.
Practical conclusion:
one strip is too tight a minimum, because there is no allowance for end trimming and cutting.
Rational approach:
-
either buy two strips;
-
or confirm the possibility of obtaining all four sides from one specific workpiece with real cutting technology.
For expensive oak, the second path requires very precise equipment and still leaves zero reserve.
Example 2. Internal opening 600×600 mm, RK‑001 24×5
External size:
648×648 mm.
Net total:
4 × 648 = 2592 mm.
Minimum:
2 planks.
Example 3. Internal opening 600×600 mm, RK‑001 40×5
External size:
680×680 mm.
Net total:
2720 mm.
Also at least 2 planks.
Example 4. Two identical hatches
If each needs four parts of 648 mm:
total net length:
2 × 2592 = 5184 mm.
By length:
5184 / 2400 = 2,16.
Minimum — 3 planks.
But the map needs to be checked.
from one plank you can get:
648 + 648 + 648 = 1944 mm
and the remainder:
456 мм
before accounting for the cut.
For eight parts 648 mm:
-
strip 1 → 3 parts;
-
strip 2 → 3 parts;
-
strip 3 → 2 parts.
Three actually work.
Why it's better to count several hatches together
Remnants from one frame can become sides of another.
This is especially important for sections:
-
70×7;
-
90×10;
-
60×23;
-
80×23,
where the price of one plank is significantly higher.
How much does a frame around a 600×600 mm hatch cost in different sections
For a commercial comparison, let's take a practical scenario: two planks, because one 2400-mm rail does not provide a comfortable margin for a full frame.
Beech
| Cross-section | Price of 1 slat | 2 rails |
| 15×5 | 490 RUB | 980 RUB |
| 24×5 | 840 RUB | 1,680 RUB |
| 40×5 | 1,130 RUB | 2,260 RUB |
| 70×7 | 2,310 RUB | 4,620 RUB |
| 90×10 | 3,350 RUB | 6,700 RUB |
| 60×23 | 4,420 RUB | 8,840 RUB |
| 80×23 | 5,720 RUB | 11,440 RUB |
Oak
| Cross-section | Price of 1 slat | 2 rails |
| 15×5 | 680 RUB | 1,360 RUB |
| 24×5 | 1,150 RUB | 2,300 RUB |
| 40×5 | 1,620 RUB | 3,240 RUB |
| 70×7 | 3,290 RUB | 6,580 RUB |
| 90×10 | 4,850 RUB | 9,700 RUB |
| 60×23 | 6,680 RUB | 13,360 RUB |
| 80×23 | 8,600 RUB | 17,200 RUB |
Prices are as of the time of checking; before payment, they need to be verified in the product card.
What this table shows
The choice of cross-section greatly affects the budget.
For example:
24×5 oak — 2,300 RUB for two slats.
80×23 oak — 17,200 RUB.
The difference:
14,900 RUB.
Therefore, a large volumetric frame cannot be chosen just because it “looks more expensive.” On a 600×600 mm hatch, it also interferes more with the mechanics.
When it is more advantageous not to buy RK‑001 at all
A separate frame is not a mandatory element.
The finished panel already matches the rhythm
If the cover is designed for cladding with the same system, an additional RK‑001 can only create an extra boundary.
The hatch is almost invisible without a frame
If the service seam is neat and the panel rhythm continues logically, a separate contour adds no value.
The cover has a small working gap
Even a thin 5-mm batten can be undesirable if the mechanism operates at a minimum distance.
The hatch manufacturer prohibits additional cladding
Then the service function is more important than decor.
The frame disrupts the rhythm of the wall
For example, on the wall there are rare verticals, but around the hatch a dense square appears.
Visually, this can look like a random overlay.
When a separate wooden batten is the best option.
The hatch is located on the border of two materials.
For example:
-
a slat panel;
-
Painted wall.
RK-001 can become a neat transition.
The finished panel has to be heavily fragmented.
The four edges of the cover create many small undercuts.
A separate frame simplifies the geometry.
A clear service contour is needed.
The frame makes the technical zone readable but neat.
The hatch is opened regularly.
For frequent maintenance, an honest framing is more practical than trying to make the cover 'invisible'.
Maintainability must be preserved.
RK-001 on the wall allows you to remove/open the cover independently of the main slat surface.
How to make a full-size mockup of the frame before purchasing.
For a 600×600 mm hatch, the mockup is especially useful.
Paper frontal test
Mark with painter's tape:
-
15 mm;
-
24 mm;
-
40 mm;
-
if necessary, 70/90 mm.
This shows the line width.
Volume test
For 60×23 or 80×23, a rigid sample of corresponding depth is needed.
Otherwise, the photo will not convey the real shadow.
What to check
-
lid size;
-
service seam;
-
pressure;
-
opening;
-
finger access;
-
view from a distance;
-
adjacent slat rhythm.
Why the layout should be left for several hours
In different lighting, a large frame can be perceived differently.
Side lighting especially emphasizes deep sections.
How to choose the RK‑001 offset from the manhole cover
The frame can go:
-
almost at the edge;
-
with a small margin;
-
along the edge of the opening;
-
along its own independent axis.
There is no universal indent.
What determines the offset
-
lid trajectory;
-
service joint size;
-
hinge type;
-
rail depth;
-
adjacent rhythm;
-
pressing method.
Why too small an indent is dangerous
The lid can catch on the rail.
Why too large an indent is also bad
An extra wall strip appears that looks random.
Practical method
First, mechanics determine the minimum allowable position, then design chooses the final one.
How to finish the corners of the RK‑001 frame
The four sides can be joined in several ways.
Angle 45°
The most "frame-like" look.
But real geometry requires:
-
precise tools;
-
equal lengths;
-
clean cuts.
Butt joint
One piece fits into the end of another.
Easier to manufacture.
But the look depends on the cross-section and grain direction.
For oak
A miter joint allows a more beautiful continuation of the pattern around the corner, but requires precise finishing.
For beech under enamel
A butt or miter joint may be less visible after opaque painting, but the geometry still needs to be precise.
Why the angle affects consumption
Mitered parts are measured at their long points.
Therefore, a clean "perimeter of 2400 mm" is even less indicative of actual consumption.
Making the frame on the wall as a single piece or from four independent parts
In practice, the frame is assembled from individual sides.
But it should be designed as one system.
What should match
-
outer size;
-
inner light;
-
diagonals;
-
angles;
-
service seam.
Diagonal of the outer square 600×600
If the outer dimension is indeed 600×600:
√(600² + 600²) ≈ 848.5 mm.
Both diagonals must be equal.
This is a simple squareness check before installation.
If the inner light is 600×600 and the profile is 24 mm
Outer square:
648×648 mm.
Diagonal:
≈916.4 mm.
Such a calculation helps control the layout.
How to check a push-to-open hatch after installing the decorative frame
The push-to-open hatch opens not just due to the gap around the perimeter. The user must press the lid, it moves inward, the mechanism releases the latch, after which the lid comes out.
RK-001 can affect this process in several places at once.
Press point
If the frame is too close, it is inconvenient for the user to press the lid.
This is especially noticeable with a small hatch, where the contact area is limited.
Internal travel
The lid may first move inward by a few millimeters.
If the decorative trim partially overlaps the edge, this travel is blocked.
Exit to the outside
After activation, the cover may shift and rotate.
You need to check the entire cycle, not just the moment of pressing.
Practical test
After temporary installation of the mockup:
-
close the hatch;
-
press the way a regular user would;
-
open;
-
close;
-
repeat at least ten to twenty times;
-
check the top, bottom, and both side edges.
If at least one cycle requires additional effort, the frame is not yet confirmed.
If RK-001 is placed on the lid itself: how mass and geometry change
The RK-001 card does not publish the mass of each section per linear meter, so the article will not invent additional weight.
But the direction of change is obvious: any wooden batten adds mass to the lid.
Why this is important
Hinges and push mechanisms are designed for a specific load.
Additional weight can:
-
slow down opening;
-
cause sagging;
-
change the position of the latch;
-
increase the load on hidden hinges.
The larger the cross-section, the higher the risk
15×5 and 24×5 add less material than 80×23.
This does not automatically mean compatibility of thin profiles.
But large cross-sections require particularly strict inspection.
Center of mass
The rack is added to the front side.
The center of mass of the cover shifts forward.
For a hinged structure, this increases the moment relative to the hinge.
How to check
The best way is a real test piece or an accurate mass-dimensional mock-up.
After temporary fastening:
-
open;
-
leave the cover in the working position;
-
check for play;
-
close;
-
evaluate repeatability.
What to ask the hatch manufacturer
-
is cladding allowed;
-
maximum weight;
-
allowable thickness;
-
are additional hinges needed;
-
can slats be glued to the lid.
Main slat rhythm and a separate frame: how to avoid a double grid
A separate frame around the hatch creates horizontal and vertical lines.
The main wall already has its own verticals.
If the two systems are not coordinated, visual noise appears.
Scenario 1. Frame thinner than main slats
For example:
-
main layout — 40 mm;
-
frame — 15 mm.
Then the frame reads as thin technical graphics.
This can be successful.
Scenario 2. Frame of the same width
If the main batten is 24 mm and the frame is also 24 mm, the hatch blends more into the overall pattern.
Scenario 3. Thicker frame
For example:
-
main verticals 24 mm;
-
frame 70 mm.
The hatch becomes an accent.
For a service cover, this is often excessive.
Why horizontal sides are especially noticeable
A vertical slat wall usually contains no horizontals.
The frame adds top and bottom lines, so even a narrow RK‑001 sharply defines a square.
If the goal is to hide the hatch as much as possible, sometimes it's better to use only vertical trims or skip the frame altogether.
Do all four sides need to be made from the same profile?
Not necessarily, but any mixing should be deliberate.
For example, a designer might want:
-
verticals 24×5;
-
top/bottom 15×5.
This reduces the visual mass of the horizontals.
But such a project:
-
is more difficult to calculate;
-
is harder to install;
-
requires a careful corner solution.
For a regular service hatch, the same cross-section on all four sides is simpler and more predictable.
How to align RK-001 with ready-made slat panels
If ready-made PAN panels are already used around, you need to check:
-
the face width of their slats;
-
depth;
-
step;
-
color;
-
the backing;
-
the position of the edge elements.
Why RK-001 does not have to exactly match the ready-made panel slat
A separate frame can be an independent boundary.
If you try to perfectly imitate the factory profile, but the depth and shape differ, the mismatch will become more noticeable.
When is it better to make a contrasting contour
If the panel has a pronounced relief, thin RK-001 can work as a neutral frame.
When is it better to refuse a frame
If the finished panel already fits perfectly to the hatch and the service seam is preserved.
What to do if the hatch cover protrudes from the wall plane
This is a separate edge case.
Suppose the cover protrudes a few millimeters relative to the finished wall.
If you place a flat RK-001 24×5 nearby:
-
the frame may end up flush with the cover;
-
or below it.
If you choose a 23-mm deep profile:
-
it may protrude more than the cover.
What to check
Not "which profile is prettier," but three planes:
-
wall;
-
cover;
-
front surface of RK-001.
Side mockup
It is the side cut that shows whether you get:
-
a smooth transition;
-
step;
-
a deep niche.
Why a step is not always a defect
If it repeats evenly, it may be a deliberate detail.
It's bad when it's random and different on each side.
What to do if the lid is recessed
A recessed lid already creates a shadow seam.
An additional frame can:
-
enhance the effect;
-
overload it.
If the cover is recessed to a noticeable depth, the thin RK‑001 is often more logical than a large one.
But the final choice is again made by the mockup.
Installation of RK‑001 around the hatch: attach to the wall or to a separate substrate
The RK-001 card does not define a single mounting system.
The specific method depends on the base.
Possible bases
-
concrete;
-
brick;
-
gypsum board;
-
MDF;
-
plywood;
-
finished wall panel.
Why one universal adhesive cannot be assigned
Different substrates have different adhesion.
Additionally, near the hatch, the frame may be subject to contact by hands and tools.
What is required from the mounting system
-
hold the rail;
-
not interfere with the lid;
-
do not block the service;
-
allow final adjustment.
Do not accidentally glue to the lid
If
What to do if, after installation, the frame catches the lid in only one corner
There is no need to immediately increase the gap around the entire perimeter.
First, determine the cause:
-
the lid has sagged;
-
the frame is not square;
-
corner RK-001 came out inward;
-
the wall is uneven;
-
the hinge has play.
Why local contact is important
If the problem is in the lid geometry, increasing the entire internal light will ruin the composition but won't eliminate the cause.
Correct sequence
-
check the frame diagonals;
-
check the lid position;
-
check the hinges;
-
only then adjust the specific side.
Final procurement specification RK-001 for one hatch
Before payment, the order can be written in one line:
RK-001 / 24×5×2400 mm / beech / 2 slats / cover 600×600 mm / internal frame light × / service joint ___ mm / external dimension × / 45° miter or straight joint / slat remains on wall / finish ___ .
For oak:
RK-001 / 40×5×2400 mm / oak / 2 slats / natural finish ___ / frame on wall / cover opens to ___ / spare slat not needed or needed due to ___ .
Such a specification captures the essentials: product, geometry, and mechanics in one document.
If it still contains words:
"approximately 600×600, we'll decide the offset later,"
the order is not ready yet.
Mistakes when ordering RK-001 around the inspection hatch
Mistake 1. Choosing the slat only by width
24 mm may seem like a suitable scale, but even 5 mm of thickness needs to be checked along the trajectory.
Mistake 2. Forgetting the depth of 60×23 and 80×23
A large volume can interfere with the lid.
Error 3. Not checking the hinges
The frame is installed, but the lid stops opening fully.
Error 4. Closing the latch
Especially for push-hatches.
Error 5. Considering one 2400 mm plank sufficient using the formula 4×600
Cuts and the external size make the calculation too tight.
Error 6. Painting all parts first, then fitting
After adjusting the angle, a fresh end face appears.
Error 7. Choosing 80×23 for a small hatch without a mockup
The frame overloads the service area.
Error 8. Confusing the ventilation grille with the inspection hatch
The grille needs constant airflow, the hatch needs periodic access.
Error 9. Starting the slat rhythm from the hatch
The entire wall becomes subordinated to the technical point.
Error 10. Gluing the slat to both the wall and the cover
The hatch stops opening.
Error 11. Not checking the appearance in the open state
A closed hatch is beautiful, an open one catches the decorative contour.
Error 12. Not aligning the frame with the main panel
A double random rhythm appears.
Error 13. Making a frame from different scraps without sorting oak
The four sides noticeably differ in tone.
Error 14. Placing a direct joint without checking the end
On natural wood, the cut may look rough.
Error 15. Ordering the exact quantity without one trial mockup
Especially risky with an expensive profile.
When a separate RK-001 around the hatch may be more expensive, but still more rational
You need to compare not only the cost of the batten, but also the cost of reworking the finished panel.
Let's imagine that the main slatted surface has already been purchased. To neatly bring it to the hatch, you need:
-
four precise cutouts;
-
trimming around hinges;
-
fitting the service joint;
-
possible replacement of one damaged panel.
A separate RK-001 can add to the material cost, but reduce the risk of error on a large panel.
Example 24×5 from beech
Two battens:
1680 RUB
If they allow turning the complex perimeter of a hatch into four simple straight boundaries, such a surcharge may be economically justified.
Example 24×5 oak
2300 RUB
With a natural oak wall, this is simultaneously:
-
an extension;
-
an end frame;
-
a repairable boundary.
When an additional frame is truly redundant
If the hatch is already built into a factory panel system and its cover is faced without complex cuts.
Then RK-001 will only add an extra layer.
Inspection hatch on a painted wall with individual vertical slats: how to calculate the rhythm
There are not always ready-made panels around the hatch. Sometimes the wall is assembled from individual vertical RK-001.
Then the task changes.
First, the overall module
For example:
-
rail 24 mm;
-
gap 36 mm.
Module:
60 mm.
Hatch 600 mm
It takes exactly:
600 / 60 = 10 modules
by width.
This is a beautiful coincidence in a conditional example.
But if the real hatch:
615 mm,
and the module is 60 mm,
We get:
10.25 modules.
Then the edge of the hatch falls inside the rhythm.
What to do
-
shift the start of the entire layout;
-
change the step;
-
make a separate frame;
-
accept the asymmetry.
Why the frame is useful
It separates the technical size of the hatch from the decorative step of the entire wall.
If the hatch is located close to the inner corner
For example, from the edge of the hatch to the wall:
180 mm.
The RK‑001 frame with a width of 40 mm leaves little free space.
If a main vertical rail also runs nearby, the assembly may become overloaded.
What to check
-
the distance from the outer edge of the frame to the corner;
-
the width of the main slat;
-
the presence of a baseboard;
-
ability to open the lid.
When a thin profile is better
On a narrow wall segment 15×5 or 24×5, they usually fit more easily than 70×7.
But this is again a design choice, not a universal rule.
If the hatch is located above the baseboard
The lower side of the frame may conflict with the floor baseboard.
For example:
-
the lower edge of the hatch at a height of 150 mm;
-
baseboard 120 mm;
-
RK-001 frame 40 mm.
Between the top of the baseboard and the frame, only the following will remain:
150 − 120 = 30 mm
by geometry, before accounting for the width of the frame itself.
If the bottom side of the frame occupies 40 mm, it will actually intersect with the baseboard zone.
Options
-
raise the frame if the hatch allows;
-
use a thinner batten;
-
connect the frame to the baseboard;
-
abandon the bottom horizontal bar.
This scenario needs to be checked before purchase.
If the hatch is located under the ceiling
Similarly, check:
-
ceiling cornice;
-
the shadow gap;
-
ventilation;
-
the top row of battens.
A tall hatch may not need a massive top side of the frame if an architectural horizontal line already runs nearby.
How to match the color of RK-001 with the technical cover
There are three basic scenarios.
Frame in wall color
Beech under enamel is a strong candidate.
The hatch becomes calmer.
Frame in slat color
If the main wall is oak, the oak RK-001 makes the technical contour part of the overall system.
Contrasting frame
For example:
-
black;
-
oak;
-
white.
The hatch becomes a visible accent.
This may be correct in an engineering interior, but for a living room, the scale needs to be checked.
What to send to the manager before ordering RK-001
A good request should contain more than just "need a 600×600 frame."
Product
-
RK‑001;
-
cross-section;
-
beech or oak;
-
Quantity.
Hatch
-
photo of closed;
-
photo of open;
-
lid size;
-
opening size;
-
opening type;
-
hinges;
-
latch location.
Wall
-
photo of rack layout;
-
step;
-
nearest slats;
-
baseboard;
-
ceiling profile.
Frame drawing
Specify:
-
outer size;
-
inner size;
-
service seam;
-
type of corner joint.
Ready-made wording
"The inspection hatch 600×600 mm is already installed. We plan a separate frame RK‑001 with section ___ made of beech/oak. The lid opens ___, working service gap ___ mm, outer frame size × mm. Please confirm the current version, price, availability, and possibility to order ___ strips 2400 mm long."
Why the manager should not choose the service gap
He confirms the product.
The minimum gap is determined by:
-
hatch manufacturer;
-
installer;
-
actual test.
Where to buy wooden slat RK-001 and slat panels
For individual framing after checking, you can order wooden slat RK-001.
If you need to compare other wooden profiles, you can buy wooden slats.
If the task is the main wall surface, not a technical frame, wooden slat panels for interior finishing provide a different installation scenario.
For a general comparison of the piece RK-001 and the interior RK-002, existing material is useful RK-001 or RK-002 — which slat to choose.
Before installation, it is worth checking Mounting and finishing materials и payment and delivery terms.
Control inspection after installation of the frame around the hatch
After final installation, you need to evaluate not only the appearance of the closed lid. Acceptance is carried out in two modes.
Closed hatch.
Check:
-
identical service seam on all sides;
-
alignment of the frame with the overall slat rhythm;
-
absence of glue on the edge of the lid;
-
evenness of corners;
-
absence of steps between the sides of RK-001.
Open hatch.
Check:
-
full angle;
-
free access to the lock;
-
ability to remove the cover if it is removable;
-
no contact with the frame;
-
tool access inside the opening.
If the frame is beautiful only when closed but hinders maintenance, the assembly is done incorrectly.
For a regular service hatch, it is useful to do another test: open and close the cover several times in a row after the glue and finish coating have fully dried. Sometimes contact appears not on the first movement, but after slight shifting or settling.
The criterion for the finished result is simple: RK‑001 should look like part of the wall design, but at the moment of maintenance cease to be an obstacle. This is what distinguishes a decorative frame for a technical zone from an ordinary picture or mirror frame.
Final decision tree: is RK‑001 needed around a 600×600 mm hatch
Step 1. Does the hatch already work without finishing?
-
no → first fix the mechanics;
-
Yes → continue.
Step 2. Does the manufacturer allow cladding the cover?
-
yes → compare the rail option on the lid;
-
no/unknown → the frame remains on the wall.
Step 3. Is the main slat panel brought to the lid without complex cutting?
-
yes → a separate RK‑001 may not be needed;
-
No → continue.
Step 4. Is an independent technical contour needed?
-
yes → RK‑001 is rational;
-
no → keep the common rhythm.
Step 5. Is the cross-section selected?
-
first mock up 15×5, 24×5, 40×5;
-
large profiles — only after checking the volume.
Step 6. Is the lid trajectory checked?
-
no → do not buy;
-
Yes → continue.
Step 7. Are the outer and inner dimensions of the frame determined?
-
no → the 2400 mm calculation is unreliable;
-
Yes → continue.
Step 8. Is one 2400 mm rail enough with real cuts?
-
exactly in mathematics → consider too dense variant;
-
there is a technological reserve → check the map;
-
not enough → two planks.
Step 9. Do you need a spare?
Decide based on material, price, and complexity.
Step 10. Only now place the order.
FAQ
What sizes are available for RK-001?
15×5, 24×5, 40×5, 70×7, 90×10, 60×23, and 80×23 mm. All are 2400 mm long.
What materials are available?
Beech and oak.
What cross-section should be chosen for a 600×600 mm hatch?
Usually, 15×5, 24×5, and 40×5 are compared first. Large cross-sections require a separate mockup and opening check.
Will the RK-001 24×5 mm fit?
It is a good candidate for a light, readable frame, but the final decision depends on the service joint and wall rhythm.
Can the slats be attached to the hatch cover?
Only if the hatch manufacturer allows additional cladding and the mechanism continues to operate normally after the test.
Will the slats interfere with opening?
They can, especially deep 23-mm profiles. This is checked with a physical mock-up.
How to maintain the overall rhythm of the wall?
First lay out the entire slat system, then overlay the hatch outline and decide which slats are interrupted.
How does an access hatch differ from a ventilation grille?
An access hatch requires periodic full access to utilities. A ventilation grille requires constant air exchange.
How many RK-001 to buy for one frame?
One 2400-mm plank is mathematically equal to four sides of 600 mm each, but in practice this is too tight a calculation. Often two planks are more rational, especially if 600×600 is the internal dimension.
What to choose — beech or oak?
Beech is logical under a covering enamel, oak — for a visible natural texture. First, the mechanics are checked.
Is it worth buying a ready-made panel instead of individual slats?
Yes, if it already matches the rhythm and the cover is designed for such cladding.
Where to order RK-001?
In the RK-001 card on STAVROS after approval of the cross-section and quantity.
Brief conclusion
For a 600×600 mm access hatch, a separate RK-001 is useful not because it makes the wall look "more expensive," but because it can separate the service cover from the main slat system and simplify maintenance.
The main rule: first mechanics, then decor.
Need to check:
opening type → cover trajectory → service joint → RK-001 position → outer/inner frame size → actual 2400 mm cutting → material → quantity.
It is especially important not to repeat the mistake:
4×600 = 2400 → so one slat is definitely enough.
If 600×600 is the internal light, the outer frame size is already larger. Even with an external 600×600, zero allowance for cutting and trimming makes one slat a risky minimum.
If a ready-made slat panel integrates seamlessly with the hatch cover and does not interfere with maintenance, a separate RK-001 is not needed at all. However, if the hatch requires its own neat border, a thin or medium wooden slat becomes a clear additional product that can be calculated and ordered separately. Before payment, it remains to verify the current price, the selected cross-section, the service joint, the type of hatch opening, the final parts map, and the actual compatibility of the frame after a control mock-up.