Article Contents:
- What is the wooden cornice KZ-011 108 × 34 mm
- Why a wooden ceiling cornice cannot be chosen separately from a slat wall
- How to check the installation location of a wooden cornice above slat panels
- 1. Record the actual thickness of the slat system
- 2. Measure the depth of the grooves
- 3. Find the load-bearing line
- 4. Check for a solid mounting zone
- 5. Mark the lower boundary of the profile
- 6. Check the side overhang
- 7. Mark all obstacles
- 8. Check angles and lengths
- 9. Do a visual fitting
- 10. Only after checking, place the order
- The mounting zone is left until the panels are installed
- The panels are installed, but a smooth strip is preserved on top
- The panels are already brought up to the ceiling
- Why a mounting strip doesn't always solve the problem
- Cost of the mathematical minimum
- How to measure a room with corners
- Inside corner
- Outside corner
- Non-perpendicular and uneven walls
- Tension Ceiling
- Hidden Lighting
- Built-In Light Fixtures
- Ventilation and sensors
- Top of a built-in wardrobe
- Buying the cornice before checking the base
- Mistaking a thin decorative strip for a mounting bar
- Setting the thickness of the embedded piece based on the 34 mm projection
- Forget that the height of 108 mm overlaps the top of the rails
- Count 4.8 m as two solid wood planks without reservations
- Mix lengths of 2400 and 2600 mm in one calculation
- Order oak "under enamel" for transparent tinting
- Assume all angles are 90°
- Place the joint between support sections
- Cover the stretch ceiling profile with a cornice without approval
- Use KZ-011 as a base for curtains or lighting without a project
- Paint each plank separately without a common control panel
- Do not check the delivery of long-length parts
- Object
- Product
- Execution
- Is KZ-011 a curtain rod?
- Can KZ-011 be mounted directly onto protruding rails?
- Is a strip exactly 108 mm high required?
- How to determine the thickness of the mounting strip?
- Which material to choose for enamel?
- Can the oak KZ-011 be tinted to match the panels?
- What is the difference between lengths 2400 and 2600 mm?
- How many slats are needed for a straight wall of 4.8 m?
- Can KZ-011 be installed next to a stretch ceiling?
- How to finish an internal corner?
- Do I need to leave expansion gaps?
- Can KZ-011 be used only on one accent wall?
- What to do if the panels are already fully installed up to the ceiling?
- Can an LED strip be hidden behind a 34 mm projection?
- What to do with the leftover plank after cutting?
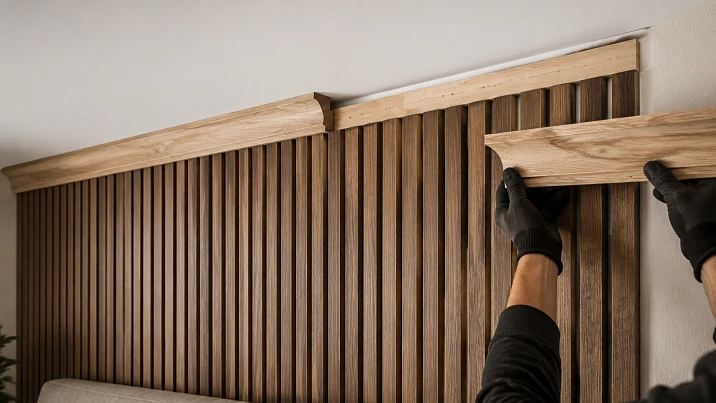
If vertical slat panels already reach the ceiling, the wooden cornice KZ-011 cannot be purchased based only on the wall length. First, you need to check what its rear part will be attached to. Individual slat tops do not form a continuous mounting plane: gaps remain between them, the depth of contact varies, long pieces are harder to align in one line, and joints may end up in areas without reliable support. For a cornice with a height of 108 mm and a projection of 34 mm, a pre-designed solid mounting zone connected to a sturdy wall base or frame is required.
The practical conclusion is this. KZ-011 can be ordered now if the upper mounting strip already exists, its geometry is confirmed with a template, all angles are known, and the cutting plan is made for the selected material. First, the top of the slat wall needs to be redone if the panels are brought to the ceiling without an embedded support and the cornice would have to be glued or screwed only to individual slats. It is better to abandon the profile if the 108 mm height blocks ventilation, conflicts with a cabinet or door, the 34 mm projection interferes with lighting, or creating a continuous base without damaging the finished finish is impossible.
For KZ-011, the length depends on the material. The profile made of beech or oak is produced in a length of 2400 mm, and from MDF — 2600 mm. Therefore, the same wall will require a different cutting plan. For example, 4.8 m is mathematically covered by two solid wood planks without waste, but such an order leaves not a millimeter for trimming and corners. For MDF, two pieces give 5.2 m and a nominal reserve of 400 mm. On a 5.2 m wall, the situation is reversed: two MDF planks meet exactly in length, while solid wood requires at least three.
Before payment, four checks must be completed: make a cross-sectional template of 108 × 34 mm; find a solid load-bearing base along the entire line; measure not only straight sections but also actual angles; choose the material together with the final finish. Only after this does the number of planks become a production calculation, not an approximate division of the wall length.
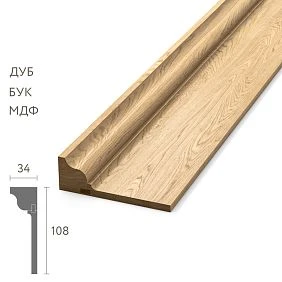
What is the wooden cornice KZ-011 108 × 34 mm
KZ-011 is a decorative ceiling cornice, that is, a profiled molding for the architectural completion of the upper edge of a wall. It is not a rod, rail, or curtain track system for hanging curtains. Rings, runners, and fabric are not attached to it. Its task is to form a visible transition between the wall and the ceiling area, unify the vertical finish, and cover the designed upper joint.
В in the card of the wooden cornice KZ-011 three material versions and two standard lengths are confirmed. Their cross-section is the same — 108 × 34 mm. The 108 mm parameter describes the height of the visible upper strip, and 34 mm — the depth, or projection of the profile from the base plane. Before installation, the designations must be compared with the manufacturer's drawing: the final assembly depends on the shape of the rear side and the actual contact zones, not just the external rectangle.
| Characteristic | KZ-011 made of MDF | KZ-011 made of beech | KZ-011 made of oak |
|---|---|---|---|
| Cross-section | 108 × 34 mm | 108 × 34 mm | 108 × 34 mm |
| Standard length | 2600 мм | 2400 мм | 2400 мм |
| Sanding in the card | «Prestige» | «Prestige» | «Prestige» |
| Basic finishing logic | Covering enamel | Enamel or agreed tinting | Tinting with preserved texture — only after confirming the blank category |
| Price as of 23.08.2026 | 2 840 ₽ | 5 480 ₽ | 8 230 ₽ |
| Stock in Saint Petersburg as of the check date | 6 pcs. | 81 pcs. | 44 pcs. |
The card shows the quality of the "under enamel" re-lamination for the selected configuration. This is fundamental for solid wood. The "under enamel" blank is produced without mandatory matching of wood lamellas by color and texture; differences are intended to be covered by an opaque coating. If the designer wants to tint the oak cornice and preserve the natural grain, before ordering it is necessary to find out whether KZ‑011 is available specifically in the "under tinting" category, whether planks from the same batch can be matched, and whether the price and lead time will change.
As of the check date, all three options were marked as available in Saint Petersburg. The manufacturer states that if in stock, shipment from the warehouse takes up to three working days, and the average production time for a missing item made to order is 5–10 working days. These data change, so stock and price are re-checked when placing an order.
The size 108 × 34 mm cannot be perceived as a universal guarantee that the profile will cover any top of a slat panel. The height of 108 mm defines the visible strip and the possible contact zone, but the covering capability depends on the specific profile shape, panel position, and mounting plane. The 34 mm projection is also measured from the base wall, not automatically from the front face of the slats. If the slats are already extended forward by a significant amount, the front edge of the cornice may end up flush with them, deeper than them, or too far ahead.




Why a wooden ceiling cornice cannot be chosen separately from a slat wall
The cornice and slat panels form a single unit. It has four interdependent layers: the load-bearing wall or frame, the mounting strip, the slat finish, and the KZ‑011 itself. If one layer is not accounted for, a beautiful profile will not fix the joint. It will only highlight the difference in depths, a wavy line, or an uneven gap at the ceiling.
The slat surface visually appears to be a wall, but technically consists of alternating protrusions and recesses. Adhesive applied to the back side of a long cornice will only contact individual points or strips. If the profile is additionally mechanically fastened, the fastening points may fall into voids, thin decorative lamellas, or a soft background between slats. Such a base cannot be considered continuous without checking its construction.
The top joint must be considered in a side cross-section. The diagram indicates:
-
the original wall plane;
-
the thickness of the adhesive layer or panel substructure;
-
the maximum protrusion of the slats;
-
depth of gaps;
-
position of the solid mounting plate;
-
rear geometry of KZ-011;
-
its front projection of 34 mm;
-
ceiling covering and allowable abutment;
-
space for an LED profile, if backlighting is provided.
Without such a section, it is impossible to answer how far the cornice will protrude forward. Suppose the front plane of the slats is located 20 mm from the base wall. If KZ-011 is attached directly to the wall and protrudes 34 mm, its front point will be approximately 14 mm ahead of the slats. But if an overlay strip 12 mm thick is added behind it, the final projection will already be about 26 mm relative to the slats. This is only an example of calculation logic, not a ready-made strip size: actual values are obtained on site and from the profile drawing.
The top of the panels is checked separately. If the slats reach the ceiling, KZ-011 cannot simply be placed over them and considered that their height is no longer important. Part of the cladding will be covered, and part may interfere with the rear side of the cornice. It may be necessary to stop the slats lower, locally remove the upper section, or change the plane of the entire zone. Such actions are performed before finishing and after coordination with the panel installer.
The composition also depends on the joint. Vertical slats lead the eye upward, and the cornice should complete them with a confident horizontal line. If it varies in depth or is broken by random short fillers, the architectural line becomes weaker than the slat rhythm itself. Therefore, the number of strips, the position of joints, and solid support are part of the design, not a hidden technical detail.
Our factory also produces:
How to check the installation location of a wooden cornice above slat panels
The check is carried out before ordering, even if the wall is still only being designed. In a finished room, it starts with measurements, not dismantling.
Get Consultation
1. Record the actual thickness of the slat system
You need to measure the distance from the base wall to the most protruding face point. If the panels are installed with adhesive, lathing, or an acoustic backing, the entire build-up is taken into account. The rated thickness of a single slat does not describe the finished system.
2. Measure the depth of the recesses
It shows what voids will remain behind the cornice with direct application. If the recesses are deep and wide, the profile will have sparse supports. If the panel has an almost continuous face base with shallow grooves, the joint may be simpler, but it still requires checking the strength of the face material.
3. Find the load-bearing line
Based on the design or the accessible area, determine the material of the base wall, the position of frame studs, embedded elements, and utilities. Do not drill blindly in the upper zone: lighting cables, curtain power, ventilation, or air conditioning routes may be running there.
4. Check for a continuous mounting zone
You need not just a horizontal rail somewhere behind the finish, but a zone that supports the contact points KZ‑011 specified in the drawing along the entire length and allows the fastening to transfer the load to a solid base. Its height is determined by the profile, the fixing method, and the working documentation.
5. Mark the lower boundary of the profile
From the ceiling line, measure down 108 mm on the full-size template. This immediately shows how much of the slat finish will be covered, and whether the cornice will intersect the top of the door casing, cabinet front, decorative lintel, or window.
6. Check the side overhang
A 34 mm deep template is applied to the mounting surface, not to the tops of the slats. Check where the front edge will be relative to panels, light profiles, and the ceiling. If an additional shim is needed, its thickness is added to the overhang.
7. Mark all obstacles
On the layout, mark ventilation grilles, sensors, hidden access panels, stretch ceiling tracks, curtain rods, built-in cabinets, doors, light fixtures, and cable outlets. The decorative KZ-011 must not block equipment maintenance.
8. Check angles and lengths
Measure each straight section separately along the mounting line. Measure angles with a protractor; do not assume 90° by default. For external corners, additionally consider the vulnerability of the protruding edge and the length of the miter cut.
9. Do a visual mock-up
A cardboard strip 108 mm high and a side piece 34 mm deep give a more accurate sense of scale than a large product photo. Evaluate the mock-up from the entrance, from the sofa, from the hallway, and with lighting turned on.
10. Only after verification, place the order
The application records the material, length, quantity, seam map, finish, and method of preparing the installation area. If at least the base or corners are unknown, the order is premature.
Why the wooden cornice KZ-011 needs a continuous mounting strip
The continuous mounting strip creates a unified geometric and structural base. It is not needed for decorative covering of voids, but to ensure that long planks lie in a single plane and transfer forces through designated attachment points. The strip must be connected to the base wall or a calculated frame; a thin overlay glued only to the tops of the slats does not automatically become an embedded element.
If KZ-011 is attached directly to the relief, five different defects arise.
-
Uneven contact. One part of the profile touches a protruding slat, another passes over a depression. The adhesive is distributed in separate islands, and the rear surface does not receive uniform support.
-
Visible gaps. Under side lighting, voids at the lower edge become noticeable. Attempting to fill them with sealant turns a neat wooden profile into a strip with varying seam widths.
-
Broken line. If individual slats are at different depths, the long cornice follows these variations or hangs between high points.
-
Unstable joints. The connection of two planks may fall between slats. Without support, one edge shifts relative to the other over time, and a step appears at the finish.
-
Random depth. On adjacent walls, the number of layers may differ. In the corner, profiles of the same model meet with different projections and do not form a clean miter.
The continuous strip helps solve these problems, but does not fix a curved wall by itself. It is first aligned to a plane and level, checked with a long straightedge, then KZ-011 is fitted. Support is especially important at plank joints and near internal or external corners.
It is not possible to assign a universal width and thickness for the mounting strip based on the cornice name. A profile height of 108 mm does not mean that the mounting strip must be exactly 108 mm. The actual contact area may differ due to the relief of the rear side. The width is determined by the drawing and the chosen fastening method, and the thickness by the difference between the required mounting plane and the existing base.
What should the mounting strip be for a wooden ceiling cornice
A proper strip meets four requirements: it is continuous on each straight section, lies in a single plane, is secured to the load-bearing base, and is compatible with adhesive or mechanical fixation. The material and cross-section are chosen by the designer or installer, taking into account the wall, cornice, and fire safety requirements of the room. In the article, it is not possible to reasonably assign a single batten or plywood of a specific thickness for all projects.
The plane calculation can be written as follows:
Thickness of the leveling strip = required position of the rear plane of KZ‑011 − actual position of the solid base.
If the profile must protrude relative to the face of the panels by a value X, a more complete check is used:
Final overhang of the cornice relative to the panels = thickness of the mounting strip + overhang of KZ‑011 from its base − total offset of the batten system.
All values are measured from a single reference plane. Mixing the rated thickness of the batten, the adhesive layer size "by eye," and the overhang from an already finished panel is not allowed.
The mounting zone is left until the panels are installed
This is the most controllable scenario. In the project, the lower boundary of KZ‑011 is determined in advance, the batten cladding is stopped below it, or a continuous upper belt connected to the frame is formed. Cables and lighting are routed so that they do not fall into the fastening points. After panel installation, a smooth prepared strip remains, onto which the profile can be fitted at full length.
The advantage is not only in strength. The installer can see the base, check its level, mark the studs, and lay out the joints. The panel finish is not damaged during subsequent rework.
The panels are installed, but a smooth strip is preserved at the top.
This option may be suitable if the smooth zone is strong enough and matches the back geometry of the cornice. Its height, depth relative to the battens, and continuity are checked. If it is recessed, a calculated shim is added. If it protrudes too far, KZ‑011 may be excessively projected forward; then the joint is changed rather than trying to hide the error with a thick adhesive layer.
The panels are already brought up to the ceiling.
In a finished wall, there are three possible solutions. The first is to locally remove or trim the upper part of the finish and open space for the embedded element. The second is to create an overlay continuous band, fastened through the panels to a solid base; its thickness will increase the overall projection. The third is to abandon KZ‑011 and leave a neat finish of the panels themselves. The choice depends on the design of the specific system. Cutting installed battens along a common horizontal line without a template is risky: a wavy cut will remain visible under the lower edge of the cornice.
Before rework, it is checked whether the panels can be dismantled without damage, where utilities run, and whether the system warranty remains valid. If there is soft acoustic material behind the battens, the fastening must reach the load-bearing wall or frame, not end in the backing.
Why an overlay strip does not always solve the problem
An overlay band can level the plane but adds thickness. Suppose the front point of KZ‑011 already protrudes in front of the battens without a shim. After adding the strip, the profile will become even deeper and may hang over the panels like a heavy shelf. New conflicts with lighting and external corners will arise. Therefore, the final side section is calculated first, then the type of embedded element is chosen.
How the size of a wooden cornice 108 × 34 mm affects the wall composition
A height of 108 mm is a noticeable strip. In a room with a 2700 mm ceiling, it occupies 4% of the total wall height; at 3000 mm, it is 3.6%. These percentages do not automatically determine beauty, but they show that the profile cannot be considered a thin, inconspicuous batten. It will form an independent upper zone and partially cover the vertical rhythm of the panels.
The bottom edge needs to be aligned with other horizontal lines: the top of door trims, cabinet cornice, kitchen column line, window top frame, or light niche. If KZ‑011 runs a few centimeters below a nearby line without a meaningful gap, visual "jitter" appears. Sometimes it's better to align the cornice with an existing architectural mark, even if panels then end below the ceiling.
The 34 mm overhang creates a side shadow. On a smooth wall, it emphasizes the profile; on a textured one, it interacts with shadows between slats. With top lighting, check whether KZ‑011 blocks the light flow and whether a bright strip appears only on its top edge. A hidden LED strip requires a separate profile, heat dissipation, access to the power supply, and a calculated niche; the wooden cornice itself cannot automatically be used as an electrical conduit.
Position relative to slats is assessed in cross-section:
| Position of the front edge of KZ‑011 | Visual result | What to check |
| A few millimeters in front of the slats | The cornice clearly completes the wall and creates a top canopy | Is the overhang too heavy, is there a conflict with light |
| Approximately in the same plane | Calm, seamless transition | Is the shadow sufficient to read the profile, do the planes match at corners |
| Deeper than protruding battens | Battens visually pass in front of the cornice | Doesn't the top line look recessed and random |
| Far forward due to the overlay strip | Pronounced shelf above the panels | Base strength, shadow, external corners, and proportions |
There is no numerical universal standard for this protrusion. A full-size side template allows you to choose the position before manufacturing the strip. If the 108 × 34 mm mockup looks too bulky, don't rely on painting to fully fix the proportion. Better to choose a different profile or a simpler panel finish.
Oak wooden cornice: when to preserve the natural texture
Oak is chosen when the top line should support the natural wood of panels, doors, or furniture. Its pronounced porosity and grain read well under a translucent finish. But the same wood species does not guarantee a shade match: the batch of wood, cut, lamella selection, stain, primer, varnish, and lighting all have an effect.
For a wall with oak slat panels, you need not just "any oak," but a matched sample of the finished surface. KZ‑011 is applied to the panel after the full finishing cycle or swatches are made on a scrap piece. Comparing unfinished parts is not very informative: oil or varnish can drastically change the contrast and warmth of the tone.
The KZ-011 card displays the category "under enamel." With transparent tinting, this creates a risk of visible differences between slats. Before ordering the oak option, you need to ask the manager four questions:
-
Is the KZ-011 "for tinting" finish available?
-
Can all slats be obtained from one batch and matched by tone?
-
How will the price, lead time, and availability change?
-
Can I order a sample or approve photos of the slats before shipment?
If the "for tinting" finish is unavailable, two honest solutions remain: use an opaque enamel or accept the pronounced unevenness after a test application. You cannot buy oak "under enamel" hoping for a uniform transparent finish without a sample.
Wooden cornice made of beech: when the profile is ordered for tinting or enamel
Beech has a calmer, fine-pored surface and is often used under opaque enamel. For KZ-011 in the color of the ceiling, wall, or light slatted panels, it allows preserving the wooden finish without the need to emphasize the active oak texture.
Under enamel, the quality of the primer, preparation of the ends, and a uniform application technology for all slats are important. Even "Prestige" sanding does not eliminate dust removal, priming, and interlayer matting. Corner and straight joints are finished after cutting; if parts are fully painted in advance, the finish will need to be restored on fresh ends at the site.
Beech can be tinted, but the result must be checked physically. The dense structure may perceive color differently than oak panels. Trying to make beech visually "exactly the same as oak" only by the stain code can give an even tone but a different pattern and depth. If a natural connection with oak slats is critical, compare finished samples of the two species under working lighting.
For opaque enamel, the "under enamel" category matches the task. For semi-transparent tinting, the relamination category must be confirmed again. Material and finish are selected as one order item, not two independent decisions.
MDF cornice under enamel: when a length of 2600 mm and an even color are needed
The MDF version KZ-011 is produced in a length of 2600 mm, 200 mm longer than the solid wood profile. This changes the cutting layout: on a 5.2 m wall, two pieces meet exactly, while on 4.8 m they leave a nominal 400 mm remainder. For long straight walls, reducing the number of joints can outweigh the desire to use natural wood.
MDF is rational when the cornice is painted in an opaque color of the ceiling or wall. Its surface is not intended to showcase the wood grain, so a semi-transparent stain is not equivalent to an oak finish. The card shows the "under enamel" preparation, and the surface quality is "Prestige."
MDF cannot automatically be considered moisture-resistant just because it is located near the ceiling after painting. In a kitchen, bathroom, or near an external cold wall, the operating conditions, protection of all ends, and material suitability per the manufacturer's documentation must be checked. A leak from above is especially dangerous for wood fiber-based moldings. If the room has unstable humidity, the decision is made by the designer after assessing the substrate and finish.
MDF with a length of 2600 mm requires careful logistics. The stairway lift, corridor turn, elevator dimensions, and on-site storage space must be checked. The profile cannot be bent for carrying. The packaging and the long piece must lie on a flat support until installation.
How to calculate a wooden cornice KZ-011 with a length of 2400 or 2600 mm
The first calculation shows the mathematical minimum for a straight wall without returns and corners:
Number of planks = rounding up (net line length ÷ length of one plank).
For beech and oak, the divisor is 2400 mm; for MDF, it is 2600 mm. But the formula result is not yet a ready order. The length of miter cuts, joint allowance, technological end trimming, possible damage, and the requirement not to place a short filler piece in the center must be added.
| Straight wall length | Array 2400 mm: minimum | Total array length | Array remainder | MDF 2600 mm: minimum | Total MDF length | MDF remainder |
| 3.2 m | 2 planks | 4.8 m | 1.6 m | 2 planks | 5.2 m | 2.0 m |
| 4.0 m | 2 planks | 4.8 m | 0.8 m | 2 planks | 5.2 m | 1.2 m |
| 4.8 m | 2 planks | 4.8 m | 0 м | 2 planks | 5.2 m | 0.4 m |
| 5.2 m | 3 planks | 7.2 m | 2.0 m | 2 planks | 5.2 m | 0 м |
| 6.4 m | 3 planks | 7.2 m | 0.8 m | 3 planks | 7.8 m | 1.4 m |
Zero remainder is a risk signal. For a wall of exactly 4.8 m, two solid wood planks provide only the nominal length. If you need to remove a damaged factory end, trim the profile to the actual angle, or make even a small return, the material is no longer sufficient. Similarly, two MDF planks for 5.2 m leave no reserve. In such cases, three solutions are possible: order an additional plank; reduce the net length of the cornice by pre-designing the ending; use a suitable leftover from another section of the same order.
On a 3.2 m wall, the remainder is large for both materials, but it cannot be considered waste until the layout of the entire room is made. From one second plank, a short side, a return, or part of an adjacent wall can be made. Calculating by room, not by each wall separately, often reduces the number of planks. At the same time, the remainders must match in material, batch, finish, and profile orientation.
Cost of mathematical minimum
According to the card prices as of August 23, 2026, one MDF plank costs 2,840 ₽, beech — 5,480 ₽, oak — 8,230 ₽. The table below accounts only for material in a straight line. Not included are an additional plank for reserve, packaging frame 390 ₽, delivery, embedded part, fasteners, glue, finishing, and labor.
| Wall length | MDF: quantity and cost | Beech: quantity and cost | Oak: quantity and cost |
| 3.2 m | 2 pcs. — 5,680 ₽ | 2 pcs — 10,960 ₽ | 2 pcs — 16,460 ₽ |
| 4.0 m | 2 pcs. — 5,680 ₽ | 2 pcs — 10,960 ₽ | 2 pcs — 16,460 ₽ |
| 4.8 m | 2 pcs. — 5,680 ₽ | 2 pcs — 10,960 ₽ without reserve | 2 pcs — 16,460 ₽ without reserve |
| 5.2 m | 2 pcs — 5,680 ₽ without reserve | 3 pcs — 16,440 ₽ | 3 pcs — 24,690 ₽ |
| 6.4 m | 3 pcs — 8,520 ₽ | 3 pcs — 16,440 ₽ | 3 pcs — 24,690 ₽ |
The comparison shows that the material affects not only the price per meter. The difference in standard lengths changes the number of planks on a 5.2 m wall: MDF mathematically requires two, solid wood requires three. However, the lack of reserve for MDF makes an order of two pieces vulnerable. If a third plank is needed anyway, the cost advantage partially changes.
How to calculate a room with corners
Each wall is measured along the mounting line of the back side of the profile, not by the approximate floor perimeter. For internal and external corners, extra length is left for precise trimming. The layout is done for each original plank: where the long part comes from, what remainder goes to the next wall, where the factory end is, and where the joint will be.
A bad map looks like "perimeter 14 m, divide by 2.4". A good map shows four walls, real corners, installation sequence, length of each segment, and the remainder after each cut. It prevents a situation where the total footage is sufficient, but the last section cannot be obtained from available offcuts.
How to create a cutting map without a short add-on piece in the most visible spot
On a straight wall longer than one plank, a joint is inevitable. It cannot be left where the first randomly taken piece ended. The location is chosen based on visibility, light, presence of support, and symmetry.
For a 4 m solid wood wall, the simplest scheme is 2400 + 1600 mm. The joint will be 400 mm to the right of center if installation is done from the left. You can make two parts of 2000 mm each and place the connection on the axis, but then both original planks are shortened, and the total remainder of 800 mm is divided into two fragments. The choice depends on the composition and the ability to use the remainders.
For MDF on the same wall, the scheme 2600 + 1400 mm shifts the joint more strongly. The symmetrical option 2000 + 2000 mm leaves two segments of 600 mm each. If there are short returns in the room, they may be useful. If not, central symmetry increases waste without technical necessity.
The joint is placed on a continuous mounting strip, not over a gap between attachment points. Side light should not run along the connection: a grazing beam reveals plane differences and finish variations. When painting with an opaque color, the seam can be finished well, but putty will not fix a step between poorly aligned pieces.
For an accent slat wall, three strategies are possible:
-
Central joint. Suitable for a strictly symmetrical composition with central furniture, TV, or door. Requires precise profile matching and the same plane for both parts.
-
Joint at the less visible edge. Appropriate if one side is hidden by a tall cabinet or is around a corner. The connection should not be shifted without reason on a fully open wall.
-
The joint is tied to the vertical division. If the slat wall has a logical section boundary or a pilaster, the connection can align with it. This vertical line must exist in the design, not be added to mask a defect.
Each slat is marked on the back before cutting: material, wall number, left/right end, face orientation. For solid wood, parts are additionally sorted by tone and grain. For enamel, slats are combined in one priming and painting cycle so adjacent sections do not differ in gloss.
How to join a wooden ceiling cornice on a long slat wall
A direct connection must ensure continuity of three lines: the bottom edge, the visible profile, and the face plane. If only the ends match but one slat is deeper than the other, the joint will remain visible after finishing.
First, both parts are dry-fitted to the mounting strip. Check whether one slat has a bend, whether the back zones touch the base equally, and whether the cross-section profile matches. Then choose the joint type. A direct transverse joint is easier to measure, but its line may be more visible. A mitered joint increases the contact area and stretches the transition, but requires more precise cutting and support. The specific cut angle is chosen by the carpenter based on form KZ-011 and the finish.
Work sequence:
-
determine the joint location on the layout;
-
ensure continuous support under both sides;
-
make a test cut on a scrap piece or template;
-
dry-fit the parts;
-
check the bottom and face plane with a long straightedge;
-
agree whether the profile is painted before or after installation;
-
secure the first part without displacement;
-
install the second one, controlling the joint until it sets;
-
after full curing, perform permissible finishing and restore the coating.
You cannot compensate for incorrect length with a thick adhesive joint. You also cannot pull a curved plank to a weak decorative rail: the stress will transfer to the base. If the geometry of the part or wall does not allow a straight line, first eliminate the cause.
How to connect the wooden cornice KZ-011 in an internal and external corner
The corner increases requirements for cutting and the mounting strip. Two profiles must meet not only in pattern but also in depth. If the embedded parts on adjacent walls are set in different planes, even perfectly executed miter cuts will not align.
Inner corner
First, measure the actual angle between the walls. In a new building, it may differ from 90°, and the layer of panels can change the geometry even more. For a symmetrical miter cut, the cutting angle of each part is usually related to half of the actual joint angle, but specific marking is done using a profile template. Test short pieces are cheaper than a mistake on a full plank.
The internal corner is often less vulnerable to impact, but it shows a gap at the ceiling more clearly. If the ceiling is wavy, you cannot force the rigid KZ-011 to follow every variation. Determine a single architectural line and coordinate the joining method with the finisher.
External corner
On the external turn, the front part of the profile extends into the passage and becomes visible from both sides. The miter must be sharp and even, and the support must reach the very corner. A short or weak embedded part leads to the joint opening. The external corner also requires additional allowance, since a damaged vertex is difficult to restore invisibly under a transparent finish.
If individual wooden corners are used in the project, their cross-section and actual compatibility with KZ-011 must be checked. A random universal corner may not match the 108 mm height and 34 mm projection. The solution with the corner must be shown in a section view before ordering.
Non-perpendicular and uneven walls
If the angle differs from 90°, the finished miter joint cannot be spread with putty. First, an adjustable template is made, the value is transferred to test pieces, and they are checked in the actual location. If the walls are still being finished, it is more reasonable to correct the geometry of the installation area than to complicate each wooden joint.
How to account for a stretch ceiling, lighting, and ventilation
KZ-011 is installed near the ceiling, so adjacent engineering systems are more important than decorative photography.
Stretch ceiling
Fasteners cannot be screwed into the fabric, and the load of the cornice cannot be transferred to it. KZ-011 must rest on the wall or a separate provided structure. The installation sequence is coordinated with the company installing the ceiling: it is necessary to understand where the wall profile of the fabric is, whether access to it will remain, and what gap is required for tucking and replacing the material. If the cornice covers the stretch ceiling profile, this must be designed before the installation of both elements.
Hidden lighting
The 34 mm projection does not mean a ready-made light shelf. For an LED strip, an aluminum profile or another solution provided by the manufacturer, heat dissipation, cable, power supply, and access for maintenance are needed. The light output is modeled on a mock-up: a strip that is too close will reveal all the unevenness of the wall and the joints of the cornice.
Recessed lights
The lower edge of KZ-011 drops by 108 mm. If wall lights or linear profiles are located nearby, not only physical intersection but also shadow must be checked. The cornice can cut off the light cone or create a bright glare on the upper edge.
Ventilation and sensors
Grilles, valves, fire detectors, and inspection openings cannot be covered by decorative trim. Even if KZ-011 fits geometrically, access to removing the grille and servicing the equipment must be maintained. In case of a conflict, moving the engineering element is coordinated with a specialist; a cutout in the cornice often worsens both strength and appearance.
Top of built-in wardrobe
If the wardrobe reaches the ceiling, the cornice either passes in front of its side panel and facade, or ends before the cabinet body, or continues along the furniture cornice. An accidental collision of two profiles at the final stage looks like a mistake. The development should show the endpoint, the open end, and the thickness of all elements.
Sequence of assembling the joint: from the base to the finish
The correct order reduces the risk of damaging finished slats.
-
Take measurements and a side section. Record the base wall, the full projection of panels, the position of KZ-011, and the ceiling system.
-
Obtain a profile drawing. Clarify the rear geometry and
-
Secure KZ-011 according to the design scheme. Adhesive and mechanical fixation are selected based on the profile and base material; fasteners must not damage the ceiling or utilities.
-
After curing, perform final finishing. Evaluate the line under daylight and working artificial light.
Official STAVROS advice divides adhesives by material and surface condition. For large solid wood decor on an unpainted base, the manufacturer recommends PVA Kleiberit 303.0 D3, and for painted or primed surfaces, a mounting compound like Fixit. These recommendations should be compared with KZ-011, the rear contact area, and the specific wall. Adhesive does not replace a continuous embedded support and does not fix voids in the slat relief.
How to coordinate a wooden cornice, molding, and baseboard
The upper cornice should not exist separately from the rest of the architectural lines. Slat panels form the main vertical texture, KZ‑011 completes it from above, a molding can set the middle layout of smooth areas, and a plinth — the lower boundary of the wall.
Coordination begins not with the same color, but with proportions. A cornice 108 mm high is more noticeable than a thin molding. If the plinth is very low and light, the upper part of the wall may seem overloaded. If the lower profile is massive, the system looks more stable, but in a small room the decorative density increases.
The material also does not have to be the same in all elements, but the logic of the finish should be clear. The following schemes are possible:
-
oak KZ‑011 and oak slats under one coordinated tint, and the plinth — in the color of the wall;
-
beech cornice, molding, and plinth under an opaque enamel, slats — natural;
-
KZ‑011 made of MDF in the color of the ceiling, wooden molding in the color of the panels, plinth neutral;
-
all linear elements under one enamel, and the slat surface works as the only wood accent.
To select a system, you can select a wooden plinth and molding to match the cornice in one section of linear products. The link helps compare sizes and purposes, but does not replace a wall elevation. The same collection or material does not guarantee that specific profiles are proportional to the room.
Errors when ordering and preparing KZ-011
Buying a cornice before checking the base
The reason is the confidence that any slat panel will support an overlay decor. The consequence is that the profile has to be attached to individual peaks, redoing the finished wall, or returning the product. Prevention is to open the panel project, find the embedded part, and make a cut before ordering.
Considering a thin decorative strip as a mounting bar
An overlay glued to the slats can level the visible surface, but it cannot transfer the load to the wall. The strip must have confirmed attachment to a solid base.
Assigning the thickness of the embedded part based on the 34 mm overhang
34 mm is the geometry of the KZ-011 itself, not the required thickness of the backing. The latter depends on the full projection of the panels and the desired face plane. This error leads to excessive overhang or a recessed cornice.
Forgetting that the 108 mm height covers the top of the slats
Panels are ordered up to the ceiling, and then the cornice covers their upper part. This results in extra waste and complex cutting. In the project, the panels should end in accordance with the bottom line of the KZ-011.
Considering 4.8 m as two solid wood strips without reservations
The math is correct, but the margin is zero. Any end cut, angle, or damage will require additional material. On a critical line, you need either a third plank or confirmed use of leftover from another section.
Mixing lengths of 2400 and 2600 mm in one calculation
Length is tied to material. You cannot calculate a wall for MDF, then replace it with oak and keep the same quantity. After changing the material, the cutting layout is rebuilt.
Ordering oak "under enamel" for transparent tinting
Lamellas may differ in color and texture. A transparent finish will reveal differences. You need to confirm the "under tinting" execution and batch selection before payment.
Assuming all angles are 90°
Ready-made miter cuts will not align, gaps or steps will appear. Each angle is measured after the base is completed and checked with a test template.
Placing a joint between support sections
Edges do not receive equal support, the joint opens up or forms a step. Under the joint, there must be a continuous, leveled strip.
Covering the stretch ceiling profile with a cornice without approval
Installers lose access to the canvas, and the fasteners may get into the wall profile or damage it. The work sequence and the joint are agreed upon before installing both elements.
Using KZ‑011 as a base for curtains or lighting without a project
The decorative profile is not a curtain rail and does not automatically become an electrical mounting box. For curtains and LED, separate calculated systems are required.
Painting each plank separately without a common control panel
Differences in primer, number of coats, and gloss will show at the joints. All parts of one line are processed according to a single technological map and compared under working light.
Not checking the delivery of long-length parts
A 2600 mm plank does not fit in the elevator or does not pass a turn. Attempting to bend it damages the profile. The delivery route and storage location are checked in advance.
When the wooden cornice KZ‑011 does not need to be purchased
Refusing to buy can be a professional decision. KZ‑011 is not needed if the slat system itself has a neat factory finish at the ceiling, and an additional horizontal line makes the wall heavier. Not every top edge must be covered with a massive profile.
The purchase should be postponed or canceled when:
-
there is no continuous base and it cannot be added without destroying the wall;
-
the mounting strip increases the overhang to a visually unacceptable value;
-
the lower edge of the profile crosses a door, cabinet, window, or light fixture;
-
KZ-011 covers a ventilation grille, sensor, or access panel;
-
the stretch ceiling is already installed, and safe access to the wall anchor is not confirmed;
-
the corners are so uneven that a neat joint is impossible without preparing the base;
-
MDF is planned under conditions whose admissibility is not confirmed by documentation;
-
a transparent oak finish is required, but the "for tinting" category is unavailable;
-
the customer is actually looking for a curtain rod;
-
delivery and installation timelines do not fit the schedule;
-
The contractor is not ready to make precise joints and miter cuts.
The alternative is to finish the slats with a smooth end plate, leave a shadow gap, use a more compact profile, or form a painted top strip without trim. The choice depends on what task KZ‑011 solves: it hides a structural joint, introduces an architectural horizontal line, or connects the cornice with the rest of the wooden decor.
What to check before ordering the wooden cornice KZ‑011
It is convenient to divide the final checklist into the object, the product, and the execution.
Object
-
exact length of each straight section;
-
actual values of internal and external corners;
-
full projection of the slat system from the base wall;
-
presence and condition of a continuous mounting strip;
-
material of the load-bearing base;
-
position of wiring, ceiling profile, and ventilation;
-
access for bringing in slats 2400 or 2600 mm long;
-
working lighting that will reveal joints.
Product
-
article KZ‑011;
-
cross-section 108 × 34 mm;
-
MDF 2600 mm or beech/oak 2400 mm;
-
quantity according to the cutting map, not just by total footage;
-
sanding "Prestige";
-
category "under enamel" or confirmed execution "under tinting";
-
batch and tone selection for transparent finish;
-
current price, availability, packaging, and shipping time.
Execution
-
drawing of the rear profile geometry;
-
material and thickness of the mounting strip per section;
-
mechanical fastening points and type of adhesive;
-
location of each direct joint;
-
corner templates;
-
painting and installation sequence;
-
finishing cutting contractor;
-
reserve for damage and repair.
If the card, designer, and installer specify different schemes, the solution is fixed on one working drawing before purchase. Verbal "we'll figure it out on site" is especially risky for an already finished slat wall.
What to write to the STAVROS manager before placing an order
The request should include not only the length of the room. Example:
We need a decorative ceiling cornice KZ-011 108 × 34 mm above the slatted wall. Straight sections: [specify]. Internal corners: [number], external corners: [number]. We are considering [MDF 2600 mm / beech or oak 2400 mm], finish — [opaque enamel / translucent tinting]. We ask to confirm the blank category, availability of the "tinted" finish if needed, current price and availability, and also provide a drawing of the back side for designing a continuous mounting strip. We need strips from one batch. Cutting map attached.
It is useful to attach a general view of the wall, a side section, and a plan with corners to the request. The manager sees that the product is used as a decorative ceiling profile, not as a curtain rod, and can check the configuration more accurately.
Where to buy a wooden cornice KZ-011 for a wall with slatted panels
When the base and cutting map are confirmed, you can order a wooden cornice KZ-011 108 × 34 mm in the required material and quantity. The product page should be reopened before payment: availability and price may change.
For comparing KZ-011 with other sizes and profiles, it is convenient buy a wooden cornice through the profile section. If the project includes not only the top of the wall, you can Buy wooden trim items from trusted manufacturers who provide care recommendations. and assemble the cornice, molding, and plinth in a common proportional system.
For those planning a covering finish and considering a length of 2600 mm, the section where you can buy an MDF cornice for painting. The choice of MDF should be based on the room conditions and the cutting plan, not just on the lower price. The slatted part of the wall should be designed in parallel: buy wall slat panels preferably after agreeing on their full projection and top termination with KZ‑011.
As of the check date, STAVROS indicated the availability of KZ‑011 in all three materials in Saint Petersburg, shipment of available items within three working days, and Contact us to confirm shipping to your destination. A rigid packaging frame of 390 ₽ is added to the order cost; packaging standards for solid wood and MDF differ. These details are clarified with a specific quantity.
Final decision on the KZ‑011 unit above the slatted wall
KZ‑011 can be purchased after the cross-section proves the presence of a continuous support. The height of 108 mm determines where the panels end; the projection of 34 mm determines the position of the front edge; the length of 2400 or 2600 mm determines the number of joints and offcuts. No parameter can be checked separately.
Wall condition Solution The embedded support is provided, the profile is tried on, the angles are measured Calculate the strips and place the order There is a smooth top strip, but its depth does not match Calculate the leveling pad and repeat the fitting The battens are brought up to the ceiling without support First design a local rework or an overlay load-bearing belt The rework sharply increases the cornice overhang Check another profile or abandon KZ-011 108 mm overlaps ventilation or furniture Do not buy until the project is changed A transparent oak finish is needed, but only "under enamel" is available Request "under tinting" or choose an opaque finish For a straight wall, the mathematical calculation is simple, but the final order is confirmed by the cutting map. Two solid wood planks of 4.8 m and two MDF planks of 5.2 m give zero margin — such a coincidence cannot be taken as safe configuration without analyzing the ends and corners.
Frequently asked questions about the wooden cornice KZ-011
Is KZ-011 a curtain rod?
No. It is a decorative ceiling molding for finishing the transition from wall to ceiling. It is not a rod or rail system and is not designed in the article to bear the weight of curtains.
Can KZ-011 be mounted directly on protruding slats?
Such installation cannot be considered universally reliable. Individual peaks provide intermittent support, and the joint may fall over a void. A proven continuous mounting area connected to a solid base is needed.
Is a strip exactly 108 mm high required?
Not necessarily. 108 mm is the external height of the profile. The height of the embedded strip is determined by the rear geometry, contact zones, and mounting scheme. It cannot be assigned without a drawing.
How to determine the thickness of the mounting strip?
Subtract the position of the solid base from the required position of the rear plane of KZ-011. Then check the final protrusion relative to the front face of the slats. All dimensions are taken from a single base wall.
What material to choose for enamel?
MDF and beech are logical starting options. MDF provides a length of 2600 mm and is designed for covering paint; beech preserves the solid wood finish. The final choice depends on room conditions, cutting layout, and budget.
Can oak KZ-011 be tinted to match the color of the panels?
Such finishing can be considered after a sample and confirmation of the "for tinting" category. The card by default shows "for enamel," where slats may not be matched by tone. The same wood species does not guarantee a match in the final color.
What is the difference between lengths of 2400 and 2600 mm?
Beech and oak slats have a length of 2400 mm, MDF — 2600 mm. The 200 mm difference affects the number of joints and waste. The material cannot be changed without a new calculation.
How many slats are needed for a straight wall of 4.8 m?
Mathematically, two solid wood slats of 2400 mm or two MDF slats of 2600 mm. For solid wood, the waste is zero, so a third piece may be needed for trimming, corners, or safety. For MDF, 400 mm remains.
Can KZ-011 be installed next to a stretch ceiling?
Yes, if the profile is attached to the wall or a separate embedded element, does not transfer load to the ceiling membrane, and does not block its installation and maintenance. The joint and work sequence should be coordinated with the ceiling installer in advance.
How to finish an internal corner?
Measure the actual angle, make a test template, and only then cut the full-size pieces. Both mounting strips must meet at the same depth. Do not rely on putty as a way to fix an incorrect miter.
Should compensation gaps be left?
Wood and wood-based materials react to room conditions, but a universal gap for any KZ-011 cannot be prescribed. The layout of joints, transitions, and finish should be agreed upon with the manufacturer and installer for the specific material, length, and microclimate. A visible random gap at a corner is not proper compensation.
Can KZ-011 be used only on one accent wall?
Yes, if the cornice ends are designed as visible edges or logically abut side walls, a cabinet, or a portal. The profile should not end abruptly in the middle of a plane.
What to do if the panels are already fully installed up to the ceiling?
First, inspect the structure. Possible options include local removal of the upper zone, an overlay strip fastened through the panels to the base, or abandoning the cornice. Cutting slats and purchasing KZ-011 before such a decision is not allowed.
Can an LED strip be hidden behind the 34 mm overhang?
Only in a separately designed lighting unit with a profile, heat dissipation, power supply, and service access. KZ-011 itself should not be considered a ready-made niche for backlighting.
What to do with the leftover plank after cutting?
Keep the marked fragment from the same batch for repairs or use it on a short section if the cutting plan allows. The remainder should be stored flat and under suitable conditions; random addition of decor just to utilize material is not necessary.
-