


Set Composition
 (Polyurethane)")
 (Polyurethane)")
 (MDF, Prestige Primed)")
 (MDF, Prestige primed).")
 (Polyurethane)")
 (Polyurethane)")
 (Polyurethane)")
 set for MLDPU-002 (Polyurethane)")
 (Polyurethane)")
 (Polyurethane)")
 (Polyurethane)")
 (Polyurethane)")
 (Polyurethane)")
 (Polyurethane)")
 (Polyurethane)")
Have questions?

Yulia Kh.
March 24, 2026
I was satisfied with the quality of the products; we purchased furniture legs. I would especially like to highlight the professionalism of manager Oksana—very client-oriented, competent, and precise specialist. She even arranged additional trimming of some elements as an extra service for us. Huge thanks!
Incognito 7.
March 24, 2026
One of the few firms that is pleasant to interact with on renovation matters. Adequate, responsive managers. Adherence to deadlines. Execution of even complex projects. Bravo! May there be more such firms!!
Marina D.
February 15, 2026
The company ordered the pens for us when we ordered furniture. But I decided to write a review personally because they are amazing! Stylish, expensive, high-quality!
Polyurethane stucco decor
We have been on the market for over 20 years and are ready to offer you the best combination of aesthetics, quality, and practicality. Our polyurethane is not just a material, but a reliable foundation for flawless details, resistance to moisture and cracks, as well as convenient and quick installation. The company's success began in 2002, when two artists – Andrey Ragozin and Evgeny Tsapko – created a small creative workshop for making carved wooden products. The work of the craftsmen was quickly noticed, and within a year they were invited to participate in the reconstruction of the Konstantinovsky Palace in Strelna.
Every product in our range is the result of years of experience, thoughtful technology, and attention to detail. We constantly update our collections, follow and shape trends in interior design ourselves. From elegant neoclassicism to bold Art Deco, you will find the perfect accent for the interior of your dreams.
Choose durable polyurethane decor STAVROS — beauty proven by time and real projects, not just words.


STAVROS Guarantees
Quality of products without complaints
We save your time, peace of mind, and budget
Large warehouse program
We solve your tasks with maximum speed
Adherence to production deadlines
Streamlined process reduces all risks
Delivery from 1 piece throughout Russia
Quality service regardless of order volume
Your positive business reputation
Reliable partner — the foundation of your business
More ceiling decor products


Frequently asked questions
Our showrooms are located in Saint Petersburg and Moscow. Production is located in Saint Petersburg.
Moscow contacts: https://www.stavros.ru/contacts_all/?tab=msk
Contacts of Saint Petersburg: https://www.stavros.ru/contacts_all/?tab=spb
- Send request by email [email protected]
- Write to us at Telegram
- Write to us at WhatsApp
- Order by phone +7 (800) 555-46-75
- Visit our showroom in Saint Petersburg and Moscow
Yes, we ship orders throughout Russia and to CIS countries.
We cooperate with transportation companies such as СДЭК and DPD.
You can also arrange pickup of your order through any convenient transportation company for you.
Delivery cost depends on the size, weight of the item, and delivery address.
When placing an order, the delivery cost is calculated automatically and displayed as a separate line on our website.
Prices and availability of items on the website are always current. Data is updated daily.
Note: items in stock are stored on the warehouse in unpolished form and shipped within 3 working days.
If the item is not in stock, average production time: 5–10 working days.
This is the quality of polishing of the items.
Standard — machine polishing, at a more attractive price.
Prestige — detailed hand polishing, items do not require further work.
More details: https://www.stavros.ru/information/kachestvo/
This is the type of veneer of the items.
Under enamel: produced by gluing wooden laminates without color and texture matching. Contrast tonal and textural differences are noticeable. This blank should be chosen if the item is intended for opaque coating.
Under tinting: produced by gluing wooden laminates with color and texture matching. Tonal and textural differences may occur. This blank should be chosen if the item is intended for semi-transparent finish.
More details: https://www.stavros.ru/information/kachestvo/
Beech — dense, non-porous wood, most often used for items covered with enamel.
Oak — dense, porous wood with clearly visible natural grain. Due to its strength and decorative properties, it is often used in items with semi-transparent coating, highlighting the wood pattern.
Custom-made, if non-standard items are required, we can produce products from other types of wood, including blanks provided by the customer, manufactured according to our technical specifications.
All our furniture legs can withstand a vertical load of at least 100 kg.
Average production time for custom-made items: 5–10 working days.
Most items are stored on the warehouse in unpolished form. We need time to polish and pack orders.
Yes, we manufacture non-standard items according to individual projects, but we only accept orders with a minimum quantity.
We can manufacture items of the desired size, but we only work with bulk orders. For details, please consult the sales department manager.
Yes, some of our products can be used outdoors. For example, polyurethane items, as well as carved door casings made of pine.
Other items are produced to order using PUR glue, if minimum quantity is available. No warranty is provided for such products, as outdoor conditions are considered aggressive.
Yes, we paint items when ordering products for a total amount of 150,000 rubles or more.
- Dust removal. After sanding, the surface must be dusted.
- Priming. Apply primer in an even layer.
- Matting. After the primer has fully dried, the surface should be matted (lightly sanded for better adhesion).
- Finish coating. Apply finish coating: lacquer or enamel, in 2 layers, with interlayer drying.
More details: https://www.stavros.ru/information/sovety/
Apply adhesive to the decor. Place it on the surface and press briefly. Then, lift the decor from the surface and leave it open for 3–5 minutes. Press the decor firmly onto the surface and hold for 5–10 seconds.
More details: https://www.stavros.ru/information/sovety/
Ideally, you should prepare a design project before placing an order.
You can do this yourself by downloading drawings of our products from our website, or you can order a project from us.
If the number of decorative elements and fittings is small, our company's manager can assist you with selection.
Unfortunately, this service is not provided.
The packaging method depends on the type of items, but in each case, we ensure sufficient protection for safe transportation.
We most often use corrugated cardboard and stretch film. Fragile items are additionally secured on a rigid base to prevent damage during transport.
We ship all items starting from 1 piece.
Room measurements and item installation can be performed by our partners — carpentry companies represented in most regions of Russia.
Often searched in category Molded decor
3751
3546
3179
2503
347
244
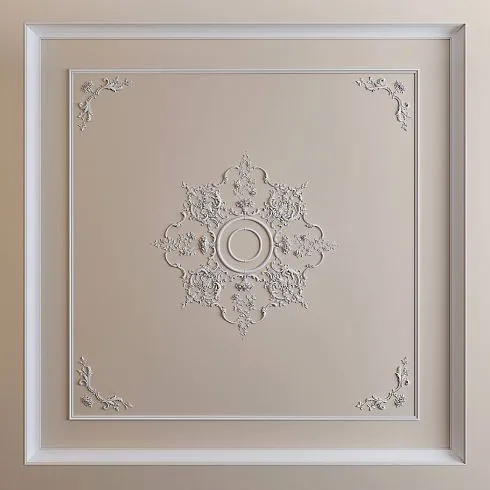
CPU-P3 Molding Decor Set — a classic polyurethane ceiling system for living room, kitchen, and dining room
There are interiors you want to enter. And there are interiors you don't want to leave. The difference between them lies in the details, in how the space is organized not only at the level of furniture and wall finishes, but also at the ceiling level. In a classic interior, the ceiling is not a technical background. It is the completion of an architectural statement. This is where it worksMolding decor set CPU-P3— a ready-made polyurethane ceiling system assembled as a single classic composition for a 3200 × 3200 × 83 mm zone.
CPU-P3 is not a set of random decorative elements thrown into one box. It is the result of design work: each of the 16 product types included is selected considering the scale, plasticity, and style of the others. The cornice defines the perimeter. Moldings form the inner contours. Paired corner overlays organize symmetry. Ornamental inserts enrich the field. The central corner molding MLDPU-2U-1.1 completes the entire system into an architecturally finished image.
View the entire assortment and compare items in the line in the sectionceiling decoration kitsSTAVROS. There you will also find other CPU series sets with different stylistic characters and compositions.
CPU-P3 decorative molding set: the philosophy of a ready-made ceiling solution
Ask yourself a simple question: when was the last time you saw a truly beautiful ceiling in someone else's interior? Most likely, a long time ago. Because most ceilings are just white. Without an idea. Without architecture. Without character.
Why? Not because people don't want beautiful ceilings. But because decorative ceiling finishing on your own is a task requiring specific knowledge: how to match cornice with molding in scale, how to choose corner overlays proportionally to the zone area, how not to lose the central accent amidst the corner details. A mistake at this stage is costly — in money, time, and nerves.
Classical ceiling decorin the format of a ready-made set completely removes this issue. CPU-P3 is designed so that the buyer can achieve a professional architectural result without designing the ceiling system themselves. Everything is already decided: the scale ratios, the balance of ornamental richness, the correct pair of left and right elements, the coordination of linear footage with overlays.
This is precisely the difference that makes CPU-P3 a tool, not just a commodity.
For which interiors is CPU-P3 designed?
The CPU-P3 ceiling molding kit was developed for spaces where the ceiling is in constant visual contact—and therefore carries a high decorative load. Below are specific scenarios with specific architectural logic.
Living room: a ceiling that unifies the space
A living room molding decor kit is a scenario for which CPU-P3 is perfectly suited in terms of scale and style. A living room of 25–40 m² with ceilings from 2.7 m is the standard application environment. The coverage area of 3200 × 3200 mm covers the central zone of the room, leaving the perimeter open or decorated with a separate cornice.
What happens to the living room after installing CPU-P3? An architectural focal point appears—a central ornamental system with clear symmetry and a classic pattern. The sofa, table, and armchairs begin to be 'read' as furniture under a dome—the space gains a hierarchy it previously lacked. A living room withpolyurethane ceiling decorCPU-P3 is a different conversation about interior quality.
For a living room in a classic or neoclassical style, the central overlay MLDPU-2U-1.1 (210 × 210 mm) serves as a frame for the chandelier. The paired corner elements—NPU-431L/R and NPU-433L/R—organize the four corners of the frame with mirror symmetry. NPU-472L/R (190 × 75 mm) create horizontal ornamental accents on the sides of the field. The result is a classic 'ceiling cartouche' in the living room, one that's not embarrassing to show off.
Kitchen-living room: a decorative ceiling over the dining area
A kitchen-living room ceiling decor kit is a case where the decor works twice. In open-plan layouts where the kitchen and living room are combined, the ceiling area above the dining table or island becomes a point of visual separation for the two functional scenes: 'kitchen' and 'living room' remain architecturally independent—even without a partition.
CPU-P3 over the dining area elegantly solves this problem: a ceiling stucco frame defines the zone without physically limiting it. A pendant light or a group of spotlights is mounted under the central ornamental accent above the dining table—this single technique alone transforms the dining area into an architecturally designed space. The kitchen-living room withdecorative ceiling designin a classic style—this is an entirely different level of perception compared to a typical open layout.
An important nuance for the kitchen-living room: the polyurethane and HIWOOD polystyrene in CPU-P3 are resistant to steam and moisture in a typical kitchen area, provided there is normal exhaust ventilation. This is not a material for a sauna—but for a residential kitchen with active cooking and proper ventilation, it serves without deformation for many years.
Dining room: ceiling decor above the main table in the house
Ceiling decor for the dining area is a separate and independent scenario that occurs less often than it deserves. In homes with a dedicated dining room (or in apartments where the dining area is placed in a separate space), the ceiling above the main table is literally 'the sky above the meal.' Classic stucco decor here carries an almost ritual meaning: a dining table under a ceiling stucco frame is not just furniture and interior; it is an architectural statement about treating mealtime as an event.
CPU-P3 for the dining room is mounted precisely above the dining table, with the center of the ornamental accent aligned with the center of the table. Under the central element—a classic chandelier or a pendant with multiple light sources. The A130V1 cornice around the perimeter defines clear boundaries of the 'dining dome.' The result is a dining room with character, with its own architectural identity.
Hall and formal spaces: a scale that speaks for itself
For halls with an area of 40–60 m², ceilings from 3 m, and a formal character of the space, CPU-P3 is a perfect match in scale and ornamental richness. The kit composition contains enough elements to create a complex multi-level system: cornice + double molding perimeter + corner accents + medium ornamental inserts + center. All six levels of decorative hierarchy—in one kit.
In a formal hall, CPU-P3 can be used as the main central ceiling system, complemented by a separate cornice around the entire perimeter of the room.decorative ceiling cornicesSTAVROS for the perimeter part are selected from the general cornice section — taking into account the style and scale of CPU-P3.
Ceiling with lighting: contour light and stucco decor
Ceiling decor with lighting is one of the most effective and technically interesting application scenarios for CPU-P3. The A130V1 cornice (100 × 83 mm) included in the kit has sufficient profile depth to accommodate an LED strip in the groove behind the rear edge. Contour lighting behind the cornice creates the effect of a 'floating' ceiling field.
In evening mode, when the central chandelier is dimmed or turned off, only the contour strip is active — and the CPU-P3 ornamental overlays acquire sculptural three-dimensionality: each curl, each junction of forms casts a shadow, the relief becomes alive and voluminous. This is a completely different quality of decor compared to the neutral daytime appearance.
For a ceiling with perimeter lighting, preliminary laying of the LED power cable before installing the cornice is recommended — retrofitting without disassembling the decor is difficult.
Apartment and private house: format versatility
The question is not whether CPU-P3 is suitable for your home. The question is in which room it will work most expressively. For an apartment of 70–100 m², CPU-P3 is a solution for the main room: the living room or combined kitchen-living room. For a private house with several formal spaces, it is possible to use CPU-P3 or other kits from the series in several rooms — but always one kit per zone, to avoid creating an overloaded effect.
The full line of CPU-P1–CPU-P6 in the sectionceiling decorationallows you to choose a kit with the required level of ornamental saturation and the required stylistic character for a specific project.
Composition of the CPU-P3 stucco decor kit: what is included and how it works together
CPU-P3 Composition — 16 types of components, each performing a specific architectural function in the ceiling system. Below is the complete list with links, dimensions, and an explanation of each element's role in the overall composition.
Trims: perimeter and inner contours
Cornice A130V1— 100 × 83 × 2000 mm, HIWOOD polystyrene. The outer perimeter of the entire ceiling system. The profile, 100 mm in width and 83 mm in height, is a powerful, architecturally significant cornice with a pronounced classical form. It sets the scale for the entire system and enables the installation of contour LED lighting behind its rear edge. Full rangeceiling cornices— in the catalog section.
LD32 molding— 32 × 15 × 2000 mm, HIWOOD polystyrene. A thin, elegant molding — the first inner contour, stepping inward from the cornice. Creates a double perimeter frame: a wide, powerful cornice on the outside + a thin molding closer to the field. This double contour technique is a characteristic feature of classical ceiling systems, adding depth and multi-level layering.
MDF primed molding MLD-002-MG— 22 × 11 × 2600 mm, primed MDF Prestige. Another inner contour — geometrically precise, even, forming the final frame of the field. MDF Prestige ensures perfect geometry and a uniform surface for painting. Full sectionceiling moldings— in the STAVROS catalog.
Paired corner overlays: symmetry as the foundation of the system
NPU-431L / NPU-431R— 138 × 48 × 11 mm. A mirrored pair of decorative corner overlays. Installed in the corner positions of the frame, forming four symmetrical corner accents. Left and right versions ensure precise mirroring in all four corners.
NPU-433L / NPU-433R— 160 × 60 × 11 mm. The second corner pair, slightly larger than the first. Within the CPU-P3 composition, both corner pairs work in a multi-level system of corner accents: NPU-431 — closer to the molding, NPU-433 — at a different level of the corner composition. Together, they create a complex, multi-detail corner assembly.
NPU-461L / NPU-461R— 195 × 112 × 13 mm. The largest corner overlays in the composition. The 195 × 112 mm size is a significant ornamental accent with a Baroque-style scroll, legible from several meters away. NPU-461L — left-hand version, NPU-461R — right-hand version. The pair creates expressive corner focal points for the entire ceiling system.
NPU-472L / NPU-472R— 190 × 75 × 7 mm. A horizontally elongated pair with slight relief (C=7 mm) — delicate accents along the sides of the frame. Their horizontal form contrasts with the more vertical corner overlays, creating an ornamental rhythm along the perimeter of the field.
Decorative inserts and ornamental details
NPU-325— 77 × 55 × 18 mm. Overlay with wood-grain texture and curved lines. Despite its compact size, the 18 mm relief provides pronounced volume. Used as an additional ornamental accent in the field between corner elements and the center.
NPU-112— 40 × 62 × 7 mm. Small decorative element for detailing the field. Delicate, with low relief — functions as 'fine ornamentation,' filling zones between larger accents and creating a sense of a rich, meticulously detailed molded surface.
NPU-306— 18 × 31 × 9 mm. The smallest element of the CPU-P3 composition. Used for final detailing — 'punctuation marks' of the ceiling system, which at close range create the impression of a complex, carefully crafted molded surface.
NPU-309— 66 × 45 × 8 mm. Medium ornamental element with low relief. Complements the system with intermediate accents in the field of the ceiling zone.
Central element: MLDPU-2U-1.1
Molding MLDPU-2U-1.1— 210 × 210 × 18 mm. Central corner molding — set for the MLDPU-002 molding. Size 210 × 210 mm with an 18 mm relief — this is a large, clearly legible ornamental center for the entire ceiling system. It is precisely under this element that the chandelier or central spot light is mounted. This is the 'apex' of the CPU-P3 architectural hierarchy — the final accent towards which all other elements converge.
Complete section decoration for moldingsand corner molding elements are available in the STAVROS catalog.
Final architectural structure of CPU-P3:
| Level | Elements | Function |
|---|---|---|
| External perimeter | Cornice A130V1 | Main frame, backlight capability |
| First internal contour | Molding LD32 | Double perimeter |
| Second inner contour | Molding MLD-002-MG | Final field frame |
| Corner dominants | NPU-461L/R, NPU-431L/R, NPU-433L/R | Symmetrical corner accents |
| Middle accents | NPU-472L/R | Horizontal ornamental inserts |
| Field detailing | NPU-325, NPU-112, NPU-306, NPU-309 | Ornamental saturation |
| Central accent | MLDPU-2U-1.1 | Ceiling light point, system focus |
Why polyurethane is the right choice for ceiling stucco decor
This question is often asked—and it deserves an honest, detailed answer. Historically, ceiling stucco decor was made from plaster or cement mortar: a craftsman molded the ornament directly on the surface, the work took days or weeks, weighed a lot, cost a lot, and required the highest qualifications.
Modern cast polyurethane is a technologically different solution. Not worse or better than historical plaster in artistic result—just different. And in most practical tasks—significantly more convenient.
Why designers and builders choosePolyurethane Items STAVROS:
-
Casting precision—each element is cast in a mold, the relief is identical from product to product. Mirror pairs CPU-P3 (NPU-461L and NPU-461R, NPU-472L and NPU-472R, and others) match with an accuracy that is fundamentally unattainable with hand molding.
-
Light weight—polyurethane is 5–7 times lighter than plaster. Mounting large overlays (NPU-461: 195 × 112 mm) without anchors, only with mounting adhesive—is realistic and reliable.
-
Elasticity—slight flexibility of polyurethane allows compensating for minor ceiling surface irregularities without cracks or peeling. Plaster in a similar situation cracks.
-
Uniform white surface—ready for painting without additional priming. Water-based paint applies evenly over the entire surface.
-
Durability—does not react to building shrinkage, does not crack from vibration, does not crumble from accidental impacts.
-
Installation speed — a full CPU-P3 kit is installed by an experienced team in 1 working day. A gypsum equivalent of the same complexity takes several days of work.
Brief comparison:
| Parameter | Polyurethane CPU-P3 | Gypsum |
|---|---|---|
| Weight | Lightweight | Heavy |
| L/R pair accuracy | Cast | Depends on the craftsman |
| Installation | 1 day | Several days |
| Reaction to shrinkage | Flexible, crack-free | Brittle |
| For painting | Immediately | Primer mandatory |
| Installation cost | Affordable | High |
Ready-made kit vs. self-assembly: real arguments
Many customers ask: is it possible to assemble a similar system from individual catalog items, cheaper and 'to your own taste'? The answer is yes, it is possible. But it's important to understand that in this case, you take on the responsibility.
The task of selecting scales
The central element MLDPU-2U-1.1 (210 × 210 mm) in the CPU-P3 set is chosen to be proportionate to the corner overlays NPU-461 (195 mm) and the cornice perimeter A130V1 (100 mm). This is a verified proportion. If, when assembling independently, you take a center of 300 × 300 mm with a 60 mm cornice — the system will lose balance: the center will 'overwhelm' the perimeter. If you take a center of 100 × 100 mm with a 100 mm cornice — the opposite situation will occur. The correct ratio is the result of design experience, which most customers lack.
The task of selecting stylistic elements
In the catalogmoldings from polyurethaneSTAVROS — hundreds of items. Among them are baroque curls, Empire motifs, Art Nouveau geometry, natural ornaments, strict classicism. Mixing them on one ceiling means getting a stylistically inconsistent system. All elements of CPU-P3 belong to the same 'Classic' collection: their plasticity, ornamental language, and scale range are coordinated.
The task of coordinating linear elements with overlays
The cornice A130V1 (100 × 83 mm) is selected in CPU-P3 taking into account the scale of the overlays. A thinner 60 mm cornice with the same large corner accents NPU-461 (195 mm) would give a feeling of 'heavy decor on a thin frame'. A wider 140 mm cornice would 'eat up' part of the visual weight of the corner accents. A130V1 is a precise hit in balance.
Saving time as a real argument
For a professional designer, time is money in the literal sense. Adding one item CPU-P3 to the estimate is faster than 16 separate items with a calculation of the quantity of each. For a private customer — coordinating one set with the manufacturer is simpler than a table with two dozen lines.
How to use CPU-P3 in a real design project
Moving from theory to practice. How exactly is CPU-P3 integrated into a specific interior project—from concept to installation?
Step 1: Zone selection and size verification
The coverage area of CPU-P3 is 3200 × 3200 mm. This is not the entire ceiling of the room (in most cases), but the central ceiling zone. Measure the room and mark the center of the ceiling. Ensure that the 3200 × 3200 mm square fits within the ceiling with clearances of at least 200–300 mm from the walls to the cornice—for proper proportions.
If the room width is less than 4 m, the 3200 mm zone will occupy almost the entire ceiling. This is possible but requires verification: the A130V1 cornice with a 100 mm profile, repeating all four sides, should not 'overwhelm' the room. For narrow spaces, consider other CPU series kits with a smaller perimeter pitch.
Step 2: Layout before installation
Layout is half the success in installing ceiling decor. Find the center of the zone with a laser level, draw the X and Y axes. Mark the contour of the cornice—this is the outer frame. Mark the position of the LD32 molding (step from the cornice), MLD-002-MG molding (second step). Mark the corner positions for paired overlays.
Check symmetry along both axes before applying adhesive. Asymmetry discovered after installation is one of the most unpleasant mistakes when working with classic ceiling decor.
Step 3: Electrical wiring and LED preparation
If perimeter lighting behind the cornice is planned—the cable for LED power is laid before installing the A130V1 cornice. A groove behind the rear edge of the cornice provides space for the tape. After installing the cornice, the tape is secured in the groove with double-sided heat-resistant tape.
The cable for the chandelier is routed through the central ornamental element MLDPU-2U-1.1. If usedCeiling rosette for chandelier— it is mounted over MLDPU-2U-1.1, concealing the mounting point and adding additional detail to the center.
Step 4: Installation by levels from perimeter to center
Installation sequence:
-
Cornice A130V1 — outer perimeter, 45° angles
-
Molding LD32 — parallel to the cornice, stepped inward
-
Molding MLD-002-MG — second inner contour
-
Corner covers NPU-431L/R in corner positions
-
Corner covers NPU-433L/R — second corner level
-
Large corner dominants NPU-461L/R
-
Horizontal accents NPU-472L/R on the sides
-
Decorative inserts NPU-325, NPU-309, NPU-112, NPU-306
-
Central molding MLDPU-2U-1.1 — the latest
Step 5: Puttying, sanding, painting
Joints between all elements — final acrylic putty, sanding with P240, dust removal. Painting in 2 layers: the first layer thin, the second — final. Traditionally — white or creamy-white tone. For accent solutions — in the ceiling color or a contrasting shade.
What to combine the CPU-P3 set with: a decorative system for a full-fledged classic interior
CPU-P3 — the ceiling level of the STAVROS classic decorative system. Below — what complements and continues its logic.
Ceiling Rosettes
Decorative ceiling rosettesare mounted in the center of MLDPU-2U-1.1 for additional detailing of the chandelier mounting point. Especially relevant when the rosette diameter is smaller than the size of MLDPU-2U-1.1 (210 mm): the rosette adds another ornamental level in the center and masks the wiring exit point.
Full rangeof ceiling chandelier rosettes— in the catalog section.
Cornices for system expansion
If CPU-P3 decorates the central zone, and the perimeter of the entire room requires a separate cornice — the full sectionof ceiling corniceswill provide a choice of profiles for the perimeter part. It is recommended to choose a perimeter cornice profile less powerful than A130V1 in CPU-P3: the perimeter cornice should support the system, not compete with it.
Molding wall systems
decorative moldingsOn the walls — frame panel systems — visually continue the theme of the CPU-P3 ceiling frame onto vertical planes. The classic technique of 'ceiling frame — wall panels' unites the upper and middle tiers of the interior into a single architectural system. Choose wall moldings from the same 'Classic' collection as the CPU-P3.
Decor for moldings: corner inserts and ornamental accents
Elements for moldings— corner and intermediate decorative overlays — transform simple molding frames on walls into detailed, ornamented classic panels. Combined with CPU-P3 on the ceiling, they create an interior with a coordinated decorative language on two planes.
Polyurethane stucco for walls and doors
polyurethane decor— for walls, doorways, window frames — overlays, corner elements, brackets — organically rhyme with the ornamental plasticity of CPU-P3. In a perfect classic interior, the decorative language is unified from ceiling to baseboard.
How to order CPU-P3 from STAVROS
Placing an order is simple and transparent. The CPU-P3 product card on the STAVROS website: 'Pre-order' or 'Add to Cart' button. By phone — free call, a manager will clarify availability, production timelines, and delivery terms. In the showrooms in Saint Petersburg and Moscow — an opportunity to see samples of the composition elements in person.
Terms:
-
Production: made to order, lead time from 5 business days
-
Delivery: SDEK, DPD across all of Russia; pickup
-
Packaging: individual protective packaging
-
Quality guarantee: inspection upon receipt, transport damage — report
The entire assortmentceiling decor, including all CPU series kits, — in the STAVROS catalog.
Frequently asked questions about the CPU-P3 kit
How does CPU-P3 differ from CPU-P1 and CPU-P2?
All three kits are designed for a 3200 × 3200 mm area, but differ in composition, ornamental detailing, and number of decorative levels. CPU-P3 includes overlays NPU-472L/R and NPU-309 unique to this series, which are not in P1 and P2, as well as a different combination of corner elements. The visual character of the system is dense, richly detailed. You can compare all kits in the section ceiling decoration.
Does the ceiling require special preparation for installing CPU-P3?
The ceiling must be dry, clean, without crumbling areas. Plane deviation — up to 3–5 mm for adhesive installation. Drywall (gypsum board) is an excellent base: a flat surface with good adhesion. For significant unevenness — preliminary leveling with filler.
Can CPU-P3 be installed by yourself?
Yes, with basic construction tools: a miter saw for cutting the cornice at 45°, a laser level for marking, mounting adhesive. Polyurethane elements are lightweight — working on the ceiling is significantly more comfortable than with heavy plaster products. The main thing is precise marking before starting installation.
What adhesive should be used for polyurethane installation?
Special installation adhesive for moldings from polyurethane acrylic-based. For polystyrene cornice and molding from HIWOOD — acrylic adhesive compatible with polystyrene (without organic solvents that dissolve polystyrene). For MDF molding — MS-polymer installation adhesive.
Can CPU-P3 be used in a kitchen-living room with active cooking?
Yes, provided there is good exhaust ventilation. Polyurethane and HIWOOD polystyrene are resistant to short-term vapors and moderate humidity. Not recommended for constant steam contact without ventilation. Finishing with moisture-resistant paint increases durability.
What to do if one of the composition elements is damaged during transportation?
Upon receipt — inspect the contents with the courier present. Damage is documented with an act. Each composition element is sold separately in the STAVROS catalog: if you need to purchase one item — it is possible.
How long does the decor last after installation and painting?
With proper installation and finishing — for the entire service life of the building. Polyurethane does not react to shrinkage, does not crack from vibration, does not yellow with quality paint. The only limitation — room humidity not exceeding 70% (standard for all residential premises).
Does STAVROS have a showroom for personal inspection of samples?
Yes — showrooms are open in Saint Petersburg and Moscow. Addresses and opening hours are on the STAVROS website. In the showroom, you can assess the relief, scale, and surface quality of the elements in person, which is especially important when choosing decor for a significant project.
Your request has been sent!
Our manager will contact you within 5 minutes