


Article Contents:
- Why slat panels are better for zoning than they seem
- Where in the apartment the need for zoning with slat panels arises
- Open-plan kitchen-living room
- Hallway and corridor transitioning into a living area
- TV area in the living room
- Workspace in a living area
- Bedroom: zoning the headboard, vanity table, walk-in closet
- Walk-in closet area of the room
- Passage between rooms without a door
- Option one: slatted panel as an accent boundary of the zone
- How It Works in Practice
- Technical solutions for an accent boundary
- Baseboard as a unifying element
- Option two: wooden slats as a lightweight partition
- What is a slatted partition and why is it needed
- How to choose the spacing and thickness of slats
- How to finish the ends of a slatted partition
- Lighting in a slatted partition
- Option three: slatted panels in the hallway as a boundary of the entry zone
- Slatted panel as a 'wall' of the entry zone
- Protective function of slatted panels in the hallway
- What to add to slatted panels in the hallway
- Option four: slatted panels for the kitchen-living room
- How to divide the kitchen and living room with slatted panels
- Combining slatted panels with molding and baseboard in the kitchen-living room
- Option five: zoning the bedroom with slatted panels
- Accent wall behind the bed
- Workspace in the bedroom: separation with a slatted insert
- Molding and baseboard as a frame for the sleeping "island"
- Option six: home office in the living room or studio
- How a slat zone creates a "cabinet regime"
- What to choose for a cabinet zone
- Ready-made solutions or individual slats: what to choose for zoning
- When ready-made slat panels are better
- When individual wooden slats are better
- Comparison table: panel vs. individual slats
- How not to overload the interior when zoning with slats
- What to buy for zoning with slat panels and slats
- Table of zoning options
- FAQ: answers to important questions about zoning
- About the Company STAVROS
A solid partition is always a compromise. You get separation, but you lose light, air, and a sense of spaciousness. A room that seemed large enough yesterday shrinks into two cramped compartments after the wall is built. That's why many who face the question of zoning look for another answer — one where space is divided without loss.
slatted panels for walls provide this answer. The vertical rhythm of the slats creates a visual boundary between zones — tangible enough to delineate the space, yet light enough not to destroy its unity. Light passes through, air circulates, and the eye understands where one zone ends and another begins. This is not a compromise — it's a smart solution.
This article covers it specifically and to the point: where and how zoning with slatted panels works, what options exist, how to implement them technically, which elements to combine them with, and what mistakes to avoid.


Why slatted panels are better for zoning than they seem
Before diving into specific options, it's worth understanding the mechanics. Why do slats work as a boundary between zones?
It's about the psychology of spatial perception. Our brain perceives a zone as separate when it has at least one distinct feature that differs from its neighbor: different lighting, different texture, different plane. A slatted panel on part of a wall does exactly that — it changes the texture and character of the surface. One zone has slats, the other doesn't. The boundary is read without a single word.
At the same time, a partition is not needed — because the slats don't physically block the space, they mark it visually. This is a subtle but important difference.
Another argument: Slatted panels in interior design they are versatile. They work in an open-plan studio apartment, in a classic multi-room apartment, and in a country house with large spaces. They can be scaled: from a small accent insert behind the sofa to a 3-meter-high panel dividing the kitchen and living room.


Where in an apartment does the task of zoning with slatted panels arise?
The zoning task is relevant in more rooms than it seems at first glance.
Our factory also produces:


Kitchen-living room in an open-plan layout
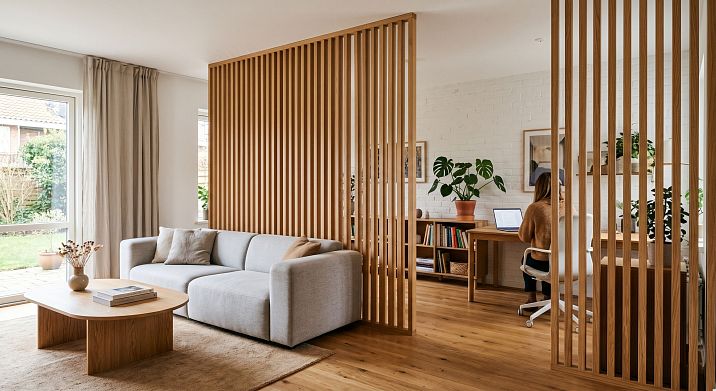
The most common case. The kitchen and living room are combined, with no wall between them. The space needs structure, a boundary needs to be defined — but without building a wall. Slatted wall panel in the transition zone, behind the bar counter or along the sofa line — just what is needed.
Get Consultation
Hallway and corridor transitioning into the living area
Often in modern apartments, the entrance area smoothly flows into the living room or corridor. A slatted panel behind the coat rack or along the hallway wall clearly marks the entrance zone — and at the same time protects the wall from mechanical damage and dirt.
TV zone in the living room
The wall behind the TV is the best place for an accent slatted panel. It simultaneously highlights the TV zone from the overall living room space and creates a visual center of the room.
Workspace in a living area
A home office in the living room, a work corner in the bedroom, a study area in the children's room — all these situations require psychological separation of the workspace from the relaxation area. A slatted panel behind the desk 'separates' the office mode from the domestic one.
Bedroom: zoning of the headboard, vanity table, dressing room
A slatted panel behind the bed is both a decorative element and a marker of the sleeping area. Separately, it zones the dressing table from the sleeping area, or the wardrobe corner from the rest of the room.
Wardrobe part of the room
When a wardrobe is built into a niche or occupies part of the room, but the wardrobe area is not separated by a door, slatted wall panels on the walls around the wardrobe create the feeling of a separate space.
Passage between rooms without a door
Where there is no door in the layout, but a transition needs to be indicated, slats on the side planes of the passage or above it create an "arch" or "portal" between zones.
Option one: slatted panel as an accent zone boundary
This is the simplest to implement and the most common method of zoning. The panel is installed on part of the wall — not the entire wall, but the fragment that marks a specific zone.
How this works in practice
Imagine a living room with a sofa against the central wall. The wall behind the sofa gets a slatted panel from floor to ceiling or as a horizontal fragment the width of the sofa. That's it — the living room zone is marked. The area around the dining table or kitchen remains smooth — and this difference is immediately noticeable.
This is exactly how a slatted panel works in a living room interiorit doesn't take up the entire wall space, it concentrates where an accent is needed. Minimum material — maximum visual effect.
Technical solutions for an accent border
An accent slat zone is a rectangular panel on the wall. It has four edges, and each requires finishing:
-
Top edge — horizontal wooden molding or a slat along the top line of the panel.
-
Bottom edge — MDF Skirting Board or Wooden baseboard covers the bottom line.
-
Side ends — Wooden corner UG-001 or a vertical molding covers the side cut of the panel.
When all four edges are finished — the panel looks like an intentional architectural element, not an incomplete installation.
Baseboard as a unifying element
An important rule: the baseboard should run in a single line throughout the entire room — including the slatted panel area. It should not be interrupted before the panel or change height. It is this continuous MDF Skirting Board or Wooden baseboard line that creates the feeling that the slatted area is part of a single space, rather than a separate element glued to the wall.
Option two: wooden slats as a lightweight partition
This is a different scale of task. Not a panel on the wall, but an independent structure made of wooden slats for zoning, which stands in the space — between two zones. A partition made of wooden slats is lightweight, airy, and transparent.
What is a slatted partition and why is it needed
A slatted partition is a frame (horizontal guides at the top and bottom) with vertical slats fixed at a certain spacing. There are gaps between the slats. Light passes through. Air circulates. The space is not physically blocked — but the zones are clearly delineated.
Such a partition weighs significantly less than a drywall one. It does not require approval for redevelopment — it is a furniture element, not a construction element. It can be dismantled if necessary. And it looks fundamentally different from any solid wall.
How to choose the spacing and thickness of slats
The spacing of the slats — the distance between them — determines how "transparent" the partition will be. Three guidelines:
Frequent spacing (20–30 mm between slats) — a denser partition, more restrictive of visibility. Suitable for zoning a dressing room or vanity area — where contents need to be hidden.
Medium spacing (40–60 mm) — a balance between visibility and zoning. Areas are separated, but the space is not blocked. Ideal for a kitchen-living room or dividing a study and living room.
Wide spacing (70–100 mm and more) — maximum transparency. The slats mark the boundary, but the space is essentially open. Suitable for separating a sofa area from a walkway or lightly marking an entry zone.
Slat thickness — from 20×20 mm to 40×40 mm and more. Thin slats create an airy, lightweight partition. Thick ones — a more massive one with pronounced volume.
How to finish the ends of a slatted partition
The ends — top and bottom — need to be covered. The top horizontal guide is covered molding or with a horizontal plank. At the bottom — a base plate or bottom guide that presses against the floor. The joint of the guide with the floor — Skirting or a profile.
The side posts of the partition — where it adjoins the wall or ends in the space — are finished wooden corner piece with a vertical molding.
Lighting in a slatted partition
This is one of the most striking techniques. An LED strip built into the top horizontal guide illuminates the vertical slats from top to bottom. In the evening, a partition made of wooden slats turns into a light object. Wires are laid in advance, during installation — after the slats are installed, this is impossible.
Option three: slatted panels in the hallway as a boundary of the entrance area
The hallway is the first and last thing a person sees in your home. In most modern apartments, it is either very small or flows into the corridor or living room without a clear boundary. Slatted panels solve both problems at once.
More details on how they work Slatted panels in the hallway interior, can be found in a separate article. Here — about the zoning function.
Slatted panel as the "wall" of the entrance area
If the hallway flows into the living room without a clear boundary — Slatted wall panel In the area of the coat rack and shoe cabinet, it creates this boundary. The slats run along the hallway wall — and where they end, the entry zone ends. The living room begins with a smooth or differently finished wall.
This is not a partition in the literal sense, but visually it works exactly like that: upon entering, a person understands where they are standing and where they need to take off their shoes and hang their jacket.
Protective function of the slatted panel in the hallway
In the hallway, walls suffer the most: backpacks, bags, jackets, children's hands, accidental impacts. decorative slatted panels Made of MDF — a hard material resistant to mechanical damage — protect the wall from these impacts. The slats cover the wall surface: impacts hit the slats, not the plaster.
What to add to the slatted panel in the hallway
The slatted area in the hallway is well complemented by:
-
Clothing hooks attached directly to the slats.
-
A mirror framed wooden molding to match the panel.
-
A lamp above the panel or backlighting along the top molding.
-
wooden skirting board matching the slats along the bottom line.
The open side end of the slatted panel in the hallway — where it ends at the passage to the living room — must be closed wooden corner piece or with a vertical molding. Otherwise, the panel cut will be clearly visible with every pass.
Option four: slatted panels for the kitchen-living room
Open-plan layout is an architectural trend that has taken hold. But along with it came the challenge: how to give the kitchen and living room structure without destroying unity? Slatted panels in the kitchen and in the living room — is one of the best ways to do this.
How to divide the kitchen and living room with slatted panels
Several working schemes for the kitchen-living room:
A slatted panel on the wall behind the sofa. The sofa faces away from the kitchen, and the wall behind it is a natural zone boundary. The slatted panel here serves as the living room's 'backdrop,' simultaneously separating it from the kitchen space.
Slatted panel along the wall of the kitchen area. The lower part of the wall with the kitchen set is smooth — a backsplash or paint. Above that is a slatted panel that continues upward and covers the wall above the set. The slats give the kitchen area a distinct "character" — and the boundary between zones is clearly perceived.
Slatted partition behind the bar counter. Where the bar counter or dining table stands perpendicular to the wall — a partition made of wooden strips continues this line upward, to the ceiling or to mid-height. The zones are separated, but the space remains open.
Combination of slatted panels with molding and baseboard in a kitchen-living room
In an open-plan layout, the baseboard and molding unify the space. They should be the same in both zones — in the kitchen as well as in the living room. This creates the feeling of a single room, within which zoning is achieved through different wall surfaces, not through different "basic elements."
wood trim items — trims, glazing beads, transition profiles — help neatly combine different materials in non-standard places: where the slatted panel meets the kitchen backsplash tiles or painted wall.
Option five: zoning a bedroom with slatted panels
The bedroom is the most personal space in the house. Here, zoning works not just to separate "work" and "rest" (though that too), but to create atmospheric focal points within the room.
Accent wall behind the bed
Slatted wall panels behind the headboard — one of the main trends in bedroom design. They turn the wall from a flat background into an architectural element. A bed with a slatted wall behind it looks "built-in" to the interior, not just placed against the wall.
Visually, the slatted panel behind the bed zones the sleeping area: it marks the "sleeping place" and separates it from the rest of the room space — the work corner, wardrobe corner, or area with a dressing table.
Choosing a panel for the bedroom is delicate. Warm light oak (PAN-003) creates coziness. A neutral primed panel for painting (PAN-002) in a pastel tone brings calm. Dark panels bring intensity, romance, a "nighttime" character.
Workspace in the bedroom: separation with a slatted insert
A desk in the bedroom is a household necessity for many. But psychologically, working where you sleep is difficult. A slatted panel on the wall behind the desk creates a visual boundary: behind the slats is the work area, behind the bed is the sleep area. Even if they are physically in the same room, the brain perceives them as different "modes."
decorative slatted panels PAN-001 on the wall behind the workspace plus lighting for the work area — and the space begins to "switch" between modes along with the light.
Molding and baseboard as a frame for the sleeping "island"
If the slatted panel only occupies part of the wall behind the bed (not from floor to ceiling, but as a horizontal fragment), then its proper framing is critical. Horizontal wooden molding at the top and bottom, vertical moldings on the sides — and the panel turns into a "picture," the center of which is the bed.
Wooden baseboard or MDF Skirting Board throughout the bedroom should be uniform — regardless of whether there is a slatted panel on the wall or not. This is the "bottom frame" of the entire space.
Option six: a home office in the living room or studio
Working from home has become the norm, and with it comes the challenge of organizing a full-fledged workspace without a separate office. Slatted panels help solve this elegantly.
How a slatted zone creates an "office mode"
A slatted panel behind a desk in the living room works as a psychological "switch." While you sit at the desk with your back to the slatted wall, you are in work mode. You see the panel out of the corner of your eye, and it reminds you that you are not "on the couch" but "at work." When you get up and go to the couch, the mode changes.
This is not mysticism — it is architectural psychology. Different surfaces create different sensations. A slatted wall behind a workspace is a deliberate technique used in serious interior design projects.
What to choose for the office zone
For a workspace zone in the living room or studio, the following work best:
-
Neutral tones: gray, linen, dark green.
-
Slatted panel paintable PAN-002 to the exact color of the workspace corner wall.
-
Dark oak or wenge — for a serious, focused atmosphere.
Avoid overly bright or warm shades: they create a relaxed atmosphere, which doesn't align well with the goal of "working focused."
Ready-made solutions or individual slats: what to choose for zoning
A question that arises for many after getting acquainted with the topic: order ready-made slatted panels or assemble a partition from individual slats?
When ready-made slatted panels are better
Ready Lath MDF Panels — for wall mounting. When you need to decorate part of a wall, create an accent fragment, or make a slatted insert between other materials — a ready-made panel is more convenient and faster. The slats are already fixed to the base with an even spacing, installation takes minimal time.
Advantages:
-
Fixed, even rhythm of slats.
-
Single base — the panel is mounted as one element.
-
Wide range of finishes: coated, for painting, wood-like.
-
Does not require complex calculation of spacing for each slat.
When is it better to use individual wooden slats
Decorative wooden slat — for self-assembly of a partition or non-standard solutions. When you need a freestanding partition, or when the slat spacing needs to be non-standard, or when the surface is an unusual shape — individual slats offer more flexibility.
Advantages:
-
You can set any spacing between the slats.
-
Suitable for self-made partitions.
-
Easier to work with non-standard surfaces and angles.
-
You can adjust the thickness and profile of the slat.
Comparison table: panel vs. individual slats
| Parameter | Ready-made slatted panel | Individual wooden slats |
|---|---|---|
| Wall mounting | Fast, convenient | Requires marking and precision |
| Self-supporting partition | Not suitable | Ideally |
| Slat spacing | Fixed | Any |
| Non-standard surfaces | More difficult | More flexible |
| Appearance | Perfectly even rhythm | Depends on installation skill |
| Price | Lower due to readiness | Depends on the choice of slats |
In most cases, the optimal strategy is a combination: slatted panels for walls on the wall plane, individual slats — for independent partitions or non-standard additions.
How to avoid overloading the interior when zoning with slats
Slat panels are a powerful tool. And like any powerful tool, they require moderation. Here are mistakes found in real projects.
Slats on all walls at once. A slat panel on every wall of a room stops zoning — it's just "slats everywhere." The task of zoning is solved by contrast: there is a zone with slats and a zone without. If slats are everywhere, contrast disappears.
Too frequent spacing over a large area. Very frequent slats on a large wall create visual "noise" — the surface irritates the eye, which can't settle. On large planes, sparse or medium spacing is better.
Dark slats in a dark room without lighting. Dark decorative slatted panels in a room without good lighting create a feeling of pressure. Any dark slat zoning requires well-planned lighting — otherwise it works against the space.
Open ends without finishing. A slat zone with an unfinished side edge is among the most common mistakes. MDF cut, open slat ends, uncovered corner — this always looks sloppy. Wooden angle, vertical Molding or layout of molding products solve this problem completely.
Baseboard breaks before the slat zone. The baseboard should run as a single line. A random break or change in height before the slat panel destroys the sense of integrity of the room's lower horizon.
Doors and architraves not accounted for. If the slat zone is located next to a door opening — the door architrave and the edge of the slat panel meet. This joint needs to be planned in advance: using a molding, corner piece, or special transition profile.
The tone of the slats and furniture is not coordinated. The slatted area and furniture in the same space should be in dialogue: either in the same tone as each other, or in a deliberate contrast. A random mismatch — «almost the same, but not quite» shades of wood — creates visual discomfort.
No partition fastening is provided. A slatted partition standing in the space must be securely fastened — to the ceiling, floor, or wall. A partition without proper fastening is an unstable structure, dangerous in case of accidental impact or tilt.
What to buy for zoning with slatted panels and slats
A complete set for slatted zoning — from main panels to small additional elements.
slatted panels for walls — the base. In three versions: PAN-001 with a ready-made coating, PAN-002 primed for painting, PAN-003 in oak wood. For wall mounting in zoned areas.
Wooden slat RK-001 — for independent partitions, non-standard spacing, and additions in complex areas.
Decorative wooden slat — a wide range of sections for non-standard partition structures and decorative elements.
wooden molding — for horizontal and vertical boundaries of slatted zones, for frames around accent panels.
molding MLD-019 — for accent framing of slat zones and partitions.
MDF Skirting Board — for paint-ready systems. A single lower horizon along the entire perimeter of the room.
solid wood baseboard — for natural wooden zoning systems.
Wooden corner UG-001 — for side ends of slat zones, for external corners of partitions.
wood trim items — for non-standard joints, transitions between materials, niche and corner connections.
Table of zoning options
| Zone | Solution option | Main elements |
|---|---|---|
| Kitchen-living room | Panel behind the sofa or behind the bar counter | Rafter panels, MDF Skirting Board, Molding |
| Hallway | Panel along the coat rack wall | PAN-001 Panel, Angle, Wooden baseboard |
| TV zone | Accent panel behind the screen | PAN-003 Panel, Molding, backlight |
| Bedroom | Panel behind the headboard | PAN-002 Panel, Skirting, molding frame |
| Study in the living room | Panel behind the desk | Rafter panels, Angle, backlight |
| Partition in the space | Slat frame structure | Rafter RK-001, Molding, Trim |
FAQ: answers to important questions about zoning
Can you zone a room with slat panels?
Yes. Slat panels create a visual boundary between zones without a physical partition. They preserve the unity of the space, allow light and air to pass through, but clearly define different zones through different wall textures.
What is better for zoning: a slat panel or individual slats?
For wall mounting — ready-made slatted panels for walls: fast, even, reliable. For a self-standing partition in the space — individual slats: more flexible, you can set any spacing and structure.
Are slat panels suitable for a kitchen-living room?
They are perfectly suitable. A panel behind the sofa or behind the kitchen island separates the kitchen area from the living room without a solid wall. More details in the article Slatted panels in the kitchen.
How to separate the hallway with slatted panels?
A panel along the hallway wall — from floor to ceiling or in the coat rack area — creates a visual boundary between the entry zone and the living space. More details in the article Slatted panels in the hallway interior.
Is a baseboard needed next to the slatted area?
Absolutely. MDF Skirting Board or Wooden baseboard they run in a single line along the entire perimeter, including the area with slatted panels. This creates a unified lower horizon of the space.
What to use to cover the end of a slatted partition?
Wooden corner UG-001 — for external corners. Molding vertically — for a decorative finish of the end. Trimming Items — for non-standard joints.
Can zoning be done with wooden slats without a solid wall?
Yes, that's exactly what they are designed for. A partition with wooden strips gaps between the slats visually divides the space while maintaining airflow and partial visibility. It is a lightweight, removable, aesthetic alternative to a solid wall.
What color of slatted panels should I choose for zoning?
For zoning, contrast works best: panels in a different tone than the smooth part of the wall. Warm oak on a white wall creates a clear boundary. Dark panels on a light background make a powerful accent. Panels in the same color as the wall act as a hidden relief zoning element.
About the company STAVROS
Zoning is not construction. It is the language of space. And the more precisely its elements are selected — Rafter panels, rails, Moldings, Skirting, corners и Trimming Items — the more accurately the space says what you wanted to say.
STAVROS produces a full range of wooden finishing materials for creating cohesive interior systems — from an accent slatted wall to the finishing baseboard.
STAVROS — when every detail is in its place.


